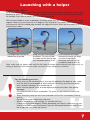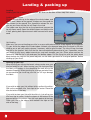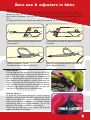
1
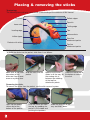
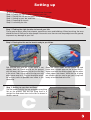
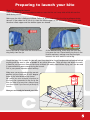
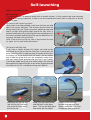
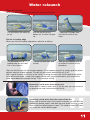
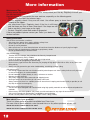
User manual
for all
Peter Lynn
Kites
Congratulations on purchasing your Peter Lynn Kite!
Using Twinskin technology this kite sets new standards in performance and handling.
This manual contains information on how to set up your kite and use it on the water or land. Its
enormous amount of power and lift are potentially dangerous, therefore it is important that you go
through this whole manual carefully in order to understand the kite and use the kite safely. We also
advice you to watch the instructional video which will give you a yet clearer understanding of some
of the issues covered in this manual.
Placing & removing the sticks
Terminology
The following terms will give you a better understanding of the contents of this manual.
Air inlets
Deflate zipper
Top skin
Lower skin
Trailing edge
Tips
Leading edge
Velcro outlets
Inflate zipper
Rear line
attachment points
Pockets with sticks
Top line
attachment points
Putting in the sticks
To place the sticks into the pocket, slide them in as follows:
Make sure all the inner
connectors of the
sticks are free of sand,
snow or anything else.
Slide the stick into the
pocket.
Make sure the stick
slides in all the way, so
the endcap sits in
between the webbing
at the top line
attachment points.
Close the velcro flap at
the bottom to secure
the stick.
Removing the sticks
To remove the sticks from the pocket, use the stick removal system:
Open up the double
velcro seal at the
bottom of the pocket.
Push the sticks out from
the top, by grabbing the
pocket in the middle and
pushing the top down.
Slide the stick out all the
way and fold it down.
Setting up
Starting off
To start flying your kite you need to follow these five steps:
Step 1. Finding the right location to launch your kite.
Step 2. Placing the kite on the beach ready to pre-inflate.
Step 3. Setting up your bar and lines.
Step 4. Preparing for launch.
Step 5. Launching the kite.
Step 1. Finding the right location to launch your kite
Find a spot to setup, away from airports, powerlines, trees and buildings. When launching, the area
should be free of kiteflyers or other people. Also make sure there are no sharp objects on the ground,
to prevent any damage to your kite.
Step 2. Placing the kite on the beach ready to pre-inflate
Roll the kite out and put in the sticks if not
already done so. Place one tip on the ground
with the lower skin upwards, and let the rest flap
in the wind. Fold a small part of the tip over and
place some sand on it. This part should be small,
so as many cells as possible can inflate in the
upwind tip.
Open the inflate zipper on the upwind tip, and
make sure it stands open so the air can flow in.
Make sure both the deflate zipper and the other
inflate zipper are closed. While the kite is being
pre-inflated you can start to get your flying lines
ready to be attached to the kite.
Step 3. Setting up your bar and lines
Roll the leader lines off the bar and place everything
flat on the ground. Roll out the flying lines in a
straight line and attach them to the bar as shown in
the bar manual.
Attaching flying lines
Attach the flying lines to the kite as shown on the diagram.
One set of lines should be attached to the depower set and to the top
attachments on the kite.
The other set of lines should be attached to the ends of the bar and to
the bottom attachment points on the kite.
rear line
e
top lin
top line
Use a larkshead knot to attach the lines:
e
rear lin
The correct knot to use for
attaching your flying lines to
the attachments on the kite,
is a larkshead knot.
Place a larkshead knot in
the sleeve, slide it over the
attachment knots and tighten the larkshead as shown.
1
2
3
To ensure that your lines are attached correctly, without twists or tangles,
you can use the following method:
1. First attach the rear line to the upwind tip.
2. Now attach the top line to the upwind tip, taking
it over the rear line you have just attached.
3. Take the other top line and attach it to the downwind tip, passing it over the kite.
4. Attach the rear line to the downwind tip. Now you
are ready for step 4: Preparing for launch.
Preparing to launch your kite
Step 4. Preparing for launch
Check that there are no sharp objects under or near the kite, as it may slide a little bit over the
sand during launch.
Make sure the kite is fully pre-inflated. Failure to do so may result in the kite to collapse during
take off. If the whole kite is full of air, close the inflate zipper on the upwind tip. Check again that
the other inflate zipper and the deflate zipper are closed.
At the upwind tip, make sure the lines are running freely from the tip.
At the downwind tip, make sure the lines are
lying over the kite. Place both flying lines in the
launch assistant, making sure they are tight
between the stick and the velcro tag.
Check that your kite is ready for take off, your lines should be free of tangles and not hooked behind
anything and the area is clear of people or any other obstacles. Take your bar and attach the safety leash to your harness. Always make sure to attach the safety leash before flying, so it can be used
in case something goes wrong during the launch.
Pull in your power adjuster about halfway.
Make sure you are standing at the correct
position so your lines are at a 45 degree
angle to the wind direction as shown.
Be careful: as soon as there is tension on
the flying line connected to the far tip the
kite can take off at any time. Always keep
your lines slack if you are not yet ready to
launch.
Now you are ready to launch your kite.
45º
Self-launching
Step 5. Launching the kite
Self launching
The self launch can be done on areas with a smooth surface. It is the easiest and most common
method of launching, especially if there is no one around who knows how to help you to launch
Twinskin kites.
Self launch with Launch assistant
When there is no help available, make sure the lines are held
tight in the launch assistant. This ensures that the lines will
not flip around the tip. Grab your power adjusting strap and
hold it up high while putting slight tension on your lines. A
series of short pulls will ensure that the lines are pulled out of
the launch assistant and the tip will flip up with both lines running over the lower skin of the kite.
Note: If the tip does not flip up, take a step forward first and
try again, do not walk further backwards.
Self launch with little help
If you have a helper around, this helper can hold up the
downwind tip to ensure that the lines are running over the
lower skin of the kite. As soon as there is tension on the lines,
the helper can let go and the kite will launch. Ask the helper
only to hold the tip up when you are completely ready to go,
with your safety leash attached and your bar in your hands.
If the helper holds the tip up at an earlier stage, the wind will
blow against the tip pushing the air out of the tip area towards
the center of the kite, making launching more difficult.
Make sure the far top and
rear line lie over the lower
skin of the kite and slowly
pull the tip up.
Keep your rear lines tensioned and take a few steps
back. The kite will slide back
and slowly get into shape.
Once the kite is off the
ground keep the rear lines
slightly tensioned until it has
completely filled up with air.
Launching with a helper
Launching with a helper
Launching with a helper is better than a self launch when the surface is rough (like rocks or dirty
beaches) or when you want to launch from a different location than where the kite was pre-inflated,
for example if you wish to stand in the water before launching.
With the kite inflated as much as possible, the helper grabs both tips firmly, holding the sticks close
together. Make sure your lines are at 45 degrees, fully tensioned. The helper holds the tips parallel
to the ground, with the leading edge towards the edge of the wind. When you are ready to launch,
signal to your helper.
The helper now first has to
release the tip on top.
Keep your rear lines slightly
tensioned. The kite will take
its shape and the tip that was
just released wants to fly off.
At this moment the helper
lets go of the other tip. Keep
your rear lines slightly
tensioned until the kite has
completely filled up with air.
Note: make sure the helper waits until the kite takes its shape before releasing the second tip, as
letting go before the kite takes its shape can result in very dangerous situations!
!
Tips for launching your kite
• Make sure you are not launching in an area with obstacles like poles or cars, make
sure the area is free of people or other kiteflyers. Do not fly your kite near powerlines, airports, highways, or in thunderstorms.
• Make sure the ground is free of sharp objects to prevent the fabric from getting
damaged.
• Pre-inflate the kite as much as possible. The more you pre-inflate the easier the
launch.
• When launching, keep the rear lines tensioned until the kite is completely filled up
with air.
• Do not launch while hooked into a harness.
• When in doubt of the wind strength, try a smaller kite first.
• Check your flying lines properly. Before attempting your launch, make sure they are
free of twists and tangles. Also check if they are not hooked behind any part of your
bar or spreader bar before you launch.
Landing & packing up
Landing
Landing your kite is easiest with a helper, but also can be done without help from others.
Landing with a helper
Fly your kite all the way to the edge of the wind window, and
slowly steer it down to the ground. A helper can then grab the
spar closest to the ground. Run forward to release the tension on your lines and the kite will flap in the wind.
The helper now lays the kite on the ground and secures the
tip with some sand. Open the deflate zipper and fold the kite
in half, placing both tips onto each other secured with some
sand.
Self-landing
Make sure you are not landing your kite in an area with poles or other sharp objects on the ground.
Fly your kite to the edge of the wind window. Unhook your depower loop when the leash is still attached to you or pull your safety release if necesary, and let go of the bar. The kite will lose its shape
and fall on the ground. Wait until the kite has moved directly downwind of you. If possible, secure
your leash to any heavy object around you, and walk towards your kite. Place some sand on the
upwind tip, fold the kite in two and open the deflate zipper. Pull the flying line with the safety leash
back through the rings on the power adjuster, so the leash gets back to its original position, before
winding up your lines.
Packing up your kite
When leaving your kite on the beach, always make sure your
kite lies folded in half. When leaving your kite laying out flat,
the fabric will weaken in the downwind tip area due to the
constant flapping. When pausing for a longer period of time,
we recommend you to roll up your kite, as UV rays damage
the fabric.
If you wish to store your kite without sticks, pull out the sticks.
Roll up the complete kite from tips to the center. Place the
kite and sticks in the bag.
If you wish to store your kite with the sticks in, just roll up your
kite from tips to center. Undo the zipper at the bottom of the
bag and pull out the sleeve from the main pocket of the bag.
Place your kite in the sleeve and reattach the clips on the
side of the bag.
Bars use & adjusters in kites
Using the bar
The power of your kite can easily be controlled with the bar. When the depower loop is hooked in,
the bar can slide over the depower line which changes the angle of attack causing the kite to produce more or less power. Also the power adjuster can be used to change the overall power of the
kite.
By slightly pulling the bar towards your body while steering, the kite will make tighter turns.
When sheeting out the bar the power of the
kite decreases.
When pulling in the bar the power of the kite
increases.
Pulling in the power adjuster
decreases the overall power of the kite.
Sheeting out the power adjuster increases the
overall power of the kite.
Flight adjuster
The flight adjuster can be found in the center of the kite,
on the webbing running between the two rear line attachments. The flight adjuster changes the allround feel of
the kite. Tightening the adjuster will give the kite slightly
more power and less depower overall. Loosening the
adjuster will make the kite less grunty. The standard setting is halfway between minimum and maximum setting.
In extreme light winds or if the kite is wet, you may find
that the kite flies better with the adjuster loose.
Steering adjusters
To adjust the kite’s steering behaviour, use the steering
adjusters, which can be reached by opening the inflate
zipper. For a tighter turn, more bar pressure and overall
more power, pull in the adjusters. For a better upwind
performance and overall more depower, let out the
adjusters. The standard setting is about halfway.
Please note to always adjust both sides of the kite, and
make sure they are set equal.
Flying tips & safety systems
Top/rear line adjustments
You may find your lines not set right for your personal way of flying your kite. These are some guidelines that might help you set your lines correctly:
• If the kite does not accelerate in flight leaving you with minimum pull, your rear lines are too tight.
Shorten the lines on the top attachments of the kite.
• If the kite steers very slow, with very little response on your bar, your rear lines are too loose.
Shorten the leader lines on your bar.
In the rare occasion that your kite stalls, grab the power adjuster and jerk the top lines until the kite
gets moving again.
Inverting
In a very rare occasion the kite may invert, so the back skin is facing the flyer. The kite will fly inverted. Land the kite nose down, allow it to roll over and then relaunch the kite.
Safety systems
If you need to lose the power of the kite without losing the kite itself the safety system can be used.
Never be afraid to use it because it can save your life!
When activating the safety system, the kite loses its shape and falls down on to the water.
Before using this kite, please check the manual supplied with your bar on how to activate
your safety systems and reattach the release systems used.
Please note: Using a Peter Lynn bar with this kite is recommended. Be aware that not all safety
systems on 4-line bars are compatible with Twinskin kites. When in doubt, check your retailer.
Using your safety release
To activate your safety system, you need to disconnect yourself from the bar. This can be done by
using the safety release on your depower loop and/or your harness line. The bar will slide forward
on the line that is connected to the safety leash. The kite loses its shape and falls down on the water.
For recovery after using your safety system, pull in the single line and grab the bar. Let the single
line slide back through the ring on the power adjuster, and continue with relaunching your kite.
Using the safety leash quick release
When the kite is still pulling, even after using the safety system, there is a safety release on the
leash. Only use it when there is no other option, as a disconnected kite be dangerous for bystanders or other kite flyers.
To disconnect the leash from your harness, use the quick release on the leash.
!
Tips regarding safety systems
• When getting a bit overpowered, slowly bring back the kite straight above your head.
Only try to use your safety system when things get out of hand.
• When your kite is on the water, always be very careful with flying lines which are not
tensioned. Make sure they do not get tangled behind any part of your body, harness
or board.
• After using your safety system, putting tension on any of the other lines can cause
your kite to take off and start to pull.
Water relaunch
Tip on Tip relaunch
When your kite lies on the water tip on tip, relaunch as follows:
The kite lies on the water tip
on tip.
Pull the rear line of the
bottom tip. The kite will open
up...
...regaining its shape. Now
just steer the kite off the
water.
Kite on its leading edge
When your kite lies leading edge down, relaunch as follows:
The kite lands with its
leading edge on the water.
Pull in one rearline...
...so the kite rolls over onto
its side.
Now you can follow the tip on
tip relaunch to finish off the
procedure.
Often the kite flies up with the two tips together. If this happens relaunch is simple: grab the power
adjuster and jerk on both toplines.The tips will come loose and the kite will fly off.
After a water relaunch fly the kite up the zenith. Shaking your bar a few times helps for the water
to fall off the kite faster. If water has seeped into the kite, keep the kite above your head till the
water has dribbled out through the tips. Then continue surfing.
Removing sand & water from the tip area
When there is sand or water stuck in the tip area, you can remove it
by opening the small velcro outlets on the tip.
Removing sand & water from the center of the kite
When there is sand or water in the center of the kite, you can get it out
through the deflate zipper. Hold both tips and shake the kite up and
down whilst the deflate zipper is open. The sand or water will come
out of the kite via the deflate zipper.
More information
Maintenance Tips
Always remove sand and water from your kite. Always store your kite dry. Regularly rinse off your
kite with tap water.
Regularly check your equipment for wear and tear, especially on the following parts:
• Fabric: Check the fabric for holes or tears.
• Zippers: regularly check if they are still intact. Use silicon spray to clean them in case of salt
residue on the zipper.
• Line attachment loops: Regularly check if the line is still intact
and that loops are free of wear. Also check if the loops are still
tied on correctly. (see image on the right)
• Pockets: Regularly check both ends of the pocket.
If there are problems please contact your Peter Lynn dealer for
the best solution.
Safety precautions
Safe location and weather conditions:
• Stay away from power lines, roads, airfields, railway lines.
• Never launch your kite on crowded beaches.
• Do not fly over bystanders.
• Make sure there is a ‘clear’ downwind area at least three times the distance of your flying line length.
• Never fly kites in thunderstorms, lightning or gusty/stormy winds.
• Do not go kiteboarding in offshore winds.
Safe traction kiting:
• Traction kites are no toys, they should not be flown by inexperienced
persons and certainly not by children.
• Learn to fly kites with smaller models and start in light winds.
• Never use kites for paragliding or parachuting.
• Never use any type of kite or kite accessory for jumping off high places like hills or cliffs, or any other manlifting activity.
• Always use fully protective gear when landboarding, snowkiting or buggy riding.
Safe kiteboarding:
• We strongly recommend the use of helmet and life jacket/impact vest. Also a safety knife to cut flying lines
in case of emergency is recommendable.
• Do not kiteboard in spots already in use by swimmers or surfers.
• Beware of strong currents.
• Stay safely away from other watercraft and shipping lanes.
• Never go further out to sea than you can safely swim back.
• Always make sure there is a capable person on shore that is keeping watch and is ready to provide (or call
for) help in case of an emergency.
Safety issues when using this product:
• This kite has been designed and manufactured using high quality materials as well as advanced production
methods.
• Prior to every use of this product, fully check your kite and spars for any signs of wear and tear.
• Only use this product for kiteboarding, landboarding and snowkiting.
• Do not use this product when your body weight is over 130kg (285lbs).
More about Peter Lynn products
There is a whole range of products available from Peter Lynn.
For more info on these products, extra tips and tricks, or any other questions, please visit:
www.peterlynnproducts.com
www.peterlynnkiteboarding.com