1
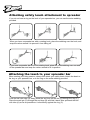
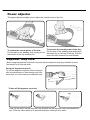
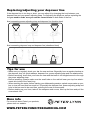
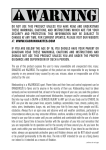
USER MANUAL
1
2
3
1
4
4
5
6
7
8
8
9
11
10
11
12
13
14
15
16
1
2
3
4
5
6
7
8
Rear line attachment knots
Top line attachment
Top line safety system attachment
Rear leader lines
Power adjusting strap
Safety leash
Stopper ball
Neoprene line cover
9
10
11
12
13
14
15
16
Depower line
Carbon bar with center hole
Line winder
Quick release depower loop
Removable depower loop lock
Safety leash quick release
Safety leash attachment for spreader bars
Spinning (Swivel) Spreader (optional)
TO ENSURE YOU ARE USING THIS BAR WITH OPTIMUM SAFETY
AND COMFORT, YOU MUST HAVE COMPLETELY READ AND FULLY
UNDERSTOOD THIS MANUAL PRIOR TO USING THIS PRODUCT.
REGULARLY CHECK OUR WEBSITE FOR PRODUCT UPDATES.
Safety instructions
CAUTION: Kite powered sports can be very dangerous and physically demanding.
The user of this product should understand that participating in kite powered sports
may involve serious injury or death and agrees to observe the safety precautions
listed below.
Safe location and weather conditions:
• Stay away from power lines, roads, airfields and railway lines when using this product.
• Never use this product on crowded beaches.
• Do not fly your kite over bystanders.
• Never fly kites or use this product in thunderstorms, lightning or gusty/stormy winds.
• Never fly a kite or use this product with wind forces so strong you are unable to maintain
full control of your kite and its power at all times.
• Do not fly a kite or use this product when wind conditions are likely to change dramatically.
• Stop kiting immediately when a storm or lightning is approaching.
Safe traction kiting:
• Traction kites are no toys, they should not be flown by inexperienced
persons and certainly not by children.
• Learn to fly kites with smaller models and start in light winds.
• Never use kites or this product for paragliding or parachuting.
• Never use any type of kite or this product for jumping off high places like hills or cliffs or any
other manlifting activity.
• Always use fully protective gear when landboarding, snowkiting or buggy riding.
Safe kiteboarding:
• Do not go kiteboarding in offshore winds.
• Be careful when kiting in onshore winds.
• We strongly recommend the use of helmet and life jacket/impact vest. Also a safety knife to
cut flying lines in case of emergency is recommendable.
• Do not kiteboard in spots already in use by swimmers or surfers.
• Beware of strong currents.
• Stay safely away from other watercrafts and shipping lanes.
• Never go further out to sea than you can safely swim back.
• Always make sure there is a capable person on shore that is keeping watch and is ready to
provide (or call for) help in case of an emergency.
Safety issues when using this bar:
• This bar has been designed and manufactured using high quality materials as well as
advanced production methods.
• Prior to every use of this product, fully check your bar (and flying lines) for any signs of
wear and tear. Replace parts immediately if needed.
• Prior to every use of this product, check if you safety releases are still working properly. In
case the safety release does not work as it should, do not use this product and replace
parts if needed.
• Only use this product for kiteboarding, landboarding and snowkiting.
• Do not use this product when your body weight is over 130kg (285lbs).
• Only use this bar in combination with Peter Lynn Twinskin kites. When using this bar with
different kite models, contact the manufacturer to ensure this bar is compatible with your
kite.
Attaching the flying lines
1
Attach the top lines to top line attachments at 2
and 3, attach the rear lines to the rear leader
lines at point 1 and 4.
2
3
4
For 1, 2 and 4
Place a larkshead knot in the sleeve of the flying line and slide it over the knot on the leader
line. Tighten the larkshead knot, and slide it against the end knot on the leader line.
For 3
A
B
C
A
A
D
Check that the tube
sits inside the ring
before EVERY
launch!
B
C
D
E
Slide the sleeve on the end of the flying line (A) through the ring on the end of the top line
attachments (B) and through the ball with tubing (C). Place the loop on the end of the leash
(D) through the sleeve (A) and place the other end of the leash (E) through this loop. Pull
this larkshead tight and pull the flying line back through, so the knot sits inside the ball (C).
Make sure the tubing goes through the ring (B). We advise you to check this before every
launch!
Attaching safety leash attachment to spreader
If you do not have a ring on the hook of your spreader bar, you can use the extra webbing
provided.
When you have a spreader bar with a rotating hook, place the webbing over the hook, and
wrap the velcro around it to prevent it from falling off.
If you have a spreader bar without a rotating hook, place the extra webbing over one end
of the spreader bar and wrap the velrco around to fix its position.
Attaching the leash to your spreader bar
When starting your kiting session, always first attach your safety leash. Attach the leash to
the ring on your spreader bar, or to the ring on the extra webbing provided.
A
D
B
A
C
C
A
Push the ball with tube (A) away, place the end loop on the line (B) through the ring (C).
Place the small pin (D) through the end loop (B) and fold it back. Now pull back the ball
with tube (A) as far as possible so it sits directly against the ring (C).
C
Power adjuster
The power adjuster enables you to adjust the overall power of the kite.
To reduce the overall power of the kite:
Pull the part of the webbing loop coming out of
the bottom of the clip towards you.
To increase the overall power of the kite:
Pull the part of the webbing loop attached to
the small ring on the top of the clip. Pull this
end of the loop towards you and release.
Depower loop lock
When using the depower loop lock it ensures that the depower loop stays hooked in when
the tension is off your top lines.
Using the depower loop lock
To use the depower loop lock, after hooking in
stick the small piece of tube through your harness hook, so it sits under your depower loop.
To take off the depower loop lock
Open up the velcro on the depower loop and pull out the depower loop lock towards the
top. Close the velcro back up to prevent sand from sticking to the velcro.
Safety releases
When things get out of hand you might want to use your safety release. The Zero4 pro carbon bar is fitted with three releases. You will find a quick release on the depower loop, a
quick release on the optional large harness line and a quick release on the leash.
When things get out of hand, use the quick release on the depower loop and/or optional
large harness line first. You will now lose the power of the kite without losing the kite itself. If
you need to totally disconnect yourself from the kite, activate the quick release on the leash
afterwards.
When pulling the quick release on the depower loop, one side of the tubing loop will be disconnected. The loop, now only supported on one side, will slide though your spreader bar,
and the rider is now fully diconnected from the depower loop.
The rider is still connected to the kite with the leash, which is connected to one top line. The
bar slides towards the kite, along this top line. Now three lines are totally slack, and the kite
opens up, losing its power.
Activating the depower loop quick release
To activate the quick release on the depower loop,
grab the red ball and/or red tag and firmly pull
backwards and let go. The loop will open up.
Re-connecting your depower loop quick release
B
C
A
D
E
G
F
F
Push the end of the loop (A) back though the webbing (B) using the thin black tag (C). Pull
the end of the loop (A) through the small loop with the black webbing around it (D), and
push the pin (E) through the end of the loop (A), and into the webbing (F) so it’s secure. Pull
the neoprene cover back over the webbing (F), and secure the red tag (G) with the velcro.
Activating the quick release on the leash
To activate the quick release on the end of the
leash, grab the ball (with tubing) and push away
and let go. The leash is now released.
Re-connecting the quick release on the leash
Check “Attaching the leash to your spreader bar” as previously explaned in this manual.
Replacing/adjusting your depower line
If the depower line is too long or short, you can adjust it by changing the knot between your
depower line and your power adjusting strap. For adjusting the length as well as replacing the
line you need to make sure you use the correct knots on both ends of the line.
Knot connecting power adjusting strap and depower line (bowline knot)
Knot connecting depower loop and depower line (sheetbend knot)
Tips for use
• Make sure you regularly check your bar for wear and tear. Especially have a regular checkup on
the depower loop, all quick releases, depower line, power adjusting stap and line attachments.
• Before launching, check that your lines are clear and the leash is not tangled around or through
the power adjusting strap.
• Before launching, always make sure the small tube on the red ball near your top line attachments sits inside of the metal ring.
• When reaching the water, before starting your kiteboarding session, splash some water op your
bar to rinse off sand that has stuck to it. Especially the depower line, power adjusting strap and
hole in the bar need to be sand free, reducing the wear on these parts.
• Before winding up your lines, take off the neoprene end covers, wind up the lines and pull the
covers back over.
More info
For more info about Peter Lynn products,
please visit our website:
WWW.PETERLYNNKITEBOARDING.COM