1
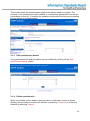
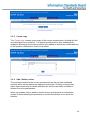
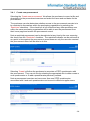
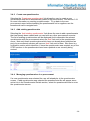
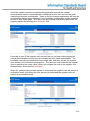
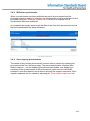
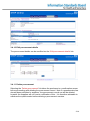
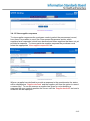
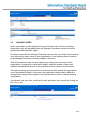
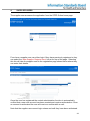
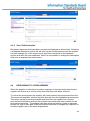
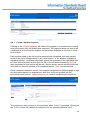
STEP Online – User Manual
September 2010
Version 1.1
TABLE OF CONTENTS
1.
Introduction
1-1
1.1
What is the STEP Questionnaire?
1-1
1.2
Why an Online Version?
1-1
1.3
When Should I Use It?
1-1
1.4
What if I Identify a Problem with the Online Questionnaire? 1-1
1.5
Where Can I Get More Information?
1-1
1.6
What are NHS Standards?
1-1
1.7
Which Standards are Mandatory?
1-2
1.8
How do I Navigate the Questionnaire?
1-2
1.9
Can I Change Text in the Questionnaire?
1-2
2.
What Should I Do?
2.1
Purchasers
2.2
Suppliers
3.
Purchaser Users
3.1
Purchaser Home Page
3.2
Sections
3.3
Manage Questionnaires
3.4
Manage Procurements
3.5
Manage Users
4.
Supplier Users
4.1
Supplier Home Page
4.2
Sections
4.3
Manage Boilerplates
4.4
Responding to a Procurement
4.5
Manage Users
2-1
2-1
2-1
3-1
3-2
3-2
3-3
3-7
3-16
4-1
4-2
4-2
4-3
4-4
4-8
1-1
1.
INTRODUCTION
1.1 WHAT IS THE STEP QUESTIONNAIRE?
The Online STEP Questionnaire is a means of checking whether IT products and
services conform to agreed NHS IT standards.
1.2 WHY AN ONLINE VERSION?
The STEP Online Questionnaire tool has been developed to:
Enhance the existing STEP process for both purchasers and suppliers
Provide a faster mechanism to respond to increasingly frequent standards
development and facilitate the timely incorporation of standards requirements
into STEP
Control the distribution of the questionnaire
Manage the question history and questionnaire versions across all
purchasers and suppliers
Ensure questions cannot be changed or altered
1.3 WHEN SHOULD I USE IT?
Purchasers: When you are buying products or services that need to conform
to IT standards.
Suppliers: When it is sent to you as part of a procurement exercise. In such
cases it is expected a requirements document such as a Summary of Need
(SON), Output Based Specification (OBS) or other requirements document
will have been or will be sent to you separately.
1.4 WHAT IF I IDENTIFY A PROBLEM WITH THE ONLINE QUESTIONNAIRE?
If you identify any problem with using the STEP Online application which cannot be
resolved through reference to the user guide or the Frequently Asked Questions
section on the STEP home page, contact [email protected] providing your contact
details and as much information as possible regards the problem experienced.
1.5 WHERE CAN I GET MORE INFORMATION?
The CFH STEP Home page provides further information on NHS standards and
these have additional links to other online resources. If you need any further help,
contact [email protected], which is available to both purchasers and suppliers.
1.6 WHAT ARE NHS STANDARDS?
1-1
An NHS Standard is any standard or technical specification that has been adopted to
meet the national objectives of the NHS.
1.7 WHICH STANDARDS ARE MANDATORY?
NHS standards policies specify three levels of conformance and these are expressed
in the questionnaire as three categories of standard:
Category 1; Mandatory standards: standards with which NHS systems
must conform unless there are overriding reasons.
Category 2; Desirable standards: standards with which NHS systems
should conform i.e. it is advantageous if the systems conform.
Category 3; Advisory standards: These are standards which are not yet
formal NHS standards, but which may become so at some stage in the
future. Therefore it can be an advantage for them to conform, but this may
not be entirely practical in all cases.
The Category of each standard in the Questionnaire is shown alongside the Question
it relates to. These Categories can be overridden; for example, the purchaser can
make a Category 2 standard mandatory by changing the question conformance level.
1.8 HOW DO I NAVIGATE THE QUESTIONNAIRE?
The Questionnaire contains two types of question:
Steering questions – these can be identified as they will have a navigation
instruction taking the user to another question or the end of a section. The
question help will also identify that it is a steering question.
Standards Questions – these will be followed by conformance level
information
All questions in the relevant sections must be answered. There is no penalty to
answering “No” to steering questions. If “No” is answered to a standards question an
explation must be given in any available comments space or in the Comments
section of the questionnaire.
1.9 CAN I CHANGE TEXT IN THE QUESTIONNAIRE?
No. If you are the purchaser you must put any additional requirements in a separate
document. If you are a supplier, you must only answer the questions as stated.
1-2
2.
WHAT SHOULD I DO?
2.1 PURCHASERS
Decide which STEP standards will be applicable to your procurement exercise. Look
at the questions in each section and decide whether the default categories are
relevant particularly considering whether any Desirable or Advisory categories should
be made mandatory.
Ensure you send out a copy of your requirements documentation to the suppliers that
have been identified through the procurement exercise and use STEP Online to
manage the distribution and collection of STEP questionnaires to the suppliers as
part of the procurement exercise.
When the supplier submits a response to the STEP questionnaire, check for “No”
answers. If there are any (other than those to steering questions), check the
supplier's explanation of non-conformance, remembering to also look at the
Comments section. If in doubt, ask the supplier for an explanation or contact
[email protected].
Don't shortlist the supplier if the mandatory standards cannot be complied with and
no reason is given or the reason given is not relevant.
2.2 SUPPLIERS
When you receive a notification that you have been selected to complete a STEP
questionnaire online, login to the STEP Online application and access the
procurement record.
Fill in all of the sections indicated in the questionnaire, if a section does not appear to
be relevant to the procurement exercise there should be a steering question at the
beginning which allows you to end the section and save it. Where you have not
completed a section in a STEP questionnaire you should include comments as to
why your product doesn't need to conform to the standard.
Additional comments can be included in the Comments section of the questionnaire.
Answer all the questions in the relevant sections, if there is an End Section or Go to
instruction against a question, follow it. On saving the section response any
navigation responses will be checked and answers to questions that are not relevant
will be deleted.
If you believe other STEP sections are relevant but have not been included in the
STEP questionnaire, create Boilerplate responses to the sections identified and send
these under separate cover to the purchaser making a note in the Comments section
of the questionnaire.
If you are proposing one solution with a number of options, complete one
questionnaire for the main solution. If the selection of any of the options would
invalidate any of the answers, you must indicate this in the Comments section of the
questionnaire.
2-1
If you are proposing more than one solution, you may need to complete a
questionnaire for each solution, using STEP Online this can only be done by
delegating responses to other users within your organisation. If this is not practical
you should talk to the purchasing organisation to agree how you will submit more
than one questionnaire response.
2-2
3.
PURCHASER USERS
The purchaser user accesses the application from the STEP Online home page.
From here a purchaser user can either login if they have previously registered or they
can select the „New Purchaser: Register Here‟ link at the top of the page. Selecting
this link will take the purchaser user to the registration page shown below where they
can enter their details.
Once the user has registered the central administration function is automatically
notified that a new user account has been created and requires authorisation. Once
an account is authorised the user will receive a confirmation e-mail.
3-1
Note that the purchaser user cannot login unless and until they have been
authorised.
3.1
PURCHASER HOME PAGE
On successfully logging in, the purchaser is directed to the purchaser home page.
The home page consists of seven sections:
Navigation tabs – These facilitate easy navigation to the main tasks that a
purchaser can undertake
2.
Breadcrumb trail – The breadcrumb trail will change according to which screen
a user has navigated to and facilitates an easy link to go back to any of the
previous screens the user has navigated through
3.
My ongoing procurements – This identifies any existing procurements that the
purchaser user has access to
4.
Authorise users – This identifies any suppliers requiring authorisation where the
purchasing organisation has invited a supplier not previously registered with
STEP Online, to participate in a procurement
5.
Authorise questionnaire access requests – This identifies any suppliers
requiring authorisation to access a questionnaire in a procurement exercise that
the purchasing organisation has notified them about but not directly added them
to the procurement
6.
Quick links – The quick links allow a purchaser user to quickly go to common
tasks
7.
Log Out – The current users name is displayed at the top with a link to log out of
the system and links to the STEP and Connecting for Health home pages
3.2
SECTIONS
1.
3.2.1
View Sections
3-2
A purchaser user can view all the STEP standards questions that have been
published by clicking on the „Sections‟ tab and selecting a section from the left hand
window. Each section can be individually exported to a Word document or printed
out.
3.3
MANAGE QUESTIONNAIRES
A purchaser can manage questionnaires by clicking on the „Questionnaires‟ tab.
From this page a purchaser can navigate through to view the details of any existing
questionnaires including whether they have been allocated to a procurement
exercise and whether the questionnaire has been sent out to suppliers as part of the
procurement exercise. From here the purchaser user can also create new
questionnaires using the published STEP standards sections.
3.3.1
Create new questionnaire
Selecting the „Create new questionnaire‟ link allows the purchaser to record a title
and description for the questionnaire.
3-3
Selecting „Create‟ will then take the purchaser to a blank questionnaire. From this
view the STEP standards sections which are relevant to the procurement that the
questionnaire is being created for can be added by selecting the section title and
then selecting „Add section‟. If necessary the conformance levels for individual
questions in the section can also be modified.
3.3.2
View questionnaire details
On clicking through an existing questionnaire name, the questionnaire details can be
viewed. The questionnaire details are shown in the summary at the top and above
this a warning will be displayed if since the questionnaire was created, STEP
sections have been updated or are currently being revised.
Note if this warning is displayed the sections in the existing questionnaire will relate
to the previous published sections and will not reflect any changes that have been
made since the questionnaire was created.
3-4
This screen allows the questionnaire details to be edited, deleted or copied. The
sections in the questionnaire can be added to or deleted as appropriate from the two
list windows on the left. If need be the questions conformance levels can be modified
for any section in a questionnaire.
3.3.3
Edit questionnaire details
The questionnaire title and description can be modified by clicking on the „Edit
questionnaire details‟ screen.
3.3.4
Delete questionnaire
When a purchaser tries to delete a questionnaire a confirmation screen is shown
allowing the purchaser to confirm the deletion by selecting „Continue‟ or to stop the
deletion by selecting „Cancel‟.
3-5
3.3.5
Create copy
The „Create copy‟ creates a new copy of the current questionnaire, allowing the title
and description to be modified. The copied questionnaire is then subsequently
displayed allowing questionnaire sections to be added or deleted as needed and any
of the question conformance levels to be edited.
3.3.6
Add / Delete section
The sections included in the current questionnaire as well as other published
sections which can be added are displayed as two lists. Clicking on any section
within these lists shows its details and then this section can either be added or
deleted from the questionnaire.
When a purchaser tries to delete a section from a questionnaire a confirmation
screen is shown allowing the purchaser to confirm the deletion or to cancel the
deletion.
3-6
3.3.7
Changing question conformance levels
The conformance levels specified for any questions in a section can be changed by
selecting „Change question(s) conformance level‟. Where a conformance level has
been changed from the default value for the question, the new conformance level is
displayed in bold when viewing the questionnaire section.
3.4
MANAGE PROCUREMENTS
A purchaser can manage procurements by clicking on the „Procurements‟ tab. From
this page a purchaser can navigate through to view the details of any existing
procurements including details of which questionnaires have been associated with
the procurement, which suppliers have been invited to participate and which
suppliers have already responded. From here the purchaser user can also create a
new procurement record.
3-7
3.4.1
Create new procurement
Selecting the „Create new procurement‟ link allows the purchaser to record a title and
description for the procurement exercise and select the issue and end dates for the
procurement.
The purchaser can also determine whether access to the procurement exercise is to
be restricted to themselves within the purchasing organisation by selecting the
„Restricted‟ check box. If the check box is left unchecked any other purchaser user
within the same purchasing organisation will be able to see the procurement from
their home page and access the procurement record.
Note a restricted procurement can be derestricted at any time by the user removing
the check from the „Restricted‟ checkbox. The restricted indicator can be set/unset at
any point in time against the procurement record however only the user who created
the procurement record will be able to do this.
Selecting „Create‟ will allow the purchaser to associate a STEP questionnaire with
the procurement. They can do this by selecting the appropriate link to either create a
new questionnaire or to add a questionnaire previously created.
Note a procurement exercise can have more than one STEP questionnaire
associated with it and each questionnaire can be sent to different supplier users.
3-8
3.4.2
Create new questionnaire
Selecting the „Create new questionnaire‟ link allows the user to create a new
questionnaire that will be automatically linked to the procurement. See section 3.3.1
for more information on creating a questionnaire. To go back to the new
procurement record without sending the questionnaire out to suppliers use the
breadcrumb trail to navigate back.
3.4.3
Add existing questionnaire
Selecting the „Add existing questionnaire‟ link allows the user to add a questionnaire
that has already been created and not used with any other procurement exercise.
The list of existing questionnaires will be displayed and to associate the relevant
questionnaire with the procurement select the „Add‟ link next to the questionnaire
name. Note only those questionnaires which have not already been published as
part of a procurement exercise will have an „Add‟ link next to them. Also there is a
notification section which identifies, if since the questionnaire was created, any of the
STEP sections in the questionnaire have been updated or are currently being
revised.
3.4.4
Managing questionnaires in a procurement
If a new questionnaire was selected the user will already be in the questionnaire
screen. If add questionnaire was selected the questionnaire title will appear as an
active link in the Questionnaire Details section, select the questionnaire title to enter
the questionnaire screen.
3-9
From the questionnaire details screen the user can edit the questionnaire to add or
remove sections or to change the default conformance level for individual questions.
3.4.5
Remove questionnaire
Selecting the „Remove questionnaire‟ link takes the purchaser to a confirmation
screen before proceeding with removal of the questionnaire from the procurement.
Note that this will just remove the linking between the questionnaire and the
procurement, the questionnaire will remain in the system and can be used again.
3-10
3.4.6
Publish questionnaire
Once the questionnaire is ready for sending out to suppliers as part of the
procurement exercise the purchaser must select the „Publish questionnaire‟ link
available from the questionnaire screen. This redirects the user to the Assign
suppliers screen where the purchaser can select which suppliers will be invited to
provide a response to the questionnaire. Suppliers are selected through a supplier
users surname, once the supplier user is identified select the „Add‟ link next to the
supplier users name. As soon as a supplier user is added they will appear in the
suppliers with access list and they will immediately be notified by email that they
have been invited to respond to a procurement exercise.
3.4.7
Supplier not a registered STEP Online user
If the supplier user cannot be found or the supplier user is not currently a registered
user of STEP Online the questionnaire can still be sent to them. To do this a URL
link is generated on the Assign suppliers screen. This link should be copied in full
and pasted into an email and sent to the nominated supplier user asking them enter
the URL into their browser. Once the supplier user submits the URL they will be
taken to the STEP Online registration screen.
Note once a supplier user is selected and added the URL link will be removed
therefore it is advisable to take a copy of the link when the screen is first accessed.
Otherwise it is necessary to navigate away from the screen and to navigate back
again in order to regenerate the URL link.
3-11
Once the supplier user has completed the registration process the central
administration function is automatically notified that a new user account has been
created and requires authorisation. Users in the purchasing organisation will have an
authorisation request which appears in the Authorise questionnaire access requests
section of their home page. The user in the purchasing organisation authorises the
supplier request by selecting the „Authorise‟ link.
Once this is done if the supplier user account has not yet been authorised by the
central administration function the user account will also need authorisation. The
purchaser user should refresh their home page view and they will see the supplier
user details in the Authorise users section. The user can now authorise the supplier
user by selecting the users name, which will navigate the user to the supplier user
details screen, and selecting „Authorise‟.
When the questionnaire access request is authorised the supplier user will receive a
notification email, also when the user account is authorised the supplier user will
receive a confirmation email.
3-12
3.4.8
Withdraw questionnaire
When a questionnaire has been published as part of a procurement and the
purchaser wants to make any changes, the questionnaire must be withdrawn by the
purchaser using the „Withdraw questionnaire‟ link which is enabled once a
questionnaire has been published.
Any suppliers previously selected will be able to see from their procurement record
that the questionnaire has been withdrawn.
3.4.9
View ongoing procurements
The details of any existing procurement exercise can be viewed by selecting the
procurement title from the home page. The procurement screen contains three
distinct sections – one for displaying the procurement details, one displaying a
summary of the questionnaires in the procurement (which can be individually
selected to view their details) and a section showing the supplier responses. Each
supplier response can be viewed by selecting the „View supplier responses‟ link.
3-13
3.4.10 Edit procurement details
The procurement details can be modified via the „Edit procurement details‟ link.
3.4.11 Delete procurement
Selecting the „Delete procurement‟ link takes the purchaser to a confirmation screen
before proceeding with deleting the procurement record. Note if a questionnaire has
already been published to suppliers, the procurement record can still be deleted
however the suppliers will not receive notification of this. It is therefore advisable to
withdraw the questionnaire before deleting a procurement exercise.
3-14
3.4.12 View supplier response
To view supplier responses the purchaser needs to select the procurement record,
from there it is possible to see in the Procurement Responses section which
suppliers have responded, which have declined and those suppliers that have not yet
provided a response. To view a particular supplier response the purchaser must
select the appropriate „View supplier responses‟ link.
Where a supplier has declined to provide a response to the questionnaire the status
will be displayed as „Supplier declined‟ and the supplier will have the option to record
a reason why. To see the reasons a supplier has given for not submitting a
response the user needs to position the cursor over the „Supplier declined‟ text and a
notes box will be displayed.
3-15
3.5
MANAGE USERS
When a purchaser is first registered if they are the first user for that purchasing
organisation they will be granted with the Manage Purchasers access role which
gives limited administration rights.
Purchaser users with the Manage Purchasers access role can create new purchaser
user accounts for other users in their organisation, in turn allowing them to also be
given Manage Purchasers access privileges if they wish.
With this access role they can also update any existing user accounts in their
organisation, changing the users name details, telephone number, login email
address and password. Note it is only possible to select users by their surname.
Through accessing any user account record they can also update the organisation
name and address details. Note where the organisation name and/or address is
changed this change will be applied to all user account records in that purchasing
organisation.
A purchaser user can view, modify and create purchaser user records by clicking on
the „Users‟ tab.
3-16
3.5.1
Updating own account
Any user in an organisation can maintain their own user account record allowing
them to change their name details, telephone number, login email address and
password. They do this by selecting the „Update profile‟ link in the Quick links section
on their home page or identifying their user record through the „Users‟ tab.
3-17
4.
SUPPLIER USERS
The supplier user accesses the application from the STEP Online home page.
From here a supplier user can either login if they have previously registered or they
can select the „New Supplier: Register Here‟ link at the top of the page. Selecting
this link will take the supplier user to the registration page shown below where they
can enter their details.
Once the user has registered the central administration function is automatically
notified that a new user account has been created and requires authorisation. Once
an account is authorised the user will receive a confirmation e-mail.
Note that the supplier user cannot login unless and until they have been authorised.
4-1
4.1
SUPPLIER HOME PAGE
On successfully logging in, the supplier is directed to the supplier home page.
The home page consists of six sections:
1.
2.
3.
4.
5.
6.
7.
Navigation tabs – These facilitate easy navigation to the main tasks that a
supplier can undertake
Breadcrumb trail – The breadcrumb trail will change according to which screen
a user has navigated to and facilitates an easy link to go back to any of the
previous screens the user has navigated through
Quick links – The quick links allow a supplier user to quickly go to common
tasks
Procurements available – This identifies any existing procurements that the
supplier user has been selected to respond to by a purchasing organisation or
those that have been delegated to the user by another user in the same
supplier organisation
Recent boilerplates – This is a list of recent boilerplate responses that have
been created for any of the STEP sections
Request access - This enables an already registered supplier to request
access to a questionnaire for which they have received a registration link from a
purchaser
Log Out – The current users name is displayed at the top with a link to log out of
the system and links to the STEP and Connecting for Health home pages
4.2
SECTIONS
4.2.1
View Sections
A supplier user can view all the STEP standards questions that have been published
by clicking on the „Sections‟ tab and selecting a section from the left hand window.
Each section can be individually exported to a Word document or printed out.
4-2
4.3
MANAGE BOILERPLATES
Boilerplates are standard responses that a supplier can create to any of the STEP
standards sections, which can then be used at any time when creating a response to
a procurement exercise.
A user can view and modify their current boilerplate responses as well as creating
new boilerplate responses by clicking on the „Boilerplate‟ tab.
4.3.1
Create new boilerplate
Choosing the „Create boilerplate response‟ link will display to the supplier all the
published sections from which they can create and save a boilerplate response. It is
recommended a meaningful title is entered in the description field to aid selection
when adding responses to a procurement exercise. Note any number of boilerplate
responses can be created for the same standards section.
4-3
4.3.2
View / Edit boilerplate
Boilerpate responses that have been created are displayed as active links. Selecting
a bolierplate description active link will open up the saved response and the supplier
can then change any of the responses to any of the questions in the standards
section and save the new responses. Note it is not possible to change the description
field once a response has been saved.
4.4
RESPONDING TO A PROCUREMENT
When the supplier is selected to provide a response to a procurement exercise the
supplier will receive an e-mail to notify them that they have been selected.
To look at the procurement the supplier will need to select the procurement from the
„Procurements available‟ window and click through from the highlighted procurement.
This opens up the procurement details and from here the supplier can view the
procurement information and see the questionnaire which has been created for the
procurement exercise. The supplier can then decide whether to create a response,
decline the offer to take part in the procurement exercise or delegate the response to
another supplier user in the same organisation.
4-4
4.4.1
Create / Update response
Clicking on the „Create response‟ will redirect the supplier to a questionnaire viewing
page from where they can submit their response. The response does not need to be
completed all at once and the supplier can save their response at any time to come
back to later.
Each section noted on the left must be selected and completed, and each section
needs to be saved independently to any other section i.e. if a supplier highlights a
standards section, completes responses against the questions in the right hand side
but then selects another section from the list on the left without selecting „Save‟ all
their responses for that section will be lost. Note a section can be saved at any time
and does not need all answers to be completed before „Save‟ can be selected.
Once a response has been saved, if the supplier navigates to a different page or logs
out and comes back to te response at a later time, they can go back into the
procurement and click on „Update response‟ to continue completing the response.
The response is only returned to the purchaser when „Submit‟ is selected. Clicking on
the „Submit‟ button will validate the response for any missed questions and if
4-5
successful will submit the response back to the purchaser. Note clicking on „Submit‟
will not validate whether any information has been added to the comments and
evidence section and therefore a response can be submitted with no details in the
„Comments on questionnaire‟ section. Once the response has successfully been
submitted the supplier cannot make any further modifications to their response.
Once the response has been submitted the purchaser will receive an email
confirmation that the supplier has provided a response.
4.4.2
Decline response
If a supplier does not wish to submit a response they should select „Decline
response‟. Selecting „Decline response‟ allows the supplier to record a reason why
they have declined, selecting „Submit‟ will then enable the purchaser to see that a
response has been declined by the supplier and the reason recorded. The reason
recorded is also automatically copied into the Additional comments field in the
„Comments on questionnaire‟ section and can be viewed at any time by selecting
„Update‟ response.
Note declining a response does not mean the supplier cannot make a response later,
if a supplier does later change their mind they can still respond by selecting the
„Create response‟ or „Update response‟ button depending on whether they had
previously already part saved a response.
4-6
4.4.3
Delegate response
A supplier can delegate the task of completing a response to another supplier user
from their organisation. They do this by selecting the „Delegate‟ link which will take
them to a new screen to identify another user from their organisation. Note it is only
possible to select other users by their surname. Once other users have been
selected and added to the list of suppliers with access the original user that was
invited to provide a response can remove themselves from the access list. Note on
doing this the supplier user will no longer have access to the procurement and it will
no longer appear in their „Procurements available‟ list.
4.4.4
Supplier receives a questionnaire URL link
A purchaser when creating a procurement exercise and publishing a questionnaire to
suppliers may not realise or be able to identify a supplier as a registered STEP
Online user. In this case the purchaser will have sent a questionnaire registration
URL to the supplier.
If the supplier is already a registered STEP online user they should login to the STEP
Online application and on their home page on the left hand side they will see a
section for the questionnaire registration link. The URL link supplied by the
purchaser should be copied in full, ensuring there are no additional spaces at the
end, and pasted in to the text box and the „Request access‟ button selected.
4-7
Once this has been done a confirmation message will be displayed. The users in the
purchasing organisation will have an authorise questionnaire access request
appearing on their home page which they will need to authorise. Once the
questionnaire access request is authorised by the purchaser, the supplier user will
receive a notification email.
4.5
MANAGE USERS
When a supplier is first registered if they are the first user for that supplier
organisation they will be granted with the Manage Suppliers access role which gives
limited administration rights.
Supplier users with the Manage Suppliers access role can create new supplier user
accounts for other users in their organisation, in turn allowing them to also be given
Manage Suppliers access privileges if they wish.
With this access role they can also update any existing users account in their
organisation, changing the users name details, telephone number, login email
address and password. Note it is only possible to select users by their surname.
Through accessing any user account record they can also update the organisation
name and address details. Note where the organisation name and/or address is
changed this change will be applied to all user account records in that supplier
organisation.
A supplier user can view, modify and create supplier user records by clicking on the
„Users‟ tab.
4.5.1
Updating own account
Any user in an organisation can maintain their own user account record allowing
them to change their name details, telephone number, login email address and
password. They do this by selecting the „Update profile‟ link in the Quick links section
on their home page or identifying their user record through the „Users‟ tab.
4-8