1
This user manual provides comprehensive instructions for setting up and using an XRS EID Stick Reader (the stick reader). For more information
about the XRS EID Stick Reader, see www.tru-test.com.
Note: In this document, EID = Electronic Identification and VID = Visual Identification.
Contents
Before you start .............................................................................. 2 © 2011-2013 Tru-Test Limited
Parts of the stick reader .................................................................. 3 All product names and brand names in this document are trademarks or registered trademarks of their
respective holders.
LEDs ............................................................................................... 4 Parts of the stick reader LCD ........................................................... 4 Turn on the stick reader .................................................................. 4 Scanning an EID tag ........................................................................ 4 Turning off the stick reader ............................................................. 4 Using a cross-reference file.............................................................. 4 Modifying the stick reader settings .................................................. 4 Other stick reader settings............................................................... 5 No part of this publication may be photocopied, reproduced, stored in a retrieval system, or
transmitted in any form or by any means, electronic, mechanical, photocopying, recording or
otherwise without the prior written permission of Tru-Test Limited. Product specifications may change
without prior notice.
For more information on other quality Tru-Test Group brands and products, visit www.tru-test.com.
Tru-Test Limited
25 Carbine Road
Mt Wellington
Auckland 1060
New Zealand
Postal address:
P O Box 51078
Pakuranga
Auckland 2140
New Zealand
Issue 2 01/2013
The Bluetooth® word mark and logos are owned by Bluetooth SIG, Inc. and use of any such marks by
Tru-Test Ltd is under license.
Adding custom field information during scanning ............................ 5 Receiving alerts during scanning ..................................................... 5 Stick reader menu settings .............................................................. 6 Battery charging options ................................................................. 7 Changing the battery ...................................................................... 8 Exporting a cross-reference file to the stick reader using EziLink™ ... 8 Importing one or more scanning sessions from the stick reader using
EziLink ............................................................................................ 9 Changing the file format using EziLink ............................................. 9 Customising the custom field using EziLink .................................... 10 Exporting an alerts file to the stick reader using EziLink ................. 11 Clearing all sessions using EziLink ................................................. 13 Clearing all alerts using EziLink ..................................................... 13 Clearing all sessions, EID-VID pairs and alerts using EziLink ........... 14 Updating the stick reader’s software ............................................. 14 EziLink XRS Configuration Reference ............................................. 15 Troubleshooting ............................................................................ 19 Caring for the stick reader ............................................................. 21 Service and warranty information .................................................. 21 Specifications ................................................................................ 22 FCC notice .................................................................................... 22 FCC warning ................................................................................. 22 Industry Canada notice ................................................................. 22 1
Before you start
Note: In this document, EID = Electronic Identification and VID = Visual Identification.
Charging the internal battery
Note: Before using the stick reader, ensure that the internal battery is fully charged.
The ambient temperature should be between +5 and +40 °C (+41 and +104 °F) when charging the battery. The battery will be fully charged in
approximately 3 hours. When fully charged, the internal battery will allow the stick reader to be used for up to 19 hours 1 .
The stick reader may be used while it is on charge.
For other battery charging options, see Battery charging options on page 7.
Using the stick reader
The stick reader can be used in two ways:
1
2
Standalone - the stick reader saves each scanned tag in its internal memory. These records can be transferred to a PC afterwards.
Connected – the stick reader is connected to another device, such as a 3000 series scale indicator or a PC running a third party application,
via cable or Bluetooth® wireless connection. When connected, the stick reader transmits every scanned tag immediately to the connected
device.
Note: When using a stick reader connected to another device, it still saves all the scanned tags to its own internal memory. Therefore, when you
connect to a PC and run EziLink™, a session with a large number of unwanted scanned records may be displayed. If you don’t need this session, it
may be deleted.
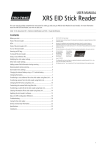
Connections to other devices
Connection to a PC can be made using the XRS-Serial cable and the USB-Serial adaptor (see picture below).
Connection to a 3000 series scale indicator can be made via the XRS-Serial cable or via a Bluetooth® wireless connection. When connecting via a
Bluetooth wireless connection, the stick reader will automatically pair and connect with an XR3000 indicator. This may take a few minutes.
1
2
When default settings are used.
Using EziLink
EziLink software can be installed from the CD provided with the stick reader. EziLink allows information to be transferred to and from the stick
reader and a PC. A number of stick reader settings can be adjusted on the stick reader itself, but there are some that must be configured using
EziLink.
To use EziLink:
1
2
3
4
Install the EziLink software on a PC (see information provided on the EziLink CD).
Connect the stick reader to the PC’s USB port using the XRS-Serial cable and the USB-Serial adaptor (see opposite).
Turn on the stick reader.
Launch EziLink by double-clicking on the EziLink icon on
the desktop:
When connected, the XRS icon in the top right-hand
corner of the EziLink screen illuminates and the
connection details appear at the bottom of the screen.
Notes:
-
-
The stick reader must be on before EziLink is launched,
otherwise EziLink will not connect with the stick reader.
For troubleshooting information, see the information
provided on the EziLink CD.
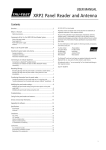
Parts of the stick reader
3
LEDs
Scanning an EID tag
The stick reader has two LEDs. One is green and the other is blue or
red, depending on the current function of the stick reader. Here are
the most common LED display sequences:
Press and release the Read button while passing the antenna near a
tag.
Blue/Red LED
flashing.
The stick reader is in the process of scanning
for or reading an EID tag.
Green LED flashes.
The EID tag has been read successfully.
Blue/Red LED is
blue when not
flashing red.
The stick reader is connected to a Bluetooth
enabled device.
The ID tag number appears on the LCD, the green LED flashes once,
the hand grip vibrates and the stick reader beeps to indicate that
the tag has been read successfully.
Tip: If animals are moving quickly through a race or into a pen, you
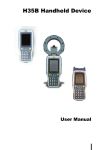
Parts of the stick reader LCD
can hold down the Read button continuously. Scanning will stop
when the Read button is released 2 .
Turning off the stick reader
Press and hold the Scroll button.
A countdown appears on the LCD (3, 2, 1) then the stick reader
beeps and turns off.
Battery indicator
Shows the battery charge level.
BLUETOOTH®
set to AUTO
Indicates that the Bluetooth setting is set to
automatically connect to a Bluetooth enabled
device. To change this, see Modifying the stick
reader settings on page 4.
Bluetooth
The stick reader is connected to another
Bluetooth enabled device.
wireless
connection active
Time
The current time is displayed. The time and
date are recorded against the animal ID
during the scanning session. The stick reader’s
date and time can be set in EziLink. See Date
Time tab on page 17 for information.
Count
The number of animals scanned during the
current scanning session.
Status
Message display area.
Turn on the stick reader
Press the Read button.
The stick reader beeps
the LCD:
and the message “READY” appears on
Using a cross-reference file
A file containing EIDs and corresponding VIDs (visible tag numbers)
can be exported to the stick reader prior to the scanning session,
using EziLink. If a cross-reference file has been pre-loaded, the
animal’s VID will appear in large numerals on the LCD when a tag is
scanned. The EID is displayed in small numerals directly above.
For information about exporting a cross-reference file, see Exporting
a cross-reference file to the stick reader using EziLink on page 8.
Modifying the stick reader settings
To access stick reader settings:
Press and hold both the Read button and the Scroll button.
The first three items appear on the LCD with the EXIT option
available at the top.
To scroll through the menu options, press the Scroll button
repeatedly.
To select an option, highlight the option and press the Read button.
To exit out of the stick reader menu settings, press the Scroll button
until EXIT is highlighted, then press the Read button.
For an explanation of the stick reader menu settings, see Stick
reader menu settings on page 6.
2
4
When Read Mode is set to “Standard” (default).
Other stick reader settings
Receiving alerts during scanning
Other stick reader settings can be configured using the EziLink
software. Settings include Automatic Power Down, Beeper and
Vibration On/Off, Date/Time settings etc. See EziLink XRS
Configuration Reference on page 15 for information.
If you have enabled the Alerts setting, you can receive alerts about
a particular animal as its tag is read. A file containing EIDs and alert
messages can be exported to the stick reader prior to the scanning
session, using EziLink.
1
Adding custom field information
during scanning
If you have enabled the Custom Field setting, you can add
information about each animal during scanning. The stick reader
has one preset custom field – Flag (options are blank, 1, 2, 3, 4 or
5). The custom field may also be customised in EziLink (see
Customising the custom field using EziLink on page 10 for
information).
1
2
3
Scan the EID tag as described above.
If an alert is stored against the EID, the stick reader will beep,
the handle will vibrate and a message appears on the LCD:
Press the Scroll button to select Continue and then press the
Read button. This acknowledges the alert and allows you to
continue scanning.
For information about exporting an alerts file, see Exporting an
alerts file to the stick reader using EziLink on page 11.
2
Scan the EID tag as described above.
Press the Scroll button to view the available options.
When the appropriate option is displayed, scan the next EID
tag.
The custom field information for the previously scanned EID
tag will then be stored against it.
Note: The custom field information will also be stored if the display
times out and returns to the READY screen or the stick reader is
turned off.
5
Stick reader menu settings
Menu name
Options1
Description
All tags recorded are stored in sessions (files). Up to 50 sessions can be created. A session can be transferred to a PC
later using EziLink (see Importing one or more scanning sessions from the stick reader using EziLink on page 9 for
information).
Press the Read button to start a new scanning session.
START NEW SESSION
CUSTOM FIELD
OFF*
ON
Enable custom field if you want to enter data about an animal during a session, such as a condition score. The custom
field label and options can be customised in EziLink then exported to the stick reader (see Customising the custom field
using EziLink on page 10 for information).
ALERTS
OFF*
ON
Enable alerts if you want to be warned when a particular animal’s tag has been scanned. For example, you may want to
set an alert in order to remind you than an animal is in a withholding period. Alert information can be configured in
EziLink then exported to the stick reader (see Exporting an alerts file to the stick reader using EziLink on page 11 for
information).
BLUETOOTH®
AUTO*
OFF
MANUAL
Bluetooth® wireless connectivity enables the transfer of information from the stick reader to another device such as an
XR3000 or a computer with Bluetooth wireless connectivity.
Auto – When BLUETOOTH® is set to Auto, the stick reader will automatically connect to the Bluetooth enabled device
most recently used. If it can’t find this device, it will attempt to connect to another Bluetooth enabled device from its list
of previously paired devices. If a previously paired device can’t be found, the stick reader will search for an XR3000
indicator, then connect with it and add it to its list of paired devices. If this is not successful, the stick reader will then
allow an incoming connection from any other Bluetooth enabled device. At any time, you may override the Auto settings
and manually search for a device (see FIND BT DEVICES below) or select a device from the list of previously paired
devices (see PAIRED DEVICES below). The Auto setting is ideal if you typically use the same Bluetooth enabled device
with the stick reader.
Off – You may want to disable Bluetooth wireless connectivity if you don’t want the stick reader to automatically
connect to or search for another Bluetooth enabled device. Disabling Bluetooth wireless connectivity conserves the stick
reader’s battery.
Manual – When BLUETOOTH® is set to Manual, the stick reader will allow an incoming connection from another
Bluetooth enabled device. Also, you can manually search for another Bluetooth enabled device (see FIND BT DEVICES
below) or select a device from the list of previously paired devices (see PAIRED DEVICES below).
FIND BT DEVICES
When BLUETOOTH® is in set to Auto or Manual, you can manually search for and connect to a particular device or
break an existing connection and force it to a different device.
Press the Read button to search for Bluetooth enabled devices within range.
After a few moments, the stick reader populates the screen with devices that are within range.
To connect to a device:
Select the required device from the list and press the Read button.
The device is added to the list of paired devices (see PAIRED DEVICES below).
PAIRED DEVICES
When BLUETOOTH® is set to Auto or Manual, you can manually connect to a previously paired device or break an
existing connection and force it to a different device.
Connecting to a previously paired device is faster than using the ‘FIND BT DEVICES’ option.
Press the Read button to display previously connected (paired) devices. Select a device and press the Read button.
The stick reader attempts to connect to the previously paired device.
DUPLICATES
ON*
OFF
When Duplicates is enabled, the stick reader will not record the same EID twice in the same session. The stick reader
remembers the previous 500 tags.
FLIP SCREEN
OFF*
ON
Enable flip screen to rotate the LCD for a left-handed user. The LCD screen will then be displayed upside-down for a
right-handed user.
CONTRAST
READ MODE
Adjust the contrast to suit the light conditions.
Press the Read button repeatedly to adjust the contrast on the LCD.
STANDARD*
CONTINUOUS
SINGLE
SOFTWARE VERSION
ENGLISH*
1
The stick reader software version is displayed.
ESPAÑOL (Spanish)
PORTUGUÊS (Portuguese)
FRANÇAIS (French)
DEUTSCH (German)
ITALIANO (Italian)
DANSK (Danish)
SVENSKA (Swedish)
Default settings marked *
6
When set to Standard, the stick reader begins scanning when the Read button is pressed. Scanning continues for 3
seconds (default) or until a tag is read if this is sooner. If the Read button is held down continuously, the stick reader will
continue to scan and therefore read multiple tags. ‘Standard’ is the recommended setting for general use. The read time
can be set in EziLink, see EziLink XRS Configuration Reference (Reading Tags tab) on page 15.
When set to Continuous, the stick reader begins scanning when the Read button is pressed and it only stops when the
Read button is pressed again. This setting is useful if you want to scan every animal in a pen or race.
When set to Single, the stick reader behaves as it would in Standard mode, except that even if the Read button is held
down, the stick reader won’t continue scanning after it reads the first tag. To scan for another tag, the Read button must
be released and pressed again.
The language displayed on the stick reader LCD can be modified.
Press the Read button repeatedly.
When the stick reader is connected to an XR3000 indicator via a Bluetooth wireless connection, it will automatically
display the same language as the indicator.
Battery charging options
Normally, the internal battery is charged by connecting the stick reader to the mains power supply via the XRS adaptor cable and the power
adaptor cable (see Charging the internal battery on page 2). However, there are alternative methods of charging the battery:
The stick reader’s internal battery may also be recharged by a 12 V vehicle battery, using the battery leads supplied.
The stick reader can be connected to a 3000 series scale indicator via the XRS-serial cable. If the indicator is connected to a 12 V battery or its own
power adaptor, the stick reader’s internal battery will be recharged using the indicator’s power supply connection.
The stick reader may be used during battery charging, even if the battery is flat. To use the stick reader while the battery is charging, the internal
battery must be in the battery compartment and the stick reader must be connected to the supplied mains power adaptor, a 12 V battery or a 3000
series scale indicator as described above.
Caution! The stick reader must only be used with the power adaptor and cables supplied or genuine replacement parts.
7
Changing the battery
A spare battery may be purchased as an accessory (Tru-Test part number 813295). To change the battery, unscrew the battery compartment cover,
located at the end of the stick reader (see Parts of the stick reader on page 3). Carefully slide the battery out and insert the spare battery. Ensure
that moisture and dirt do not enter the battery compartment and that batteries remain clean and dry at all times.
Exporting a cross-reference file to the stick reader using EziLink™
A file containing EIDs and corresponding VID tag numbers can be exported to the stick reader prior to a scanning session using EziLink. Up to
20,000 EID/VID pairs may be exported to the stick reader. The cross-reference file must be formatted as follows:
File must be in .csv, .xls or .xlsx format. .txt files are also acceptable as long as the fields are separated by a comma (essentially a .csv file).
The file must contain only two columns of data – one column for VIDs and one for EIDs.
•
VIDs can be in the first column and EIDs in the second column, or the other way around.
•
A header row is optional.
•
The file should only contain letters and digits. It must not contain any of the following characters [ ] ( ) { }, ; ` ~ ^ \ #.
•
If the VID is seven characters or more, only the digits after the last letter from the right hand end will be used. For example, if the VID in
cross-reference file is XBX00047, it will be exported as 00047. This allows the use of tag bucket files.
If the VID is six characters or less, it will be exported in full. For example, if the VID in the cross-reference file is VID001, it will be exported as
VID001.
•
The EID format used in the EID-VID pairs file can be in any of the three allowable formats, regardless of the EID format setting in the stick
reader itself. The allowable formats for EID are: Standard (e.g. 982 0000000123456), No space (e.g. 9820000000123456) and Hexadecimal
(e.g. 8000F58000000001).
Here are two possible formats for the cross-reference file:
•
•
VIDs in first column, EIDs in second column, with no header row
EIDs in first column, VIDs in second column, with header row
Note: Do not connect the stick reader to the PC until you have installed the EziLink software. EziLink includes the driver required by the stick
reader. If you have already connected the stick reader without installing EziLink, disconnect the stick reader and cancel the Windows wizard if this
has begun.
To export a cross-reference file to the stick reader using EziLink:
1
2
3
4
Click .
The ‘Load EID-VID Pairs File’ dialogue is displayed.
Browse to locate the file you want to export then click to select it.
Click Open.
The EIDs and corresponding VIDs are exported to the stick reader and a confirmation dialogue appears.
Click OK.
Note: If EID-VID pairs already exist in the stick reader, when you attempt to export a cross-reference file, you will be asked if you want to merge
the existing EID-VID pairs with the new pairs. If you select Merge, the new pairs will be merged with the old pairs and any new pairs will be
exported to the stick reader. If you select Don’t Merge, the old pairs on the stick reader will be deleted and the new pairs will be exported.
For more information about using a cross-reference file during scanning see Using a cross-reference file on page 4.
To remove EID-VID pairs from the stick reader, see Clearing all sessions, EID-VID pairs and alerts using EziLink on page 14.
8
Importing one or more scanning sessions from the stick reader using EziLink
One or more scanning sessions can be imported from the stick reader using EziLink.
When the stick reader is connected to the PC, the EziLink screen shows a list of scanning sessions stored on the stick reader. Sessions may be
imported by EziLink one at a time, or all scanning sessions can be imported at the same time.
Data can be saved in .csv, .xls or .xlsx format. Data can also be saved as a .csv file suitable for NLIS (applicable in Australia only) or as a .csv file
suitable for NAIT (applicable in New Zealand only), but these options are only available if NLIS or NAIT has been selected as the default file format
in the EziLink options. To change the default file format, see Changing the file format using EziLink below.
To import a single scanning session from the stick reader using EziLink:
1
Click on the session you wish to import in the left-hand panel.
2
Click .
If you have selected file format NLIS/NAIT in the EziLink Options, the ‘NLIS’/’NAIT’ dialogue appears. Complete fields as required and click
OK.
All file formats – the ‘Save animal records as…’ dialogue appears.
Enter a file name or accept the default file name and select a location for saving.
Click Save.
The session is imported and a confirmation dialogue appears.
Click OK.
3
4
5
Note: To register an NAIT/NLIS transaction, go to the NAIT or NLIS website, login and upload the file.
To import all scanning sessions from the stick reader using EziLink:
1
Click .
The ‘Browse for folder’ dialogue appears.
2
Select a location for saving and click OK.
The sessions are imported with default file names ‘XRS_Session x on yyyy-mm-dd’ (x being the session number on the stick reader and the
date being the date the first record was scanned). A confirmation dialogue appears.
Click OK.
A warning appears asking whether you want to clear all scanning sessions and data records on the stick reader.
Click Delete or click Don’t delete to leave the data intact.
Click OK.
3
4
5
Note: If NLIS or NAIT file format has been selected as the default file format in the EziLink Options, sessions can only be imported one at a time.
Changing the file format using EziLink
Sessions imported from the stick reader by EziLink can be saved in one of the following formats:
.xls or .xlsx
These file formats allow you to open and manipulate data using MS Excel.
.csv
Comma separated values file format. .csv files are commonly used to transfer data to a third party application. On machines
that have Excel installed, .csv files automatically open in Excel; however it is better to use the .xls format for this to avoid
issues with data formats, which can happen especially with EID numbers that have no space. To see the contents of a .csv
file, you can open it in Notepad using the 'Open With' function of Windows.
NLIS (.csv)
This is a .csv file suitable for uploading to the NLIS database (applicable in Australia only).
NAIT (.csv)
This is a .csv file suitable for uploading to the NAIT database (applicable in New Zealand only).
Changing the file format setting here means that all sessions will be saved in this format unless you override it during the importing process. See
Importing one or more scanning sessions from the stick reader using EziLink above.
To change the file format using EziLink:
1
2
3
Click
.
The ‘Options’ dialogue is displayed.
On the File Format tab, click on the required option.
Click OK.
9
Customising the custom field using EziLink
A custom field can be customised in EziLink. The custom field can be used to record information about each during scanning.
For example, you could customise it for recording the breed of animals or treatment information.
Before you begin, the stick reader must not have any session data stored on it. All session data must be transferred to a PC (see Importing one or
more scanning sessions from the stick reader using EziLink on page 9) and the sessions must be cleared from the stick reader (see Clearing all
sessions using EziLink on page 13).
Up to ten options can be created. Each label may contain up to eleven letters or numbers. Each option may contain up to six letters or numbers.
Note: The combined total of characters used for the label and the longest option cannot exceed twelve. Therefore, if a long label is entered, then
shorter options must be used or vice versa.
To customise the custom field using EziLink:
1
2
3
4
5
6
7
Click
.
Click on the Custom Field tab.
Enable Custom Field.
Click Clear All to delete existing custom field setups.
Type a label in the Label field or to use the flag symbol, type a hash (#).
Type the options you would like to select from.
Click Save.
The custom field information is sent to the stick reader.
Note: If the label and options can’t be changed, this is because the stick reader is not empty.
For more information about using a custom field during scanning, see Adding custom field information during scanning on page 5.
Example of custom field
In this example, the custom field will be used to record information about animal breed.
The custom field is labelled “BREED”.
The options are ANG (short for Angus), HER (short for Hereford), SIM (short for Simmental), BRA (short for Brangus) and X (short for Crossbreed).
EziLink is used to customise the custom field with a label and options.
Here is the custom field set up in EziLink:
During scanning, when an EID tag is scanned, breed can be entered:
1
2
3
10
The EID tag is scanned.
The Scroll button is pressed in order to view the available options.
When the appropriate option is displayed, the next EID tag is scanned.
The custom field information for the previously scanned EID tag is then stored against it.
Exporting an alerts file to the stick reader using EziLink
If you have enabled the Alerts setting, you can receive alerts about a particular animal as its tag is read. Using EziLink, a file containing EIDs and
optional alert messages can be exported to the stick reader prior to the scanning session.
Up to 10,000 alerts can be set and up to 254 different messages can be used. A message may contain up to 32 letters or digits. The alerts file
must be formatted as follows:
The file must be in .csv, .xls or .xlsx format. .txt files are also acceptable as long as the fields are separated by a comma (essentially a .csv
file).
•
The file may contain up to two columns of data – one column for EIDs and one for messages (optional).
•
EIDs must be in the first column and messages in the second column.
•
The file should only contain letters and digits. It must not contain any of the following characters [ ] ( ) { }, ; ` ~ ^ \ #.
•
The EID format used in the alerts file can be in any of the three allowable formats, regardless of the EID format setting in the stick reader
itself. The allowable formats for EID are: Standard (e.g. 982 0000000123456), No space (e.g. 9820000000123456) and Hexadecimal (e.g.
8000F58000000001).
An alerts file may look like one of these examples:
•
EIDs and messages
EIDs and messages for selected EIDs
EIDs only
To export an alerts file to the stick reader using EziLink:
1
Click .
The ‘Load EID-Alerts Pairs File’ dialogue is displayed.
2
Click the drop-down arrow next to Files of Type and select All Files (*.*) or Microsoft Excel File (*.xls) if required. If the alerts file is a .csv file,
accept the default setting.
Browse to locate the alerts file then click to select it.
Click Open.
The information is exported to the stick reader.
3
4
Notes:
-
-
If alerts already exist on the stick reader, a dialogue box will advise you that exporting new alerts will delete existing alerts.
If only selected EIDs have messages, EziLink will ask whether you want to export all EIDs or just the EIDs with messages.
If messages are not used in the alerts file, during scanning, the stick reader will still provide an alert when the EID tag is read, however the
message area on the LCD will be blank. The alert still needs to be acknowledged.
By default, alerts will be received about animals that are included in the alerts file, however this setting can be changed so that an alert is
received for any animal not included in the alerts file. See EziLink XRS Configuration Reference on page 15 (Data tab, Alert if animal setting).
Also see Example of alerts for animals not in list on page 12.
For information about using alerts during scanning, see Receiving alerts during scanning on page 5.
11
Example of alerts without messages
In this example, alerts will be used to help identify a number of animals for removal from the mob. No messages are required as the farmer knows
what the alert is for.
Here is the alerts file as it is displayed in Excel:
EziLink is used to export the alerts file to the stick reader.
During scanning, if one of the EIDs in the alerts file is read, the stick reader will beep, the handle will vibrate and an alert appears on the LCD:
The Scroll button is pressed in order to select Continue and then the Read button is pressed. This acknowledges the alert and allows scanning to
continue.
Example of alerts with messages
In this example, alerts will be used to help identify several animals for culling and withholding. Messages (CULL and W’HOLD respectively) are
required to help identify which category each animal belongs to.
Here is the alerts file as it is displayed in Excel:
During scanning, if one of the EIDs in the alerts file is read, the stick reader will beep, the handle will vibrate and a message appears on the LCD:
The Scroll button is pressed in order to select Continue and then the Read button is pressed. This acknowledges the alert and allows scanning to
continue.
Example of alerts for animals not in list
In this example, a farmer is loading a group of animals onto a truck and wants to identify animals that do not belong in the group (stray animals).
The stick reader can be set up to send an alert for animals not included in the alerts file:
12
Here is the alerts file as it is displayed in Excel:
EziLink is used to export the alerts file to the stick reader.
During scanning, if an EID is read that is not included in the the alerts file, the stick reader will beep, the handle will vibrate and an alert appears
on the LCD:
The Scroll button is pressed in order to select Continue and then the Read button is pressed. This acknowledges the alert and allows scanning to
continue.
Clearing all sessions using EziLink
When the stick reader is connected to the PC, the EziLink screen shows a list of scanning sessions stored on the stick reader.
To clear all sessions from the stick reader:
1
Click .
A warning appears advising that all data in all sessions will be removed from the stick reader.
2
Click Continue.
The data is cleared from the stick reader.
A confirmation message is displayed.
3
Click OK.
Clearing all alerts using EziLink
To clear all alerts from the stick reader using EziLink:
1
Click .
A warning appears advising that all alerts will be removed from the stick reader.
2
Click Yes.
The alerts are cleared from the stick reader.
A confirmation message appears.
3
Click OK.
13
Clearing all sessions, EID-VID pairs and alerts using EziLink
To clear all sessions, all EID-VID pairs and all alerts from the stick reader using EziLink:
1
Click File / Clear all sessions, EID-VID pairs and alerts in XRS…
A warning appears advising that this process will remove all records from all sessions, all EID-VID pairs and all alerts from the stick reader.
2
Click Clear Everything.
The data is cleared from the stick reader.
A confirmation message is displayed.
3
Click OK.
Updating the stick reader’s software
Checking for software updates
1
2
3
Connect the stick reader to the PC and launch EziLink.
Click Tools/Updates.
Click Check Web for Updates now. If you want EziLink to automatically update the software each time you connect the stick reader to the
PC and run EziLink, enable Check for Updates Automatically.
A dialogue box will appear advising whether an update is available. Follow the onscreen instructions to complete the update.
Note: The stick reader must be disconnected from the PC before it can be used.
Updating software from a file
If you have been provided with a software update file from Tru-Test, you can install it manually.
1
2
3
4
5
Download the update file onto your PC. The file format is XRS__vX.XX.hex, where X.XX is the software version.
Connect the stick reader to the PC and launch EziLink.
Click Tools/Updates.
Click Update device software from a file.
Browse to find the .hex file containing the software update. Select the .hex file and click Open.
A dialogue box confirms that the software has been updated.
Note: The stick reader must be disconnected from the PC before it can be used.
14
EziLink XRS Configuration Reference
To adjust stick reader settings using EziLink:
1
2
Click
.
Click on one of the tabs:
User Interface tab
This tab allows you to modify the stick reader’s user interface.
Setting
Options
Explanation
Contrast Level
1
2*
3
4
5
The contrast used on the LCD can be adjusted to suit the light conditions. In high or low temperatures, a
different setting may improve the contrast.
This setting may also be changed on the stick reader itself. See Stick reader menu settings on page 6.
Flip Screen
Off*
On
The LCD orientation may be adjusted for a left-handed user. When Flip Screen is set to On, the LCD
screen will then be displayed correctly for a left-handed user (upside-down for a right-handed user).
This setting may also be changed on the stick reader itself. See Stick reader menu settings on page 6.
Beeper
Disabled
Enabled*
The stick reader normally beeps when a tag is read or when a key is pressed. This can be disabled, if
desired.
Vibrator
Disabled
Enabled*
The stick reader normally vibrates when a tag is read. This can be disabled, if desired.
Display Message
Duration
1 second
2 seconds*
3 seconds
5 seconds
10 seconds
15 seconds
20 seconds
25 seconds
The stick reader displays messages, such as “Connected”, for a period of time. The length of time that
messages are displayed for can be modified, if required.
Automatic Power
Down
Off
1 minute
5 minutes
10 minutes
15 minutes*
30 minutes
45 minutes
1 hour
This setting modifies the length of time it takes for the stick reader to power down automatically.
Language
English*
Español
Português
Français
Deutsch
Italiano
Dansk
Svenska
The user interface can be displayed in English, Spanish, Portuguese, French, German, Italian, Danish or
Swedish.
This setting may also be changed on the stick reader itself. See Stick reader menu settings on page 6.
Note: When connected to an XR3000 for the first time, the stick reader’s language is set to match the
language of the XR3000.
15
Bluetooth® tab
This tab allows you to modify the stick reader’s Bluetooth settings.
Setting
Options
Explanation
Bluetooth Control
Off
Manual
Auto*
This setting allows you to change the way the stick reader’s Bluetooth wireless connection works. This
setting may also be changed on the stick reader itself. See Stick reader menu settings on page 6.
For more information about Bluetooth wireless connection options, see page 6 or the Technical
Bulletin “XRS Connections”, available on the CD supplied with the stick reader and at
www.tru-test.com.
XRS MAC Address
N/A (read
only)
This is the unique address for the stick reader’s Bluetooth wireless connection module. This address
may be used to confirm the identity of the stick reader when it is searched for by another device such
as a PC.
Clear Paired BT
Device List
N/A
Click on Clear Paired BT Device List to remove all previously paired devices from the stick reader’s
list of paired devices. You may want to do this to speed up automatic connection to a new XR3000, or
to prevent connection to a device that you accidentally paired to.
Set XRS Bluetooth
PIN
Set PIN to
0000*
Set PIN to
default
When pairing the stick reader with another Bluetooth enabled device (for example a mobile phone),
you may need to reset the stick reader’s Bluetooth PIN number. This may be because the device will
only accept a PIN number comprising of either alphabetic characters or numeric characters.
By default, the stick reader’s Bluetooth PIN number is set to 0000 (numeric characters), however if
you need to change it to default (alphabetic characters), select Set PIN to default.
If you are having trouble pairing the stick reader with another device, try resetting the PIN then repeat
the steps for pairing.
Reading Tags tab
This tab allows you to modify the way the stick reader reads tags.
Setting
Options
Explanation
Read Mode
Standard*
Continuous
Single
When set to Standard, the stick reader begins scanning when the Read button is pressed. Scanning
continues for the length of time set in the Read Time option (default is 3 seconds) or until a tag is read
if this is sooner. If the Read button is held down continuously, the stick reader will continue to scan
and therefore read multiple tags. ‘Standard’ is the recommended setting for general use.
When set to Continuous, the stick reader begins scanning when the Read button is pressed and it only
stops when the Read button is pressed again. This setting is useful if you want to scan every animal in
a pen or race.
When set to Single, the stick reader behaves as it would in Standard mode, except that even if the
Read button is held down, the stick reader won’t continue scanning after it reads the first tag. To scan
for another tag, the Read button must be released and pressed again.
This setting may also be changed on the stick reader itself. See Stick reader menu settings on page 6.
Read Time
1 second
2 seconds
3 seconds*
5 seconds
10 seconds
15 seconds
20 seconds
If the Read Mode is set to Standard or Single the Read Time setting determines the length of time the
stick reader takes to scan for a tag.
EID Output Format
Standard*
No space
Hexadecimal
This setting allows you to change the way EIDs are stored and output from the stick reader. The
options are Standard (e.g. 982 0000000123456), No space (e.g. 9820000000123456) and
Hexadecimal (e.g. 8000F58000000001).
Check for
Duplicates
Enabled*
Disabled
You can change the way the stick reader handles a duplicate ID within the same session.
If Check for Duplicates is enabled, each time a tag is scanned, the stick reader will check the EID
against the last 500 tags scanned in the session. If a duplicate ID exists, a message appears on the
LCD and the stick reader beeps differently. The duplicate ID is not saved.
If Check for Duplicates is disabled, the stick reader will store any duplicate IDs in the session.
This setting may also be changed on the stick reader itself. See Stick reader menu settings on page 6.
Read non-animal
tags
Enabled
Disabled*
This setting allows non-animal tags to be read (EID tags used in industry). EID tags used for animal
identification should be programmed as animal tags. However in some cases tags are supplied that are
programmed as non-animal.
16
Data tab
This tab allows you to change the way the stick reader manages data.
Setting
Options
Explanation
Alerts
Disabled*
Enabled
The Alerts setting must be enabled in order to receive alerts about a particular animal during scanning.
See Receiving alerts during scanning on page 5.
Alerts may be enabled or disabled on the stick reader itself (see Stick reader menu settings on page 6,
however an alerts file must be created using another application (e.g. Excel) and EziLink used to export
it to the stick reader. See Exporting an alerts file to the stick reader using EziLink on page 11.
New Session on
Power Up
Disabled*
Enabled
If this setting is enabled, the stick reader will automatically start a new session each time the stick
reader is switched on.
Note: You may want to change the Auto Power Down setting to be longer if using this feature.
Alert If Animal
In Alert List*
Not in Alert
List.
This setting allows you to determine whether an alert will be received for animals listed in the alerts
file, or animals that are not included in the alerts file. For example, if you were loading a group of
animals onto a truck and wanted to identify animals that did not belong in the group (stray animals),
you could set up the stick reader to alert you to animals not included in the alerts file.
Date Time tab
This tab allows you to change the stick reader’s date and time. The date and the time settings are recorded against the animal ID during a
scanning session. When the session is transferred to a PC, the date and time are columns in the resulting file. The filename, by default, also
contains the date of the first scanned record in the session.
Setting
Options
Explanation
Synch XRS to PC
Date/Time
N/A
Allows you to synchronise the stick reader’s date and time with the settings on the PC.
Set Time
N/A
To change the time:
1
Beside the time field, click to select the digits you want to change.
2
Either type in the required digits
– or –
Click on the arrows beside the time field.
3
Click to select a.m. or p.m.
4
Either type a or p
– or –
Click on the arrows to toggle between a.m. and p.m.
Set Date
N/A
To set the date:
1
Beside the date field, click to select the digits you want to change.
2
Either type in the required digits
– or –
Click on the drop-down arrow beside the date field to view the calendar. Use the scroll arrows on
the left and right hand side of the calendar to change the month. Click to select a date.
3
Click Close.
Custom Field tab
This tab allows you to create a custom field. See Customising the custom field using EziLink on page 10.
Setting
Options
Explanation
Custom Field
Disabled
Enabled*
The Custom Field setting must be enabled in order to add information about each animal during
scanning. See Adding custom field information during scanning on page 5.
A custom field may be enabled or disabled on the stick reader itself (see Stick reader menu settings on
page 6), however a custom field can only be customised and edited in EziLink. See Customising the
custom field using EziLink on page 10.
17
About tab
This tab allows you to view the properties of the stick reader. The stick reader properties may be required during Troubleshooting.
Setting
Options
Explanation
Software Version
N/A (read
only)
Version of software used by the stick reader. To update the stick reader’s software, see Updating the
stick reader’s on page 14.
Serial Number
N/A (read
only)
The stick reader’s serial number.
Battery Charge
Level
N/A (read
only)
The stick reader battery’s charge level. The battery charge level can also be viewed on the stick
reader’s LCD. See Parts of the stick reader LCD on page 4.
Clear Configuration tab
The tab allows you to reset the stick reader settings to default values. Resetting stick reader settings to default values will not alter previously
recorded records or sessions.
Setting
Options
Explanation
Clear All XRS
Configurations to
their Default
Values
N/A
Click on Clear All XRS Configurations to their Default Values to reset the stick reader
settings to default values, as indicated by the asterisks on the settings throughout this table.
Defaults are marked *
18
Troubleshooting
Symptom
Cause
Solution
The stick reader has
switched off
unexpectedly.
The stick reader automatically
switches off after a period of
inactivity. This is normal behaviour
when default settings are applied,
however the settings are
configurable.
Change the length of time it takes for the stick reader to automatically power
down, or disable Automatic Power Down, see EziLink XRS Configuration
Reference on page 15 (User Interface tab, Automatic Power Down setting).
The internal battery is flat.
Recharge the battery. See Charging the internal battery on page 2.
The stick reader won’t
record an EID twice in a
session.
This is normal behaviour when
default settings are applied.
To allow the stick reader to record EIDs twice, disable DUPLICATES in the
stick reader settings. See Modifying the stick reader settings on page 4.
During scanning, the stick
reader’s LCD displays a
flag and the resulting
session file contains
unwanted custom field
information.
CUSTOM FIELD has been set to
ON. A custom field has previously
been set up and this feature has
not been disabled.
Disable CUSTOM FIELD in the stick reader settings, see Modifying the stick
reader settings on page 4.
During scanning, the stick
reader beeps, the handle
vibrates and a message
appears on the LCD when
a particular animal ID is
scanned.
ALERTS has been set to ON.
Alerts have previously been set up
and this feature has not been
disabled.
Disable ALERTS in the stick reader settings, see Modifying the stick reader
settings on page 4.
The stick reader records
the EID tags in a
particular format and this
format isn’t suitable.
The stick reader has been set to
store EID tags in Standard format
982 000000012345, No space
format (e.g. 9820000000123456)
or Hexadecimal format (e.g.
8000F58000000001).
Change the EID Output Format, see EziLink XRS Configuration Reference on
page 15 (Reading Tags tab, EID Output Format setting).
EIDs display in Excel as
scientific numbers, e.g.
982000000123456
displayed as 9.82E+14
EziLink has been set to import
sessions in a NLIS or .csv format
and the EID information doesn’t
display correctly when opened in
Excel.
Change the file format to .xls, see Changing the file format using EziLink on
page 9 or, change the EID Ouput Format to include a space, see EziLink XRS
Configuration Reference on page 15 (Reading Tags tab, EID Output Format).
The stick reader starts a
new session each time the
stick reader is switched
on.
New Session On Power Up has
been set to On.
Disable New Session On Power Up. See EziLink XRS Configuration
Reference on page 15 (Data tab, New Session On Power Up setting). To start a
The stick reader only
scans for an EID tag for a
short time.
Read Mode has been set to
Standard or Single and the stick
reader has been set to scan for an
EID tag for a set period of time.
You can extend the scan time OR you can change the way the stick reader
scans for an EID by changing the Read Mode to continuously scan:
To change the length of time it takes for the stick to scan for an EID tag, see
EziLink XRS Configuration Reference on page 15 (Reading Tags tab, Read
Time setting).
To change the way the stick reader scans for an EID tag, change the Read
Mode to Continuous. In Continuous mode, the stick reader begins scanning
when the Read button is pressed and it only stops when the Read button is
pressed again. This setting is useful if you want to scan every animal in a pen
or race.
To change the Read Mode, see Modifying the stick reader settings on page 4.
new session manually, select START NEW SESSION from the stick reader
settings (see Modifying the stick reader settings on page 4).
19
Symptom
Cause
Solution
The stick reader keeps on
scanning for a tag
continuously unless the
Read button is pressed
again.
Read Mode has been set to
Continuous.
To change the way the stick reader scans for an EID tag, change the Read
Mode to Standard or Single.
In Standard mode, the stick reader begins scanning when the Read button is
pressed. Scanning continues for the length of time set in the Read Time option
(default is 3 seconds) or until a tag is read if this is sooner. If the Read button
is held down continuously, the stick reader will continue to scan and therefore
read multiple tags. ‘Standard’ is the recommended setting for general use.
In Single mode, the stick reader behaves as it would in Standard mode, except
that even if the Read button is held down, the stick reader won’t continue
scanning after it reads the first tag. To scan for another tag, the Read button
must be released and pressed again.
To change the Read Mode, see Modifying the stick reader settings on page 4.
The stick reader only
scans one tag, even
though I hold the Read
button down
continuously.
Read Mode has been set to
Single.
In Single mode, the stick reader will only read the first scanned tag, even if the
Read button is held down continuously. To scan for another tag, the Read
button must be released and pressed again.
To change the way the stick reader scans for an EID tag, change the Read
Mode to Standard or Continuous.
In Standard mode, the stick reader begins scanning when the Read button is
pressed. Scanning continues for the length of time set in the Read Time option
(default is 3 seconds) or until a tag is read if this is sooner. If the Read button
is held down continuously, the stick reader will continue to scan.
In Continuous mode, the stick reader begins scanning when the Read button is
pressed and it only stops when the Read button is pressed again.
To change the Read Mode, see Modifying the stick reader settings on page 4.
The stick reader doesn’t
beep when a tag is
scanned or the stick
reader is switched on etc.
The Beeper setting has been
disabled.
Enable the Beeper setting. See EziLink XRS Configuration Reference on page
15 (User Interface tab, Beeper setting).
The stick reader isn’t
vibrating when I scan a
tag etc.
The Vibrator setting has been
disabled.
Enable the Vibrator setting. See EziLink XRS Configuration Reference on page
15 (User Interface tab, Vibrator setting).
The stick reader will not
connect to the indicator.
Depends on the type of connection
– serial cable or Bluetooth wireless.
Refer to the Technical Bulletin “XRS Connections”, available on the CD
supplied with the stick reader and at www.tru-test.com.
The stick reader will not
connect to the PC.
Depends on the type of connection
– serial cable or Bluetooth wireless.
Refer to the Technical Bulletin “XRS Connections”, available on the CD
supplied with the stick reader and at www.tru-test.com.
EziLink does not ‘see’ the
stick reader.
The stick reader must be connected
to the PC and switched on before
EziLink is launched.
1
The Bluetooth wireless
connection between the
stick reader and the
indicator keeps dropping
out.
The signal strength or link quality
may be poor.
Refer to the Technical Bulletin “XRS Connections”, available on the CD
supplied with the stick reader and at www.tru-test.com.
Reduced read range or
responsiveness.
Another EID reader (especially a
panel reader) may be in the vicinity.
An electrical device e.g. PC
Monitor, variable speed drive (as
used in a dairy shed), may be
causing interference.
Turn off the other EID reader or electrical device or use the stick reader in an
area well away from the device causing interference.
The LCD looks washed
out.
This can be caused by extreme
temperatures.
Adjust the CONTRAST in the stick reader settings, see Modifying the stick
reader settings on page 4.
20
2
3
Ensure that the stick reader is connected to the PC properly (see Using
EziLink on page 3).
Turn on the stick reader.
Launch EziLink.
Symptom
Cause
Solution
Battery goes flat too soon.
At temperatures below 5 °C or
above 40 °C, the battery may
appear to be charging, but can’t
actually accept much charge at
those temperatures.
Always charge the battery at temperatures between 5 °C and 40 °C.
The displayed battery charge level
is only accurate five minutes after
being disconnected from the power
supply.
Wait for five minutes before gauging the battery charge level.
Lithium Ion batteries naturally lose
some of their capacity each year
depending on the temperature and
battery state, and eventually need
to be replaced.
Loss of capacity can be minimised by storing the stick reader in a cool place,
and with the battery only half full. It is better to recharge the battery before
use rather than after use.
Replace battery, if required (Tru-Test part number 813295).
There are two or more EID tags in
the read zone.
During scanning, position the stick reader or adjust the scanning setup area so
that only one tag at a time is in the read zone.
EID tag is not ISO11784/ISO11785
compliant HDX or FDX.
Contact the supplier of the EID tags.
Tag not reading at all.
EID tag is faulty or not
programmed by the manufacturer.
VIDs not displaying, even
though a cross-reference
file has been transferred
to the stick reader.
The format of the cross-reference
file may not be correct.
Check the formatting rules for a cross-reference file. See Exporting a crossreference file to the stick reader using EziLink on page 8.
Alerts not working, even
though an alerts file has
been transferred to the
stick reader.
The format of the alerts file may
not be correct.
stick reader using EziLink on page 11.
Stick reader displaying
“Animal not on list!!!”
when a tag is scanned.
The stick reader has been set to
send an alert for any animals not
included in the alerts file.
Change the setting for Alert if Animal to In Alert List. See EziLink XRS
Configuration Reference on page 15 (Data tab, Alert if animal setting).
Scanning records being
over-written.
Stick reader memory is full.
When the stick reader’s memory is full (20,000 scan capacity), the stick reader
will begin to overwrite the oldest scan records.
Transfer sessions to a PC using EziLink. See Importing one or more scanning
sessions from the stick reader using EziLink on page 9. Clear unwanted session
data from the stick reader. See Clearing all sessions using EziLink on page 13.
Check the formatting rules for an alerts file. See Exporting an alerts file to the
Caring for the stick reader
Wipe the stick reader clean using a damp cloth, warm water and soap. Other cleaners may damage the case. Do not immerse the stick reader in
water.
Store the stick reader in a cool, dry place.
Fit the dust cap when there are no cables connected to the stick reader. This will prevent moisture and dirt from entering the socket.
Service and warranty information
For service and warranty information, see www.tru-test.com.
21
Specifications
Size
651 x 65 x 51 mm (25½ x 2½ x 2”) (L x H x W)
Weight
706 g, including battery
Communications
Bluetooth® Class 1 wireless connection, up to 100 m (330’) range.
RS232 9600-115200 bps, Xon/Xoff
Operating temperature
-10 to +50 °C (+14 to +122 °F).
Storage temperature
-20 to +35 °C (-4 to +95 °F).
Battery charging temperature
+5 to +40 °C (+41 to +104 °F).
Read distance
HDX up to 330 mm (13“), FDX up to 350 mm (14“).
Read rate
Up to 1000 reads per minute.
Memory capacity
Up to 20,000 scanned records
Up to 10,000 alerts
Up to 20,000 EID-VID pairs
Tag compatibility
Reads ISO HDX and ISO FDX-B
Ingress protection
IP67 (immersion in 1 m (3’) of water for 30 minutes).
Battery life
19 hours – Read Mode = Standard or Single
9.5 hours – Read Mode = Continuous
Battery
7.4 V, 1500 mAh Lithium Ion
Charging time
3 hours
Software
Tru-Test EziLink™
FCC notice
This device complies with part 15 of the FCC Rules. Operation is subject to the following two conditions: (1) This device may not cause harmful
interference, and (2) this device must accept any interference received, including interference that may cause undesired operation.
This equipment has been tested and found to comply with the limits for a Class B digital device, pursuant to part 15 of the FCC Rules. These limits
are designed to provide reasonable protection against harmful interference in a residential installation.
This equipment generates, uses and can radiate radio frequency energy and, if not installed and used in accordance with the instructions, may
cause harmful interference to radio communications. However, there is no guarantee that interference will not occur in a particular installation. If
this equipment does cause harmful interference to radio or television reception, which can be determined by turning the equipment off and on, the
user is encouraged to try to correct the interference by one or more of the following measures:
- Reorient or relocate the receiving antenna.
- Increase the separation between the equipment and receiver.
- Connect the equipment into an outlet on a circuit different from that to which the receiver is connected.
- Consult the dealer or an experienced radio/ TV technician for help.
FCC warning
Note: Users are cautioned that changes or modifications not expressly approved by the party responsible for compliance could void the user's
authority to operate the equipment.
Industry Canada notice
This radio transmitter, model XRS-2, has been approved by Industry Canada to operate only with its integral antenna.
This device complies with Industry Canada licence-exempt RSS standard(s). Operation is subject to the following two conditions:
(1) this device may not cause interference, and
(2) this device must accept any interference, including interference that may cause undesired operation of the device.
Tru-Test Limited hereby declares that this EID Reader is in compliance with the essential requirements and other relevant provisions of
Directive 1999/5/EC. The declaration of conformity may be consulted at http://www.tru-test.com/weighing/pdfs/EC_DoC_XRS-2.pdf.
22
Index
Adding custom field information during scanning, 5
Alerts
clearing, 15
creating, 13
example of alerts for animals not in list, 14
example of alerts with messages, 14
example of alerts without messages, 14
exporting to the stick reader, 13
receiving messages during scanning, 5
EziLink
installing, 3
using, 17
FCC notice, 24
File format
changing, 10
Importing one or more scanning sessions from the stick reader
using EziLink, 10
Battery
alternative charging methods, 7
changing, 8
charging, 2
Industry Canada notice, 24
Caring for the stick reader, 23
Parts of the stick reader, 3
Changing the battery, 8
Parts of the stick reader LCD, 4
Changing the file format using EziLink, 10
Receiving alerts during scanning, 5
Clearing all alerts using EziLink, 15
Scanning an EID tag, 4
Clearing all sessions using EziLink, 15
Servicing information, 23
Clearing all sessions, EID-VID pairs and alerts using EziLink, 16
Sessions
clearing, 15
importing from the stick reader, 10
Cross-reference file
exporting to the stick reader, 8
Custom field
adding information during scanning, 5
customising using EziLink, 12
example, 12
Customising the custom field using EziLink, 12
Deleting contents of the stick reader. See Clearing all sessions, EIDVID pairs and alerts using EziLink
EID tag
scanning, 4
LEDs, 4
NLIS, 10
Settings
modifying on the stick reader itself, 4
modifying via EziLink, 17
table of menu options available in EziLink, 17
table of menu options available on the stick reader, 6
Software
updating, 16
Specifications, 24
Stick reader menu settings, 6
Exporting a cross-reference file to the stick reader using EziLink, 8
Troubleshooting, 21
Exporting an alerts file to the stick reader using EziLink, 13
Turn on the stick reader, 4
Turning off the stick reader, 4
Updating the stick reader’s software, 16
Warranty, 23
23