1
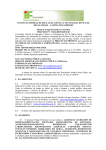
Vetlab Premiere 500
BIOLOGICAL BINOCULAR
MICROSCOPE
USER MANUAL
To obtain the best results from your microscope, please read this manual before using
WARNING: To prevent fire or shock hazard, do not expose this unit to rain or moisture.
CAUTION:
No user-serviceable parts inside. Refer servicing to qualified service personnel.
Premiere® trademark reg. No. 1713212 USA
Vetlab Supplies Ltd Unit 13 Broomers Hill Park Broomers Hill Lane Pulborough RH20 2RY
Telephone 01798 874567 Fax 01798 874787 Email [email protected]
www.vetlabsupplies.co.uk
SPECIFICATIONS
Objectives: Achromatic objectives.
Objective
4x
10x
40x
60x
100x (oil)
Numerical
Aperture
(N.A.)
0.10
0.25
0.65
0.85
1.25
Working
Distance
37.5mm
7.31mm
0.63mm
0.28mm
0.19mm
Total magnifying powers:
Eyepiece &
Auxiliary
Lens
10x wide
field
Objective
4x
10x
40x
60x
100x
40x
100x
400x
600x
1000x
Stage Size:
X-direction movement range:
Y-direction movement range:
Condenser:
Fine focusing range:
Coarse focusing range:
Interpupillary distance between
eyepiece tubes
Magnifying power of the auxiliary
lens:
140x135mm
80 mm
45 mm
Abbe double lens condenser: N.A. = 1.25
with a built in iris diaphragm.
30 mm. One division is 0.0015 mm
30mm
From 55 mm to 75 mm
1x
STANDARD OUTFIT
Biological Microscope
Eyepieces: 10x (wide field)
Achromatic Objectives: 4x, 10x, 40x, 60x, 100x (oil) (fitted)
Replacement halogen bulb: (6V 20W)
Replacement fuse (0.5Amp 250V)
UK Mains Power Lead
Blue and green glass filters. (Blue filter fitted)
Covers for protecting Eyepiece Tubes
Cedar-Wood Oil
Cover for microscope
1
1
1
1
1
1
1
2
1
1
set
pair
piece each
each
each
each
piece each
pieces
bottle
Vetlab Supplies Ltd Unit 13 Broomers Hill Park Broomers Hill Lane Pulborough RH20 2RY
Telephone 01798 874567 Fax 01798 874787 Email [email protected]
www.vetlabsupplies.co.uk
APPLICATION
The Vetlab Premiere 500 Microscope is one of the most modern designed
instruments for clinical examination and teaching demonstrations in laboratories,
colleges and medical fields.
It is also an ideal instrument for biological,
bacteriological, pathological and pharmaceutical research. These microscopes are
equipped with achromatic objectives, planoscope eyepieces, Abbe condenser, built-in
variable light source providing Kohler illumination and coarse and fine focus
adjustment to give a clear sharp image. The magnifying powers range from 40X to
1000X.
The binocular microscope offers the advantage of being able to observe the
specimen with both eyes at the same time, allowing more comfort for the user when
compared to a monocular microscope. The depth of field of the binocular
microscope is longer and a stereo image can be obtained when observing a
specimen.
ASSEMBLY INSTRUCTIONS
1. Remove microscope stand from box and styrofoam packing and place it on a
stable work table.
2. Remove all plastic bags and covering (these can be discarded).
3. Remove binocular head from the packing.
4. Remove the plastic cap covering the neck of the microscope base and the one on
the bottom of the binocular head. Fit the binocular head into the neck of the
microscope stand and tighten with the screw clamp as necessary. The head is
360° rotatable and can be adjusted to any position desired.
5. Remove the plastic eyepiece tube covers and insert eyepieces into each eyepiece
tube.
6. Attach power cord to the back of microscope and connect to power source.
Your microscope is now ready for use.
Vetlab Supplies Ltd Unit 13 Broomers Hill Park Broomers Hill Lane Pulborough RH20 2RY
Telephone 01798 874567 Fax 01798 874787 Email [email protected]
www.vetlabsupplies.co.uk
The Structure of Vetlab Premiere 500 Binocular Microscope
STRUCTURE
1
2
5
3
6
4
7
8
10
9
11
12
1.
2.
3.
4.
5.
6.
7.
8.
9.
10.
11.
Eyepiece
Graduated Diopter Ring
Nosepiece with Objectives
Objective Stage
Adjustable Locking Nut
Tension Control for Focusing Knob
Coarse Focus Adjustment Knob
Fine Focus Adjustment Knob
Mechanical Stage X-Y Adjustment Knob
Condenser with Iris Diaphragm and Filter Holder
Field Diaphragm for Kohler Illumination
12. Dimmer Control for Brightness Adjustment
Vetlab Supplies Ltd Unit 13 Broomers Hill Park Broomers Hill Lane Pulborough RH20 2RY
Telephone 01798 874567 Fax 01798 874787 Email [email protected]
www.vetlabsupplies.co.uk
OPERATING INSTRUCTIONS
Set light dimmer control to lowest intensity. Switch on the power at the mains
and then at the back of the microscope.
Begin by placing a microscope slide containing a specimen to be observed on the
object stage and clamp it carefully with the movable spring clip. Ensure the
specimen is on the top side.
Adjust the light level using the dimmer control. Adjust the interpupillary distance
between the two eyepieces to the most comfortable position for the user. The
left eyepiece is equipped with a diopter adjustment to enable the operator to
focus his/her left eye on the specimen.
Using the X and Y Direction Knobs located just below the stage (on the right
hand side) the specimen may be moved to the center of the stage for
observation. Once the specimen is in focus, the X and Y Direction Knobs may be
adjusted to observe different sections of the specimen.
Begin observation of your specimen with the 4x Objective. Turn the coarse
focusing knob until a clear image is obtained, then use the fine focus knob to
enhance the observation of the specimen to its clearest image. On the coarse
focus knob is a tension control ring (located on the right side of the microscope
against the stand) which can be turned to tighten or loosen the tension of the
focusing knob to the user’s desired setting.
When the desired view is obtained under the lowest power (4x), rotate the
nosepiece to the next higher magnification (10x). The nosepiece should “click”
into position. It should only be necessary to adjust the fine focus knob slightly to
have a clear view of the specimen. As the magnification is increased, the user
may also find adjustments in the various methods of regulating the brightness
(see below) will improve the view of the specimen.
It is important to remember when adjusting the focus that the objective should
never touch the specimen. When increasing to 100x magnification, the objective
will appear to be very close to the slide. Because the 100x is an oil immersion
objective, a drop of immersion oil should be applied in the gap between the
objective and the specimen. The 100x oil immersion objective should be wiped
off with a piece of soft clean cloth or lens tissue to remove the immersion oil
immediately after using.
This microscope is equipped with a “locking nut” (located behind the stage
against the arm of the stand) to help prevent the stage from moving up far
enough to collide with the objectives. This locking nut is pre-set in position at
the factory and should not require adjustment. If you find that the stage is not
moving up far enough to get your specimen in focus, try turning the locking
knob slightly to allow the stage to travel farther.
Vetlab Supplies Ltd Unit 13 Broomers Hill Park Broomers Hill Lane Pulborough RH20 2RY
Telephone 01798 874567 Fax 01798 874787 Email [email protected]
www.vetlabsupplies.co.uk
Regulating brightness of the view:
There are several ways to adjust the intensity of light shining through the specimen,
in order to see things more clearly. In most cases, a better view is obtained by the
use of a coloured glass filter inserted below the iris diaphragm. Slide the filter
holder to the right to reveal an open ring. Insert the blue filter into this ring and
slide the filter holder back into position under the diaphragm.
The iris diaphragm below the stage fitted underneath the condenser can be opened
(slide lever back to left) or closed (slide lever forward) to control the amount of light
directed through the condenser.
The condenser assembly under the stage can be shifted up or down by means of the
control knob (left hand side under stage) to effectively move the light beam closer to
(up) or away from (down) the specimen under observation.
The Vetlab Premiere 500 is also equipped with a field diaphragm installed over
the collector lens for Kohler illumination. Open or close this diaphragm as desired by
rotating the outer ring to control the amount of light aimed at the condenser
assembly.
Finally, the dimmer control also allows the user to adjust the intensity of the halogen
light. Vary these different methods of regulating the light beam on the specimen to
obtain the most effective picture for your eyes.
As a general rule you will find that the higher the magnification you use, the more
light is required and so all light controls will need to be increased.
After using your microscope, turn the dimmer control to the lowest setting and turn
off the power to prolong the life of the halogen bulb.
MAINTENANCE
Like other optical instruments, this microscope should be kept in a cool, shady and
dry place, free from dust, fumes and moisture. If not stored in its box, cover with a
hood to protect from dust.
If there is any dirt settled on the lens, wipe it off gently with some lens paper. If
alcohol is used, be careful not to let it penetrate through the lenses and dissolve the
gumming. Any dust settled on the lenses can be blown away with an air blower or
wiped off with a clean soft camel hair brush.
Please keep the original packing for shipment in case of need for repair or servicing.
Vetlab Supplies Ltd Unit 13 Broomers Hill Park Broomers Hill Lane Pulborough RH20 2RY
Telephone 01798 874567 Fax 01798 874787 Email [email protected]
www.vetlabsupplies.co.uk
IMPORTANT: Use of Immersion Oil
The only objective requiring oil is the x100 objective. However, once oil is used it
must be wiped off the objective (and possibly the slide) with a lens tissue otherwise
it can ruin the lens. The use of oil also can lead to contamination of the x40
objective if it is not cleaned off immediately. Unfortunately, it is common for busy
operators to forget to do this.
We strongly recommend that you try to use the x40 or x60 objectives first,
whenever possible, when attempting to examine stained smears (including those
stained for viewing bacteria) before using the x100 objective.
Bulb Replacement:
Note: The new bulb must be the same specification as the old bulb (6V 20W)
Unplug the unit from power source. Allow bulb to cool before removal. (It will
become very hot during use).
Loosen the screw knob on the underside of microscope and open the panel to
expose the bulb.
Use a small screwdriver to loosen the screws holding the prongs of the halogen
bulb (the two screws closest to the bulb). Note that the prongs of the bulb are
held in place by small brass plates which shift slightly when the screws are
loosened.
Remove the old bulb. Important: Do not touch the new halogen bulb with bare
hands. Wear gloves or hold the bulb using tissue or lens paper. Body oils may
damage the halogen bulb.
Insert prongs of replacement bulb into top of socket (above the brass plate) and
tighten screws slightly. (The brass plates will move up to hold the prongs in
place.)
Close door and hand tighten the thumbscrew knob.
Fuse Replacement:
Unplug the unit from power source.
Open the fuse holder by unscrewing the knob in the direction of the arrow.
Remove the old fuse and insert a replacement fuse with the same specification
as the old one.
Replace the fuse holder and screw in place.
Vetlab Supplies Ltd Unit 13 Broomers Hill Park Broomers Hill Lane Pulborough RH20 2RY
Telephone 01798 874567 Fax 01798 874787 Email [email protected]
www.vetlabsupplies.co.uk
For your all your microscope consumable needs please telephone us for our latest
price list or visit our website:
www.vetlabsupplies.co.uk
The manufacturer warrants this instrument to be free from defects in material and workmanship
under normal use for two years from the date of purchase (one year for electrical
components). It does not cover damage resulting from abuse or misuse, repairs or alterations
performed by other than authorised repair technicians, or damage occurring in transit.
If you have any problems with your Vetlab Premiere 500 microscope during the two year
warranty period, please contact:
Vetlab Supplies Ltd.
Unit 13 Broomers Hill Park, Broomers Hill Lane, Pulborough, West Sussex, RH20 2RY
Tel: 01798 874567 Fax: 01798 874787 Email: [email protected]
Please retain original box and packing in case your microscope needs to be returned. It will be
repaired or replaced at no charge and returned to you. If misuse, alterations, accident or
abnormal conditions of operation caused failure, an estimate for repairs will be provided for your
approval prior to work being performed.
Vetlab Supplies Ltd Unit 13 Broomers Hill Park Broomers Hill Lane Pulborough RH20 2RY
Telephone 01798 874567 Fax 01798 874787 Email [email protected]
www.vetlabsupplies.co.uk