1
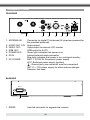
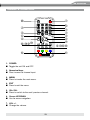
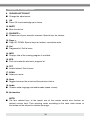
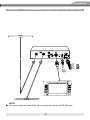
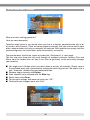
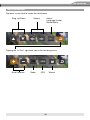
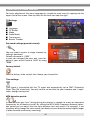
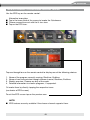
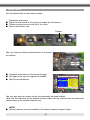
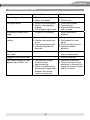
MODEL N0:
2-CH DIVERSITY DVB-T TUNER
USER MANUAL
GERMAN/English
Contents
Contents ....................................................................................................................... 24
Features and accessories ..................................................................................... 25
Safety instructions ............................................................................................ 26-27
connecTIONs ................................................................................................................ 28
Remote control ................................................................................................... 29-30
Replacing the batterY ............................................................................................. 31
Connect AV Monitor ..................................................................................................32
Connect touchscreen compatible CONTROL UNIT .......................................... 33
Placing and connecting antennas ..................................................................... 34
GENEral HANDLING ...................................................................................................... 35
SCAN for AVailable carriers ..................................................................................36
Main menu choices .....................................................................................................37
Status settings ........................................................................................................... 38
quick menu ................................................................................................................... 39
carrier installation ................................................................................................. 40
choosing program channels ............................................................................... 41
installation menu ...................................................................................................... 42
electronic program guide .................................................................................... 43
teletext ......................................................................................................................... 44
troubleshooting ...................................................................................................... 45
specifications ............................................................................................................. 46
WARRAnty ................................................................................................................. 47-48
24
ZE-DVBT50
Features
■ 2-CH antenna diversity system
■ AFS-Function with automatic carrier adaption
■ Touchscreen compatible with ZENEC E>GO naviceiver models
■ PAL/NTSC compatible incl. MPEG2 decoder
■ 24-Bit audio D/A converter
■ Multilingual OSD-Menu
■ Electronic program guide (EPG)
■ Teletext and subtitles
■ Manual and automatic channel scan
■ 400 TV program presets
■ 1 x RCA A/V-Output
■ Separate IR-remote sensor with extension cord
■ Active digital TV antennas supplied with set
■ IR-remote control
Accessories
■ User manual
■ ZE-DVBT50 main unit
■ DIN ➝ DIN connector
■ Power cable
■ IR-sensor with cable
■ 2 x active DVB-T antennas
■ Mounting material
■ IR-remote control
25
Safety instructions
The exclamation point within an equilateral triangle is intended to alert the user of the
presence of important operation and servicing instructions in the literature accompanying
the device.
WARNING:TO REDUCE THE RISK OF FIRE OR ELECTRIC SHOCK, DO NOT EXPOSE
THIS DEVICE TO RAIN OR MOISTURE.
The apparatus shall not be exposed to dripping or splashing, and no objects filled with
liquids, such as beverage cans, bottles and alike, shall be placed on the apparatus.
IMPORTANT SAFEGUARDS
In addition to the careful attention devoted to quality standards in the manufacture of your
DVB-T product, safety is a major factor in the design of every instrument. However, safety is
your responsibility, too. This and the following page lists important information that will help
to assure your enjoyment and proper use of the DVB-T product and accessory equipment.
Please read them carefully before using your DVB-T product.
Installation
1.Read and follow instructions – All the safety and operation instructions should be read
before the DVB-T product is operated.
2.Retain instructions – The safety and operating instructions should be retained for future
reference.
3.Heed all warnings – Comply with all warnings on the DVB-T product and in the operating
instructions.
4.Power sources – This DVB-T product should be operated only from the type of power
source indicated on the marking label. If you are not sure of the type of power supply,
consult your ZENEC dealer. For DVB-T products intended to operate from battery power,
or other sources, refer to the operating instructions.
5.Attachments – Do not use mounting accessory unless recommended by the DVB-T
product manufacturer as they may cause hazards.
6.Electrically operated equipment or accessories connected to this unit should bear safety
certification mark on the accessory itself and should not be modified so as to defeat the
safety features. This will help avoid any potential hazard from electrical shock or fire.
If in doubt, contact qualified service personal.
26
ZE-DVBT50
Safety instructions
7.Cleaning of device – Turn off the unit before cleaning. Do not use liquid cleaners or aerosol
cleaners. Use a damp cloth for cleaning.
8. Objects that may touch dangerous voltage points or “short-out” parts could result in a
fire or electric shock. Never spill liquid of any kind on the DVB-T product.
9. Service – Do not attempt to service this DVB-T product yourself, as opening or removing
covers may expose you to dangerous voltage or other hazards. Refer all servicing to
qualified service personal.
10.Conditions requiring service – Unplug this DVB-T product from the power circuit and
refer servicing to qualified service personal under the following conditions:
A.When the power supply cord or plug is damaged.
B.If liquid has been spilled, or have entered the DVB-T product.
C.If the DVB-T product has been exposed to rain or water.
D.If the DVB-T does not operate normally by following the operating instructions.
E.If the DVB-T product has been dropped or housing has been damaged.
F.When the DVB-T product exhibits a distinct change in performance this indicates a
need for service.
11.Heat – The product should be situated away from heat sources.
12. According to the law in different European countries, driving with monitors which are
showing movies in the viewing range of the driver is not allowed, because the driver
might be distracted from the traffic. Please respect the traffic regulations of your
country, or you might face penalties in case of an accident or even loose your insurance
cover. Please pay attention to the volume inside your vehicle, because you are obliged
to notice exterior sounds like a police siren.
This Unit has been manufactured to satisfy international safety standards.
27
connections
FRONTSIDE
①
w
③
④
⑤
⑥
⑦
1.ANTENNA IN:Connector for digital TV antennas (5V phantom powered for
the provided antennas)
2. AUDIO OUT L/R: Audio output
3. VIDEO OUT:
Video output to external LCD monitor
4. RGB OUT:
RGB output to E>GO
5. POWER LED:
Green light indicates that power is on
6. IR IN:
Infrared external cable connector
Blue light indicates that power is on, red signal standby
7. DC POWER:
BATT +12/24V IN: Permanent power supply
ACC: Switched power supply (ignition)
: Ground (only one connector must be connected)
ANT. P: + 12V power supply for other antenna designs
Detector: Not used
BACKSIDE
RS232
①
1. RS232:
Use that connector to upgrade the receiver.
28
ZE-DVBT50
Remote control
•)
q
t
u
u
e
i
o
•# •$•^•%
w
r
y
i
•* •( •&•)
•@
•!
1.POWER
■ Toggle the unit ON and OFF.
2. Numerical keys
■ Direct numerical channel input.
3. MENU
■ Press to invoke the main menu.
4. EXIT
■ Press to exit the menu.
5. CH+/CH■ Press to switch to the next/ previous channel.
6. Cursor UP/DOWN
■ Use for menu navigation.
7. VOL +/■ Change the volume.
29
remote control
8. CURSOR LEFT/RIGHT
■Change the adjustments.
9.OK
■Press OK to acknowledge your choice.
10. MUTE
■ Mute the device.
11. FAVORITE +■ Choose one of your favourite channels. Special keys for teletext.
12. Page +■ Page UP/ DOWN. Special keys for teletext, see bottom note.
13. List
■ Programmlist. Exit to leave.
14. INFO
■ Displays info of the running program if available.
15. EPG
■ Push to invoke the electronic program list.
16. TXT
■ Invoke teletext. Exit to leave.
17. SCAN
■ Autoscan carrier.
18. Back
■ Toggles between the actual and the previous choice.
19. Audio
■ Choose audio language and audio mode (mono, stereo).
20. No function
Note:
■ The four colored keys at the lowest row of the remote control also function as
teletext custom keys. Their meaning varies according to the color code shown at
the bottom of the respective teletext message.
30
ZE-DVBT50
replacing the battery
Replacing the battery of the remote control unit
■ When the range of the operation of the card remote control deteriorates or has no
function at all, replace the lithium battery type 2025 with a new one.
1. Open the back cover of the remote control.
2.Insert the button-type battery with the stamped (+) mark facing upwards, directly under
the small metal tongue. Close the back cover.
Warning:
■ Store the battery where children cannot reach it. If a child accidentally swallows the
battery, consult a doctor immediately.
■ Do never recharge, short-circuit, disassemble or heat up the battery nor dispose it in fire
as this might cause it to explode. Lithium batteries, even more than other battery types,
are prone to explode when they become excessively hot.
■ Do not expose or bring the battery into contact with any other metallic material as it will,
most likely, short-circuit the battery.
■ For the very same reason, when throwing away or storing the battery, wrap it in tape or
insulate it somehow.
31
connect AV monitor
Green
Black
Blue
Black
Red
Yellow
Monitor
32
12V-24V
ZE-DVBT50
connect touchscreen compatible control unit
Green
Grün
Black
Schwarz
Blue
Blau
Black
Schwarz
Red
Rot
Yellow
12V-24V
Gelb
Connect to control unit
Naviceiver
Note:
■ For touchscreen only operation, you may omit to connect the IR-Receiver.
33
Placing and connecting Antennas
Note:
■ Reception quality is largely dependent on proper positioning of the antennas.
Please keep that in mind, when mounting.
■ Do not place them under any metal obstacle (car roof) or metal coated screen (i.e. full screen heating or insulation).
■Bear in mind that you have to place the two antennas as far as possible from each other
to achieve a good reception.
■A direct and non obstructed line-of-sight of the antennas to the sky is mandatory for
best results.
x
x
■Lay the cables for the antennas first. Check for correct wiring. Clean the surface where
the antennas will be mounted. Make sure it is dry and free of any greasy substances.
Strip the protective sheet from the adhesive backside and push the antennas firmly into
their final position.
■Reception differs a lot regionally.
You may encounter distortions in some densely populated areas or in cities with sky
scrapers.
34
ZE-DVBT50
general handling
■ To invoke the main menu tap into the upper third of the touchscreen.
■ To execute a choice in that menu you always have to tap twice: Choose and
acknowledge.
■ Tapping into the lower third of the screen invokes a menu which allows you to scroll
through programs, teletext and EPG.
■ Invocation of one menu always terminates the other one.
■ To set your menu language refer to chapter “Installation menu”.
35
Scan for available carriers
First time use or significant relocation make it necessary to scan/rescan for available carriers.
Use the scan key of the remote control to directly initiate a channel scan.
Or alternatively:
Tap in the upper third of the screen to invoke the
main menu.
Then tap:
Installation
Autoscan
Choose the country using the scrollbar.
Tap OK to start the scan.
The unit will now scan the entire frequency range for
all available carriers.
Any carrier usually contains several TV program
channels.
36
ZE-DVBT50
Main menu choices
Channel View
The Channel View offers you an overview of all
available channels.
Tap ▲ or ▼ to scroll through
the programlist.
Viewer’s Preference
Shows you and lets you change the status of a program channel.
▲
▲
Status settings in short:
Tap ▲ or ▼ to choose the channel.
Tap or for status change.
Choices are:
Favorite
Delete
Lock
Skip
Clean
Tap OK to acknowledge.
Alternative:
Use ▲ or ▼ to choose the channel oder tap it directly. Set the desired Status-Icons.
Tap Ok to acknowledge.
37
Status settings
What are status settings good for ?
Here are some examples:
Favorites might come in very handy when you live in a densely populated area with a lot
of carriers and channels. There are some program channels that you tend to watch more
often, whereas others will only occasionally be watched. With favorites you simply skip the
uninteresting ones, but leave them, quite convieniently, accessible.
Tap into the lower third of the screen to invoke the “Quickmenu” (s. next page).
The first two icons (from the left) scroll through all available channels, whereas Plus and
Minus from the second icon set (tap U-turn icon to get there) scrolls exclusively through
your favorites.
■
■
■
■
■
■
You might have children which you don´t allow to access all channels. Simply secure
the excluded ones with a password by setting the status flag to Lock. Be aware, that a
new “Autoscan” disables the password protection.
Remove single channels with Delete.
Mark channels to be skipped with the Skip flag.
Reset status with Clean.
To save your settings and leave the menu use “OK”.
To discard your changes leave with “Exit”.
38
ZE-DVBT50
Quickmenu
Tap lower screen third to invoke the Quickmenu.
Prog. Up/Down
VolumeAdjust:
Language (Audio)
Stereo/Mono
Tapping the “U-Turn” sign leads you to the remaining icons:
Scroll favoritesRadioEPGTeletext
39
Carrier installation
This menu allows you to inspect, add and delete a carrier. You can
also autoscan for all available carriers.
Add carrier
Choose the country first. As you did not launch
an autoscan you are expected to identify the
desired carrier by either channel number or
frequency. The program will then compute the
lacking parameters. Tap OK. If the receiver is in
range of the desired carrier it will now tune in.
If something went wrong, the display will show
“No carrier found”. If the frequency change
does not start immediately, switch the unit OFF and ON again.
Carrier information
This part will give you all available information
concerning the chosen carrier. Tapping OK will
initiate a rescan.
Delete carrier
Choose a carrier. Tap OK to delete. This procedure will also erase all carried programs.
AUTO SCAN
(see “Scan for available carriers”).
40
ZE-DVBT50
Choosing program channels
You may choose program channels in three different ways:
Choose by channel number
Directly type in the channel number using the remote control.
Acknowledge with OK to skip waiting for the second digit.
Via the Channel View directly on-screen or using the remote
Use the CH+/CH- keys of the remote control to scroll through the channels. Alternatively
you may also use the touchscreen. Tap in the upper screen third to invoke the main menu.
Choose Channel View and select the desired channel using the on-screen cursor icons.
Acknowledge with OK.
Electronic program guide
The EPG offers you a list of the currently running shows and additional info regarding their
content.
1.)Press the EPG key of the remote control or tap the EPG icon on the Quickmenu.
2.)Choose the desired channel using the cursor keys.
3.)Press OK to acknowledge your channel selection, getting into the channel preview.
You can choose via touchscreen or using the right-hand rotary knob.
Tap into the preview area to exit EPG and switch to fullscreen.
41
Installation menu
For basic adjustments like menu language etc. invoke the main menu by tapping into the
upper third of the screen. Now tap twice on the third icon from the right.
TV-Settings:
■ Language
■TV Screen
■ Mode
■ Audio Mode
■ Transparency
■ Banner Timeout
Password settings (parental control):
You may protect access to single channels by
setting a password.
Default password is: “0000”.
In case you changed the pass and have forgotten it, you can set it back to “0000” by using
“9999”.
Factory default:
Reset to delivery state, except that it keeps your channel list.
Time settings:
Time signal is transmitted with the TV signal and automatically set to GMT- Greenwich
Mean Time (UK wintertime). You only have to set an offset for your timezone and, if applicable, daylight saving time.
MFN detection period:
In case a carrier gets “lost” during driving the receiver is capable to search on alternative
frequencies for an identical carrier. By setting the MFN (Multi-Frequency-Network) detection period you can adjust the time span between loss and search. For example, if you
frequently drive through the same tunnel you ideally set your detection period slightly longer
in order to avoid unnecessary searching.
42
ZE-DVBT50
Electronic program guide (EPG)
Use the EPG key on the remote control.
Alternative invocation:
■Tap in the lower third of the screen to invoke the Quickmenu.
■Choose second icon set with the U-turn icon.
■Tap on the EPG icon.
Tap one through four on the remote control to display one of the following choices:
1. Name of the program currently running, Starttime, Endtime.
2. Name of next transmission through chosen channel, Starttime, Endtime.
3. Weekly overview. Choose any day of the week.
4. Detailed information to chosen programs, if supported.
Or invoke them by directly tapping the respective icons
(see footer of EPG screen).
To exit the EPG screen tap on the preview area.
Note:
■ EPG features are only available if the chosen channel supports them.
43
Teletext
Use the teletext key on the remote control.
Alternative invocation:
■Tap in the lower third of the screen to invoke the Quickmenu.
■Choose second icon set with the U-turn icon.
■Tap on the teletext icon.
Teletext
You can choose to display teletext either as e-journal
or subtitles.
■ Up/down arrow keys on the remote to page.
■ Left/right arrow keys to page one hundreds.
■ Tap Exit to end teletext.
You may also use the remote control to comfortably navigate teletext.
Note that the functions of the colored teletext footer can be invoked with the identically
colored keys of the remote´s bottom row.
Note:
■ Teletext features are only available if the chosen channel supports them.
44
ZE-DVBT50
Troubleshooting
Program
Possible Cause
What to do
Standby light not lit.
1. Mains lead unplugged.
2. Mains fuse blown.
1. Check mains lead.
2. Check fuse.
No signal found.
1. Aerial are disconnected.
2. Aerial is damaged/misaligned.
3. Out of digital signal area.
1. Check aerial leads.
2. Check aerials.
3. Move to different area
and try again.
Scrambled channel message.
No response to remote
control.
Channel is scrambled.
1. Receiver off.
2. Handset not aimed correctly.
3. Front panel obstructed.
4. Handset batteries exhausted.
Forgotten channel
lock code.
1. Plug in and turn on plug.
2. Aim handset at front
panel.
3. Check for obstructions.
4. Replace handset
batteries.
Re-install channels to
cancel channel lock.
Forgotten menu lock code.
The remote control will not
operate your DVB-T unit.
Select alternative
channel.
Contact help line.
1. The batteries of your
remote control
need replacing.
2. There is an obstruction
blocking the signal path
between the remote
control and the box.
45
1. Replace the batteries.
2. Check that there are no
obstacles in the path between the remote control
and the receiver.
Specifications
SYSTEM RESOURCES
FLASH 2MB
SDRAM 8MB
EEPROM 2KB
TUNER & CHANNEL
RF input connector x 2 (5V Phantom powered)
(F-TYPE FEMALE)
FREQUENCY RANGE:
170MHz ~ 230 MHz(VHF)&470 MHz ~ 862 MHz(UHF)
SIGNAL LEVEL:
-15 ~ -78dbm
DECODER
■ Transport stream
■ Profile level
■ Input rate
■ DVB-T formats
■ Audio format
■ DVB-T output
MPEG-2 ISO/IEC 13818
MPEG-2 MAIN PROFILE@MAIN LEVEL
MAX. 15Mbit/s
4:3/16:9 SWITCHABLE
MPEG Layer I & II,32/44.1/48KHz
RGB, CVBS (DIN-AV Cable), RGB (DIN-DIN Cable)
CONNECTION
■ Main power cable
■ Tuner
■ Data port
■ DIN AV cable
■ DIN to DIN cable
PLUGGABLE TYPE
ANTENNA INPUT x 2
RS-232
AUDIO STEREO, CVBS, IR
AUDIO STEREO, RGB, CVBS, RS-232
POWER SUPPLY
■ Input voltage
■ Power consumption
DC 12-24 V, 3 A Fuse
MAX.10W/STANDBY 5W
DIMENSIONS (mm)
40 x 173 x143 (H x W xD)
WEIGHT (g)
900
■ Design and specifications are subject to change without notice.
E13 10R03 10210
If at any time in the future you should need to dispose this product
please note that electrical products should not be disposed with the
household waste. Please recycle where facilities exist. Check with your
local authorities or retailer for recycling advice (Waste Electrical and
Electronic Equipment Directive).
46
ZE-DVBT50
2 Years Limited WarrantY
Dear customer,
thank you for purchasing this ZENEC product. It is advisable to keep the original packing
material for any future transporting of the product. Should your ZENEC product require warranty service, please return it to the retailer from whom it was purchased or the distributor in
your country. This ZENEC product is warranted against defective materials or workmanship
for a period of TWO years from date of purchase at retail.
Warranty Limitations
This warranty does not cover any damage due to:
1. Improper installation, incorrect audio or mains connection(s).
2. Exposure to excessive humidity, fluids, heat sun rays or excessive dirt or dust.
3. Accidents or abuse, unauthorized repair attempts and modifications not explicitly
authorized by the manufacturer.
This warranty is limited to the repair or the replacement of the defective product at the
manufacturer’s option and does not include any other form of damage, whether incidental,
consequential or otherwise. The warranty does not cover any transport costs or damages caused by transport or shipment of the product. Warranty work will not be carried
out unless this warranty certificate is presented fully completed with model, serial number,
purchaser’s address, purchasing date and dealer stamp together with the original sales slip!
2 Jahre Garantie
Sehr geehrter Kunde,
vielen Dank, dass Sie sich zum Kauf dieses ZENEC Produktes entschlossen haben. Wir bitten Sie, die Originalverpackung aufzuheben, z.B. für den Transport bei einem Garantiefall.
Wenn Sie Garantie-Leistungen für dieses ZENEC Produkt beanspruchen, wenden Sie sich
bitte direkt an den Händler, bei dem das Gerät gekauft wurde. Dieses ZENEC Produkt ist
durch eine Werksgarantie von 2 Jahren ab Kaufdatum im Fachhandel gegen Material- oder
Herstellungsfehler geschützt.
Garantie-Einschränkungen
Nicht unter Garantie fallen Schäden infolge von:
1. Unsachgemässem Einbau oder inkorrektem Audio- oder Stromanschluss.
2. Einwirkung von übermässiger Feuchtigkeit, Flüssigkeit, Hitze, Sonneneinstrahlung oder
starker Verschmutzung.
3. Mechanischer Beschädigung durch Unfall, Fall oder Stoss; Schäden durch nicht
autorisierte Reparaturversuche und/oder Modifikationen.
Die Garantie dieses Produkts bleibt in jedem Fall auf die Reparatur bzw. den Ersatz (Entscheidung beim Hersteller) des ZENEC Produktes beschränkt. Transportschäden und die Kosten
des Rücktransportes sind durch diese Garantie nicht abgedeckt. Jeder über diese GarantieErklärung hinausgehende Anspruch und Haftung für direkte/indirekte Folgeschäden werden
ausdrücklich abgelehnt. Garantie-Ansprüche können nur mit einer korrekt und vollständig ausgefüllten Garantie-Karte und dem Original-Kaufbeleg geltend gemacht werden.
47
Zenec Model: ZE-DVBT50
Serial number:............................................................................................................................... Date of purchase:..........................................................................................................................
Your name:....................................................................................................................................
Your address:................................................................................................................................
City:...............................................................................................................................................
State: ................................... ZIP or postal code .........................................................................
Country: . ......................................................................................................................................
Dealer’s address & stamp
48
Notes
49
50
Notes
51
ZENEC by ACR AG · Bohrturmweg 1 · Bad Zurzach · Switzerland