1
CEGUI Unified Editor User Manual
Martin Preisler
July 13, 2014
☛
✟
This document has been laid out for a computer screen viewing and thus may be unsuitable for printing. LYX sources
are available in doc/user-manual-src in the source tarball if you wish to relayout.
✡
✠
1
Contents
1
2
Prerequisites
1.1 Hardware and software requirements
1.2 Knowledge prerequisites . . . . . . . .
1.3 Installation . . . . . . . . . . . . . . . .
1.3.1 Source tarball . . . . . . . . . .
1.3.2 Standalone executable (Win32)
1.3.3 .app bundle (MacOS X) . . . .
.
.
.
.
.
.
.
.
.
.
.
.
.
.
.
.
.
.
.
.
.
.
.
.
.
.
.
.
.
.
.
.
.
.
.
.
.
.
.
.
.
.
.
.
.
.
.
.
.
.
.
.
.
.
.
.
.
.
.
.
.
.
.
.
.
.
.
.
.
.
.
.
.
.
.
.
.
.
.
.
.
.
.
.
.
.
.
.
.
.
.
.
.
.
.
.
.
.
.
.
.
.
.
.
.
.
.
.
.
.
.
.
.
.
.
.
.
.
.
.
.
.
.
.
.
.
.
.
.
.
.
.
.
.
.
.
.
.
.
.
.
.
.
.
.
.
.
.
.
.
.
.
.
.
.
.
.
.
.
.
.
.
.
.
.
.
.
.
.
.
.
.
.
.
.
.
.
.
.
.
.
.
.
.
.
.
.
.
.
.
.
.
.
.
.
.
.
.
.
.
.
.
.
.
4
4
4
4
5
5
5
Working with the application
2.1 The basics . . . . . . . . . . . . . . . . . . . . .
2.1.1 Main interface . . . . . . . . . . . . . . .
2.1.2 Multi tab editing . . . . . . . . . . . . .
2.1.3 Multi mode editing . . . . . . . . . . . .
2.1.4 Copy / Paste . . . . . . . . . . . . . . .
2.1.5 Project manager . . . . . . . . . . . . . .
2.1.6 File manager . . . . . . . . . . . . . . .
2.1.7 Resizable rectangle . . . . . . . . . . . .
2.1.8 Zooming . . . . . . . . . . . . . . . . . .
2.1.9 Undo and Redo functionality . . . . . .
2.1.10 Compatibility layers . . . . . . . . . . .
2.2 Creating a project . . . . . . . . . . . . . . . . .
2.2.1 Creating a project file . . . . . . . . . . .
2.2.2 Project settings . . . . . . . . . . . . . .
2.3 Imageset editing . . . . . . . . . . . . . . . . . .
2.3.1 Overview . . . . . . . . . . . . . . . . .
2.3.2 Imageset properties . . . . . . . . . . .
2.3.3 Moving and resizing image definitions
2.3.4 Deleting image definitions . . . . . . . .
2.3.5 The property box . . . . . . . . . . . . .
2.3.6 Editing image definition offsets . . . . .
2.3.7 Selecting overlapping image definitions
2.3.8 The code mode . . . . . . . . . . . . . .
2.4 Layout editing . . . . . . . . . . . . . . . . . . .
2.4.1 Overview . . . . . . . . . . . . . . . . .
2.4.2 Moving and sizing widgets . . . . . . .
2.4.3 Deleting widgets . . . . . . . . . . . . .
2.4.4 Property editing . . . . . . . . . . . . .
2.4.5 Reparenting widgets . . . . . . . . . . .
2.4.6 Live preview . . . . . . . . . . . . . . .
2.4.7 Custom widgets . . . . . . . . . . . . .
2.4.8 The code mode . . . . . . . . . . . . . .
2.5 Command line . . . . . . . . . . . . . . . . . . .
2.5.1 ceed-gui . . . . . . . . . . . . . . . . . .
2.5.2 ceed-migrate . . . . . . . . . . . . . . .
2.5.3 ceed-mic . . . . . . . . . . . . . . . . . .
2.6 Settings . . . . . . . . . . . . . . . . . . . . . . .
2.6.1 Applying changes . . . . . . . . . . . .
2.6.2 Back to default . . . . . . . . . . . . . .
2.6.3 Shortcuts . . . . . . . . . . . . . . . . . .
.
.
.
.
.
.
.
.
.
.
.
.
.
.
.
.
.
.
.
.
.
.
.
.
.
.
.
.
.
.
.
.
.
.
.
.
.
.
.
.
.
.
.
.
.
.
.
.
.
.
.
.
.
.
.
.
.
.
.
.
.
.
.
.
.
.
.
.
.
.
.
.
.
.
.
.
.
.
.
.
.
.
.
.
.
.
.
.
.
.
.
.
.
.
.
.
.
.
.
.
.
.
.
.
.
.
.
.
.
.
.
.
.
.
.
.
.
.
.
.
.
.
.
.
.
.
.
.
.
.
.
.
.
.
.
.
.
.
.
.
.
.
.
.
.
.
.
.
.
.
.
.
.
.
.
.
.
.
.
.
.
.
.
.
.
.
.
.
.
.
.
.
.
.
.
.
.
.
.
.
.
.
.
.
.
.
.
.
.
.
.
.
.
.
.
.
.
.
.
.
.
.
.
.
.
.
.
.
.
.
.
.
.
.
.
.
.
.
.
.
.
.
.
.
.
.
.
.
.
.
.
.
.
.
.
.
.
.
.
.
.
.
.
.
.
.
.
.
.
.
.
.
.
.
.
.
.
.
.
.
.
.
.
.
.
.
.
.
.
.
.
.
.
.
.
.
.
.
.
.
.
.
.
.
.
.
.
.
.
.
.
.
.
.
.
.
.
.
.
.
.
.
.
.
.
.
.
.
.
.
.
.
.
.
.
.
.
.
.
.
.
.
.
.
.
.
.
.
.
.
.
.
.
.
.
.
.
.
.
.
.
.
.
.
.
.
.
.
.
.
.
.
.
.
.
.
.
.
.
.
.
.
.
.
.
.
.
.
.
.
.
.
.
.
.
.
.
.
.
.
.
.
.
.
.
.
.
.
.
.
.
.
.
.
.
.
.
.
.
.
.
.
.
.
.
.
.
.
.
.
.
.
.
.
.
.
.
.
.
.
.
.
.
.
.
.
.
.
.
.
.
.
.
.
.
.
.
.
.
.
.
.
.
.
.
.
.
.
.
.
.
.
.
.
.
.
.
.
.
.
.
.
.
.
.
.
.
.
.
.
.
.
.
.
.
.
.
.
.
.
.
.
.
.
.
.
.
.
.
.
.
.
.
.
.
.
.
.
.
.
.
.
.
.
.
.
.
.
.
.
.
.
.
.
.
.
.
.
.
.
.
.
.
.
.
.
.
.
.
.
.
.
.
.
.
.
.
.
.
.
.
.
.
.
.
.
.
.
.
.
.
.
.
.
.
.
.
.
.
.
.
.
.
.
.
.
.
.
.
.
.
.
.
.
.
.
.
.
.
.
.
.
.
.
.
.
.
.
.
.
.
.
.
.
.
.
.
.
.
.
.
.
.
.
.
.
.
.
.
.
.
.
.
.
.
.
.
.
.
.
.
.
.
.
.
.
.
.
.
.
.
.
.
.
.
.
.
.
.
.
.
.
.
.
.
.
.
.
.
.
.
.
.
.
.
.
.
.
.
.
.
.
.
.
.
.
.
.
.
.
.
.
.
.
.
.
.
.
.
.
.
.
.
.
.
.
.
.
.
.
.
.
.
.
.
.
.
.
.
.
.
.
.
.
.
.
.
.
.
.
.
.
.
.
.
.
.
.
.
.
.
.
.
.
.
.
.
.
.
.
.
.
.
.
.
.
.
.
.
.
.
.
.
.
.
.
.
.
.
.
.
.
.
.
.
.
.
.
.
.
.
.
.
.
.
.
.
.
.
.
.
.
.
.
.
.
.
.
.
.
.
.
.
.
.
.
.
.
.
.
.
.
.
.
.
.
.
.
.
.
.
.
.
.
.
.
.
.
.
.
.
.
.
.
.
.
.
.
.
.
.
.
.
.
.
.
.
.
.
.
.
.
.
.
.
.
.
.
.
.
.
.
.
.
.
.
.
.
.
.
.
.
.
.
.
.
.
.
.
.
.
.
.
.
.
.
.
.
.
.
.
.
.
.
.
.
.
.
.
.
.
.
.
.
.
.
.
.
.
.
.
.
.
.
.
.
.
.
.
.
.
.
.
.
.
.
.
.
.
.
.
.
.
.
.
.
.
.
.
.
.
.
.
.
.
.
.
.
.
.
.
.
.
.
.
.
.
.
.
.
.
.
.
.
.
.
.
.
.
.
.
.
.
.
.
.
.
.
.
.
.
.
.
.
.
.
.
.
.
.
.
.
.
.
.
.
.
.
.
.
.
.
.
.
.
.
.
.
.
.
.
.
.
.
.
.
.
.
.
.
.
.
.
.
.
.
.
.
.
.
.
.
.
.
.
.
.
.
.
.
.
.
.
.
.
.
.
.
.
.
.
.
.
.
.
.
.
.
.
.
.
.
.
.
.
.
.
.
.
.
.
.
.
.
.
.
.
.
.
.
.
.
.
.
.
.
.
.
.
.
.
.
.
.
.
.
.
.
.
.
.
.
.
.
.
.
.
.
.
.
.
.
.
.
.
.
.
.
.
.
.
.
.
.
.
.
.
.
.
.
.
.
.
.
.
.
.
.
.
.
.
.
.
.
.
.
.
.
.
.
.
.
.
.
.
.
.
.
.
.
.
.
.
.
.
.
.
.
.
.
.
.
.
.
.
.
.
.
.
.
.
.
.
.
.
.
.
.
.
.
.
.
.
.
.
.
.
.
.
.
.
.
.
.
.
.
.
.
.
.
.
.
.
.
.
.
.
.
.
.
.
.
.
.
.
.
.
.
.
.
.
.
.
.
.
.
.
.
.
.
.
.
.
.
.
.
.
.
.
.
.
.
.
.
.
.
.
.
.
.
.
.
.
.
.
.
.
.
.
.
.
.
.
.
.
.
.
.
.
.
.
.
.
.
.
.
.
.
.
.
.
.
.
.
.
.
.
.
.
.
.
.
.
.
.
.
.
.
.
.
.
.
.
.
.
.
.
.
.
.
.
.
.
.
.
.
.
.
.
.
.
.
.
.
.
.
.
.
.
.
6
6
6
6
6
7
7
7
7
8
8
8
10
10
10
12
12
12
13
13
13
13
13
13
14
14
14
16
16
16
16
16
16
18
18
18
18
19
19
19
19
.
.
.
.
.
.
.
.
.
.
.
.
.
.
.
.
.
.
.
.
.
.
.
.
2
3
Further help
3.1 Common issues . . . . . . . . . .
3.2 Getting support . . . . . . . . . .
3.3 Help CEED . . . . . . . . . . . . .
3.3.1 Report bugs . . . . . . . .
3.3.2 Help with documentation
3.3.3 Help with development .
3.3.4 Donate money . . . . . .
.
.
.
.
.
.
.
.
.
.
.
.
.
.
.
.
.
.
.
.
.
.
.
.
.
.
.
.
.
.
.
.
.
.
.
.
.
.
.
.
.
.
.
.
.
.
.
.
.
.
.
.
.
.
.
.
.
.
.
.
.
.
.
.
.
.
.
.
.
.
3
.
.
.
.
.
.
.
.
.
.
.
.
.
.
.
.
.
.
.
.
.
.
.
.
.
.
.
.
.
.
.
.
.
.
.
.
.
.
.
.
.
.
.
.
.
.
.
.
.
.
.
.
.
.
.
.
.
.
.
.
.
.
.
.
.
.
.
.
.
.
.
.
.
.
.
.
.
.
.
.
.
.
.
.
.
.
.
.
.
.
.
.
.
.
.
.
.
.
.
.
.
.
.
.
.
.
.
.
.
.
.
.
.
.
.
.
.
.
.
.
.
.
.
.
.
.
.
.
.
.
.
.
.
.
.
.
.
.
.
.
.
.
.
.
.
.
.
.
.
.
.
.
.
.
.
.
.
.
.
.
.
.
.
.
.
.
.
.
.
.
.
.
.
.
.
.
.
.
.
.
.
.
.
.
.
.
.
.
.
.
.
.
.
.
.
.
.
.
.
.
.
.
.
.
.
.
.
.
.
.
.
.
.
.
.
.
.
20
20
21
21
21
21
21
21
Chapter 1
Prerequisites
1.1 Hardware and software requirements
Operating system:
• GNU/L INUX system with X11
• W INDOWS XP and newer
• A PPLE M AC OS X 10.6+
• *BSD system with X111
Hardware:
• At least Intel Pentium 4 or AMD Athlon XP
• 512 MB of RAM
• Graphics card capable of accelerated OpenGL with FBO support
• Display area of at least 800*600 px available to the application2
Dependencies:
• P YTHON 2.7
– make sure your Python architecture matches your CEGUI and PyCEGUI architecture, use 32bit Python for
32bit PyCEGUI
• Q T 4.7 or 4.8
• P Y S IDE – python bindings for Q T
• CEGUI 0.83
• P Y CEGUI 0.8
1.2 Knowledge prerequisites
To use the Unified Editor, you have to have some basic knowledge of how GUI systems work in general. It would be
best if you were familiar with how CEGUI works but Qt or GTK knowledge can be transferred without problems.
For editing assets in code mode you should understand the format in question, the editor makes no effort to make
code editing easier with highlighting or any code references (it’s a planned feature though).
There is no need to understand programming in general to use CEED efficiently, the application is targeted at
artists. You may still need help from a fellow programmer about setting up the project file.
1.3 Installation
The application is currently distributed as a source tarball that works on all supported platforms (if you install the
dependencies). Furthermore, binary standalone builds are made for Windows and Apple MacOS X. This only applies
to official releases, mercurial code is not being built regularly.
1 CEED
has been reported to work on BSD but this platform is not officially supported.
screen estate of at least 800 px is recommended.
3 CEED supports CEGUI 0.7 data as well but uses 0.8 internally.
2 Vertical
4
1.3.1 Source tarball
First, make sure you have all dependencies installed. Refer to guides of the dependencies on how to install them.
Download the tarball and extract it. You should end up with a folder called CEED-${version}. Go into this folder
in CLI4 and call python setup.py install as administrator5 . This should trigger the installation. After the installation
finishes, run ceed-gui to start the application.
1.3.2 Standalone executable (Win32)
You do not have to install anything in this case (all dependencies are bundled), just unzipping the archive and
running ceed-gui.exe will make the application start. If this is not the case, please report it as a bug.
If you have made custom changes to CEGUI that you use with your application, this distribution method might not
work well for you! Upstream CEGUI is used for the build.
1.3.3 .app bundle (MacOS X)
CEED behaves like a proper MacOS X native application. Double clicking will start the GUI, dragging it to Applications will install it. If you use multiple versions they might share settings!
If you have made custom changes to CEGUI that you use with your application, this distribution method might not
work well for you! Upstream CEGUI is used for the build.
4 Use
5 Use
terminal emulator of choice on UNIXes, cmd.exe on Windows.
su/sudo on UNIXes, “Run as administrator” on Windows.
5
Chapter 2
Working with the application
2.1 The basics
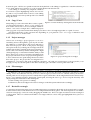
2.1.1 Main interface
This interface hosts all the tabbed editors and provides functionality that is shared by all the editors. It surrounds the
application.
Figure 2.1: overview of the interface
2.1.2 Multi tab editing
The centre of the application consists of tabs, each tab represents one opened file. CEED will strive not to have two
tabs for one file opened, if you try to open one file twice it will just activate the existing tab for the file. Any of the
tabs can be closed on request. If there are unsaved changes the user will be asked what to do about them.
Reordering tabs is also possible using mouse dragmoving. The interface including dock widgets, toolbars,
etc... may change when switching tabs. Switching tabs
does not count as an undo action, it is instead just a context change action.
2.1.3 Multi mode editing
For some file types (mostly .imageset and .layout) it
makes sense to edit in both visual mode as well as code
mode (raw XML). Undo and redo are transparent between mode switching as mode switching counts as an
undo action. You can switch modes by clicking on the
Figure 2.2: tabs offer reordering and a context menu
6
bottom tab pane. All files are opened in Visual mode by default. Code editing is regarded as a crutch mechanism, a
tool to make tedious mass changes or work around problems with Visual mode.
Code editing is currently very simplistic and does
not even have syntax highlighting! Please also note undo/redo is very wasteful when it comes to code editing
and long editing sessions may end up with a lot of RAM
being allocated.
2.1.4 Copy / Paste
Figure 2.3: switch modes by clicking the bottom mode tabs
Many things you can select in the editor can be copied/cut and pasted elsewhere. This is a very useful workflow feature and works even across multiple CEED instances. You can for example have 2 different projects
and copy parts of layouts between them. Both projects have to have all widget types that or copied of course!
The default shortcuts are the expected ones depending on your platform. Ctrl + C for copy on Windows and
GNU/Linux, Cmd + C on Mac OS X.
2.1.5 Project manager
Allows user to manage a project (project is a set of related files), browse through files, open any file for editing, add new or existing files to the project and remove
files from the project. Most of the project managing
takes place in the Project Manager dock widget. The dock
widgets lists all files currently in the project and allows
user to edit/view them by double clicking them. Right
clicking brings up a context menu with the ability to add
files to the project or remove currently selected files from
the project. The main reason for project management is
Figure 2.4: project manager dock widget
to have CEGUI resource path settings shared for all the
files in the project. The project files are designed to be
committed to a repository and used on different computers. All paths are stored relative to the project file, even
though you may see absolute paths in the editor itself, they get converted to relative paths in the end.
2.1.6 File manager
You are advised to use project manager if at all possible, it will improve workflow, especially in bigger teams.
In addition to the project manager, CEED allows you to browse the filesystem and simply open files for quick
editing. Please note that this will only work for some file types (it cannot work for schemes and layouts because
CEGUI paths are not set if project is not loaded). This is again contained in a dock widget that hosts the functionality.
It has a very simplistic interface, displaying current path, allowing the user to go one level up the hierarchy and
simply listing files and folder in the current path.
Double clicking a file opens it for editing.
Furthermore, this dock widget will watch for changes on the filesystem and refresh accordingly.
2.1.7 Resizable rectangle
A construct used reused in many places in CEED. Represents a rectangular object that can be resized and/or resized.
It offers features that would otherwise have to be reimplemented in many places. The main inspiration was GIMP’s
selection rectangle [?]. Can be moved by dragging the middle area. There are eight areas that resize the rectangle if
you drag them. These are called resize handles - four edges and four corners. They get highlighted when you hover
over them.
7
Figure 2.5: resizable handles appear when you hover over edges/corners
2.1.8 Zooming
To make editing easier and possibly more precise, user is allowed to zoom in the editors that support it. Both imageset
and layout editors support zooming. By default you can zoom by clicking the zoom icons in the toolbar as seen in
Figure 2.1 or holding the Ctrl key and scrolling with your mouse wheel. You can zoom out to 50% to get an overview
or zoom in multiples of two. If you are at the zoom level of 100%, one zoom in will change that to 200%, another
zoom in will change it to 400%, etc.
The zoom level will in no way affect your data, it will only change the context you are editing in. It therefore is
not an undo action.
2.1.9 Undo and Redo functionality
Since most tabbed editors allow undo and redo, the main interface allows you to perform these actions via shared
means in the top toolbar. Undo/redo are per-file, so whenever you switch tabs the undo stack gets changed to a
completely different stack. If you for example do changes to file A, then switch to file B, do some changes and keep
pressing undo, only changes to file B gets undone, You have to switch to A again and undo there. Selections are not
undoable as they do not count as undo actions. There is one very important aspect that breaks the “context switching
is not an undo action” rule. Switching editing mode is an undoable action because the changes of XML code do not
make sense in visual mode.
Undo and Redo can be very powerful and allows free experimentation without fear of losing data. Apart from
possible bugs in the applications, all things that affect data are undo actions and are undoable. Use that fact to your
advantage!
Even with undo/redo, you are advised to use version control or other mechanisms. Undo/redo actions are lost when
you close the application!
2.1.10 Compatibility layers
CEED has a facility called compatibility layers which allows it to work with data from many versions of CEGUI. In a
nutshell these layers allow you to transform raw data from version to version. Each layer has source and target data
types that describe the transformation. Layers can be chained, if there is a path to go from data type A to B and B to
C, it is possible to transform A to C.
Each time you are editing a file, you can right click the tab to bring out a context menu and see the exact data type
you are editing, see Figure 2.2. It is not currently possible to change the data type of a file that’s been opened, CEED
will attempt to detect the data type when you are opening the file and ask you if it cannot decide for sure. Make sure
you set the correct CEGUI target version as described in Figure 2.7. The CEGUI version will affect what data type
newly created files in CEED will have.
You can also use all compatibility layers using the shipped CLI tool called ceed-migrate. Call ceed-migrate –help for
more info.
CEGUI file format versions
Keep in mind that file format versions are usually simple unsigned integers. We do not use CEGUI versions to
version file formats because the file formats do not always change with new CEGUI version. CEED knows which
file format versions are required for whichever CEGUI version. The following table should serve as a reference, if
8
in doubt you can always check the CEED source code - ceed/ceed/compatibility/$format/__init__.py - the file will list all
versions CEED knows and will map CEGUI versions to file format versions.
animation list font imageset layout looknfeel scheme
0.6
N/A
2
1
2
4
3
0.7
1
2
1
3
6
4
0.8
1
3
2
4
7
5
9
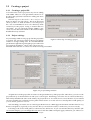
2.2 Creating a project
2.2.1 Creating a project file
You will need to create a project for any serious editing
with CEED. There are some quick hints about how to
do this in the Quickstart Guide but we will dig into more
details here.
The first step is to choose File » New » Project. The
dialog in Figure 2.6 will appear. The most important
choice you have to make is where to store the project
file. It is recommended to store it in a directory made
exclusively for the project. Doing so ensures that it is
relocatable. You can optionally instruct CEED to auto
create resource directories similar to the CEGUI sample
datafiles directory structure.
2.2.2 Project settings
Project settings window will pop up after the project file
Figure 2.6: first step of creating a project
is created. You can always return to the project settings
window to change settings later. It is recommended to
get the basics right when creating the project as that will
prevent many headaches1 . Most of the options are documented in the interface as can be seen on the following screenshots.
Figure 2.7: project settings window
All paths stores in the project file are relative to the parent directory of the project file. This allows you to move the
project directory around and share it with your co-developers. First thing you need to choose is the base directory.
This will by default be the same as the folder your project file is in. You can however set it to the base of your CEGUI
resources and the rest of CEGUI resource paths will be relative to it. This allows to switch paths around quickly. If
you are unsure, just leave it as it is.
The next thing you need to choose is the target CEGUI version. CEED supports CEGUI 0.8 and 0.7. This has very
drastic consequences, especially on any resource files you create from scratch, so make sure you set it correctly.
Following is the section with paths to CEGUI resource directories. If you use CEGUI’s directory structure (the
one used in samples), you can simply fill or browse for the first editbox and press apply. Otherwise you will have to
1 CEED
uses the project to choose versions of new files for example.
10
fill the resource paths manually. Even though the paths are shown as absolute, they are stored relative to the project’s
base directory, which again is stored relative to parent directory of the .project file. This is what makes the whole
project directory relocatable.
11
2.3 Imageset editing
An imageset is practically a texture atlas, a technique used to put many smaller images on one texture to drastically
speed up rendering. Each imageset has a name, underlying texture file path, autoscaled settings, native resolution
and a set of images. “Image” means a rectangle selection of the underlying texture. Each of these images has a
position (x, y), width, height and an offset (x, y).
Opening existing imagesets for editing does not require you to have a project opened. The underlying texture file
is sought after in the same directory the .imageset file resides in. If a project file is opened the appropriate resource
directory is used to search for the files instead.
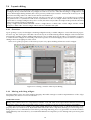
2.3.1 Overview
A dock widget containing basic imageset properties and a list of image definitions shows up upon opening an imageset file. The centre part of the editor shows the underlying texture and rectangles describing geometry of image
definitions. Image definitions can be selected (including multiple selection). Selection works in both the image definition list and the editor’s centre part (rubber band selection). Both selections are synchronised. Names of image
definitions will be shown as labels when the definitions are selected. This can be disabled in settings, see Section 2.6
for more details.
Figure 2.8: rubber band selecting in the imageset editor
2.3.2 Imageset properties
As can be seen in Figure 2.8, imageset itself has several properties that affect all image definitions defined in it.
The name of the imageset means different things depending on which version of CEGUI you are targeting. It is
simply a prefix of each of the defined image definitions’ names in CEGUI 0.8 with “ImagesetName/ImageName” being the full name of a single image definition, in 0.7 image definitions are strictly tied to imagesets and are referenced
using “set: ImagesetName image: ImageName”.
Underlying texture is the texture that will be used to draw the imagery of image definitions inside the imageset.
The auto scaled settings affects how the imageset’s image definition sizes will be affected on various resolutions.
In a nutshell, with disabled auto scaling the image definitions will always have exactly the size they are defined
with, with any other auto scaled settings, the size will be affected by the resolution CEGUI is currently rendered in
(see CEGUI documentation for explanations of each setting). Please note that only “false” and “true” settings are
implemented in CEGUI 0.7, the rest are new in CEGUI 0.8.
Native resolution is the resolution this imageset was created for in simplified terms. If the target resolution is
different, the image definitions may be scaled, depending on the auto scaled settings.
12
2.3.3 Moving and resizing image definitions
You can move selected image definitions by dragging or using keyboard (WSAD scheme moves them one pixel in
each direction, pressing Ctrl moves them 10 pixels in each of the directions). You can also resize the image definitions
by pressing Shift and one of the WSAD keys, this moves just the bottom right vertex of the image definition rectangle.
Rectangles are “resizable rectangles”, see Section 2.1.7 for more details. This will only delete the rectangle definitions
of the images in the imageset, it will not alter the underlying texture in any way.
2.3.4 Deleting image definitions
Figure 2.9: selected images context menu
You can delete a selection of image definitions by selecting, right clicking and choosing Delete in the context menu
or pressing the Delete key. This will only delete the image definitions, it will not alter the underlying texture in any
way.
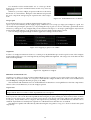
2.3.5 The property box
To allow precise adjustments, user can alter all the values of selected
image definition manually using the property box. Just select exactly
one image definition and the property box will get filled with its values.
Altering them will immediately preview the changes in the visual editing pane. All editing has undo/redo support, see Section 2.1.9 for more
details. Editing image definition properties in the property box should
always be preferred to editing raw XML in code mode, it is safer and
has better and faster undo/redo.
Figure 2.10: image property box
2.3.6 Editing image definition offsets
Offsets describe where the 0, 0 position is in the image definition. By
default it is at the top left corner of the rectangle of the image definition.
You may want to adjust it, especially if you are working with crosshairs,
cursors or window edge imagery. Enable editing of offsets using the context menu (see Figure 2.9) and red offset
crosshairs will appear, move them around to alter the offsets. You can alternatively use the property box to edit
offsets manually using the keyboard, see Section 2.3.5.
2.3.7 Selecting overlapping image definitions
Sometimes the image definitions overlap in a way that would prevent you from selecting the image definition you
need. You can select any image definition in the overlapping area and use the Cycle Overlapping Images feature.
It will cycle all overlapping image definitions, just stop when the desired one is selected. The order in which the
overlapping image definitions are cycled is not well defined, just cycle until the right one is selected. You can see the
option in the context menu in Figure 2.9.
2.3.8 The code mode
Raw editing of the XML is supported in imageset editing, click the “Code” tab in the bottom to switch to it. Please
note that the raw format will always be the native CEGUI 0.8 format even if you selected CEGUI 0.7 as the target
version. The conversion will only happen when you save to a file.
13
2.4 Layout editing
The word layout has two meanings in the CEGUI world so I will first disambiguate it. The first meaning is a hierarchy
of widgets, the layout describes the way widgets are laid out as an n-tree. The other meaning is a widget able to lay
out its child widgets during runtime, this is more precisely called Layout Container. I will use the word “layout” with
the former meaning in the rest of this section unless stated otherwise.
Each layout starts with a root widget and can only have exactly one root widget. If you need more top widgets,
just put them into a DefaultWindow and use the DefaultWindow as the root widget. When CEGUI loads the layout it
returns this root widget. Widgets always have a name, this name only needs to be unique in the parent in CEGUI 0.8,
it has to be globally unique in CEGUI 0.7.
Saying “widget Parent/Child/SubChild” means a widget that is a child of the “Child” widget and the “Child”
widget is a child of the “Parent” widget. This notation is called the name path.
2.4.1 Overview
Upon opening a layout, dock widgets containing widget hierarchy, available widgets to create and selection properties show up. The centre part of the editor shows the layout as rendered using CEGUI. Widgets can be selected and
unselected by clicking on them, rubber band selection is not available in the layout editor. Coloured lines are shown
to outline how the widgets are sized and positioned. Properties of selected widget(s) are shown and are available for
editing in the bottom right part of the screen.
There are no global properties of the GUI layout, the only objects holding information are the widgets.
Figure 2.11: selecting a window when layout editing
2.4.2 Moving and sizing widgets
Selected widgets can be moved around by dragging. Resizable rectangle is used for implementation of the widget
manipulators, see Section 2.1.7 for more details.
Unified dimensions
Both position and size have two components in CEGUI - scale and offset. Scale represents the dimension relative to
the parent, offset is absolute pixels. Both can be positive or negative, both are stored as floating point numbers.
There are several tools in CEED to deal with unified dimensions without having to edit them manually in the
property editor (see Section 2.4.4). By default CEED affects the offset component, meaning you are moving everything in pixels. It is recommended to learn relative positioning and sizing, it is a very powerful tool to make resolution
independent layouts. Press the A key to switch which dimension component you are affecting with your moving and
resizing.
14
Use Normalise Position and Normalise Size to “clean up” the dimensions in your layout. Default shortcuts are the D key and S key
respectively.
Whenever you select a widget, its position and size are shown by
the means of coloured lines. Red part of the dimension represents
the scale component and green part represents the offset component.
Figure 2.12: unified dimensions of a button
Snap to grid
It is really hard to keep your widgets aligned and it is quite easy to
spot for your users that they do not align properly. CEED has a tool to help you align your widgets to a grid. You
can enable it by pressing the Spacebar key or by clicking the Snap to grid icon. If it is activated, a grid will be shown
whenever you drag move any widgets and your movements will snap to it. All snap to grid happens only between
parent and its child widgets, so the grid will be only shown in the dragged widget’s parent.
You can change snap grid settings in CEED’s application settings, see Section 2.6.
Figure 2.13: snapping to grid, zoom at 200%
Alignment
Position of a widget in CEGUI is relative to a certain pivot. By default this pivot is the top left corner of the widget’s
parent widget client area. You can change this by selecting a different alignment. Choosing Centre for both horizontal
and vertical alignments.
Figure 2.14: alignment of widgets
Minimum and maximum size
Another tool to help you create resolution independent layouts. Consider you are using relative sizes and your top
with is 50% of the screen width. You can place a limit that the widget should be 50% of the screen width but not
exceed 1000px by setting the MaxSize property to (0, 1000).
The maximum and minimum sizes are unified dimensions but there is one big difference: The first component is
relative to the screen dimension, not to the widget’s parent!
Aspect ratio
This feature was added in CEGUI 0.8 and it is not available in earlier versions. The compatibility layer will simply
strip it and the behavior will be as if the AspectMode was set to Ignore.
Is a tool to make sure your UI is not stretched in any way in a case where your display’s aspect ratio differs from
that of your user. Choose the desired AspectMode first using the property editing (see Section 2.4.4). There are three
modes you can select: Ignore, Shrink or Expand. Ignore ignores your chosen aspect ratio and does not affect the sizes
in any way. Shrink makes sure to comply to the aspect ratio by shrinking one of the dimensions until the ratio is
satisfied. Expand behaves similarly but expands one of the dimensions until the ratio is satisfied.
The dimension guides will reflect this by either drawing the size guide too long or too short for shrink and expand
respectively.
15
Figure 2.15: aspect ratio demonstration
2.4.3 Deleting widgets
Selected widgets can be deleted by right clicking them in the widget hierarchy dock widget to bring the context menu
and choosing Delete or by simply selecting them and pressing the Delete key. Please note that deleting a widget also
deletes all its descendants - children, children of children, ...
2.4.4 Property editing
A well implemented CEGUI widget should expose most of its properties using the CEGUI::PropertySet class. All properties exposed as
such will be editable within the editor in the Selection Properties dock
widget.
Simply select a widget, scroll through its properties in the dock
widget, choose one and double click it to alter it. Such action will
be recorded as an undo action and will be undoable, see Section 2.1.9
for more details. You can use the property filter to quickly find the
property you are looking for by name, see Figure 2.16.
Some of the properties will show an expandable icon on the left,
these are usually complex properties made up from multiple pieces.
Clicking this icon will expand the property and allow you to edit its
components.
It is possible to edit properties of multiple widgets but properties
will display <multiple values> if there is no single value in all of
them for that property.
2.4.5 Reparenting widgets
Reparenting means changing parent of a widget or an entire hierarchy of widget. This can be done in the widget hierarchy dock
widget, pick a widget there, drag it and drop it into a widget that
Figure 2.16: recursively expanded Area propshould be its new parent.
erty
2.4.6 Live preview
You can preview your widget layout including limited interaction
by clicking the Live preview tab in the bottom. It is possible to then
interact with your GUI as if it were in your application. Nothing
you do in Live preview will affect the edited layout.
2.4.7 Custom widgets
The editor loads all schemes in the project so standard widgets get registered if you have them in your scheme. The scheme will be able to load a
custom widget set module. The custom widget set module is able to add
widget factories so you can even add custom made widgets and have the
editor edit them.
2.4.8 The code mode
Raw XML editing is supported in layout editing, click the Code tab in the
bottom to switch to it. Please note that the raw format will always be
the native CEGUI 0.8 format even if you selected CEGUI 0.7 as the target
version. The conversion will only happen when you save to a file.
Please note that there are several errors that you can make in the layout XML that will go silently ignored! This is an issue which CEED cannot
16
Figure 2.17: previewing a layout
solve, it is CEGUI that ignores this input. Examples include various property values, for example the ColourRect, invalid values will result in black.
XML editing should only be used as the last resort!
17
2.5 Command line
While most of this manual talks about the main executable - ceed-gui - two
more are offered in all releases. As with most command line tools, inbuilt
help is offered and it would make no sense to repeat it here. Instead, a
brief overview of some capabilities of the tools will be presented.
2.5.1 ceed-gui
The main use of this executable is to bring up the CEED GUI interface. Most people will probably call it with no
command line arguments at all. Some of the supported arguments might be very useful though, you can for example
call ceed-gui so that it immediately loads a certain project and opens specific files.
Call ceed-gui --help for more info.
2.5.2 ceed-migrate
Allows you to use compatibility layers as described in Section 2.1.10 without having to start the main GUI app. This
can be very useful when you want to migrate all your assets to a new CEGUI version. You can also incorporate it to
your workflow if you have to support multiple CEGUI versions for some reason.
Call ceed-migrate --help for more info.
2.5.3 ceed-mic
Makes it possible to build a rectangle packed imageset out of given data. Source data is a MetaImageset. In a nutshell
you can specify separate image files or even imagesets and ceed-mic will make just one imageset with one underlying
texture out of them. It will make effort to have the resulting texture as small as possible.
See data/samples/AllStockImagery.meta-imageset for an example.
Call ceed-mic --help for more info.
18
2.6 Settings
Go to Edit » Settings to open the settings window. Note that these settings are only persistent on the user’s machine,
they are not stored in a project file! If you make changes that you want your colleagues to share, you will have to tell
them how to replicate these changes on their machines.
Figure 2.18: settings window
2.6.1 Applying changes
Most of the settings will apply immediately after pressing the Apply button. Some will require you to close and open
the edited file again and some will even require you to restart the application. If you experience glitches related to a
settings change a restart will very likely cure them. We would still appreciate it if you reported them as a bug though,
for further detail see Section 3.3.1.
2.6.2 Back to default
Feel free to change settings and experiment with them. Whenever you regret making some setting, click the Reset
icon as seen on Figure 2.18 to reset it to its default value. Please note that same rules about applicability of the settings
apply when you reset them to default. In some cases you will even have to restart the application.
2.6.3 Shortcuts
Most of the actions in CEED are using the Action API
and can be triggered using shortcuts. The default shortcuts are set depending on your platform. Go to Edit »
Settings and choosing Shortcuts in the tab header. Clicking the button in the middle will allow you to press
your desired combination to change to it. Only combination keypresses are supported, preferably with modifier keys. Discrete sequences or key chords cannot be
used for shortcuts.
Figure 2.19: changing key sequence for an action
19
Chapter 3
Further help
3.1 Common issues
Cannot find PyCEGUI
Assuming you are using a release source tarball, make sure you have installed PyCEGUI system-wide. Check the
PyCEGUI.{so,dll} with ldd -r or depends.exe to check whether it can find all required libraries.
You can also use the runwrapper.sh script if you use a UNIX system but that is not officially supported.
Cannot find XYZ
Install dependency XYZ, all dependency upstreams offer binary installers with the exception of PyCEGUI. Check
with ldd -r or depends.exe to see whether the libraries can find their dependencies.
Only widget outlines move when I pan the layout editing viewport
Confirm that zooming also only moves the outlines.
Make sure your GPU supports FBO and that it supports it properly. The solution is to get better OpenGL drivers.
This may also be a newly introduced bug that may be worth reporting. Use common sense.
OpenGL invalid enum exception
Make sure your GPU supports FBO. Other than that it is usually a driver bug. I have witnessed this in VirtualBox
VM. The solution is to get better OpenGL drivers.
This may also be a newly introduced bug that may be worth reporting. Use common sense.
Cannot start ’hg’
This is just a warning and you need not be concerned with it. Mercurial is used to get the tip revision hash for error
reporting purposes. It will simply “unknown” in cases where it is not possible to get the hash.
I only see a black viewport with outlines instead of my widgets!
Make sure the widgets are set as visible! Many people create layouts with widgets hidden and then show them
selectively after they are loaded. CEED will not display hidden widgets, it will only display their outlines.
Imageset editing is unresponsive
There are two configurable modes of drawing the imageset editing viewport. The default one uses OpenGL and
redraws the entire viewport when any redraw is needed. It has a predictable speed and does not stall often. It is
suitable for all but the biggest imagesets.
In cases where you edit really big imagesets and/or have a slow GPU you can use the alternative mode. It uses
software QPainter and only redraws portions that need it. This makes it a bit unpredictable with occasional stalls but
it will be faster if you edit in a small area.
The settings option is Settings » Imageset editing » Use partial drawing updates.
See Section 2.6 to learn how to alter settings.
Changing sizing modes while resizing/moving widgets
20
3.2 Getting support
Community support is provided on the following channels. No official commercial support is offered.
• forum: http://cegui.org.uk/phpBB2
• IRC: #cegui on irc.freenode.net1
• wiki: http://cegui.org.uk/wiki
3.3 Help CEED
3.3.1 Report bugs
Software gets complex really quickly, nobody is pretending that CEED does not have any bugs. If you find some we
would really appreciate you reporting them using the CEGUI bug tracker2. Please make sure the bug has not been
reported already by searching the bug tracker before submitting the ticket. Feature requests are also welcome.
Please note that there are no assurances on whether and when particular tickets get resolved, we do our “best
effort” to fix tickets but cannot possibly give you a reliable time frame.
3.3.2 Help with documentation
Documenting is a very hard task, any help is welcome in that area. The usual starting point is editing the CEGUI
wiki3 . If you feel up to it you can also send patches to the manuals, they are written in LYX so it should not be a
problem to correct typos or even add new content.
3.3.3 Help with development
CEED is a community project, GPLv3+ licensed. That means that anyone can contribute! See the Developer manual for
more info.
3.3.4 Donate money
If you would like to help us spend more time developing the software you use and hopefully like, consider making
a donation. Every amount counts, no matter how small.
Donating to the main developer of CEED is possible at
https://bitbucket.org/cegui/ceed
You can also donate to the CEGUI library itself using
https://bitbucket.org/cegui/ceed
Both types of donations require a PayPal account.
1 See
http://freenode.net for information about the FreeNode network.
have a Mantis tracker at http://cegui.org.uk/mantis.
3 Wiki of the project is at http://cegui.org.uk/wiki.
2 We
21