1
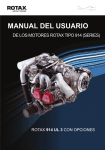
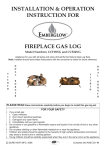
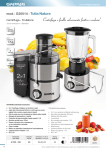
EN
DIESEL POWER GENERATORS
DHY12000SE(-3)
DHY15000SE(-3)
USER MANUAL
REVIEW MANUAL CAREFULLY TO AVOID PERSONAL INJURY
MADE UNDER LICENSE OF HYUNDAI CORP. SEOUL, KOREA
INDEX
1.
SAFETY INFORMATION
1
2.
COMPONENTS
2
3.
CHECK BEFORE USE
4
4.
START OF THE ENGINE
5
5.
STOP OF THE ENGINE
6
6.
MAINTENANCE
6
7.
PROBLEM/SOLUTIONS
9
8.
SPECIFICATIONS
10
9.
GUARANTEE
16
10.
NOTES
16
1.
SAFETY INFORMATION
In order to ensure a safety use of the generator please follow the
next safety instructions:
1.
Check the outside of the generator in order to detect any apparent trouble.
2.
The use or good quality oil and diesel is a must.
3.
Storage should be in a dry place. Frost damage permanently
your group. Drain your machine completely before storing in a
dry hot place.
4.
Check and clean filters regularly.
5.
Make sure all subset of the machine are right.
6.
Exhaust fumes contain carbon monoxide, a very dangerous
gas, colorless and odorless, never use the generator in premises or areas closed. Make sure the group is installed in a
location with adequate ventilation or equipped with a smoke
extractor.
7.
The exhaust temperature rises during the use of the group and
still burning even after shutdown. Take care never to touch or
move it to store before being on it is cool enough.
8.
Repair your generator shall be made by a qualified person and
trained for this purpose.
9.
Do not smoke, do not flame or spark when operating or filling
the tank, store the generator near flammable materials.
10.
Store the group in a well ventilated area.
11.
Never transport or store your generator in a horizontal or
leaning of fuel leak and / or oil or will permanently damage your
machine.
12.
Never stop the generator when is load applied, be sure to
disconnect any apparatus from the generating set prior start of
prior stop.
13.
Do not allow children to operate the engine. Keep children and
pets away from the area of operation.
14.
The engine and exhaust become very hot during operation.
Keep the generating set at least 1.5 meter away from buildings
and other equipment during operation. Keep flammable materials away, and do not place anything on the engine while it is
running.
15.
Use only diesel fuel.
16.
To avoid electric shocks or short circuit, do not touch the generating set when your hands are wet. This generating set is not
water proof, so it should not be used in a place exposed to rain,
snow or water spray. Use of the generating set in a wet place
can cause short circuits and electric shock during operation.
17.
The generating set must be grounded to prevent electrical
shocks from from faulty appliances. Please connea lenght of
heavy wires between the generating set ground terminal and a
external ground source
18.
Most applicance motors requiere more than their rated waltage
for star-up, so follow recommendations of your dealer to
choose the right power for your applicance.
19.
Do not exceed the expecific current limit of any socket.
20.
Do not connect directly the generating set to a household
circuit.
18.
No guarantee will be covered in case of non-compliance of
start-up procedures and safety precautions.
1
1.
SAFETY INFORMATION
Any use of the generator without reading this manual could cause hard
damage to the machine o can hurt yourself seriously
Pay special attenction to the next:
•
Do not use the generator in a non ventilated area
•
Do not use the generators in wet conditions
•
Do not start the generator when device plug.
•
Keep at least 1 meters from flammable objects
•
Do not refill the fuel tank with the generator running
•
Do not smoke when fuel refill
•
Do not overfill the fuel
SAFETY GUARDS:
1.
Do not use kerosene or other fuel, only use diesel fuel. Clean
all the excess of fuel when refill.
2.
Any flammable or explosive product shall be kept away from
the generator, due to the high temperature of the engine.
3.
Install your group on a flat, horizontal surface, to avoid spillage of gasoline.
4.
Inhalation of exhaust gas:
The exhaust gases contain poisonous carbon monoxide. Never
use the group in a poorly ventilated area
5.
Never touch the exhaust when the generator is running or
after starting.
6.
Short circuits:
Do not touch your group with wet hands. The generator is not
waterproof, so it should not be exposed to water or snow.
7.
Other safety points:
Yon must know how to absolutely stop your group before using it.
Never allow someone to use the generator without having read the
manual! Always wear a safety shoes and keep you always ready to
clean rags. Keep children and pets away
2
2.
COMPONENTS
1
3
2
4
5
6
7
10
9
8
11
1 Frame
2 Fuel level meter
3 Fuel cap
4 Air filter cover
5 Control panle
6 Fuel filter
7 Fuel valve
8 Speed gobernor
9 Oil Dipstick
10 Battery
11 Muffler
12 Wheels
11
12
3
1
1 Frame
2 Fuel level meter
3 Fuel cap
4 Air filter cover
5 Control panle
6 Fuel filter
7 Fuel valve
8 Speed gobernor
9 Oil Dipstick
10 Battery
11 Muffler
12 Wheels
11 13 Oil filter
2
13
11
12
1
6
2
8
7
5
4
3
9
10
3
11
12
1 Plate
2 Main breaker
3 Controller fuse 2A
4 Contactor Key
5 Controller
6 16A circuit breaker
7 16A single phase socket
8 ATS connector
9 socket
10 12V connector
11 12V fuse
12 Earth connection
3.
CHECK BEFORE USE
3.1 Notes for diesel generator set operation
Before operating diesel generator, please read the manual. Especially following points should be paid attention to for preventing
the accident happened.
3.1.1. Preventing the fire
The engine fuel is light diesel. It is forbidden to adopt gasoline and
kerosene etc. When the oil overflows, please use clean cloth to
remove the oil. It is not permitted to have diesel generator near to
gasoline, kerosene, match and inflammable material, because the
temperature around the muffler is very high when the engine is
operated. For the sake of better ventilation during the generator
operation, the distance between diesel generator and the building
should be more than 1.5 meters. The diesel generator should be
operated on plain ground. Otherwise, the oil will overflow from
diesel generator.
3.1.2 Preventing the suction of exhaust gas
For avoiding exhaust gas sucked by the person, the diesel generator will be not allowed to work under condition of worse ventilation,
because exhaust gas emitted from the engine includes harmful
CO.
3.1.3 Preventing the damage by high-temperature
parts
When diesel engine is working, it is not allowed to touch hightemperature parts, such as muffler and its shell etc.
3.1.4 Preventing the electric shock or short circuit
For avoiding the shock by electricity or short circuit, it is forbidden
to touch with hand the alternator when working. Do not operate
the generator in raining or foggy.
For preventing the shock by electricity, the grounding should be
made with adoption of the wire, which of one end is connected
with the grounding terminal of the generator and another end is
connected with the device outside. The grounding terminal of the
generator is on control panel.
3.1.5 Other safety points
It is very important to know how to stop the generator and the
functions of all switches. The untrained person is not permitted to
operate the generator. The operator should wear safe clothes and
shoes during working.
4
3.
CHECK BEFORE USE
3.2 Preparation before starting
3.2.1 Selection of the fuel
fuel filter
Only use light diesel. Fill in the diesel to fuel tank at full level. If the
water exists in the diesel, should drain off the water from oil/water
separator. Otherwise, the water will enter into fuel pump, resulting
in the engine to be damage.
FUEL TANK CAPACITY: 21l.
Note: Clean overflow diesel.
It is not permitted to smoke or stay close to fire when filling in or at
fuel storage. During adding the fuel, overflowing should be prevented. After completion of filling oil, should firmly retighten the tap of
fuel tank.
When the diesel includes water, the diesel generator is fit with
fuel/water separator to remove the water. Only screw down the
tap of the separator with left direction to drain off the wate fromt
he fuel filter, them retight the screw. Remember to clese the fuel
valve before drain the water from the fuel filter.
3.2.2 Filing the lube oil
The qualified lube oil should meet following condition.
ACEA-B2/E2 or higher-grade specification
API-CD/CE/CF-4/CG-4 or higher-grade specification
If adopting inferior lube oil, should change the lube oil after every
150 hour operation.
It is very important to select the applicable engine oil for keep up
the performance and life of the generating set. If inferior engine oil
is used, or if your engine oil is not replaced periodically, the risk of
piston seizure, piston ring sticking and accelerated wear of the
cylinder liner, bearing and other moving components increases
significantly. So the generating set life will be shortened.
We recommend CC/CD oil classified by API. Choose the applicable viscosity oil according to the local ambient temperature.
Replacement of the oil:
- First replace after 20 hours
- Second to forth replace every 100hours
- Them every 200 hours
5
3.
CHECK BEFORE USE
Put the generator on plain ground, then fill in lube oil through the
opening of oil dipstick. When checking oil level, only place the
dipstick into the hole.
When starting the generator each time, should check oil level. If
not being enough, should add the lube oil to the stipulated level.
Draining off lube oil can be immediately done after engine
stopped, because it is difficult to drain off the oil thoroughly when
the engine is in cold state
1 Prime lube oil filter
2 Speed gobernor bolt
3 Speed gobernor
4 Oil dipstick
5 Manual speed stop
2
4
1
3
5
1 oil filter
2 Oil drain bolt
3 Drain groove
1
2
3
6
3.
CHECK BEFORE USE
3.2.3 Check air cleaner
① It is forbidden to clean the element with detergent.
② When output power drops or exhaust gas is black, should
change the element.
③ It is not permitted to start the generator without air cleaner.
Otherwise, it will cause the generator to be damage easily.
Air filter removal:
Unscrew the bolt and take out side plate
Loosen the clipper to take out the cover of air cleaner for getting
the element.
After installing the element, fit the cover of air cleaner and retighten
the clipper firmly.
3.2.4 Checking the alternator
Turn off main switch for unloading, like lamp and motor etc.
Before starting the generator, must turn off main switch. If not in
this position, it is very dangerous for the generator to be started
with the load so can damage the AVR and the alternator.
The alternator should be grounded correctly to prevent the shock
by electricity.
ATTENTION!!!
The fuel and lube oil have been removed prior to delivery. When
filling in the fuel, should check whether there is the air in the piping
before starting. If existing, should drain off the air by unscrewing
on fuel pump till no air bubbling comes out from the diesel, then
retighten the screw again, new models are equiped with a air
purge valve to take out the air of the fuel injector. Do not open the
valve when the generator works normally. Just open to purge the
air.
Air purgue valve
7
3.
CHECK BEFORE USE
3.2.5 Battery
The battery The baterIf the accumulator is of liquid-added type, sis
maintenance free.
During the operation, the generator can automatically charge the
battery. If the generator is used for stand-by application, the
charge of the battery could drop down. We recommend to make
at least 2 start up of the generator per week with at least 30min.
running in order to keep the battery recharge. If longer time not
starting the generator the battery can go out of charge so a external charger should be used in order to complete the charge.
Please check regularly the charge of the battery, should be over
12V in order to keep the battery in good conditions.
3.2.6 Operation in trial
For new engine, it is necessary to have 20 hour running-in operation initially.
A. Avoiding over-load
During the trial operation, should prevent over-load.
B. Changing lube oil at fixed period
Change it after initial 20 hours operation
8
4.
START THE GENERATOR
4.1 Preparation before starting
1 Turn fuel switch to “ON” position.
2 Put speed handler of the engine at “RUN” position.
3 Place circuit breakers in OFF position so no power is given by
the generator.
4.2 Starting
1 Insert the key to “OFF”position.
2 Be sure the speed gobernoris set to “RUN” position
STARTER SW
OFF
ON
a)
3 Turn the key to “START” position clockwise. no longer than 5
seconds.
4 After starting successfully, remove the hand from the key to
make the key be “ON”position automatically.
START
OFF
ON
b)
START
OFF
ON
c)
START
5 If failed to start please wait 15 seconds for next starting.
If starting motor works too long, the voltage of the accumulator will
drop to cause the motor to be blocked. During the operation, let
the key be in “ON” position.
6 If the control panel is intelligent type, also please refer to its
manual
7 For remote control start be sure there is no load before starting
the generator.
4.3 Difficulties on start up
When it is difficult to start the engine in cold temperature, the
engine need to be equipped with glow plug. (Please require
specially when buy engine).
It is very important to retighten oil dipstick firmly before starting.
Otherwise the engine parts will be worn out by rain, dust and other
impurities.
NOTE: Do not adjust fuel quantity controller or speed
limiter-gobernor (has been adjusted before delivery).
Otherwise, the performance of the engine will be affected.
9
4.
START THE GENERATOR
4.4 Operation of the generator
1 Start the engine
2 Preheat the engine for three minutes without load.
Do not adjust fuel quantity controller or speed limiter-gobernor
(has been adjusted before delivery). Otherwise, the performance
of the engine will be affected.
3 Read values of voltage and frequency in the display, and wait to
add load until this values are stable and according to the specifications of the product.
4 Check whether there is abnormal sound or strong vibration.
STARTER SW
OFF
ON
a)
START
OFF
ON
b)
START
OFF
ON
c)
5 Check whether the engine works out of order.
6 Check the color of exhaust gas: black or too white, If any of them
mentioned before occurs you should stop the generator and then
contact with local dealer
7 When voltage indicating on control panel reaches ±10% of rated
limit, can add the load.
8 Place the circuit breaker up to the ON position and them the
generator is ready to receive load.
9 Do not start more than two machines in the same time. Only start
them one by one. Do not use floodlights with other machines
meanwhile. Please refer to table bellow.
START
LOAD
MODEL
Home electric appliance, Machine with rectifier type Machine with capacitance
motor
starting type
incandescent lamp.
Projector, electric cooker, Drilling machine, grinding Water pump, air compressor.
machine
T.V., bulb, microwave.
DHY12000SE/3
8000 W
4000 W
1000 W
DHY15000SE/3
1000 W
5000 W
1500 W
10
4.
START THE GENERATOR
4.5 DC applications
DC terminal output is 12V 8.3A. Red terminal refer to the positive
poles of battery. The rated voltage is 12V and charge 12V battery.
1 When connecting automatic-type accumulator, must disconnect
the wire from the cathode of the accumulator when charging.
2. Starting diesel generator.
3 Connect charging wire between accumulator terminal and generator anode DC connection. Pay attention to the anode and cathode. Otherwise, it will make the generator and accumulator be
damaged.
Do not let two terminals contact with each other, which will make
the circuit short.
When charging big capacity accumulator, the charging current
should be less than 8A. Otherwise, the fuse will burn.
4. During charging the accumulator will make inflammable gas. So
place away spark, flame and cigarette. To avoid spark near the
accumulator, connect first the charging wires with the accumulator before charging and disconnect from the generator after
breaking down.
5 Charge the accumulator under the place with better ventilation.
Before charging, open the accumulator cover. If electrolytic
temperature is over 45 degrees Celsius,should not recharge.
4.6 . Instruction for control panel function
2
1
3
4
1 Three numeral code
“VOLT.”, indicates the
alternating
voltage
value (virtual value),
unit: V;
2 Three numeral code
“POWER.”, shows the
power value, unit: KW;
6
5
7
6
11
Three numeral code,
3T
multifunctional, related
with 4
4 Ten bar codes show
as following:
4.
START THE GENERATOR
1. Frequency (Hz)
2. Current (A)
3. Battery voltage(V)
4. Run time (H)
5. Engine temp. (degrees Celsius)
6. Disuse
7. Software release
8. Auto protection
9 Diesel valve on indicator
10. Starter indicator
5
Six LED lamps show as following:
1.
Green lamp: disuse;
2.
Green lamp: indicate fan starting (the fan will start
when inner temperature is higher than set value);
3.
Red lamp: Warning and indicate protecting for over
temperature (when the inner temperature is higher than 98 , the
red lamp will turn on; the generator will stop if the temperature is
continuously excess for 5 seconds, meanwhile, the red lamp
twinkles);
4.
Red lamp: lower diesel level warning (when the diesel
fuel level is low, the red lamp will turn on; the generator will stop if
the level is continuously low for 20 minutes; meanwhile, the red
lamp twinkles);
5.
Green lamp: charging indicator (to detect the
charging and AC output of the winding, if the charging and AC
output are normal, the lamp twinkles);
6.
Red lamp: engine oil pressure warning (the generator
will stop automatically when the engine oil pressure is low;
meanwhile, the red lamp twinkles).
6
Press button to navegater thru the functions
7 Indication for engine oil pressure: the lamp will be on when turn
key on “ON” position for 10S and before the engine start, show
signal wire for the engine oil pressure is reliable. If the lamp is not
on when turn the key, indicate that the failure connection for signal
wire for engine oil pressure.
12
4.
START THE GENERATOR
Turn key from “OFF” to “ON” when engine is stopped, at this
moment, the voltage, the current, the frequency and the power
values are all showing the set parameters, and then will show “—”
after 2 seconds ;
“LOW OIL” indicator lamp shows according to detection result,
the lamp is on when the switch of engine oil level is closed (the
switch should be closed when the generator is not working). If the
lamp is not on before running, indicates there is something wrong
with the switch of engine oil level or wiring.
Ten bar codes;
1# lamp is on shows the frequency value (the one on the top of the
ten bar codes), press button “ ” in order, the following value will
shown on 33 if continue pressing the key will show as:
2. Current (A)
3. Battery voltage(V)
4. Run time (H)
5. Temp. (degrees Celsius)
6. Disuse
7. Software release
If lamp 8# is on, auto protection is effective; otherwise, auto
protection is ineffective.
If lamp 9# is on, diesel valve is power up;
If lamp 10# is off, the start motor is not power up.
Start of the Generator
Under this mode, the generator will stop when engine oil level is
low, or diesel level continuously low for 20 minutes, or the temperature continuously excess for 5 seconds, meanwhile, the system
is controlled automatically.
Turn the key to “START” position from “ON” position, the generator starts; meanwhile, the diesel oil valve indicator and the starter
indicator are both on, while engine oil level indicator is off.
Loose the key after start, at this time, the diesel oil valve indicator
is on, the starter indicator is off, the present value of voltage,
frequency and power are all shown;
Press “ ” or “ ”ordinally, the other parameters are shown, when
pressing “
”, it will go back to show frequency value.
13
4.
START THE GENERATOR
4.7 Autoprotection
The protection that related with voltage, frequency and
overloading (except engine oil, temperature and diesel oil level) are
effective under auto mode.
If lamp 8# in the ten bar codes is on, the auto protection is effective, otherwise, it is ineffective.
1.
Voltage protection
If the value is higher or lower than the limits 10%, the voltage
digital code will twinkle, if it continuously low for 7 seconds or
continuously high for 3 seconds, the auto protection will begin to
take effect, meanwhile, the voltage digital code will continue
twinkling, and will show the value before protection.
If the auto protection setting is ineffective, the voltage digital code
will twinkle and the generator will not stop.
2.
Frequency protection
50Hz:47~55
60Hz:57~65
If the value exceed the limits, the frequency digital code will
twinkle, if it continuously low for 7 seconds or continuously high
for 3 seconds, the auto protection will begin to take effect,
meanwhile, the frequency digital code will continue twinkling and
will show the value before protection.
If the auto protection setting is ineffective, the frequency digital
code will twinkle and the generator will not stop.
1.
Stop automatically
The system will stop automatically when it meets auto protection
condition.
The fuel oil way will cut off when the generator stops.
2.
Stop manually
Under any condition, the generator will stop when the key is turned
to “OFF” position from “ON” position.
14
5.
STOP THE GENERATOR
5.1 Stop the generator
1 Before stopping the generator stop any machine connected.
2 Move the thermal of 30mA leakage breaker to the lower position
so the generator is not giving power.
3 Let the generator run for at least 3 min. without load in orther to
cool it down.
4 Stop the generator
- Electric start: Turn the key to the off position
6.
- Remote control: Push the lock open key on the remote
controller.
MAINTENANCE
6.1 Maintenance at fixed period
For the generator to work in conditions, maintenance at fixed
period is very important. The diesel generator is consisted of
diesel engine, alternator, control panel, frame etc.
Before maintaining the generator, stop the engine. You should
perform the maintenance in a well ventilated area
After stopping the generator, clean it immediately to prevent the
corrosion and to remove the sediment.
ITEM
everyday
Check the
fuel
•
at 20h
every
100h
every
200h
Clean fuel
tank
every
500h
•
Check oil
leakage
•
Check each
fastening
•
Change lube
oil
•
(first time)
Clean the element
of air cleaner
•
•
(next 3 times)
shorter the time in dusty enviroments
•
Clean fuel
filter
•
•
(replace)
Check fuel
pump
•
Check the
injector
•
•
Check fuel
pipe
(change if need)
Adjust intake/
exhaust valve clearance
•
(first time)
Grind intake/
exhaust valve
Change piston
ring
Check battery
voltage
EVERY MONTH
15
every year
or 1000h
6.
MAINTENANCE
6.2 Change lube oil
TIME INTERVAL:
20 hours for first time and 100 hours for next three times and 200
hours for normal operation.
Loosen oil-drained plug located at the bottom of cylinder block
when the engine is at hot state. After removing used lube oil, screw
in the plug and add the stipulated oil.
Please refer to point 3.2.2 for detailed information
6.3 Change the element of air cleaner
TIME INTERVAL:
every 500 hours, please change the element often in dusty enviroments. Also is recommend to perfom a cleaning everytime the oil
is change.
Please refer to point 3.2.3 for detailed information
NOTE: Do not clean the filter element with detergent
6.4 Change of fuel filter
TIME INTERVAL:
every 500 hours replace, for areas with poor quality of diesel the
cleaning and changing of the oil filter should be made often.
After changing the fuel filter the the air should be purgue, please
refer to point 3.2.4 for details about purgue.
1 Close fuel valve of the fuel tank
2 Remove the fuel filter
3 Place the new fuel filter
4 purgue the air if needed as explained in point 3.2.4
6.5 Long term storage
When the generator will not operate for more than three months, it
should be stored.
1 Drain off the fuel and lube oil.
2 Remove the dust and the oily.
16
6.
MAINTENANCE
3 Clean the crankcase and gear chamber with diesel and kerosene. Then drain off them.
4 Inject rust-proofed oil or lube oil without water (heat the lube oil
to about 120 degrees Celsius till no foam exists.)into crankcase at
stipulated level. Then run the engine for three minutes to splash
the oil to the surface of all moving parts. Last drain off the oil after
engine stopped.
5 Inject rust-proofed oil or lube oil without water into intake manifold and then rotate the engine rapidly. Last make intake/exhaust
valve be at close state.
6 Dismantle cylinder head cover and brush rock arm etc. with a
few rust-proofed oil or lube oil without water.
7 Wrap air cleaner and muffler with wet-proofed paper to prevent
the dust and moisture going in.
8 Remove the dust and the oily on the frame and control panel.
9 Take out the key
10 Disconnect battery connector from the battery
11 The generator should be stored at a place with better ventilation, clean, dry and no corrosive material nearby.
17
7.
PROBLEM / SOLUTIONS
Causes
No start
of the
engine
No output
of generator
Voltage
too low
Insufficient fuel
Fill in the fuel
Fuel switch not at “OPEN” position
Put fuel valve handler to “OPEN”
position.
Air in fuel circuit
Purge air in fuel circuit
No spray on injector or a little quantity
Repair and adjust the injector
Speed control rod not at “RUN” position
Set control rod to “RUN” position
Check lube oil lever
The level between upper mark “H”
and lower mark “L”
Dirty on the nozzle
Clean the nozzle
No electricity in battery
Charge or change the battery
Not turn on the switch
Turn to “CLOSE” position
Worse contact of the socket
Adjust the socket
Not reach rated speed of the engine
According the stipulation
Not reach rated speed of the engine Set speed control rod to operation position.
Check AVR
Automatic
stop after
a certain
time of
operation
Remedies
Adjust the resistance clockwise
(1) lack of the fuel
(2) lack of lube oil
Repair according to relative
(3) voltage too low/too high
alarming of control panel
(4) frequency too low/too high
(5) over-current
If the problem is not solved please contact your dealer.
18
8.
SPECIFICATIONS
30mA BREAKER
INTELLIGENT CONTROLLER
OFF
ON
START
STARTER SW
PRE.
HEATER
EMERGENCY STOP
AC230V
AC230V
DC 12V 8.3Amp
ATS
FUSE
-
H
+
W
L
Log.data Alternator
Engine
Generator Set
Model
Product Size (mm)
Length
Width
Height
Packaging Size (mm)
Length
Width
height
Package
Material
DHY12000SE
1040
660
740
1140
730
790
DHY12000SE-3
1040
660
740
1140
730
790
Veneer Box
DHY15000SE
1040
660
740
1140
730
790
Veneer Box
DHY15000SE-3
1040
660
740
1140
730
790
Veneer Box
Generator Model
DHY 12000SE DHY12000SE-3 DHY15000SE DHY15000SE-3
Frequency (Hz)
Rated Power
Max.Power
Voltage (V)
Current (A)
Sockets
Display
Fuel Tank Capacity (L)
Running Time under 50% Load (hr.)
Noise Level behind 7 Meters 50% Load (dBA)
DC Output (V/A) (2)
Battery (Ah)
50
8.7 kW
9.2 kW
230
40
1x 16A & 1x 32A(1)
LED5
21
18
76
12 / 8.3
36
50
10.9 kVA
11.9 kVA
400
16.6
1x 16A/3~ & 1x 16A/1~(1)
LED5
21
18
76
12 / 8.3
36
50
10.4 kW
11.2 kW
230
48
1x 16A & 1x 32A(1)
LED5
21
17.5
77
12 / 8.3
36
50
13.0 kVA
14.0 kVA
400
20.2
1x 16A/3~ & 1x 16A/1~(1)
LED5
21
17.5
77
12 / 8.3
36
Engine Type
Engine
Power Output (HP)
Start Method
Displacement (ml)
Oil Capacity (L)
Diesel
D840E
22
Elec. star
836
1.7
Diesel
D840E
22
Elec. star
836
1.7
Diesel
D870E
25
Elec. star
870
1.7
Diesel
D870E
25
Electrical start
870
1.7
Alternator
Rated Power (kVA)
Power Factor (Cosφ)
Voltage Regulation
A9-1S
9
1
AVR
A9-3S
11
0.8
AVR
A12.5-1S
12.5
1
AVR
A12.5-3S
14
0.8
AVR
N.W.(kg)
G.W.(kg)
Loading capacity 20/40/40HQ
245
280
30/64/94
245
280
30/64/94
245
280
30/64/94
245
280
30/64/94
(1) Single phase socket thermal protected
(2) 100W max. output. 10A fuse protection
Veneer Box
DHY-diesel generator set S-Soundproof
E-electric start -3-three phase
Specifications are subject to continuous product delevopment
19
9. GUARANTEE
This generators are guaranteed for any failure or defect of fabrication for a period of 1 year or 1000 hours. Non respect of the
instructions in this user manual will avoid the guarantee.
10. NOTES
20
21
by
MADE UNDER LICENSE OF HYUNDAI CORP. SEOUL, KOREA