Transcript
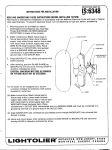
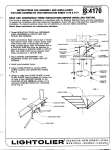
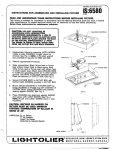
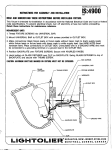
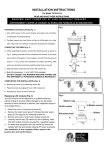
/
INSTRUCTIONSHEETNO
INSTRUCTIONS
FOR ASSEMBLING
AND INSTALLING
IS:6737WH
FIXTURE
R0390
~
-3
--l
READ AND
UNDERSTAND
THESE
INSTRUCTIONS
This fixture is intended
for installation
in accordance
with
To assure full compliance
with local codes and regulations,
installation.
To Drevent electrical
shock, turn off electricity
Retain these i&truotions
for maintenance
reference.
BEFORE
INSTALLING
FIXTURE.
the National
Electrical
Code and local regulations,
check with your local electrical
inspector
before
at fuse box before Droceedirm.
1, Diaaesemble
fixture by removing
LATCH SCREW
(visible at bottom).
HOUSING
“hinges” up for
removal. See Fig. 3.
2. Remove appropriate
match outlet box.
knockouts
in back
of fixture
/“-
to
BRACKET
OUTLET
3. Make connections
Black fixture lead or fixture lead
without
tracer mark to black supply lea@ white
fixtUre lead or fixture lead with tracer mark to white
eupply lead. Uninsulated
wire is GROUND
WIRE
and must be connected
to a grounding
terminal
or
ground wire in OUTLET
BOX. Use WIRE NUTS
(local hardware
item). Place connections
in OUTLET
BOX. See Fig. 2,
GROUN
WIRE
4, Secure FIXTURE
BODY
OUTLET
BOX SCREWS
WIRE NUT
to OUTLET
BOX with
(provided
in OUTLET
BOX).
5. Mount diffuser HOUSING to FIXTURE BODY by
tilting HOUSING to engage LUG with BRACKET on
FIXTURE BODY. Swing HOUSING into poeition,
seating against GASKET See Fig. 3.
— /\
FIG. 2
LUG
\
6. Press HOUSING
into alignment
againet GASKET
and secure with LATCH SCREW. See Fig. 3.
N~E
Mount with LATCH SCREW
in down position.
– HOUSING
CAUTION:
LAMPS-USE
— HOUSING
m
USE ONLY CORRECT WAlTAGE LAMP,
AS MARKED ON FIXTURE. MINIMUM
TEMPERATURE FOR STARTING IS 32°E
PL SY PHILIPS
lT BY SYLVANIA
h
.
\
\
DU LUX@ S BY OSRAM
BX BY GENERAL ELECTRIC
\
\’
LATCH SCREW –
I—
FIG. 3