1
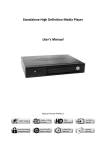
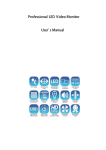
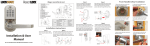
Freestanding Infrared Multi Touch Screen Display User’s Manual Manual Version LHD‐T1.1 Freestanding Infrared Multi Touch Screen Display User’s Manual Our Full Product Range Page 1 Freestanding Infrared Multi Touch Screen Display User’s Manual Safety Instructions Please keep the display away from any heat sources such as radiators or direct sunlight. Place the display in a stable and well‐ventilated place. Please handle with care as product contains glass. The holes or openings on the display are designed for ventilation. Do not cover or block the ventilation holes or openings. Remove protective covering from the screen before you use the display. As the display surface is vulnerable to scratches, avoid touching the surface with sharp pen point. Shut off the power supply before cleaning. Use a soft lint‐free cloth instead of a tissue to wipe the screen. You may use a glass cleaner to clean the product as required. However, never spray the cleaner directly onto the display surface. Do not attempt to repair this product yourself! Improper disassembly of the product will invalidate the warranty and could be dangerous. If you have a problem that cannot be solved using the "Troubleshooting" guidelines, please contact your supplier. Page 2 Freestanding Infrared Multi Touch Screen Display User’s Manual Quick Start Guide (Windows 7) This section of the guide allows quick setup and use of the unit. Please refer to the main part of the User Guide for full information on use of the unit. Please follow the steps detailed below: 1. Connect your PC to the mains via the power outputs located inside the unit (using either C6 or C14 connectors) and ensure that there is a mouse connected to it. 2. Plug in the unit’s power supply to the mains outlet – this should power on both PC and screen. 3. Connect the screen to the PC via the VGA Cable and link the screen’s Infrared touch sensors to the PC via the USB cable (as shown below). Figure 1 Screen to PC Connections 4. Access the display options from your Control Panel or right‐click on your Desktop and choose “Screen resolution”. 5. Select the “Orientation” dropdown menu then click on “Portrait (flipped)”. 6. Click “OK” and your screen contents and operations will now be rotated 90° clockwise. 7. You may be asked “Do you want to keep these display settings?” click on “Keep changes”. 8. The screen should now be acting as a monitor and allowing you to use your finger as a mouse on the screen displaying the PC’s contents. Page 3 Freestanding Infrared Multi Touch Screen Display User’s Manual Quick Start Guide (Windows XP) This section of the guide allows quick setup and use of the unit. Please refer to the main part of the User Guide for full information on use of the unit. Please follow the steps detailed below: 1. Connect your PC to the mains via the power outputs located inside the unit (using either C6 or C14 connectors) and ensure that there is a mouse connected to it. 2. Plug in the unit’s power supply to the mains outlet – this should power on both PC and screen. 3. Now connect the screen to the PC via the VGA Cable ONLY (as shown below). 4. Access the display options from your Control Panel or right‐click on your Desktop and choose “Properties” > “Settings” > “Advanced”. 5. Click on the tab for your graphics card and find a way of rotating your display 90° clockwise. 6. Insert the CD included into the PC then access the CD‐ROM drive and launch the application inside called ‘TouchStartup’. Follow the “InstallShield Wizard” to install the software. 7. Launch the ‘TouchStartup’, it will display the message ‘Have not linked equipment’. Then link the screen’s Infrared touch sensors to the PC via the USB cable (as shown below). Figure 2 Screen to PC Connections 8. When the message changes to ‘Already link equipment’, click “Settings” > “Rotation” > “270°” then click “OK”. 9. The screen should now be acting as a monitor and allowing you to use your finger as a mouse on the screen displaying the PC’s contents. Page 4 Freestanding Infrared Multi Touch Screen Display User’s Manual Contents: 1. 2. Introduction ................................................................................................................................ 7 1.1 Box Contents ................................................................................................................... 7 1.2 Product Overview ............................................................................................................ 7 1.3 Remote Control ............................................................................................................... 8 1.4 Replacing the Remote Control Battery ........................................................................... 9 1.5 Menu Operation ............................................................................................................ 10 1.6 Inputs ............................................................................................................................ 12 Set Up ........................................................................................................................................ 13 2.1 Connecting to PC ........................................................................................................... 13 2.2 Changing your display to portrait mode ....................................................................... 15 2.2.1 (Windows 7) ........................................................................................................... 15 2.2.2 (Windows XP) ......................................................................................................... 17 2.3 2.3.1 3. Installing the touch screen driver (Windows XP only) .................................................. 19 Windows XP Driver Installation ............................................................................. 19 F.A.Qs and Troubleshooting Guide ........................................................................................... 24 3.1 My Touch Screen is not displaying what is on my PC .................................................... 24 3.1.1 Input Source ........................................................................................................... 24 3.1.2 Display/monitor button on keyboard .................................................................... 24 3.2 3.2.1 3.3 My display turns itself OFF when it’s not connected to my PC ..................................... 24 Power saving function ............................................................................................ 24 My screen is displaying video signal but touch function is disabled ............................ 25 3.4 My Touch Service software is displaying the message “Have not linked equipment” even though I have. ....................................................................................................................... 25 4. Full Range Specifications .......................................................................................................... 28 Page 5 Freestanding Infrared Multi Touch Screen Display User’s Manual Table of Figures Figure 1 Screen to PC Connections ...................................................................................................... 3 Figure 2 Screen to PC Connections ...................................................................................................... 4 Figure 3 Product Overview ................................................................................................................... 7 Figure 4 Screen Inputs ....................................................................................................................... 12 Figure 5 Screen to PC Connections .................................................................................................... 13 Figure 6 Screen to PC Connections .................................................................................................... 22 Page 6 Freestanding Infrared Multi Touch Screen Display User’s Manual 1. Introduction Congratulations on your purchase of our product. Please read carefully and follow all instructions in the manual before first use. The product should not be exposed to liquids dripping or splashing and no liquid filled objects, such as vases, should be placed on the product. For user convenience, a number of operations can be performed through the remote control. Attention: 1. Do not change any default settings unnecessarily 2. Keep the product far away from water during installation and use. 1.1 Box Contents 1xFreestanding Infrared Touch Screen Display 1xVGA Cable 1xUSB Cable 1xCD (User Manual and Software Driver) 1xRemote Control 1.2 Product Overview Figure 3 Product Overview Page 7 Freestanding Infrared Multi Touch Screen Display User’s Manual 1.3 Remote Control Button Function Power Power ON or OFF Mute Disable audio ⓿‐❾ Numbers for time input ‐/‐‐ Input multiple numbers MODE Signal input select ← Left navigation button ↑ Up navigation button → Right navigation button ↓ Down navigation button OK Confirm selection MENU Open/close menu settings Page 8 Freestanding Infrared Multi Touch Screen Display User’s Manual 1.4 Replacing the Remote Control Battery 1. Open the battery cover 2. Take out the battery box in the right direction as shown in the picture below 3. Remove the used battery 4. Insert the new battery with its terminals corresponding to the indicator 5. Put the cover back in Page 9 Freestanding Infrared Multi Touch Screen Display User’s Manual 1.5 Menu Operation The Menu includes the following sub‐menus: Picture, Sound, System, Function and Geometry. When using the Remote Control please ensure that it is no more than 20cm away from the sensor. This close proximity control feature is to ensure that you only control the desired device if there are others in its vicinity. Press “MENU” to enter Main Menu, press ←→ to select the right sub‐menu and ↑↓ to select the desired item, press “OK” to confirm selection. Press → where instructed to confirm section. Press “menu” at any time to go back or exit. PICTURE SOUND SYSTEM FUNCTION GEOMETRY Picture As with all settings these can be adjusted and changed back to default at any time. CONTRAST 50 BRIGHTNESS 50 COLOR TEMP <NORMAL> or WARM/COOL/USER DEFINED <STANDARD> or DYNAMIC/SOFT/USER DEFINED SCALE AUTO PICTURE MODE Sound EQUALIZER 120 50 500 50 1.5K 50 5K 50 10K 50 BALANCE 0 (LEFT/RIGHT SOUND DISTRIBUTION) SOUND MODE <USER> or STANDARD/MOVIE/MUSIC SURROUND <OFF> or ON Page 10 Freestanding Infrared Multi Touch Screen Display User’s Manual System Here you can change all of the On Screen Display (OSD) settings such as menu brightness and how long it displays for. This sub‐menu also includes the fan settings so you can set what temperature the internal fan activates. OSD LANGUAGE <ENGLISH> or 中文 OSD H‐POSITION 50 (HORRIZONTAL POSITION OF THE MENU) OSD V‐POSITION 50 (VERTICAL POSITION OF THE MENU) OSD DURATION 15 (NUMBER OF SECONDS MENU WILL DISPLAY FOR) OSD HALFTONE 50 (BRIGHTNESS OF THE MENU) TEMPERATURE XX (INTERAL TEMPERATURE) FAN ACTIVE 30 (TEMPERATURE AT WHICH FANS BECOME ACTIVE) RESET > (RESETS ALL SETTINGS BACK TO DEFUALT) TIMER CURRENT TIME – XX.XX Function <OFF> or ONCE/EVERYDAY TURN OFF TIME – 00.00 TURN ON TIME – 00.00 CURRENT X 1 CURRENT Y 1 TOTAL X 1 TOTAL Y 1 LEFT EDGE 0 UP EDGE 0 RIGHT EDGE 0 DOWN EDGE 0 (VIDEO WALL FUNCTION) Page 11 Freestanding Infrared Multi Touch Screen Display User’s Manual Geometry H‐POSTION V‐POSTION CLOCK PHASE Switching between inputs One crucial feature that does not appear on the Main Menu is selecting the input source. This is done by first pressing “MODE” and then scrolling down to the desired input source and select by pressing “→”. PC (VGA) HDMI DVI AV1 AV2 YPBPR 1.6 Inputs VGA – Video Graphics Array Signal Input (RECOMMENDED) HDMI – High Definition Multimedia Interface Signal Input DVI – Digital Video Interface YPbPr – Component Signal Input Video In (AV) – Composite Signal Input (X2) Figure 4 Screen Inputs Page 12 Freestanding Infrared Multi Touch Screen Display User’s Manual 2. Set Up 2.1 Connecting to PC There is space inside the unit for a small form factor PC. As well as being internally powered, the PC must be connected to the touch screen in two ways: visually and interactively. The recommended visual connection is via the VGA Cable (included) meaning that the display acts like a monitor for the PC. The touch function is achieved by linking the Infrared touch sensors around the screen to the PC via the USB Cable inside (DO NOT connect this yet unless you are using a PC with Windows 7 Operating System). Figure 5 Screen to PC Connections IMPORTANT: Be sure to connect the PC to the USB port on the side of the input panel and NOT the one adjacent to the other inputs. Computer Touch screen Description VGA Output VGA input Computer drives the video display on the monitor Touch Input (USB) Touch Output (USB) Feedback from the touch monitor to the PC on where has been touched on the screen Page 13 Freestanding Infrared Multi Touch Screen Display User’s Manual Begin by connecting your PC to the mains via the power outputs located inside the unit (using either C6 or C14 connectors) and ensure that there is a mouse connected to it. Next, Plug in the unit’s power supply to the mains outlet – this should power on both PC and screen. Connect the screen to the PC via the VGA cable ONLY (as shown above). Before taking any more steps ensure that the screen is sourcing its display from the PC. This is done by first pressing “MODE” and then scrolling down to the desired input source (PC) and select by pressing “→”. PC (VGA) HDMI DVI AV1 AV2 YPBPR Page 14 Freestanding Infrared Multi Touch Screen Display User’s Manual 2.2 Changing your display to portrait mode 2.2.1 (Windows 7) First ensure that you have connected to touch screen to the PC via the VGA cable. Still using your mouse access the display options from your Control Panel or right‐click on your Desktop and choose “Screen resolution”. Select the “Orientation” dropdown menu then click on “Portrait (flipped)”. Page 15 Freestanding Infrared Multi Touch Screen Display User’s Manual Click “OK” and your screen contents and operations will now be rotated 90° clockwise. You may be asked “Do you want to keep these display settings?” click on “Keep changes”. Page 16 Freestanding Infrared Multi Touch Screen Display User’s Manual 2.2.2 (Windows XP) First ensure that you have connected to touch screen to the PC via the VGA cable. Still using your mouse access the display options by right‐clicking on your Desktop and choose “Properties”: Then click the “Settings” tab: Now click the “Advanced” button, you can access your graphics card settings: Page 17 Freestanding Infrared Multi Touch Screen Display User’s Manual Now you can rotate your display 90° clockwise or 270° anti‐clockwise. Each graphics card will have a different method for this, if you are having trouble please read the manual of the graphics card or contact your supplier. Page 18 Freestanding Infrared Multi Touch Screen Display User’s Manual 2.3 Installing the touch screen driver (Windows XP only) The touch screen driver only needs to be installed on a Windows XP Operating System. If you are using a PC with a Windows 7 Operating System you DO NOT need to install the driver and it should run automatically once both VGA and USB connections have been made (see figure 4). Windows 7 also supports the multi touch function; all Windows Operating Systems before Windows 7 can support the single touch function. To find out your operating system and system type click Start>right‐click Computer>Properties, which should bring up a window like this: Once you know your PCs operating system type you will know if it needs the driver to be installed and if it supports the multi touch function. 2.3.1 Windows XP Driver Installation First ensure that you have connected to touch screen to the PC via the VGA cable and you have rotated your display to portrait mode. Insert the CD into the CD‐ROM drive on the computer. Using Windows Explorer access the CD‐ROM drive and launch the application called “TouchStartup”. This will prompt the installation of the touch screen driver that allows you to use your finger like a mouse on the monitor. You will first be greeted with the following message, Page 19 Freestanding Infrared Multi Touch Screen Display User’s Manual click “Next”. Then you will be presented with this message, click “Install”. Next you will have to wait a few minutes while the software is installed onto your PC. Page 20 Freestanding Infrared Multi Touch Screen Display User’s Manual Page 21 Freestanding Infrared Multi Touch Screen Display User’s Manual Once installation is complete you will see the following message, ensure the “Launch TouchService.exe” box is ticked and click “Finish”. Now launch the ‘TouchStartup’ application, it will display the message ‘Have not linked equipment’. Next, link the screen’s Infrared touch sensors to the PC via the USB cable (as shown below). Figure 6 Screen to PC Connections IMPORTANT: Be sure to connect the PC to the USB port on the side of the input panel and NOT the one adjacent to the other inputs. In the “Touch Service” software, if the connection has been made successfully the message should read “Already link equipment”; if you have not made a successful connection it will read “Have not Page 22 Freestanding Infrared Multi Touch Screen Display User’s Manual linked equipment”. Please wait for a minute to allow the PC to detect the new hardware. Next, still using your mouse, click the “Settings” button then under the “Rotation setting” dropdown menu select “270°” and click “OK”. This should calibrate your screen. Your screen should now be a fully functioning touch screen display. Page 23 Freestanding Infrared Multi Touch Screen Display User’s Manual 3. F.A.Qs and Troubleshooting Guide 3.1 My Touch Screen is not displaying what is on my PC 3.1.1 Input Source Your Touch Screen may be sourcing its display from another input. First connect the Serial Control Box to the screen via the CAT5 port (marked REMOTE KEY BOARD on “Inputs” diagram Figure 2). When using the Remote Control please ensure that it is no more than 20cm away from the sensor on the Serial Control Box. This close proximity control feature is to ensure that you only control the desired device if there are others in the area. Press “MODE” and then scroll down to the desired input source and select by pressing “→”. PC (VGA) HDMI DVI AV1 AV2 YPBPR 3.1.2 Display/monitor button on keyboard Your keyboard may have a display/monitor button on it, especially if you are using a laptop. If your Touch Screen does not display the content of the PC try hitting this button before contacting your supplier. 3.2 My display turns itself OFF when it’s not connected to my PC 3.2.1 Power saving function If your Touch Screen display is powered ON without being connected to a PC via a visual signal (e.g. VGA, DVI etc.) it will automatically power OFF within a few minutes. If your Touch Screen display Page 24 Freestanding Infrared Multi Touch Screen Display User’s Manual is not being supplied with a video signal it will power OFF so ensure that video signal connection is connected properly. Also you must ensure that the Touch Screen is accessing the correct input. To do this you must first connect the Serial Control Box to the screen via the CAT5 port (marked REMOTE KEY BOARD on “Inputs” diagram Figure 2). When using the Remote Control please ensure that it is no more than 20cm away from the sensor on the Serial Control Box. This close proximity control feature is to ensure that you only control the desired device if there are others in the area. Press “MODE” and then scroll down to the desired input source and select by pressing “→”. PC (VGA) HDMI DVI AV1 AV2 YPBPR 3.3 My screen is displaying video signal but touch function is disabled Please ensure the Touch Screen is connected to the PC via the USB Cable. Go though the steps in Section 2.1 to do this correctly. 3.4 My Touch Service software is displaying the message “Have not linked equipment” even though I have. If you are using a Windows XP PC and you have installed the driver software it should be able to detect the new hardware once you have connected it via the USB cable. If installation is compete and connections have been made you should NOT see the following: Page 25 Freestanding Infrared Multi Touch Screen Display User’s Manual If, however, you see this message you should begin by disconnecting the USB cable and restarting the PC. Once your PC has powered back up launch the Touch Service software and reconnect it to your touch screen via the USB cable, then you should see this message: Give this a few seconds and once the PC has detected the touch screen you will see this message: Page 26 Freestanding Infrared Multi Touch Screen Display User’s Manual Your PC and touch screen should now be linked interactively. Finally, still using your mouse, click the “Settings” button then under the “Rotation setting” dropdown menu select “270°” and click “OK”. This should calibrate your screen. Your screen should now be a fully functioning touch screen display. Page 27 Freestanding Infrared Multi Touch Screen Display User’s Manual 4. Full Range Specifications Page 28