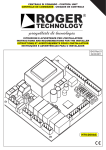
1
RetailMan POS The Easy Business Solution to Fully control Your Business. © EziSolution Systems, 2011 © EziSolution Systems, 2011 Table of Contents RetailMan Introduction Quick Start Function Keys Support and Contacts Main Menu User Interface Other Languages Support POS Point Of Sale Touch Screen Payment Quick Menu Buttons POS Docket Re-Print POS List Start/End Day Point Of Sales Reports Summary Income Report Daily Sales Report Staff Sales Report Group Sales Report Hourly Sales Report Sales Invoicing Quotations Lay-away / Lay-by Credit Note Consignment Out Payments Received Add / Modify Clients Email Bulk E-mail Labels Printing Sales Reports List of Clients Invoices List Report Summary Sales Report Aged Clients Report Clients' Statements Sales Analysis Report Back Orders Report Sales Tax Report Bank Deposit Sales Payments Report Sales By Client Sales By Product Client Sales/Product Product Sales/Client Sales by Sales Rep Stock Add / Modify Stock Card 6 7 8 10 12 13 13 14 15 15 18 20 23 24 25 26 26 27 28 29 30 31 31 36 37 38 39 40 42 45 46 48 49 49 50 51 52 53 54 55 56 57 58 59 60 61 62 63 64 65 p2 © EziSolution Systems, 2011 Details Tab History Equivalent Part Numbers Package Contents Kit Stock Groups Maintenance Global Stock Maintenance Stock Quantity Adjustment Stock Reports Item Enquiry Transactions Enquiry Quantities Report Selling Prices Report Cost Price Report Slow Moving Items Report Out Of Stock Report Stock Reorder Report Stock Take Report Stock Value Report Items' History Purchase Menu Purchasing Payments To Suppliers Add/Modify Suppliers E-mail Broadcast Purchase Reports List of Suppliers Report Purchases List Report Purchase Orders Report Summary Purchase Report Aged Suppliers Report Suppliers' Statements Purchase Analysis Report Back Orders Report Stock On Order Report Purchases Tax Report Purchase Payments Report Payroll Sign In / Out Process Payroll Add/Modify Staff Payroll Parameters Payroll Slips Report Payroll Report Sign In/Out Report Accounts Chart of Accounts Journal Posting Entry Posting Bank Reconciliation Accounting Reports Chart of Accounts Report Daily Entries Report Daily Balances Report 65 67 68 69 70 73 74 75 76 76 77 78 79 80 81 82 83 84 85 86 87 87 90 92 93 94 94 95 96 97 98 99 100 101 102 103 104 105 105 108 109 110 111 113 114 115 115 117 119 121 122 122 123 124 p3 © EziSolution Systems, 2011 Monthly Balances Report Statement Of Account Trial Balance Report Trading Profit / Loss Report Balance Sheet Report Diary Diary Screen Telephone Telephones Directory Maintenance Files Reindex System Setup Company Setup General Setup Sales Setup Stock Setup Purchase Setup Point Of Sale Setup Payments Setup Loyalty Locations Hardware Setup POS printer Cash Drawer Pole Display Electronic Scale Barcode Scanner Credit Cards Import / Export Files Restore Data From Backup Users Settings Modify User Security Settings Sales POS e-Mail Tax File Maintenance Default Accounts Setup Clear Data files Data Files Statistices Versions History Version 1.8 Version 1.80 Version 1.80.1 Version 1.80.2 Version 1.80.3 Version 1.80.4 Version 1.80.5 Version 1.80.6 Version 1.80.64 Version 1.80.73 Version 1.81 Version 1.9 125 126 127 128 129 130 130 132 132 133 133 135 135 136 137 140 141 143 146 148 150 151 152 154 156 157 159 160 162 164 165 166 168 169 171 172 174 176 177 178 179 180 181 181 182 183 184 185 186 187 188 189 190 191 p4 © EziSolution Systems, 2011 Version 1.90 Version 1.90.09 FAQ Barcode Printing Cash Drawer Setup Cannot load 32-bit DLL repinv3.frx Error Access Printer Spooler Issuing a discount on invoice or POS total POS printer setup Pole Display Setup Network Printing Network Setup System Freeze Serial Number Tracking Supported Hardware p5 191 192 194 194 196 199 200 201 202 204 207 210 214 215 216 © EziSolution Systems, 2011 RetailMan RetailMan POS, the easiest way to take full control of your business -o- p6 © EziSolution Systems, 2011 Introduction Retail ManPOS System makes it easy for users with only a partial acc ounting background to start entering information on the computer without worrying too much about debit and c redit principles. The whole idea behind the system is that it is very similar to the paperwork side of the business, but much faster. This can save the business thousands of dollars in m any ways including: Increase profit and decrease work load Boost sales using the built in emailing system Stock Control Faster debit collection On-time payment to c reditors Smaller acc ountants bills Faster tax returns Track staff sales and give rewards based on performance And more . . . The user interface of the system is very simple and errors made during data-entry c an be corrected as easily as they are made. All needed information is always at your fingertips therefore saving you tim e. The Retail ManPOS System System runs under the operating system Windows 9x, 2000, XP, Vista, Windows 7, Windows 2003/2008 and most network systems that are Windows compatible. It is year 2000 compliant and has no end-of-period posting. The multi-user version, ships with the ability for the data to be accessed by several users at the same time. Retail ManPOS System now comes with internet support. The user can email the clients, suppliers or contacts directly from within with great ease. It also supports em ail broadcasting, giving the user a very valuable quick and inexpensive advertising tool. A full copy of the user manual can be downloaded from our web site, to do that, go to HELP > ABOUT and click on the web site link on the about page. -o- p7 © EziSolution Systems, 2011 Quick Start Trying to implement an electronic accounting and stock control system in the business c an be overwhelming. You are probably asking yourself "Where do I start first?". This quick start guide gives you a clear step-by-step approac h with a minimum of fuss. The overall task is broken into separate, simple steps that you can follow in sequenc e to achieve the required result. Step 1 Select Maintenance > System Setup to set up your company name and other details. Refer to the corresponding section below for further information Step 2 Decide which users are going to be using the system and their acc ess levels. When first installed. Retail ManPOS System comes with five users. Users 1 and 2 have access to all parts of the system. If you need to make the system secure, you should allocate a password to each user at the earliest opportunity. If you do not need security on the system, simply blank the password of the master user. To assign security, select Maintenance> Users File Maintenance , and add or remove users as you need. You can give users one of four possible access levels. These are: 0 No access 1 Read only 2 Read and Write 3 Full access (Read, write, Modify, and Delete) Note: The first two users will always have a full access to all parts of the system regardless of what their access levels are set to. Note: Use Ctrl + F12 to change users from anywhere in the system Step 3 Select Sales, then Add/Modify Clients to add the client details. You are recom mended to create a client name called CASH SALES for all cash sales. Step 4 Select Purchase, then Add/Modify Suppliers to add supplier details. You are rec ommended to create a supplier name called CASH PURCHASE for all cash purchases Step 5 You will need to add stock to the system , you can do that in a number of ways, but make sure when you enter new stock to include the item s part number (or barcode), item details, selling price and most importantly the cost pric e, this is the minimum amount of information to p8 © EziSolution Systems, 2011 properly handle the stock. To add stock, you can do so from the Stock > Add/Modify Screen or from the Maintenance > Import/Export Files Screen, then once the stock data is entered, you can start buying and selling. -o- p9 © EziSolution Systems, 2011 Function Keys Use the following function keys for speed and simplicity: F1 : Activate help system. This function key activates the Windows style built-in help. It is active throughout the system . F2 : Save Transaction. The F2 function key is used in the data entry forms throughout the system and allows the user to use the keyboard to save the entered data by pressing F2. F3 : Print Transaction. The F3 function key is used to print reports, invoices, quotes, purc hase orders and more. To choose the printer destination, you have to use the m ouse and right click on the F3 Print key to access the printer dialog box. F4 : Delete Transaction (Invoicing & Purchasing). The F4 function key is used to delete transactions in the data entry screens such as invoicing, purchasing and more. The system will ask for delete c onfirmation before proceeding. F5 : Process Payment (Invoicing & Purchasing). Pressing the F5 function key in the invoicing the purchasing screens will activate the payment screen to pay a single invoice or purchase. F7 : Produce a list of outstanding invoices in invoic ing and purchasing Pressing F7 in the invoicing or purchasing screens will produce a list of all invoic es or purchases for the past 12 months. To view a list of invoices for either one c lient or supplier, enter the client or supplier code before pressing F7 in the invoic ing or purchasing screen. F8 : Search by for serial number. Pressing F8 will prompt the user to supply a serial num ber to search for. The serial number has to be exactly as entered, otherwise the search will fail. If you have m ore than one serial number for 2 different items, you can use the UP/DOWN arrow keys to scroll through them . F9 : Search by Part Number. Pressing F9 will prompt the user to supply a part num ber to search for, if the part number did not exist, the system will display the stock list with the nearest part num ber highlighted. Shift+F9 : Search by Equivalent Part Number Pressing the SHIFT and F9 combination will prompt the user to supply an equivalent part number to search for. F10 : Search by Part Details Pressing F10 will prompt the user to enter an item details to search for, You c an enter the first few letters of the item details and the system will produce the stock list sorted by item details with the search string or its nearest at the top of the list. p10 © EziSolution Systems, 2011 SHIFT+F10 : Search by Parts Other Details Pressing the SHIFT and F10 key combination will prompt the user to enter the item other details to search for. To view the items other details in the stock search list, it should have been enabled from the Maintenance > System Setup > Stock menu F11 : Calendar. Pressing F11 will show the calendar with the current date highlighted. Use the arrow keys to move between dates, then press <Enter> to transfer the date from the calendar to a date field. F12 : Calculator Pressing F12 key will open the Windows calculator. Pressing F12 again will open another instance of the Windows calculator. <Alt>+F12 : Open Cash Drawer if connected Pressing Alt and F12 key combination will open the cash drawer if installed and c onnected. To install a cash drawer, go to Maintenance > System Setup > Hardware. <Ctrl>+F12 : Change user Press the Control and F12 keys combination allows the system to c hange the logged in user, if an invalid password was entered 3 times, the system will close down. <Shift>+F12 : Print Labels in Invoicing & Purchasing screens Use this key combination to print labels and bar codes for your stock items. The output c an be directed to any printer and can be started from any position on the page by choosing the row and column values. Print (F3) and Windows Print Dialog Box To print to the default printer, select Print (F3) anywhere this print button is available, If you right-click on the Print (F3) button, the Windows print dialog will be displayed. This will allow you to choose the printer/destination. This c ould be a local printer, network printer or a fax. (to send invoices, quotes or purchase orders as a fax, you need to have a modem installed or connected to your system with fax software on your system . Windows comes with a fax software you can use. Otherwise, there are m any packages that you can use as Fax Software. -o- p11 © EziSolution Systems, 2011 Support and Contacts EziSolution Systems are the authors of Retail ManPOS System and can be contacted via e-mail at: For help and support : [email protected] or for sales enquiries: [email protected] We respond to all e-mails within 24 hours. Although e-mail is a great communication medium it is not 100% reliable and if for any reason you do not receive a reply within 24 hours, please assume that we have not received it and e-mail us at our backup address: [email protected]. For users on Gold support, you can contact us using skype on: Ezisolution Ordering Retail ManPOS System Ordering online is the quickest way to receive your License Key. Please note that it normally takes up to 24 hours for the license key to be emailed back to you. When ordering, make sure to enter the business name as you want it to appear on the invoices, the license key is generated based on that name. Paypal You can pay using Paypal, make the payment to [email protected] Paying via Bank Transfer If you prefer to pay directly via bank transfer, you can email us with your request. -o- p12 © EziSolution Systems, 2011 Main Menu User Interface Once a valid password is entered, the system displays the main menu screen, with the options displayed horizontally at the top of the screen. You can use the left and right Arrows to move between the options, and use the Enter key to access that option. The system comes with two built-in interfaces the user can choose from as shown below BIG BUTTONS INTERFACE This interface is suitable for touch screens and also for quick mouse clicking MENU and TOOLBARS INTERFACE You can change the user interface by going to MAINTENANCE > USER SETTINGS > SETTINGS and choose the Menu and Toolbars option to use a menu style interface with toolbars for quick access to the frequently used items. The navigation with this interface differs slightly from the previous one, you have to use the ALT+the underlined letter on the menu followed by the first letter of number of the option, or you can use the mouse and either click on the toolbar or the desired menu item. You can further change the look of the system by changing the system colors or even have a picture on the main menu by changing the display as needed. Note that if you decide to add a picture to the desktop, make sure the picture file path is correct for all computers on the network. An example of that, if you have a server and the program is instsalled on drive c:, it is best to copy the picture to the program folder and enter the file name without any paths. This way it will always be correct for all stations connected to the server. -o- p13 © EziSolution Systems, 2011 Other Languages Support The system allows each user to choose his/her own language file, so someone can be working on the system in Spanish, while the other user uses English, yet another user use Arabic and so on. If the language file you need is not there, you can add it in and edit the language file to your likning by clicking on the edit button and editing the Captions to show the new language. -o- p14 © EziSolution Systems, 2011 POS Point Of Sale The Point of Sale screen is where the checkout operator does all the sales. Select POS from the main menu to display the Point of Sale screen. Point of Sale screen fields: Date: Today’s date, this c an be disabled from MAINTENANCE > USER SETTINGS > POS, to stop uses from changing today's date. Number: This is the sales number that will auto increment.. Client Name: Enter either the client code or client name, otherwise leave blank if you do not wish to track sales to this client. Balance: This will display the current balance for the c lient. Points: This will display the number of un-redeemed points earned by this c lient. The way to enter transactions in to the grid, is by either pressing the button on the touch screen, or clicking on the button using the mouse, typing on the keyboard, or using a barc ode scanner to scan item barcodes. Part No.: Enter or scan the item or bar code. This field can take of up to 20 characters (letters and numbers). If you entered a code that does not exist, you will be shown a list of items starting with the code next to the one you have entered. You can scroll up or down, p15 © EziSolution Systems, 2011 then select the one you want by pressing the Enter key. The item code of what you have selected is transferred to the sales screen. Part Details: If you have enabled description editing (refer to the Maintenance Menu, Users Settings, Settings Button, POS Setup tab ), the cursor stops at the description field, to allow the operator to modify it. If you leave the part num ber field blank, and enter an item description, the system will display the stock file for you to make a choice. Qty: This field lets you to enter the quantity sold. It defaults to 1. If you have enabled Qty field editing (refer to the Maintenance Menu,Users Settings, Settings Button, POS Setup tab), then the cursor stops on the Qty field and waits for the operator to change the quantity if needed. If you have not enabled Qty field editing, the cursor skips the Qty field. However, the operator can still edit that field by mouse clicking on the qty field. Amount $: This field displays the retail price of the item being sold. If you have enabled the edit option, the operator can change the price. If you have not enabled the edit option, the operator cannot change the price. Tax: The tax code as recorded for the item in the stock file, is displayed. The operator can change this manually to another valid tax c ode. Disc. : The operator can enter a discount amount or percentage, To change the amount to percentage, enter the % sign after the value. NOTE: Clicking the Descount% Header allows you to add a disc ount to all the items in the grid at once. Total $: As each item is entered, the line item total will be displayed in the Total $ field. To end the transaction, you can use one of the following methods: 1 - Enter the amount paid by the client in the PART NUMBER field, then press F2 to Save or F3 to Print, doing so will save the payment as being paid by the default paym ent which you can set from MAINTENANCE > SYSTEM SETUP > PAYMENTS. You can assign some of the buttons to be fixed amounts paid, such as the $10,20,50 and $100 notes, so when you press on that button, the system will save the amount as the one being paid. 2 - Press either F2 or F3, the system will pay the exact sale amount using the default payment method, then save or print the transac tion. 3 - Press the PAYMENT Button (F5) which will take you to the m ulti-payment screen and you can choose to pay the transaction with one or m ore payment types before saving or printing. To re-print a docket (or print it as a Gift Voucher), press the Print Button (F3) while the POS screen is blank. Hit F7 to reprint or delete a sales docket. To enable or disable deletion, refer to the Maintenance Menu, Users Settings, Settings Button, POS Setup tab . Station Number: The default station number, shown at the top of the screen, is 1. To change the station number (say to 2), add the required station number as a parameter to the p16 © EziSolution Systems, 2011 shortcut as follows: 1. On the desktop, right click on the shortcut to display the pop-up m enu. 2. Select Properties. 3. Select the Shortcut tab. 4. The path to the Retail ManPOS System program will be displayed in the Target field. 5. Click at the end of the path to m ake sure it is no longer highlighted. 6. At the end of the path, type a space then the param eter (required station number). 7. The path will now look something like this: C:\RMAN\RMAN.EXE 2 8. Click OK to close the shortcut and save the change. -o- p17 © EziSolution Systems, 2011 Touch Screen Payment This screen is activated if you press F5 after com pleting the POS transaction. It can be used with touch screen, mouse or keyboard and will acc ept multiple payment options for the sam e POS transaction. Note that if you have the rounding on, the rounding will occ ur on the payments which has rounding enabled. Use the keypad to enter the amounts, or press the payment tabs to quic kly fill the payment field. so if you want to pay by credit card, press the 0 button to zero the cash field, then press the C/Card button to fill the Credit Card field with the full amount. Once done, press F2 to save or F3 to save and print. To enter a different currency payment, click on the Cash option whic h will give you a drop down list of all the available currencies. If you need to add a new currency, Right Click on the Cash Option and you will get the Currency file that will enable you to add/modify the currencies and their exchange rates. Make sure to enable the users to allow them to edit the currency screen. p18 © EziSolution Systems, 2011 To add a new currency, just enter it on the first line then save. To modify, just over-write the text and click save -o- p19 © EziSolution Systems, 2011 Quick Menu Buttons The quick menu buttons are used to speed the selling process by allowing the user to use either a touch screen or a mouse to process sold items. The user MUST have the ALLOW QUICK MENU BUTTON EDIT security flag set to enable the user to edit, this setting is ac c essed from MAINTENANCE > USER SETTINGS > Click on the SETTINGS button, then choose the POS tab. The Quick Menu allows up to 50 buttons per menu, all menus and buttons c an be programmed as follows: Menu Button To assign and program a Menu Button, use the SHIFT and Right m ouse click on the button you wish to assign as a menu button, the following screen will appear: You can then assign a menu name, icon and color, then save. To use the menu color for all the buttons in that menu, use the Control + Shift + Mouse Click Key on the menu button. Item Button You can press CONTROL + Right Mouse Click on any button to modify the contents and icon of that button to suit your business. p20 © EziSolution Systems, 2011 Please note that changing the Retail Price from here will change the item Retail price in the stock card. TEXT Button You can assign any button as a text button to include any text inc luding money paid. Enclosing the text in square brackets will force the system to use that text to fill the grid fields when that button is pressed. FUNCTION KEY BUTTON To assign a function key to a menu button, enter the text enclosed by < > p21 © EziSolution Systems, 2011 -o- p22 © EziSolution Systems, 2011 POS Docket Re-Print Pressing F3 or clicking the Print button will allow you to re-print previously entered POS transactions. The system will pre-fill the document number with the last doc ket number, you can then send the printout to the docket printer or to the default Windows printer Clicking on the Docket Button will print the docket, clicking on the Gift Button, will print a gift docket with no prices, pressing F3 or clicking on the Print button will print a full invoic e. If you need to print a Gift Docket, once you click on the Gift Print button, the system will allow you to change the text on the docket to allow for m ore personalised service to your clients. -o- p23 © EziSolution Systems, 2011 POS List Pressing F7 or clicking on the POS List key will display the POS list for today, you c an then re-print any of the listed transactions on either the docket printer or the default Windows printer, or you can delete any of these transactions, provided you have the authority to do so. Note that you can disable the display of the total of sales and their amount from the MAINTENANCE > USER SETTINGS > SETTINGS button > POS tab -o- p24 © EziSolution Systems, 2011 Start/End Day The Start / End of Day screen is used to perform the cash reconciliation at the end of day. The user has to enter the amounts that are in the cash drawer at the start of day, and also the amounts that are in the cash drawer at the end of the trading day. Then using the second POS report ( POS Sales Report), the user can print the cash reconciliation report that will show any discrepancy in the amounts present at the end of day. Any positive am ounts indicate a surplus, while negative amounts indicate a shortfall that should be investigated. Date: Enter today's date Station Number: The default station number is 1, however, if you have a m ulti-user license, you need to enter each station number and amounts separately. Day Start: Enter the amounts at the start of each day by counting the m oney in the till for that station. Counted: You have to enter the amounts at the end of the trading day for each station, then once done, you can then run POS report 2 to list the correct am ounts. -o- p25 © EziSolution Systems, 2011 Point Of Sales Reports Summary Income Report Description: This report displays the sales summary by payment type for a given period. Report request screen fields: Location: This field will only appear on the Multi-Loc ation version of the program. From Date & To Date: Enter the first to last dates you want the report to cover. -o- p26 © EziSolution Systems, 2011 Daily Sales Report Description: Reports on Sales for the specified date. Choose report type: Detailed report: Every item on every sale is listed. Summary report: Total amount for each sale is listed. Report Size: Choose narrow for a 40 column report, wide for an 80 c olumn. Date: Enter the date you want the report for. Station No: Enter the station number or leave blank for all stations -o- p27 © EziSolution Systems, 2011 Staff Sales Report Description: Sales for the staff members over a spec ified period in detailed, summary, or itemized format. Report request screen fields: Staff Name: Choose the staff name from the dropdown list, or leave blank to report on all staff members. From Date & To Date: Enter the first to last dates you want the report to cover. Totals/Summary/Detailed: Select as required. -o- p28 © EziSolution Systems, 2011 Group Sales Report Description: Product group sales over a specified time span, in Totals, summary, or detailed format. Report request screen fields: From Date & To Date: Enter the first to last dates you want the report to cover. Totals/Summary/Detailed: Select as required. -o- p29 © EziSolution Systems, 2011 Hourly Sales Report Description: This report dispays the Hourly Sales over a specified time span, it allows the user to know which hours of the day are the busy ones so as to be able to allocate staff accordingly to better serve the custom ers and yet save money on unwanted staff time. Location: This option only appears on the Multi-Loc ation version, leave blank for all locations, or choose location. Date Range: enter date range to report on. Day of Week: Tick all required days to report on. -o- p30 © EziSolution Systems, 2011 Sales Invoicing The Invoicing screen is used to enter client invoices, Quotations, Lay-bys / Layaways and credit notes (or sales returns) Code: Enter the client’s code and hit Enter. If the code you entered is not found, the system will display the Clients List and you can scroll up or down and choose the one you want. If you cannot remember the client code, then leave it empty, enter the client name or part of the name and press Enter. Pressing Enter on the client name will position the cursor in the grid and you can start entering item, if you wish to set focus to the other fields in the top of the screen, then use the TAB key instead of the Enter key Type: Choose from drop down options Invoice, Quotation, Layby or Credit Note or Consignment out. Number: To enter a new invoice, press Enter on the invoice number field. A new invoice with the next number in sequence will be created. To recall an existing invoic e, type in the old invoice number. This invoice will be recalled. You can then modify it or delete it. NOTE: The invoice number range is 1 to 99999999 Date: The default is today’s date. Change this if you need to. p31 © EziSolution Systems, 2011 Note: Right mouse click on any date field and select a date interactively from a calendar. Ref. no: Enter the client’s reference number such as order number. For backorders, enter ‘BO’+Existing invoice number (for example, BO123) this will issue a new invoice which recalls the back orders on that previous invoice. In this case the invoice details will be displayed on the list part of the screen. Salesperson: Select the salesperson’s name from the drop down list of users. Source: Choose the sales source (such as word of mouth or TV Ad), you will then be able to produce a report of where are your clients are c oming from. Note: You can edit the source file by pressing Control+Right Mouse Clien on the Source field, this will bring up the Source file and you can add, edit or delete entries. Terms: Enter the invoice terms, such as COD, 7, 14, 90 days, etc . Currency: You can choose a different currency if the currency option is enabled. Note: To modify the curreny file, use Control+Right click on the currency field. Invoice line items columns: Part No: Enter the item part number. If you enter only a part of the c ode, the system will display the Stock List where you can choose an item by pressing Enter on the one you want. To enter a non-stock item, Enter an asterisk * in the code field. To enter text, tab to the item details and type it in. You can enter a serial number to the previous item by entering the text S/N in the part number field and then enter the serial num ber in the details field, the system will add the serial number to the serial numbers file. The part number also accepts equivalent part numbers for the same item, so if you have an item that you buy from different suppliers with eac h supplier having their own part number, you can enter all these part numbers in the Equivalent Part Numbers section in the Stock Card, then you can use any of these part numbers to sell the same part. Details: If you entered a valid code, this field will be filled automatically. If you entered a *, the system allows you to type in the item description yourself. If you wish to enter text r items that do not show on the invoice printout, then start the text with > Quantity: Enter the quantity being sold. If the qty in negative, it indicates that you are returning that item to the stock. B/Order: If the required quantity is more than you have in stock, the system allows you to enter a back order if you have the backorder option enabled. To enable this option, selec t Maintenance, then System Setup, then select the Sales tab, and check Force Backorder. Amount: This field is filled automatically as part of the item details. However, you c an over type this. Tax: If the stock card has the tax code included, this field will be filled autom atically, otherwise select the appropriate code from the drop down list. Disc.: Enter the item discount. Discounts can be in percentage or amount, the discount type (as percentage or amount) can be setup from Maintenance > System Setup > Sales tab Note if you have setup the discount as an amount, but while entering the invoice you want to enter a percentage discount (say 20%) just enter 20 followed by the % sign and the system will calculate the discount amount for you. p32 © EziSolution Systems, 2011 Totals: The system calculates and displays the total amount automatically. Continue entering line items as required until the order is filled. When you have c ompleted the invoice, select one of the following: Save (F2): Save the invoice. Right click on this button will save the invoice, and also save a PDF copy of it in the C:\temp folder and will display that invoice on screen. Print (F3): Save and print the invoice. Hint: You can send the invoice to a different printer or even fax it by right clicking the print button and choosing the destination. Email: This will email the invoice directly to the client. The c lient must have the email field filled with a valid email address. If you are using a dialup modem, you need to c onnect to your ISP first. For ADSL users, the system will send the email as an attac hment. Delete (F4): Delete the invoice. Payment(F5): Pay or part pay the invoice. Note that the system will auto-fill the payment number with the last payment number + 1, you can choose the payment date, amount, payment method, details and the account to send to. If there are two or m ore persons on the network doing payments at the same time, the one who saves first will save that paym ent number and the next one will inc rement the payment number before saving automatically. If you press the F5 button with no items in the grid, the system will display a deposit screen and allows you to receive money from the client as a deposit. p33 © EziSolution Systems, 2011 F7: Display a list of invoices or quotes for the previous 12 months. If you wish to see invoic es for a particular client, enter the client Code/name in the invoicing screen first before pressing the F7 function key. Exit (Esc): Close the Invoice screen without saving. The invoice is disc arded. Shift+F12: Print labels for the items you just entered. To be able to print part num bers as barcodes, you must install the barcode font that com es with Retail ManPOS System by either copying the file to C:\WINDOWS\FONTS, or by Control Panel > Fonts >ADD New Font. Import: Click this option to import data from an external data file or right c lick to use a remote scanner and scan stock item s. If you have enabled the Multi-Currency option, you will notice that you have a Currenc y option on the top left hand section of the screen. Choosing a currency will change the currency headings of most of the screen, however, the payment will always be in the local currency. p34 © EziSolution Systems, 2011 -o- p35 © EziSolution Systems, 2011 Quotations You can issue quotations to clients using the same screen as the invoicing screen, you can choose the quotation from the drop down option on the top right hand of the sc reen. The quotation entry is the same as the invoice entry, but when saving, the accounts and stock will not be affected. When the clients comes back to buy, you can copy the quotation as an invoice by sim ply recalling the quotation, (just enter the quotation number and press Enter) then c lick on the drop-down list and you will notic e some added options including "Copy as Invoice" Choosing the "Copy as Invoice" option will replace the heading to Invoice, then you c an modify the entries (if you need to) and process it as an invoic e before payment and saving. -o- p36 © EziSolution Systems, 2011 Lay-away / Lay-by Lay-aways / Lay-bys are used to sell to clients but the client will not take possession of the goods sold until the full payment is made. It is basically a promise from the client to buy the said goods, within a c ertain period of time for a promise from the seller to hold these goods for that c lient for that same period of time. The client will have to pay some money towards this contract, and if the client fails to show up at the end of that period, then the seller can keep all or some of that money. To start processing a lay-away, choose the Lay-away / Lay-by option from the drop-down list from the invoicing screen, then process the transaction as usual. The way this works is the client comes in and brings you the goods they want to buy, they pay a minimum amount for you to keep these goods for them , then within the agreed period, the client comes in at regular intervals and make more payments towards these goods, and when they pay the full amount, the lay-away is changed to an invoice by the system . Note that the transaction number is the same as the invoice number, and at the end, when the client pays the full amount of the Lay-away, the system will automatically change the transaction type from Lay-away to Invoice. Every time the client comes back to part pay for the lay-away, just recall the lay-away number and press the payment button to process a part payment, if you c an't recall he number, just enter the client code or name, then press the F7 to see all their transactions, choose the correct one and press Enter. (Make sure to change the transaction type first before pressing the F7) -o- p37 © EziSolution Systems, 2011 Credit Note This screen is used to return stock bought by clients who decided they do not want the stock and want it returned. You can choose this option from the Drop-down list Note that you can do stock sales returns by using the Invoice and enter the Qty in negative, this is useful especially if you are returning stock as well as selling new stoc k for the same client, so using the Invoice to process the returns makes more sense than using the Credit Note. Also note that when using the credit note to return stock, the qty MUST be entered as a positive number and not as a negative number, entering the Qty in negative will be as if you are selling it and not returning it to the stoc k. -o- p38 © EziSolution Systems, 2011 Consignment Out This screen is used to send stock to clients or resellers who want to have the stock but not pay for it until they sell it. So issuing a consignment out will take stock out, but will not debit your c lient with that amount. To issue a consignment out, choose the Consignment out option from the drop down list in the Invoicing screen. -o- p39 © EziSolution Systems, 2011 Payments Received The Payments Received screen is used to pay a batch of invoices. Invoices can be fully or partly paid. Payment No.: To enter a new payment, press Enter on the Payment No. field, A new payment record with the next number in sequence will be created. To recall an existing payment, type in the old paym ent number. This payment will be recalled. You can then modify it or delete it. NOTE: The payment number range is 1 to 99999999 Payment Date: The default is today’s date. Change this at will. HINT: Right mouse click on any date field and select a date interac tively from a calendar. Client Name: Enter the client’s name. Payment Details: Enter payment the details. The field is pre-filled with the paym ent method. From Invoice Date: Enter an optional start date for the invoices you want to pay. To Invoice Date: Enter an optional end date for the invoices you want to pay. These two fields will filter the invoices into this date range and display them on the Outstanding Invoices list. Amount: Enter the amount being paid, you can choose more than one type of paym ent. If you are part paying some invoice, you MUST change the PAYMENT TODAY am ount in the grid. p40 © EziSolution Systems, 2011 But to save the transaction, the total am ount paid must equal the paid amounts. Account: The system will post the paid amounts to the default accounts that you configured in the system setup screen, if you wish to send the payment to a different account, right click on the payment button and choose a different account for the chart of accounts. Outstanding Invoices columns: No.: This is just a line item number. Each line is numbered off starting with 1 at the top. Invoice #: The invoice number as it was saved. Date: The date of the invoice. Total $: The total currency value outstanding on this invoic e. Paid $: This is what has been paid already. Payment Today $: Enter the amount being paid spread over the list of outstanding invoic es. These can be part payments. The total of this column is displayed at the bottom right. This must agree exactly with the value in the Amount field on the left of the screen. If you try to save with the amounts not in agreement, you will receive a warning message. Continue entering invoice payments on eac h line as required. When you have finished selec t either press: Save (F2): Save the payment. Note that the total of this Paid $ colum n must agree exactly with the value in the Amount field. The Save button is disabled until you have achieved this. Print (F3): Saves and print the payment. Hint: Right mouse-click on Print to choose the destination, suc h as a different printer. Email: Saves the payment and emails the client with the payment receipt. Delete (F4): Delete the payment. Close (Esc): Discard any changes or additions to the payment and position the c ursor to the top. -o- p41 © EziSolution Systems, 2011 Add / Modify Clients Select Add/Modify Clients to add, modify or delete details on the list of your c lients. By typing the name of the client, the system displays the name in the top field, and the list follows your entry. Pressing <ENTER> will take you to the Modify sc reen. New(F2) Shows the New Client Screen. Print(F3) Prints envelope with the client name and address details. Labels: This will print client labels, you can choose the range of labels and the label form at. Email Opens the Send Email screen, enter the required fields before sending. Bulk Email: This option will allow you to send bulk em ails to all clients with valid email addresses. Delete(F4) Allows you to delete the client. However, the client will not be deleted, but sim ply add ’~’ to the front of the code and nam e so as not to appear in the normal list. This will stop users from deleting clients who have trading history. When you have made the required changes, select Save (F2) to save the changes and return to the previous screen. To add a new client, select New (F2) from the Clients List screen. The New Client screen will be displayed for you to enter the details. This screen is sim ilar to the Edit Client Details screen. p42 © EziSolution Systems, 2011 Client Type: Choose either business or individual Code: Enter a unique code of up to ten alphanumeric characters Title: Clients title (Mr., Mrs. Etc.) Client Name: The name of the person, company or business. If you choose type Individual, the system asks for the client Surname, Name and date of birth. NOTE: Code and Client Name fields must be filled. Address: Enter the client's address. Telephone: Enter the client's telephone numbers. Mobile: Enter the c lient's mobile numbers. Fax: Enter the client's fax number. Salesperson: You can associate a sales-person with each client, so when you issue an invoice, the sales person's name appears on the invoice autom atically. Join Loyalty: Ticking this option will cause the system to add one point for eac h one dollar spent by the client, you can then decide on how m uch money to give to the client in the form of a STORE CREDIT to redeem these points. Total Points: This shows the total loyalty points the clients has accum ilated, you can over-ride this field. p43 © EziSolution Systems, 2011 Delivery Address: Enter the Delivery address if there is one, this is an optional field. http://: Enter the client's web address if they have one. Clicking on that button will open your web browser on that address. Email: Enter the Cleint's email address, this email address will be used when you email the client their invoices or statements. Clicking on that button will open your em ail client with that email address. No Bulk Email: Tick if you do not wish to inc lude the client email when you send bulk emails to your clients. Notes: Enter notes regarding the client of up to 100 characters. Contact: Enter the contact name if there is one. Pricing: Enter the pricing type for that client as Retail, Trade, Wholesale, Reseller or Qty discount. This field is tied with the stock cards and will display the pric e assigned for eac h stock item or service. If you choose the qty discount option, the price will be changed according to the qty bought of each item. Price Include Tax: Tick if the selling price includes the sales tax, untic k to exclude. Trading Terms: enter the trading terms for the client such as the number of days before the payment is due or a text such as COD (c ash on delivery). Credit Limit: Enter a credit limit to enable the system to warn you if the client exceed that limit. If you do not want the system to issue unpaid invoice, enter a small negative amount (such as -1) to clock the system from issueing unpaid invoices for that client. Start Trading: Enter Start trading date of the client. Stop Trading: Filling this date field will prevent the system from issuing new invoices as of that date. -o- p44 © EziSolution Systems, 2011 Email This option allows you to send email to individual clients, suppliers or contacts. To be able to send the email, you must have setup the email screen settings correctly in the User Settings under the Maintenance > User settings > Settings button > Email Tab Section. Each user of the system must have their own email setup parameters such as senders name and email address. -o- p45 © EziSolution Systems, 2011 Bulk E-mail This menu option allows you to send bulk email to contacts, with or without file attachm ents. No. of Recipients: This field displays the number of email recipients. If the file c ontains a large number of entries, it may take a short while to display this sc reen. To c hange the number of recipients, click on the box next to the field, the system will display the list with the names and email addresses and a tick box next to them, to un-tic k them all, right mouse click on the column header, to tick them all, left clic k the column header; or individually tick or un-tick, once finished, click on the Close button at the bottom to return to the send email screen. Carbon Copy: Enter the email address to send a copy to. Sender’s Name: Enter your name. If you have entered your name in the email setup screen under the Maintenance menu, your name will automatically appear in this field. Sender’s Email: Enter your email address in this field. Ask for Receipt: Tick this box to allow the recipient to automatically send you a receipt acknowledgment before reading your em ail. Subject: Enter the email subject line. If the subject line was left blank, the system will warn you before sending the email. Attachment: This must be a valid file name. You can have more than one attac hment by separating the file names with a semicolon. Tick the box next to the field for the system to allow you to graphically choose the attachment files. Message Type: You can choose to send your message as a text written in the following edit box, or as a file. If you choose a file, The system will disable the edit box and allow you to enter a file name in the following field. The file must be of type text, .HTM, .HTML or .RTF; p46 © EziSolution Systems, 2011 otherwise, an error message will be displayed if you try to send the em ail with a wrong file type. Message File: This field will initially be disabled. Once you choose a file message type, it will be enabled. You can only have one entry and of the types m entioned above. Message Text: If you have chosen a text message type, you can manually enter a text message of variable length. General notes on sending emails For users with dial-up connection (using a standard modem), you need to manually connect the modem using the dial-up icon under Windows before you are able to send em ails. Trying to send emails, when there is no connection, will result in error messages being displayed. If you are an ADSL user, the system will use the ADSL connection without any intervention on your part since it is always open. Note also that you need to setup the em ail screen under the maintenance section before you are able to send any emails. (see Email Setup Tab under the Maintenance Menu) -o- p47 © EziSolution Systems, 2011 Labels Printing Clicking Labels on the List Screen will enable you to print labels which iclude the code as a barcode and the name ad address for the clients, suppliers and contacts. From Label No.: This is an optional field, leave blank to print all tic ked labels, or use it in conjunction with the To Label No. to print a range of labels. This is handy if you wish to print labels in small batches. Label Name: Choose the label stationary to print on. Starting Row: Enter the printing starting label row. Starting Column: Enter the printing starting c olumn. To tick or untik all entries, click on the header of the grid next to the name heading. Screen (F2): Click or press F2 to view on screen Print (F3): click or press F3 to send to printer, Right Click to choose a different printer. -o- p48 © EziSolution Systems, 2011 Sales Reports List of Clients Description: List of selected clients, printed as either a landscape or portrait Report request screen fields: Type: Choose Client type. Report Type: Choose report type of landscape or portrait. State: Enter state code (WA, NSW, etc), or leave blank for all states. -o- p49 © EziSolution Systems, 2011 Invoices List Report Description: List of invoices for a given period, c lient, or part number. Report request screen fields: Choose report type Part Number: Enter a part number to list invoices that inc lude this item. Leave this field blank to include invoices for all parts. Client Name: Enter a client name to list invoices that have been issued to that client. Leave this field blank to include invoices for all clients. Report Type: Choose either detailed of Summary. Status: Choose invoice status, such as paid, unpaid or all. From Date: Enter start date you want the report to cover. To Date: Enter end date you want the report to cover. HINT: Right mouse click on any date field and select a date interac tively from a calendar. -o- p50 © EziSolution Systems, 2011 Summary Sales Report Description: Summary of sales over a given number of months. Report request screen fields: For the Period: Select the start month and year To the Period: Select the end month and year. NOTE: For a report spanning only one month, enter the same in both fields -o- p51 © EziSolution Systems, 2011 Aged Clients Report Description: List of clients with amounts owing, categorized into periods of current, 30, 60 and 90+ days. Report request screen fields: For the Period: Select the start month and year the report is to cover. State: Enter a state code to restrict the report to that state. Leave this field blank to include all clients regardless of state Include Addresses: Check this box if you want addresses in the report. Show 0 Balance: Check this box if you want the report to include clients with a zero balanc e. -o- p52 © EziSolution Systems, 2011 Clients' Statements Description: Detailed client’s statements showing all the outstanding invoices and the payments made during a particular period of time Report request screen fields: Name: Enter the client name if you want to report on only one client, or leave blank to report on all clients with outstanding invoices. From Date: Report start date. To Date: Report end date. Include Paid Invoices: Check to include payments made during the report period, unchec k to list outstanding invoices only. Detailed Statement: Check to produce a detailed statement showing the payments. Leftmost Column: Check or uncheck to include or exclude each client. To uncheck all clients, right mouse click on the header of the left column. To check all c lients with outstanding invoices, click on the header again. Notes to Appear on Statement: You may wish to send the report to a defaulting client. Add any remarks to be included in this field -o- p53 © EziSolution Systems, 2011 Sales Analysis Report Description: Sales analysis for a particular period of time, broken down by sales departments. Report request screen fields: Report Type: Choose report type. Year Ending: Choose month / year end date date. Report Format: Choose Graph or Text. For graphical report, office must be installed. -o- p54 © EziSolution Systems, 2011 Back Orders Report Description: List of back orders sorted by item and client. Report request screen fields: Part Number: Enter a part number. If you enter an inc omplete part number, the Stock List will be displayed fro you to select from. Leave this field blank for all part numbers. Client Name: Enter a client name. If you enter an incomplete name, the Clients List will be displayed for you to select from. Leave this field blank for all clients. Sort Order: Select either Part Number of Client Name depending on which order you want. -o- p55 © EziSolution Systems, 2011 Sales Tax Report Description: Tax collected in a given period of time, on either a cash or acc rual basis, detailed or summary. Tax Name: “Tax” can be GST, VAT, or TAX, depending on the country you are in. Select the specific tax name according to your location as follows: Go to the Maintenance menu, select System Setup, and then go to the General tab. Set the Tax Name field appropriately. The word “Tax” will become whatever you have chosen. Report request screen fields: From Date: Report start date. To Date: Report end date. Detailed/Summary & Cash/Accrual: Select according to requirements. -o- p56 © EziSolution Systems, 2011 Bank Deposit Description: Banking slip for a particular time span. Report request screen fields: From Date: Start date. To Date: End date. Bank Name: Enter the bank you are making the deposit to. Account Name: Enter the account details you are making the deposit to. Branch Number: Branch code or Sort code Account Number: Enter your acc ount number. NOTE: Information entered in these fields will be redisplayed in the future. -o- p57 © EziSolution Systems, 2011 Sales Payments Report Description: List of payments and the way they were allocated on invoic es. Primarily used to verify payments entered. Report request screen fields: Client: Select one client from the dropdown list, or leave this field blank for all clients. From Date: Start date. To Date: End date. -o- p58 © EziSolution Systems, 2011 Sales By Client Description: Sales details broken down by client, for one or more clients, over a time span. Report request screen fields: From Client Code: Lowest client number to be included in the report. To Client Code: Highest client number to be included in the report. For a single client, enter the same number in both fields. From Date: Start date. To Date: End date. Sales Rep.: Select one user from the dropdown list, or leave blank for all sales reps. State: Enter a state code, or leave blank for all states. Show 0 Sales: Check this option if you want to include zero sales in the report -o- p59 © EziSolution Systems, 2011 Sales By Product Description: Sales details broken down by stock group and/or product, for one or more stock groups and/or products, over a time span. Report request screen fields: Stock Group: Select a stock group from the dropdown list, or leave blank for all stoc k groups. From Part No & To Part No: Enter the range of part numbers to be reported. For a single part number, put this in the From field, or leave both fields blank for all part num bers. From Date: Start date. To Date: End date. Value $ / Quantity: Select according to the order required for the report. Show 0 Sales: Check if you want zero sales included in the report. -o- p60 © EziSolution Systems, 2011 Client Sales/Product Description: Products bought by a specified client over a time span. Report request screen fields: Client Name: Enter the clients name, or select from the Clients List. From Date: Start date. To Date: End date. Value $ / Quantity: Report on either currency value or quantity. -o- p61 © EziSolution Systems, 2011 Product Sales/Client Description: what range of products have been sold to all clients over a tim e span!! Report request screen fields: From Part No. & To Part No.: Enter the range of part numbers to be reported. For a single part number put this in both fields. Stock Group: Select a stock group from the dropdown list, or leave blank for all stoc k groups. From Date: Start date. To Date: End date. Sales Rep: Select a user from the dropdown list, or leave blank for all sales reps. -o- p62 © EziSolution Systems, 2011 Sales by Sales Rep Description: Sales report, broken down by sales representative over a specified tim e span. Report request screen fields: From Date: Start date. To Date: End date. Show 0 Sales: Check if you want zero sales included in the report. -o- p63 © EziSolution Systems, 2011 Stock p64 © EziSolution Systems, 2011 Add / Modify Stock Card Details Tab Retail Price $: Enter the retail price of the item. Retail Qty.: Enter the quantity that applies to the retail price. Trade Price $: Enter the trade price of the item. Trade Qty: Enter the quantity that applies to the trade price. Wholesale Price $: Enter the wholesale price. Wholesale Qty: Enter the quantity that applies to the wholesale price. Reseller: Enter the Reseller's price Reseller Qty: Enter the reseller qty The above prices and their sell qty are to be used to allocate different prices for differnet clients, the client can be assigned as a Retail, Trade, WholeSale, Reseller or a Qty Discount client If the client is assigned as a Trade client, then the trade prices will show up on his invoic e automatically, but if he was assigned as a Qty discount client, then the pric e will change according to the quantity he buys, so if he buys a qty of up to 4 of the exam ple above, the system will apply the retail price of $64.99, however, if he buys 5 or more (up to 9), then the Trade price of $62 will apply, if he buys 10 or more then the whole sale pric e of $60 will p65 © EziSolution Systems, 2011 apply. Setting up of the client price type is done from the Add/Modify Clients Screen Bundle Price and Qty: Enter the total price for the bundle (2 or more of the same item) such as $125 for 2 as shown above On Special and date range: Enter the Special price and the date range that this special price apply in. This price will over-ride the other pric es. The information on the right of the screen is updated through the stock transac tions (Sales and Purchases) and cannot be changed manually Except the LAST COST field. To start entering quantities in stock, you must use purchasing with the supplier as ‘Brought Forward Stock’ Bin Location: Optionally, use this field to locate the stock in a large store. Tax Code: Choose the tax details from a drop down list. Sales Account: Choose an optional sales account, if no account was chosen, .the system will post the sale to the default sales account. Purchase A/C: Choose an optional purchase account. This is useful in posting expenses suc h as telephone charges, electricity etc. to its’ proper expense account. If left blank, the system will post the purchase to the default purchase account. Reorder Level: Enter a minimum stock quantity value whic h if the stoc k level falls below this quantity, the system can report it. Reorder Qty: Enter the quantity to order when the level falls below the m inimum stoc k level. On Special: Enter an optional special discount price. From & To: Enter the dates over which the special discount price is to be available to customers. Last Cost: Enter the last item cost for a new item. -o- p66 © EziSolution Systems, 2011 History History Tab: This displays the past months performance of eac h item. -o- p67 © EziSolution Systems, 2011 Equivalent Part Numbers This allows you to enter several suppliers ’ part numbers for equivalent parts you buy from different suppliers. Each line item on the list represents an alternative supplier for the part spec ified in the fields at the top of the screen. No.: This is just a line item number. Each line is numbered off starting with 1 at the top. Part Numbers: The alternative supplier’s own part number. these part numbers are interchangeable with the main part number, so you c an enter any of these part num bers on the invoice, pos or purchase and the system will display this part number for you. Supplier Name: The name of the alternative supplier. Last buy: The date you last purchased this part from this alternative supplier. Cost: The current price charged by this alternative supplier. Note that in the POS, sales and purchase, you can use any of these num bers to recall that part. The nice part about this feature is when you issue a purchase or a purchase order, you c an enter any part number and if the supplier you are buying from has his own number, then the system will recall that part number and display it under the part number column in the purchase regardless which part number you used to rec all the item. This will help you send your suppliers their correct part numbers. -o- p68 © EziSolution Systems, 2011 Package Contents The Package Contents tab is enabled only when Package is checked. Each line item on the list represents one of a number of possibly different items contained in the package. For example, a computer can be supplied as a pac kage comprising several items such as case, monitor, keyboard, mouse, and so on. These item s will be shown as line items on this tab. Part Number: The part number of the item in the package. Description: The item’s description. Quantity: The number of these items supplied in a single package. Cost $: The cost to you. Sell $: The cost to your customer. -o- p69 © EziSolution Systems, 2011 Kit The Kit option is useful in allowing the user to setup Parent/Child stoc k relationship to sell the same stock item in different packages. The way to set it up is as follows: 1 – Create the Parent item in the Add/Modify Stock (if you have not already done so) Make sure the item is flagged as Stock (not service, pac kage or kit) 2 -Once this is done and saved, you can now start creating Child stock item s. Each of these items can have their own part number, details and selling price. There are no limits to the number of child items for any particular stock item. All stock items can have children if you choose to. Note that the system will not keep track of their quantities but as you buy and sell these c hild items, the system will update the cost and quantity of the parent item . Also note that you can create child item s based on more than one stock item, but the only limitation is the system will not allow you to buy that item since it will not know how to allocate the cost of multiple stock items. So the parent items have to be purchased and not the child item. p70 © EziSolution Systems, 2011 p71 © EziSolution Systems, 2011 -o- p72 © EziSolution Systems, 2011 Stock Groups Maintenance Select Stock Groups Maintenance to add, modify or delete from the group file. This file is used in conjunction with the stock file to group items into categories to m ake reporting easier. Select New to add a new group. Select Edit to change the details of an existing group. Code: The alphanumeric group code. Group Name: The group name. -o- p73 © EziSolution Systems, 2011 Global Stock Maintenance Select Global Stock Maintenance to change reorder levels, reorder quantities, prices, tax codes, raise prices by a percentage, and so on over a range of part num bers, or one group code in a single operation. Maintenance Type: Select one of the following from the dropdown list according to the type of m aintenance you want to do: Re-Order Level Re-Order Quantities Retail Price % Trade Price % Wholesale Price % TAX Code Discount% From Part No.: The first part number you want this to apply to. To Part No. & Group Name: Enter a combination of part numbers and group code to restric t the range to those parts you want to m aintain. -o- p74 © EziSolution Systems, 2011 Stock Quantity Adjustment Select Stock Quantity Adjustment to change the stock quantities on a specified range of part numbers or a group. From Part No.: First part number of the range. To Part No. & Group: Use a combination of part numbers and group codes to restric t the part numbers to what you want. Bin Location: This is an alternative way to select a range of parts. Post to Account: Enter an account name or number of the account to be used for posting on these parts. This is validated against the Accounts List. Item list: Part No.: The part number and items details are displayed to show you Item Details: which parts you are working with. Qty on Hand: The quantity is recalculated when you change Counted. Counted: Change this field to the actual stock count. Difference: The difference is recalculated when you change Counted. Select Save (F2) to save the updated stock quantities. Select Cancel (Esc) to close the screen without saving. -o- p75 © EziSolution Systems, 2011 Stock Reports Item Enquiry Description: Report on the sale or purchase of an item over a spec ified time span. Report request screen fields: Item Details: Enter the item details you wish to the report for use. F9 Search Part No: Enquire on item code. F10 Search Part Name: Enquire on item details. Stock Group: Choose Group, or leave blank for all groups. From Date: Start date for the report. To Date: End date for the report. Sales / Purchase: Sales will report the sales transactions. Purchase will report the purchase transactions. Detail / Summary: Select according to the level of detail you want. -o- p76 © EziSolution Systems, 2011 Transactions Enquiry Description: Report showing the transactions of all items over a spec ified time span. Report request screen fields: From Date: Start date for the report. To Date: End date for the report. Sales / Purchase: Sales will report the sales transactions Purchase will report the purchase transactions. -o- p77 © EziSolution Systems, 2011 Quantities Report Description: Report of stock items and their current quantities in stock, for a spec ified range of part numbers. Report request screen fields: From Part No.: Enter first part number. To Part No.: Enter last part number. Group: Enter a group code to report on. Leave this field blank for all groups. Sort Order: Select from the dropdown list: - Group & Part Number - Group & Details Include 0 Qty: Check this option if you want to include stock with a zero quantity in the report. -o- p78 © EziSolution Systems, 2011 Selling Prices Report Description: Report of the selling prices of the stoc k items. Report request screen fields: From Part No.: Enter first part number. To Part No.: Enter last part number. Group: Enter a group code to report on. Leave this field blank for all groups. Sort Order: Select from the dropdown list: - Group & Part Number - Group & Details Include 0 Qty: Check this option if you want to include stock with a zero quantity in the report. -o- p79 © EziSolution Systems, 2011 Cost Price Report Description: Report of the last and average cost of stock item s, sorted by item code. Report request screen fields: From Part No.: Enter first part number. To Part No.: Enter last part number. Group Code: Enter a group code to report on. Leave this field blank for all groups. Sort Order: Select from the dropdown list: - Group & Part Number - Group & Details -o- p80 © EziSolution Systems, 2011 Slow Moving Items Report Description: Report on all items that have not been sold after a specified date. Report request screen fields: From Part No.: Enter first part number. To Part No.: Enter last part number. Group Code: Enter a group code to report on, or leave blank for all groups. Sort Order: Select from the dropdown list: - Group & Part Number - Group & Details Last Sold Date: Enter the date in which the items have not been sold after. -o- p81 © EziSolution Systems, 2011 Out Of Stock Report Description: Report of all items where the stock quantities have fallen to zero or below. Report request screen fields: From Part No.: Enter first part number. To Part No.: Enter last part number. Group Code: Enter a group code to report on, or leave blank for all groups. Sort Order: Select from the dropdown list: - Group & Part Number - Group & Details -o- p82 © EziSolution Systems, 2011 Stock Reorder Report Description: This report is used to list all of the items which it’s quantities has fallen below the minimum order level. Report request screen fields: From Part No.: Enter first part number. To Part No.: Enter last part number. Group Code: Enter a group code to report on, or leave this field blank for all groups. Sort Order: Select from the dropdown list: - Group & Part Number - Group & Details -o- p83 © EziSolution Systems, 2011 Stock Take Report Description: Also called the Stock Cost Report. Lists the current stock quantities and prices. Report request screen fields: From Part No.: Enter first part number. To Part No.: Enter last part number. Group Code: Enter a group code to report on, or leave this field blank for all groups. Sort Order: Select from the dropdown list: - Part Number - Item Details - Group & Part Number - Group & Details -o- p84 © EziSolution Systems, 2011 Stock Value Report Description: Displays the actual current stock take. You can display the stock take for either a specified group or all groups. Report request screen fields: From Part No.: Enter first part number. To Part No.: Enter last part number. Group Code: Enter a group code to report on, or leave this field blank for all groups. Sort Order: Select from the dropdown list: - Group & Part Number - Group & Details -o- p85 © EziSolution Systems, 2011 Items' History Description: History of sales and purchases of a specified range of items over a spec ified time span. Report request screen fields: From Part No.: Enter first part number. To Part No.: Enter last part number. Group Code: Enter a group code to report on, or leave this field blank for all groups. From Date: Start date for the report. To Date: End date for the report. -o- p86 © EziSolution Systems, 2011 Purchase Menu Purchasing Select Purchasing to enter cash and creditor invoices or purchase orders. Once you have entered an invoice it will automatically update stock quantities, supplier statem ents, acc ount files and supplier history file. The following function keys are active in this sc reen: F9 Search the stock list by item code (item number) F10 Search stock file by item details Code: Enter Supplier Code. If not found, the system displays the Suppliers List and you can scroll up or down and choose a supplier. Hint: If you cannot remember the supplier code, go down to the supplier nam e field and enter the supplier name or part of the name. Name & Address: Filled automatically from the Suppliers List. You may overtype/alter the details if you wish. Terms: Enter Invoice trading terms (7days, 14 days etc.). Delivery Details: Enter any additional details needed on the invoice/delivery docket. Tax Inclusive: Controls whether or not tax is included in the price Pur./Order: Select Purchase or Order from the dropdown list. Hint: To change to a Purchase Order, hit the letter O key on this field. Number: To enter a new number, press Enter on the number field. A new entry with the next number in sequence will be created. To recall an existing number, type in the old number. This entry will be recalled. You can then modify it or delete it. NOTE: The number range is 1 to 99999999 Date: The default is today’s date. Change this at will. Ref_no: Enter the supplier’s reference number, such as the supplier's invoic e number. Salesman: Enter the Salesman’s code. Invoice or Order line item details: Part Number: Enter the item part number. If only a part of the code is entered, you will be shown the Stock List. Choose one by pressing Enter on the desired item. To enter a non stock item, Enter a ‘*’ in the code field and you will then be able to enter text in the item Details field. Details: If you entered a valid code in the Part Number field, the item details will be filled automatically. If you entered a ‘*’ in the Part Number field, you can type in the item description. p87 © EziSolution Systems, 2011 Quantity: Enter number of items or weight, etc . B/Order: If the required quantity cannot be supplied due to lack of stock, the system allows you to enter a back order. Note that the back order option m ust be enabled. For further information refer to Maintenance, System Setup, Sales. Amount $: This is calculated automatically, but you can override the pric e supplied by the system. Tax: Enter a tax code, for example, ‘G’ for GST. Refer to Maintenance, Tax File Maintenance for further details. Disc %: Enter the item discount. Total $: Calculated automatically. Other fields: With the cursor positioned on the part num ber field of a partic ular line item, these fields below display details about this part. Bin: The part location in store. On Hand: The stock quantity currently in stock. Total Qty: The total number bought. Retail $, Trade $ & W/Sale $: The Retail, Trade, and Wholesale currency values can be overtyped if you wish. Subtot $, Tax $, Paid $ & Total $: The subtotal, Tax, Paid and Total currency values will be recalculated autom atically. Continue entering line items until the invoice or order is complete, then selec t either: Save (F2): Save the invoice. You can right click this button to view on screen and save as PDF ot HTM file. Print (F3): Saves and prints the invoice. Hint: Right mouse-click on Print to choose the destination - either a different printer or fax the invoice. Email: Saves the document and emails it to the supplier. Delete (F4): Delete the invoice. Exit (Esc): Discard any changes or additions to the invoice and position the cursor to the top. Shift+F12: Print labels. Payment (F5): Pay or part pay. Selecting Payment allows you to enter the invoice payment or part payment. The payment screen will be displayed: Payment No.: Filled automatically. Date: The default is today’s date. Change this at will. Amount: Enter amount paid. p88 © EziSolution Systems, 2011 Payment Method: Select Cash, Check, Credit Card, etc, from the dropdown list. Details: Enter the payment details. Account: Enter the payable account. Type in either the account nam e or the code. This will be verified against the Accounts List. -o- p89 © EziSolution Systems, 2011 Payments To Suppliers Select Payments To Suppliers to pay a batch of invoices. Invoices can be fully or partly paid. Payment No.: To enter a new payment, press Enter on the Payment No. field, A new payment record with the next number in sequence will be created. To recall an existing payment, type in the old payment number. This payment will be recalled. You can then modify it or delete it. NOTE: The payment number range is 1 to 99999999. Payment Date: The default is today’s date. Change this at will. Supplier’s Name: Enter the supplier’s Name. Amount $: Enter amount paid. Paid By: Enter payment mode, Cash, Credit Card, etc , from the dropdown list. Details: Enter the payment details. This field defaults to the paym ent mode. Change this at will. Account: Enter the payable account. Type in either the account nam e or the code. This will be verified against the Accounts List. Enter ? to obtain the list to select from. Outstanding Invoices fields: No.: This is just a line item number. Each line is numbered off starting with 1 at the top. Invoice #: The invoice number as it was saved. Date: The date of the invoice. Total $: The total value outstanding on this invoice. Paid $: This is what has been paid already. Due $: Enter the amount being paid spread over the list of outstanding invoices. These can be part payments. The total of this column is displayed at the bottom right. This must agree exactly with the value in the Amount field on the left of the screen. If you try to save with the amounts not in agreement, you will receive a warning message. Continue entering invoic e payments on each line as required. When you have finished selec t either: Save (F2): Save the payment. Note that the total of this Paid $ column must agree exactly with the value in the Amount field. The Save button is disabled until you have achieved this. Print (F3): Saves and print the payment. Hint: Right mouse-click on Print to choose the destination, such as a different printer Email: Saves the payment and emails a Remittance Advice to the supplier. Delete (F4): Delete the payment. Close (Esc): Discard any changes or additions to the payment and position the c ursor to the top. -o- p90 © EziSolution Systems, 2011 p91 © EziSolution Systems, 2011 Add/Modify Suppliers Select Add/Modify Suppliers to add, modify or delete supplier details Scroll the list and select the supplier rec ord with your mouse. To quickly find a supplier, simply start typing the supplier name. The list will c hange to follow your entered information. Select Edit to modify the details of an existing supplier. This will display the Edit Supplier Details screen. Supplier Code: Each supplier is given a code of up to six alphanumeric characters. This field must be filled. Salutation: Mr., Mrs. etc. Supplier Name: The name of the c ompany or organization. This field must be filled. Business No.: Business Number. Address: The supplier’s address. Contact Name: Person you normally deal with. Telephone: Enter telephone number. Mobile: Enter Mobile number. Fax: Enter Fax number. Email: Enter email address. http://: Enter web page address, pressing http:// tab will open web page. No Bulk Email: Tick to remove from bulk email list when email broadcasting. Remarks: Any useful information. Payment terms: COD, 7,14, 30 days, etc. Credit Limit: Enter the credit limit amount before the system issues a warning. Other fields: Purchases $: Snapshot of your trading. Due $: History with that supplier. Select Save to save the changes. This will return you to the previous screen. To add a new supplier, select New (F2) from the Suppliers List screen. The New Supplier screen will be displayed for you to enter the details. This sc reen is similar to the Edit Supplier Details screen. -o- p92 © EziSolution Systems, 2011 E-mail Broadcast This menu option allows you to send bulk email to contacts, with or without file attachm ents. No. of Recipients: This field displays the number of email recipients. If the file c ontains a large number of entries, it may take a short while to display this sc reen. To c hange the number of recipients, click on the box next to the field, the system will display the list with the names and email addresses and a tick box next to them, to un-tic k them all, right mouse click on the column header, to tick them all, left clic k the column header; or individually tick or un-tick, once finished, click on the Close button at the bottom to return to the send email screen. Sender’s Name: Enter your name. If you have entered your name in the email setup screen under the Maintenance menu, your name will automatically appear in this field. Sender’s Email: Enter your email address in this field. Ask for Receipt: Tick this box to allow the recipient to automatically send you a receipt acknowledgment before reading your em ail. Subject: Enter the email subject line. If the subject line was left blank, the system will warn you before sending the email. Attachment: This must be a valid file name. You can have more than one attac hment by separating the file names with a semicolon. Tick the box next to the field for the system to allow you to graphically choose the attachment files. Message Type: You can choose to send your message as a text written in the following edit box, or as a file. If you choose a file, The system will disable the edit box and allow you to enter a file name in the following field. The file must be of type text, .HTM, .HTML or .RTF; otherwise, an error message will be displayed if you try to send the em ail with a wrong file type. Message File: This field will initially be disabled. Once you choose a file message type, it will be enabled. You can only have one entry and of the types m entioned above. Message Text: If you have chosen a text message type, you can manually enter a text message of variable length. General notes on sending emails For users with dial-up connection (using a standard modem), you need to manually connect the modem using the dial-up icon under Windows before you are able to send em ails. Trying to send emails, when there is no connection, will result in error messages being displayed. If you are an ADSL user, the system will use the ADSL connection without any intervention on your part since it is always open. Note also that you need to setup the em ail screen under the maintenance section before you are able to send any emails. (see Email Setup Tab under the Maintenance Menu) -o- p93 © EziSolution Systems, 2011 Purchase Reports List of Suppliers Report Description: List of suppliers in either as a full page report or as envelope labels. Report request screen fields: State: State Code or leave blank for all states. -o- p94 © EziSolution Systems, 2011 Purchases List Report Description: List of purchase invoices over a specified time span, for one or more suppliers. Report request screen fields: Part Number & Supplier Name: Enter a part number and/or supplier name to filter the data for the report. Leave either or both fields. Blank for all parts and/or all suppliers. HINT: Right mouse click on supplier name field to get a supplier list. From Date: Start date for the report. HINT: Right mouse click on any date field and select a date interac tively from a calendar. To Date: End date for the report. Report Type: Select Detailed or Summary according to the level of detail you want. Status: Choose purchases status. -o- p95 © EziSolution Systems, 2011 Purchase Orders Report Description: List of purchase orders over a given time period. Report request screen fields: Part Number & Supplier Name: Enter a part number and/or supplier name to filter the data for the report. Leave either or both fields. Blank for all parts and/or all suppliers. From Date: Start date for the report. To Date: End date for the report. Report Type: Select Detailed or Summary according to the level of detail you want. -o- p96 © EziSolution Systems, 2011 Summary Purchase Report Description: List of purchases over a specified period of time. Report request screen fields: For the Period & To the Period: Select month and year in each field to cover the period you want the report to cover. -o- p97 © EziSolution Systems, 2011 Aged Suppliers Report Description: List of suppliers with amounts owing categorised into current, 30, 60 and 90+ days periods. Report request screen fields: For the Period: Select the month and year to report on. State: Enter a state code or leave blank to report on all states. Include addresses: Check if you want the report to include addresses. Show 0 Balance: Check if you want the report to include zero balances. -o- p98 © EziSolution Systems, 2011 Suppliers' Statements Description: Detailed supplier’s statements showing all outstanding invoices and the payments made over a specified time period. Report request screen fields: Name: Enter the supplier name if you want to report on only one supplier, or leave blank to report on all suppliers with outstanding invoic es. This will fill the list below with suppliers accordingly. From Date: Start date for the report. To Date: End date for the report. Include Paid Invoices: Check to include payments made during the report period, Unc heck to list outstanding invoices only. Detailed Statement: Check for a detailed statement showing the payments. Notes to Appear on Statement: Notes entered here will appear on the report. Columns on the list of suppliers: Leftmost column: Include or exclude suppliers for the report by checking or un-checking each supplier. Hint: To uncheck all checked suppliers, right mouse click on the header of the left column. To check all suppliers with outstanding invoices, left c lick header. Name & Phone: Details filled automatically to help you identify the suppliers. Current Balance $: Shows current outstanding balance. -o- p99 © EziSolution Systems, 2011 Purchase Analysis Report Description: Purchases analysis over a specified time period, broken down by eac h purchase department. Report request screen fields: From Date: Start date for the report. To Date: End date for the report. -o- p100 © EziSolution Systems, 2011 Back Orders Report Description: List of back orders sorted by either part num ber or supplier. Report request screen fields: Part Number & Supplier Name: Enter a part number and/or supplier name to filter the data for the report. Leave either or both fields blank for all parts and/or all suppliers. Sort Order: Select Part Number or Supplier Name depending on the order you want the report in. -o- p101 © EziSolution Systems, 2011 Stock On Order Report Description: Also called the Purchase Orders Report. List of items on order. Report request screen fields: From Part No. & To Part No: Restricts the report to a specified range of part num bers, or leave blank for all. Group Code: Restricts the report to one group or leave blank for all groups. Sort Order: Select from the dropdown list: - Group & Part Number - Group & Details -o- p102 © EziSolution Systems, 2011 Purchases Tax Report Description: Tax paid over a specified period of time, on either cash or acc rual basis, detailed or summary. Report request screen fields: From Date: Start date for the report. To Date: End date for the report. Detailed/Summary & Cash/Accrual: Select according to requirements. -o- p103 © EziSolution Systems, 2011 Purchase Payments Report Description: List of payments and the way they were allocated on invoic es. It is primarily used to verify payments entered. Report request screen fields: Supplier: Select a supplier from the dropdown list (or type in the supplier c ode or name). Leave this field blank for all suppliers. From Date: Start date for the report. To Date: End date for the report. -o- p104 © EziSolution Systems, 2011 Payroll Sign In / Out Sign In/Out screen is used to sign staff in and out. the staff m ember has to sign in when they first arrive at work and start their shift, then have to sign out when they are done. The system will then keep track of their work time, and based on it, it can c alculate their wages if they are on an hourly rate. Staff Number: Enter the staff index number to sign in or out. Once that is done, the system will display the staff name and clicking on the sign in / out button will do the signing in or out. Entering the numbers -199, -299 and -399 will allow the Master User to perform special maintenance functions as discussed below. If you need to edit old log in / out entries, you must login as the Master User, then enter the number -199 in the staff number field, a list of all the log in / out entries will appear and allows you to modify or delete. p105 © EziSolution Systems, 2011 You can also change the log in and log out message that appears to the staff when they log in or out, to modify the log in message, enter the number -299 in the Staff Number when logged as the Administrator to modify the log in message, or -399 to modify the Log out message. To suppress the messages from appearing, just blank the whole message. p106 © EziSolution Systems, 2011 -o- p107 © EziSolution Systems, 2011 Process Payroll The Process Payroll screen is used to process the weekly staff payroll figures. Choose the payroll date to process, then choose the staff m ember to process its pay, then enter the hours worked and the rest of the amounts as required. The system will then calculate the payroll amount based on the tax table and payroll parameters. Save: Clicking the Save button will save the entry and the cursor goes back to the grid to choose a new staff member. Print: Clicking the Print button will save and print the entry and the cursor goes bac k to the grid to choose a new staff member. Delete: The system will delete the entry -o- p108 © EziSolution Systems, 2011 Add/Modify Staff The Add / Modify Staff is the screen to use to add new staff m embers or edit old data. Enter all the relevant data in this screen, leaving the rest blank. The data required are the staff name, rate amounts and the work type, residency and tax sc ale. -o- p109 © EziSolution Systems, 2011 Payroll Parameters the Payroll Parameters screen is used to enter the payroll parameters that will dec ide on how to calculate the pay amounts for the staff members. This information is country specific, so if you need m ore configuration, you will need to contact us for this. -o- p110 © EziSolution Systems, 2011 Payroll Slips Report The Pay slips Retport is used to produce the pay slips to give to the staff m ember with their pay. Staff Name: Choose the staff name or leave blank to print the slips for all staff m embers Date: Enter the Pay Date p111 © EziSolution Systems, 2011 -o- p112 © EziSolution Systems, 2011 Payroll Report The Payroll Report is used to report on paid payroll during a c hosen time period. Staff Name: Enter the Employee name, or leave blank to inc lude all From/to Date: Enter the date range to be included in the report Report Type: Enter the report type of either Summary or detailed. -o- p113 © EziSolution Systems, 2011 Sign In/Out Report The Sign In/Out report is used to print out the time sheet for a partic ular period of time Staff Name: Enter the staff name to report on or leave blank for all staff m embers From/To Date : Enter the date range to report on -o- p114 © EziSolution Systems, 2011 Accounts Chart of Accounts Select Chart of Accounts to display, add, modify or delete an account from the chart of accounts. Most chart of accounts are m ade of ten headings Heading: Example: 1. Current Assets Bank, cash in hand 2. Fixed Assets Office Building 3.Intangible Assets Shares, Goodwill 4.Current Liabilities Creditors, Overdraft Long Term 5. Liabilities Loans 6.Financed By Shareholders, Capital 7.Sales Cash Sale, Credit Sale 8.Cost of Sales Purchases 9.Expenses Advertising, Car Expenses 10.Other Income Commission Received Under each heading there are subheadings that can be added, m odified or deleted. Select Account screen fields are displayed to help you find and identify any that need to be changed: Code: Each account must have a unique code. Name: The name of the account. Group: The group this acc ount is in. Groups are numbered 1-11. Type: T=Title H=Header P=Posting Roll: Roll the account balance at the end of the accounting year. To modify an account, use the up and down arrow keys to position the cursor on the account you want and press the Enter key or select Edit. This will display the Edit Accounts screen. p115 © EziSolution Systems, 2011 Make the required changes by typing in the Edit Account screen fields: Account Code: Up to six characters to uniquely identify the account. Account Details: Account name. Group: Account group 1 to 11. Type: H = account that cannot be posted to P = posting account such as ‘Bank Account’ Roll Balance: Y = Balance Sheet Accounts (1 to 6) to carry them forward to next year. N = Trading, Profit & Loss Accounts. When you roll the balance of an ac count, it will show in next year’s balances as a starting balance for the following year. When you have made the required changes, select one of the following: Save: Save the changes and return to the previous screen. Cancel: Abandon the changes without saving and return to the previous sc reen. To add a new account, select New. This will display the Add New Acc ount screen which is similar to the Edit Account screen. To delete an account, use the up and down arrow keys to position the cursor on the account you want and then press the Delete key or select Delete. -o- p116 © EziSolution Systems, 2011 Journal Posting Select Journal Posting to post transactions that occur in the business. The posting has two sides, the Account Name and Current Balance fields at the top of the screen show one side and the accounts on the screen listing below represent the other side. Journal Voucher screen fields: Journal Number: To create a new journal entry, press Enter on the Journal Number field. A new journal entry with the next number in sequence will be created. To recall an existing journal entry, type in the old journal number. This journal entry will be recalled. You can then modify it or delete it. Account Code: Enter the account code, or double clock to choose from the chart of accounts sorted by the code. Account Name: Enter account name or double click to list the chard of account by nam e. You can then choose the account you want by pressing Enter on the account. Current Balance $: The balance of the top account. The following assumes you are entering transactions on a journal entry. If you have rec alled an old entry, you will be able to deduce from the following how to modify transactions. All the following transactions will affect the selected account, so if the am ount entered is positive, it will add to the account balance, if negative it will subtract from it. List columns in the Journal Voucher screen: Accont Code: Enter the account code that will post against the top account, double click for the chart of accounts. Account Name: If you can’t remember the account number, then enter the acc ount name. If p117 © EziSolution Systems, 2011 the system finds the name it will display it and the cursor moves to the details field. Details: Enter the transaction details such as c heque number. Date: Enter the transaction date. Amount: Enter the amount, either positive or negative. A positive am ount will add to the balance of the top account, while a negative will take away from that balance. Continue entering transactions onto the list as required. When you have finished, selec t one of the following: Save: Save the journal entry with the assigned num ber. Print: Save and print. Delete: Delete the journal entry. This is usually to delete an old entry. Close: Abandon any changes and additions without saving. The above screen shows an example of how to do the daily banking when depositing the content of the cash drawer to the bank account/ -o- p118 © EziSolution Systems, 2011 Entry Posting Select Entry Posting to post multiple entries to the accounts. It is usually used for non-direc t cash transactions such as adjustments between two or more accounts. Entry Voucher screen fields: Entry Number: To create a new entry, press Enter on the Entry Number field. A new entry with the next number in sequence will be created. To recall an existing entry, type in the old entry number. This entry will be recalled. You can then modify it or delete it. Date: Enter the date. Account Name: Enter the account name or code. The column will be filled with the acc ount name automatically. Details: Enter the transaction details such as c heque number. Debit $: Enter the amount in the debit side. Credit $: Enter the amount in the credit side. Note you can either enter the debit or credit sides for the same account, not both. Total $: The computer keeps track of the running totals. Note: Before you can save the transaction both debit and credit am ounts must be equal. Continue entering transactions onto the list as required. When you have finished, selec t one of the following: Save: Save the entry with the assigned number. Print: Save and print. Delete: Delete the entry. This is usually to delete an old entry. p119 © EziSolution Systems, 2011 Close: Abandon any changes and additions without saving. -o- p120 © EziSolution Systems, 2011 Bank Reconciliation Select Bank Reconciliation to reconcile the accounts entries such as cash or bank. There is a temporary account used to hold all cash, check, and credit card incom e. This is a very effective method of keeping track of the bank account. This account is called ‘Cash on Hand’. The balance of the Cash on Hand account must be zero after depositing the period’s income into the bank. This way, your bank statem ent will always match your computer generated bank statement. Accounts Reconciliation screen fields: Account: Enter either the number or name of the account you need to rec oncile. Once a valid account number has been entered, the account and all its non-rec onciled transactions with the debits and credits will be displayed on the list part of the sc reen. Note that when reconciling the bank statement, the debit and credit sides appear reversed. This is normal and should be this way because the bank ’s statement is showing the transactions from the bank’s point of view. To reconcile a transaction, check the leftm ost column of the transaction with a mouse click or by pressing the space bar. The totals at the bottom will be adjusted accordingly. When all the transactions have been reconciled, select one of the following: Save: Save the reconciled accounts Print: Print and save Delete: Un-checks all checked items. Close: Close the screen without saving. This will not restore the checked items. Once saved, the reconciled transactions will not appear on this screen the next tim e unless that transaction was modified or re-entered. -o- p121 © EziSolution Systems, 2011 Accounting Reports Chart of Accounts Report This report will produce the chart of accounts which can be viewed on screen, printed or sent to a file. Show Account Codes: Check this box if you want the report to include the account codes. -o- p122 © EziSolution Systems, 2011 Daily Entries Report Description: Listing of detailed daily entries over a spec ified time span, for one or all transaction types. Report request screen fields: Transaction type: Select from the dropdown list, or leave blank for all types of transac tion. From Date: Start date for the report. To Date: End date for the report. -o- p123 © EziSolution Systems, 2011 Daily Balances Report Description: List of debit and credit daily balances of posting accounts Report request screen fields: From Account: Starting account code for the report. To Account: Ending account code for the report. Leave this field blank for only one account. From Date: Start date for the report. To Date: End date for the report. -o- p124 © EziSolution Systems, 2011 Monthly Balances Report Description: Monthly credit and debit balances of the posting accounts for the entire accounting year. Report request screen fields: From Account: Starting account code for the report. To Account: Ending account code for the report. Leave this field blank for only one account. For the Year: Select the year for the report. No. of Months: Enter the number of months the report is to c over. -o- p125 © EziSolution Systems, 2011 Statement Of Account Description: All transactions for an account over a specified period of tim e. Report request screen fields: From Account: Starting account code for the report. To Account: Ending account code for the report. Leave this field blank for only one account. If you include more than one account, the system produces the statements in account order. From Date: Start date for the report. To Date: End date for the report. Show Zero Balance: Y if you need to show accounts that have no transaction N if not. -o- p126 © EziSolution Systems, 2011 Trial Balance Report Description: Report to check the total balance of the accounts chart. Report request screen fields: For the Period: Select the month and year the report is to cover. Show Zero Balance: Check if you want to show accounts with a zero balance. Show Account Codes: Check if you want the report to include account codes. Show Dr.&Cr. Sides: Check to show the debit and credit sides, uncheck to show the balance. Total debits must equal to total credits, if not, the cause m ay be : The total balance offset is not zero at the entry of the starting balances. Correct the starting balances to get zero offset. Unexpected system shutdown. To fix, select Maintenance, then File Re-index, and re-index and repost all files. Wrong account code numbering. To fix, renumber the acc ount code in a logical manner. Posting to a Heading account. To fix, delete that particular posting. -o- p127 © EziSolution Systems, 2011 Trading Profit / Loss Report Description: This report is used to find out the gross and net profit/loss inc urred during a specified period of the accounting year. Report request screen fields: For the Period: Select the month and year the report is to cover. Show 0 Balance: Check to view the accounts with a zero balance, uncheck to suppress them. Show Account Codes: Check if you want account codes. -o- p128 © EziSolution Systems, 2011 Balance Sheet Report Description: The net worth of the business. Report request screen fields: For the Period: Select the month and year the report is to cover. Show 0 Balance: Check to view the accounts with a zero balance, uncheck to suppress them. Show Account Codes: Check if you want account codes. -o- p129 © EziSolution Systems, 2011 Diary Diary The diary comprises three sections: Appointments The Appointments section has the headings Time and Details and occupies the left side of the screen. This area displays appointments and notes that apply for the partic ular date selected on the interactive calendar. To enter appointm ents, you do not type directly into these fields, but use the New push button. Refer to Push Buttons further on in this section for more information on how to enter appointm ents. Notes The Notes section is positioned at the top right. You can type directly into this area. Unlike the pages of a paper diary, what you write in here is displayed regardless of the date selec ted on the Interactive Calendar. This means that your notes are always visible. Interactive Calendar The interactive calendar is positioned at the bottom right. When you first go to the Diary, today’s date is selected. To view your appointments for other dates, select the date interactively using your mouse. Push Buttons p130 © EziSolution Systems, 2011 New: To add an appointment, select New. The New Appointment screen will be displayed. Enter the appointment details. New Appointment screen fields: Type: Select from the dropdown list. The choices are: - Once: The appointment occurs once only. - Daily: The appointment occurs every day at this tim e. - Weekly: The appointment occurs every week on this day. - Day of Month: The Appointment occurs on a certain day of m onth. - Monthly: The appointment occurs on this date every m onth. - Yearly: The appointment occurs on this date every year. Date: The date defaults to today’s date regardless of the date selected on the interactive calendar. Change this to your appointment date. Time: Enter the time of your appointment. Details: Type the appointment details. You can type in up to 50 characters. Today: Pressing this button takes the user back to today ’s date. Search: You can search for any string of text in the appointm ents file . List: The list can be sorted by appointment type for a range of dates. Close (Esc): Closes the Diary and returns you to the m ain menu. -o- p131 © EziSolution Systems, 2011 Telephone Telephones Directory Use Telephones to find, add, modify, or delete entries in your telephone direc tory. The directory allows you to record the following information in each entry: Name, Address, Phone number, Mobile number, Fax number and Email address and more. Modify: Position the cursor on the Telephone Directory at the entry you wish to change, then select Modify. This will display the Modify Directory Entry screen (similar to the Add New Entry screen) with the details in the appropriate fields. Change these at will, then selec t Save to save the changes, or Cancel to abandon the changes without saving. New: Add a new entry. Type in the required details and select Save to save the entry, or select Cancel to abandon the details without saving. This will return you to the Telephone Directory screen where you will see the new entry, if saved, displayed along with the old ones in nam e order. Envelope (F3): Position the cursor on the Telephone Directory at the entry you wish to print, then select Print or hit F3. This will print the name and address details on an envelope. Delete (F4): Position the cursor on the Telephone Directory at the entry you wish to delete, then select Delete or hit F4. This does not actually delete the entry, but m oves it to the end of the list, prefixing the name with a tilde (~). For example, if you delete an entry for John Doe, it will be renamed to ~John Doe. To restore a deleted entry, search at the end of the list for (exam ple) ~John Doe. Then use Modify (F6) to change the name back to John Doe. Email: Choose this option to email the person in the directory entry Bulk email: Choose this option to bulk email all the entries in the telephone direc tory. (Refer to Clients Email Broadcast for instruc tions) Please note that under the Group field, you can group your entries any way you wish, by either text or numbers. This field will be used to filter out em ails and printouts. Close (Esc): Close the telephone directory and return to the m ain menu. -o- p132 © EziSolution Systems, 2011 Maintenance Files Reindex Use Files Reindex under the following conditions: After an unexpected power blackout, surge, or brownout. This inc ludes unintentionally turning off your computer without going through the normal shutdown sequenc e. Attention: If anything like this happens, you are strongly rec ommended to reindex all files. Failure to do so may produce unexpected results. If the index files were deleted by mistake. After a data restore operation. If the system starts to behave strangely in any way. Typically, this could include not being able to find data that you know should be there. Recalculate Cost Price: Only tick this option if you need the system to recalculate the cost price for all of your stock item from day one. Repost Clients Transactions: Ticking this option will fix any problems that may have occurred in posting clients transactions. This will repost all the individual transac tions to the p133 © EziSolution Systems, 2011 totals file and can be done any time you notice a problem with client amounts. Repost Suppliers Transactions: Ticking this option will fix any problems that may have occurred in posting suppliers transactions. This will repost all the individual transac tions to the totals file and can be done any time you notice a problem with suppliers amounts. Repost Stock Transactions: Ticking this option will fix any problems that may have occurred in posting stock transactions. This will repost all the individual transac tions to the stock file and can be done any time you notice a problem with stoc k quantities. Pack Selected Files: This option will remove any deleted or modified transactions. Note that the system keeps track of all deletions/modifications to all transac tion files with eac h transaction tagged with user number, station number, date and time, so in case of trail audit, you can see all the changes that took place from the last pack. Once packed, all these records are lost. Sequence of operations: You must be the only user signed on to Retail ManPOS System. All other users, including people on a network, must sign off Retail ManPOS System. It is advisable to backup your data before the files reindex takes place. Select the file or files you think may need to be re-indexed, or selec t all after abnormal shutdown, by checking boxes appropriately. Select Proceed to start the re-indexing. This may take several minutes depending on the amount of data stored and the speed of your c omputer. Do not interrupt your computer until you see the Indexing Done message. Choose Pack Selected Files if you need to remove all of the deleted information from the database. -o- p134 © EziSolution Systems, 2011 System Setup Company Setup Use the Company tab to enter the business name and details that will be printed on all the reports and invoices the system produce. Business Name: Enter your business name, note that when you receive the produc t key with your business name, the business name can not be c hanged, otherwise, the program will revert to the demonstration mode. Location: Enter the business location, this is useful for the multi-location version. Address: Enter your company contact and address details. Business Logo File: Enter the optional logo file. Note: if you plan to run the multi-user version, then you must provide the absolute path names such as \\Server\Server_c\logos\mylogo.bmp, otherwise, if you store the logo file in the program folder, then you only need to provide the logo file nam e without any paths attached such as MyLogo.bmp or Acme.jpg -o- p135 © EziSolution Systems, 2011 General Setup Use the General tab to set up storage locations on your com puter, and to set currency and tax details appropriate to the country you are in. Decimal in Amount: The number of places of currency dec imals, such as $123.45 Amount Format: Enter the amount format in the form of 999,999.99, if it was left blank, it will default to 999,999,999.99 Currency Symbol: Examples: $, £, ¥ Accounting Year Start: Enter the accounting year start date, this has to be done only once, the system will use the day and month and will automatically roll the year. Date Format: Choose date format dd=Day, mm=month yy or yyy= year Stationary Size: Choose the stationary size to be used for printing. Letter size is used in the USA, while A4 is used in the rest of the world. Temporary Files Path: Enter the temporary files path folder name (default is c :\temp) for temporary files needed while in use. These files are deleted automatically as soon as they are no longer required. -o- p136 © EziSolution Systems, 2011 Sales Setup Use the Sales tab to set up the invoicing options. Invoice Screen Setup Prices Inclusive of TAX: Determines whether or not the invoiced pric es include or exclude Tax. If ticked, the amounts shown on the invoice will be including tax, otherwise, tax will be added to the sale price. Choose Sales Account: When this is checked, the Post To field on the Invoicing screen is visible. This allows you to post the whole invoice amount to a particular acc ount. When this is not checked, the Post To field on the Invoicing screen is not visible and the whole invoic e is posted to the default Sales account. Remind if Below Min Qty: Issue a warning if stoc k levels fall below the spec ified minimum. Warn if no stock: Issue a warning if there is a zero stock level. Warn if price too low: Issue a warning if the price is lower than the cost p[ric e. Block Sale if no stock: check to block the sale is the stock qty is zero or below. Force backorder: Issue a backorder automatically if stock levels fall below the predetermined minimum. Force Cash Sale if No Credit: If selling to a client with no available credit, then force it as a cash sale. Make Quote as Default: Sets the default such that when you select Sales, then Invoice, the Invoice/Quote option defaults to Quote. Track Sales Sources: Allows the user to choose a sale source for each sale from a drop down list. p137 © EziSolution Systems, 2011 Allow Currency Change: Allows user to change defult currency when selling. Give Change when overpaid: Tick to treat sale as a cash sale, if client pays m ore than the invoice total, then system will treat extra payment as a change. If un-tic ked, amount gies against client's account as an overpayment. Default Qty Value: Enter the default quantity the system will automatically enter as you process sales, default is 1. Decimals in Qty Field: Enter the number of decimals in the quantity field, zero for whole numbers such as 123, 1 for one dec imal such as 123.1, 2 if you are selling in lb suc h as 123.05 anf 3 if you are selling in Kg suc h as 123.275 Decimals in Disc. Field: Enter the number of decimals in the Discount field, zero for no decimals such as 25, 1 for one dec imal such as 25.5. Maximum is 3 decimals. Decimals in Tax Field: Enter the number of decimals in the tax field. Invoice Printout Enable Backorder Column: Tick to enable the use of the back order column on the screen and printout. Enable Discount Column: Tick to enable the discount column, Tick the % to force the discount as a percentage discount. Note that if you do not tick the % option, then the discount will be in amount value, however, you can always process the discount as a percentage by pressing the % after you enter the discount am ount in the discount column. Enable Tax Code Column: Tick force the system to show the tax code for each item sold. Enable Tax Amount Column: Tick force the system to show the tax amount for each item sold, this will also allow you to change the tax amount. Enable Tax Total: Tick force the system to show the tax total for the whole invoice. Print Part No. on Invoice: Tick to print the part numbers on invoice. Print back orders on Invoice: Include back orders on invoices. Print Bin on Invoice: Tick to print bin location of each item on the invoice. This is a handy feature if you have a large number of items as it will allow you to quic kly locate the items. Report Format File Name: Leave blank to use the default file, otherwise, if you are using a custom invoice format file, then enter the name here (with the extension of FRX), Make sure you include the absolute path if you are on a network (suc h as \\Server\c\Rman\MyInvoice.FRX) or if the file is in the Rman folder, then just enter the file name with no path (suc h as MyInvoice.FRX) Invoice Title: Enter the invoice title such as "TAX Invoice" Copies to Print: Determines how many copies of invoices are printed. Print Invoice as Docket: Enabeling this option will cause the system to print the invoic e as a Docket. Invoice Message: Allows you to type in text that will be printed on footer of the invoice. The same can be done for the Quote, Layby/Layaway and Returns. p138 © EziSolution Systems, 2011 -o- p139 © EziSolution Systems, 2011 Stock Setup Use the Stock tab to set up the stock costing on sales and stock enquiry screen. Stock Costing on Sales : This option group are radio buttons. You can select only one option. Don’t Cost on Sale: Select this option to prevent posting the cost of each sale to the accounts. Use Last Cost: Select this option to post the last stock cost to the accounts. Use Average Cost: Select this option to post the last stock cost to the accounts. First in First Out Cost: Select this option to post to the accounts on a first in first out basis. Extra Stock Groups: This option enables of up to three extra optional stock groups that can be named by the user. -o- p140 © EziSolution Systems, 2011 Purchase Setup Use the Purchase tab to set defaults and other values associated with purchases and purchase orders. Purchase Screen Setup Choose Purchase Account: When this is checked, the Post To field on the Purchasing screen is visible. This allows you to post the whole Purchase amount to a particular acc ount. When this is not checked, the Post To field on the Purchasing screen is not visible and the whole purchase is posted to the default account. Allow Currency Change: Displays the currency Rate field on the Purchasing screen. Copy Supplier’s Tel & Fax to P/O: Include the supplier’s contact details in the Delivery Details field of the Purchasing screen. Make P/O as Default: On the Purchasing screen, set the default for Pur./Order field to Order. Default Qty Value: Sets the default quantities for purchase or purc hase order items. Decimals in cost: You can modify the number of decimals in the cost price in the purc hase screen. Purchase Copies to Print: The number of copies of purchase invoices to be printed. P/Orders Copies to Print: The number of copies of purchase orders to be printed. Purchase Printout Setup Enable Expiry Date: Choosing this option will display the expiry date c olumn in the p141 © EziSolution Systems, 2011 purchasing screen, this is useful when you need to track the expiry dates of the purc hased products. The assumption with this feature is First in First out, that is the stock you buy first is assumed is sold first, this will eliminate entering expiry dates on sales Enable Backorder Column: Tick to enable the use of the back order column on the screen and printout. Enable Discount Column: Tick to enable the discount column, Tick the % to force the discount as a percentage discount. Note that if you do not tick the % option, then the discount will be in amount value, however, you can always process the discount as a percentage by pressing the % after you enter the discount am ount in the discount column. Enable Tax Code Column: Tick force the system to show the tax code for each item. Enable Tax Amount Column: Tick force the system to show the tax amount for each item bought, this will also allow you to change the tax amount. Enable Tax Total: Tick force the system to show the tax total for the whole purchase. Purchase Order Message: Allows you to enter a message that will be printed on all purchase orders. -o- p142 © EziSolution Systems, 2011 Point Of Sale Setup Use the P.O.S tab to set defaults and other values associated with point of sales and docket printout. POS Screen Setup Sets up the behavior of the POS screen. Ask for User No on each line of sale: Tick to allow the user to supply a user num ber on each line item, this is useful if more than one staff m ember serves the same customer on the same sale. Ask for User Number on Save: Tick to force the user to supply a user number before saving the transaction, each sale is then tagged with their num ber. Collate Similar Part Numbers: Choosing this option will group same part numbers together as if entered on one line. This is useful in many cases but may not work properly in other cases where you sell the same item with different prices, such as when you sell one at full price and the next item as half price. Allow Multi-Currency Payment: Tick if you plan to accept cash foriegn currencies as pos payments, this will allow you to choose the currency in the cash paym ent section of the pos screen. You will need to make sure the exchange rate is updated on regular bases, you c an edit the currency file by pressing Control+Right Mouse Click on the currency field. Allow Layby/Layaway Sales: Tick this option if you plan to use Laby/Layaway sales in the pos screen. p143 © EziSolution Systems, 2011 Allow Credit Sales: Tick to allow selling your repeat clients on account, you will notice an added Account payment type appearing the pos payments screen for eligible clients. Force Print on Credit Sales: Tick to force the system to print sales docket for credit sales, this to allow the staff to clooect the client signature on your copy of the docket as a proof of sale. Enable Quick Buttons: Tick to enable the quick menu and item buttons in the pos sc reen, this will facilitate faster sales process as it allows the user to press buttons instead of looking for the fast moving items. You c an choose the number of rows (maximum of 6) and c olumns (Maximum of 10). Random Weight Barcodes: this option will allow the system to process barcodes that are printed on some scales with variable weights. These types of scales usually sit in eac h department (not on the checkout) and the custom er comes in, buys a certain type of item that is sold by weight, the staff member weighs the item, prints the barcode and sticks it on the item, then when the client goes to the checkout, the staff m ember reads the barcode, the system will then be able to know the item code and its weight/price. The scales c an be programmed to print the barcodes in few different form ats, and you will need to m atch these formats with the format option from the drop-down list. noting that D= Dept. P= Part No. C=Checkdigit W=Weight (in lbs or Kgs) A= Amount (price) Decimals in Weight: This is the number of decimal places the weight has, its 2 for lbs and 3 for Kgs. POS Docket Setup Company Name: Enter the company name as you want it to appear on the docket/receipt Docket Header: Enter the receipt/docket header which may include the address, telephone number, email address and any other relevant inform ation. Print as Invoice: Ticking this option will print the docket/receipt as a full invoic e on the Windows default printer. Format File Name: This will allow you to modify the way the rec eipt look, the format files are a normal text files that you can modify from within the program, they have the extention .POS. If you choose to modify the receipt printout, the rest of the options will be inactive. Print Transaction No.: Tick if you want the printed docket to contain the transaction number. Print Part Number: Tick to print the part number on the receipt. Print Subtotal: Tick to print the subtotal on the receipt. Print Discount Total: Tick if you want to print the discount total on the receipt . Print Tax Total: Tick if you want to print the Tax total on receipt . Print Client Address: Tick if you need to print the repeat client address on the receipt. Docket Footer: Enter the text to appear at the receipt footer, you can include the staff nam e by including the variable <STAFF> in the text. Copies to Print: Enter Number of docket/receipts copies to print, the default is 1. p144 © EziSolution Systems, 2011 Docket Printer Currency Symbol: Enter the currency symbol to print on the receipt, for some printer you will need to enter the ascii code for some currencies such as the £ whic h is 156. No of Lines to Skip: Enter number of lines to skip after printing . -o- p145 © EziSolution Systems, 2011 Payments Setup Use the Payments tab to set the default payments methods (up to 9). And also the accounts to post to when the sales or purchase payments are processed. Payment Name: Enter Payment names keeping the cash as the top name Sales Account: Enter the sales Account Code or Account Nam e from the chart of accounts, this will cause the system to post payment to that account on a sale. Purchase Account: Enter the Purchase Account Code or Account Nam e from the chart of accounts, this will cause the system to post payment to that account on a purchase. Deposit: Tick all the rows that you want to appear in a bank deposit slip. Default: Choose one payment to be used as the default payment method by your c lient. Round: Tick all the payments to be rounded up or down, usually its the c ash payment to allow for better cash handling. Open Till: Will cause the system to open the cash drawer if that payment method was used. Type: This column is used to identify the Credit Card, Debit Card and Gift Card sales payments. This option is used if you plan to use the on-line credit c ard processing option. You will need to have the following for this to work: 1. Have a merchant account with any bank 2. Choose a credit card processor from Maintenance > Hardware Setup > Credit Card 3. Install the credit card processor software p146 © EziSolution Systems, 2011 Rounding: If you plan to round sale amounts, you can choose rounding up or down and the amount to round to. -o- p147 © EziSolution Systems, 2011 Loyalty The loyalty points is used to reward clients who buy from you with a set number of points for amount spent, then once the client accum ulates a set number of points, the system will issue them with a store credit for a certain amount that is determined by you. This will help you with client loyalty and give the clients more incentives to buy from you and to keep c oming back. You can assign how many loyalty points each stock or service item is worth, this can be set in the stock file. To setup the loyalty points system, there are few steps to take, the first is to create a Payment Type called Loyalty (created in the payments screen) and it should post to an expense account such as Discounts Given. Points to Redeem: Enter the number of points the client will need to ac c umulate before the system issue them with the store credit vouc her. For the Amount of: Enter the amount to be used as store credit for that num ber of points. Days to Expiry: Enter the number of days before the store credit expires, zero for no expiry. Payment Name: This is a drop down list that displays the payment types, you must choose the Loyalty payment type that we have created in step one, note that the loyalty paym ent option will be disabled in the POS screen for any client who does not have enough loyalty points to spend. Note that the system will keep track of the loyalty points for the client and will autom atically issue the loyalty points voucher when the number of points are reached or exceeded the allotted number of points (in this case 500). Docket Header and Footer: Enter the text you wish to display on the loyalty points header and footer. p148 © EziSolution Systems, 2011 You also have to make sure that you properly setup any client you wish to join to the loyalty points, by enabling the loyalty points flag in the client card as shown below. -o- p149 © EziSolution Systems, 2011 Locations This option will only appear in the Multi-loc ation version. Path to Save Export Data: This is used on the remote location, the default is OutBox. Path to Import Data From: This used on the Server or head office that collects data from all the remote stores How does it work: The program will save all the transactions from the remote locations on the loc al hard disk in the sub folder OutBox, then these files need to be sent (by VPN, FTP or any other way) to the sub folder InBox on the server before it is imported in to the main system. -o- p150 © EziSolution Systems, 2011 Hardware Setup Use the Hardware Setup to set defaults and other values associated with hardware used such as docket printers, cash drawers and pole displays. -o- p151 © EziSolution Systems, 2011 POS printer This option allows the adding of a POS printer to the system as shown below. Pos printer 2 is used to print a second copy on a remote printer such as in restaurants to the kitchen. Labels Printer: Choose the printer from a drop down list, if the printer is not listed there, The labels printer can be used to print labels and barc odes POS Printer: Choose the printer from a drop down list, if the printer is not listed there, you may choose a compatible mode, most pos printers can em ulate the Epson T88II Windows Driver: Choose a POS printer Windows Driver from the drop down list. This is normally created by the Windows User from the Control Panel > Printers and Faxes sc reen. Make sure to name the printer drivers a meaningful name and also test the driver by printing to the printer using the Print Test Page button in Windows. If the printer does not print under Windows, then it will not work in the program . Print Header Logo: This is an optional field that will allow the POS printer to print the company logo on the docket. Most new POS printers store graphic s in their built-in NV memory (Non-Volatile Memory) using the software that c omes with them, and then using the correct control codes, it will allow the user to place the com pany logo on the sales docket thus enhancing the business image. You will need to consult your printer manual on the control codes to use to print the logo p152 © EziSolution Systems, 2011 Note: the control codes can be entered in the format xx yy zz or xx,yy,zz , where xx, yy and zz are the codes in Decimals, you can use Hex by preceding the numbers by 0x Double Width On: This allows the company name to be printed in large font. Note that if the company name is too long (more than 40 characters) its best not to print it in large font. Double Width Off: This turns off the large print Auto Cutter On: This is used with POS printers that have the auto paper cutter to force the printer to cut the docket after it is printer, most printers with auto cutters have two m odes of cutting, a full cut and a partial cut. print Footer Logo: This is the same as the header logo, and can be used to print suc h things as advertisements, specials, discount vouchers etc., the graphics bitm ap has to be uploaded to the printer memory at a new location to allow the program to use it. Graphics Support: This option is for future use. POS Printer2 This option is used to allow the user to print using 2 printers, such as pos station and back station -o- p153 © EziSolution Systems, 2011 Cash Drawer This option is used to setup the cash drawer that is connected to the system through either the serial port, POS printer port or USB Port. Please note that cash drawers that connect to the POS printer port are the easiest to setup and also the cheapest to buy. Connection Type: Available cash drawer connection type options are: No Cash Drawer: Choose this option if you have no cash drawer connected to the system POS Printer: Choose this option if the cash drawer is connected through the pos printer using RJ-45 cable Serial Port: Choose this option if the drawer is connected to the com puter using RS-232 Serial Cable. Once you choose this option, a new drop down option will appear and you must enter the serial port Windows Driver whic h you should have created using the Generic Printer Driver. Make sure to set the serial port parameters to match those of the printer's. If you are not sure what those parameters are, you can usually forc e the printer to display them by pressing one or more of the printer's buttons and switc h it on while you keep pressing these buttons. p154 © EziSolution Systems, 2011 USB Port: Choose this option if drawer is connected to a USB port, you will need to load the driver that comes with the drawer for it to work External Program: This option allows you to use an external exec utable program to open the cash drawer. You will need to provide the nam e of the external program (see example below). Make sure this program opens the drawer if you run it from DOS or Windows. Open Drawer Sequence: Enter the decimal codes to open the cash drawer in the format of aa bb cc ..., you can enter the Hex code as 0xaa 0xbb 0xcc Password Protect to Open Drawer: Tick this option if you wish to force the user to enter his/her password to open the cash drawer. -o- p155 © EziSolution Systems, 2011 Pole Display This option is used to setup the optional Customer Pole Display which shows the items sold and their amounts, the total of the sale, the tendered am ount and the change to be returned to the customer. Pole Display driver: Choose the Pole Display Driver from the drop-down list of the printer drivers, this list is created by the Windows users as desc ribed here Home Code: Enter the home Code in ASCII format (the default is 11), the hom e code is used to force the cursor to the top left hand side of the display. CR Key Code: Enter the Carriage Return Key code in ASCII format. The default is 13), this code is used to skip to the next line. Welcome Text: Enter the welcome text that appears on the pole display Currency Symbol: Enter the currency symbol. Some currency characters will not display properly on the pole display, so its ASCII equivalent must be entered to overc ome this limitation. An example of that is the Sterling Pound sign £, you can use the value 156 to allow the display to show the £. -o- p156 © EziSolution Systems, 2011 Electronic Scale This option is used to setup the optional electronic scale that is connected to the system using the serial port. Scale Name: Choose the scale name from the drop-down list, if your scale type does not appear, you can email us with your scale type and its control codes and we will add it to the list. Com Port: Enter the scale communications port, leave it zero for no sc ale. Baud Rate: Choose the scale baud rate from the drop down list. from the sc ale. Parity: Choose the scale Parity, such as N- No Parity, O- Odd Parity, or E- Even Parity. Bits: Choose the data bits of either 7 or 8 Stop Bits: Choose the stop bits of 0, 1 or 2 NOTE: The communications parameters must match the actual scale parameters, otherwise, you will not get the proper readings from the sc ale. Enabling Weight: Enter the control codes for enabling the weight, the code can be entered in Decimals or preceded by "0x" for Hex such as shown in the sc reen example above. Disable Weighing: Enter the control codes for disabling the weighing, this is to stop the scale from sending data to the computer when not suppose to. Weight Start Position: Enter the start of the weight position to bypass the control codes the scales sends with the weight. Weight Digits: Enter the weight number of digits (normally 5 for Kg and 4 for lbs) p157 © EziSolution Systems, 2011 Factor: Enter the number to multiply with to get the c orrect reading, (0.001 for Kg and 0.01 for lbs) -o- p158 © EziSolution Systems, 2011 Barcode Scanner This option is used to setup a barcode scnner connected to the system . Please note barcode scanners connected to the Keyboard or USB ports do not need any setup, they should just work. However, a serial barcode scanner needs to be setup with the correct serial port param eters. Connection Type: Enter connection type of the scanner, options are Keyboard, USB and Serial, Some scales come with integrated barcode scanner so it will have the same parameters as the scale. Serial Port Parameters: Enter the correct serial port Parameters. Extra Characters: some barcode scanner will read extra characters at the start and end of the barcode, you must identify thier number and enter the correc t information here to allow the system to read the barcode properly. -o- p159 © EziSolution Systems, 2011 Credit Cards The credit cards option allows you to setup and process Credit Cards, Debit Cards and Gift Cards from within the program without the need to a telephone line or bank equipm ent, thus saving you substantial sum of money every year. An added benefit of the c redit card processing is speed, elimination of entry errors, no equipment hire from your bank, one less telephone line rental as the processing is done on-line and c heaper rates. The system comes with built in credit card processor (CCP) companies that you can c hoose from. Before you are able to work with credit cards, you must contact either us or the chosen CCP to arrange for the following: 1 - You must have a murchant account with your own bank (or any other bank) 2 - You Must install the CCP's software, the CCP will help you download and install (or install it for you). 3 - you must get a swipe device such as a keyboard with a credit card reader or a m agnetic card reader which can read tracks 1 and 2 p160 © EziSolution Systems, 2011 4 - If you need to process debit cards, then you will need to get a Debit Card Reader. 4 - Setup the hardware according to the CCP recom mendations. Once all the above is done, you will be able to accept credit cards and process credit cards (including Visa, Master Card, Amex, JCB, Diners Club, Discover, Union Pay, Bank Debit Cards and Gift Cards) -o- p161 © EziSolution Systems, 2011 Import / Export Files This menu item allows the import or export of data to and from the database files used by the system. EXPORTING DATA: Data File to Export From : Choose the data file to export from. Choose Data Fields Required : Choose the required fields by moving them to the box on the right. Operation : Choose Export to export one of many database files to a number of different formats. File Type : Choose the file type you are exporting to. Valid formats are EXCEL, CSV and TAB DELIMITED. File to Export To : The system fills in the default destination file, it uses the C:\TEMP folder to store the exported file. You can choose to accept this choice or change it to a different folder. Note that the file path and name must not contain any spaces, otherwise the export will fail and an error message generated. Onc e this is done, the system will display a grid with all of the data to be exported, you can choose to change the data in the grid without affecting the database. You can also stop any row from being exported by simply clicking on the left most column and un-check. Click on the Export button to export the data. Note: Make sure when you export to a file, that there is no file with the sam e name that is open, otherwise you will get an error message and the export will fail. IMPORTING DATA : Data File to Import To : : Choose the data file to import to. Imprting Stock file, you will need to provide the part number. Importing existing data will only refresh that data and will not cause duplicates. Choose Data Fields Required : Choose the required fields by moving them to the box on the right. Make sure to match the import data with the im port fields. Operation : Choose the Import option File Type : Choose the file type you are importing from, the valid formats are EXCEL, CSV and TAB DELIMITED. Note: Importing from Excel files may cause problems, especially with new types of Exc el files as they contain too many hidden control characters to be used by their programs, so its p162 © EziSolution Systems, 2011 advisable to convert the Excel files to CSV files (Just save as CSV from Excel), this will eliminate too many problems including the importing part numbers as digits. File to Import From : Enter the file name including the full path of the file you are im porting from, Make sure the data matches the field names in the grid, otherwise, you will get incorrect data in your data files. If there is a c olumn you are not importing, make sure to have blank fields in the source file. Also, make sure to enter a valid file nam e, the file name and path must not contain spaces. To choose the file name interactively, double click on the file field. To exclude any row from being imported, un-tick the first c olumn in the grid. You can change data being imported by over writing the data in the grid, this will not c hange the data in the original file. Note: Make sure when you import from a file, that this file is not open, otherwise you will get an error message and the import will fail. -o- p163 © EziSolution Systems, 2011 Restore Data From Backup This option is used to restore the data that was earlier backed up when exiting the system . Note that restoring will wipe out all the data that was entered from the time the bac kup was done up until now, so you must be very careful when you perform a restore. Lost data c an not be recalled so it must be entered manually. Backing up regularly and under different file names is the best insurance for a good data integrity. Restore is usually done if there was a disaster that caused data loss. Make sure to reindex the files after the restore. You are also advised to check on the data after the restore is done to make sure all is OK. -o- p164 © EziSolution Systems, 2011 Users Settings Use Users Settings option to do the following operations: Create a new user Delete an existing user Set a user’s file access permissions. Setup the proper user interface You must be the Master user, or have been granted permission to do these functions, by the master user. -o- p165 © EziSolution Systems, 2011 Modify User This screen is used to add/modify users and their settings, note that users file is not the sam e as the staff file. A staff m ember can have one or more user accounts with different setting for each account, this will facilitate better use and security for the system . To Modify the user basic information, click on the Modify button to get the following screen: p166 © EziSolution Systems, 2011 The above screen stores the basic user information such as name and contact details, once all the information is correct, just click on the save button to save. -o- p167 © EziSolution Systems, 2011 Security Clicking on the Security button will display the following sc reen, which allows the system administrator to assign the security settings for each user. This screen allows security of down to the menu level, you will need to assign a sec urity value of between 0 to 3 for each menu item, 0 being no access and 3 for full access. First you must assign a password for the user, followed by security levels for eac h and every screen. To make sure the password works, you will need to assign a password to the very first user (Master User), otherwise, the password will be inactive and these settings will not apply. -o- p168 © EziSolution Systems, 2011 Settings The Settings button is used to configure the user interface, and em ail settings for each system user, clicking on the settings button will show the following sc reen: User Interface: the interface tab is used to configure the user interface, a choice between a menu and toolbars or Big Buttons interface (which is more suitable for touch screens) the colors of screens, a background picture to the m ain menu, show tips and also the ability to choose and modify a language file. To modify the text on the user interface, choose a language file, then click on the edit button, then you can edit any text to appear on the various screens. Language file: You can also change the interface language for each user, thus allowing each user to work with his/her own language, the system comes with some default languages but if you need to change the language to one that is not on the system , you can just create a new file and edit the file your self, this can also work if you need to change any text on the interface to say whatever you want. If you need to create a new language file for your specific country, copy the following files as p169 © EziSolution Systems, 2011 follows: If you need to c reate a German Language File copy the ENGLISH.LNG and ENGLISH.CDX files and rename them as GERMAN.LNG and GERMAN.CDX, then choose the German language file and edit the text in there to make it German, then you will notice that all text on all sc reens will now show German. Desktop Picture File: This will display any picture file you have on the m ain menu. Note that if you are running a network version and need to enter a pic ture file, make sure to enter the full path name of the picture suc h as \\Server\Serverc\Rman\ezi_blue.jpg or you can just remove the path name and just enter the file name if that file is residing in the sam e folder you start the program from. Show Tips on Startup: Tick to show random tips whn you start up the program . Open Diary on Startup: Tick to display the diary when you first enter the program . Show Tool Tips: Tick to force the system to show you tool tips on all screens to help you learn the system. -o- p170 © EziSolution Systems, 2011 Sales The Sales tab is used to configure the sale screens for each system user. Choose the proper settings for each user, making sure to save after finishing. This screen is user specific, so each user can have his/her own settings. Invoicing Screen Disable Date Change: Tick to block user from changing the invoice date when entering new invoices. Disable Price Change: Tick to block user from changing the selling price when entering new invoices. Disable discount Column: Tick to block user from adding discount. Show total profit: Tick to show total profit as you enter the invoice Cash Drawer Allow Open Cash Drawer: Tick to allow user to open Cash drawer. Stock Enquiry screen Is used to check on stock items and is valid throughout the system, you can configure it to show different prices for different users based on their sec urity levels. -o- p171 © EziSolution Systems, 2011 POS The POS tab is used to configure the POS screen and its behavior, you can allow the user to edit or block a cell, you can also hide a cell such as the tax c olumn Choosing Skip will speed up the sales process but will still allow the user to go bac k and change the field if need be. note that you can set a stock item in the stock card to force price and quantity editing even if the column is sat to disable in this screen, this is required for such items that do not have a fixed quantity or price to be edited by the user. If you choose disable to a particular field, the user will not be able to modify the content of that field. However, you can switch between users using the CONTROL+ F12 to allow another user with more authority to change settings on the fly. Allow Qty Discount: This setting is used in conjunction with the stock card by setting the price for a volume discount, so if you assign a Retail price for up to 3 item s and the Trade price for qty of 4 to 10, so if the custom er buys 4 or more, the system will automatically change the price from the Retail to the Trade Price. Allow Deletion: this option will allow the user to delete POS transac tion including their payments, note however, the system will keep a log of all deleted transac tions including the time and date of deletion, the active user and the am ounts deleted. Allow Quick Menu Buttons Edit: Enabeling this option will allow the use to edit the quic k buttons in the POS screen Show Total Sales Amount on POS List: Choosing this option will show the suer the total sale and their amounts. Block user from changing entered data: This option will prevent the user from changing or deleting any data once entered in the pos screen. Disable the Hold Button: This option will block the user from using the Hold button. Block Sales Return: This option will block entering negative quantities. p172 © EziSolution Systems, 2011 Disable F7 Sales List: This option will block the F7 func tion key from displaying the sales list in the pos screen for that day. Disable POS Re-print: This option will diable the re-printing of pos dockets after they have been saved. -o- p173 © EziSolution Systems, 2011 e-Mail The e-mail tab allows you to configure the email account for every system user. From Name: Enter the name you want to appear on your rec ipient email. From email Address: Enter the staff email address Reply to Address: Enter a different email address if exist for the recipient to reply to. SMTP Domain: Normally is left blank, but sometimes, you may need to fill it with the sam e text as the SMTP Server. Leave it blank for Gm ail. SMTP Server: Enter your SMTP server, normally in the form of mail.ispname.com, if not sure, you can check your email client to see it in there. Note that you must use your own Internet Service Provider (ISP) SMTP. This will cause the email to go through your ISP which is a lot faster and m ore secure. Most ISP's have an online help to show you how to setup your em ail SMTP. If you are using Gmail, enter "smtp.gmail.com" SMTP Port: enter 25 as default, some ISPs may use a different port, if you are using Gm ail, enter 465. If you are using Gmail to send emails, you will need to tic k the Server Authentication optin and enter the User Nam e as your Gmail acc ount (example [email protected]) and your Gmail password Timeout: Enter the timeout is seconds Attachment: Enter the attachment type you want the system to send as. Server Authentication: Choose this if your ISP offers Server Authentication, which will require a user name and password, most ISP's do not support this feature whic h allows the user to use their email account from different locations by simply using their user name and password, so if in doubt, leave this off, otherwise, ask your ISP. Gmail requires Server Authentication Ticked, with the user name as <user>@gmail.com and the password. Default email Message: Enter the default email Message, you will be able to m odify it p174 © EziSolution Systems, 2011 before you send an email -o- p175 © EziSolution Systems, 2011 Tax File Maintenance Select Tax File Maintenance to set up taxes and rates appropriate to your country. Retail ManPOS System allows the users to choose the tax system used in their country. The options are: No tax applicable, one tax system (such as USA, Australia and the UK), or a two taxes system (such as Canada). To setup the system for a NO TAX system, keep both TAX NAME fields empty. For a Single Tax System, enter the default tax name in the TAX1 field, it is usually TAX, VAT, GST etc, then you have to enter the different taxes applicable in the grid below. For a Two Taxes System, enter the names of these taxes in the TAX NAME fields TAX1 and TAX2, then you also have to enter the tax codes and tax % in the grid below. In some instances, the tax may not be a percentage, but a dollar value (such as fuel tax, which is charged at a certain amount per liter or gallon), in this case, when you enter the tax code in the grid, precede that with a Dollar sign $ such as $T. When the system sees the $ sign on calculating the tax, it will multiply the quantity by the tax am ount, instead of calculating the percentage. To add a new tax code, select New. This will position the cursor on a blank line at the end of the list. Set the values of the three colum ns to your needs. To change an existing tax code, position the cursor on the code you want to change and select Edit. This will allow you to change the fields of this code. Select Close to return to the previous screen and save your changes. -o- p176 © EziSolution Systems, 2011 Default Accounts Setup Select Default Accounts Setup to determine which accounts are to be used for posting if no account is specified. This applies to Invoicing, Purc hasing and Payments. Enter a valid account name in each field. The accounts must be in the Chart of Accounts and must also be Posting Accounts. You can obtain the Accounts List to select from interactively by one of the following methods: When you have finished, select one of the following: Save: Save the changes and return to the previous screen. Close: Abandon the changes and return to the previous screen without saving. The system comes with pre-configured accounts and should be kept as is if you are not sure what to do. -o- p177 © EziSolution Systems, 2011 Clear Data files This option is used to clear data files, all cleared data will be perm anently erased with little chance of recalling it, and the time taken to erase data is very fast, so be very careful in using this option. Use it only if you need to erase all of your data (such as when you first start and want to remove all the test data that you created. Also m ake sure to lock this option to all other users of the system using the security settings discussed above in the user settings screen. To clear data, tick the required files, then you have to enter the MASTER USER password. If the Master User does not have a password, then you must assign a password before you are able to clear data. -o- p178 © EziSolution Systems, 2011 Data Files Statistices This option will display vital information on the data files used by the system including the number of records per file, each file size and the last date the files was updated. -o- p179 © EziSolution Systems, 2011 Versions History p180 © EziSolution Systems, 2011 Version 1.8 Version 1.80 Legend = New Feature = Improvement = Resolved Issue Version Released 1.80 20-Oct-2007 Added Quick Menu Buttons to POS Screen Added Hourly sales Report to POS reports Changed interface to Purchase and Sales screens, new screens allow resizing of the whole screen, change grid fields and faster data entry Added Staff Sign In/Out with report Added Payroll Module with payroll slip printout Improved stock Search Procedure Added Sales Source feature in the POS and Sales Sc reens Improved Lay-by procedure with better printout Added Gift Voucher Docket printout in the POS sc reen Modified the Payments sc reens to allow multiple payments Resolved Rounding issues in sales and purchas screens Added an accounting error checking report when reindexing the accounts transactions file Improved main screen sizing to fit any screen size over 800x600 -o- p181 © EziSolution Systems, 2011 Version 1.80.1 Legend = New Feature = Improvement = Resolved Issue Version Released 1.81 29-Oct-2007 Added Stock Expiry Date report fixed bug with Default Quote in Sales Sc reen -o- p182 © EziSolution Systems, 2011 Version 1.80.2 Legend = New Feature = Improvement = Resolved Issue Version Released 1.80.2 9-Nov-2007 Added DOB date filters to Clients report Added Location Filter to Stock Enquiry Report for the multi-locations version Removed Zap file query from Statements report and fixed m inor bugs -o- p183 © EziSolution Systems, 2011 Version 1.80.3 Legend = New Feature = Improvement = Resolved Issue Version Released 1.80.4 20-Nov-2007 Modified Clients Entry Screen Modified Suppliers Entry Screen Fixed bug in number of copies to be printed in invoic e -o- p184 © EziSolution Systems, 2011 Version 1.80.4 Legend = New Feature = Improvement = Resolved Issue Version Released 1.80.4 28-Nov-2007 Fixed POS Daily Report bug Modified some reports to properly display in Excel Files Fixed average stock cost price calculation bug -o- p185 © EziSolution Systems, 2011 Version 1.80.5 Legend = New Feature = Improvement = Resolved Issue Version Released 1.80.5 15-Jan-2008 Fixed POS Daily Report bug Added Drill Down (History) option in Clients List Added Drill Down (History) option in Suppliers List Added Drill Down (History) option in Stock Enquiry Screen Fixed bug in Recalling Accounts in Purchase and Invoice sc reen Fixed Voluntary Super bug in Payroll -o- p186 © EziSolution Systems, 2011 Version 1.80.6 Legend = New Feature = Improvement = Resolved Issue Version Released 1.80.6 28-Feb-2008 Fixed POS currency Pole Display bug Added Old POS screen option Modified Delivery Print Button in Invoice List to c hange printer Added Ability to hide text on POS and Invoice Printouts Added Ability to block printing of client address on POS Docket Fixed bug in calculating Stock Average Cost Fixed Monthly Totals bug in Client Statements Added Invoice Cost Price Recalculation in re-Indexing -o- p187 © EziSolution Systems, 2011 Version 1.80.64 Legend = New Feature = Improvement = Resolved Issue Version Released 1.80.64 23-May-2008 Fixed bug with reports giving error C000005 added clients seach facility Added Balance to the Entry Voucher Added Stock history lookup Removed Service items from stock value report Fixed bug when pressing the F2 or F3 in Entry and Journal Vouc hers Fixed Monthly Totals bug in Client Statements Add user number in line invoice -o- p188 © EziSolution Systems, 2011 Version 1.80.73 Legend = New Feature = Improvement = Resolved Issue Version Released 1.80.73 23-Nov-2008 Fixed bug with FIFO cost price Fixed bug in Invoice when using discounted price Fixed bug in the invoice screen relating to the disc ount column Fixed Monthly Totals bug in Client Statements Fixed problem when docket printing an item that has { in details (gives error # 10) Added % Discount option in POS, Sales and Purc hase Block collate feature if item has the edit price flag set Added extra digit to the stock prices in the stock card m aintenance Moved the Hardware Maintenance to its own menu Added Stock Merge button on the Stock List Add a new Account Button in the POS payment screen -o- p189 © EziSolution Systems, 2011 Version 1.81 Legend = New Feature = Improvement = Resolved Issue Version Released 1.81 20-May-2009 Fixed bug when pressing F7 in POS screenFixed bug in POS to remove hold files when done Fixed Bug in POS to remove hold files when done Added % Discount on Client card Changed Email Library to a newer version Add Multi-Currency Payments in POS Add Foreign Currency in Sales screen Add Foreign Currency in Purchase screen -o- p190 © EziSolution Systems, 2011 Version 1.9 Version 1.90 Legend = New Feature = Improvement = Resolved Issue Version Released 1.90 01-Mar-2010 Fixed bug in Stock Value Report Fixed Backup Bug that stopped open files from being restored. Fixed bug that leaves tem p files after aborting emailing. Fixed bug in Payments sc reen Fixed bug when saving POS after recalling a hold transaction Added Install support for Windows Vista and Windows 7 Changed Programming Language to a newer one Added a new price brakcet in the stock and debtors files for resellers Added Takeaway feature for quick buttons Add Foreign Currency in Purchase screen Added filter to recall stock to be ordered by suppliers in the im port button Added more controls to the scale setup Added Payment amounts and types to Staff Sales Report in POS menu Added Zip to backup and restore Serial numbers can now be entred on one line as follows: Multiple serial numbers in series First_serial - Last_Serial Note that they must be seperated by space,dash and space Multiple serials can be serial1,serial2, serial3 (seperate by comma) -o- p191 © EziSolution Systems, 2011 Version 1.90.09 Version 1.90.9 01/2011 Added credit card processing Added Serial barcode scanner support added hex support to control codes Fixed bug in Stock Transfer screen and report Fixed bug that was introduced in earlier versions in the Loyalty Points in both the POS and Invoicing Screen Version 1.90.8 09/2010 Activated the Archive feature in the Maintenance Section Added Automatic station allocation without using the shortc uts for multi-user versions Fixed bug in importing Stock qtys in the import/export stoc k data Fixed bug in Tax reports restored the database integrity check to the default. Version 1.90.7 07/2010 Added Account code to Journal and Entry Vouchers in the accounting section Added detailed reports in the Trial balance acc ounting report Added detailed reports in the Profit & Loss acc ounting report Added detailed reports in the Balance Sheet acc ounting report Added the ability to group posting accounts under heading accounts in the chart of accounts Added BIN sort option to stock take report Fixed bug in invoice payment screen Version 1.90.6 07/2010 Added individual points to the stoc k items fixed bug in calculating the holiday and sic k hours on the pay slip Version 1.90.5 06/2010 Added Profit diplay in Invoice for selected users Fixed bug in POS screen to display pac kage pricing Fixed bug in purchase returns report Fixed bug when pressing the discount header in POS sc reen Version 1.90.4 06/2010 Set reports to open at max screen Added a new procedure to fix corrpted data files in the pac k option in the Files reindexing procedure Fixed bug in printing 2nd line on invoic e Added more options to the Random Weight barcodes Added decimal option in the weight for the Random Weight barcodes to handle both lb and kg Fix bug when printing using an external printer that changes the default path Added an option to block reprint on pos sc reen Adding Archive option to compact old data Modified Selling prices report to add resellers, on special prices and other details option Added a default labels printer option in Hardware Setup Added Data Files Statistics in the Maintenance Section Fixed bug in stock History file when modifying sales and purchases Version 1.90.3 04/2010 Added option to exclude cost price and profit from invoice list report Adding option to customise POS docket printout. Fixed bug in Groups sales report to filter by group p192 © EziSolution Systems, 2011 Fixed bug in pos screen when collate flag is ac tive -o- p193 © EziSolution Systems, 2011 FAQ Barcode Printing To Setup the barcode font, click on Windows START > SETTINGS > CONTROL PANEL > FONTS Choose Install new font, then change the folder to C:\RMAN or C:\EZI_W (depending on which software you are using) Double click on the folder, you will notice a font Barc128c (True Type) appears in the List of Fonts window, highlight that font and click OK p194 © EziSolution Systems, 2011 The system will tell you the font is already installed, click OK, then click Close, This will install the new font properly. You can now view or print barcodes from the software. -o- p195 © EziSolution Systems, 2011 Cash Drawer Setup Cash drawers can either connect to a serial or USB port (such as COM1 or COM2, USB1, etc) or it can connect to the POS docket printer. You must enter the correct open drawer command for the drawer to open, Use Shift + F12 to test. To setup a cash drawer with a serial or USB interface, follow the following steps: Click START > SETTINGS > PRINTERS > ADD NEW PRINTER Choose the com port used by the cash drawer (com1, com2 etc.) p196 © EziSolution Systems, 2011 Click Next and choose the GENERIC / TEXT Printer Then rename to the device name used. Once this is done, the device name should appear in the HARDWARE Setup screen. p197 © EziSolution Systems, 2011 Once this is done, go to MAINTENANCE > HARDWARE Setup and adjust the settings as shown. -o- p198 © EziSolution Systems, 2011 Cannot load 32-bit DLL repinv3.frx System produce the following error when starting up: Error Number: 1753 Error Message: Cannot load 32-bit DLL repinv3.frx. This error is due to a Windows protection setting which can be modified from CONTROL PANEL > SYSTEM > Choose the ADVANCED TAB > Click on the SETTINGS button under the PERFORMANCE Heading > Click on the DATA EXECUTION PREVENTION TAB, then choose the TURN ON DEP FOR ESSENTIAL WINDOWS PROGRAMS AND SERVICES ONLY, or if you do choose the TURN ON DEP FOR ALL PROGRAM AND SERVICES EXCPET THOSE I SELECT:, then you have to add the RMAN.EXE in the box as shown below. -o- p199 © EziSolution Systems, 2011 Error Access Printer Spooler When trying to print a receipt from the receipt printer it gives following error: Error 1957 (error accessing printer spooler) This error is normally is generated when the user c hanges the name of the Windows POS printer. to fix, the use must go to Windows > Printer and Faxes Panel, remove the old POS printer driver and re-install it, (making sure NOT to make it the default Windows Printer). Then go in t the program, go to MAINTENANCE > SYSTEM SETUP > HARDWARE and choose the newly installed driver for the POS printer, then save. -o- p200 © EziSolution Systems, 2011 Issuing a discount on invoice or POS total If you need to issue a total discount on the total sum of the invoice, you will need to do the following: 1 - Create a new service item from the Stock Add/Modify screen, the part number of that item must be the discount amount, so if you need to give a 5% disc ount, the part number must be -5%, you can enter any details such as "5% discount" 2 - Entering the -5% service item in the invoice or POS will cause the system to give a 5% discount for all the items preceding the -5% discount line. This is much more flexible than having a total discount at the bottom of the screen for two reasons, the first is for allowing the user to give a total discount on some items and not others, so the user enters all the items that need to be discounted on the top, then enter the discount then continue with undiscounted items, the second reason is the user can use reports to see how m any times an item discount has been given and how much it was. -o- p201 © EziSolution Systems, 2011 POS printer setup To setup a POS printer connected to the local com puter, go to Windows > Start > control Panel > Printers and Faxes the add new printer Choose the port used by the POS printer (com1, com2, Lpt1, Lpt2, USB1 etc.) p202 © EziSolution Systems, 2011 Click Next and choose the GENERIC / TEXT Printer Then rename the name to be used Such as Epson TM III. Once this is done, the device name should appear in the HARDWARE Setup screen Warning: Make sure not to make the POS printer as the Default Windows Printer, you MUST use a proper report printer driver to print and display your reports correctly. -o- p203 © EziSolution Systems, 2011 Pole Display Setup To setup a Customer Pole Display with a serial or USB interface, follow the following steps: Click START > SETTINGS > PRINTERS > ADD NEW PRINTER Choose the com or USB port used by the Pole Displ;ay (com1, com2 etc.) p204 © EziSolution Systems, 2011 Click Next and choose the GENERIC / TEXT Printer Then rename to the device name used. Once this is done, the device name should appear in the HARDWARE Setup screen. p205 © EziSolution Systems, 2011 Once this is done, go to MAINTENANCE > SYSTEM SETUP > HARDWARE and adjust the settings as shown in the following screen. -o- p206 © EziSolution Systems, 2011 Network Printing Network Printing To setup network printers, you have to setup the network users and stations first To setup a network point of sale printer, choose where the POS printer is needed to be located, then create a printer driver on that system (it has to be GENERIC, TEXT) then make it sharable. On the other stations under Windows, click START > SETTINGS > PRINTERS & FAXES and click ADD ANEW PRINTER Choose A network printer, or a printer attached to another computer p207 © EziSolution Systems, 2011 Click Next to browse for a printer Select the printer you want to use and click next p208 © EziSolution Systems, 2011 Next open the program then go to MAINTENANCE > SYSTEM SETUP > HARDWARE and under the POS Printer chose the printer you just created and save Note that you should not make the POS printer your default Windows printer, even if you do not have another printer connected to the system, the reason for that is you will have problem printing all other reports since the system uses the default Windows printer font to print the reports, and the POS printer fonts are very limited, so you must always install a standard printer as your default Windows printer. -o- p209 © EziSolution Systems, 2011 Network Setup SERVER SETUP To make the system run on a network, do the following steps: Decide which computer is going to act as a server Set up the hard disk of that machine to be sharable, to do that, double click on My Computer, Right Click on the Hard Disk Drive Icon, click Sharing and Security and then give the drive a share name Such as (C ) and make it fully sharable, if successful, you will see a hand under the Hard drive icon. Create a short cut on each station as follows (let us assume you server name is SERVER and the drive share name is C) in the short cut enter \\SERVER\C\RMAN\RMAN.EXE and in the START IN field in the short cut properties you must also enter \\SERVER\C\RMAN . An easier way to setup the station is to locate the Rman folder on the server, open that folder, locate the Rman.exe program, right click it and choose the "Send to Desktop (Create Short-cut)" option. There is another way to do the same thing but instead of using the Absolute Path p210 © EziSolution Systems, 2011 Names, use instead mapped network drives , to do that : follow the first three steps as above On each station, Double Click on Network Neigbourhood (for Windows 98) or (My Network Places ) in 2000 or XP Once you see the server, double click on the server icon, then you should see the sharable drive on the server Right click on that sharable drive, and click Map Network Drive, then choose a network drive letter such as N Tick the Connect at logon, and save this setting Create a short cut and browse to the RMAN directory on the server, then save. Either ways will work fine, the only thing you have to watch for is the network drive mapping in the second method may drop out if the server was not available when you start the stations, so you have to re-install it. The first method is more consistent and will work each and every time. Workstations Setup To setup each station to have its own peripheral devices such as POS printers, report printers, cash drawers and so on, you have to add the number of each station as a parameter to the program name in the program desktop short cut. The stations has to be numbered 1, 2, 3, 4 etc, then the short cut has to have the station number as follows : For station number 2, the TARGET field in the short cut should look something like C:\RMAN\RMAN.EXE 2 (RMAN.EXE is the program name for Retail Man) Note that version 1.90.08 and above does automatic allocation of station numbers, so no need to incluse the station number, but you can force the system to use a particular station number by including the station number in the short-cut. p211 © EziSolution Systems, 2011 Or p212 © EziSolution Systems, 2011 -o- p213 © EziSolution Systems, 2011 System Freeze If you are running the program on a network, you may experience what look like freeze (but its actually trying to look for files) if you have included the path names that are valid on one system but not on the others that are networked. Here is an example: RMAN is installed on Machine called Server and you enter the logo file path as C:\RMAN\MyLogo.jpg Now, if you run this from the server, it will work fine, but if you run it from the network, it will be trying to look for a file called MyLogo.jpg on the local drive but it can't find it. The system will give you an error. But if you have entered a Desktop Picture file under the User Maintenance section and the path is valid for one system but not the rest, then a delay of 1 to 5 minutes will happen every time the main menu gets focus (which will look like a freeze) To fix, use the absolute file names such as \\Server\DriveC\RMAN\MyLogo.jpg (replace the computer, hard drive names according to your network), or simply enter the file name without path such as MyLogo.jpg If the above does not apply, then there may be other reasons including: 1 - Computer Hardware failure (mainly hard disk drive or memory) 2 - System is heating up due to faulty fans or poor air flow circulation in the system 3 - Viruses or Trojans 4 - Windows file corruption To check if it is a hardware or software problem (this is a quick test and is generally true but not always): When the system freezes, pressing the Num Lock key few times should turn the Number Lock led on the keyboard on and off, if it doesn't then its a hardware problem, otherwise, it could be a software problem. -o- p214 © EziSolution Systems, 2011 Serial Number Tracking Make sure to tick the Track serial number option in the stock card, then when you enter the stock item and press the Enter or Tab key on the Qty field, the system automatically generate the text S/N under the part number column, you can then enter the serial numbers in the details column, if you have many serial numbers, they c an be entered on the sam e line (separated by commas) such as 12345,12346,12347, or on different lines, but you m ust make sure you enter the text 'S/N' in the part number for the system to recognize it as a valid serial. You can also enter a series of consecutive serial num bers such as 12345, 12346, 12347,12348 by simply entering the first and last serial num bers separated by a "spac e, dash, space" such as 12345 - 12348 The system will be able to report on the serial number using the F8 func tion key as shown -o- p215 © EziSolution Systems, 2011 Supported Hardware RetailMan can use the following hardware (Other hardware with the same connection types and specs will also work fine): Recommended POS Printers Must have a minimum of 40 column wide printout. Connection Type: Serial (suitable if the printer far away from the c omputer) Parallel USB Printing Type: Thermal (faster, quiet, no ink ribbons needed) Dot Matrix Brands: Epson Star Samsung Posiflex Recommended Barcode Scanner: There are two types of barcode scanners, Laser and CCD, CCD type is cheaper but the laser is much better as it can scan from some distance away. p216 © EziSolution Systems, 2011 Connection Type: Keyboard USB Serial (Not recommended) Brands: Posiflex DATALOGIC PSC METROLOGIC Recommended Customer Pole Display: Two Lines of 20 Characters each. Connection Type: Serial USB Brands POSIFLEX EPSON Samsung Recommended Touch Screen: Minimum Screen Resolution of 800x 600 but larger is better p217 © EziSolution Systems, 2011 Brands ELO (or any brand using Elo Tecnology) LG LIYI (or any brand using Liyi Technology) Recommended Cash Drawer: Connection Type: Serial Printer Driven (Needs POS printer to operat) Brands POSIFLEX EPSON CITIZEN Recommended Barcode Printers The best solution for printing Barcodes is to use the reports printer (laser or inkjet) to print your barcodes. Laser printers are recommended because they are faster, c heaper to run and produce a better quality barcodes. The built in barcode labels c an be used and the barcode labels stationary is widely available. However, if you do require a barc ode printer, then Zebra is a good way to go. p218 © EziSolution Systems, 2011 Electronic Scales Connection type: Serial USB Brands NCR Mettler Toledo TEC and many others -o- p219 © EziSolution Systems, 2011 Index -AAdd / Modify Clients 42 Add/Modify Staff 109 Add/Modify Suppliers 92 Aged Clients Report 52 Aged Suppliers Report 98 -BBack Orders Report 55, 101 Balance Sheet Report 129 Bank Deposit 57 Bank Reconciliation 121 Barcode Printing 194 Barcode Scanner 159 Bulk E-mail 46 -CCannot load 32-bit DLL repinv3.frx 199 Cash Drawer 154 Cash Drawer Setup 196 Chart of Accounts 115 Chart of Accounts Report 122 Clear Data Files 178 Client Sales/Product 61 Clients' Statements 53 Company Setup 135 Consignment Out 39 Cost Price Report 80 Credit Cards 160 Credit Note 38 -DDaily Balances Report 124 Daily Entries Report 123 Daily Sales Report 27 Data Files Statistices 179 Default Accounts Setup 177 Details Tab 65 Diary Screen 130 -Ee-Mail 174 Electronic Scale 157 p220 © EziSolution Systems, 2011 Email 45 Entry Posting 119 Equivalent Part Numbers 68 Error Access Printer Spooler 200 -FFiles Reindex 133 Function Keys 10 -GGeneral Setup 136 Global Stock Maintenance 74 Group Sales Report 29 -HHardware Setup 151 History 67 Hourly Sales Report 30 -IImport / Export Files 162 Introduction 7 Invoices List Report 50 Invoicing 31 Issuing a discount on invoice or POS total 201 Item Enquiry 76 Items' History 86 -JJournal Posting 117 -KKit 70 -LLabels Printing 48 Lay-away / Lay-by 37 List of Clients 49 List of Suppliers Report 94 Locations 150 Loyalty 148 p221 © EziSolution Systems, 2011 -MModify User 166 Monthly Balances Report 125 -NNetwork Printing 207 Network Setup 210 -OOther Languages Support 14 Out Of Stock Report 82 -PPackage Contents 69 Payments Received 40 Payments Setup 146 Payments To Suppliers 90 Payroll Parameters 110 Payroll Report 113 Payroll Slips Report 111 Point Of Sale 15 Point Of Sale Setup 143 Pole Display 156 Pole Display Setup 204 POS 172 POS Docket Re-Print 23 POS List 24 POS printer 152 POS printer setup 202 Process Payroll 108 Product Sales/Client 62 Purchase Analysis Report 100 Purchase Orders Report 96 Purchase Payments Report 104 Purchase Setup 141 Purchases List Report 95 Purchases Tax Report 103 Purchasing 87 -QQuantities Report 78 Quick Menu Buttons 20 Quick Start 8 Quotations 36 -RRestore Data From Backup 164 p222 © EziSolution Systems, 2011 RetailMan 6 -SSales 171 Sales Analysis Report 54 Sales By Client 59 Sales By Product 60 Sales by Sales Rep 63 Sales Payments Report 58 Sales Setup 137 Sales Tax Report 56 Security 168 Selling Prices Report 79 Serial Number Tracking 215 Settings 169 Sign In / Out 105 Sign In/Out Report 114 Slow Moving Items Report 81 Staff Sales Report 28 Start/End Day 25 Statement Of Account 126 Stock Groups Maintenance 73 Stock On Order Report 102 Stock Quantity Adjustment 75 Stock Reorder Report 83 Stock Setup 140 Stock Take Report 84 Stock Value Report 85 Summary Income Report 26 Summary Purchase Report 97 Summary Sales Report 51 Suppliers' Statements 99 Support and Contacts 12 Supported Hardware 216 System Freeze 214 -TTax File Maintenance 176 Telephones Directory 132 Touch Screen Payment 18 Trading Profit / Loss Report 128 Transactions Enquiry 77 Trial Balance Report 127 -UUser Interface 13 Users Settings 165 -VVersion 1.80 181 Version 1.80.1 182 Version 1.80.2 183 Version 1.80.3 184 p223 © EziSolution Systems, 2011 Version 1.80.4 185 Version 1.80.5 186 Version 1.80.6 187 Version 1.80.64 188 Version 1.80.73 189 Version 1.81 190 Version 1.90 191 Version 1.90.09 192 p224 © EziSolution systems w w w .Retailmanpos.com