1
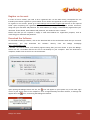
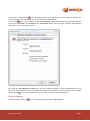
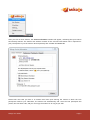
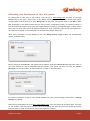
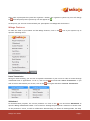
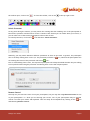
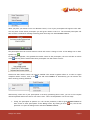
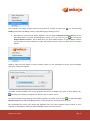
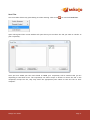
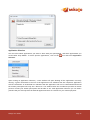
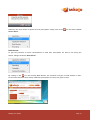
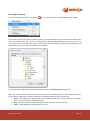
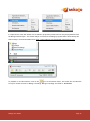
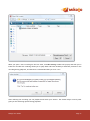
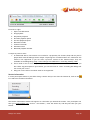
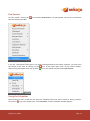
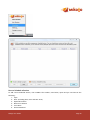
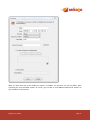
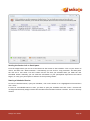
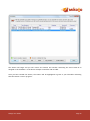
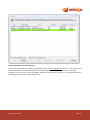
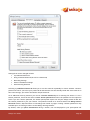
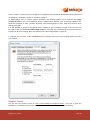
Mikogo Web Conferencing & Remote Support User Guide (Windows Version) Table of Contents Register an Account................................................................................. 3 Download the Software ............................................................................ 3 Start a Session ....................................................................................... 4 Informing your Participants to Join the Session............................................... 6 Mikogo Features ..................................................................................... 7 Pause Transmission 7 Whiteboard 7 Switch Presenter 8 Remote Control 8 Send Files 11 Application Selection 12 Lock Session 13 Back Monitor 14 Recording & Playback 15 Session Information 18 End Session ..........................................................................................19 Using the Scheduler................................................................................19 How to Schedule a Session 20 Sending the Session Info to Participants 22 Starting a Scheduled Session 22 How Participants Join the Session 24 Using the Same Session ID for Future Sessions 25 Start a Scheduled Session at Any Time 25 Voice Conferencing Service ......................................................................26 Change Settings .....................................................................................26 Support Forum ......................................................................................29 Mikogo User Guide Page 2 Register an Account In order to host a session, you need to be a registered user. On the other hand, participants who are invited by the session organizer to join a session do not need to be registered in order to participate. To register for an account, please go to www.mikogo.com/account/register.php and fill in the required fields. Upon completing the registration you will receive an email confirming your account activation, along with your username and password. The email address you supply is automatically registered as your username. These details, email address and password, are needed to start a session. Please note that you are required to supply a valid email address for registration purposes, such as confirming your username and password. Download the Software To download the Mikogo software, click on the download link in the confirmation email that you received. Alternatively, you may download the software directly from the Mikogo homepage http://www.mikogo.com. A window, as pictured below, will instantly appear stating that you have chosen to open the MikogoStarter.exe file. Click Save and save the file to the desktop of your computer. Once the download is complete, double click on the file to run the software. Upon opening the Mikogo-Starter.exe file, the icon will appear in your system tray in the lower right corner of your screen next to the computer’s clock. At approximately the same moment, a message will appear above the Mikogo User Guide icon, announcing that Mikogo has started. Page 3 Furthermore, along with the icon, a Mikogo shortcut icon will appear on your computer desktop. For future reference, you can double click on this shortcut to start Mikogo. Click on the icon in your system tray and select Settings. Under the Account tab you will be asked to provide your Username, the Password, and Your Name. Please note that your password and username were sent to you in the original email. By ticking the Load Mikogo at startup box, you can configure Mikogo to start automatically when you switch on your computer. This way Mikogo will always be available in the background, and by simply clicking on the icon in your system tray, you can start a session at your convenience. Start a Session To start a session, click the Mikogo User Guide icon in your system tray and select Start Session. Page 4 After you click on Start Session, the Session Information window will appear, indicating that your session has instantly started. The Session Info window contains all the relevant information that is required for your participants to join the session. Most importantly this includes the Session ID. Please take note that you have a 15 minute time limit upon starting the session in which the first participant needs to join. Otherwise, the session will automatically end. Once the first participant has joined, the time limit ends, and you can enjoy the session for as long as you wish. Mikogo User Guide Page 5 Informing your Participants to Join the Session For participants to take part in your session, they can go to www.mikogo.com and click on the Join Session link in the upper right corner of the Mikogo homepage. A file download window will appear notifying them of their selection to open Mikogo.exe. At this point, participants need to click Run or Save File, depending on the Web browser they are using. If they clicked Run initially, for security reasons, a second window will appear where your participants need to confirm by clicking Run again. If they clicked Save, they can then open the file by double-clicking on it which essentially runs the file. Participants are not required to register on the homepage nor download the Mikogo-Starter file. When your participants run the Mikogo.exe file, the Mikogo Session Login window will automatically appear, as shown below. Before clicking on Join Session, your guests will be asked to enter the Session ID along with their name. If you have selected to host a password-protected session, your guests will have to enter the Session Password in a second window, as depicted below, in order to join the session. For further information on how to set a session password for your online meetings, please refer to Change Settings on page 28. Alternatively participants can visit http://join.mikogo.com, enter the session ID and their name, and click on Join Session. This will prompt them to run or save Mikogo.exe with the particular session ID already saved for them in order to connect directly to the organizer’s session. Mikogo User Guide Page 6 Note: when a participant has joined the organizer’s session, the organizer’s system tray icon will change to while the participant’s system tray icon will appear as . At this point, you are now connected with your participants in a Mikogo Web Conference! Mikogo Features To make the most of your session and the Mikogo features, click on the icon in your system tray to open the following menu: Pause Transmission During an online meeting, you are free to suspend transmission of your screen in order to browse through confidential files or applications. To do so, click on the wish to return and transmit your screen, click on the icon and select Pause Transmission. If you icon again and select Continue Transmission. Whiteboard For demonstration purposes, the current presenter can click on the icon and select Whiteboard to open the Mikogo Whiteboard toolbar. This is ideal for drawing the participants’ attention to certain areas on the presenter’s screen, as well as collaborative brainstorming. To delete all drawings made, but keep Mikogo User Guide Page 7 the toolbar open, click on the . To close the toolbar, click on the in the top right corner. Switch Presenter At any point during the session, you may switch the viewing direction enabling one of the participants to become the presenter and share their screen. Thanks to this feature you can either share your screen, or you can allow one of the session participants to share their screen. To switch presenters, click on the icon and select Switch Presenter. Naturally, you may switch between different presenters as often as you wish. In general, the participant who is currently sharing their screen (i.e. the presenter) will have a are viewing the screen of the presenter will have a icon, whereas the participants who icon. Prior to transmitting their screen, the respective participant will always be asked whether they are willing to accept before becoming the presenter and sharing their screen with all participants. Remote Control Not only can you view the screen of one your participants, but you may also assign Remote Control to one of your participants. I.e. while you are sharing your screen, one of your participants may be granted control over both your mouse and keyboard. This can easily be accomplished by clicking on the icon and selecting Remote Control. Mikogo User Guide Page 8 When you place your mouse cursor over Remote Control, a list of your participants will appear to the side. You may then choose which participant you will grant remote control to. The selected participant will then receive a notification message informing them that they now have Remote Control. The participant who has received remote control will notice a change of color of the Mikogo icon in their system tray: For the session organizer, who granted the remote control to the participant, the icon will take on a blue color and they will be notified that their participant now has remote control: Please note that remote control can only be enabled if the session organizer allows it. In order to regain complete remote control, click on the icon and select Disable. Or alternatively you can achieve the same result by pressing Ctrl+F12. Alternatively, when one of your participants is currently presenting their screen, you can in fact request remote keyboard and mouse control over their screen. This is accomplished in one of two ways: 1. Firstly, the participant in question (i.e. the current presenter) is able to grant Remote Control of their screen to other participants via the Mikogo menu. By clicking on their icon, the current presenter can open the Mikogo menu and select Remote Control. Mikogo User Guide Page 9 The presenter can regain remote control at any point by clicking on their new icon and selecting Disable from within the Mikogo menu or alternatively by pressing Ctrl+F12. 2. Alternatively, if you are the session organizer, you are able to Request Remote Control from the participant who is currently presenting their screen. To do so, click on your icon and select Request Remote Control. This is ideal when you have asked someone to join a Mikogo session, and you wish to switch presenter to them and request remote control to assist them via remote support. However take note that before receiving remote control of your participant’s screen, that participant must first accept your request. Via either of these methods, the current presenter will notice a change in the color of their Mikogo icon, indicating that another participant has remote control of their screen. To end the remote control function, the session organizer can either click on their icon and select Stop Remote Control from within the Mikogo menu, or the participant can simply press Ctrl+F12. We recommend not using your mouse and keyboard once you have granted remote control to your organizer or participant, unless you wish to disable control and click Ctrl+F12. Mikogo User Guide Page 10 Send Files You can transfer files at any point during an online meeting. Click on the icon and click Send Files. Upon clicking Send Files a new window will open where you can select the file you want to transfer to your recipient(s). Once you have added your files and clicked on Send, your recipient(s) will be notified that you are requesting to send them a file. The recipient(s) can either accept or decline to receive the file. If the recipient(s) accept the file, they may select the appropriate place where to save the file on their computer. Mikogo User Guide Page 11 Application Selection You can select which applications you want to share with your participants, and which applications you would rather keep hidden. To select specific applications, click on the icon and select Application Selection. Upon clicking on Application Selection, a new window will open showing all the applications currently running. A green checkmark to the left of the application icon indicates that this respective application will be transmitted. An unchecked box indicates that this application will not be transmitted and instead the session participants will only see a blue area. The window below the checkboxes provides an instant preview of what your session participants will be able to see. With Application Selection you can assure yourself that you will only show the desired applications that are relevant for your session purposes. Mikogo User Guide Page 12 The Application Selection settings can also be adjusted prior to a session. Please refer to Change Settings on page 26. Lock Session Once you have started a session and all your invited participants have joined, you are able to lock the session room in order to prevent unauthorized people from joining. To do so, click on the icon and select Lock Session. Even if someone has the current session ID and password, once the session is locked they will be denied access and informed of this via a small notification window. Mikogo User Guide Page 13 Naturally, the room can be re-opened for new participants. Simply click on the icon and select Unlock Session Room. Back Monitor To give the presenter an exact representation of what their participants are able to see during the session, Mikogo contains a Back Monitor. By clicking on the icon and clicking Back Monitor, the presenter will gain a small window on their screen which will show them exactly what their participants can see at any point in time. Mikogo User Guide Page 14 Recording & Playback To start recording your session click on the icon, move your mouse over Recording and click Start. If this is the first time you have recorded a session, you will be asked where you want the recording to be saved. We suggest that you save the recordings under My Documents/Mikogo/records, but you can of course select your preferred folder. Keep in mind that after selecting your preferred location Mikogo will automatically save your future recordings to this location. If you later wish to change the saving location please refer to Change Settings on page 28. When you are recording a session a red circle will show up in the Mikogo menu, which indicates that you are currently recording your session. During the recording you have the following options: 1. Pause – Recording will be paused and can be resumed at any time. If you paused the recording a blue icon will be shown in the Mikogo menu 2. Stop – Recording will be stopped and saved in your chosen location (see above). 3. Cancel – Recording will be stopped but not saved Mikogo User Guide Page 15 It’s important to note that session are recorded in proprietary format and can only be played back with the Mikogo Session Player. The Session Player is located in the Mikogo program folder. Alternatively the Session Player can be downloaded from: http://www.mikogo.com/downloads/session-player.exe To playback a recorded session, click on the icon in the Session Player, and locate the recorded file from your chosen location for Mikogo recordings. Mikogo recordings are saved in .bs4 format. Mikogo User Guide Page 16 When you open a new recording for the first time, an Index missing window will pop-up and asks you to index the recorded file. Indexing allows you to jump back and forth randomly to different positions in the recording during playback, and therefore recommended that you click “Yes”. After indexing the recording you can playback and watch your session. The Session Player control panel gives you the following options during playback: Mikogo User Guide Page 17 From left to right: 1. Open recorded session 2. Stop playback 3. Play/Pause playback 4. Decrease playback speed 5. Increase playback speed 6. Rewind 2 seconds 7. Forward 2 seconds 8. Automatic zoom 9. Maximize playback window A couple of points to note: 1. As mentioned above, the sessions are recorded in a proprietary file format (.bs4) and can just be played back with the Mikogo Session Player. Exporting the recorded session into a different file format is not supported. If you are after a previous version of the Session Player, they are available on the Mikogo Blog: http://www.mikogo.com/2009/02/11/recording-meeting-v203/ 2. There needs to be at least one participant in your Mikogo session to record the session. If you don’t have any participants in your session, you can still click on “Start” recording but Mikogo will not record your screen. 3. Only your screen will be recorded. Audio is not supported. Session Information If a new participant wishes to join while during a session and you are after the Session ID, click on the icon and select Session Information. The Session Information window will appear as it did when you started the session. Your participant can then go to www.mikogo.com, click on “Join Session”, enter the session ID, and they will then join your session. Mikogo User Guide Page 18 End Session To end a session, click on the icon and select End Session. Your participants will receive a notification that the session has ended. If you are a participant taking part in an online meeting hosted by the session organizer, you may leave the session at any time by clicking on the Alternatively participants may click on their icon in the upper right corner of your viewer window. icon in the system tray and select Quit Session. Using the Scheduler The first thing to note, is that you can open your Scheduler before you start a session or during a session. Click on the icon in the system tray, select Scheduler, and the Scheduler window appears: Mikogo User Guide Page 19 How to Schedule a Session To add a new scheduled session, click on New. The window, seen below, opens and you can then set the following: 1. Topic 2. Start (including date, time and time zone) 3. Expected Duration 4. Recurrence Pattern 5. Your Name 6. Session Password Mikogo User Guide Page 20 When you have filled out all the fields you require, click Save. You will then see your Scheduler again containing the new scheduled session. Of course, you are able to click Edit and add several sessions to your Scheduler as seen below: Mikogo User Guide Page 21 Sending the Session Info to Participants From the images above you can see a few buttons at the bottom of the Scheduler. Click on your session of choice, and then click “Email Invitation”. Alternatively you can click on “Copy Invitation” and then paste the info into a new email. This will contain all the info that you included when you made the new scheduled session. Naturally you can send this information to your participants days before the session begins, to notify your participants in advance of the upcoming session. Starting a Scheduled Session To start a scheduled session, open your Scheduler, click on the session so it is highlighted in blue and then click “Start”. In order for a scheduled session to start, you have to open your Scheduler and click “Start”. Sessions will not begin automatically simply because the scheduled time and date has been reached – this is for security reasons. Mikogo User Guide Page 22 The session will begin and you will receive the Session Info window containing the exact same ID as assigned in the Scheduler. In the above example it would be 246-115-823. Once you have started the session, the session will be highlighted in green in your Scheduler indicating that the session is now in progress: Mikogo User Guide Page 23 How Participants Join the Session Once you have started your session, participants can go to www.mikogo.com, click on “Join Session” and enter the session ID. In this case they will be joined instantly and can view your screen in real-time. However if for some reason, your participant attempts to join before you have in fact started the session, the participant will arrive in the waiting room: Mikogo User Guide Page 24 The instant you start the session, all participants currently in the waiting room will automatically enter the session and can then view your screen live. Using the Same Session ID for Future Sessions For any scheduled session, the same session ID will always be saved in the Scheduler and you may start a session with this ID at any time you wish. This allows you to save multiple session IDs, which you can use repeatedly, and send them in advance to your session participants. Start a Scheduled Session at Any Time Please note that you do not have to start the session at the exact time that was scheduled. Say for example you scheduled a session last week, and today you now wish to start another session but you want Mikogo User Guide Page 25 to use the same ID. In this case, open the Scheduler, select the session with the session ID you wish to use, and click “Start”. The session will begin and the Session Info window will appear containing the same ID that you had last time. Voice Conferencing Service If you require a conference calling service, feel free to use the provided Mikogo numbers. The organizer and participants can call an appropriate number (based on location) and enter the current session ID. They will then be connected in a conference call. USA +1-641-715-3762 Canada +1-641-715-3762 Great Britain +44-(0)870-223-3543 Germany +49-(0)1805-009-491 Austria +43-(0)820-4011-5441 Switzerland +41-(0)848-560-351 Ireland +353-(0)818-270-080 Netherlands +31-(0)870-001-915 Belgium +32-(0)70-359-873 France +33-(0)826-109-023 Spain +34-902-881-244 Italy +39-848-391-826 Mikogo does not charge fees for this service. However a calling fee may apply where the amount will depend on your telephone provider. Such fees would be applicable to the session organizer and each participant. Change Settings Mikogo offers a variety of settings which can be easily enabled and disabled. Some settings can be made effective for entire sessions and can only be changed prior to starting a session, while others can also be changed during a session. Prior to starting a session, click on the icon in the system tray and select Settings. Within the Preferences tab, you can select which applications you are willing to share with the other session participants, and those applications you would rather keep hidden. In the upper right-hand corner of the tab, you will find a checkbox titled Show new applications. By checking this, all new applications opened while you are presenting your screen will be instantly visible for the other participants. Mikogo User Guide Page 26 At the bottom of the window there are three checkboxes: Enable viewer pointer, Enable instant screen build-up and Hide desktop wallpaper. Checking or unchecking the first checkbox will affect the ability of the participants to click and show their mouse cursor while the organizer is presenting their screen. By ticking Hide desktop wallpaper, the presenter’s wallpaper will be replaced by a blank solid color. This can improve screen sharing speed, especially if you have a high definition image as your desktop wallpaper. By ticking the Instant Screen Build Up box, your participants will see any screen changes you make in faster response time. Mikogo achieves this by displaying screen changes on the participant's screen as and when screen data arrives. This will ensure that screen updates are displayed as fast as possible. If you prefer to update the participants’ view only after all changes have been transmitted, simply disable the screen build up by un-ticking the checkbox. You can also adjust the Quality/Speed settings. Max Speed will enable screen sharing in just black and white but will improve the speed of screen sharing and is ideal for remote support situations. The High Quality setting will transmit the presenter’s screen in true color and at its best quality. Naturally, the Application Selection settings, including Hide desktop wallpaper and Instant Screen Build Up, can also be adjusted during an online session. For further details please refer back to Application Selection on page 12. Under the Start Options tab it is possible to change a few different settings before you start a session. Mikogo User Guide Page 27 Settings that can be changed include: A predefined Session ID Using a Session Password (as well as a Session ID) Recording Settings Pause Transmission Settings Initial Viewing Direction Selecting a predefined Session ID allows you to use the same ID repeatedly for future sessions. However please note that if you select your preferred ID and someone else has already saved that exact same ID in their own settings, you will be allocated a unique Session ID As an additional security measure you can set a Session Password prior to starting the session. To set a session password, check the box next to Use a session password and enter the password in the respective field. If you set a session password, the session participants require not only the 9-digit session ID but also the session password to join your session. The password needs to be entered within the Mikogo Session Password window, depicted earlier in the Mikogo User Guide on page 6. Setting a session password is only available prior to starting a session via the Mikogo Settings window. By default, when you pause transmission during a session, the text displayed to your participants will Mikogo User Guide Page 28 read as “Pause”. However you may change this by adjusting the field below Pause Text. More information on the Pause Transmission feature is available on page 7. To assist Mikogo users in remote support situations, the software allows you to predefine the Initial Viewing direction of the screen sharing as well as remote control abilities, prior to starting a session. This allows the organizer to start a session, and then view the participant’s screen (with their consent) upon joining the session. It is also possible to choose or change the saving location of your recordings. Simply click on the icon to the right of the field under Saved Recording Location. A window will open allowing you to select the new location for saved recordings. More information on the Recording feature on page 14. If required, you can click on the Connection tab to manually enter your proxy settings before you start your sessions. Support Forum You will find our Support Forum at: http://www.mikogo.com/support/forum/. Feel free to post any questions or comments you may have. Our moderators monitor the Forum and reply constantly. Mikogo User Guide Page 29