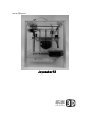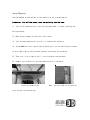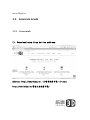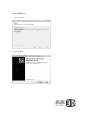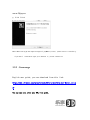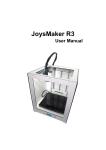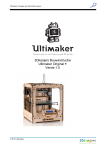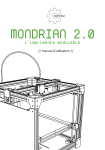
1
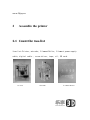
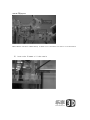
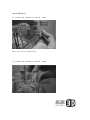
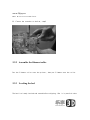
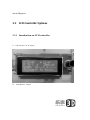
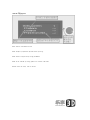
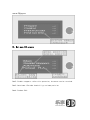
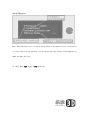
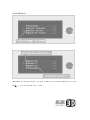
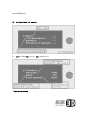
User Guide 3Djoy JoysmakerR2 3D Printer www.3djoy.cn 1 General Info -------------------------------- 4 2 Assemble the printer --------------------- 7 3 2.1 Count the Item list ---------------------- 7 2.2 Assemble the Printer ------------------ 9 2.2.1 Assemble the extruder ------------------ 9 2.2.2 Assemble the filament roller---------- 13 2.2.3 Leveling the bed ------------------------- 13 Prepare to print -------------------------- 15 3.1 Know the principle -------------------- 15 3.2 Generate Gcode ------------------------ 16 3.2.1 Cura install -------------------------------- 16 3.2.2 Cura usage -------------------------------- 20 www.3djoy.cn 3.3 4 LCD Controller Options --------------- 22 3.3.1 Introduction on LCD controller ------- 22 3.3.2 Operations -------------------------------- 23 3.3.3 LCD controller option when printing 29 3.3.4 Fill the nozzle with filament----------- 30 Start to Print ------------------------------ 31 4.1 Power on the printer------------------ 31 4.2 Start to Print ---------------------------- 32 www.3djoy.cn 1 General Info A.Security Do not use other power supply other than the one provided by 3Djoy. JoysMaker 3D printer power supply is designed with strict current control and defense mechanism. Don’s touch the hot end when the printer is working, the temperature is as high as more than 200℃. Unplug the wires, when moving the 3D printer. Check the connection of the wires is in good status before printing. B.Protection Waterproof rain, water. www.3djoy.cn Do not hit the frame to cause deformation. Do not disassemble the machine, so as not to break the machine. Long time not using the machine, seal the machine and store it. Next time you use it you need to daub grease. Do not press the printing head, or else the 6mm rod may bend, hence the printing quality may be affected. Unplug the wires during thunderstorm weather. To replace the nozzle, you need to heat the nozzle firstly till the filament is melted. C.JoysmakerR2 User Guide In order not to break the machine during transport, we put the extruder and the machine separately. When receiving the machine, assemble it according to our user guide. www.3djoy.cn JoysmakerR2 www.3djoy.cn 2 Assemble the printer 2.1 Count the Item list Item list:Printer, extruder, filament Roller, filament,power supply cable,digital cable ,screw driver,tape,oil,SD card. Printer Extruder Filament Roller www.3djoy.cn Cables Tape, screw driver, oil, SD card Filament Note: When receiving the package, if the packaging is broken from the outside, do not sign it. Take photos and contact us a.s.a.p. or go to the shipping company to request for compensation. www.3djoy.cn 2.2 Assemble the Printer 2.2.1 Assemble the extruder 1).Insert the extruder into the printer as shown bellow 2).Take off the blue horse shoe, stick the broaden tube into the quick plug. www.3djoy.cn 3).Insert the blue horse shoe into the quick plug. Note: make sure the broaden tube is inserted to the end. 4). Put the filament into the extuder www.3djoy.cn Note: Better cut the filament sharp, so that it will be easier to insert it to the nozzle. 5). Insert the filament till the nozzle www.3djoy.cn 6). Fasten the extruder as bellow, step1. Note: Do not use too much force. 7). Fasten the extruder as bellow, step2 www.3djoy.cn Note: Do not use too much force. 8). Fasten the extruder as bellow, step3 2.2.2 Assemble the filament roller Put the filament roller onto the printer, then put filament onto the roller. 2.2.3 Leveling the bed The bed is already leveled and tested before shipping. But it is possible that www.3djoy.cn the bed become unleveled due to the shaking in the transportation. Predation:Turn off the power, move the printing head to home. 1). Turn the Z-leadscrew until the the extruder head is almost touching the build-platform. 2). Move the printhead to the front left corner. 3). Turn the adjustment bolt up until it touches the platform. 4). Screw DOWN the front right of the platform until you can move the print head to the right side of the platform without scratching the platform. 5). Then turn it up slightly until it also touches the platform. 6). Repeat this process for the adjustment bolts in the back. Adjust the thumb-screws glass bed and the aluminum bed. Note: Use the clamp to nip tight the www.3djoy.cn 3 Prepare to print 3.1 Know the principle Xxx.stl 3D model file Cure software Xxx.gcode cure slice it into gcode SD Card JoysmakerR2 3D Printer 3D Printing 3D Printings Target 3D printings www.3djoy.cn 3.2 Generate Gcode 3.2.1 Cura install 1). Download cura from bellow address Address:http://www.3djoy.cn —>>常用软件下载—>> cura http://www.3djoy.cn/常用工具软件下载/ www.3djoy.cn 2).Cura installation a. Select the directory that you install the cura then press next b. Chose the supported file types www.3djoy.cn c. Cura install d. Click Next www.3djoy.cn e. Click finish f. Click next www.3djoy.cn g. Click finish Note: When setting up the supported type of joysMaker printer, please select it carefully, if you dont’ know which type your machine is, please contact us. 3.2.2 Cura usage English user guide, you can download from this link: https://www.ultimaker.com/spree/uploads/38/original/Cura_User-Manual_v1.0.p df You can use cura slice your STL into gcode. www.3djoy.cn And copy the gcode into SD card. Then use LCD controller to start printing. www.3djoy.cn 3.3 LCD Controller Options 3.3.1 Introduction on LCD controller 1). LCD controller display 2). Information screen www.3djoy.cn Row1: Actual nozzle temp./target nozzle temp. Actual Heated bed temp./Target heated bed temp Row2: X, Y , Z coordinate Row3: FR: Printing Speed in ratio. SD: Finished ratio. O: time used. 3.3.2 Operations 1). Info screen>> Main menu www.3djoy.cn Row1: back to information screen Row2: Prepare: preparation options before printing. Row3: Control: adjust the printing parameters Row4: Print from SD: printing gcode files stored in SD card Button: Press to entre, tune to select www.3djoy.cn 2). Main menu >>> prepare Row2: Disable steppers: after this operation, the motor can be revolved. Row3: Auto home: Extruder head will go to home position. Row4: Preheat PLA: www.3djoy.cn Note:Auto home option will let the printing head go to the home position. If the nozzle is too far away from the platform, you can adjust the limit switch on the backplane to adapt the home position. 3). Main menu >>> prepare >>> move axis www.3djoy.cn Note: When testing the extruder, you need to make sure the nozzle temperature is above 180℃, or else the extruder won’t move. www.3djoy.cn 4). >>> Main Menu >>> control 5). >>>Main Menu>>> control >>> temperature Temperature Setting: www.3djoy.cn Filament PLA ABS PVA Nylon Nozzle(℃) Heated Bed(℃) 200 40 230 70 100 40 260 70 3.3.3 LCD controller option when printing 1).MainMenu 2). >>>Main Menu >>> tune www.3djoy.cn Note: For those options that are not mentioned, you just need to set it as default. 3.3.4 Fill the nozzle with filament Method:Preheat PLA, then when the nozzle reaches target temperature >>> Prepare >>> Move Axis >>> chose 1mm step>>> Extruder >>> tune the button,till the filament comes out of the nozzle. Till now you have finished the preparation before printing. www.3djoy.cn 4 Start to Print 4.1 Power on the printer Connect the power supply wires, and then turn on the power, check that the LED is shown as bellow: Normal Display www.3djoy.cn 4.2 Start to Print Press the button >> turn the button to choose “Print from SD card” >> select the files You should see your machine is printing now. www.3djoy.cn [email protected]