1
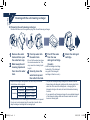
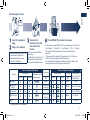
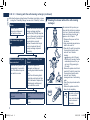
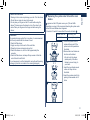
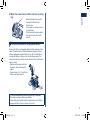
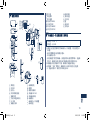
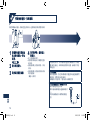
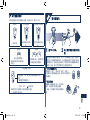
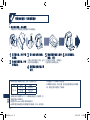
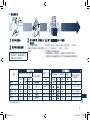
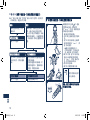
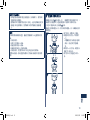
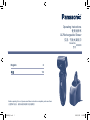
Operating Instructions 使用说明书 AC/Rechargeable Shaver 交流 / 充电式剃须刀 Model No. ES8259 型号 English 中文 2 12 Before operating this unit, please read these instructions completely and save them. 在使用本产品前,请仔细阅读本说明书并妥善保管。 ES8259_CH.indb 1 2007/07/25 20:25:02 Important English 1 Using the shaver Caution - The outer foil is very thin and can be damaged if not used correctly. Check that the foil is not damaged before using the shaver. Do not use the shaver if the foil etc. is damaged as you will cut your skin. Persons using an implanted medical electronic device, such as a pacemaker, should not allow this unit to touch the skin where the medical electronic device is implanted because this may cause a malfunction. 1 Charging the shaver Do not use any power cord, AC adaptor or recharger other than one specifically designed for this model. Plug in the adaptor into a household outlet where there is no moisture and handle it with dry hands. The shaver and the recharger may become warm during use and charging. However, this is not a malfunction. Do not charge the shaver where it will be exposed to direct sunlight or other heat sources. Hold the adaptor when disconnecting it from the household outlet. If you tug on the power cord, you may damage it. Contact an authorized service center if the power cord gets damaged. 1 Cleaning the shaver Warning - Disconnect the power cord from the shaver before cleaning it to prevent electric shock. Keep both the inner blades inserted. If only one of the inner blades is inserted, the shaver may be damaged. If you clean the shaver with water, do not use salt water or hot water. Do not soak the shaver in water for a long period of time. Wipe it with a cloth dampened with soapy water. Do not use thinner, benzine or alcohol. 1 Storing the shaver Disconnect the power cord when storing the shaver. Do not bend the power cord or wrap it around the shaver. Do not leave this shaver within the reach of small children. Keep these operating instructions in a safe place. 1 Self-cleaning recharger Do not clean the adaptor or the self-cleaning recharger in water as it will damage them or cause an electric shock. Do not remove the shaver from the self-cleaning recharger while using a course that includes the “Dry” function. A heater is used so the area around the blades becomes extremely hot and you may burn yourself. Place the self-cleaning recharger on a level and stable surface. Otherwise the cleaning liquid may spill and discolor leather products or other surfaces. Wipe it immediately. The selfcleaning recharger cleans the inner blades and the system outer foil. Brush or wash with water to remove beard trimmings in other areas. SPECIFICATIONS Model: ES8259 Rated input: a.c 100-240 V, 150 mA Rated output: d.c 5.7 V, 1.0 A Charging time:1 hour This product is intended for household use only. • The unit is applied to the Chinese standard GB4706.1 appendix B, GB4706.9 and Q/(GZ) PEWWBG 6. ES8259_CH.indb 2 2007/07/25 20:25:02 CLEAN DRY CHARGE STATUS SELECT Protective cap System outer foil 3Inner blades 4System outer foil release buttons 5Finger rest 6Pivot action selector 70/1 switch Operating environment for the self-cleaning recharger Operating temperature: Operating humidity: Charge lamp Status lamp Select button Cleaning tray Water level Case Cleaning brush Oil English Self-cleaning recharger (Referred to as the “Recharger”.) Detergent cartridge Water tank Socket Water tank cap Clean lamp Dry lamp Parts identification 15-35 °C Less than 95% • If you use the self-cleaning recharger in temperatures outside the above range, the following problems may occur. - The time it takes to charge the shaver increases. - The recharger stops functioning. - The lifespan of the rechargeable battery shortens. (Only when you use the recharger in lower temperatures.) In this case, the indicators on the LCD panel will blink twice every second. • If the indicators on the LCD panel do not glow, wait for a short while until it glows. • Depending on the environment, the shaver may not dry even if you select a course that includes the “Dry” function. In this case, wipe off any drops of water with a dry cloth. 8LCD panel 9Appliance socket Trimmer Trimmer handle Adaptor (RE7‑40) Power cord Appliance plug ES8259_CH.indb 3 2007/07/25 20:25:02 Ch ar ge English Charging with the self-cleaning recharger Thoroughly wipe off any drops of water on or around the recharger so that it is dry before charging it. 3 2 the detergent the protective 1 Attach 4 Remove cartridge and the cap and then attach water tank to the self-cleaning recharger. Page 6 the appliance 2 Insert plug. 3 Plug in the adaptor. the shaver. • Turn the shaver off before attaching. • Check that the outer foil is not deformed or damaged when you are attaching the shaver. • The indicators on the LCD panel glow and charging starts. • Charging is completed when the indicators on the LCD panel blink. (Max. 1 hour later) • You can keep the shaver attached to the recharger, or connected to the adaptor, when not using it to maintain full battery capacity. You cannot overcharge the shaver. 1 Cord shaving If you insert the appliance plug to the shaver and plug in the adaptor into a household outlet, you can use it even if the battery capacity is low. • If the shaver does not work, continue charging it for approx. 1 minute. 1 Charging without the self-cleaning recharger You can also charge without the recharger. 1.Insert the appliance plug into the shaver. 2.Plug in the adaptor into a household outlet. ES8259_CH.indb 4 2007/07/25 20:25:03 While charging After charging is completed Using the shaver English The LCD panel shows the remaining battery capacity from 0% to 100%, in 10% increments. Sh av e About the LCD panel 10 minutes after charging is completed 90˚ The indicators glow. The indicators blink once every second. During use min.used The used time is shown. • The shown time returns to [0’00”] after 10 minutes. The indicators blink once every 2 seconds. After use min.used The used time and the remaining battery capacity are shown alternately after turning off the shaver. When the battery capacity is low • You can shave 1 to 2 times after “10%” appears. (This will differ depending on usage.) “10%” appears and blinks. • A full charge will supply enough power for approx. 14 shaves of 3 minutes each. the 0/1 1 Press switch. the shaver as 2 Hold illustrated above and shave. • Start out shaving by applying gentle pressure to your face. Stretch your skin with your free hand and move the shaver back and forth in the direction of your beard. You may gently increase the amount of pressure as your skin becomes accustomed to this shaver. Applying excessive pressure does not provide a closer shave. 1 Pivot action selector Use to select “SOFT” (soft) or “LOCK” (lock). You can change the pivot action whether the shaver is turned on or off. SOFT LOCK 1 Using the trimmer Slide the trimmer handle up. Place at a right angle to your skin and move downwards to trim your sideburns. ES8259_CH.indb 5 2007/07/25 20:25:03 C ar e English Cleaning with the self-cleaning recharger 1Preparing the self-cleaning recharger Remove the shaver and the appliance plug from the self-cleaning recharger. 2 3 1 4 the water tap water into off the seals 1 Remove 3 Pour 5 Peel tank and then open the water tank. from the new the water tank cap. away the old 2 Wash cleaning liquid and then rinse the water tank. the detergent 6 Attach cartridge. • Do not let the water rise above detergent cartridge. the maximum water line. This (2 seals) may cause the cleaning liquid • Hold the detergent cartridge to spill. horizontally. (The detergent may spill if the detergent Securely close the cartridge is tilted too much.) water tank cap and 4 then attach the tank. • Replace the detergent cartridge when the status lamp is illuminated. Use the below chart as a guide. Shaving Cleaning Reusability 1 time/day approx. 30 times 1 time/day 1 time/3 days approx. 10 times 1 time/week approx. 4 times The expiration date of the cleaning liquid is 6 months after it is opened. If you do not use the cleaning liquid for more than 6 months, throw away the detergent cartridge and the cleaning liquid. • Only use self-cleaning recharger detergent for Panasonic shavers. • Always change the detergent cartridge and the cleaning liquid in the water tank at the same time. Adding water, or changing just the detergent cartridge or the water, will result in deteriorated cleaning functions. • If you operate the self-cleaning recharger, the concentrated detergent in the detergent cartridge dilutes and the water inside the tank will become a cleaning liquid. ES8259_CH.indb 6 2007/07/25 20:25:04 1Cleaning the shaver English 2 SELECT CLEAN DRY CHARGE 1 STATUS the appliance the 1 Insert 3 Remove 4 Press [SELECT] to select the course. plug. protective cap and then attach the 2 Plug in the adaptor. shaver. • Turn the shaver off before • Remove any soap or water on attaching. the shaver if it has been • Check that the outer foil is not washed with hand soap or deformed or damaged when any other detergent. you are attaching the shaver. Course selection indications Course On recharger CLEAN DRY 1Charge • Each time you press [SELECT], the course changes from “Clean/ Dry/Charge” “Clean/Dry” “Dry/Charge” “Dry” “Charge”. • The courses start approximately 6 seconds after they are selected. • The course will be aborted if the power is cut off. In this case, perform the course again from the beginning. • Do not detach the detergent cartridge or the water tank as the cleaning liquid may spill causing a malfunction. On shaver Changeable course CHARGE halfway through * 2345 2Clean/Dry/ Charge 3 3Clean/Dry 2 4Dry/Charge 235 5Dry 234 CLEAN Glows Glows while charging – Glows while charging – Course completion summary On shaver Time required (guide) [In the low DRY CHARGE temperature] Blinks 1 hour On recharger Blinks 2 hours [+30 min] – 1 hour [+30 min] Blinks 2 h 40 min – 1 h 40 min *The lamp goes out in 6 seconds. ES8259_CH.indb 7 2007/07/25 20:25:05 11 1 1 Cleaning with the self-cleaning recharger (continued) English Follow the steps outlined below if the status lamp blinks or glows during the “Clean/Dry/Charge” course or the “Clean/Dry” course. Blinks Glows Correctly set the detergent cartridge and then restart a course. Remove the shaver from the selfcleaning recharger and then check that the [CLEAN] lamp has gone out. (Be careful as the blade may be hot or wet.) Check that the water tank is correctly attached, the water tank cap is securely closed and the selfcleaning recharger is placed horizontally. If the status lamp goes out Continue a course. When an abnormality has been corrected When no abnormality was found Press and hold [SELECT] for approximately 2 seconds to turn off the status lamp and then restart a course. It is time to replace the detergent cartridge and cleaning liquid inside the water tank. Drain the old cleaning liquid inside the water tank and then refill it with water. Replace the old detergent cartridge and then restart the course. When the status lamp goes out When the status lamp glows again Continue a course. Contact an authorized service center. Cleaning the shaver without the self-cleaning recharger We recommend that you clean your shaver with the self-cleaning recharger or the “sonic” vibration turbo-cleaning mode when the faucet symbol appears on the LCD panel. 1. Disconnect the power cord from the shaver. 2. Apply some hand soap and some water to the outer foil. 3. Press the 0/1 switch for more than 2 seconds to activate the turbo mode for “sonic” vibration cleaning. appears on the LCD panel. • • After about 20 seconds, it will be automatically turned off, or you can turn it off by pressing the 0/1 switch. 4. Remove the system outer foil and press the 0/1 switch for more than 2 seconds to activate the turbo mode for “sonic” vibration cleaning and clean it with running water. 5. Wipe off any drops of water with a dry cloth. 6. Remove the system outer foil to allow it to dry completely. The mark on the left is for a washable shaver and indicates it can be cleaned with water. ES8259_CH.indb 8 2007/07/25 20:25:05 Lubrication To maintain shaving comfort for a long time, it is recommended that the oil provided with the shaver is used. 1.Switch off the shaver. 2.Apply one drop of oil to each of the outer foils. 3.Raise the trimmer and apply a drop of oil. 4.Switch the shaver on, and run it for approximately five seconds. 5.Switch off the shaver, and wipe off any excess oil from the outer foils with a soft cloth. It is not necessary to oil the blades after using the self-cleaning recharger (lubricant is included in the cleaning detergent). Replacing the system outer foil and the inner blades English Caution for turbo mode • Shaving in turbo mode may damage your skin. Turn the shaver off and then on again to cancel turbo mode. • Do not place your fingers on the 0/1 switch while using the shaver. This may cause the shaver to turn off or enter turbo mode. Place your fingers on the finger rest while using the shaver. appears on the LCD panel once a year. (This will differ depending on usage.) We recommend checking the system outer foil and the inner blades when it appears. • Press the 0/1 switch for more than 30 seconds to delete . system outer foil once every year inner blade 2 3 once every two years 1.Press the system outer foil release buttons and lift the system outer foil upwards as illustrated. 2.Remove the inner blades one at a time as illustrated. • Do not touch the edges (metal parts) of the inner blades to prevent injury to your hand. 3.Insert the inner blades one at a time until they click as illustrated. 4.Insert the system outer foil by pushing it downwards until it clicks. ES8259_CH.indb 9 2007/07/25 20:25:06 Cleaning with the brush English (A) (B) 1.Clean the inner blades using the short brush by moving it in direction (A). Clean the system outer foil, the shaver body and the trimmer using the long brush. • Do not move the short brush in direction (B) as it will damage the inner blades and affect their sharpness. • Do not use the short brush to clean the outer foils. Cleaning the self-cleaning recharger Beard trimmings may become attached to the cleaning tray of the self-cleaning recharger. Follow the steps below to remove them. We recommend doing this each time you change the detergent cartridge. 1.Be sure to remove the water tank and the appliance plug from the self-cleaning recharger. • Be careful not to spill the cleaning liquid. 2.Gently wipe off any beard trimmings attached to the inside of the cleaning tray with 2 a cloth or tissue paper dampened with water. • Clean the corners and uneven parts of the cleaning tray with a cotton swab dampened with water. • Do not pull hard on the rubber blade protector at the bottom of the cleaning tray. The rubber may come off if you pull hard on it. It is only necessary to pull it up slightly. • Warning - Do not wash or apply water to the adaptor or selfcleaning recharger. Failure to observe this may cause electric shock or result in short circuits. 10 ES8259_CH.indb 10 2007/07/25 20:25:06 English 1When the water does not drain from the cleaning tray Beard trimmings may clog the drain at the bottom of the cleaning tray. In this case, you cannot clean or dry the shaver. Push the beard trimmings down through the drain with a tooth pick etc. Removing the built-in rechargeable battery Remove the built-in rechargeable battery before disposing of the shaver. Please make sure that the battery is disposed of at an officially designated location if there is one. Do not dismantle or replace the battery so that you can use the shaver again. This could cause fire or an electric shock. Replace it at an authorized service center. • Disconnect the power cord from the shaver when removing the battery. • Perform steps 1 to 7 and lift the battery, and then remove it. For environmental protection and recycling of materials This shaver contains a Lithium-ion battery. Please make sure that the battery is disposed of at an officially assigned location, if there is one in your country. 11 ES8259_CH.indb 11 2007/07/25 20:25:06 重要事项 中文 1 使用剃须刀 注意 - 外刀网很薄,若使用不正确就可能造成损坏。使用剃须 刀前,请确认刀网是否损坏。如果刀网已损坏请不要使用该剃须 刀,因为这样会割伤皮肤。请勿用于修剪宠物的毛发。 曾接受过医疗电子仪器(如起搏器)移植手术的人士不允许将本 设备接触此类仪器移植处的皮肤表面,否则会引发其功能障碍。 1 给剃须刀充电 除了为本型号专门设计的充电器外,不要使用其它任何电源线、 充电器或自动清洗·充电装置进行充电。将充电器插入非潮湿的 家用插座里,拿时双手要保持干燥。剃须刀在使用和充电过程中 可能会发热。但是,这不是故障。不要在有阳光直射或其它热源 的地方给剃须刀充电。从家用插座上拔出充电器时要抓住充电 器。如果用力拉电源线,可能会损坏电源线。电源软线不能更 换,如果软线损坏,此充电器应废弃。 1 清洁剃须刀 警告 - 清洁剃须刀前请断开电源线,以防触电。 请在装有两个内刀头的状态进行清洗,若在仅装有一个内刀头的 状态进行清洗,可能会损坏剃须刀。可用水清洗剃须刀,不要使 用盐水或热水。不要将剃须刀长时间浸泡在水中。用蘸肥皂水的 布擦拭剃须刀。不要使用稀释剂,汽油或酒精擦拭剃须刀任何 部位。 1 存放剃须刀 存放剃须刀时请拔出电源线。不要折弯电源线或将电源线绕在剃 须刀上。请勿将剃须刀放在幼童可以接触到的地方。请妥善保管 本说明书。请妥善处理本产品的包装袋,避免婴幼儿窒息等意外 发生。 1 自动清洗·充电装置 不要在水里清洁充电器或自动清洗·充电装置,因为这会损坏它 们或导致触电。当使用“干燥”程序时不要将剃须刀从自动清 洗·充电装置上拿开。因为使用了加热器,刀片周围会变得非常 烫,可能会烫灼伤您。 将自动清洗·充电装置放在平稳的表面上。否则清洁液会溢出并 污染皮革品或其他表面。万一清洁液发生溢出,请立即将它擦 去。自动清洗·充电装置可清洁内刀头和外刀网。请用清洁刷或 水洗清除未浸入清洁液或无法清洁的区域残留的胡须渣。 规格 型号: ES8259 额定输入: 交流100-240 V,150 mA 额定输出: 直流5.7 V,1.0 A 充电时间: 1小时 本产品仅限家庭使用。 • 本产品符合中国标准GB4706.1附录B和GB4706.9及企业标准 Q/(GZ)PEWWBG 6。 12 ES8259_CH.indb 12 2007/07/25 20:25:07 蓄水盒 底座插口 蓄水盒盖 清洁灯(CLEAN) 干燥灯(DRY) 充电灯(CHARGE) 状态灯(STATUS) 各部分名称 CLEAN DRY CHARGE STATUS SELECT 自动清洗·充电装置的工作环境 选择按钮 清洁托盘 注水线 盒 清洁刷 润滑油 工作温度:15-35°C 工作湿度:小于95% • 如果在上述温度范围外使用自动清洗·充电装置,可能会发生以 下问题。 - 剃须刀需要的充电时间将会增加。 - 充电器停止工作。 - 在较低温度下使用充电器,会缩短可充电池的使用寿命。在这种 情况下,液晶显示屏上的指示灯将以每秒两次的频率闪烁。 • 如液晶显示屏上的指示灯不亮,请稍等片刻直至其亮起。 • 当您选择“干燥”程序时,根据环境,剃须刀可能不会完全烘 干。在这种情况下,请使用干布拭去水珠。 保护盖 外刀网 3内刀头 4外刀网释放按钮 指握位置 刀头浮动选择开关 70/1开关 8液晶显示屏 9电源线插孔 修剪刀 修剪刀操纵杆 充电器(RE7-40) 充电器电源线 电器插头 自动清洗·充电装置 清洁剂盒 中文 13 ES8259_CH.indb 13 2007/07/25 20:25:07 电 充 使用自动清洗·充电装置 彻底拭除自动清洗·充电装置上的水滴,这样充电前保证其是干燥的。 3 2 1 将清洁剂盒及蓄水盒 4 取下保护盖,然后装上 装上自动清洗·充电 剃须刀。 装置。 第16页 2 3 将充电器接通电源。 插入电器插头。 • 装上前关掉剃须刀。 • 装剃须刀时确认外刀网是否变形 或损坏。 • 液晶显示屏上的指示灯亮,充电 开始。 • 液晶显示屏上的指示灯开始闪烁 则充电完成。 (最多1小时后) • 不使用剃须刀时,可以将剃须刀连接在自动清洗·充电装 置上或充电器上,以维持电池充足的电量。此剃须刀不会 充电过渡。 1 交流电剃须 当电池电量低时,您也可以将剃须刀通过充电器连接至家用 电源插座,利用交流电进行剃须。 • 如果剃须刀不能工作,请充电约1分钟后使用。 1 不使用自动清洗·充电装置充电 没有充电器也可进行充电。 1.将充电器电源线插头连接到剃须刀 上。 2.将充电器插头插入家用电源插座 里。 中文 14 ES8259_CH.indb 14 2007/07/25 20:25:07 液晶显示屏显示电池的剩余电量,从0%至100%,每10%一档。 充电时 充电完成后 剃 须 关于液晶显示屏 使用剃须刀 充电完成10分钟后 90˚ 指示灯每秒闪烁一 次。 指示灯亮 指示灯每两秒闪烁一 次。 使用中 使用后 1 按下0/1开关。 2 如上图所示握住剃须刀剃 须。 min.used min.used 显示已使用时间。 • 显示时间在满10分钟后归 [0’00”]。 关闭剃须刀后,已使用时间 和剩余电量交替显示。 电池电量不足时 • 电量显示“10%”后您还可以使用剃须刀1到 2次。 (根据使用情况而定。) 1 刀头浮动选择开关 用来选择“SOFT”(柔和)或“LOCK”(锁定)。 不论剃须刀是否接通或关闭,你都可以改变刀头 浮动模式。 SOFT LOCK 1 使用修剪刀 将修剪刀操纵杆往上推,以打开修 剪刀。将修剪刀与皮肤成直角 (90度)的位置向下移动以修剪鬓 角。 中文 显示“10%”, 开始闪烁。 • 充足电后大约可提供14次剃须所需的电量。 (一次剃须约为3分钟) • 轻轻地压向面部开始剃须。用另一只手绷紧脸上皮肤,逆着胡 须生长方向前后移动剃须刀。当皮肤适应剃须刀之后您可以稍 稍增加压力。但是施加过多的压力不能为您带来更服贴的剃须 效果。相反,对初次使用者可能会造成皮肤伤害。 15 ES8259_CH.indb 15 2007/07/25 20:25:08 养 保 使用自动清洗·充电装置清洁 1准备自动清洗·充电装置 从自动清洗·充电装置上拔出剃须刀和电器插头。 2 3 1 4 1 取下蓄水盒,并打开蓄 3 倒入自来水至注水线。 5 剥去新清洁剂盒上的密 6 装上清洁剂盒。 水盒盖。 封条。(2根) 2 洗去旧的清洁液,并冲 洗蓄水盒。 4 盖紧蓄水盒盖并装上蓄 水盒。 • 不要让自来水超过注水线。这可 • 水平握住清洁剂盒。(如果清洁 能会导致清洁液溢出。 剂盒太倾斜清洁剂会溢出。) • 当状态灯亮时更换清洁剂盒。使用下列图表作参考。 剃须 清洁 可重用 1次/天 大约30次 1次/天 1次/3天 大约10次 1次/周 大约4次 洁剂盒或水,将导致清洁功能变差。 • 如果操作自动清洗·充电装置,清洁剂盒里浓缩的清洁剂将稀 释,蓄水盒里的水就变成了清洁液。 中文 清洁液开启后有效期为6个月。如果清洁液超过6个月未使用,扔 掉清洁剂盒以及清洁液。 • 仅使用专为Panasonic剃须刀配制的清洁剂。 • 必须同时更换清洁剂盒以及蓄水盒里的清洁液。加水,或只换清 16 ES8259_CH.indb 16 2007/07/25 20:25:08 1清洁剃须刀 2 CLEAN SELECT DRY CHARGE 1 STATUS 1 插入电器插头。 3 取下保护盖,然后装上 4 按下[SELECT]选择一个进程。 剃须刀。 2 将充电器接通电源。 进程 程序选择指示 在自动清洗·充电装置 上 中途可改程序 CLEAN DRY CHARGE 1充电 2清洁/干燥/充 电 3清洁/干燥 * 2345 3 2 4干燥/充电 235 5干燥 234 程序完成概况 在剃须刀上 在自动清洗·充电装置上 在剃须刀上 需要时间(参考值) [在低温度下] CLEAN DRY CHARGE 闪烁 1小时 在充电时发亮 闪烁 2小时[+30分钟] – 1小时[+30分钟] 闪烁 2小时40分钟 – 1小时40分钟 发亮 – 在充电时发亮 – 中文 • 若用洗手液或任何其他清洁剂 洗过剃须刀,请清除剃须刀上 残留的任何皂液或水渍。 • 装上前请关闭剃须刀。 • 每次按下[SELECT],程序从“清洁/干燥/充电”“清洁/干 • 装剃须刀时确认外刀网是否变形 燥”“干燥/充电”“干燥”“充电”。 或损坏。 • 程序被选择约6秒钟后启动。 • 如果电源切断,程序将中止。这种情况下从头再执行程序。 • 不要拆开清洁剂盒或蓄水盒,因为清洁液会溢出导致故障发生。 *此灯6秒钟内熄灭。 17 ES8259_CH.indb 17 2007/07/25 20:25:10 11 1 1 使用自动清洗·充电装置清洁(续前页) 在“清洁/干燥/充电”程序或“清洁/干燥”程序中,若状态灯 闪烁或发亮,请进行以下步骤。 闪烁 发亮 正确设置清洁剂盒,然后 重新启动。 从自动清洗·充电装置上取下剃须 刀后,确认[CLEAN]灯已经熄灭。 (小心刀片可能烫手或潮湿。)确认 水箱是否正确装上,水箱盖是否盖 紧,自动清洗·充电装置是否水平 放置。 如果状态灯熄灭 继续下一个程序。 发现异常并更正后 当无异常发现时 按住[SELECT]并保持约2秒钟 以关闭状态灯,然后启重新 启动。 此时需更换清洁剂盒以及蓄水 盒里的清洁液。 排出蓄水盒里旧的清洁液,然 后给蓄水盒充水。更换旧的清 洁剂盒,然后重新启动。 当状态灯熄灭时 当状态灯再次变亮时 继续下一个程序。 联系授权的维修中心。 不使用自动清洗·充电装置清洁剃须刀 当液晶显示屏上出现 时,建议 您使用自动清洗·充电装置 或“sonic”(声波)振动清洗模 式来清洗您的剃须刀。 1.断开剃须刀的电源线。 2.在外刀网上涂抹少量洗手液和 水。 3.按下0/1开关2秒钟以上启动声 波洗净模式进行“sonic”(声 波)振动清洗。 • 显示在液晶显示屏上。 • 大约20秒钟后,它会自动关 闭,或者按0/1开关关闭它。 4.取下外刀网,按下0/1开关2秒 钟以上启动声波洗净模式进 行“sonic”(声波)振动清 洗。使用流动水来清洁。 5.用干布拭去水珠。 6.取下外刀网使其彻底干燥。 左侧符号表示剃须刀 可以全身水洗。 警告:剃须刀需与电源软线分离 后才能用水清洗。 中文 18 ES8259_CH.indb 18 2007/07/25 20:25:10 注意声波洗净模式 • 以声波洗净模式剃须可能会损伤皮肤。关闭剃须刀,再打开即 可取消声波洗净模式。 • 使用剃须刀时不要将手指放在0/1开关上。这样会导致剃须刀关 闭或进入声波洗净模式。使用剃须刀时将手指放在指握位置 上。 液晶显示屏上的 每年显示一次。(根据使用次数会有所不同。) 当此信号开始显示时,建议您检查本产品的外刀网和内刀头。 • 按住0/1按钮30秒以上以清除 标识。 建议外刀网每年更换一次,内刀头每两年更换一次,以维持剃须刀 剃须性能。 1.按下按钮,如图示向上提起。 2.如图示取下内刀头,每次取下 一个。 • 不要触摸内刀头的边沿(金属 部分),防止您的手受到损 伤。 3.每次插入一只内刀头,如图所示 直到它们卡嗒入位。 4.向下推入外刀网直至它卡嗒入 2 3 位。 中文 润滑 为长期保持剃须的舒适度,建议使用随剃须刀一起提供的润滑 油。 1.关闭剃须刀。 2.给每个外刀网涂一滴油。 3.提起修剪刀并涂一滴油。 4.接通剃须刀电源,运转约5秒钟。 5.关闭剃须刀,使用软布从外刀网上拭去多余的润滑油。 使用自动清洗·充电装置后无需给刀片涂油(清洁剂中含有润滑 剂)。 更换外刀网和内刀头 19 ES8259_CH.indb 19 2007/07/25 20:25:11 使用刷子清洁 (A) (B) 清洁自动清洗·充电装置 1.使用短刷,沿图示(A)的移动方 向移动,清洁内刀头。 使用长刷,清洁外刀网,剃须 刀机身和修剪刀。 • 请勿沿(B)方向移动短刷,因 为这样将损坏内刀头,影响 刀片的锋利度。 • 请勿使用短刷清洁外刀网。 修剪下来的胡须屑可能会附着在自动清洗·充电装置的托盘里。按 照以下步骤清除胡须屑。建议每次更换清洁剂盒时同时完成此事。 1.务必从自动清洗·充电装置上 移除蓄水盒和电器插头。 • 注意不要溢出清洁液。 2.使用用水蘸湿的布或面巾纸, 轻轻拭去任何附着在清洁托盘 里的胡须屑。 • 使用一蘸水的棉签清洁托盘 的四角和不平之处。 2 • 不要用力拉清洁托盘底部的刀头橡皮保护套。如果用力拉橡皮 会脱落。只需轻轻向上提即可。 • 警告 - 禁止用水洗或将水撒在充电器或自动清洗·充电装置 上。否则可能会导致触电或短路。 中文 20 ES8259_CH.indb 20 2007/07/25 20:25:11 1当水没有从清洁托盘里排出时 修剪下来的胡须屑可能会堵塞清 洁托盘底部的排水口。 在这种情况下,您无法清洁或干 燥剃须刀。 请使用一牙签将修剪下来的胡须 屑推向排水口。 取出内置的可充电电池 本机内藏有可充电的电池,在消费 者决定废弃本机前,请务必将电池 从机器中取出。 • 分解剃须刀,取出电池前,一定要 断开电源。 • 建议消费者在决定废弃剃须刀前, 事先征求经销商或本公司指定维修 点的意见,尽量延长剃须刀的使用 寿命。 • 当消费者决定废弃剃须刀又不想自 行分解机器取出电池时,建议消费 者将器具送往本公司指定的维修 站,由维修店对电池进行分解和回 收。 • 电池务必废弃于政府规定的地方或 回收处理单位。 • 按右图所示的1~7的顺序拆开本 体,卸下电池。 中文 环境保护与资源回收 此剃须刀使用锂电池。 如果您的国家有相关规定,请务必在指定处对旧电池进行统一处 理。 21 ES8259_CH.indb 21 2007/07/25 20:25:11 MEMO 22 ES8259_CH.indb 22 2007/07/25 20:25:11 本机:日本制 充电器、清洗·充电装置:中国制 23 ES8259_CH.indb 23 2007/07/25 20:25:11 输入公司:松下电工(中国)有限公司 地址:北京市东城区东长安街1号东方广场 东方经贸城西三办公楼201-204室 电话:86-10-85185988 原产地:日本制造 制造厂商:松下电工株式会社 地址:日本大阪府门真市门真1048 Matsushita Electric Works, Ltd. 1048, Kadoma, Osaka 571-8686, Japan No.1 EN, CH ES8259_CH.indb 24 Printed in Japan 2007/07/25 20:25:11