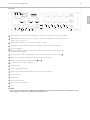
1
BEDIENUNGSANLEITUNG
OPERATING INSTRUCTIONS
SIS
Dolmetschersystem für Simultanübersetzungen
Simultaneous Interpretation System
39
1. General Safety Information for SIS Control Unit and Interpreter Station . . . . . . . . . . . . . . . . . . . . . . . . . . . . . . . . . . . . . . . . . Page
40
2. Installation . . . . . . . . . . . . . . . . . . . . . . . . . . . . . . . . . . . . . . . . . . . . . . . . . . . . . . . . . . . . . . . . . . . . . . . . . . . . . . . . . . . . . . . Page
41
3. SIS - Simultaneous Interpretation System. . . . . . . . . . . . . . . . . . . . . . . . . . . . . . . . . . . . . . . . . . . . . . . . . . . . . . . . . . . . . . . . . Page
3.1
General Information . . . . . . . . . . . . . . . . . . . . . . . . . . . . . . . . . . . . . . . . . . . . . . . . . . . . . . . . . . . . . . . . . . . . . . . . . . Page
3.2
SIS 1202 Interpreter Station . . . . . . . . . . . . . . . . . . . . . . . . . . . . . . . . . . . . . . . . . . . . . . . . . . . . . . . . . . . . . . . . . . . . Page
3.2.1 Connections, Controls and Indicators . . . . . . . . . . . . . . . . . . . . . . . . . . . . . . . . . . . . . . . . . . . . . . . . . . . . . . . . . . . . . Page
3.2.2 How to operate the Interpreter Station. . . . . . . . . . . . . . . . . . . . . . . . . . . . . . . . . . . . . . . . . . . . . . . . . . . . . . . . . . . . Page
How to set Volume, Treble and Bass . . . . . . . . . . . . . . . . . . . . . . . . . . . . . . . . . . . . . . . . . . . . . . . . . . . . . . . . . . . . . . Page
How to set the Target Language. . . . . . . . . . . . . . . . . . . . . . . . . . . . . . . . . . . . . . . . . . . . . . . . . . . . . . . . . . . . . . . . . Page
How to set the Relay Language . . . . . . . . . . . . . . . . . . . . . . . . . . . . . . . . . . . . . . . . . . . . . . . . . . . . . . . . . . . . . . . . . Page
How to listen to the Original Language . . . . . . . . . . . . . . . . . . . . . . . . . . . . . . . . . . . . . . . . . . . . . . . . . . . . . . . . . . . Page
How to listen to the Relay Language . . . . . . . . . . . . . . . . . . . . . . . . . . . . . . . . . . . . . . . . . . . . . . . . . . . . . . . . . . . . . Page
How to switch on the Microphone . . . . . . . . . . . . . . . . . . . . . . . . . . . . . . . . . . . . . . . . . . . . . . . . . . . . . . . . . . . . . . . Page
How to mute the Microphone . . . . . . . . . . . . . . . . . . . . . . . . . . . . . . . . . . . . . . . . . . . . . . . . . . . . . . . . . . . . . . . . . . Page
How to switch off the Microphone. . . . . . . . . . . . . . . . . . . . . . . . . . . . . . . . . . . . . . . . . . . . . . . . . . . . . . . . . . . . . . . Page
Assistance when technical Problems occur . . . . . . . . . . . . . . . . . . . . . . . . . . . . . . . . . . . . . . . . . . . . . . . . . . . . . . . . . Page
Hearing Protection . . . . . . . . . . . . . . . . . . . . . . . . . . . . . . . . . . . . . . . . . . . . . . . . . . . . . . . . . . . . . . . . . . . . . . . . . . . Page
3.3
SIS 121/122/123 Control Unit. . . . . . . . . . . . . . . . . . . . . . . . . . . . . . . . . . . . . . . . . . . . . . . . . . . . . . . . . . . . . . . . . . . Page
3.3.1 Connections, Controls and Indicators of the Control Unit. . . . . . . . . . . . . . . . . . . . . . . . . . . . . . . . . . . . . . . . . . . . . . Page
42
42
42
42
45
45
45
45
46
46
46
46
47
47
47
48
48
4. How to set up the System and put it into Operation . . . . . . . . . . . . . . . . . . . . . . . . . . . . . . . . . . . . . . . . . . . . . . . . . . . . . . . . Page
How to prepare the Control Unit . . . . . . . . . . . . . . . . . . . . . . . . . . . . . . . . . . . . . . . . . . . . . . . . . . . . . . . . . . . . . . . . Page
How to connect the Interpreter Station . . . . . . . . . . . . . . . . . . . . . . . . . . . . . . . . . . . . . . . . . . . . . . . . . . . . . . . . . . . Page
How to put the System into Operation . . . . . . . . . . . . . . . . . . . . . . . . . . . . . . . . . . . . . . . . . . . . . . . . . . . . . . . . . . . . Page
Application with SIS Interpretation System, MCW-D Wireless Digital Conference System
and TTS 300 Wireless Tour Guide System . . . . . . . . . . . . . . . . . . . . . . . . . . . . . . . . . . . . . . . . . . . . . . . . . . . . . . . . . . Page
Application with SIS Interpretation System, MCW-D Wireless Digital Conference System,
TTS 300 Wireless Tour Guide System and external Loudspeaker . . . . . . . . . . . . . . . . . . . . . . . . . . . . . . . . . . . . . . . . . Page
Application with SIS Interpretation System, TTS 300 Wireless Tour Guide System
and Microphone . . . . . . . . . . . . . . . . . . . . . . . . . . . . . . . . . . . . . . . . . . . . . . . . . . . . . . . . . . . . . . . . . . . . . . . . . . . . . Page
Application with SIS Interpretation System and MCW-D Wireless Digital Conference System . . . . . . . . . . . . . . . . . . . Page
50
50
50
50
5. Configuration SIS System . . . . . . . . . . . . . . . . . . . . . . . . . . . . . . . . . . . . . . . . . . . . . . . . . . . . . . . . . . . . . . . . . . . . . . . . . . . . Page
5.1
Configuration via “Wizard” . . . . . . . . . . . . . . . . . . . . . . . . . . . . . . . . . . . . . . . . . . . . . . . . . . . . . . . . . . . . . . . . . . . . Page
5.1.1 How to display or enter Time / Date . . . . . . . . . . . . . . . . . . . . . . . . . . . . . . . . . . . . . . . . . . . . . . . . . . . . . . . . . . . . . . Page
5.1.2 How to enter the Languages . . . . . . . . . . . . . . . . . . . . . . . . . . . . . . . . . . . . . . . . . . . . . . . . . . . . . . . . . . . . . . . . . . . Page
5.1.3 How to enter the Specs of the Headset . . . . . . . . . . . . . . . . . . . . . . . . . . . . . . . . . . . . . . . . . . . . . . . . . . . . . . . . . . . Page
5.2
Configuration via “Custom”. . . . . . . . . . . . . . . . . . . . . . . . . . . . . . . . . . . . . . . . . . . . . . . . . . . . . . . . . . . . . . . . . . . . Page
5.2.1 Main Menu . . . . . . . . . . . . . . . . . . . . . . . . . . . . . . . . . . . . . . . . . . . . . . . . . . . . . . . . . . . . . . . . . . . . . . . . . . . . . . . . Page
5.2.2 How to enter the Languages . . . . . . . . . . . . . . . . . . . . . . . . . . . . . . . . . . . . . . . . . . . . . . . . . . . . . . . . . . . . . . . . . . . Page
5.2.3 Suppression of the Original Signal . . . . . . . . . . . . . . . . . . . . . . . . . . . . . . . . . . . . . . . . . . . . . . . . . . . . . . . . . . . . . . . Page
5.2.4 How to enter Messages . . . . . . . . . . . . . . . . . . . . . . . . . . . . . . . . . . . . . . . . . . . . . . . . . . . . . . . . . . . . . . . . . . . . . . . Page
How to send a Message to an individual Interpreter Station . . . . . . . . . . . . . . . . . . . . . . . . . . . . . . . . . . . . . . . . . . . . Page
How to send a Message to all Interpreter Stations . . . . . . . . . . . . . . . . . . . . . . . . . . . . . . . . . . . . . . . . . . . . . . . . . . . Page
5.2.5 How to enter Time / Date. . . . . . . . . . . . . . . . . . . . . . . . . . . . . . . . . . . . . . . . . . . . . . . . . . . . . . . . . . . . . . . . . . . . . . Page
5.2.6 How to display the Software Version . . . . . . . . . . . . . . . . . . . . . . . . . . . . . . . . . . . . . . . . . . . . . . . . . . . . . . . . . . . . . Page
5.2.7 How to enter the Headset Specifications . . . . . . . . . . . . . . . . . . . . . . . . . . . . . . . . . . . . . . . . . . . . . . . . . . . . . . . . . . Page
5.2.8 Presets . . . . . . . . . . . . . . . . . . . . . . . . . . . . . . . . . . . . . . . . . . . . . . . . . . . . . . . . . . . . . . . . . . . . . . . . . . . . . . . . . . . . Page
How to create a new Preset . . . . . . . . . . . . . . . . . . . . . . . . . . . . . . . . . . . . . . . . . . . . . . . . . . . . . . . . . . . . . . . . . . . . Page
How to save Presets . . . . . . . . . . . . . . . . . . . . . . . . . . . . . . . . . . . . . . . . . . . . . . . . . . . . . . . . . . . . . . . . . . . . . . . . . . Page
How to load Presets . . . . . . . . . . . . . . . . . . . . . . . . . . . . . . . . . . . . . . . . . . . . . . . . . . . . . . . . . . . . . . . . . . . . . . . . . . Page
How to delete Presets. . . . . . . . . . . . . . . . . . . . . . . . . . . . . . . . . . . . . . . . . . . . . . . . . . . . . . . . . . . . . . . . . . . . . . . . . Page
5.2.9 How to display the “EarPatron” Hearing Protection . . . . . . . . . . . . . . . . . . . . . . . . . . . . . . . . . . . . . . . . . . . . . . . . . . Page
5.2.10 How to clear the Microphones . . . . . . . . . . . . . . . . . . . . . . . . . . . . . . . . . . . . . . . . . . . . . . . . . . . . . . . . . . . . . . . . . . Page
5.3
Service Call. . . . . . . . . . . . . . . . . . . . . . . . . . . . . . . . . . . . . . . . . . . . . . . . . . . . . . . . . . . . . . . . . . . . . . . . . . . . . . . . . Page
5.4
How to display the Firmware Version . . . . . . . . . . . . . . . . . . . . . . . . . . . . . . . . . . . . . . . . . . . . . . . . . . . . . . . . . . . . . Page
59
59
59
60
60
62
62
62
63
63
63
64
64
64
65
66
66
66
66
67
67
67
67
68
6. Accessories . . . . . . . . . . . . . . . . . . . . . . . . . . . . . . . . . . . . . . . . . . . . . . . . . . . . . . . . . . . . . . . . . . . . . . . . . . . . . . . . . . . . . . . Page
68
7. Technical Specifications . . . . . . . . . . . . . . . . . . . . . . . . . . . . . . . . . . . . . . . . . . . . . . . . . . . . . . . . . . . . . . . . . . . . . . . . . . . . . . Page
69
Functional Description of the Hearing Protection . . . . . . . . . . . . . . . . . . . . . . . . . . . . . . . . . . . . . . . . . . . . . . . . . . . . . . . . . . . . . . Page
72
Declaration of Conformity . . . . . . . . . . . . . . . . . . . . . . . . . . . . . . . . . . . . . . . . . . . . . . . . . . . . . . . . . . . . . . . . . . . . . . . . . . . . . . . Page
74
52
54
56
58
english
Contents
Safety Information
1.
•
•
•
•
•
•
•
•
•
•
•
•
•
•
•
•
•
•
•
•
•
•
•
•
•
•
•
40
General Safety Information for SIS Control Unit and Interpreter Station
READ the Operating Instructions.
KEEP these Operating Instructions safe.
COMPLY with the Operating and Safety instructions listed.
The equipment must be set up so that the plug connector is easily accessible.
The equipment must be connected to a mains socket that has an earth contact.
Never expose the equipment to rain or a high level of humidity. For this reason do not install it in the immediate vicinity of swimming
pools, showers, damp basement rooms or other areas with unusually high atmospheric humidity.
Never place objects containing liquid (e.g. vases or drinking glasses) on the equipment. Liquids in the equipment could cause a short
circuit.
Only clean the equipment with a slightly damp or dry cloth. Never use solvents as these damage the surface.
Never install and operate the equipment close to radiators, lighting equipment or other heat generating equipment.
Always run all cables so that they cannot be damaged or severed by sharp objects.
Lay all connection cables so that they do not present a trip hazard.
Whenever working on the equipment switch off all inputs and outputs to the power supply.
Check whether the connection figures comply with the existing mains supply. Serious damage could occur due to connecting the system
to the wrong power supply. An incorrect mains voltage could damage the equipment or cause an electric shock.
This equipment needs adequate ventilation. Do not cover ventilation grilles. If the heat it generates cannot be dissipated, the equipment
could be damaged or flammable materials in its immediate vicinity could be ignited. Take care to ensure that the air can circulate freely
through the ventilation grilles and keep flammable materials away.
Never place naked flames near the equipment.
If you connect defective or unsuitable accessories, the equipment could be damaged. Only use connection cables available from or
recommended by beyerdynamic. If you use cables you have made up yourself, all claim to warranty is null and void.
If you transport the equipment to another location take care to ensure that it is adequately secured and can never be damaged by being
dropped or by impacts on the equipment.
If there is a thunderstorm or you will not be using the equipment for a lengthy period of time, remove it from the mains supply.
If the equipment causes a blown fuse or a short circuit, disconnect it from the mains and have it checked and repaired.
Do not open the equipment without authorisation. You could receive an electric shock. Leave all service work to authorised expert
personnel.
Do not hold the mains cable with wet hands. There must be no water or dust on the contact pins. In both cases you could receive an
electric shock.
The mains cable must be firmly connected. If it is loose there is a fire hazard.
Always pull out the mains cable from the mains and/or from the equipment by the plug - never by the cable. The cable could be
damaged and cause an electric shock or fire.
If the power cable is connected, avoid contact of the unit with other metallic objects.
Do not touch the contact pins of the plug even after you have disconnected the equipment from the mains. You could receive an electric
shock.
Do not insert objects into the ventilation grilles or other openings. You could damage the equipment and/or injure yourself.
Do not use the equipment if the mains plug is damaged.
Safety Information for Headphones / Headsets
• When connecting the headphone / headset please ensure that the volume is turned down to minimum. Adjust the volume after putting
on the headphone. Do not set the volume too high, as you could permanently damage your hearing.
• With wired headphones / headsets you should avoid sharp movements, which could cause the headphone to fall off your head. You
could be seriously injured especially if you are wearing pierced earrings, spectacles etc. The cable could wind around your neck and
cause strangulation.
Installation
2.
41
Installation
The SIS Simultaneous Interpretation System has been developed for installation on tables. When setting up the system please
follow the safety instructions mentioned in chapter 1.
•
•
•
•
•
•
the ambient temperature of the installation site must not exceed 40°C.
there must not be exceeding dust and humidity at the installation site.
that the unit is not exposed to direct sunlight.
the connections must be protected against direct access during operation.
that there must be a strain relief of the cables.
the installation site must be protected against vibrations.
english
Furthermore, please note
SIS 1202 Interpreter Station
3.
42
SIS - Simultaneous Interpretation System
3.1 General Information
The SIS Interpretation System consists of the SIS 121/122/123 control unit, the SIS 1202 interpreter station and the DT 394.SIS headset.
With the SIS 1202 interpreter station the interpreter can select the channel into which he/she wants to translate and which he/she wants to
listen to. For his/her work the interpreter can use the DT 394.SIS headset or a microphone and a headphone. The interpreter station is
connected to the control unit with special cables. The SIS control unit manages the input and output channels of the interpreting system.
The system is fed with the original signal from the room, film projector or other sources. Each interpreting channel is available as output
signal, which is transmitted to headphones connected to receivers or a discussion system.
3.2 SIS 1202 Interpreter Station
The SIS 1202 interpreter station has been designed for two interpreters. For listening and interpreting simultaneously, a headset or a
microphone and a headphone have to be connected to the station. Each operating element can be operated intuitively by the interpreter.
As a standard a maximum of 4 interpreter stations can be connected in a daisy chain to the control unit. If the control unit is equipped
with two more modules for further languages, a maximum of 12 interpreter stations can be connected in a daisy chain.
3.2.1 Connections, Controls and Indicators
Top View
6
6
6
6
6
6
6
6
6
6
2
2
15
5
5
10
10
8
9
7
7
7
7
7
7
7
7
12
7
9
4
13
8
7
12
1
13
1
EarPatron
EarPatron
11
11
3
14
14
SIS 1202 Interpreter Station
43
Talk
LED
LED
LED
button
green = Microphone on
red = Occupied channel
off = Microphone off
2
On Air LED
will illuminate when the microphone is switched on
3
Mute = Cough button to mute the microphone (press, do not turn)
4
Off button
to switch off the microphone
5
Language Select button
and one of the upper „Relay“ buttons 6 must be pressed simultaneously to select the relay language that is to be
listened to (appropriate LED of the selected language will illuminate green).
5
Language Select button
and one of the lower „Mic Out“ buttons 7 must be pressed simultaneously to select the target language into which the
interpreter will translate (appropriate LED of the selected language will illuminate green).
6
upper Relay button to select the language that is to be listened to (appropriate LED will illuminate green)
7
lower Mic Out button to select the language into which the interpreter will translate
(appropriate LED will illuminate green)
8
Original button
This button is to be pressed if the original language is to be listened to -> LED will illuminate green
9
Relay button
This button is to be pressed if the selected relay language
6
is to be listened to -> LED will illuminate green
10
Service button
This button is to be pressed if technical problems occur:
LED red = Call is sent to the technician
LED green = technician has received and confirmed the call via the control unit
11
Volume control for headphone
12
Bass control for headphone
13
Treble control for headphone
14
Hearing protection. This function can be switched on/off by using a pen.
“Active” LED is illuminated green -> function is activated
WARNING:
If the hearing protection is switched off, the volume suddenly can
become too high and irreversible hearing damage can occur.
15
Display
1. line = Relay language/s
Capital letters = channel occupied; language is spoken currently
Small letters = channel vacant; language is not spoken
2. line = free programmable via control unit (display of current speaker or message etc.)
3. line = Display of time and hearing protection
4. line = Target language
english
1
SIS 1202 Interpreter Station
44
Right Side of the Interpreter Station
18
17
19
20
21
16
16
17
18
19
20
21
Card reader
Network output (to connect to the next interpreter station)
Network input (to connect to the control unit or the previous interpreter station)
Microphone input with 12 V phantom powering to connect a microphone
Headphone connection 6.35 mm jack (1/4")
Headphone connection 3.5 mm jack (1/8"), also for the connection of a recorder
Left Side of the Interpreter Station
19
20
21
22
16
16 , 19
22
- 21 same as above
Connection for power supply unit
SIS 1202 Interpreter Station
45
3.2.2 How to operate the Interpreter Station
How to set Volume, Treble and Bass
12
13
english
Volume, treble and bass of the headphone / headset connected to the interpreter station can be
adjusted as follows:
• Use the volume control 11 to adjust the volume of the connected headphone / headset.
• Use the bass control 12 to adjust the bass of the connected headphone / headset.
• Use the treble control 13 to adjust the treble of the connected headphone / headset.
EarPatron
11
How to set the Target Language
The target language into which the interpreter is to translate has to be selected on the interpreter station. Before
you can select the language, you have to enter into the
SIS control unit all languages that are spoken during the
meeting. Please refer to chapter 5. Configuration of the
5
SIS System - How to enter Languages.
• Hold down the “Language Select” button 5 and select
the desired target language by pressing the “Mic Out”
button 7 several times.
• If you want to select more target languages, hold down
the “Language Select” button 5 and select the desired
7
7
7
target language by pressing the next “Mic Out” button 7
of the row several times.
• Repeat these steps until all target languages are set.
• The LED of the “Mic Out” button for the selected target language will illuminate green.
How to set the Relay Language
6
6
If the interpreter does not translate from the original
language, but from an interpretation (= relay language), the
appropriate relay language must be set. Before you can
select the language, you have to enter into the SIS control
unit all languages that are spoken during the meeting.
Please refer to chapter 5. Configuration of the SIS System
5
- How to enter Languages.
• Hold down the “Language Select” button 5 and select
the desired relay language by pressing the “Relay”
button 6 several times.
• If you want to select more relay languages, hold down
the “Language Select” button 5 and set the desired
relay language by pressing the next “Relay” button 6
of the row several times.
• Repeat these steps until all relay languages are set.
• The LED of the “Relay” button for the selected relay language will illuminate green.
6
5
7
7
7
7
7
7
7
6
6
6
6
6
6
6
5
IMPORTANT :
• An occupied channel is displayed with capital letters, i.e. the language is spoken currently.
• A free channel is displayed with small letters, i.e. the language is not spoken at the moment.
• On free channels (i.e. when the appropriate language is not spoken at the moment) the original language (floor) is switched through by
the SIS control unit.
SIS 1202 Interpreter Station
46
How to listen to the Original Language
• If the interpreter wants to interpret from the original language, he/she must press the “Original”
button 8 to listen to the original language via headphones.
• The green LED of the “Original” button will illuminate.
8
How to listen to the Relay Language
6
6
6
6
6
6
6
6
6
6
If the interpreter wants to interpret from a relay language,
it has to be selected before as described under “How to
set the Relay Language”.
• To listen to the relay language, the appropriate relay
buttons 6 and 9 must be selected.
• The green LED of the “Relay” button 9 will
illuminate.
IMPORTANT:
• If the selected relay language is not spoken, the
signal of the original language is switched through
automatically.
9
9
How to switch on the Microphone
The microphone has to be switched on for the
participants of the meeting to be able to listen to the
translation of the interpreter.
• Press the “Talk” button 1 . The appropriate LED will
illuminate green.
• At the same time the red “On Air” LED 2 will
illuminate.
• The “Talk” button 1 features a toggle function, i.e. if the
“Talk” button 1 of the right hand side is pressed, when
the microphone of the left hand side is switched on, the
microphone is switched off and vice versa.
2
2
1
1
IMPORTANT:
• It is not possible that two interpreters speak the same language simultaneously. In this case the microphone cannot be switched on.
The LED of the “Talk” button 1 will illuminate red and then go out.
How to mute the Microphone
• In order to mute the microphone, press the “Mute” button 3 and hold it down.
The “On Air” LED 2 goes out.
• In order to release the microphone again, stop pressing the “Mute” button 3 .
The “On Air” LED 2 will illuminate again.
1
1
3
SIS 1202 Interpreter Station
47
How to switch off the Microphone
4
. The “On Air” LED
2
and the LED
4
english
• In order to switch off the microphone press the Off button
of the “Talk” button 1 will extinguish.
Assistance when technical Problems occur
If technical problems occur, the interpreter can send a
signal to the technician at the SIS control unit.
• If the interpreter presses the “Service” button 10 , the
technician at the SIS control unit receives a message.
• The LED of the “Service” button 10 will illuminate red.
• If the “Service” button 10 is pressed once again, the
call is cleared, the LED of the “Service” button will
extinguish and the message on the screen of the SIS
control unit will disappear.
• If the technician at the SIS control unit has received and
confirmed the message, the LED will turn green and
extinguish after approx. 10 seconds.
10
10
EarPatron
EarPatron
Hearing Protection
EarPatron
EarPatron
The interpreter station features a hearing protection.
• The hearing protection 14 is activated as soon as the
14
SIS system is active.
• The “Active” LED will illuminate green.
• If you want to switch off the hearing protection 14
press with a pen into the dip next to the “Active” LED.
• The display of the interpreter station indicates how
much percentage of the allowed noise level have been achieved already.
14
WARNING:
If the hearing protection is switched off, the volume suddenly can become too high and irreversible hearing damage can
occur.
For the functional description of the hearing protection please refer to the Appendix.
SIS 121/122/123 Control Unit
3.3
48
SIS 121/122/123 Control Unit
The modular control unit can manage a maximum of 12 interpreter stations allowing translation into 12 languages. The base version of the
control unit is equipped with one original channel and 4 foreign language channels. With two additional modules, each with 4 output
channels, the system can be extended to 8 or 12 foreign language channels. The interpreter stations are connected with usual standard
network cables (CAT.5) or special cables. The SIS control unit is configured via an integrated 5.5" touch screen.
3.3.1 Connections, Controls and Indicators of the Control Unit
Front View
4
3
1
2
1
Volume control for headphone connection
2
Headphone connection, 6.3 mm jack (1/4")
3
5.5" Touch panel
4
Power LED
2
SIS 121/122/123 Control Unit
49
Rear View
22
19
21
20
english
18
8
10
6
6
7
6
7
6
7
7
9
17
16
15 14
12
11
13
5
5
Output, balanced, 15-pin Sub-D, with switchable floor signal suppression (CA 3201 output cable is required)
6
Output, balanced, 3-pin XLR, e.g. for the connection of stationary transmitters such as CT 316, lower row “A”,
middle row “B”, upper row “C”
7
Output, unbalanced, RCA for the connection of recorders or similar
8
„Digital Audio Network“- DAN connection for the interpreter stations (connected in a daisy chain)
9
10
Input (from MCW-D) /
Output (to MCW-D - use CA 3125 cable), 25-pin Sub-D for the connection of a discussion system such
as MCW-D from beyerdynamic
11
Input, balanced, 3-pin XLR, for original signal (if there is no discussion system connected to input
12
Output to loop through the original signal if several SIS control units are linked
13
Changeover switch to switch over between input
14
Level switch to select +6 dB or -10 dB gain
15
Ground lift switch
16
Input for external relay language
17
Output to loop through the relay language, if several SIS control units are linked
18
Power connection
19
On/Off switch
20
RS 232 connection for PC
21
LAN connection for PC (network)
22
Fuse
9
and
9
)
11
CAUTION
• Inside of the control unit there is a lithium battery (CR2032). If necessary replace it by the same or equivalent type only.
There is danger of explosion if the battery is replaced incorrectly.
Set up
4.
50
How to set up the System and put it into Operation
In this chapter you will learn how to set up the SIS interpretation system and how to put it into operation.
How to prepare the Control Unit
18
19
• Connect the power cable to the power connection 18 and to a power
socket (100 - 240 V, 50 - 60 Hz)
4
• Switch on the control unit with the on/off switch 19 . The green
“Power” LED 4 will illuminate. After approx. 30 seconds the main
screen will appear on the touch panel.
How to connect the Interpreter Station
• Connect the supplied power supply unit to the interpreter station and to
power 23 .
• Connect the DAN In input 18 of the first interpreter station to the DAN
connection 8 of the control unit. Use a CAT.5 cable with RJ 45 plug for
this.
8
• Connect the DAN Out output 17 of the first interpreter station to the
DAN In input 18 of the second interpreter station and so on. In this daisy
chain a maximum of 12 interpreter stations can be connected to the
DAN connection 8 of one SIS control unit.
18
17
How to put the System into Operation
• Set the volume control 11 of the interpreter station to
minimum. Connect a headset 20 and 19 or 21 and 19
or connect a microphone 19 and a headphone 20
or 21 .
12
13
19
EarPatron
11
21
20
Set up
51
• Connect the audio signal of the original language to the
control unit 11 .
english
• If you use a discussion system from beyerdynamic such
as MCW-D connect the MCW-D control unit to the
input 9 and output 10 of the SIS control unit by using
two CA 3125 cables.
• With the changeover switch 13 select which input
9 or 11 is to be activated.
11
• Press the “Original” button 8 of the interpreter station and
turn up slowly the volume control 11 . Now the original
language should be heard via headphone, if it is spoken.
13
9
10
8
8
EarPatron
EarPatron
11
11
• If an external relay language is used, connect it to the
input 16 . If an internal language is used as relay
language this input remains vacant.
16
• Adjust the relay language/s as described under “How to set the
Relay Language” (page 37) and press the “Relay” button 9 .
Now the relay language should be heard via headphone, if it is
spoken. If the relay language is not spoken, the original language
is heard automatically.
9
9
EarPatron
• If the interpreter system is used with a discussion system
such as MCW-D 200 from beyerdynamic, connect the
control unit of the discussion system to the input 9
and output 10 of the SIS control unit.
• If the interpreter system is used with a tour guide
system such as TTS 300 from beyerdynamic, connect
the stationary CT 316 transmitter to the outputs 6 of
the SIS control unit.
EarPatron
19
10
9
6
6
Set up
52
Application with SIS Interpretation System, MCW-D Wireless, Digital Conference System and TTS 300
Wireless Tour Guide System (7 + 1)
Required Components:
1 x MCW-D 200 Control unit
2 x CA 3125 Cables to connect the MCW-D 200 control unit to the SIS 122 control unit
1 x MCW-D 2073 Chairman station with display and headphones to listen to the foreign languages
several MCW-D 2071 Delegate stations with display and headphones to listen to the foreign languages
1 x SIS 122 Control unit
7 x SIS 1202 Interpreter stations
1 x CA 3110 CAT.5 cable, 10 metres
6 x CA 3105 CAT.5 cables, 5 metres
7 x Microphone cables
14 x DT 394.SIS Headsets
1 x CT 316 Stationary transmitter for original language
6 x CT 316 Stationary transmitters for 6 foreign languages
Set up
53
Connection
Connect the DAN In input 18 of the first interpreter station to the DAN connection 8 of the SIS control unit. Connect the DAN Out
output 17 of the first interpreter station to the DAN In input 18 of the second interpreter station and so on. Use e.g. the CA 3110 cable
(10 metres long) to connect the first interpreter station to the SIS control unit. To connect the interpreter stations to one another use e.g.
the CA 3105 cable (5 metres long). Connect the DT 394.SIS headset to the interpreter stations.
Connect the input (In) of the CA 2451 PCB (25-pin Sub-D) of the MCW-D 200 control unit to the output 10 (to MCW-D) of the SIS control
unit and the output (Out) of the MCW-D 200 control unit to the input 9 (from MCW-D) of the SIS control unit. Use CA 3125 cables.
There are several headphones available to connect to the MCW-D microphone units, such as DT 1 S, DT 1 D and DT 2.
If more listeners are to listen to the discussion without taking part (e.g. press), the FE 316 tour guide receivers with headphones and the
stationary CT 316 transmitters can be used. Connect the input (In) of a stationary CT 316 transmitter to the output 6 of the SIS control
unit and for each foreign language connect one stationary CT 316 transmitter to the appropriate outputs 6 of the SIS control unit. As a
standard one original language and a maximum of 3 foreign languages can be connected. If the SIS control unit is equipped with two
other plug-in modules each with 4 connections, one original language and a maximum of 11 foreign languages can be connected.
Connect the outputs of 4 CT 316 transmitters to the inputs of the first AD 808 combiner. Connect the output of the first AD 808 combiner
with one of the 4 inputs of the second AD 808 combiner. Furthermore, you can connect 3 CT 316 transmitters to the second AD 808 combiner.
Connect the antenna e.g. AT 70 to the combiner by using the AVK 800/100 cable.
english
2 x AD 808 Combiners 4 to 1 for transmitter level
1 x AVK 800/10 Cable, low-attenuation
1 x AT 70 Groundplane antenna
several FE 316 Tour guide receivers and headphones to listen to foreign languages
Charger for FE 316 (LG 30/1-10)
Charger for MCW-D 2071/2073 (MCW-D 10)
Set up
Application with SIS Interpretation System, MCW-D Wireless, Digital Conference System, TTS 300
Wireless Tour Guide System and external Loudspeaker to address the Speaker or Technician directly
(2 + 1)
Required Components:
1 x MCW-D 200 Control unit
2 x CA 3125 Cables to connect the MCW-D 200 control unit to the SIS 121 control unit
1 x Loudspeaker
1 x MCW-D 2073 Chairman station with display and headphones to listen to the foreign languages
several MCW-D 2071 Delegate stations with display and headphones to listen to the foreign languages
1 x SIS 121 Control unit
2 x SIS 1202 Interpreter stations
1 x CA 3110 CAT.5 cable, 10 metres
1 x CA 3105 CAT.5 cables, 5 metres
4 x Microphone cables
4 x DT 394.SIS Headsets
1 x CT 316 Stationary transmitter for original language
54
Set up
55
Connection
Connect the DAN In input 18 of the first interpreter station to the DAN connection 8 of the SIS control unit. Connect the DAN Out
output 17 of the first interpreter station to the DAN In input 18 of the second interpreter station and so on. Use e.g. the CA 3110 cable
(10 metres long) to connect the first interpreter station to the SIS control unit. To connect the interpreter stations to one another use e.g.
the CA 3105 cable (5 metres long). Connect the DT 394.SIS headset to the interpreter stations.
Connect the input (In) of the CA 2451 PCB (25-pin Sub-D) of the MCW-D 200 control unit to the output 10 (to MCW-D) of the SIS control
unit and the output (Out) of the MCW-D 200 control unit to the input 9 (from MCW-D) of the SIS control unit. Use CA 3125 cables.
There are several headphones available to connect to the MCW-D microphone units, such as DT 1 S, DT 1 D and DT 2.
If more listeners are to listen to the discussion without taking part (e.g. press), the FE 316 tour guide receivers with headphones and the
stationary CT 316 transmitters can be used. Connect the input (In) of a stationary CT 316 transmitter to the output 6 of the SIS control
unit and for each foreign language connect one stationary CT 316 transmitter to the appropriate outputs 6 of the SIS control unit. As a
standard one original language and a maximum of 3 foreign languages can be connected. If the SIS control unit is equipped with two
other plug-in modules each with 4 connections, one original language and a maximum of 11 foreign languages can be connected.
Connect the outputs of the CT 316 transmitters to the inputs of the AD 808 combiner. Connect the antenna e.g. AT 70 to the combiner
by using the AVK 800/100 cable.
Connect a loudspeaker to an SIS output by using an external amplifier, if the loudspeaker is to be activated from the interpreter station
(e.g. for giving information to the speaker or technician).
english
2 x CT 316 Stationary transmitters for 2 foreign languages
1 x AD 808 Combiners 4 to 1 for transmitter level
1 x AVK 800/10 Cable, low-attenuation
1 x AT 70 Groundplane antenna
several FE 316 Tour guide receivers and headphones to listen to foreign languages
Charger for FE 316 (LG 30/1-10)
Charger for MCW-D 2071/2073 (MCW-D 10)
Set up
56
Application with SIS Interpretation System, TTS 300 Wireless Tour Guide System and Microphone (3 + 1)
Required Components:
1
1
1
2
1
1
4
6
1
3
1
1
x
x
x
x
x
x
x
x
x
x
x
x
Microphone (if you use a condenser microphone, a pre-amplifier or mixing console with phantom power is needed)
Microphone cable
SIS 121 Control unit
SIS 1202 Interpreter stations
CA 3110 CAT.5 cable, 10 metres
CA 3105 CAT.5 cables, 5 metres
Microphone cables
DT 394.SIS Headsets
CT 316 Stationary transmitter for original language
CT 316 Stationary transmitters for 3 foreign languages
AD 808 Combiners 4 to 1 for transmitter level
AVK 800/10 Cable, low-attenuation
Set up
57
1 x AT 70 Groundplane antenna
several FE 316 Tour guide receivers and headphones to listen to foreign languages
Charger for FE 316 (LG 30/1-10)
Connect the DAN In input 18 of the first interpreter station to the DAN connection 8 of the SIS control unit. Connect the DAN Out
output 17 of the first interpreter station to the DAN In input 18 of the second interpreter station and so on. Use e.g. the CA 3110 cable
(10 metres long) to connect the first interpreter station to the SIS control unit. To connect the interpreter stations to one another use
e.g. the CA 3105 cable (5 metres long). Connect the DT 394.SIS headset to the interpreter stations for instance.
For the speaker connect a microphone to the Original In input 11 of the SIS 121 control unit. If you use a condenser microphone, a
pre-amplifier or mixing console with phantom power is needed.
If more listeners are to listen to the discussion without taking part (e.g. press), the FE 316 tourguide receivers with headphones and the
stationary CT 316 transmitters can be used. Connect the input (In) of a stationary CT 316 transmitter to the output 6 of the SIS control
unit and for each foreign language connect one stationary CT 316 transmitter to the appropriate outputs 6 of the SIS control unit. As a
standard one original language and a maximum of 3 foreign languages can be connected. If the SIS control unit is equipped with two
other plug-in modules each with 4 connections, one original language and a maximum of 11 foreign languages can be connected.
Connect the outputs of the CT 316 transmitters to the inputs of the AD 808 combiner. Connect the antenna e.g. AT 70 to the combiner
by using the AVK 800/100 cable.
english
Connection
Set up
58
Application with SIS Interpretation System and MCW-D Wireless, Digital Conference System (3 + 1)
Required Components:
1 x MCW-D 200 Control unit
2 x CA 3125 Cables to connect the MCW-D 200 control unit to the SIS 121 control unit
1 x MCW-D 2073 Chairman station with display and headphone to listen to the foreign languages
several MCW-D 2071 Delegate stations with display and headphones to listen to the foreign languages
1 x SIS 121 Control unit
3 x SIS 1202 Interpreter stations
1 x CA 3110 CAT.5 cable, 10 metres
2 x CA 3105 CAT.5 cables, 5 metres
6 x DT 394.SIS Headsets
Connection
Connect the DAN In input 18 of the first interpreter station to the DAN connection 8 of the SIS control unit. Connect the DAN Out
output 17 of the first interpreter station to the DAN In input 18 of the second interpreter station and so on. Use e.g. the CA 3110 cable
(10 metres long) to connect the first interpreter station to the control unit. To connect the interpreter stations to one another use e.g. the
CA 3105 cable (5 metres long). Connect the DT 394.SIS headset to the interpreter stations.
Configuration SIS System
59
5.
Configuration SIS System
The SIS system is configured via an integrated touch screen on the SIS control unit. All settings that are entered here are transmitted to the
interpreter stations. After switching on the SIS control unit the green Power LED will illuminate first. It takes approx. 30 seconds until the
selection screen of “Wizard” and “Custom” will be displayed. If you select “Wizard”, you will be guided through the configuration. If you
select “Custom”, you can enter all settings on your own.
If you do not make a choice within approximately 10 seconds, the mode,
which has been activated before, will be loaded.
5.1
Configuration via “Wizard”
• When the SIS control unit displays the selection screen, you can choose
if you want to configure the SIS system via “Wizard” or “Custom”.
• For a configuration via “Wizard”, press the “Wizard” button.
5.1.1 How to display or enter Time / Date
• As soon as you have pressed the “Wizard” button, the present date and
time will be displayed.
• If you want to change the settings, press the “change” button.
• If you press the “next” button, you will access the menu for
language selection.
• If you have pressed the “change” button, you can set the time and
date.
• You can choose if the time is to be displayed in 24 or 12-hour mode.
• Under “Time” you can set the time with the appropriate arrow buttons.
h = hour, m = minute, s = seconds.
• Under “Date” you can set the date with the appropriate arrow buttons.
• Press the “OK” button to save the settings and to leave this menu.
• If you want to cancel the entry, press the “Cancel” button.
english
Connect the input (In) of the CA 2451 PCB (25-pin Sub-D) of the MCW-D 200 control unit to the output (to MCW-D) 10 of the SIS control
unit and the output (Out) of the MCW-D 200 control unit to the input (from MCW-D) 9 of the SIS control unit. Use CA 3125 cables.
There are several headphones available to connect to the MCW-D microphone units, such as DT 1 S, DT 1 D and DT 2.
Configuration SIS System
5.1.2 How to enter the Languages
• If you have pressed the “next” button in the Date/Time menu, the
menu for the language selection will be displayed.
• In order to be able to select the relay and target languages on the
interpreter stations, the languages have to be adjusted on the SIS
control unit before.
• Via the pull-down menu you can select how many languages will be
spoken at the meeting.
• With a standard SIS control unit you can select a maximum of 4 languages.
If the control unit is equipped with more channel output modules, you
can select a maximum of 12 languages.
• As soon as you have selected the number of the languages, you can
select the individual languages in the next display.
• Press the appropriate surface and select the language from the opened
menu.
Important: Language 1 corresponds to the 1st interpreter station
connected to the control unit. Language 2 corresponds to the 2nd interpreter station connected to the 1st interpreter station and so on.
• If another language has been connected to the “Ext. lang. In” input,
you can select this one as well.
• With “back” you will return to the previous “Date/Time” menu.
• With “next” you will access the menu for entering the specs of the
connected headset.
5.1.3 How to enter the Specs of the Headset
• If you have pressed the “next” button in the language selection menu,
the “Headset configuration” menu for entering the specs of the headsets connected to the interpreter stations will be displayed.
• The specs of the DT 394.SIS headset have been already entered at the
factory.
• If other headsets are used, you can enter the appropriate specs of the
headset connected to the left and/or right hand side of each interpreter
station.
• For this press the “config” button.
• With “back” you will return to the previous language selection.
• Press the left (le) or right (ri) button of the interpreter station for which
you want to enter or change the headset specs.
Important:
1 corresponds to the 1st interpreter station connected to the control
unit. 2 corresponds to the 2nd interpreter station connected to the
1st interpreter station and so on.
60
• For different headsets some specs such as impedance (ohm), sound
pressure level (dB SPL) and microphone (condenser, dynamic) had been
already entered at the factory.
• Select the appropriate headset from the list.
• Under “Sensitivity” you can adjust the sensitivity of the microphone
between -12.5 dB and +12.5 dB. The settings in the “-dB” area are
recommended for interpreters speaking very loud; the settings in the
“+dB” area are recommended for interpreters speaking very low.
• The settings can be sent to all interpreter stations by pressing the “Send
to all Desks” button or to an individual interpreter station by pressing
the “Send to Desk” button.
• If the connected headset is not in the list, you can enter it by pressing
the “New” button.
• As soon as you have pressed the “New” button a window with a
keyboard will be opened.
• With this keyboard you can enter the name of the connected headset
and press the “OK” button.
• If you press the “lower case” button, you can enter small letters.
• With the “<-” button you can delete individual characters.
• With the “<<” button you delete the whole line.
• With the “Cancel” button you can cancel the entry.
• After having pressed the “OK” button you can enter the impedance (ohm)
and the sound pressure level (dB SPL) of the connected headset with the
“+” and “-” buttons.
• Select if the headset has a condenser or dynamic microphone.
• In order to save the settings press the “Save” button.
• Now the new headset will be displayed in the list and can be selected.
• When all described settings have been entered, press the “next” button.
• The configuration via “Wizard” will be finished, when you press the
“finish” button. The main menu (refer also to the chapter 5.2.1) will be
displayed.
• With “back” you will return to the previous “Headset configuration” menu.
61
english
Configuration SIS System
Configuration SIS System
5.2
62
Configuration via “Custom”
• If you want to configure the SIS system via “Custom”, press the
“Custom” button.
5.2.1 Main Menu
• The main menu will be displayed, as soon as you have pressed the
“Custom” button or after a configuration via “Wizard”.
• In the main menu you cannot enter anything. It is to control the selected
languages and the number of the connected interpreter stations.
• With a headphone connected to the SIS control unit you can listen to
the original language (Floor), another external language (Extern) and the
individual foreign languages. You can select the language by pressing
the appropriate button. The language chosen is highlighted in yellow.
• The languages adjusted in the rows A, B and C correspond to the rows
of the outputs 6 or 7 on the rear of the SIS control unit.
• A red bar above the appropriate language indicates that the language is
currently spoken by an interpreter. A green bar above the appropriate
language indicates that this is the external relay language (in the picture
it is FRE).
• “No. of Desks” displays the number of the interpreter stations connected
to the SIS control unit and to the mains.
5.2.2 How to enter the Languages
• In order to be able to select the relay and target languages on the interpreter stations, the languages have to be adjusted on the SIS control
unit before.
• Press the “Language” button in the main menu.
• In this menu you can select all languages that are spoken during the
meeting.
• Press the appropriate button, e.g. A1.
• A list with different international abbreviations of languages will be
opened.
• Select a language from this list.
• Proceed with the other buttons until all languages are selected which
are spoken during the meeting.
• To transmit the selected languages to the interpreter stations press the
“OK” button.
• In order to select the external relay language, press the “Ext. lang. in”
button and select the language from the list. Please note that the
external relay language must also be selected in one of the fields from
A 1 to C 4.
• If there is no abbreviation for a language in the list, you can enter the
abbreviation via a keyboard. Press the “New” button and a window
with a keyboard will be opened.
• Enter the abbreviation with the appropriate buttons. Please note that
the abbreviation must consist of three letters.
• If you have entered wrong letters, you can delete them with the “<<”
button.
• Press the “OK” button to enter the new abbreviation into the list.
• In the “Language” menu you can then select the abbreviation from the
list.
• If you want to cancel the entry, press the “Cancel” button.
Keyboard to enter new abbreviations for languages
Configuration SIS System
63
5.2.3 Suppression of the Original Signal
Warning:
The floor signal suppression can only be activated for the 15-pin Sub-D
output 5 on the rear of the SIS control unit.
5.2.4 How to enter Messages
• If you want to send a message to one or all interpreter stations, press
the “Message” button in the main menu.
• You can select, if you want to send the message to all or an individual
interpreter station.
• Press the “all desks” button, if you want to send the message to all
interpreter stations.
• Select the interpreter station from the list of all connected interpreter
stations, if you want to send the message to an individual station.
Important:
1 corresponds to the 1st interpreter station connected to the control
unit. 2 corresponds to the 2nd interpreter station connected to the
1st interpreter station and so on.
• If you press the “OK” button, you will return to the main menu.
How to send a Message to an individual Interpreter Station
• Existing messages can be selected from the pull-down menu by pressing
the arrow button and selecting the appropriate message.
• By pressing the “Create New” button you can create new messages. A
window with a keyboard will be opened. With the “Cancel” button you
can cancel the entry. With the “<-” button you can delete individual
characters. With the “<<” button you can delete a whole line. If you
press the “lower case” button, you can write small letters.
• Write your message with the keyboard and then press the “OK” button.
• You will return to the “Change Message” menu and can select the new
message from the pull-down menu.
• To send the message press the “Display on desk no.” button.
• The message appears in the second line of the display of the selected
interpreter station.
• If you want to delete the message on the interpreter station, press the
“Clear on desk no.” button.
• If you press the “OK” button you will return to the window “Displayed
Messages”.
english
• If the original signal is to be suppressed, press the “Floor Suppression”
button.
• The suppression of the original signal is activated by pressing the
appropriate surface (language) which will turn red then.
Configuration SIS System
How to send a Message to all Interpreter Stations
• Existing messages can be selected from the pull-down menu by pressing
the arrow button and selecting the appropriate message.
• By pressing the “Create New” button you can create new messages. A
window with a keyboard will be opened. With the “Cancel” button you
can cancel the entry. With the “<-” button you can delete individual
characters. With the “<<” button you can delete a whole line. If you
press the “lower case” button, you can write small letters.
• Write your message with the keyboard and then press the “OK” button.
• You will return to the “Change Message” menu and can select the new
message from the pull-down menu.
• To send the message press the “Display on desk no.” button.
• The message appears in the second line of the display of the selected
interpreter station.
• If you want to delete the message on the interpreter station, press the
“Clear on desk no.” button.
• If you press the “OK” button you will return to the window “Displayed
Messages”.
5.2.5 How to enter Time / Date
• To display the time and date in the display of the interpreter
stations, press the “Time/Date” button in the main menu.
• You can choose if the time is to be displayed in the 24 or 12-hour
mode.
• Under “Time” you can set the current time with the appropriate arrow
buttons.
h = hour, m = minute, s = seconds.
• Under “Date” you can set the current date with the appropriate arrow
buttons.
• Press the “OK” button to save the settings and to leave this menu.
• If you want to cancel the entry, press the “Cancel” button.
5.2.6 How to display the Software Version
• To display the software version of the control unit, press the “About”
button in the main menu.
• Press the “back” button to return to the main menu.
64
Configuration SIS System
65
• In order to regulate the headphone volume of the interpreter
stations you can enter the impedance (ohm) and sound pressure level
(dB SPL) of the connected headphone.
• Press the “Headset” button in the main menu.
• You can enter the appropriate headset connected to each side (left or
right hand side) of the individual interpreter stations.
• Press on the surface of the left (le) or right (ri) hand side for which you
want to enter the headset.
Important:
1 corresponds to the 1st interpreter station connected to the control
unit. 2 corresponds to the 2nd interpreter station connected to the
1st interpreter station and so on.
• For different headsets some specs such as impedance (ohm), sound
pressure level (dB SPL) and microphone (condenser, dynamic) had been
already entered at the factory.
• Select the appropriate headset from the list.
• Under “Sensitivity” you can adjust the sensitivity of the microphone
between -12.5 dB and +12.5 dB. The settings in the “-dB” area are
recommended for interpreters speaking very loud; the settings in the
“+dB” area are recommended for interpreters speaking very low.
• The settings can be sent to all interpreter stations by pressing the “Send
to all Desks” button or to an individual interpreter station by pressing
the “Send to Desk” button.
• If the connected headset is not in the list, you can enter it by pressing
the “New” button.
• As soon as you have pressed the “New” button a window with a
keyboard will be opened.
• With this keyboard you can enter the name of the connected headset
and press the “OK” button.
• If you press the “lower case” button, you can enter small letters.
• With the “<-” button you can delete individual characters.
• With the “<<” button you delete the whole line.
• With the “Cancel” button you can cancel the entry.
• After having pressed the “OK” button you can enter the impedance (ohm)
and the sound pressure level (dB SPL) of the connected headset with the
“+” and “-” buttons.
• Select if the headset has a condenser or dynamic microphone.
• In order to save the settings press the “Save” button.
• Now the new headset will be displayed in the list and can be selected.
• When all described settings have been entered, press the “OK” button.
english
5.2.7 How to enter the Headset Specifications
Configuration SIS System
5.2.8 Presets
• Presets are settings of the SIS control unit which have been set before.
One default preset has been entered at the factory.
• You can create new presets where you can save all language and
headset settings you have entered.
• Press the “Preset” button in the main menu.
How to create a new Preset
• Press the “New name” button. A window with a keyboard will be
opened where you can enter the name of a new preset.
• In addition to the existing default preset you can create 19 presets so
that in total there are 20 presets.
• Press the “OK” button when you have entered a name.
• With the “Cancel” button you can cancel the entry. With the “<-”
button you can delete individual characters. With the “<<” button you
can delete a whole line.
How to save Presets
• If you want to overwrite and save a preset, select it from the
pull-down menu.
• Press the “Save preset” button.
• The message “Write present values in ...?” will be displayed.
• If you want to save all settings as preset, press the “Yes” button. The
main menu will be displayed again.
How to load Presets
• If there are other presets available in addition to the default preset, you
can select the desired preset from the pull-down menu and press the
“Load preset” button.
• The message “Overwrite present values?” will be displayed.
• Press the “Yes” button. The selected preset will be opened in the main
menu.
66
Configuration SIS System
67
• Select the preset you want to delete from the pull-down menu and
press the “Delete preset” button.
• The message “Delete file ?” will be displayed. Press the “Yes”
button to delete the preset.
• The preset will be no longer available in the pull-down menu.
5.2.9 How to display the “EarPatron” Hearing Protection
• In order to display the “EarPatron” hearing protection press the
“EarPatron” button in the main menu.
• You can see if the “EarPatron” function is activated or deactivated and
how much percentage of the allowed noise level has been achieved.
White surface: EarPatron is deactivated
Green surface: EarPatron is activated
Red surface: EarPatron is activated, noise level > 95%
• With the “Reset EarPatron” button you can reset the hearing
protection for all interpreter stations to 0% before the start of a new
meeting for instance. .
• By pressing the “OK” button you will return to the main menu.
Important:
1 corresponds to the 1st interpreter station connected to the control unit. 2 corresponds to the 2nd interpreter station
connected to the 1st interpreter station and so on.
5.2.10 How to clear the Microphones
• If you want to clear the microphone of one or all interpreter stations,
select the “Clear” button on the main menu.
• Then you can select which microphone you want to clear. If you want to
clear the microphone of all interpreter stations, select the “all desks”
button.
Important:
1 corresponds to the 1st interpreter station connected to the control
unit. 2 corresponds to the 2nd interpreter station connected to the
1st interpreter station and so on.
• By pressing the “OK” button you will return to the main menu.
5.3
Service Call
• If an interpreter presses the “Service” button on the interpreter station,
the message “Service Call! Please confirm” and the interpreter station
that has sent the call will be displayed as a red field.
• To confirm press the red field in the “left” or “right” column, which
indicates the appropriate interpreter station and the side (left or right).
english
How to delete Presets
Accessories
5.4
68
How to display the Firmware Version
• To display the Firmware version press the “beyerdynamic))))
Simultaneous Interpretation System” line twice while the system is
booting up.
• As soon as the “Wizard” and “Custom” buttons are displayed, you
have ten seconds to press the “beyerdynamic)))) Simultaneous
Interpretation System” line twice and the “Firmware” button.
• For each interpreter station (Desks) you can display information about
MCU, DSP and FPGA.
• For the control unit you can also display the FPGA.
• Press the “OK” button to return to the main menu.
6.
Accessories
Components
SIS 1202
Interpreter station for two interpreters, with power supply unit. . . . . . . . . . . . . . . . . . . . . . . . . Order # 475.424
SIS 121
SIS 122
SIS 123
Control unit with one module (= 4 foreign language channels). . . . . . . . . . . . . . . . . . . . . . . . . Order # 458.783
Control unit with two modules (= 8 foreign language channels) . . . . . . . . . . . . . . . . . . . . . . . . Order # 458.767
Control unit with three modules (=12 foreign language channels) . . . . . . . . . . . . . . . . . . . . . . Order # 458.759
System Cables
CA 3101
CA 3105
CA 3110
CA 3125
CAT.5 cable with footproof RJ-45 metal connector, 1 m . . . . . . . . . . . . . . . . . . . . . . . . . . . . . . Order #
CAT.5 cable with footproof RJ-45 metal connector, 5 m . . . . . . . . . . . . . . . . . . . . . . . . . . . . . . Order #
CAT.5 cable with footproof RJ-45 metal connector, 10 m . . . . . . . . . . . . . . . . . . . . . . . . . . . . . Order #
Connecting cable SIS - MCW-D with 25-pin Sub-D connector. . . . . . . . . . . . . . . . . . . . . . . . . . Order #
475.440
475.319
475.327
476.579
Optional System Components
CA 3201
Adapter output cable, 15-pin Sub-D, 4xXLR (switchable floor signal suppression) . . . . . . . . . . . Order # 475.955
CA 3204
4-channel output module for SIS interpreter system . . . . . . . . . . . . . . . . . . . . . . . . . . . . . . . . . Order # 475.343
CA 3221
Docking station with loudspeaker and gooseneck microphone . . . . . . . . . . . . . . . . . . . . . . . . . Order # 475.335
Optional Communication Systems
CT 316
Stationary UHF transmitter (863 - 865 MHz), 16-channel . . . . . . . . . . . . . . . . . . . . . . . . . . . . . Order # 472.832
FE 316
Tour guide receiver (863 - 865 MHz), 16-channel . . . . . . . . . . . . . . . . . . . . . . . . . . . . . . . . . . . Order # 474.840
DT 1 S
Single earphone, 32 Ω, cable length 0.8 m, mono jack 3.5 mm . . . . . . . . . . . . . . . . . . . . . . . . Order # 471.399
DT 1 S
same as above, but cable length 1.6 m . . . . . . . . . . . . . . . . . . . . . . . . . . . . . . . . . . . . . . . . . . . Order # 471.402
DT 1 D
Dual earphone, 16 Ω, cable length 0.8 m, mono jack 3.5 mm . . . . . . . . . . . . . . . . . . . . . . . . . Order # 471.410
DT 1 D
same as above, but cable length 1.6 m . . . . . . . . . . . . . . . . . . . . . . . . . . . . . . . . . . . . . . . . . . . Order # 471.429
DT 2
Headphone, 16 Ω, cable length 0.8 m, mono jack 3.5 mm. . . . . . . . . . . . . . . . . . . . . . . . . . . . Order # 471.437
DT 2
same as above, but cable length 1.6 m . . . . . . . . . . . . . . . . . . . . . . . . . . . . . . . . . . . . . . . . . . . Order # 471.445
MCW-D 200
Control unit, 2.4 GHz, wireless conference system . . . . . . . . . . . . . . . . . . . . . . . . . . . . . . . . . . Order # 472.522
MCW-D 2071 Delegate station with display. . . . . . . . . . . . . . . . . . . . . . . . . . . . . . . . . . . . . . . . . . . . . . . . . . . Order # 472.751
MCW-D 2073 Chairman station with display . . . . . . . . . . . . . . . . . . . . . . . . . . . . . . . . . . . . . . . . . . . . . . . . . . Order # 472.778
CA 2431
Antenna cable, low-attenuation, 10 metres. . . . . . . . . . . . . . . . . . . . . . . . . . . . . . . . . . . . . . . . Order # 464.309
CA 2432
Antenna cable, low-attenuation, 20 metres. . . . . . . . . . . . . . . . . . . . . . . . . . . . . . . . . . . . . . . . Order # 464.325
CA 2447
Antenna cable adapter N/HF(F)-N/HF(F) . . . . . . . . . . . . . . . . . . . . . . . . . . . . . . . . . . . . . . . . . . . Order # 476.587
AD 808
Combiner 4 to 1 for transmitter level (CT 316) . . . . . . . . . . . . . . . . . . . . . . . . . . . . . . . . . . . . . Order # 481.718
Headphones
DT 394.SIS
7.
Headset for SIS Simultaneous Interpreter System, headphone 40 Ω, condenser
microphone (cardioid), cable with 6.3 mm stereo jack and 3-pin XLR plug . . . . . . . . . . . . . . . . Order # 475.815
Technical Specifications
General
The system corresponds to the standards:
IEC 60914 – Discussion Systems
DIN 56924 – Booths for Simultaneous Transmission
IEC 2603.2
CAT 5 cable length (DAN) . . . . . . . . . . . . . . . . . . max. 70m between 2 SIS components
SIS 1202 Interpreter Station
Power supply voltage, external PSU. . . . . . . . . . . 110 – 240 VAC, 50/60 Hz
Wiring DC-connector, 5-pin XLR . . . . . . . . . . . . . 1 = +5 V
2 = +12 V
3 = ground
4 = -12 V
5 = ground
Dimensions . . . . . . . . . . . . . . . . . . . . . . . . . . . . . Depth: 208 mm
Width: 335 mm
Height front:17 mm
Height rear: 98 mm
Weight . . . . . . . . . . . . . . . . . . . . . . . . . . . . . . . . 3 kg
Operating temperature range . . . . . . . . . . . . . . . +5º to +40ºC (at < 90 % humidity)
Storage temperature range . . . . . . . . . . . . . . . . . -20º to +80ºC (bei < 90 % humidity)
S/N ratio . . . . . . . . . . . . . . . . . . . . . . . . . . . . . . . > 70 dB
Channel separation . . . . . . . . . . . . . . . . . . . . . . . > 70 dB at full modulation
Headphone output 6.3 mm (1/4")
Frequency response rel. to 1 kHz. . . . . . . . . . . . . 50 Hz – 20 kHz (-3dB)
T.H.D. . . . . . . . . . . . . . . . . . . . . . . . . . . . . . . . . . < 1% at full modulation
Max. output level . . . . . . . . . . . . . . . . . . . . . . . . at 20 Ω load 2.2 Veff
at 300 Ω load 6.3 Veff
Unweighted S/N ratio
rel. to full modulation . . . . . . . . . . . . . . . . . . . . . 83 dB (unweighted) / 85 dB(A)
Connection . . . . . . . . . . . . . . . . . . . . . . . . . . . . . 3-pole jack socket 6.3 mm, both channels occupied
Headphone output 3.5 mm (documentation output)
Frequency response rel. to 1 kHz. . . . . . . . . . . . . 50 Hz – 20 kHz (-3dB)
T.H.D. . . . . . . . . . . . . . . . . . . . . . . . . . . . . . . . . . < 1% at full modulation
Max. output level . . . . . . . . . . . . . . . . . . . . . . . . at 20 Ω load 2.2 Veff
at 300 Ω load 6.3 Veff
Unweighted S/N ratio
rel. to full modulation . . . . . . . . . . . . . . . . . . . . . 83 dB (unweighted) / 85 dB(A)
Connection . . . . . . . . . . . . . . . . . . . . . . . . . . . . . 3-pole jack socket 3.5 mm, both channels occupied
69
english
Technical Specifications
Technical Specifications
Microphone Input
Phantom powering . . . . . . . . . . . . . . . . . . . . . . . +12 V
Wiring microphone connection . . . . . . . . . . . . . . 1 = Shield
2 = AF+ / phantom powering +12 V
3 = AF- / phantom powering +12 V
Frequency response rel. to 1 kHz. . . . . . . . . . . . . 80 Hz – 20 kHz (-3dB)
T.H.D. . . . . . . . . . . . . . . . . . . . . . . . . . . . . . . . . . < 1% at full modulation
Input sensitivity
rel. to full modulation . . . . . . . . . . . . . . . . . . . . . high: 11 mV (for dynamic microphone capsules)
low: 115 mV (for electret microphone capsules)
Unweighted S/N ratio
rel. to full modulation . . . . . . . . . . . . . . . . . . . . . 85 dB (unweighted) / 87 dB(A)
Connection . . . . . . . . . . . . . . . . . . . . . . . . . . . . . 3-pin XLR, female
DT 394.SIS Headset
Microphone
Transducer type . . . . . . . . . . . . . . . . . . . . . . . . . . Electret condenser
Powering. . . . . . . . . . . . . . . . . . . . . . . . . . . . . . . via integrated impedance transducer
voltage range 11 – 52 V
Polar pattern . . . . . . . . . . . . . . . . . . . . . . . . . . . . Cardioid
Sensitivity . . . . . . . . . . . . . . . . . . . . . . . . . . . . . . 6 mV / PA
Output voltage while talking
at a distance of 5 cm . . . . . . . . . . . . . . . . . . . . . approx. 12 mV
Max. sound pressure level . . . . . . . . . . . . . . . . . . 122 dB SPL
Headphone
System impedance . . . . . . . . . . . . . . . . . . . . . . . 40 Ω
Nominal sound pressure level
(1 mW at 1 kHz) . . . . . . . . . . . . . . . . . . . . . . . . . 94 dB SPL
Nominal power handling. . . . . . . . . . . . . . . . . . . 100 mW, corresponds to 114 dB SPL
Headband pressure . . . . . . . . . . . . . . . . . . . . . . . 1.5 N
Weight without cable and connector . . . . . . . . . 154 g
Weight with cable and connector . . . . . . . . . . . . 218 g
SIS 12x Control Unit
Power supply voltage . . . . . . . . . . . . . . . . . . . . . 10 – 240 VAC, 50/60 Hz
Fuse . . . . . . . . . . . . . . . . . . . . . . . . . . . . . . . . . . 2 x 6.3 A, slow blow
Power consumption . . . . . . . . . . . . . . . . . . . . . . 18 W
Display . . . . . . . . . . . . . . . . . . . . . . . . . . . . . . . . 5.5" touch screen, 256-colour display
Dimensions . . . . . . . . . . . . . . . . . . . . . . . . . . . . . Width: 483 mm (19")
Depth: 310 mm
Height: 132 mm (3HU)
Weight (SIS 121) . . . . . . . . . . . . . . . . . . . . . . . . . 5.75 kg
Operating temperature range . . . . . . . . . . . . . . . +5º to +40ºC (at < 90 % humidity)
Storage temperature range . . . . . . . . . . . . . . . . . -20º to+80ºC (at < 90 % humidity)
Outputs
Original Through . . . . . . . . . . . . . . . . . . . . . . . . . XLR male, 0 dB gain, min. impedance 300 Ω
Ext.Language Through . . . . . . . . . . . . . . . . . . . . XLR male, 0 dB gain, min. impedance 300 Ω
to MCW-D . . . . . . . . . . . . . . . . . . . . . . . . . . . . . 25 pin Sub-D (Tascam wiring)
balanced connection with appropriate level for MCW-D
Language Output XLR
Frequency response rel. to 1 kHz. . . . . . . . . . . . . 50 Hz – 20 kHz (-3dB)
T.H.D. . . . . . . . . . . . . . . . . . . . . . . . . . . . . . . . . . < 0.5% at full modulation
Max. output level . . . . . . . . . . . . . . . . . . . . . . . . + 8dB
Unweighted S/N ratio
rel. to full modulation . . . . . . . . . . . . . . . . . . . . . 106 dB (unweighted) / 110 dB(A)
Connection . . . . . . . . . . . . . . . . . . . . . . . . . . . . . 3-pin XLR, male
70
Language Output RCA
Frequency response rel. to 1 kHz. . . . . . . . . . . . . 50 Hz – 20 kHz (-3dB)
T.H.D. . . . . . . . . . . . . . . . . . . . . . . . . . . . . . . . . . < 0.5% at full modulation
Max. output level . . . . . . . . . . . . . . . . . . . . . . . . + 1.55 Veff
Unweighted S/N ratio
rel. to full modulation . . . . . . . . . . . . . . . . . . . . . 106 dB (unweighted) / 110 dB(A)
Connection . . . . . . . . . . . . . . . . . . . . . . . . . . . . RCA socket
Language Output Sub-D
Frequency response rel. to 1 kHz. . . . . . . . . . . . . 50 Hz – 20 kHz (-3dB)
T.H.D. . . . . . . . . . . . . . . . . . . . . . . . . . . . . . . . . . < 0.5% at full modulation
Max. output level . . . . . . . . . . . . . . . . . . . . . . . . + 1.0 Veff
Unweighted S/N ratio
rel. to full modulation . . . . . . . . . . . . . . . . . . . . . 106 dB (unweighted) / 110 dB(A)
Connection . . . . . . . . . . . . . . . . . . . . . . . . . . . . . 15 pin Sub-D socket, CA 3201 cable
Headphone output
Monitoring output on the front
Frequency response rel. to 1 kHz. . . . . . . . . . . . . 100 Hz – 20 kHz (-3dB)
T.H.D. . . . . . . . . . . . . . . . . . . . . . . . . . . . . . . . . . < 1% at full modulation
Max. output level . . . . . . . . . . . . . . . . . . . . . . . . at 32 Ω load 1.8 Veff
at 560 Ω load 5.9 Veff
Unweighted S/N ratio
rel. to full modulation . . . . . . . . . . . . . . . . . . . . . 106 dB (unweighted) / 110 dB(A)
Connection . . . . . . . . . . . . . . . . . . . . . . . . . . . . 3-pole jack socket 6.3 mm, both channels occupied
CA 3204 Module for Source Languages
please refer to Technical Specifications for Language Outputs
SIS - CA 3204 Wiring
Inputs
Original in . . . . . . . . . . . . . . . . . . . . . . . . . . . . . . XLR female,
switchable -10 dBu (1 Veff) / +6 dBu (6.5 Veff)
Ext. Language in . . . . . . . . . . . . . . . . . . . . . . . . . XLR male, +6 dBu
from MCW-D . . . . . . . . . . . . . . . . . . . . . . . . . . . 25-pin Sub-D (Tascam wiring)
balanced connection with appropriate level for MCW-D
71
english
Technical Specifications
Appendix
72
Functional Description of the Hearing Protection
1. Basic Principles of Hearing Protection
Background
The human hearing is one of the most important and sensitive sense organs. Therefore, hearing protection is essential for people who are
exposed to high sound pressure levels for a longer period of time. It is even of existential importance for people who need a good hearing
for their profession such as musicians, sound engineers, interpreters or radio moderators.
Problem
Like a sunburn which is noticed when the skin has become red already, it is found out that the noise level was too high when the ears are
already “ringing”. In both cases it is too late to think about protective measures.
State of the Art
The current offer of electronic hearing protection includes more or less the use of audio limiters only. For an extensive hearing protection
the limiting of the electric output signal with a limiter is not sufficient. Instead of this the actual sound pressure the user is exposed to has
to be registered, evaluated and regulated during the whole time of listening. The target is that the listener cannot reach a critical noise dose
over a long period of time of listening.
2. Function of EarPatron
The EarPatron technology implemented in the SIS interpretation system contains the following functions:
“Headphone-Adapt” Technology
Depending on the technical specifications, each headphone produces a different sound pressure with the same output level of the
headphone amplifier. For this reason the “Headphone Adapt” technology has been developed. The measured electrical values are put into
relation to the used headphone. After entering the technical specifications of the headphone, EarPatron is able to use the actual sound
pressures as basis of all calculations, because electrical values are in direct relation to the acoustical impact. In conjunction with the SIS
interpretation system the adjustable headphone level is limited to a maximum of 105 dB(A) with full modulation of the data bus and right
stop of the volume control.
“Noise Fuel Gauge”
As the “Headphone Adapt” algorithm is used to find out the actual sound pressure at any time, EarPatron is able to sum up the level of
noise already arisen over an arbitrary period of time. This is converted into a percentage value of the rating sound level (maximum noise
level) of 85 dB(A) for 8 hours. A rise of the noise level by 3 dB results in a splitting of the permitted time (e.g. 88 dB(A) for 4 hours,
91 dB(A) for 2 hours etc.). This rating sound level must not be mixed up with the maximum sound pressure level that can be achieved (here
105 dB(A) at 1 kHz), as the effective sound pressure is regarded in proportion to the working time. A sound pressure of e.g. 119 dB(A) for
10 seconds results in the same noise level as an 8-hour sound pressure of 85 dB(A).
The interpreter station displays how much percentage of this value has been achieved already. 10% means: „A lot of noise still may be
given“, 100%, however, means: “You have already received the whole daily ration of noise”.
The “noise fuel gauge” is always displayed, no matter if EarPatron is switched on or off. Therefore, even a user, who does not want an
automatic control of the hearing volume (EarPatron switched off), can check if his listening habits are “healthy”. A displayed value of more
than 100% means: “The hearing volume has been too high for the duration of the work”. Furthermore, it is helpful to develop a feeling
for the consequences of high listening levels, because an increase of the volume automatically increases the display of the “noise fuel
gauge”.
Intelligent EarPatron Control
EarPatron can control if the noise level for the user is still in a safe area or if it makes sense to reduce the hearing volume. This happens so
that the intervention is performed smoothly and unnoticed. With a progressive hearing duration, the hearing level is reduced continuously
so that the maximum noise level (100%) is usually never reached. Should the maximum noise level, however, be reached due to unhealthy
listening habits (or EarPatron was activated when the noise level had exceeded 100%
already), the algorithm will reduce the volume level so that no serious volume (> 85 dB (A)) can be achieved anymore. This allows continuous
work at relatively safe audio levels without fearing additional stress of the hearing.
The EarPatron algorithm works without automatic reset. This means that breaks of the user, when the hearing volume is set to “0”, are not
evaluated as recreation phases for the hearing. EarPatron can be reset with “Reset” only. The reason why is that the noise level the user is
exposed to during a break is unknown. It is unknown, if the hearing of the user really could recover or if it was exposed to a higher noise.
This means the “noise fuel gauge” will not reduce, even when the hearing volume has been “0” for a longer period of time. EarPatron
cannot take into account the whole daily routine of the user, but with EarPatron and the SIS interpretation system the stress of the hearing
can be kept harmless.
Appendix
73
•
•
•
•
•
“Headphone Adapt” technology
Conversion of electrically measurable values in equivalent acoustic identification values
Allows the calculation of actual sound pressures and noise levels
Calibration of the system according to the used headphone
Headphone characteristics required
•
•
•
•
•
“Noise fuel gauge”
Requires “Headphone Adapt” technology
Display of the given noise level percentage of the maximum daily ration
Tool for information and self-control of the user
Cannot be deactivated
•
•
•
•
•
•
•
Intelligent EarPatron Function
Requires “Headphone Adapt” technology and “noise fuel gauge”
Can be deactivated by the user
Monitoring of the supplied noise level over the complete duration of usage
Sensitive intervention in the hearing volume before stress of the hearing becomes obvious
No permanent signal manipulation or signal alienation
The maximum, legally fixed, daily noise level cannot be exceeded.
english
Summary
The EarPatron technology includes the following functions:
FCC Class B Compliance Statement
Information to the User
NOTE:
This equipment has been tested and found to comply with the limits for a class B digital device, pursuant to Part 15 of the FCC Rules and
meets all requirements of the Canadian Interference-Causing Equipment Regulations (ICES-003). These limits are designed to provide
reasonable protection against harmful interference in a residential installation. This equipment generates, uses and can radiate radio
frequency energy and, if not installed and used in accordance with the instructions, may cause harmful interference to radio
communications. However, there is no guarantee that interference will not occur in a particular installation. If this equipment does cause
harmful interference to radio or television reception, which can be determined by turning the equipment on and off, the user is
encouraged to try to correct the interference by one or more of the following measures:
•
•
•
•
Reorient or relocate the receiving antenna.
Increase the separation between the equipment and receiver.
Connect the equipment into an outlet on a circuit different from that to which the receiver is connected.
Consult the dealer or an experienced radio/T.V. technician for help.
beyerdynamic GmbH & Co. KG is not responsible for any radio or television interference caused by unauthorized modifications of this
equipment or the substitution or attachment of connecting cables and equipment other than those specified by beyerdynamic GmbH & Co. KG.
The correction of interference caused by such unauthorized modification, substitution or attachment will be the responsibility of the user.
The use of shielded I/O cables is required when connecting this equipment to any and all optional peripheral or host devices. Failure to do
so may violate FCC and ICES rules.
FCC-DECLARATION
OF
CONFORMITY
This device complies with Part 15 of the FCC Rules. Operation is subject to the
following two conditions:
(1)
(2)
This device may not cause harmful interference, and
This device must accept any interference received, including interference
that may cause undesired operation.
Manufacturer:
beyerdynamic GmbH & Co. KG
Theresienstrasse 8
D- 74003 Heilbronn, Germany
U.S. Responsible Party:
beyerdynamic North America
56 Central Avenue
Farmingdale, NY 11735, USA
Contact Person:
Wolfgang Luckhardt
Phone: Tel. (631) 293 3200
Fax: (631) 293 4463
Type of Equipment: Simultaneous Interpretation System SIS
Model Names:
SIS 121, SIS 122, SIS 123, SIS 1202
Classification:
Class B digital device
We hereby declare that the equipment bearing the trade name and model number specified above was tested conforming to the applicable
FCC rules under the most accurate measurement standards possible, and that the necessary steps have been taken and are in force to
assure that production units of the same equipment will continue to comply with the Commission’s requirements.
October 12, 2004
Signature:
EC-DECLARATION
OF
CONFORMITY
Application of
Council directive:
89/336/EEC, 93/68/EEC
Electromagnetic Compatibility
73/23/EEC, 93/68/EEC
Low Voltage Directive
Standards to which
Conformity is Declared:
EMC
EN 55 022
EN 61 000-6-2
EN 61 000-6-3
Safety
EN 60 065
Manufacturer's Name:
beyerdynamic GmbH & Co. KG
Manufacturer's Address:
Theresienstrasse 8, 74072 Heilbronn, Germany
Type of Equipment:
Simultaneous Interpretation system
Model Numbers:
SIS 121, SIS 122, SIS 123, SIS 1202
I, the undersigned, as an employee of beyerdynamic, hereby declare that the
equipment specified conforms to the above Directive and Standards.
Full Name:
Ulrich Roth
Date:
1. November, 2004
Position:
Director of R&D
Weitere Vertriebspartner weltweit finden Sie unter www.beyerdynamic.de
For further distributors worldwide, please go to www.beyerdynamic.com
DE9/BA SIS (11.08)/576.034 • Änderungen und Irrtümer vorbehalten • Subject to change without notice. • Printed in Germany
beyerdynamic GmbH & Co. KG
Theresienstr. 8 | 74072 Heilbronn – Germany
Tel. +49 (0) 7131 / 617 - 0 | Fax +49 (0) 7131 / 617 - 224
[email protected] | www.beyerdynamic.de