1
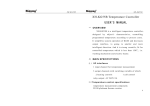
EMIC-XM - USB Audio Converter With eMic Function
User Manual
Table of Content
1. Features ................................................................................................................................................................................................2
2. Technical specification........................................................................................................................................................................2
3. Quick installation.................................................................................................................................................................................3
3.1 Hardware installation ...................................................................................................................................................................3
3.2 Software installation.....................................................................................................................................................................3
4. eMic-XM controls and usage tips .....................................................................................................................................................3
5. EHSMonitor software ........................................................................................................................................................................4
5.1 Software overview........................................................................................................................................................................4
5.1.1 EHSMonitor..........................................................................................................................................................................4
5.1.2 LAME MP3 encoder............................................................................................................................................................4
5.2 E-mail microphone recording......................................................................................................................................................4
5.2.1 Recording..............................................................................................................................................................................4
5.2.2 Managing recordings............................................................................................................................................................5
5.3 General settings ............................................................................................................................................................................6
5.3.1 One-touch recording options ...............................................................................................................................................6
5.3.2 Button A/Button B function ................................................................................................................................................6
5.3.3 Launch at Windows startup (Launch at user login) ...........................................................................................................6
5.4 Advanced settings.........................................................................................................................................................................6
5.4.1 External MP3 encoder..........................................................................................................................................................6
5.4.2 File name format for one-touch recording..........................................................................................................................7
5.4.3 Advanced recording options................................................................................................................................................7
5.4.4 Address book options...........................................................................................................................................................7
5.5 eMic4All account settings ...........................................................................................................................................................7
5.5.1 Account options....................................................................................................................................................................7
5.5.2 Registration...........................................................................................................................................................................8
5.5.3 Subscription upgrade............................................................................................................................................................8
5.5.4 Upload options......................................................................................................................................................................8
5.6 Managing recordings....................................................................................................................................................................8
5.6.1 Recording manager ..............................................................................................................................................................8
5.6.2 Synchronization....................................................................................................................................................................9
5.7 Troubleshooting (Solving problems) ..........................................................................................................................................9
6. Multimedia Address Book utility .....................................................................................................................................................10
6.1 Overview.....................................................................................................................................................................................10
6.2 Multimedia Address Book Contacts file creation ....................................................................................................................10
6.3 Navigating through Contacts and Selecting Recipient ............................................................................................................10
6.4 Settings........................................................................................................................................................................................10
6.5 Troubleshooting..........................................................................................................................................................................10
7. Multimedia Address Book Editor utility..........................................................................................................................................11
7.1 Overview.....................................................................................................................................................................................11
7.2 Editing Contacts list ...................................................................................................................................................................11
7.3 Multimedia Address Book Contacts file...................................................................................................................................11
8. Sound Editor utility ...........................................................................................................................................................................11
8.1 Overview.....................................................................................................................................................................................11
8.2 Editing audio files ......................................................................................................................................................................11
8.3 Creating new audio files ............................................................................................................................................................12
8.4 Filters...........................................................................................................................................................................................12
8.5 Mpeg 3 Settings..........................................................................................................................................................................13
1. Features
- High-quality USB audio converter with three one-touch, quick action eMic buttons
- One-touch recording function for Skype and MSN (as well as other VoIP applications) conversations
- Record voice messages and attach these to an e-mail, ready to be sent with the touch of one button. You can also
automatically upload the recorded message or conversation to the server. The link can be automatically placed into any
document (e-mail or spreadsheet/database/whatever) with the touch of one button. Free storage space on the
www.eMic4all.com server is provided for you for this function
- Plug-and-play USB interface with integrated Sound Card adds audio “out” to any PC or MAC for connecting your favorite
headphones (or active speakers) and microphone
- The mono 2.5mm connector earphone with microphone can be connected for the sound playback and voice recording
- Recording quality is suitable for voice recognition or voice command applications
- Stylish design, output volume control, playback mute control and microphone sensitivity control make this product a personal
professional audio solution
- eMic Monitor software extra features:
- Multimedia address book allows you to associate picture/sound with the e-mail entries. This makes the product
suitable for disabled people or very small children
- Sound editor allows you to continue or revise your recording
- Built-in (or custom-made) sound filters are just for fun. Surprise your friends by sounding like James Bond or
Mickey Mouse
2. Technical specification
Microphone input:
- Type of recording: mono
- Frequency: 100 - 12000Hz
- ADC resolution: 16 bit
- Sampling rate: 48 kHz
- SNR: 83dBA (1kHz at -20dB)
- THD+N: -42dB (1kHz at -3dB)
Headphones/speakers output:
- Frequency: 50 – 20000Hz (+/- 3db)
- Type of playback: stereo
- DAC resolution: 16 bit
- Sampling rate: 48 kHz
- Output power: 60mW per channel
- THD+N: -44dB (50Hz-20kHz, 40mW)
Connectors and plugs:
- 3.5mm stereo headphones/speakers output
- 3.5mm mono condenser microphone input
- 2.5mm input/output for earphone with microphone
- USB A-type male plug cable
System requirements:
* PC: Pentium 133 MHz processor or higher, OS Windows 2000/XP/2003/Vista;
* Macintosh: PowerMacintosh G4 or better, MacOS 10.3 or later
* USB 1.1 port
Package content:
* eMic-XM
* Desktop stand
* Software CD
* User manual
* Quick Installation guide
3. Quick installation
3.1 Hardware installation
• Connect the USB plug to the computer.
• Put microphone cable jack to “MIC IN” jack.
• Connect headphones, earphone or speakers to “SPK OUT” jack.
• Connect earphone with microphone to the “MONO OUT+MIC” jack.
3.2 Software installation
For PC:
• Insert the EHSMonitor software CD into the CD drive.
• Providing autorun is enabled the CD will begin automatically.
• if it does not: Press Start/run/ browse/ - The drive where the CD can be found
• Double click on the file named eMic4all_setup – and follow the instructions shown.
For Macintosh:
• Insert the EHSMonitor software CD into the CD drive.
• On the pop-up window which will appear, find EHSMonitor.pkg and double click on it.
Installing notes
For PC: After first time plugging into USB-port eMic becomes a default playback device (“USB Audio CODEC” or “USB
Audio Device”). You should set preferred audio playback device manually. To configure a preferred sound playback or
recording device in Control Panel, double-click Sounds and Multimedia. Click the Audio tab, and then under Sound Playback
or Sound Recording, click the preferred device that this workstation should use for playing (or recording) sound.
For Macintosh: You should set preferred audio playback device manually. To configure a preferred sound playback or
recording device in System Preferences, click "Sound". Click the "Output" tab, and select the preferred device that this
computer should use for playing sound.
4. eMic-XM controls and usage tips
eMic-XM has 2 eMic buttons, on which various eMic software functions can be assigned, output mute button, output volume
and microphone sensitivity controlling wheels. Headsets, speakers, microphones, mono earphones can be connected to the
eMic-XM jacks. If connected to desktop microphone, eMic-XM, when it is placed on a stand, can be used as desktop eMic
control box. If connected to the headset, eMic-XM can be used as a hand-held eMic control box. Placement of controls and
jacks is shown on fig.1. For best adjustment of the microphone sound level use the “Sensitivity” control on the eMic-XM. For
adjustment of the volume output control use the “Volume” control on the eMic-XM in a couple with system volume contol. On
and off muting of output sound by pressing “Output mute” button on the eMic-XM.
Figure 1. eMic-XM controls and connectors
5. EHSMonitor software
5.1 Software overview
5.1.1 EHSMonitor
With EHSMonitor it is possible using only one button to record file, save it, convert to MP3 and even to generate an e-mail
message with the recorded file attached or upload record to web server.
5.1.2 LAME MP3 encoder
MP3 is a format for compressed audio storage. MP3 uses psychoacoustic filters to remove sounds that are inaudible to the
human ear, as well as other methods to compress the audio information. Thus there could be discernable difference between the
original and encoded audio data (a great depends on the encoding parameters). Modern MP3 encoders are very flexible and
allow you to set a lot of parameters, affecting the encoding speed and the output file quality. EHSMonitor uses LAME as
default encoding engine. LAME is quite fast (encodes faster than real time on a PII-266 at highest quality mode) and provides a
very good sound quality. For more information, please visit LAME official site at http://www.mp3dev.org. If for one or
another reason you do not like LAME, you can use any other MP3 encoder that supports command line interface. See
“Advanced settings” section for details.
5.2 E-mail microphone recording
5.2.1 Recording
eMic allows you to record and E-mail sound files by pressing only one button. The rest (MP3 encoding, generating of the eMicmessage, uploading it to the eMic4all server etc.) will be done for you automatically.
Recording is always first made to a temporary file. Thus, even if the recording is finished abnormally (power failure, etc.) the
recorded data would not be lost (however such file would not be recovered automatically).
It is possible to assign one of five pre-defined functions to any of the microphone buttons (since it is assigned, it becomes a
function of eMic). That means that it is even possible to assign the same function to the both eMic buttons.
There are two ways to use the eMic buttons:
Hold down. Recording starts right after the button is pressed down and lasts while the button is held pressed. When the button
is released, recording stops.
Click. Recording starts after the button is pressed and consequently released. Recording stops when the button is pressed for
the second time. Recording can be paused and resumed as many times as needed by pressing and releasing the button different
from the one that has started the recording.
The five pre-defined functions are:
Rec. If MP3 recording option is set the recorded file is encoded to mp3 file format.
Rec and Attach. After the recorded file is saved (and encoded if necessary), an e-mail message is generated with the recorded
file attached. It just remains to specify the recipient and send the message.
Rec and save to specified file or MEMO function. When the recording is finished, EHSMonitor prompts you for the recorded
file name. If specified, the recorded file is encoded to mp3 file format.
Rec and upload to eMic4all server. Encoding to mp3 and uploading to the server is being processed during the recording.
After the recording is finished the link to the eMic-message on the server is generated and immediately pasted into the window
that had input focus at the beginning of the recording.
Note: Rec and upload function is available for the Wav and normal quality Mp3 recordings only.
Note: Normally by default a defined by you text (prefix) precedes the link to the eMic-message. If the prefix text is not
required (which e.g. can be useful if you intend to insert the link into Excel file or database) push the Shift key just prior to the
moment when you start the recording.
Rec Skype/MSN. Records Skype, MSN, Windows Live Messenger or other VoIP software voice conversations. During the
eMic installation Skype and MSN will be automatically configured for this function to work. If you install Skype/MSN after the
eMic or if you use a different VoIP software for the voice communication, make sure that the virtual device named eMic Audio
Filter 1 (Windows XP) or Line 1 (eMic Audio Filter) (Windows Vista) is selected as the input microphone and the virtual
device named eMic Audio Filter 2 (Windows XP) or Line 2 (eMic Audio Filter) (Windows Vista) is selected as the output
sound device in the settings of the Skype/MSN/VoIP software.
Note: Rec Skype/MSN function is available for Windows XP and Windows Vista only.
Undefined (Unused). The button is not used by the EHSMonitor software. Check, if other software uses this button.
Use filter. With this option set, before the eMic-function is executed the selected sound filter will be applied to the recording.
Use Sound editor to edit and create your own sound filters.
Note: Use filter option applies to the currently selected pre-defined function.
Use sound editor. With this option set, before the eMic-function is executed the Sound editor will be launched. With the help
of the Sound editor you will be able to listen to your recording and edit or amend it if necessary.
Note: Use sound editor option applies to the currently selected pre-defined function.
MMAB. With this option set, every time creating an e-mail with Rec and attach eMic-function you will be offered to choose
the recipient from multimedia address book.
Note: MMAB option applies to the currently selected pre-defined function.
Note for Windows version: All settings changes come into force only after the “Apply” button at the bottom of the dialog box
window is pressed.
5.2.2 Managing recordings
After the recording has been finished, the recorded file name is saved in the list of all recorded files. EHSMonitor allows to
change the file name or location (the file will be renamed and moved if necessary), to delete one or more files or to generate an
e-mail message with one or more previously recorded files attached. See “Recording manager” section for details).
5.3 General settings
5.3.1 One-touch recording options
Save recorded files Specifies the folder where the recorded files will be saved to. You can select any existing folder.
Wav/Mp3/HQ Wav/HQ Mp3 radio button. You can also select one of the four formats to save the recorded data.
“HQ Wav” and “HQ Mp3” formats has higher sound quality then “Wav” and “Mp3”, but less compact file sizes (by a factor of
2 and 1,5 respectively). Formats are described in the table below.
Table 1. Audio file formats.
Designator
Wav
Mp3
HQ Wav
HQ Mp3
Audio file format
Wave PCM, 11,025 kHz 16bit mono
MPEG Audio Layer-3 16kBit 11,025 kHz
Wave PCM, 22,050 kHz 16bit mono
MPEG Audio Layer-3 VBR 8-24kBit 22,050 kHz
5.3.2 Button A/Button B function
eMic has five different functions. Any function could be assigned to any of the eMic buttons; it is even possible to assign the
same function to both buttons. See “E-mail microphone recording” section for details.
5.3.3 Launch at Windows startup (Launch at user login)
If this option is set the EHSMonitor will start automatically whenever the Windows is started (on user logon for Macintosh
users).
Note: Any changes made, will take effect only after the current recording is finished (if any).
5.4 Advanced settings
5.4.1 External MP3 encoder
By default EHSMonitor uses LAME encoder to encode to MP3 and the default format is CBR 16Kbps, 11025 Hz, 1 channel
(mono). If you would like to change from LAME or if you want to specify the custom encoding parameters, you can choose
any other encoder (here and later - external encoder) you like. There is only one requirement: the external encoder should
support command line interface, i.e. it should be possible to use it from the command prompt.
Use External MP3 encoder By checking this check box; you can make EHSMonitor use any external command-line MP3
encoder instead of the default encoder.
Path to executable Specify the full path to the external encoder executable file. You can enter the path manually in the edit box
or browse for the file. If the invalid path is specified in this field, EHSMonitor will attempt to use its own encoder. If for some
reasons the built-in encoder cannot be used as well, then the file will be saved to the same folder and with the same name but in
the “wave” format (and with .wav extension). So, whatever happens, your recording will not be lost.
Additional parameters Specify any additional parameters, supported by the external encoder. These parameters are passed
directly to the encoder exe-file without any check if the external encoder really supports the specified parameters.
Generally, the external encoder call string should satisfy the following template:
<full path to encoder> <additional options> <full path to source file> <full path to
destination file>
Parameters are described in the table below.
Table 1. External MP3 encoder parameters.
Full path to
The full path to the external encoder executable file.
encoder
Additional
Any additional options.
options
Full path to Full path to the source wave file. Supplied by EHSMonitor. User does not have to care about this
source file
path.
Full path to Full path to the destination mp3 file. If supplied by EHSMonitor , it is always valid. If this path is
source file
supplied by the user, the user is responsible for validity of this path.
Warning! If encoding fails due to the invalid path to the destination file, or due to the invalid additional options (not supported
by encoder), the original recorded wave file will be deleted. Unless you are able to supply the correct external encoder
parameters, it will not work. In general it is quite enough to use the LAME encoder, supplied with EHSMonitor.
5.4.2 File name format for one-touch recording
Names for the files recorded with one-touch recording are generated automatically based on the user-defined template. The
generated file name looks like this:
<Prefix><Random number>.<extension>
Parameters are described in the table below.
Table 2. File name format parameters.
An arbitrary string. This string can’t include system characters (such as backspace character, new
Prefix
line character, etc.) and any character from the following set: < > : " / \ |.
This is the part of the file name, which makes files different from each other. This number can be
generated in two ways.
Date/Time based – the generated number represents date and time when the recording is finished,
Some
using the following template YYYYMMDDhhmmss, where letters "YYYY", "MM", "DD", "hh",
number
"mm", "ss" represent current year, month, day, hour, minute and second respectively.
Enumerated – numbers are generated consecutively, i.e. the generated number is the least not used
number (there is no file with the same filename), starting from zero.
Extension
File extension. "Wav" or "mp3" depending on the selected file format.
5.4.3 Advanced recording options
EHSMonitor sets the minimum recording time. This means, that any recording, that lasts less than minimum recording time is
discarded. This can be useful to eliminate recordings caused by accidental eMic button pressing. By default the minimum
recording time is 1 second. The minimum recording time can be any number in the range from 1 to 262144 (3 days 49 minutes
4 seconds). The maximum recording time is limited only by the available hard disk space.
5.4.4 Address book options
Use multimedia address book. When this option is checked every time creating an e-mail with EHSMonitor using Attach
selected files button you will be offered to choose the recipient from multimedia address book. Use Edit... to run Multimedia
address book editor to form list of contacts.
Note: Any changes made to this setting will take effect only after the current recording is finished (if any).
5.5 eMic4All account settings
5.5.1 Account options
To be able to use the Rec and upload eMic function you have to be logged in to an existing account on one of the eMic4all
servers.
Upload records to server. Select or enter the URL of the server where you already have an account to login to or of the server
where you wish to create a new account. After the login all the messages generated by the Rec and Upload function will be
automatically stored on the specified here server.
Login. Enter your login of an existing account here.
Password. Enter your password of an existing account here.
Press Login button to login to existing account or Register button to create a new account on the specified server. When you
are logged in, the Profile button is enabled. Use it to view and change your account settings.
5.5.2 Registration
Please fill in the registration form to register the new account. The serial number can be found inside the package or at the
bottom of the product.
The trial registration allows creating the trial (valid for 30 days) account without serial number if the serial number is missing
or invalid.
Note: Only devices supplied with EHSMonitor software version 2.0 or later can be accepted for registration.
Note: Trial account requires activation, activation instructions will be sent to you by e-mail.
5.5.3 Subscription upgrade
There are two ways to upgrade your account. The first is to do it on the eMic4all server in your account profile. The second is
to get a new subscription with the new eMic. Note that the users of eMic-S, EPH-USB or EHS-OFFICE get the Basic
subscription free of charge. If you decide to purchase eMic-PRO or EHS-USB later on, you will be entitled to get the
Advanced subscription free of charge. To upgrade the existing account with the Basic subscription to the Advanced
subscription, please click the Upgrade button and enter the new product serial number when required to do so.
5.5.4 Upload options
Link prefix. The text entered here will precede a link to the eMic-message and pasted to the currently open document.
Insert new line. Select this option to insert a new line automatically after the link to the eMic-message is pasted in the
currently open document.
Preview. With this option chosen whenever you create a message by Rec and upload function the eMic-message properties
window will appear. It will allow you to change the appearance of the eMic-message on the server, listen to the recording and
edit it.
Note: if Preview option is selected the link to the eMic-message (with eventual prefix and new line) will not be pasted
automatically into the document in the active window. If you wish to paste the link, press Copy link button in the Upload
properties window.
Note: even if Preview option is not selected an icon
will appear in the system tray for one minute after the recording is
finished. Double-click on this icon to launch the Upload properties window.
Note: if by the time you finish the recording the document in the active window does not accept entering of the text, the link to
the eMic-message will not be inserted there. However the whole link will be stored in the Clipboard. Use Paste function (CtrlV) to place the link wherever you wish to.
5.6 Managing recordings
5.6.1 Recording manager
EHSMonitor maintains the list of all recorded files and links to their remote copies stored on the eMic4all server. If the eMicmessage has a title it is also displayed next to the file name. Any time you make a new recording the recorded file is added to
the list. Uploaded records are marked with a special icon
. Using the recording manager you can manage your recordings:
rename them, generate e-mail messages with one or more recordings attached to them, upload records to server, delete recorded
files or their remote copies on server, you can also edit your records using the Sound editor including updating stored on the
server eMic-messages and their appearance.
To generate an e-mail message with some recordings attached or to delete some recordings, select them in the list and click
Attach selected files or Delete selected files button respectively.
To edit a record, no matter uploaded or not, click Edit button. If for the currently selected record there exists an eMic-message
uploaded to the server, eMic-message properties window will appear.
Click Copy link button to copy a link to the uploaded eMic-message to the clipboard.
You can click Upload button on the locally made record to create an eMic-message on the eMic4all server.
Use Refresh button to update status of the selected records. If the eMic-message cannot be found on the eMic4all server a
special icon
will disappear from the record row. The eMic-message titles will also be updated from the server.
To rename a certain recording, select it in the list, click on it and edit the file name (location).
The double click on the file in the list will cause this file to be played or opened by the default application that is assigned to
handle this file extension. In fact the double click on the file will have the same effect as executing this file from the Windows
Explorer.
Note: it is also possible to play records from synchronization window.
5.6.2 Synchronization
To synchronize all locally stored files and the eMic-messages on the server press Sync button. This button will update all the
titles of the eMic-messages. In addition to it a synchronization window will appear when:
a) one or more records which are supposed to be on the eMic4all server but cannot be found there (so probably need to be
uploaded again)
b) one or more records which do exist on the eMic4all server but the local copy is missing (so probably need to be downloaded
again)
c) one or more records which cannot be found neither on the eMic4all server, nor locally (such records have to be removed).
The synchronization window is intended to help you keep your recordings synchronized with the eMic-messages on the server.
The three first columns in the table indicate which action should be taken with the “troublesome” record. At the same time the
icons in the first two columns show the status of the local record and of the eMic-message.
The green tick
in the first column means that the locally stored record has been found. The empty space in the first column
means that the locally stored record on the server is missing.
The green tick
in the second column means that the eMic-message record on the server has been found. The empty space in
the second column means that the eMic-message record on the server is missing.
You can specify the action to be taken with each record. The possible actions are:
1. Upload local record to the server – represented by the symbol
2. Download the record from the server – represented by the symbol
3. Delete the record – represented by the symbol
When the window is opened for the first time the system by default selects the most logically correct action for each record.
This default action can be changed by clicking on the cell.
All the actions will be performed immediately after you press the OK button.
5.7 Troubleshooting (Solving problems)
Common problems and solutions:
·
External MP3 encoder does not work
The external MP3 encoder call string is the following:
<executable name> <additional parameters> <full path to source file> <full path
to destination file>
Be sure that your encoder would accept this string.
6. Multimedia Address Book utility
6.1 Overview
Multimedia Address Book application has the following main features:
• Can be used with EHSMonitor software. Use Multimedia Address Book for selecting the recipient of the e-mail with your
voice recording. Refer to EHSMonitor Help file for details.
• Provides easy access to Multimedia address book contacts.
• Allows postponed e-mail sending using the default mail client interface.
• Supports immediate e-mail sending through the specified SMTP server (no mail client required).
6.2 Multimedia Address Book Contacts file creation
Before using Multimedia Address Book create a list of contacts using Multimedia Address Book Editor. Refer to Multimedia
Address Book Editor Help file for details.
6.3 Navigating through Contacts and Selecting Recipient
Multimedia Address Book allows selecting one recipient of the contacts list to deliver your e-mail to. It is also possible to
create an e-mail with no recipient (only with mail client interface) by pressing No recipient button. In this case the recipient has
to be specified in the mail client interface by typing it or selecting from the default mail client address book.
Entries of the Contacts list are initially shown in the alphabetical order, with the only exception of Default recipient which is
always shown first. To navigate through the Multimedia Address Book Contacts you can use mouse wheel, Multimedia
Address Book user interface buttons or eMic “Letter” button. Type first characters of the recipient name or e-mail address in
the Recipient filter box to filter the displayed Contacts. To select the recipient double click the mouse left button on it's picture
or press enter key when the picture of the recipient is highlighted with the green frame. You can also press eMic “Record”
button to select the currently chosen recipient.
Note: Refer to Multimedia Address Book Editor Help file to learn how to specify the Default recipient.
6.4 Settings
Send to default recipient. If this option is on then the e-mail created using EHSMonitor will be sent to the Default recipient
automatically and immediately. In this case Multimedia Address Book window will not be shown.
Note: Refer to Multimedia Address Book Editor Help file to learn how to specify the Default recipient.
Send through SMTP server immediately. Use this option to send e-mails with Multimedia Address Book directly through
SMTP server using your e-mail account. No mail client is required in this case. Enter SMTP server address in Outgoing mail
(SMTP) server field, enter your name and e-mail address, check SMTP server requires authentication and specify Server
logon options if necessary. The message will be then sent directly through the SMTP server.
Note: the Subject field of the e-mail in this case will be filled with Subject prefix followed by time stamp, using the template
[DD. MM. YYYY hh:mm:ss], where letters "YYYY", "MM", "DD", "hh", "mm", "ss" represent current year, month, day, hour,
minute and second respectively. The sender of such E-mail can be specified in the E-mail account options.
Use Outgoing mail (SMTP) server port number field to change the server port number.
6.5 Troubleshooting
Possible reasons of being unable to send an e-mail.
If you are trying to send an e-mail using your default mail client (Send through SMTP server immediately option is switched
off):
·
Check if one of the supported mail clients (MS Outlook, Outlook Express, Lotus, Mozilla Mail, Netscape) is installed
on your computer and used as a default mail client.
If you are trying to send an e-mail directly through SMTP server (Send through SMTP server immediately option is switched
on):
· Check your Internet connection.
· Check the following Multimedia Address Book settings:
o Check if your SMTP server is specified correctly.
o Check if the server logon options are specified correctly, if your SMTP server required authentication.
o Contact your system administrator to verify the outgoing mail server port number.
7. Multimedia Address Book Editor utility
7.1 Overview
Multimedia address book editor is a utility tool intended to fill and update the multimedia address book, which can be used
with the EHSMonitor software. When Use multimedia address book option is switched on, whenever you create an e-mail
using EHSMonitor the Multimedia Address Book - Contacts dialog appears and helps to choose the message recipient
without typing. To make navigation through the list of Contacts easier each contact is coupled with an image and/or sound.
7.2 Editing Contacts list
Use New contact button to create a new contact. Select any existing contact from the list to edit its attributes. In addition to the
standard Name, E-mail and Phone attributes MAB Editor allows to assign an image and/or a sound to any contact. You can
select one of the images from the supplied image collection or use your own picture (BMP,JPG,GIF graphics formats are
supported). Browse for an appropriate Wav or Mp3 file on your computer to assign it to the contact. Use Save button to save
changes.
Press Default button to make from the currently selected contact the Default recipient. Default recipient is shown as first in
the Multimedia Address Book - Contacts dialog for quicker access. Refer to the Multimedia Address Book help file for
details of using Default recipient. Use Preview button to open the Multimedia Address Book - Contacts dialog with the
updated Contacts list.
Hint: Use Rec or Rec and Save to file options in the EHSMonitor software to create audio files, which can later be assigned
to the Multimedia address book entries.
7.3 Multimedia Address Book Contacts file
All
Contacts
information
is
stored
in
a
single
file
associated with
the
Windows®
user.
Path to address book file shows the current address book file location. Use … button to open a different existing address book
file or to create a new one by typing a new file name.
8. Sound Editor utility
8.1 Overview
Sound editor application has the following main features:
· Can be used with EMicMonitor USB/EHSMonitor/EMicMonitor Pro software to process voice recordings before
sending them by e-mail (uploading to the eMic4All server). Refer to EMicMonitor USB/EHSMonitor/EMicMonitor
Pro Help file for details.
· Allows editing sound audio files of .wav and .mp3 formats.
· Performs MP3 encoding using LAME MP3 encoder.
· Performs conversions of .wav to .mp3 audio file format and vice versa.
Provides sound recording capabilities.
8.2 Editing audio files
To edit an existing audio file please, follow the steps below:
· Use Open… command from the File menu to open an existing file. Sound editor supports audio files in Wav and MP3
audio formats.
· Use Play and Stop buttons or just click over the blue bar to navigate through the sound file. The yellow marker shows
the current position in file.
· Use Mark button to set one of two red markers in the specified location.
Note: You can change the red and yellow markers position by dragging them with your mouse along the time scale. Drag
the marker somewhere outside the time scale to remove it.
Note: The playback always starts from the yellow marker and stops by the red marker. To resume the playback, click the
Play button again. This is specially made so to let you set the precise mark between the sound fragment you’d like to keep
and the one you wish to delete or overwrite.
·
·
If you would like to delete a piece of the recording, first place one of the red markers at the start of the fragment you’d
like to remove and then place the other red marker at the end. Press the Delete… button to remove the marked
fragment from the recording.
To insert an additional voice recording into the file at the specified position (where the single red marker is) use eMic
"Letter" (Hold down) and “Record” (Click) buttons in the usual fashion.
Note: insertion is not allowed if both of the two red markers are in place.
·
There are three ways to insert the new recording into the existing file:
o
o
o
Insert at marker - inserts at current (red marker) position, the whole file gets bigger.
Overwrite - overwrites the file starting from the red marker.
Continue from marker - replaces the rest of the file from the current (red marker) position with the new
recording.
Please, choose the appropriate setting from the When recording combo box.
·
If you wish to save the amended audio file please, use Save and Save As… commands from the File menu. Using
Save As… you can also convert audio files from Wav to MP3 formats or vice versa if required.
Note: the eMic buttons to start the new recording will work only if the Sound editor window is active, otherwise the device
buttons will not work with the Sound Editor.
Note: if the opened file was originally compressed to MP3 then it will be saved with the same MP3 encoder settings and quality
by either Save or Save As…
Note: Encoding Wav files to MP3 format is processed using Normal quality encoding or High quality encoding settings.
8.3 Creating new audio files
To create a new audio file please, follow the steps below:
· Use New command from File menu to create an empty audio file.
· To start recording please, hold down eMic “Letter” button or click eMic “Record” button.
Note: recording is started by pressing eMic buttons only if the Sound editor window is active, otherwise pressing device
buttons will not work in the Sound Editor.
Note: Voice recording is performed in uncompressed Wav audio format. To reduce the output file size select Mp3 sound files
file type in the Save as type combo box of the Save dialog box.
Note: Saving Wav files in MP3 format is processed using Normal quality encoding or High quality encoding settings.
8.4 Filters
Sound editor also allows to apply different sound filters to the recording. You can create these filters by yourself. The Filters
window can be accessed by choosing Filters menu item of the Options menu. To add a new filter use Add button in the Filters
window. There are three types of possible filters: Tempo, Pitch or Rate. Each filter can be adjusted up or down by specifying a
modifying factor value. Each filter can also be assigned a picture to make identification easier.
To edit the existing filter select it in the list on the right of Filters window and press Edit… button.
By clicking Remove button you can delete the filter currently selected in the list of filters.
Press Test button to listen to the result of applying the selected filter to the recording. Use Apply button to confirm applying of
the filter. Press Cancel button to leave the recording without changes and close Filters window.
The same list of filters is also available from the list box in the main Sound editor window. Select one of the existing filters
from the list box and press Test button to listen to the result of the chosen filter to the recording. Use Apply button to confirm
applying of the filter.
8.5 Mpeg 3 Settings
Exact technical specifications of each setting are described below.
Normal quality encoding: MPEG Audio Layer-3 16kBit 11,025 kHz.
High quality encoding: MPEG Audio Layer-3 VBR 8-24kBit 22,050 kHz.