1
JetBox 9300/9310
User Manual
Web UI & CLI
www.korenix.com
0.0.6
Copyright Notice
Copyright© 2008 Korenix Technology Co., Ltd.
All rights reserved.
Reproduction without permission is prohibited.
Information provided in this manual is intended to be accurate and reliable. However,
the original manufacturer assumes no responsibility for its use, or for any
infringements upon the rights of third parties that may result from its use.
The material in this document is for product information only and is subject to
change without notice. While reasonable efforts have been made in the preparation
of this document to assure its accuracy, Korenix assumes no liabilities resulting from
errors or omissions in this document, or from the use of the information contained
herein.
Korenix reserves the right to make changes in the product design without notice to
its users.
Acknowledgments
Korenix is a registered trademark of Korenix Technology Co., Ltd.
All other trademarks or registered marks in the manual belong to their respective
manufacturers.
2
Overview | Korenix
Table of Content
Copyright Notice ........................................................................................ 2
Acknowledgments ...................................................................................... 2
Table of Content ........................................................................................................ 3
Chapter 1
Overview ............................................................................................ 5
Chapter 2
Software Specification ........................................................................ 6
2-1
Utilities for the PC .............................................................................. 6
2-1-1
JetBox Virtual COM Commander ................................................ 6
2-1-2
JetView....................................................................................... 6
2-2
Software Package ............................................................................... 6
2-3
Linux SDK (software development kits) ............................................... 8
2-3-1
Installing SDK .............................................................................. 8
2-3-2
Application source code (ap_src) ................................................ 8
2-3-3
Linux tool chain (toolchain) ......................................................... 8
Chapter 3
Getting Started ................................................................................... 9
3-1
Power on JetBox ................................................................................. 9
3-2
Connect JetBox to a PC ....................................................................... 9
3-2-1
IP address ................................................................................... 9
3-2-2
Web User Interface ..................................................................... 9
3-2-3
Telnet Console .......................................................................... 10
Chapter 4
Software Feature—Web User Interface ............................................ 10
4-1
System ............................................................................................. 13
4-2
Device Configuration ........................................................................ 14
4-2-1
Time Settings ............................................................................ 14
4-2-2
Basic Settings ............................................................................ 15
4-2-3
Warning .................................................................................... 16
4-3
Network Configuration ..................................................................... 20
4-3-1
WAN Settings ............................................................................ 21
4-3-2
LAN Settings ............................................................................. 22
4-3-3
Leased Entries ........................................................................... 24
4-3-4
NAT Settings ............................................................................. 24
4-3-5
VLAN ........................................................................................ 26
4-3-6
Traffic Prioritization .................................................................. 28
Korenix | Overview
3
4-3-7
SNMP ....................................................................................... 33
4-3-8
Security .................................................................................... 38
4-3-9
Switch Port Configuration ......................................................... 39
4-4
Serial Port Configuration .................................................................. 42
4-4-1
Serial Settings ........................................................................... 42
4-4-2
Service Mode ............................................................................ 44
4-5
DIO Configuration ............................................................................. 48
4-5-1
Digital Output Control............................................................... 48
4-5-2
Digital Output Schedule ............................................................ 48
4-5-3
DIO Status................................................................................. 49
4-6
Power over Ethernet (JetBox 9310 Supported) ................................. 49
4-6-1
PoE Control ............................................................................... 50
4-6-2
PoE Schedule ............................................................................ 50
4-6-3
PoE Status ................................................................................. 51
4-7
4-8
4-9
4-10
4-11
4-12
Chapter 5
5-1
5-2
Backup and Restore .......................................................................... 52
Firmware Upgrade............................................................................ 52
Factory Default ................................................................................. 55
System Reboot ................................................................................. 56
Save ................................................................................................. 56
Logout .............................................................................................. 57
Software Features—Command Line Interface ................................... 58
CLI menu tree ................................................................................... 58
Difference between Web UI & CLI .................................................... 68
5-2-1
Port statistics: more counters are supported in CLI ................... 68
5-2-2
Syslog display: Only CLI has syslog display item. ........................ 69
5-2-3
Autorun.sh update .................................................................... 69
Chapter 6
SNMP MIB ........................................................................................ 70
Chapter 7
Appendix .......................................................................................... 74
7-1
Index for Tables, Snapshots, and Notices .......................................... 74
7-2
Revision History ................................................................................ 79
7-3
Customer Service ............................................................................. 80
4
Overview | Korenix
Chapter 1 Overview
In networking communication environments, routers, switches and computers are
indispensable devices to a typical networking architecture. Along with technology
development, the complexity of devices increases and the troublesome settings
become more and more confusing. Hence, the revolution of networking devices is
anticipated. Functional integration and human-oriented manipulation will be the
mainstream in next networking generation.
JetBox 9300 is the communication transformer that digests router functionality,
managed switch, and computer functions into one tiny box. Extreme simple
operation is the core spirit of JetBox 9300. Korenix provides not only API, but also the
User Interface to make managing the router, managed switch, and computer setting
simple.
Entire system can be controlled through SNMP
SNMP (Simple Network Management Protocol) is used in networking management
systems to monitor network-attached devices. JetBox 9310 provides complete SNMP
v1, v2c, v3 protocol and MIBs (Management Information Bases). Customers can use
one or more systems to manage a number of devices through JetBox 9300/9310
SNMP control.
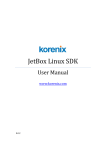
JetBox9310
Power over Ethernet (JetBox 9310)
Korenix | Overview
5
JetBox 9310 is an advanced version of the JetBox 9300 line with PoE function. Power
over Ethernet is a useful technology for powering devices where it would be
inconvenient, expensive or infeasible to supply power separately. JetBox 9310 refers
to IEEE802.3af standard as a PSE (Power Sourcing Equipment) that provides 48 volts
DC over two of the four available pairs on a Cat 3/Cat 5e/Cat 6 cables with a
maximum current of 400 mA for a maximum load power of 15.4W.
Both JetBox 9300 and 9310 are RISC-based embedded computers, system memory
64MB SDRAM by default and also carries all major interfaces such as five Ethernet
ports, two USB2.0 ports, two RS-232 ports, two RS-232/422/485 ports, four digital
inputs, four digital outputs and one SD card slot. In addition, the built-in Linux OS and
network essential applications allow the JetBox 9300/9310 to become powerful
network engines.
Chapter 2 Software Specification
2-1
Utilities for the PC
2-1-1 JetBox Virtual COM Commander
This item provides support for Virtual COM driver installation in the PC and the
VCOM management in the windows operating system. Refer to JetBox Virtual COM
Commander user manual for details.
2-1-2 JetView
The JetView is a device management utility which supports various device
management features. Currently, JetBox supports JetView 1.1 (or above version) for
device discovery and basic system LAN IP address modification. With different
versions, more features may be supported and you can always find the latest
information on the Korenix web site or get help from Korenix Customer Support.
2-2
Item
Software Package
Description
6
Software Specification | Korenix
Item
Description
Boot Loader
U-boot
Kernel
Linux 2.6.21
Protocol Stack
ARP, PPP, CHAP, PAP, IPv4, ICMP, TCP, UDP, DHCP,
FTP, SNMPV1/V2c/V3, HTTP, NTP, NFS, SMTP, SSH
1.0/2.0, SSL, Telnet, PPPoE, Open VPN
File System
JFFS2, NFS, Ext2, Ext3, VFAT/FAT
OS Shell Command
Bash
Linux normal command
Busybox
utility collection
Table 1: JetBox 9300/9310 Linux system
Utility
Description
iptable
The name of the user space tool by which
administrators create rules for the packet
filtering (both inbound and outbound) and
NAT modules
telnet
telnet client program
ftp
FTP client program
smtpclient
Email utility
ethtool
Ethernet configuration program
Table 2: JetBox 9300/9310 Linux utility
Daemons
Description
pppd
Dial in/out over serial port daemon
snmpd
Snmpd agent daemon
telnetd
telnet server daemon
inetd
TCP server manager program
ftpd
ftp server daemon
goahead
Web server daemon
sshd
Secure shell server
openvpn
Virtual private network
openssl
Open SSL
syslogd
System log deamon
Table 3: JetBox 9300/9310 Linux daemons
Korenix | Software Specification
7
Linux Tool Chain
Description
Gcc (arm-linux V3.4.6)
C/C++ PC Cross Compiler
uClibc (V0.9.29)
POSIX standard C library
Table 4: JetBox 9300/9310 Linux tool Chain
Windows Tool Chain
Description
Gcc (arm-linux V3.4.6)
C/C++ PC Cross Compiler
uClibc (V0.9.29)
POSIX standard C library
Table 5: JetBox 9300/9310 Linux tool chain for windows OS
2-3
Linux SDK (software development kits)
JetBox SDK has all the required software and utilities for you to develop your own
applications. There are two folders in JetBox Linux SDK. One folder is for application
source code and the other one is for Linux tool chain.
2-3-1 Installing SDK
JetBox SDK must be installed on your host computer running Linux. We have
confirmed that Fedore Core 6 Linux distribution can be used to install the tool chain.
Using the command tar to uncompress the SDK archive jetbox_9300sdk-0.1.tgz at the
directory where you want to complete the installation.
2-3-2 Application source code (ap_src)
This folder is for your application source code storage. One sample code inside is for
your reference.
2-3-3 Linux tool chain (toolchain)
This folder contains a suite of cross compilers, other tools, and the libraries and
header files that are necessary to compile your application. These tool chain
components must be installed on your computer running Linux.
8
Software Specification | Korenix
Chapter 3 Getting Started
3-1
Power on JetBox
Connect the DC power line to the DC terminal block at the bottom of the JetBox
9300/9310 and turn on the power switch. If the power is properly supplied, the
power LEDs (P1, P2) on the front panel will show a solid green color.
The power supply of the JetBox 9300/ 9310 is 12 ~ 48V dual inputs and 48V only for
JetBox 9310 PoE function. Only the correct power inputs will make the PoE chipset
working normally, JetBox 9310 can modify the PoE function in web UI & CLI.
3-2
Connect JetBox to a PC
3-2-1 IP address
There are five Ethernet ports on the JetBox 9300/9310. The default settings are one
WAN port and four LAN ports. The default IP addresses are as follows:
Default IP Address
WAN
Assigned by DHCP server
LAN1~4
192.168.10.1
Subnet mask
255.255.255.0
Table 6 IP addresses of JetBox Ethernet ports
You should first modify your PC’s IP address and subnet mask so that your PC is on
the same subnet as the JetBox WAN or LAN ports. For example, if you connect to the
JetBox LAN ports, you can set your PC’s IP address to 192.168.10.2 and subnet mask
to 255.255.255.0.
3-2-2 Web User Interface
You can use Web Browser (for example, enter http://192.168.10.1 ) to connect to the
JetBox 9300/9310 console utility. To login, type the Login name and password as
required. The default values are both admin.
Login: admin
Password: admin
Korenix | Getting Started
9
3-2-3 Telnet Console
You can use Telnet (for example, telnet 192.168.10.1 in cmd mode in your PC) to
connect to the JetBox 9300/9310 console utility. To login, type the Login name and
password as required. The default values are both admin.
Login: admin
Password: admin
Notice 1: You can also use Telnet to connect to the JetBox 9300/9310 Linux
environment. To login, you need another Login name and password. Kindly contact
us for further inquiry. When you use the JetBox 9300/9310 Linux environment for
some system modifications, the settings of the JetBox 9300/9310 Web UI and CLI
might be changed and can’t be used to control the JetBox 9300/9310 anymore.
Chapter 4 Software Feature—Web User
Interface
JetBox Web management pages are developed by JAVA Script. Hence the JAVA virtual
machine must be pre-installed in your PC. You can use a standard web browser such
as Microsoft Internet Explorer or Mozilla Firefox to navigate the pages.
10
Software Feature—Web User Interface | Korenix
Snapshot 1: JetBox 9300/9310 Web UI login page
SW menu tree
Snapshot 2: The SW menu tree and the welcome page of the JetBox 9300/9310 Web UI.
After you make any changes of Web UI, press the Apply button to enable the setting,
please note that the setting will go back to default when the device is powered off.
If you want to save the changes you made, please go to the SW menu tree|Save
page, and press the Save to Flash button to keep the changes of system.
Korenix | Software Feature—Web User Interface
11
Snapshot 3: Save page of the JetBox 9300/9310 Web UI
If you want to change the user name and password of the JetBox 9300/9310, go to
the SW menu tree| Admin. Password to modify them.
Snapshot 4: Admin Password page of the JetBox 9300/9310 Web UI
Notice 2: JetBox 9300/9310 Web UI or CLI will time out if there is no activity for a
long period of time, you will need to reconnect to the JetBox 9300/9310 Web UI or
CLI.
Snapshot 5: Error Message: JetBox 9300/9310 Web UI time out
12
Software Feature—Web User Interface | Korenix
4-1
System
Both JetBox 9300 and JetBox 9310 use the same SW. The SW will detect the
difference of HW between JetBox 9300 and 9310, it will reflect the different SW
menu tree on the Web UI. PoE function of the JetBox 9310 will be displayed in the
SW menu tree only when the JetBox 9310 is correctly powered by a 48V power input,
otherwise, the system will show JetBox 9300 instead with no PoE function.
Snapshot 6: System page of JetBox 9300 Web UI
Snapshot 7: System page of JetBox 9310 Web UI
Korenix | Software Feature—Web User Interface
13
4-2
Device Configuration
4-2-1 Time Settings
4-2-1-1 NTP Server & Time Zone
Snapshot 8: Time setting page of JetBox 9300/9310 Web UI
4-2-1-1-1 Time Setting Source
You can choose Manual Settings or Settings by NTP server.
Manual Settings: You can input the time directly, or use the Get Time from PC
button to get the time from your PC connected to JetBox.
Snapshot 9: Time Setting Source: Manual Setting page of JetBox 9300/9310 Web UI
NTP servers: You can also input the IP addresses of your NTP server. JetBox provides
two NTP server address items.
14
Software Feature—Web User Interface | Korenix
Snapshot 10: Time Settings Source: NTP page of JetBox 9300/9310 Web UI
4-2-1-1-2 Time Zone Settings
Choose your Time Zone from the listed items.
4-2-1-1-3 Daylight Saving Time
Check the Daylight Saving Time and input the start and end date of Daylight Saving
Time if your Time Zone is in the Daylight Saving Time areas.
4-2-2 Basic Settings
4-2-2-1 Device Settings
You can input system name, system location, and system contact manually. The
maximum input is 127 characters of English or numbers without a space, for example,
112TaipeiTaiwan. Special character inputs, such as \ / ? ! % #, are allowed.
After your modifications, press the Apply button. The welcome page of the JetBox
9300/9310 Web UI shows the new settings, system name, system location, and
system contacts.
Korenix | Software Feature—Web User Interface
15
Go to The SW menu tree|Save and press the Save to Flash button to keep the
change of system.
Snapshot 11: Device settings page of the JetBox 9300/9310 Web UI
4-2-2-2 Admin Password
You can change the user name and password of the JetBox 9300/9310 here. Fill in the
same password in the fields of password and confirm password to double check. The
maximum inputs for name, password, and confirm password is 20 continuing
alphanumeric characters. Special character inputs, such as \ / ? ! % #, are allowed.
Snapshot 12: Admin Password page of the JetBox 9300/9310 Web UI
4-2-3 Warning
4-2-3-1 Event Selection
JetBox 9300/9310 provides a system warning function through email and SNMP trap.
Please set up the email address and SNMP trap first, and then choose the system
events you want to monitor here.
Refer to 4-2-3-3 SMTP Configuration for email address settings and 4-3-7-3 SNMP
Traps for SNMP trap settings.
16
Software Feature—Web User Interface | Korenix
Snapshot 13: System event selection page of the JetBox 9300/9310 Web UI
Following are the warning events and timing to be sent out as warning message.
System event
Device Cold Start: Power source cut off and then reconnect to the device
Device Warm Start: Reboot the device through Web UI or CLI.
Authentication Failure: An incorrect login password of JetBox 9300/9310 is entered.
Port events (Ethernet port or serial port)
Ethernet Link Status Change: The status of the Ethernet ports are changed, such as
Link up or link down. Link-up is if the Ethernet port is connected to another device
and link-down is if the Ethernet port is disconnected, e.g. the cable is pulled out or
the opposing device turns down.
DCD/DSR Status Change: The event reports changes in the status lines of serial ports
e.g. DCD (data carrier detect) or DSR (data set ready), when connection of
communication line is ready or communication errors occur (the serial signal is high
or low).
Korenix | Software Feature—Web User Interface
17
Snapshot 14: SNMP Trap receiver for event warnings
4-2-3-2 Syslog Configurations
System log is useful to provide system administrators locally or remotely monitor
JetBox 9300/9310 occurred events including the warning events that you selected in
the event selection page, Linux system events, and other application events (e.g.
serial server events). There are two system log modes provided by JetBox 9300/9310,
local mode and remote mode.
Snapshot 15: Syslog configuration page of the JetBox 9300/9310 Web UI
Disable: Do not enable syslog function in JetBox 9300/9310.
Local Mode: In this mode, JetBox 9300/9310 will print the occurred events to the
System Log table of JetBox 9300/9310. You can monitor the system logs in Main|
Warning|System Log| Show Event Logs page of the JetBox 9300/9310 CLI.
18
Software Feature—Web User Interface | Korenix
Snapshot 16: Show Event Logs page of the JetBox 9300/9310 CLI
Remote Mode: In this mode, you need to assign the IP address of the System Log
server. JetBox 9300/9310 will send the occurred events to the System Log server that
you assigned.
Snapshot 17: Syslog configuration—Remote mode page of JetBox 9300/9310 Web UI
Both: Local Mode and Remote Mode can be enabled at the same time.
4-2-3-3 SMTP Configurations
SMTP means Simple Mail Transfer Protocol. You can set up a SMTP server and a mail
account here to deliver the warning e-mails of the JetBox 9300/9310 based on the
events you select in the SW menu tree| Basic Setting| Warning| Event Selection.
JetBox 9300/9310 provides up to four recipient e-mail addresses.
JetBox 9300/9310 also provides the authentication mode for SMTP server setting. In
authentication mode, the user name and password of SMTP server is required. Fill in
the same password in password and confirm password to double check. The
Korenix | Software Feature—Web User Interface
19
maximum inputs for user name, password, and confirm password is 60 continuing
alphanumeric characters. Special character inputs, such as \ / ? ! % #, are allowed.
Snapshot 18: SMTP configurations page of JetBox 9300/9310 Web UI
Snapshot 19 E-mail warning message of the JetBox 9300/9310
4-3
Network Configuration
There are five Ethernet ports of JetBox 9300/9310. The default setting of Ethernet
ports in the JetBox 9300/9310 is one WAN port and four LAN ports. Advanced Linux
20
Software Feature—Web User Interface | Korenix
users can change the settings through JetBox 9300/9310 Linux environment to
provide the flexibility of adapting JetBox 9300/9310 to various networking
environments, such as using two WAN ports for two enterprises’ networks as
networking redundancy.
4-3-1 WAN Settings
WAN (Wide Area Network) Settings are settings that are used to connect to your ISP
(Internet Service Provider). The WAN settings are provided to you by your ISP. Please
select the appropriate option for your specific ISP and enter the DNS server
addresses if necessary.
WAN-Dynamic IP Address
Select this option if your ISP provides you with IP address automatically. Cable
modem providers typically use dynamic assignment of IP Addresses. In this mode,
the DNS server is often dynamically assigned by your ISP.
Snapshot 20: Internet Configuration—Dynamic IP page of the JetBox 9300/9310 Web UI
WAN-Static IP Addresses
If required by your ISP, select this option to configure the device with static IP
Address information. Enter the IP Address, Subnet Mask, Gateway address, and DNS
(Domain Name Server) addresses provided to you by your ISP. Each IP address
entered in the fields must be in the appropriate IP form, which are four IP octets
separated by a dot (x.x.x.x.). The device will not accept the IP address if it is not in
this format.
Snapshot 21: Internet Configuration—Static IP page of the JetBox 9300/9310 Web UI
Korenix | Software Feature—Web User Interface
21
WAN-PPPoE
Select this option if your ISP requires you to use a PPPoE (Point to Point protocol over
Ethernet) connection. DSL providers typically use this option. Enter your PPPoE user
name and password in PPPoE Configuration. If the connection can’t be made within
30 seconds (default setting in system), then it will cause a connection timeout.
Snapshot 22: Internet Configuration—PPPoE page of the JetBox 9300/9310 Web UI
DNS (Domain Name System): This is the name resolution protocol for TCP/IP
networks, such as the Internet. Client computers query a DNS server to resolve
memorable, alphanumeric DNS names to the IP addresses that computers use to
communicate with each other. If your ISP will assign the DNS server dynamically,
choose disable or choose enable and enter the static DNS addresses provided to you
by your ISP.
Snapshot 23: WAN settings—DNS server configuration of JetBox 9300/9310 Web UI
4-3-2 LAN Settings
This page allows users to configure the device IP address settings. The default IP
addresses of four LAN ports of the JetBox 9300/9310 is 192.168.10.1, the subnet
mask is 255.255.255.0. For Advanced Linux users, four LAN ports can be configured
as four separate subnets in the JetBox 9300/9310 Linux environment. Please go to
3-2-3 Telnet Console for view how to go to JetBox 9300/9310 Linux environment.
JetBox 9300/9310 provides either DHCP Client or DHCP Server for LAN ports.
DHCP Client: You can select to Enable or Disable the DHCP Client function. When
DHCP Client function is enabled, an IP address will be assigned to JetBox 9300/9310
from the network’s DHCP server. In this mode, the default IP address will therefore
be replaced by the one assigned by the DHCP server. If DHCP Client is disabled, then
22
Software Feature—Web User Interface | Korenix
the IP address that you specified will be used instead.
Snapshot 24 LAN settings| DHCP client page of JetBox 9300/9310 Web UI
DHCP Server: You can select to Enable or Disable DHCP Server function. When DHCP
server function is enabled, the JetBox 9300/9310 will assign the IP addresses
between the low and high IP addresses, and configuration parameters such as the
default subnet mask, the default gateway, the default DNS server, and the lease time
to the DHCP client devices connected to the JetBox 9300/9310.
Notice 3: When JetBox 9300/9310 works as a DHCP server to assign the IP
addresses to the DHCP client devices connected to JetBox 9300/9310, it will cause IP
address conflicts if there are any other devices connected to the JetBox 9300/9310
using static IP addresses that are within the same range. In this case, the same IP
address might be used twice.
Snapshot 25: LAN settings| DHCP server page of the JetBox 9300/9310 Web UI
Lease Time (s): A DHCP-enabled client obtains a lease for an IP address from a DHCP
server. Before the lease expires, the DHCP server must renew the lease for the client
or the client must obtain a new lease. The maximum lease time is 2147483647
seconds.
Korenix | Software Feature—Web User Interface
23
4-3-3 Leased Entries
When DHCP server is enabled, you can check the leased IP addresses here.
Snapshot 26: LAN settings| DHCP leased entries of the JetBox 9300/9310 Web UI
4-3-4 NAT Settings
Masquerade: This item is to enable (on) or disable (off) the NAT function.
JetBox 9300/9310 provides the NAT (Network Address Translation) function to map
the local inside network addresses to one or more global outside IP addresses and
unmap the global IP addresses on incoming packets back into local IP addresses. This
function is often part of firewall to ensure the security since each outgoing or
incoming request must go through a translation process.
If Masquerade is on, JetBox 9300/9310 maps the local inside network addresses of
one subnet to one global outside IP addresses and unmaps the global IP addresses on
incoming packets back into local IP addresses.
For advanced Linux users, JetBox 9300/9310 also provides the mapping of the local
inside network addresses of several subnets to one or more global outside IP
addresses in Linux environment. Please refer to the document “Advanced NAT
settings for JetBox 9300.”
Notice 4: The maximum bandwidth of the routing is limited at 2M.
Snapshot 27: NAT setting| Masquerade page of JetBox 9300/9310 Web UI
24
Software Feature—Web User Interface | Korenix
DMZ: This item is to enable (on) or disable (off) the DMZ (demilitarized zone) when
the masquerade item is on. Enter the IP address of the server to expose to the
outside world.
JetBox 9300/9310 provides NAT endpoint filtering as a firewall to protect the
customer’s network from the outside world. Any incoming traffic must match the IP
address of the outgoing connection when NAT endpoint filtering is enabled.
Sometimes, customers need to expose certain types of applications to the outside
world; therefore the JetBox 9300/9310 also provides DMZ host function. Customers
can place a computer in the DMZ to expose to the Internet and run the application
on that computer when DMZ host is enabled.
Snapshot 28: NAT setting| DMZ page of JetBox 9300/9310 Web UI
VPN Pass Through: This item is to enable (on) or disable (off) the VPN Pass Through
function when the masquerade item is on. You can specify which VPN protocol is on
or off.
VPN (Virtual Private Network) is to create encrypted “tunnels” though the Internet
and works as a cost-effective alternative to using a private, dedicated, leased line for
a private network. VPN is using industry standard encryption and authentication
technology, such as L2TP, PPTP, or IPsec VPN protocol.
VPN Pass Through is needed because the JetBox 9300/9310 is Network Address
Translation (NAT)-enabled and VPN protocols, such as L2TP, PPTP, or IPsec, don't have
a specific port number for the device to multiplex the port address translation back
to. This feature enables special processing of VPN protocol data packets and allows
the device to keep a table of active connected VPN tunnels.
VPN Protocol
PPTP (Point to Point Tunneling Protocol) extends the Point to Point Protocol (PPP)
standard for traditional dial-up networking. PPTP is a layer 2-based encryption
technology and is suited for the remote access applications of VPNs
L2TP (Layer Two Tunneling Protocol) L2TP is an extension of the PPTP commonly
used today.
IPSec (Short for IP Security) is a layer 3-based encryption technology and is faster
and more efficient than PPTP.
Korenix | Software Feature—Web User Interface
25
Snapshot 29: NAT setting| VPN Pass Through page of the JetBox 9300/9310 Web UI
4-3-5 VLAN
VLAN (Virtual Local Area Network) is for segmenting ports on an Ethernet switch into
logical groupings. Each logical grouping works as if it were a separate physical LAN.
JetBox 9300/9310 supports both 802.1Q tag VLAN and port based VLAN.
802.1Q tag VLAN
The IEEE 802.1Q specification establishes a standard method for inserting VLAN
membership information into Ethernet frames.
Any traffic without a VLAN tag entering the LAN ports of the JetBox 9300/9310 will
be inserted with a VLAN tag of the assigned PVID (Port VLAN ID) and then be
forwarded to the corresponding VLAN members. Any traffic with a VLAN tag can
enter any of the LAN ports of JetBox 9300/9310 and be forwarded to the
corresponding VLAN members directly. You can choose tagged, untagged, or
unmodified for the egress packet. In the JetBox 9300/9310, 1~8 VLANs can be
established in the web UI or CLI. For advanced Linux users, 1~4096 VLANs can be
established in the JetBox 9300/9310 Linux environment. The default setting is VLAN
disable.
Snapshot 30: VLAN setting (VLAN disable) of JetBox 9300/9310 Web UI
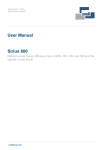
The following snapshot is a sample setting. A packet with VID 3 enters LAN port 4 (as
a VLAN trunk port) of the JetBox 9300/9310, it will keep the VID3 and be forwarded
to VLAN group 3 (LAN port3). For the egress packet of LAN port3, the VID 3 tag is
taken off when the packet exits the port.
26
Software Feature—Web User Interface | Korenix
VLAN group 3 (VID 3)
Snapshot 31: VLAN setting (802.1Q tag VLAN) of the JetBox 9300/9310 Web UI
Port
Unique identifier for the LAN ports of the JetBox 9300/9310
PVID (Port VLAN ID): Default 1, input from 1 to 8
This is the native VLAN assigned to this port. When the port receives an untagged
packet, an IEEE802.3ac VLAN tag is added to the packet using the port’s PVID. When
a port receives a tagged packet on an access port, the tag is kept with the packet. The
Default value is 1 and it could be set from 1 to 8. If the input value is not correct, the
system will pop out a warning message.
Snapshot 32: Error message: VLAN| Wrong PVID range (1~8)
VLAN members: VID from 1 to 8
Each port that’s connected to the VLAN must be assigned a VID. The LAN ports of the
JetBox 9300/9310 can be configured to include or exclude specific VLANs by this
matrix. This item defines the port that traffic could be forward to.
Egress Tagged/ Untagged
This item is a tag modification function. All egress packets will be modified by the
selected rule, such as tagged, untagged, or unmodified.
Tagged—the original tag is kept or the assigned PVID tag is added into the egress
packet.
Untagged—the original tag or the assigned PVID tag is removed from the egress
packet.
Unmodified—the egress packet keeps the original tagged or untagged status
without further modification.
Korenix | Software Feature—Web User Interface
27
Notice 5: A untagged packet that enters one of the JetBox 9300/9310 Ethernet
ports is inserted the PVID tag of that port and then the packet is forwarded to the
corresponding VLAN members, exits the port and still keeps the PVID tag if you
choose to un-modify for egress setting. If you want the egress packet without any
tags, you must choose untagged for egress setting.
Port based VLAN
Each LAN port of the JetBox 9300/9310 can be defined as an access port that is
statically assigned to the VLAN members of its PVID and the PVID of each LAN port of
the JetBox 9300/9310 is a user-configurable parameter from 1 to 8. For port based
VLAN, you need to choose untagged for the egress packet to remove the PVID tag
that the JetBox 9300/9310 added into the packet.
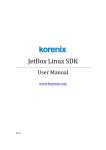
The following snapshot is a sample setting. An untagged packet enters the LAN port 4
and it’s given the VLAN tag of the PVID 2 and is forwarded to the VLAN members of
VID 2. The packet exits by LAN port 3 and the VLAN tag of the packet is removed by
the untagged egress setting.
VLAN group 2 (VID 2)
Snapshot 33: VLAN setting (port based VLAN) of JetBox 9300/9310 Web UI
4-3-6 Traffic Prioritization
In the past, the concept of quality in networks meant that all network traffic was
treated equally. The QoS (Quality of Service) concept means that some traffic needs
preferential treatment because the requirements of some applications and users are
more critical than others. In addition, QoS for networks is an industry-wide set of
standards and mechanisms for ensuring high-quality performance for critical
applications.
When QoS is enabled, packets are queued based on the port trust mode, which is
derived from the incoming port configurations, CoS queue mapping, or DSCP queue
mapping.
28
Software Feature—Web User Interface | Korenix
4-3-6-1 QoS Settings
Through this section, you can set up the priority level for port based CoS value,
incoming CoS (CoS-Queue Mapping), or incoming DSCP (DSCP-Queue Mapping) and
define the way to process all ingress packets by either the strict priority scheme or
the weighted fair queue according to the priority levels of port based, CoS only, DSCP
only, CoS first, or DSCP first. JetBox 9300/9310 supports 4 physical queues from 0 to
3.
Physical queue Priority
0
Low
1
Normal
2
Medium
3
High
Table 7: QoS setting| Physical queue of JetBox 9300/9310 Web UI
Snapshot 34: Traffic prioritization| QoS setting page of the JetBox 9300/9310 Web UI
Snapshot 35: QoS setting| Port setting| Priority page of the JetBox 9300/9310 Web UI
Korenix | Software Feature—Web User Interface
29
Snapshot 36: QoS setting| Port setting| Trust mode page of the JetBox 9300/9310 Web UI
Queue scheduling
Use an 8,4,2,1 weighted fair queuing scheme: This is also known as WRR (Weight
Round Robin). JetBox 9300/9310 follows the rate of 8:4:2:1 to process the packets
with the high, the medium, the low, and the normal priority in a queue. For example,
the system processes 8 packets with the high priority in the queue, 4 with medium
priority, and 2 with low priority and 1 with the normal priority at the same time.
Use a strict priority scheme: Packets with higher priority in the queue will always be
processed first, unless there is no packet with higher priority in a queue.
The default is using an 8,4,2,1 weighted fair queuing scheme.
Port setting
Priority: You can choose the QoS priority levels for each Ethernet port of JetBox
9300/9310 from 0 to 7.
Trust Mode
Trust Mode
Description
Port Based
Use the priority level of the port configuration
CoS Only
Use the priority level of CoS Queue Mapping only
DSCP Only
Use the priority level of DSCP Queue Mapping only
DSCP First
Use the priority level of both CoS and DSCP Queue Mapping, but
DSCP Queue Mapping first
CoS First
Use the priority level of both CoS and DSCP Queue Mapping, but
CoS Queue Mapping first
Table 8: QoS Setting| Trust mode page of JetBox 9300/9310 Web UI
30
Software Feature—Web User Interface | Korenix
Port Based: JetBox 9300/9310 will give all ingress packets the priority tag based on
the priority level (CoS Value) of the ingress port. The CoS value maps to physical
queue in the page of CoS Queue Mapping.
CoS (Class of Service): Layer 2 prioritization of packets is based on a CoS value.
CoS Value Traffic type
0
Best effort
1
Background
2
Standard
3
Excellent load
4
Controlled load
5
Voice and Video
6
Layer 3 network control reserved traffic
7
Layer 2 network control reserved traffic
Table 9 QoS priority level follows 802.1p
DSCP (Differentiated Services Code Point): Layer 3 prioritization of packets is based
on a DSCP value. A network could have from 0 to 64 different traffic classes using
different markings in the DSCP.
4-3-6-2 CoS-Queue Mapping
The default setting follows IEEE802.1p standard to map the CoS values to the physical
queues. You can modify the physical queue of each item here.
CoS Value Physical Queue
0
Normal
1
1
Low
0
2
Low
0
3
Normal
1
4
Medium
2
5
Medium
2
6
High
3
7
High
3
Table 10: The CoS values map to the physical queues
Korenix | Software Feature—Web User Interface
31
Snapshot 37: Traffic Prioritization| CoS-Queue Mapping page of the JetBox 9300/9310 Web UI
4-3-6-3 DSCP-Queue Mapping
The default setting follows IEEE802.1p standard to map the DSCP values to the
physical queues. You can modify the physical queue of each item here.
DSCP Value Physical Queue
0~15
Low
0
16~31
Normal
1
32~47
Medium
2
48~63
High
3
Table 11: The DSCP values map to the physical queues
Snapshot 38: Traffic prioritization| DSCP-Queue Mapping page of the JetBox 9300/9310 Web UI
32
Software Feature—Web User Interface | Korenix
4-3-7 SNMP
SNMP (Simple Network Management Protocol) is used in networking management
systems to monitor network-attached devices. JetBox 9300/9310 provides complete
SNMP v1, v2c, v3 protocol and MIBs (Management Information Bases). Customers
can use one or more systems to manage a number of devices through the JetBox
9300/9310 SNMP control.
SNMP basic components
SNMP component
Description
Managed device
A network node contains an SNMP
agent and resides on a managed
network. It collects and stores
management information for NMSs
using SNMP.
Agent
(SNMP server)
It is a network management software
module that resides in a managed
device. It translates the management
information of the local managed device
into a form compatible with SNMP.
Network management system (NMS)
(SNMP client)
It executes applications to monitor and
control managed devices.
Table 12: SNMP basic component
MIB (Management Information Base)
MIBs is a collection of information with organized hierarchy and be accessed by using
a network management protocol like SNMP. A MIB hierarchy can be illustrated as a
MIB tree. SNMP uses a subset of Abstract Syntax Notation One (ASN. 1) to adapt to
communication to various systems of managed devices. The SMI (Structure of
Management Information) use ASN.1 to define the rules for describing management
information.
A managed object is one of specific characteristics of a managed device. Two types
of managed objects are scalar object (a single object instance) and tabular object
(multiple related object instances grouped in a MIB table). An object identifier (OID)
identifies a managed object in the MIB tree uniquely. The top-level MIB OIDs are
defined by different standards organizations and lower-level OIDs are allocated by
companies.
Korenix | Software Feature—Web User Interface
33
RMON (Remote Monitoring) is a standard monitoring specification that enables
various network monitors and console systems to exchange network-monitoring data.
There are 2 versions of RMON: RMON1 (RMONv1)and RMON2 (RMONv2). RMON1
defined 10 MIB groups for basic network monitoring, which can now be found on
most modern network hardware. RMON2 is an extension of RMON1 that focuses on
higher layers of traffic above the MAC (medium access-control) layer.
SNMP version
SNMP V1 is the initial implementation of the SNMP protocol and focuses on
functions within the specification of SMI. The SNMP v1 SMI defines highly structured
MIB tables used to group the instances of a tabular object.
SNMP V2c (Community-Based SNMP) is an evolution of SNMP
v1 for the specification of the SMI and additional protocol operations.
SNMP V3 adds security and remote configuration enhancements to SNMP such as
message integrity, authentication, and encryption.
MIBs for JetBox 9300/9310 SNMP agent
Standard MIB
第 1 章 RFC1213-MIB
第 2 章 SNMPv2-MIB
第 3 章 IF-MIB
第 4 章 IP-MIB
第 5 章 Ethernet-MIB
第 6 章 EtherLike-MIB
第 7 章 RFC1271-MIB
第 8 章 RMON2-MIB
第 9 章 BRIDGE-MIB
第 10 章 Q-BRIDGE-MIB
第 11 章 HOST-RESOURCE-MIB
Private MIB
Basic setting
Ethernet configuration
PoE
Serial
DIO setting
SNMP
34
Software Feature—Web User Interface | Korenix
Security
Warning
Backup and restore
System update
System reboot
Factory default
Save
Notice 6: Before viewing the private MIB of JetBox 9300/9310, you need to
compile the private MIB files into your MIB browser.
4-3-7-1 SNMP V1/V2c Configuration
For SNMPV1 and V2c, the authentication of clients is performed only by a
community string, in effect a type of password.
You can define the community string and its corresponding privilege here. The
default setting is public for read only and private for read and write. JetBox
9300/9310 provides up to 4 community strings. The maximum input for community
strings is 32 continuing alphanumeric characters. Special character inputs, such as \
/ ? ! % #, are allowed.
Notice 7: Most SNMP management applications use public and private as default
community strings, so highly recommend you to change the community string for
better network security of SNMP v1 and v2c.
Snapshot 39 SNMP| SNMP V1/V2c configuration page of JetBox 9300/9310 Web UI
4-3-7-2 SNMP V3 Profile
JetBox 9300/9310 supports user based security mode of SNMP V3 including
authentication, privacy, and access lists. You can configure the privacy (DES
encryption password), authentication (MD5 or SHA) and access control list (user
Korenix | Software Feature—Web User Interface
35
name, security level, authentication level, and authentication password) here.
The maximum input for user name is 32 continuing alphanumeric characters. Special
character inputs, such as \ / ? ! % #, are allowed.
The input for authentication password is 8~20 continuing alphanumeric characters.
Special character inputs, such as \ / ? ! % #, are allowed.
The input for DES encryption password is 8~16 continuing alphanumeric characters.
Special character inputs, such as \ / ? ! % #, are allowed.
If the authentication or DES encryption password value is less than 8 characters, the
system will pop out a warning message.
Snapshot 40: Error message: Password should be longer than 8 characters
36
Software Feature—Web User Interface | Korenix
Snapshot 41: SNMP| SNMP V3 profile page of JetBox 9300/9310 Web UI
Security Level
Security level
Description
None
No password or encryption for access
Authentication
An authentication password is required
for access
Authentication and privacy
An authentication password and an DES
encryption password is required for
access
Table 13: SNMP V3| Security level of the JetBox 9300/9310
MD5 (Message Digest algorithm 5) is a widely used cryptography with a 128-bit
resulting has value.
SHA (Secure Hash Algorithm) is for computing a condensed representation (known
as the message digest) of electronic data (the message).
DES (Data Encryption Standard) is a standard encryption mechanism to authenticate
both users and systems in the network by the DES and public key cryptography.
Korenix | Software Feature—Web User Interface
37
4-3-7-3 SNMP Traps
A SNMP Trap is used to report an alert or other asynchronous event about a
managed subsystem.
In SNMP V1, asynchronous event reports are called traps and traps are defied using
the TRAP-TYPE macro.
In SNMP V2c, asynchronous event reports are called notifications and traps are
defined using the NOTIFICATION-TYPE macro.
SNMP trap is disabled as default. You can enable SNMP trap here and enter SNMP
server IP address, enter community and choose SNMP version (V1 or V2c).
Snapshot 42 SNMP| SNMP traps page of JetBox 9300/9310 Web UI
4-3-8 Security
JetBox 9300/9310 provides an access denied list based on IP addresses for specific
connection policy.
4-3-8-1 IP Access Blocking
IP access blocking is disabled by default. You can enable it here. Enter the blocking IP
address you want to add into blocking IP list and press [add]. Up to 50 IP addresses
can be added into the blocking IP list. If you want to remove any IP addresses of the
blocking IP list, choose the one you want to remove, press [remove].
Press [reload] to check the latest status of blocking IP list.
38
Software Feature—Web User Interface | Korenix
Snapshot 43: Security| IP access blocking page of the JetBox 9300/9310 Web UI
4-3-9 Switch Port Configuration
JetBox 9300/9310 provides five 10/100 based Tx Ethernet ports. You can configure
related port setting through this page.
4-3-9-1 Port Control
You can configure the state, the speed/duplex, and the flow control of each Ethernet
port of JetBox 9300/9310 through this page and check the updated status in the port
status page.
State: The state of each Ethernet port is enabled as default. If you disable the port,
the port stops linking to the other end and stops forwarding any traffic.
Korenix | Software Feature—Web User Interface
39
Snapshot 44 Switch port configuration| Port control| State page of JetBox 9300/9310 Web UI
Speed/Duplex: You can configure the port speed and the duplex mode of each
Ethernet port of the JetBox 9300/9310. Auto-Negotiation is set by default. You can
modified this in the listed items.
Speed/Duplex
Speed
Duplex
Auto Negotiation
Auto Negotiation
Auto Negotiation
10 Full
10M
Full
10 Half
10M
Half
100 Full
100M
Full
100 Half
100M
Half
Table 14: Port control| Speed/Duplex of JetBox 9300/9310
Snapshot 45: Switch port configuration| Port control| Speed/Duplex page of JetBox 9300/9310 Web UI
Flow control: JetBox 9300/9310 supports IEEE802.3x flow control in full duplex mode
and back pressure in half duplex mode. Flow control is disabled as default. Choose
symmetric to enable both flow control in full duplex mode and back pressure in half
duplex mode.
IEEE802.3x flow control reduces network congestion on ports that are operating in
full duplex mode using MAC Control PAUSE frames. When symmetric flow control is
enabled, MAC transmitter sends flow control frames and MAC receiver interprets and
processes incoming flow control frames.
40
Software Feature—Web User Interface | Korenix
Back Pressure in half duplex mode: When back pressure is enabled and no buffers
are available to a port, the switch sends collision frames across the affected port and
causes the transmitting station to resend the packets.
Snapshot 46: Switch port configuration| Port control| flow control page of the JetBox 9300/9310 Web
UI
4-3-9-2 Port Status
You can check the settings (state, speed/duplex, flow control) of each Ethernet port
and the link status and type here.
The Link and type item list
Type
Link
Description
100BASE
Down
No connection
100BASE-TX
Up
Fast Ethernet
10BASE-T
UP
Ethernet
Table 15 Port status| Link and type of JetBox 9300/9310
Snapshot 47: Switch port configuration| Port status page of the JetBox 9300/9310 Web UI
4-3-9-3 Port Statistics
You can check the statistic data for received (Rx) and transmitted (Tx) packets of each
Ethernet port.
Korenix | Software Feature—Web User Interface
41
Press [Reload] to update the statistic data. Normally, the system updates the statistic
data once every 30 seconds automatically.
Press [Clear all] to clean all the statistic data.
Snapshot 48: Switch port configuration| Port statistics page of the JetBox 9300/9310 Web UI
Notice 8: If bad packets count is increased, it means the network cable is not
connected correctly or the network performance of the port is poor…etc. Please
cross check your network environment.
4-4
Serial Port Configuration
JetBox 9300/9310 also provides perfect solution to manage serial devices via
Ethernet in flexible ways, such as TCP server, TCP client, UDP, or Windows virtual
COM. JetBox 9300/9310 creates a transparent gateway for the serial communication
to Ethernet. If the control program uses network standard API, you can choose TCP
or UDP as the communication protocol. If the control program uses COM port, you
can install the Windows driver to add virtual COM ports.
Refer to JetBox Virtual COM Commander User Manual for details.
4-4-1 Serial Settings
You can configure the settings of the serial ports here.
Port and interface list
Port
RS232
COM1
Full
42
RS422
Software Feature—Web User Interface | Korenix
RS485
(2 wires)
RS485
(4 wires)
COM2
Half
COM3
Half
COM4
Half
Table 16: Serial setting| port and interface of JetBox 9300/9310
Baud Rate: The data rate in bits per second. And the port speed and device speed
must match.
300
bps (bits per second)
1200
bps
2400
bps
4800
bps
9600
bps
19200
bps
38400 bps
57600
bps
115200 bps
230400 bps
460800 bps
Data Bits: The number of data bits in each character
5 (for Baudot code)
6 (rarely used)
7 (for true ASCII)
8 (for any kind of data, as this matches the size of a byte)
Stop Bits: Stop bits sent at the end of every character. The receiving device detects
the end of a character and to resynchronize with the character stream.
1
2(1.5)
Parity: This is a method that sends an extra bit with each data character for detecting
some errors in transmission.
None no parity bit is sent
Even: The number of each character, including the parity bit, is always even.
Odd: The number of each character, including the parity bit, is always odd.
Mark: The parity bit is always set to the mark signal condition
Space: The parity bit is always set to the space signal condition
Flow Control: The interface to pause and resume the transmission of data.
None
Korenix | Software Feature—Web User Interface
43
Hardware: Use hardware handshake signals for flow control.
Xon/Xoff: The Xon/Xoff characters are sent by the receiver to the sender for
flow control.
Snapshot 49: Serial port configuration| Serial setting page of JetBox 9300/9310 Web UI
Notice 9: Please reconnect all the attached serial devices to the JetBox 9300/9310
once you change the setting of any serial ports of JetBox 9300/9310, especially under
TCP server or VCOM mode of JetBox 9300/9310 serial ports.
4-4-2 Service Mode
You can change Service Mode here. JetBox provides the communication over
Ethernet to serial devices by using TCP/IP or UDP/IP.
Snapshot 50: Serial port configuration| Service mode page of the JetBox 9300/9310 Web UI
44
Software Feature—Web User Interface | Korenix
Notice 10: TCP server and client modes do not support RFC2217, so the hardware
flow control cannot work properly.
Server Port or Listen Port
The TCP/UDP port defines a communication port number. In all modes of operating
VCOM, TCP server, TCP client, and UDP, both the TCP/UDP client and server port
settings must match. The default setting is
Port1: 62001
Port2: 62002
Port3: 62003
Port4: 62004
Idle Timeout
This item can be set to any value between 0~99 minutes. The default setting is 0
minutes. If communications are idle for a specified timeout value, JetBox will reset
and make itself available for another connection.
Delimiter (Hex 0~ff) 1 & 2
These two items allow you to enter two ASCII characters in hex format that delimit
the end of a message. When a message with both these delimiters is received at the
serial port, the data contained in the serial buffer is placed in an Ethernet packet and
set out the Ethernet port. The serial buffer is 1024 Byte.
TCP Alive Check Time
This item can be set to any value between 0 and 99 seconds. The default setting is 7
seconds. The server will monitor the TCP activity and reconnect if the server is
disconnected for the length of time specified in this item.
Max Connection
This item provides users up to 4 TCP connections.
4-4-2-1 VCOM Mode
Running JetBox Virtual COM Commander adds a COM port in the Device Manager of
the operating system. This will provide traditional PC COM ports access to a serial
Korenix | Software Feature—Web User Interface
45
device anywhere on the LAN network. In this mode, JetBox acts as either TCP server
with a designated communication port number. The Virtual COM driver is a TCP
client.
Snapshot 51: Serial port configuration| Service mode| VCOM mode of JetBox 9300/9310 Web UI
4-4-2-2 TCP Server Mode
This mode is using TCP/IP network socket programs to communicate with the
asynchronous serial port on JetBox. In this mode JetBox is configured to TCP server
and the socket program running on the PC establishes a communication connection
with JetBox. The raw data is sent directly to and from the serial port.
Snapshot 52: Serial port configuration| Service mode| TCP server mode of JetBox 9300/9310 Web UI
4-4-2-3 TCP Client Mode
JetBox also can be configured as a TCP client. In this mode, JetBox builds up TCP
connections to remote hosts and the hosts can receive and transmit data to and from
the JetBox. TCP Client mode supports up to 4 simultaneous connections, allowing
multiple hosts to communicate with the same serial device, at the same time.
46
Software Feature—Web User Interface | Korenix
Snapshot 53: Serial port configuration| Service mode| TCP client mode of the JetBox 9300/9310 Web
Ui
4-4-2-4 UDP Mode
UDP provides faster transmission whereas TCP guarantees reliable communication
with error checking. If the application does not require a UDP connection, selecting
TCP is safer. In UDP mode JetBox can be configured to broadcast data to and receive
data from multiple IP addresses. Four IP addresses are provided.
Snapshot 54: Serial port configuration| Service mode| UDP mode of JetBox 9300/9310 Web UI
4-4-2-5 Paired Mode
Any two dumb serial devices that can communicate with each other through a serial
link will be able to communicate using two JetBoxes through LAN. Two JetBoxes are
configured with, one setup as a TCP client, and the other to TCP server. When setting
Korenix | Software Feature—Web User Interface
47
up the Client, the remote IP address section must contain the address of the Server.
4-5
DIO Configuration
JetBox 9300/9310 use GPIO (General Purpose Input/Output) of CPU to provide four
digital inputs and four digital outputs for device control.
The values of each digital input are low (0 volt) and high (2~5 volts). Maximum input
current is 500 mA at 6.5 Voltage.
Notice 11: Over voltage or over current for digital input will damage JetBox.
The values of each digital output are low (0 volt) and high (2.5 ~ 3.3 volts).
Notice 12: Improper operation of DO might damage the opposite devices.
4-5-1 Digital Output Control
You can enable the DO as a high value, disable the DO as value low, or enable the DO
based on scheduled time slots. Check the latest status of DO in DIO status page.
Snapshot 55: DIO configuration| Digital output control of the JetBox 9300/9310 Web UI
Notice 13 When JetBox 9300/9310 boots up, the status of Digital Outputs is set
on High temporarily. It might cause attached devices status abnormal temporarily.
After the system is ready, the status is back to the setting you made.
4-5-2 Digital Output Schedule
JetBox 9300/9310 also provides the flexibility on scheduled digital output control.
You can set a time table to enable the digital outputs by clicking the time slot fields.
48
Software Feature—Web User Interface | Korenix
Snapshot 56: DIO configuration| Digital output control of the JetBox 9300 Web UI
4-5-3 DIO Status
You can check the latest DIO status here. Press [reload] to update the DIO status.
Generally, the system updates the DIO status once every 30 seconds automatically.
Snapshot 57: DIO configuration| DIO status of the JetBox 9300/9310 Web UI
4-6
Power over Ethernet (JetBox 9310
Supported)
Power over Ethernet is a useful technology for powering devices where it would be
inconvenient, expensive or infeasible to supply power separately. JetBox 9310 refers
to IEEE802.3af standard as a PSE (Power Sourcing Equipment) to provide 48 volts DC
over two of the four available pairs on a Cat 3/Cat 5e/Cat 6 cables with a maximum
Korenix | Software Feature—Web User Interface
49
current of 400 mA and a maximum load power of 15.4W.
The IEEE802.3af standard describes two types of devices: PSE (Power Sourcing
Equipment) and PD (Powered Devices). PSE provides power to the PDs.
PD classification: detection, class ID 0~3 follow IEEE802.3af standard
PIN assignment (RJ45 connector): V+ (Pin 4,5), V- (Pin 7,8), Tx (Pin 1,2), Rx (Pin 3,6)
You can refer to Korenix’s “Power Over Ethernet” White paper for PoE introduction.
4-6-1 PoE Control
For each PoE port, you can enable, disable, or enable based on scheduled time slots.
Check the latest status of DO in DIO status page.
Notice 14: When the PoE ports are enabled, they power devices based on correct
PoE connections and conditions. When PoE ports are enabled and power devices, the
PoE indicators in the front panel of the JetBox 9310 will show a solid green color and
the status in the PoE status page shows on.
Snapshot 58: Power over Ethernet| PoE control of JetBox 9310 Web UI
4-6-2 PoE Schedule
JetBox 9300/9310 also provides the flexibility on scheduled PoE control. You can set a
time table to enable the PoE ports by clicking the time slot fields.
50
Software Feature—Web User Interface | Korenix
Snapshot 59: Power over Ethernet| PoE schedule of JetBox 9310 Web UI
4-6-3 PoE Status
You can check the latest status for PoE ports.
PoE Mode: disable, enable, schedule
Status: When PoE ports are enabled, the status is on if the PoE ports power devices
or the status is off if the PoE ports do not power any devices.
Consumption(W): The PoE port provides to a PD, between 0 and 15.4W
Voltage(V): The PoE port provides to a PD, between 44V and 48V
Current(mA): The PoE port provides to a PD, between 0 and 425mA
Press [Reload] to get the latest PoE status. Generally, the system updates the PoE
status once every 30 seconds automatically.
Korenix | Software Feature—Web User Interface
51
Snapshot 60: Power over Ethernet| PoE status of JetBox 9310 Web UI
4-7
Backup and Restore
You can back up the configuration of the Web UI into the system flash, SD card or
USB storage and also restore the backup file into the JetBox 9300/9310 when the
JetBox 9300/9310 need to go back to a previous configuration.
For both JetBox 9300 and 9310, The backup file in the SD card or USB storage is
named as jb9300.cnf and it’s located under the root directory.
Snapshot 61: Backup and restore| backup configuration of the JetBox 9300/9310 Web UI
Snapshot 62: Backup and restore| Restore configuration of the JetBox 9300/9310 Web UI
4-8
Firmware Upgrade
There are three ways to upgrade the JetBox 9300/9310 firmware, through TFTP
server, through a SD card, or through a USB flash storage.
52
Software Feature—Web User Interface | Korenix
Snapshot 63: Firmware upgrade page of JetBox 9300/9310
Firmware File name: Both JetBox 9300 and 9310 use the same system file, so the
firmware file name is 9310-vBB.bin. “vBB” means SW version. For example,
jb9310-v12.bin means v1.2 SW of JetBox 9300 and 9310.
Notice 15: When you upgrade the JetBox 9300/9310 firmware, it takes a few
minutes depending on the file size. After the firmware upgrade is finished, JetBox
9300/9310 will restart automatically. Do not turn off the JetBox 9300/9310 and its
web UI during firmware upgrading; otherwise it will cause an abnormal situation.
Snapshot 64: Reminder message for firmware upgrade in the JetBox 9300/9310 Web UI
Snapshot 65: Warning message of upgrading firmware in the JetBox 9300/9310 Web UI
Korenix | Software Feature—Web User Interface
53
Snapshot 66: Firmware upgrading message of the JetBox 9300/9310 Web UI
Snapshot 67: Success message of firmware upgrade in JetBox 9300/9310 Web UI
If you want to upgrade the firmware through TFTP server, put the firmware file in
your TFTP server, enter the firmware file name and the TFTP server IP, and then press
[Upgrade].
Snapshot 68: Firmware upgrade| TFTP server of JetBox 9300/9310 Web UI
If you want to upgrade firmware through a SD card or a USB flash storage, put the
firmware file under the root directory of the SD card or the USB flash storage, insert
the SD card or the USB storage into the JetBox 9300/9310, enter the firmware file
name in the JetBox 9300/9310 Web UI, and press [Upgrade].
54
Software Feature—Web User Interface | Korenix
Notice 16: When you upgrade the JetBox 9300/9310 firmware through a SD card
or an USB storage, the system will mount the SD card or the USB storage into the
JetBox 9300/9310, execute the firmware upgrade, and then unmount the SD card or
the USB storage.
Notice 17: You need to go to the JetBox 9300/9310 Linux environment for other
SD card or USB storage usage. In the Web UI or CLI, the SD card or the USB storage
function is to upgrade firmware only.
Snapshot 69: Firmware upgrade| USB storage of JetBox 9300/9310
4-9
Factory Default
You can reset the JetBox 9300/9310 back to factory default. Press [Reset] to reset all
configurations back to the factory default. After reset, you need to restart the JetBox
9300/9310 to make the factory default configuration effective.
Notice 18: You can also use the reset button in the JetBox 9300/9310 front panel
to reset the system. Hold the button for 3 seconds on the reset button to go back to
the last configuration. Hold the button for 7 seconds on the reset button to go back
to the factory default configuration.
Snapshot 70: Factory default page of the JetBox 9300/9310 Web UI
Korenix | Software Feature—Web User Interface
55
Snapshot 71: Reminding message for resetting to factory default in the JetBox 9300/9310 Web UI
Snapshot 72: Success message for resetting to factory default in the JetBox 9300/9310
4-10 System Reboot
Press [Reboot] to restart JetBox 9300/9310.
Snapshot 73: System Reboot page of JetBox 9300/9310 Web UI
4-11 Save
Press [Save to Flash] to save current configuration into the system flash. After the
current configuration is saved, a success message pops out.
56
Software Feature—Web User Interface | Korenix
Snapshot 74: Save to Flash page of JetBox 9300/9310 Web UI
Snapshot 75: Success message of saving configuration to flash in the JetBox 9300/9310 Web UI
4-12 Logout
Click the logout item of the JetBox 9300/9310 SW menu tree, a reminder message
pops out, press [yes] in the reminder message to log out of the JetBox 9300/9310
Web UI.
Snapshot 76: SW menu tree| Logout of the JetBox 9300/9310 Web UI
Korenix | Software Feature—Web User Interface
57
Snapshot 77: Reminder message for logout in JetBox 9300/9310 Web UI
Chapter 5 Software Features—Command
Line Interface
You can have an overview of CLI architecture through the menu tree and refer the
function description of the Web UI for CLI manipulation.
5-1
CLI menu tree
basic Setting
Device Setting
System information
DeviceName
DeviceLocation
DeviceContact
admin Password
User Name
Password
System Time
Local Time
NTP Server
NTP Server IP1
NTP Server IP2
Enable
Disable
Status
Time Zone
Daylight Saving Status
58
Software Features—Command Line Interface | Korenix
Enable Daylight Saving
Disable Daylight Saving
Daylight Saving Status
EthernetConfiguration
WAN IP Configuration
Static IP
Address
Mask
Gateway
DNS1
DNS2
Status
PPPoE
User Name
Password
DHCP Client
IP Mode Status
LAN IP Configuration
DHCP Client
Static IP
Address
Mask
Gateway
Status
IP Mode Status
NAT setting
Masquerade
On
Off
DMZ
On
Off
PPTP
On
Off
L2TP
On
Off
Korenix | Software Features—Command Line Interface
59
IPSEC
On
Off
Status
DHCP Server
Status
Low IP Addr
High IP Addr
Mask
Gateway
DNS
Lease Time
Enable
Disable
Dump Lease
SwitchPortConfiguration
Port Control
WAN Port
Port 1
Port 2
Port 3
Port 4
Port Status
Off
ON
Speed
10M
100M
Duplex
Half
Full
Flow Control
Disable
Symmetric
Status
Auto Negotiation
ON
Off
60
Software Features—Command Line Interface | Korenix
portStatus
WAN Port
Port 1
Port 2
Port 3
Port 4
Type
Link
State
Speed
Duplex
FlowCtrl
Port Statistic
WAN Port
Port 1
Port 2
Port 3
Port 4
Show Counter
Reset Counter
VLAN
WAN Port
Port 1
Port 2
Port 3
Port 4
Status
PVID
Tag
Unmodified
Untag
Tag
Member
Traffic Prioritization
QoS Policy
Queue Scheduling
Weighted
Strict
Korenix | Software Features—Command Line Interface
61
WAN Port
Port 1
Port 2
Port 3
Port 4
Priority
Trust Mode
Port Based
CoS Only
DSCP Only
DSCP First
CoS First
QoS CoS
Queue ID and CoS ID
QoS DSCP
Queue ID and CoS ID
Status
PoE
Port 1
Port 2
Port 3
Port 4
PoE Control
ON
OFF
Schedule
Status
PoE Schedule
EnableHourOnSunday
EnableHourOnMonday
EnableHourOnTuesday
EnableHourOnWednesday
EnableHourOnThursday
EnableHourOnFriday
EnableHourOnSaturday
Status
PoE Status
Serial
62
Software Features—Command Line Interface | Korenix
Serial Setting
Port 1
Port 2
Port 3
Port 4
Baud Rate
300
1200
2400
4800
9600
19200
38400
57600
115200
230400
460800
Data Bits
5
6
7
8
Stop Bits
1
2
Parity
None
Odd
Even
Mark
Space
Flow Control
None
Hardware
Xon Xoff
Status
Apply
Service Mode
Korenix | Software Features—Command Line Interface
63
Port 1
Port 2
Port 3
Port 4
Virtual COM Mode
Server Port
Max Connection
Status
TCP Server Mode
Server Port
Max Connection
Idle Timeout
Status
TCP Client Mode
Destination host1
Destination host2
Destination host3
Destination host4
IP String
Port String
Idle Timeout
Status
UCP Mode
Listen
Host IP1
Host IP2
Host IP3
Host IP4
Start IP
End IP
Send Port
Status
Delimiter
Pattern 1
Pattern 2
Delimiter 1 ON
Delimiter 2 OFF
Delimiter 1 ON
64
Software Features—Command Line Interface | Korenix
Delimiter 2 OFF
Status
TCP Alive Check Timeout
Configure
Status
DIO Setting
DIO Status
DO Configure
Port 0
Port 1
Port 2
Port 3
DO Schedule
EnableHourOnSunday
EnableHourOnMonday
EnableHourOnTuesday
EnableHourOnWednesday
EnableHourOnThursday
EnableHourOnFriday
EnableHourOnSaturday
Status
Activity
Force ON
Force OFF
Scheduling
Status
SNMP
SNMP V2c Communication
Community 1
Community 2
Community 3
Community 4
Community String
Privilege
Read Only
Read Write
Status
SNMP V3 User
Korenix | Software Features—Command Line Interface
65
User Add
User Delete
Status
SNMP Trap Server
IP Address
Communication
Version
Version 1
Version 2c
Status
Enable
Disable
Security
IP Access Blocking Status
Add Blocking IP
Remove Blocking IP
Enable IP Blocking
Disable IP Blocking
Warning
Event Selection
Cold Start
Warm Start
Ethernet Link Status Change
DCD/DSR Status Change
Authentication Failure
Status
SMTP Configuration
Server IP Address
Mail Account
Authentication
Enable
Disable
User Name
Password
Receive mail Address 1
Receive mail Address 2
Receive mail Address 3
Receive mail Address 4Status
66
Software Features—Command Line Interface | Korenix
Enable
Disable
System Log
Configuration
Syslog Mode
Disable
Local Only
Remote Only
Local and Remote
Remote Server Address
Status
Show Event logs
Backup and Restore
Backup to
System
SD card
USB Storage
Restore from
System
SD card
USB Storage
Autorun Update
System Upgrade
Local File Mode
Update Location
SD card
USB
UpdateFileName
UpdateStatus
TFTP Server Mode
Fireware File Name
TFTP server IP
SD card
USB Storage
systemReboot
factoryDefault
save
Korenix | Software Features—Command Line Interface
67
5-2
Difference between Web UI & CLI
In order to keep a user friendly manipulation in the JetBox 9300/9310 Web UI, some
functions could only be operated in CLI.
5-2-1 Port statistics: more counters are
supported in CLI
Snapshot 78: Port statistics of the JetBox 9300/9310 CLI
68
Software Features—Command Line Interface | Korenix
5-2-2 Syslog display: Only CLI has syslog display
item.
Snapshot 79: Syslog display of JetBox 9300/9310 CLI
5-2-3 Autorun.sh update
After SW1.3 release, the JetBox provides the autorun function and the autorun.sh file
can be updated through TFTP server.
Korenix | Software Features—Command Line Interface
69
Snapshot 80: Autorun.sh update of JetBox 9300/9310 CLI
Notice 19: Please refer to autorun user manual for autorun function details.
Chapter 6 SNMP MIB
JetBox 9300/9310 provides the SNMP private MIB in the enclosed CD in the package.
Before viewing the private MIB of the JetBox 9300/9310, you need to compile the
private MIB files into your MIB browser.
Refer to 4-3-7 SNMP for more description.
Following is a partial description of the JetBox 9300/9310 private MIB.
=================================================================
JetBox9300 DEFINITIONS ::= BEGIN
IMPORTS
internet
FROM
RFC1155-SMI
RowStatus, DisplayString, MacAddress, TimeInterval FROM SNMPv2-TC
70
SNMP MIB | Korenix
;
private
OBJECT IDENTIFIER ::= { internet 4 }
enterprises
OBJECT IDENTIFIER ::= { private 1 }
korenix
OBJECT IDENTIFIER ::= { enterprises 24062 }
products
OBJECT IDENTIFIER ::= { korenix 2 }
jetBox
OBJECT IDENTIFIER ::= { products 8 }
jetbox9300/jetbox9310
OBJECT IDENTIFIER ::= { jetBox 1 }
-- -----------------------------------------------------------------------------
contact MODULE-IDENTITY
LAST-UPDATED "0802200000Z"
ORGANIZATION "Korenix Technology, Inc."
CONTACT-INFO "korenix Technology, Inc.
F8-1, No. 98, Ming-Chuan Rd., Shing Tien City, Taipei, Taiwan
Tel:+886-2-82193000 Fax:+886-2-82193300
Business service : [email protected]
Customer service: [email protected]"
DESCRIPTION "The MIB module for Korenix JetBox9300/JetBox9310"
REVISION
"0802200000Z"
DESCRIPTION "version 1.2"
::= { korenix 1 }
basicSetting
OBJECT IDENTIFIER ::= { jetbox9300/jetbox9310 1 }
ethernetConfiguration OBJECT IDENTIFIER ::= { jetbox9300/jetbox9310 2 }
poe
OBJECT IDENTIFIER ::= { jetbox9300/jetbox9310 3 }
serial
OBJECT IDENTIFIER ::= { jetbox9300/jetbox9310 4 }
dioSetting
OBJECT IDENTIFIER ::= { jetbox9300/jetbox9310 5 }
snmp
OBJECT IDENTIFIER ::= { jetbox9300/jetbox9310 6 }
security
OBJECT IDENTIFIER ::= { jetbox9300/jetbox9310 7 }
warning
OBJECT IDENTIFIER ::= { jetbox9300/jetbox9310 8 }
backupAndRestore
OBJECT IDENTIFIER ::= { jetbox9300/jetbox9310 9 }
systemUpdate
OBJECT IDENTIFIER ::= { jetbox9300/jetbox9310 10 }
systemReboot
OBJECT IDENTIFIER ::= { jetbox9300/jetbox9310 11 }
factoryDefault
OBJECT IDENTIFIER ::= { jetbox9300/jetbox9310 12 }
save
OBJECT IDENTIFIER ::= { jetbox9300/jetbox9310 13 }
Korenix | SNMP MIB
71
-- ------------------------------------------------------------------------------ BasicSetting
-- ----------------------------------------------------------------------------deviceSetting
adminPassword
systemTime
OBJECT IDENTIFIER ::= { basicSetting 1 }
OBJECT IDENTIFIER ::= { basicSetting 2 }
OBJECT IDENTIFIER ::= { basicSetting 3 }
-- ------------------------------------------------------------------------------ deviceSetting
-- ----------------------------------------------------------------------------deviceSettingDeviceName OBJECT-TYPE
SYNTAX
DisplayString (SIZE (1..256))
ACCESS
read-write
STATUS
current
DESCRIPTION "An administratively-assigned name for this managed node. By
convention, this is the node's fully-qualified domain name."
::= { deviceSetting 1 }
deviceSettingDeivceContact OBJECT-TYPE
SYNTAX
DisplayString (SIZE (1..256))
ACCESS
read-write
STATUS
current
DESCRIPTION "The textual identification of the contact person for this
managed node, together with information on how to contact
this person."
::= { deviceSetting 2 }
deviceSettingFirmwareVersion OBJECT-TYPE
SYNTAX
DisplayString (SIZE (1..256))
ACCESS
read-only
STATUS
current
DESCRIPTION "Firmware version of the device."
::= { deviceSetting 3 }
deviceSettingMacAddress OBJECT-TYPE
SYNTAX
DisplayString (SIZE (1..256))
72
SNMP MIB | Korenix
ACCESS
read-only
STATUS
current
DESCRIPTION "The MAC address of this device. An Media Access Control
address (MAC address) is a unique identifier attached to
most network adapters (NICs). It is a number that acts
like a name for a particular network adapter"
::= { deviceSetting 4 }
deviceSettingDescription OBJECT-TYPE
SYNTAX
DisplayString (SIZE (1..256))
ACCESS
read-only
STATUS
current
DESCRIPTION "A textual description of the entity. This value should
include the full name and version identification of the
system's hardware type, software operating-system, and
networking software. It is mandatory that this only contain
printable ASCII characters."
::= { deviceSetting 5 }
deviceSettingLocation OBJECT-TYPE
SYNTAX
DisplayString (SIZE (1..256))
ACCESS
read-write
STATUS
current
DESCRIPTION "The physical location of this node (e.g., telephone closet,
3rd floor')."
::= { deviceSetting 6 }
deviceSettingOID OBJECT-TYPE
SYNTAX
DisplayString (SIZE (1..256))
ACCESS
read-only
STATUS
current
DESCRIPTION ""
::= { deviceSetting 7 }
Korenix | SNMP MIB
73
Chapter 7 Appendix
7-1
Index for Tables, Snapshots, and Notices
Table Index
Table 1: JetBox 9300/9310 Linux system ..................................................... 7
Table 2: JetBox 9300/9310 Linux utility ....................................................... 7
Table 3: JetBox 9300/9310 Linux daemons ................................................. 7
Table 4: JetBox 9300/9310 Linux tool Chain ................................................ 8
Table 5: JetBox 9300/9310 Linux tool chain for windows OS ....................... 8
Table 6 IP addresses of JetBox Ethernet ports ............................................. 9
Table 7: QoS setting| Physical queue of JetBox 9300/9310 Web UI ........... 29
Table 8: QoS Setting| Trust mode page of JetBox 9300/9310 Web UI ........ 30
Table 9 QoS priority level follows 802.1p .................................................. 31
Table 10: The CoS values map to the physical queues ............................... 31
Table 11: The DSCP values map to the physical queues ............................ 32
Table 12: SNMP basic component ............................................................ 33
Table 13: SNMP V3| Security level of the JetBox 9300/9310 ..................... 37
Table 14: Port control| Speed/Duplex of JetBox 9300/9310 ...................... 40
Table 15 Port status| Link and type of JetBox 9300/9310 .......................... 41
Table 16: Serial setting| port and interface of JetBox 9300/9310 .............. 43
Snapshot Index
Snapshot 1: JetBox 9300/9310 Web UI login page .................................... 11
Snapshot 2: The SW menu tree and the welcome page of the JetBox
9300/9310 Web UI. ........................................................................... 11
Snapshot 3: Save page of the JetBox 9300/9310 Web UI ........................... 12
Snapshot 4: Admin Password page of the JetBox 9300/9310 Web UI ........ 12
Snapshot 5: Error Message: JetBox 9300/9310 Web UI time out ............... 12
Snapshot 6: System page of JetBox 9300 Web UI...................................... 13
Snapshot 7: System page of JetBox 9310 Web UI...................................... 13
Snapshot 8: Time setting page of JetBox 9300/9310 Web UI .................... 14
Snapshot 9: Time Setting Source: Manual Setting page of JetBox 9300/9310
Web UI ............................................................................................. 14
Snapshot 10: Time Settings Source: NTP page of JetBox 9300/9310 Web UI
74
Appendix | Korenix
......................................................................................................... 15
Snapshot 11: Device settings page of the JetBox 9300/9310 Web UI ........ 16
Snapshot 12: Admin Password page of the JetBox 9300/9310 Web UI ...... 16
Snapshot 13: System event selection page of the JetBox 9300/9310 Web UI
......................................................................................................... 17
Snapshot 14: SNMP Trap receiver for event warnings ............................... 18
Snapshot 15: Syslog configuration page of the JetBox 9300/9310 Web UI 18
Snapshot 16: Show Event Logs page of the JetBox 9300/9310 CLI ............. 19
Snapshot 17: Syslog configuration—Remote mode page of JetBox
9300/9310 Web UI ............................................................................ 19
Snapshot 18: SMTP configurations page of JetBox 9300/9310 Web UI ...... 20
Snapshot 19 E-mail warning message of the JetBox 9300/9310 ................ 20
Snapshot 20: Internet Configuration—Dynamic IP page of the JetBox
9300/9310 Web UI ............................................................................ 21
Snapshot 21: Internet Configuration—Static IP page of the JetBox
9300/9310 Web UI ............................................................................ 21
Snapshot 22: Internet Configuration—PPPoE page of the JetBox 9300/9310
Web UI ............................................................................................. 22
Snapshot 23: WAN settings—DNS server configuration of JetBox 9300/9310
Web UI ............................................................................................. 22
Snapshot 24 LAN settings| DHCP client page of JetBox 9300/9310 Web UI23
Snapshot 25: LAN settings| DHCP server page of the JetBox 9300/9310 Web
UI ..................................................................................................... 23
Snapshot 26: LAN settings| DHCP leased entries of the JetBox 9300/9310
Web UI ............................................................................................. 24
Snapshot 27: NAT setting| Masquerade page of JetBox 9300/9310 Web UI
......................................................................................................... 24
Snapshot 28: NAT setting| DMZ page of JetBox 9300/9310 Web UI .......... 25
Snapshot 29: NAT setting| VPN Pass Through page of the JetBox 9300/9310
Web UI ............................................................................................. 26
Snapshot 30: VLAN setting (VLAN disable) of JetBox 9300/9310 Web UI .. 26
Snapshot 31: VLAN setting (802.1Q tag VLAN) of the JetBox 9300/9310
Web UI ..............................................................................................27
Snapshot 32: Error message: VLAN| Wrong PVID range (1~8) ...................27
Snapshot 33: VLAN setting (port based VLAN) of JetBox 9300/9310 Web UI
......................................................................................................... 28
Snapshot 34: Traffic prioritization| QoS setting page of the JetBox
9300/9310 Web UI ............................................................................ 29
Korenix | Appendix
75
Snapshot 35: QoS setting| Port setting| Priority page of the JetBox
9300/9310 Web UI ............................................................................ 29
Snapshot 36: QoS setting| Port setting| Trust mode page of the JetBox
9300/9310 Web UI ............................................................................ 30
Snapshot 37: Traffic Prioritization| CoS-Queue Mapping page of the JetBox
9300/9310 Web UI ............................................................................ 32
Snapshot 38: Traffic prioritization| DSCP-Queue Mapping page of the
JetBox 9300/9310 Web UI ................................................................. 32
Snapshot 39 SNMP| SNMP V1/V2c configuration page of JetBox 9300/9310
Web UI ............................................................................................. 35
Snapshot 40: Error message: Password should be longer than 8 characters
......................................................................................................... 36
Snapshot 41: SNMP| SNMP V3 profile page of JetBox 9300/9310 Web UI 37
Snapshot 42 SNMP| SNMP traps page of JetBox 9300/9310 Web UI ........ 38
Snapshot 43: Security| IP access blocking page of the JetBox 9300/9310
Web UI ............................................................................................. 39
Snapshot 44 Switch port configuration| Port control| State page of JetBox
9300/9310 Web UI ............................................................................ 40
Snapshot 45: Switch port configuration| Port control| Speed/Duplex page
of JetBox 9300/9310 Web UI............................................................. 40
Snapshot 46: Switch port configuration| Port control| flow control page of
the JetBox 9300/9310 Web UI........................................................... 41
Snapshot 47: Switch port configuration| Port status page of the JetBox
9300/9310 Web UI ............................................................................ 41
Snapshot 48: Switch port configuration| Port statistics page of the JetBox
9300/9310 Web UI ............................................................................ 42
Snapshot 49: Serial port configuration| Serial setting page of JetBox
9300/9310 Web UI ............................................................................ 44
Snapshot 50: Serial port configuration| Service mode page of the JetBox
9300/9310 Web UI ............................................................................ 44
Snapshot 51: Serial port configuration| Service mode| VCOM mode of
JetBox 9300/9310 Web UI ................................................................. 46
Snapshot 52: Serial port configuration| Service mode| TCP server mode of
JetBox 9300/9310 Web UI ................................................................. 46
Snapshot 53: Serial port configuration| Service mode| TCP client mode of
the JetBox 9300/9310 Web Ui ........................................................... 47
Snapshot 54: Serial port configuration| Service mode| UDP mode of JetBox
9300/9310 Web UI ............................................................................ 47
76
Appendix | Korenix
Snapshot 55: DIO configuration| Digital output control of the JetBox
9300/9310 Web UI ............................................................................ 48
Snapshot 56: DIO configuration| Digital output control of the JetBox 9300
Web UI ............................................................................................. 49
Snapshot 57: DIO configuration| DIO status of the JetBox 9300/9310 Web
UI ..................................................................................................... 49
Snapshot 58: Power over Ethernet| PoE control of JetBox 9310 Web UI... 50
Snapshot 59: Power over Ethernet| PoE schedule of JetBox 9310 Web UI 51
Snapshot 60: Power over Ethernet| PoE status of JetBox 9310 Web UI .... 52
Snapshot 61: Backup and restore| backup configuration of the JetBox
9300/9310 Web UI ............................................................................ 52
Snapshot 62: Backup and restore| Restore configuration of the JetBox
9300/9310 Web UI ............................................................................ 52
Snapshot 63: Firmware upgrade page of JetBox 9300/9310 ...................... 53
Snapshot 64: Reminder message for firmware upgrade in the JetBox
9300/9310 Web UI ............................................................................ 53
Snapshot 65: Warning message of upgrading firmware in the JetBox
9300/9310 Web UI ............................................................................ 53
Snapshot 66: Firmware upgrading message of the JetBox 9300/9310 Web
UI ..................................................................................................... 54
Snapshot 67: Success message of firmware upgrade in JetBox 9300/9310
Web UI ............................................................................................. 54
Snapshot 68: Firmware upgrade| TFTP server of JetBox 9300/9310 Web UI
......................................................................................................... 54
Snapshot 69: Firmware upgrade| USB storage of JetBox 9300/9310 ......... 55
Snapshot 70: Factory default page of the JetBox 9300/9310 Web UI ........ 55
Snapshot 71: Reminding message for resetting to factory default in the
JetBox 9300/9310 Web UI ................................................................. 56
Snapshot 72: Success message for resetting to factory default in the JetBox
9300/9310 ........................................................................................ 56
Snapshot 73: System Reboot page of JetBox 9300/9310 Web UI ............... 56
Snapshot 74: Save to Flash page of JetBox 9300/9310 Web UI .................. 57
Snapshot 75: Success message of saving configuration to flash in the JetBox
9300/9310 Web UI ............................................................................ 57
Snapshot 76: SW menu tree| Logout of the JetBox 9300/9310 Web UI .... 57
Snapshot 77: Reminder message for logout in JetBox 9300/9310 Web UI . 58
Snapshot 78: Port statistics of the JetBox 9300/9310 CLI .......................... 68
Snapshot 79: Syslog display of JetBox 9300/9310 CLI ................................ 69
Korenix | Appendix
77
Snapshot 80: Autorun.sh update of JetBox 9300/9310 CLI ........................ 70
Notice Index (JetBox 9300 limitations)
Notice 1: You can also use Telnet to connect to the JetBox 9300/9310 Linux
environment. To login, you need another Login name and password.
Kindly contact us for further inquiry. When you use the JetBox
9300/9310 Linux environment for some system modifications, the
settings of the JetBox 9300/9310 Web UI and CLI might be changed
and can’t be used to control the JetBox 9300/9310 anymore. ........... 10
Notice 2: JetBox 9300/9310 Web UI or CLI will time out if there is no
activity for a long period of time, you will need to reconnect to the
JetBox 9300/9310 Web UI or CLI. ...................................................... 12
Notice 3: When JetBox 9300/9310 works as a DHCP server to assign the IP
addresses to the DHCP client devices connected to JetBox 9300/9310,
it will cause IP address conflicts if there are any other devices
connected to the JetBox 9300/9310 using static IP addresses that are
within the same range. In this case, the same IP address might be used
twice. ............................................................................................... 23
Notice 4: The maximum bandwidth of the routing is limited at 2M. ......... 24
Notice 5: A untagged packet that enters one of the JetBox 9300/9310
Ethernet ports is inserted the PVID tag of that port and then the
packet is forwarded to the corresponding VLAN members, exits the
port and still keeps the PVID tag if you choose to un-modify for egress
setting. If you want the egress packet without any tags, you must
choose untagged for egress setting. ................................................. 28
Notice 6: Before viewing the private MIB of JetBox 9300/9310, you need to
compile the private MIB files into your MIB browser. ....................... 35
Notice 7: Most SNMP management applications use public and private as
default community strings, so highly recommend you to change the
community string for better network security of SNMP v1 and v2c. . 35
Notice 8: If bad packets count is increased, it means the network cable is
not connected correctly or the network performance of the port is
poor…etc. Please cross check your network environment. ................ 42
Notice 9: Please reconnect all the attached serial devices to the JetBox
9300/9310 once you change the setting of any serial ports of JetBox
9300/9310, especially under TCP server or VCOM mode of JetBox
9300/9310 serial ports. ..................................................................... 44
Notice 10: TCP server and client modes do not support RFC2217, so the
78
Appendix | Korenix
hardware flow control cannot work properly. ................................... 45
Notice 11: Over voltage or over current for digital input will damage JetBox.
......................................................................................................... 48
Notice 12: Improper operation of DO might damage the opposite devices.
......................................................................................................... 48
Notice 13 When JetBox 9300/9310 boots up, the status of Digital Outputs is
set on High temporarily. It might cause attached devices status
abnormal temporarily. After the system is ready, the status is back to
the setting you made. ....................................................................... 48
Notice 14: When the PoE ports are enabled, they power devices based on
correct PoE connections and conditions. When PoE ports are enabled
and power devices, the PoE indicators in the front panel of the JetBox
9310 will show a solid green color and the status in the PoE status
page shows on.................................................................................. 50
Notice 15: When you upgrade the JetBox 9300/9310 firmware, it takes a
few minutes depending on the file size. After the firmware upgrade is
finished, JetBox 9300/9310 will restart automatically. Do not turn off
the JetBox 9300/9310 and its web UI during firmware upgrading;
otherwise it will cause an abnormal situation. .................................. 53
Notice 16: When you upgrade the JetBox 9300/9310 firmware through a SD
card or an USB storage, the system will mount the SD card or the USB
storage into the JetBox 9300/9310, execute the firmware upgrade, and
then unmount the SD card or the USB storage. ................................ 55
Notice 17: You need to go to the JetBox 9300/9310 Linux environment for
other SD card or USB storage usage. In the Web UI or CLI, the SD card
or the USB storage function is to upgrade firmware only. ................. 55
Notice 18: You can also use the reset button in the JetBox 9300/9310 front
panel to reset the system. Hold the button for 3 seconds on the reset
button to go back to the last configuration. Hold the button for 7
seconds on the reset button to go back to the factory default
configuration. ................................................................................... 55
Notice 19: Please refer to autorun user manual for autorun function
details. ............................................................................................. 70
7-2
Revision History
Official release
Date
Description of Change
Korenix | Appendix
79
0.0.6
1-Jul-08
1. Add autorun.sh update description.
2. Modify IP security to IP access blocking.
3. Remove PoE over current protection
0.0.5
23-Apr-08
1. First official release
7-3
Customer Service
Korenix Technologies Co., Ltd.
9F, No. 100-1, Ming-Chuan Rd., Shing Tien City, Taipei, Taiwan
Tel:+886-2-82193000 Fax:+886-2-82193300
Business service: [email protected]
Customer service: [email protected]
80
Appendix | Korenix