1
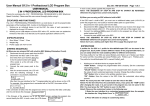
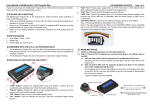
User Manual Of 2 In 1 Professional LCD Program Box
USER MANUAL
2 IN 1 PROFESSIONAL LCD PROGRAM BOX
Thanks for purchasing the 2 IN 1 PROFESSIONAL PROGRAM BOX for ESC (Electronic
Speed Controller). Please read this user manual throughly before using it.
【FEATURES AND FUNCTIONS】
The 2 IN 1 PROFESSIONAL PROGRAM BOX is a small device to set the programmable
parameters of the brushless speed controllers; it works in the following 2 ways:
1. Working as an individual device to set the ESC, the option of each parameter is
displayed on its own LCD screen;
2. Working as an USB adapter to link the ESC with a PC, and the user can update the
firmware of the ESC or set the ESC by the special application software on PC.
【SPECIFICATION】
1.
2.
3.
Size: 91mm * 54mm * 18mm
Weight: 65g
Power supply: DC 4.5V to 6.0V
【WIRING SEQUENCE】
HW-SM803ENG-20120607
Page 1 of 2
If the firmware of the program box is not the latest version, perhaps the program box
cannot identify the ESC, in such a case, the LCD shows:
In such a case, please upgrade the program box.
Note1: THE SEQUENCE OF STEP #2 AND STEP #3 CANNOT BE REVERSED!
Otherwise the program box cannot work properly.
B) When you are using an ESC without a built-in BEC
If the ESC hasn’t a built-in BEC, you must use an additional battery pack (4.5-6.0V) to
supply the program box, and usually a receiver battery pack is a good choice.
1. Disconnect the main battery pack from the ESC.
2. Disconnect the Rx cable of the ESC (trio wires) from your receiver, then plug it into
the port marked with
(This port is at the left side of the program box).
3. Connect the additional battery pack (4.5-6.0V) to the program box (Plug it into the port
marked with
)
4. Connect the main battery pack to the ESC.
Note2: THE SEQUENCE OF STEP #2, STEP #3 AND STEP #4 CANNOT BE
REVERSED! Otherwise the program box cannot work properly.
Note3: Don’t use a battery pack higher than 6V to supply the program box!
【OPERATION】
A) When you are using an ESC with a built-in BEC (Battery Elimination Circuit)
1. Disconnect the main battery pack from
the ESC.
2. Disconnect the Rx cable of the ESC
(trio wires) from your receiver, then plug
it into the port marked with
(This port is at the left side of the
program box).
3. Connect the main battery pack to the
ESC.
4. Wait for several seconds, the LCD will
show the following message if the
connection is successfully established.
st
After that, the user interface for the 1 programmable item will be shown on the LCD.
For example, if the program box is connected with a Car ESC, the screen will be:
If the connection is failed, then the program box will try to reconnect the ESC continually,
and the LCD shows this message:
3 profiles for Car ESC or 1 profile for Aircraft/Helicopter ESC can be stored in the
program box. Each profile contains different options of the programmable items, so
user can easily select the most suitable profiles for different tracks.
The three profiles for Car ESC are named Mode0_car0, Mode1_car1, Mode2_car2 (Note:
For some Car ESC, the profiles are named Profile0_car0,Profile1_car1,Profile2_car2).
The profile for Aircraft/Helicopter ESC is named Profile0_esc0.
1.
Working as an individual device to program the ESC
“ITEM” Button: Change the programmable items circularly; Exit the customized
option setting process.
“VALUE” Button: Change the options of each programmable item circularly; Change
the options of each customized parameter circularly; Change the profiles circularly.
“R/P” Button: Enter or return to the profiles selection menu.
“OK”: Button: Save the options in the ESC; Enter the customized option setting
process.
Note4: You must press the “OK” button to save the settings in the ESC.
Note5: Some programmable items have customized options, if you press the “ITEM”
button after setting the customized option; it is just saved in the program box, but
not saved in the ESC. You must press the “OK” button to save it in the ESC.
Note6: Please set the customized options in the following way:
1) Enter the user interface for a customized programmable item, for example,
the interface for “Drag Brake Force” is
User Manual Of 2 In 1 Professional LCD Program Box
2) Press OK button to change to customizing status.
3) Press VALUE button to select the option.
4) Press OK button the save the settings in the program box and in the ESC.
2.
Working as an USB adapter to link the ESC with a PC
Please download the latest software and the user manual from the manufacturer’s
website.
HW-SM803ENG-20120607
Page 2 of 2
【SPECIAL NOTE】
The firmware of the LCD program box and the related USB LINK SOFTWARE are updated
frequently, please often check the websites to get the latest product information and the
latest software package.
The detail information of the LCD Program Box:
http://www.hobbywing.com/product_show.asp?id=215
【EXAMPLE OF PROGRAMMING AN ESC】
In the following example, we use some characters to represent the different buttons.
► Auto = The next event will happen automatically
► 1 = Press the “ITEM” button, 2 = Press the “VALUE” button
► 3 = Press the “R/P” button, 4 = Press the “OK” button
The detail information of the USB Link Software:
http://www.hobbywing.com/product_show.asp?id=218