1
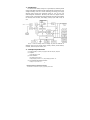
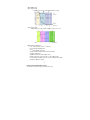
Version: 1.80.0001
KCG3 SMART BATTERY CHARGER
USER MANUAL
KCG3-250A/36V-3
BEIYANG ELECTRIC APPARATUS FACTORY
TEL: +86-532-88913950
FAX: +86-532-80663528
ADDR: No. 57 Haier Road, QINGDAO, P. R. CHINA
WEB: www.byauto.com.cn
Email: [email protected]
Beiyang Electric Apparatus Factory
This document contains the company proprietary information
1. Introduction
The KCG3 smart battery charger is a high frequency switching mode
charger with IGBT and PWM controller. Designed with soft switching (zero
voltage switching and zero current switching) technology, the highly
efficient KCG3 ensures the maximum power for use yet very low
electromagnetic interference. Moreover, the KCG3 can support various
charge curves, provide all all-around protections and prolong the battery
life. Friendly user interface, LCD display, and key input make it easy to
use.
Figure 1. Block diagram of KCG3
Thus, it can be widely used to charge any kind of batteries in
different areas such as marine vessel, railway vehicle, electric-vehicle,
e-forklift, and solar power station, etc.
2. Technique Specifications
(1) Power supply: 3-phase, 220(support 208 and 240)VAC, 50/60Hz.
(2) Outputs:
12VDC-48.6VDC, 250A.
(3) User interface:
LCD display and key input
voltage display precision: 0.1V; amps display precision: 1A
(4) Set charging parameter precision:
voltage: 0.1V; current: 1A
.1.
Beiyang Electric Apparatus Factory
This document contains the company proprietary information
(5
5) Charg
ge curve:
(5
5-1) 3-stage charge
e
A: limited
d current / Boost, B
B: Constan
nt Voltage
e, C: floating
Figure 2. 3-sta
age recha
arge voltag
ge/curren
nt curve.
(5
5-2) 4-stage charge
e
A: C
Constant ccurrent 1,, B: Consttant Voltag
ge 1, C: C
C.C. 2, D: C. V. 2
Figure 3. 4-sta
age recha
arge voltag
ge/curren
nt curve.
(6
6) Protection and Alarm:
Over vvoltage prrotection, Over load
d protection,
Input voltage lo
ow/high p
protection,,
Input fuse/air b
breaker prrotection.
Batterry reverse
e connection protecction with output fu
use.
Outpu
ut power llimitation,,
Tempe
erature co
ontrol fan cooling (a
about 45°°C)
Reducce output power (about 75°C
C -78°C), resume (a
about 65°°C)
Over ttemperatu
ure protecction (abo
out 80°C --85°C) (sto
op and au
uto restartt)
Passw
word for pa
arameter setting.
.2.
Be
eiyang E
Electric A
Apparattus Facttory
This document contains the company prop
prietary info
ormation
(7) Low ripple, 0.5% of the charge voltage
(8) Passive PFC for 3-phase input, cosΦ>0.93.
(9) Battery temperature compensation.
(10) Real time clock and Daily start time. With a CR2302 Li-ion battery.
(11) Charge efficiency: >92%
(12) Operating temperature range: 0~50°C (32~122°F)
3. Naming
KCG3-
A/
V-
Smart Battery
Charger
Battery
Blank: LA, GEL, etc. *
A: Alkaline
Maximun output-current
INPUT
Blank: 220VAC
G: 380VAC
G1: 440VAC
G2: 110VAC
G3: 480VAC
G4: 600VAC
P :Universal, PFC
P1:110V, PFC
P2:220V, PFC
Nominal battery voltage
INPUT
Blank: 1 phase
3: 3 phase
4. Installation and Operations:
(1) The battery charger must not be installed in the vicinity of heat
sources or exposed to water.
(2) Ventilation slots must not be obstructed and ensure adequate
ventilation
(3) The battery should be connected correctly. Be careful and do not
reverse the poles “+” and “-”.
(4) The temperature compensation sensor should be installed next to or
near the battery.
(5) The input wires and the GND should be connected correctly.
Turn on the input air breaker; the LCD back-light will be on.
(6) Keys for control.
(7.1) There are 5 keys on the front panel which are “Menu/Set”, “Up”,
“Down”, “Back/Cancel”, and “Start/Stop”.
(7.2) Press “Menu/Set” to enter the menu. Then
Press “Up”, “Down” to choose item; or
Press “Back/Cancel” to return to previous menu.
.3.
Beiyang Electric Apparatus Factory
This document contains the company proprietary information
(7.3) Choose an item, press “Menu/Set”, the value will flash. Then
Press “Up”, “Down” to increase or decrease the value. Then
Press “Menu/Set” to save the new value; or
Press “Back/Cancel” back to return to previous menu without save.
Press and hold “Up” or “Down” will speed up the value changing.
(7.4) Press “Start/Stop” to start or stop the charging manually.
(7.5) press any key, the beeper will beep once.
(7) If the “Password” function is enabled, a password is required before
enter the menu. If the password is accepted, the user can modify all the
values; otherwise, the user can modify the clock and start time only, that
is to say, other values can be viewed but cannot be modified.
(8) Set parameters.
1. “Start time”. Set the daily auto charge time. It can be enabled or
disabled.
2. “Floating volt”. Set the floating charge voltage.
3. “Constant curr”. Set the constant current.
4. “Equalize volt”. Set the equalize charge voltage.
5. “Curr to Float”. Set a current value, the floating charge will begin
when the current reaches this value.
6. “Delay time”. Set the floating charge time.
7. “Volt. Protect”. Set the over voltage protection value
8. “Equalize Days”. If “Delay time” is set to “NO STOP”, floating
charge will last 7-30 days, then the charger will restart to equalizing
charge. This is a “3-stage curve” parameter only.
9. “Battery Type”.
With 3-stage curve, “LA/VRLA/AGM” and “GEL”
With 4-stage curve, “Flooded LA”, “GEN GEL LA”, “AGM SEALED LA”,
and “TUBULAR LA”. Changing battery type will change the charge
voltages and currents automatically.
10. “T. compenst”. Set the environment temperature compensation
voltage value.
11. “Charge curve”. Choose 3-stage or 4-stage charge curve.
12. “Battery volt”. Choose battery voltage from 12V, 24V or 36V. The
charge voltages will change automatically.
13. “Ah rating”. Setting the battery capacity will change the charge
current values. This is a “4-stage curve” parameter only.
.4.
Beiyang Electric Apparatus Factory
This document contains the company proprietary information
14. “Set default”. Set parameters to the factory default values. This
item will not be displayed if the password is invalid.
15. “Set password”. Change the password. This item will not be
displayed if the password is invalid.
16. “Set clock”. Set the real time clock.
Parameters can only be set when the charger is in “Stop Charge” status.
(9) LCD will display output voltage & current on the first line, the status of
charger on the second line, the charging time on the third line and the
real time clock & environment temperature on the fourth line.
Status
Display
Indicator
Actions
Constant current
Equalize charge
Yellow flash
3-stage
Constant voltage
Constant Volt
Yellow light
Floating charge
Floating charge
Green flash
Constant current 1
C. C. 1
Yellow flash
Constant voltage 1
C. V. 1
Yellow light
Constant current 2
C. C. 2
Yellow light
Constant voltage 2
C. V. 2
Yellow light
Charge complete.
Completed!
Green flash stop charge
4-stage
temperature
Reduce the
protection (75°C)
output power
Over volt protection
Over voltage
Red flash
stop charge
Manually restart
Over Load protection
Over load
Red flash
stop charge
Auto restart.
Over temperature
Over heating
(If the charger restarts 3
protection (80°C -85°C)
low/high AC input
times in 1 minute, the
user should restart it
Input abnormal
manually.)
voltage protection
Extremely high AC input Input abnormal
Red flash
voltage protection
stop charge
Cut off input
Beeper beeps. immediately and
check the input
voltage.
Stop charge
Stop charge
Green light
Table 1. Charger status
(10) Stop and alarm
• The charger will stop due to output over voltage. The indicator
will red and flash. The user should restart the charge manually.
.5.
Beiyang Electric Apparatus Factory
This document contains the company proprietary information
• The charger will stop due to over load, or over temperature, or
AC input voltage abnormal. The indicator will turn red and flash.
When the charger resumes, it will restart automatically. But if it
protects 4 times in 1 minute, it will restart once every hour. In this
condition, the user can restart the charge manually.
• Press “Menu/Set” key to acknowledge the alarm and then press
“Back/Cancel” key to restart manually.
• When charge is completed, the charger will stop. The indicator will
turn green and flash.
(11) Extremely high input voltage protection. When the input voltage is
higher than 275VAC, the charger will stop and the beeper will beep in
each second. The input should be cut off immediately.
(12) Please check your battery document to get more information about
how to set the charge parameters to charge the battery properly.
(13) DC active: Connect the battery and the charger will start to charge.
(14) Auto-stop: Disconnect the battery. When the current is less than 2
Amps, the charger will stop charging and show “Completed!”.
Note: The “DC active” is disabled during the charging. And it can be
enabled again when the voltage of the output terminals falls below
half of the battery nominal voltage. That is to say, the user should
wait a few seconds after disconnect the charged battery and then
connect another empty battery.
For example, when a 24V battery is disconnected from the charger,
the voltage of the output terminals will decrease. After a few
seconds, it falls to 12.0V, which is half of the battery nominal voltage
24V. The “DC active” will be enabled at this moment. Then the user
can connect another 24V battery to the charger and the charger will
start to work automatically.
(15) Charging time will not be cleared until a new charging starts.
(16) Replace the CR2302 battery for real time clock. Open the front door
and remove the cover behind the LCD. CR2302 is located on the PCB.
The life of a new CR2302 is about 15000 hours if AC power is cut off.
Note: Specifications is subject to change without notice.
.6.
Beiyang Electric Apparatus Factory
This document contains the company proprietary information