1
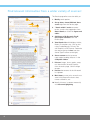
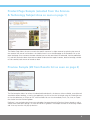
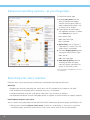
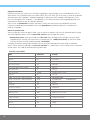
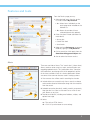
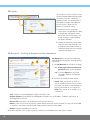
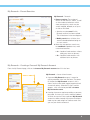
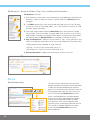
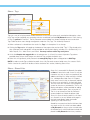
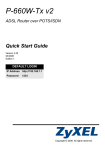
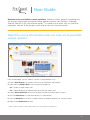
User Guide
Welcome to the new ProQuest search experience. ProQuest’s all-new, powerful, comprehensive,
and easy-to-navigate search environment brings together resources from ProQuest, Cambridge
TM
Scientific Abstracts (CSA), and Chadwyck-Healey. It’s a better way to search, find, use, and share
information. Here are all the key points you’ll need to know for successful research.
Search for more information with our new, more powerful
search options!
5
4
3
1
6
2a
*
2b
From the homepage, you may conduct a search in several different ways:
1. Enter a Quick Search that searches across all of your ProQuest subscriptions.
2. Select from the Subject Areas icons to search by category or:
• 2a – Choose a single subject area.
• 2b – Explore databases by hovering the mouse over the subject area.
3. Choose Advanced Search to construct complex searches and select specific limiters.
4. View the Publications list, and search directly in a selected title.
5. View the Databases list to select a single resource or combine databases for a custom search.
6. Login to your My Research account.
* Subject areas and topics may be different based on your ProQuest subscriptions.
1
Find relevant information from a wider variety of sources!
The Results page offers users the ability to:
1
2
1.
Modify search options.
2.
Set up alerts, Create RSS feed, Save
search right from the Results page.
3.
“Search within” results to narrow
results, search using suggestions from
Smart Search, or search for figures and
tables.
4.
Add items to My Research, Email,
Cite, Export references from the
Results page.
5.
View Results List which displays Articles,
Books, Dissertations, etc. Click to view
using Citation/Abstract, Full text, Text
with Graphics, or PDF formats. Determine
the source type by the icon (see also
Source Type in column to the right).
6.
Sort or narrow results by source
type, subject heading, date, etc. in the
collapsible sidebar.
7.
Discover images, charts, graphs, maps,
etc. found within the results quickly
from the results page. Click the image
to open.
8.
Preview the contents of the full-record
in a lightbox.
9.
Mark items to save, print, or email or to
store in My Research to access later;
create a shared list, etc.
3
6
4
5
7
8
10
9
10. Identify hit-terms in context more easily
with hit-term highlighting.
2
Product Page Sample (selected from the Science
& Technology Subject Area as seen on page 1)
The Product Page allows the user to search the specific content of a single resource by selecting the name of
the resource from one of two locations: the Subject Areas lists on the homepage or the Databases link at the
top of each page. Once a resource has been selected, you can then search (basic or advanced), view the publications
list, and view particulars about the resource to better understand the scope of content, dates of coverage, number
of titles covered, total amount of records to date.
Preview Sample (#8 from Results list as seen on page 2)
The Preview option allows for review of indexed publication details, the abstract (when available), accessible and
searchable subject headings, as well as the opportunity to click to view the full record using the Citation/Abstract
or view the document as full text or PDF when available. You can also immediately Email, Cite, Save, or Export
the citation from the Preview lightbox.
ProQuest is very excited to be using a new technology for presenting article Previews (shown above) as well as
Subject Area information (see pg 1) in what are known as lightboxes. These open and float in the existing window
and in no way interfere with pop-up blockers.
3
Advanced searching options – at your fingertips!
The Advanced Search page:
1. Multiple query boxes offer the
ability to create more complex
searches and limit query fields to
specific indexed information* such
as Author, Title, or Subject.
5
3
1
2. Further define the search query
with additional selections* available
in the Limit to area, such as:
• 2a – Source Type
2b
2a
• 2b – Document Type
• 2c – Language
3. Search Tools, such as Thesauri,*
Field Code lists,* Search Tips, and
Subject Areas, are available.
2c
4. Pre-select Display Options before
viewing the Search Results Page:
• 4a – Sort by
• 4b – Items per page
4a
4b
5. Other Search Options allow for
searching for Tables & Figures,
Look Up Citation, Command Line
search, or Text Match search.
*Determined by the database(s) selected
for searching.
Search tips for every searcher
ProQuest allows you to search quickly and efficiently, and provides advanced search features.
Quick Tips
• Broaden your search by separating your search terms with OR; combine terms or phrases with AND.
• Look for phrases by enclosing them in quotation marks, e.g. “wind energy.”
• Use Advanced Search to search using specific information, such as Authors or Subjects.
• Use Publications to browse issues of a newspaper, journal, or magazine, or search for articles in a specific magazine.
How ProQuest interprets your search
You can search just by typing words into the search form (Basic, Advanced, or on Results pages) and ProQuest will:
• Look for results containing all your search terms. A search on “wind energy” is the same as a search for
“wind AND energy”, and will not retrieve results with just the word “wind” or just the word “energy”.
4
• Look for your search terms appearing in key fields, including document titles, authors, abstract, subjects,
full text, and tags.
• Remove common phrase terms to ensure a focused search. For instance, if you search on “who is
Abraham Lincoln,” you’ll find results on Abraham Lincoln even if they do not contain the terms “who” and
“is.” You can include those terms in your search by enclosing them in a phrase search.
Control your search using advanced features
• Use operators to combine search terms (AND, OR, NOT, etc.).
• Search for phrases and exact terms:
– Look for phrases by enclosing your search terms in quotation marks. For instance, “higher education”
will retrieve results with the phrase higher education. It will not retrieve results with the word “higher”
and the word “education”, they must appear in a phrase.
– You can also look for your exact search term in its entirety. This is primarily used when searching specific
fields, like Subject. For instance, a search on su.exact(“higher education”), will return documents with a
subject term of “higher education,” but not documents with a subject term of “higher education funding.”
• Search for terms in specific fields (see p. 6 for list of codes and proper syntax).
• Use wildcards and truncation to broaden your search.
*
?
Used to replace zero or more characters.
Used to replace one character.
nurse*
Returns “nurse, nurses, nursed”
colo*r
Returns “colour, color”
*taxa
Returns “taxa, supertaxa”
nurse?
Returns “nurses, nursed”
sm?th
Returns “smith and smyth”
ad???
Returns “added, adult, adopt”
Operators and Search Modifiers
Use operators to combine your search terms. Use search modifiers to tell ProQuest what results to look for.
Operators are not case-sensitive.
Operator/Modifier Description
and
Example
Look for documents containing both term A and term B.
Helps you narrow your search.
food and nutrition
Look for documents containing term A and for documents
containing term B. Helps you broaden your search.
food or nutrition
not
Look for documents containing term A, that do not have term B.
nursing not shortage
near/n
Look for documents where term A appears close to term B, in any order.
Use "n" to specify the number of words apart - “3” means within 3 words.
nursing near/3 education
Look for documents where term A appears before term B.
Use "n" to specify the number of words apart - “3” means within 3 words.
nursing pre/3 education
or
pre/n
exact
Look for your exact search term in its entirety. Used primarily for searching
specific fields, like Subject. For instance, a search on su.exact(“higher
education”), will return documents with a subject term of "higher education,”
but not documents with a subject term of “higher education funding.”
su.exact(“higher education”)
-
Used to search for ranges in numerical fields, such as Publication Date.
YR(2005-2008)
5
Operator precedence
ProQuest assumes your search terms should be combined in a certain order. If you include operators such as
AND and OR, we will combine them in this order: NEAR, PRE, NOT, AND, OR. For instance, a search on “education
AND elementary NOT secondary” would be interpreted as “(elementary NOT secondary) AND education.” So in
this case, “elementary NOT secondary” is considered first. This search will return results regarding education with
information on elementary but not secondary education.
You can also use parentheses to control the order in which your search terms get combined, instead of
using the standard operator precedence.The use of parentheses and Boolean operators in combination is
perfectly acceptable.
Search in specific fields
You can target your search to specific fields, such as Authors or Subjects. You can use Advanced Search to help
you build targeted searches, OR use search field syntax to quickly target your search.
• Search field syntax - each search field has a field code. Type the code for the field you want your search
targeted against, then put your search terms in parentheses (i.e., CODE(search term) ) A search for author
with the surname of Smith would be entered as AU(smith).
Examples of common search fields are below. You can also view field codes for search fields in Advanced
Search. Please note that field codes are not case sensitive (i.e., Proper nouns such as Author names, Corporate
Author names, etc. need not be entered using capital letter.
Common search fields
6
Field
Field Code
Example
Abstract
AB
AB(food)
Author
AU
AU (smith)
Date of publication
PD
PD(20051231)
Document feature
DF
DF(maps)
Document ID/Accession number
AN
AN(123)
Document title
TI
TI(food)
Document type
DTYPE
DTYPE(literature review)
Full Text
FT
FT(food)
ISBN - search with or without hyphens
ISBN
ISBN(0205189997)
ISSN - search with or without hyphens
ISSN
ISSN(10673881)
Issue
ISS
ISS(23)
Language
LA
LA(french)
Location as subject
LOC
LOC(france)
Person as subject
PER
PER(smith)
Publication title
PUB
PUB(wall street journal)
Source Type
STYPE
STYPE(newspapers)
Subject heading
SU
SU(higher education)
Tag
TAG
TAG(benefits)
Volume
VO
VO(85)
Year of publication
YR
YR(2005)
ISSN(1067-3881)
Features and tools
From the Results page you may:
3
2
1. Select desired items from the results
list to be saved in My Research:
• 1a – Select items individually or the
entire page to be included on the
Marked List.
4
1b
• 1b – Notes the number of items
selected (dynamically updates).
5
2. Other functions include (see below for
more detail):
1a
• Set up alert
• Create RSS feed
• Save Search
3. Adapt and save Preferences to personal
needs by signing in to My Research.
4. Click to search for similar topics from the
Smart Search Suggested subjects box.
5. Sort or otherwise Narrow results.
Alerts
There are two kinds of alerts. The “search alert” (shown here)
allows searches to be saved, run anew, and notification sent
regarding updated results. The “publications alert” (found on
the Publications search page with similar properties) notifies
of the latest available issues of a favorite publication. Below
are some of the common features used in setting up alerts:
1
2
1. View sources that will be used in searching for the alert.
2. Include either new materials only from a search, or choose
to also receive historical information along with new materials
from the search.
3
3. Schedule to receive alerts daily, weekly, monthly, or quarterly.
Stop the alert in as little as two weeks or as much as one
year. Renew at any time.
4
5a
5b
4. Provide email details, including email address, subject, and
optional message.
5. Select:
• a – Text only or HTML format
• b – Click Set up alert button to save settings
7
RSS Feeds
RSS Feeds are similar to alerts, except
that they provide on-demand information
whenever accessed. A feed URL is
generated which may be placed on a
web page or saved inside a browser
for easy access. Below are the
options in setting up a feed:
1
1. Information on the name and
search terms are provided. The feed
is based upon the original search
terms from the results page. A list
of the resources used in building
the feed is provided.
2
2. Choose to isolate only newly found
materials each time the feed is run,
or choose to also receive historical
information along with new materials
whenever the feed is run.
My Research – Creating an Account and New Documents
2
1a
1b
1b
My Research may be used as a gathering
place for generating citations, emailing, printing,
and more!
1. Click My Research at the top of any page:
• 1a – Create a personal username and
password (see p. 9 for more detail).
• 1b – Click the Sign In link each time
you logon to better manage your
research.
3
2. Functions to manage marked records:
• Email: Send as plain text or HTML to
one or multiple recipients with a custom
message. Also select to send records as
brief or full records or as a citation list.
• Print: Print as brief or full records, or as
a citation list.
• Cite: Create an instant bibliography using 20 available styles..
• Export citations: Send records to a bibliographic manager such as RefWorks, EndNote, and ProCite, or
download RIS or text files.
• Save as file: Save the list to the desktop, USB memory drive, etc.
• Share: Create a list to share with others. When relevant items are found in Shared Lists they will be included
in searches, and listed in the right-hand sidebar found on relevant article pages.
• Delete: Remove selected items from list.
3. Research provides a list of recent searches, and newly marked documents and figures & tables.
8
My Research – Recent Searches
My Research - Research
1. Recent searches: The number of
results for the search is shown, as well
as the number of collections which
were searched. Any search may be
saved, modified, deleted, or set up as
an alert or RSS feed.
2a
1
• Searches may be saved if a My
Research account has been created.
This will be shown in the next diagrams.
2b
• Modify search item will allow for a
search to be edited before being run
as a new search.
2. More than one previous search may
be combined to produce new, more
customized searches.
• 2a – Combine listed searches without
adding new terms or phrases.
• 2b – Combine listed searches with
additional terms or phrases.
My Research – Creating a Personal My Research Account
From the My Research page, click on the Create a My Research account then fill in the form.
My Research – Create a New Account
2
1
1. A personal My Research account is central to
gaining complete value from ProQuest. The power
of the personal My Research account is that it
allows results to be saved, tagged, organized, and
shared with others. Whenever a sign in section
appears, a link will also be provided to Create a
My Research account.
2. Creating the account requires providing a username,
password, first name, last name, and email address.
All fields are required. Once a personal My Research
account has been created, the username and password may be used to login to ProQuest each time
you use your favorite resources!
9
My Research – Research, Folders, Tags, Lists, and Account Information
My Research continued:
1. A My Research account allows the management of saving/deleting and working with
documents, figures & tables, email alerts, and RSS feeds in the Research section
(see pg 9).
1
2. The Folders option allows items to be placed and saved from lists in My Research
into any of a series of multi-tiered folders. Lists in My Research will contain an “Add
to Folder” option (see below).
2
4
5
3. (see screen capture below) Selecting New Folder allows the creation of multiple
tiers of folders. Each time a folder is created, folder name, location (1st tier or within
another folder), and notes are provided. When folders are tiered within other folders,
they appear under the Manage Folders link indented as indication of the tier.
4. Tags and Shared Lists – Add your own keywords as “tags” to any reference in your
results list or add your marked items to lists that can be shared with all ProQuest users!
• Setup a public profile – Required to tag or share lists
• My Tags – A list of all your tag keywords (see p. 11)
• My Shared Lists – See all lists you’ve shared (see p. 12)
5. Account Information – Update your My Research account at any time.
3
Share
Social Networking
The most effective and powerful research tools
promote the ability of researchers to share information
in order to encourage collaboration on essential
projects. This section discusses ProQuest’s extensive
sharing options both within the main interface as
well as within personal My Research accounts.
When a searched document has been opened,
along with all of the standard document options,
a social networking button provides an option
of sharing links to the article on popular social
networking sites, encouraging information sharing.
This function is available regardless of whether
or not a personal My Research account has
been established.
10
Share – Tags
2
1
3
4
Tags are a way of using keywords to label references so that they may be easily searched and located at a later
time. Tags may be created by any researcher who has established a personal My Research account. Public sharing
of Tags is optional in ProQuest. The My Research account holder may choose whether or not to make their
Tags visible to other users through management under the “My Tags” link inside My Research.
1. When a reference is viewed from the results list, Tags is in the options list at the top.
2. Clicking the Tags option will toggle to the bottom of the page to the section titled “Tags.” If Tags already exist,
they will display here and options will be provided for altering their display, including List - Alphabetically, List Most Popular, List - Most Recent, and Cloud. You may create or add a Tag at any time.
3. A link titled People who tagged this can also be present. It will only list names of previous Tag authors
provided those authors have chosen to make their Tags available for public view.
4. Other links will go directly to My Research to manage My Tags or open a dialogue box to Add Tags.
NOTE: In order to make Tags available for public view, a My Research account holder must first create a Public
Profile. Creation of a profile will be discussed at the end of this section, following Shared Lists.
Share – Shared Lists
Once a list is accessed in My Research, the option
to Share is found at the top. A new list may be
created at any time, or items may optionally be
added to existing lists. When creating a Shared
List, a dialogue box titled Share in list opens.
Here, enter a new list title, or alternately add the
list items to an existing list. A check box titled
Take me there now will return the management
screen for the new or amended list. The list will
display and options will be provided for adding
a subtitle and description, then saving the list.
The list is not shared until the My Research
account holder has clicked the button titled
Share List. Once shared, a public list will show
as a Shared List on any related article page in
the right hand sidebar under the header
Appearing in (X#) shared list(s).
Shared lists may consist of the first 100 items from
any search results list which have been added
to My Research, or they may be a combination
of individual items which have been marked and
placed into My Research from many searches.
11
Share – Creating a Public Profile
2
1
3
1. To create a “Public Profile” for publishing tags and shared lists to all other ProQuest database users, you must
first create an unshared tag or save an unshared list. Once complete, access your personal My Research
account. On the tab options bar, go to the tabs titled My Tags or My Shared Lists and click the link in the right
sidebar titled My Public Profile. On the resulting page, click the link titled Create Your Public Profile.
2. In the lightbox that appears, enter your first and last name (this is the only required information). Optional
fields include: Role, Institution, About me, Email address, and a URL (for blog, university library website, etc.).
3. Before submitting your Public Profile, you must check the box stating your age eligibility, your understanding that
your public profile will be visible to the entire ProQuest community, and that you have read and agree to the
privacy policy.
For more information, visit www.proquest.com/go/yourpath
P6629/LB-BD/PDF/06-11
12