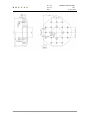
1
B•R•U•S•A•G
Sensorik & messtechnische Entwicklungen AG
Chapfwiesenstrasse 14
CH-8712 Stäfa (Switzerland)
Software User's Manual
(SUM)
for
IntraCfg
BRUSAG Ref:
ph: +4144 926 74 74
INTRA/SUM/1909-BRU
web: www.brusag.ch
Version 1.01 of 28-Apr-2010
em: [email protected]
fx: +4144 926 73 34
Doc.-No.
Version:
Date:
B•R•U•S•A•G
INTRA/SUM/1909-BRU
1.01
28-Apr-2010
Change Record
Date
Version
Who
Description
06-Jul-09
0.10
RB
Quick Guide part of document
13-Aug-09
0.11
RB
The chapter "How to update INTRAs Firmware" added.
3-Mar-10
1.00
RB
Additional text on compatibility between firmware – and INTRAcfgversions.
File: G:\PROJEKTE\AT91g\Docs\SUM\SUM_IntraCfg_101.doc
i
Doc.-No.
Version:
Date:
B•R•U•S•A•G
INTRA/SUM/1909-BRU
1.01
28-Apr-2010
Table of Contents
1
Introduction
1
2
References
1
3
A Quick Guide to INTRA
1
3.1
4
Setting up INTRA for Configuration
1
3.1.1
Installation of IntraCfg
1
3.1.2
Interconnecting your PC with INTRA
1
3.2
Simple Startup Procedure
2
3.3
How to update INTRAs Firmware
6
3.4
Installation of the tracker
7
Reference Section
4.1
The File Menu
9
9
4.1.1
save
9
4.1.2
path
9
4.1.3
exit
9
4.2
RemoteCfg
10
4.2.1
EEPROM
10
4.2.2
TimeDate
11
4.2.3
comsettings
12
4.3
Utilities
12
4.3.1
WhoAmI
12
4.3.2
Position
12
4.3.3
Sun
14
4.3.4
Memory
14
4.3.5
ADC
14
4.4
Messages
14
4.5
LocalLog
14
File: G:\PROJEKTE\AT91g\Docs\SUM\SUM_IntraCfg_101.doc
ii
B•R•U•S•A•G
1
Doc.-No.
Version:
Date:
INTRA/SUM/1909-BRU
1.01
28-Apr-2010
Introduction
As of INTRA #66, a new controller with a new user interface has become part of INTRA. This new
controller – termed INTRA Controller Version 2 (icb2) – provides a user interface based on remote
procedure calls. Hence it is no longer possible to configure INTRA using a simple terminal, but one has
to use a PC with the configuration utility IntraCfg installed. This is a handicap, but far outweighed by the
advantages of a graphical user interface as provided by IntraCfg.
Once configured, INTRA runs autonomously1. But when configuring INTRA, you should understand
what all these parameters mean. Therefore this document not only explains IntraCfg, but also covers the
aspects with respect to the firmware working in INTRAs controller. Hence it is also an INTRA-Manual.
Finally, because most people do not like to read dozens of pages, we start with an introductory chapter, a
Quick Guide to INTRA.
2
References
Normally, a user does not have to bother about the remote procedure call interface. Except when he
wants to make his software system to talk with INTRA. Such a user must have a close look at the
document listed below and available from our internet site www.brusag.ch
1
INTRA Software Interface Definition Document (SIDD)
R. Brusa, BRUSAG CH-8712 Stäfa
3
A Quick Guide to INTRA
3.1
3.1.1
V 1.02 3-Mar-10
INTRA/SIDD/
1827-BRU
Setting up INTRA for Configuration
Installation of IntraCfg
The installation program for IntraCfg may be downloaded from our web site: www.brusag.ch/dlc.htm.
Get this zip-file on your computer and unpack it. You will end up with a folder as e. g. IntraCfg_100304.
Double-click on the setup.exe-link inside this folder and follow the instructions of the installation
program (Note: Our setup-generating software does not allow to install a program over an already
(possibly older) installed version. You must uninstall it prior to run the new setup.)
We have tested IntraCfg on Windows 2000 and Windows XP.
3.1.2
Interconnecting your PC with INTRA
The setup operation described in this paragraph may be performed in the lab or with the tracker already
installed at its site.
The INTRA controller V2 provides two interfaces: RS232C and an optical LAN socket. However, the
present firmware ifw 1.03 only serves the RS232C interface. This is available from the 10-wire cable
that also feeds 24 VDC and possibly Heater Power (24VDC or 24VAC) to the controller. The pinassignment and color coding of this cable is shown in tab. 1.
1
most user prefer to supervise INTRA and thus remain connected to its user interface during operational
use of the tracker.
File: G:\PROJEKTE\AT91g\Docs\SUM\SUM_IntraCfg_101.doc
1
B•R•U•S•A•G
Doc.-No.
Version:
Date:
INTRA/SUM/1909-BRU
1.01
28-Apr-2010
Access to the X1-socket through the service opening is possible, but rather cumbersome. We therefore
deliver the tracker with a 30 cm piece of cable connected to X1. The end of the piece "duplicates" the
X1 connector and is easy accessible through the service opening.
Table 1
Pin Assignment and colors of wires to/from the power
connector X1. PWR is 24 VDC, less than 200 mA typical,
2A max, HEA is 24 VDC or VAC, 8A typical, 10A max.
The serial I/F is galvanically isolated from the rest of the
controller. STxD is the send line of the controller, SRxD
the receive line and S GND is the serial ground.
X1: INRTRA2_MAIN_CONNECTOR
NC - bwn
2 1 CASE wht
PWR+ - yel
4 3 PWR- grn
STxD pink
6 5 S GND gry
NC red
8 7 SRxD blu
HEA +~ pur
10 9 HEA -~ blk
In the following, we assume that you connected STxD to pin2 of the COM1 connector (DB9p) of your
PC, SRxD to pin3 and S GND to pin 5. PWR+/PWR- should be connected to a power supply that is able
to deliver up to 2A at 24 VDC. The Heater power may be left unconnected for now.
3.2
Simple Startup Procedure
If you have an INTRA with gears 66:1, you may skip the following point about the registry.
If you have an INTRA with gears 592:1 you should firstly define appropriate parameters in the registry.
You will find a file 100428_gear592.reg in the installation folder – typically C:\Program
Files\Brusa\Intra. Run regedit (use the Run command from the Start button) and import this file. Now
you are ready to launch IntraCfg.
Doubleclick on the IntraCfg-Icon on your desktop
and the program will open a window as
shown below. This may take a few seconds, because the program tries to connect to INTRA – which has
no power yet.
Now you switch INTRAs power on. The redboot startup message will be displayed in the terminal
window and after 4s, redboot will start the intra firmware ifw.
File: G:\PROJEKTE\AT91g\Docs\SUM\SUM_IntraCfg_101.doc
2
Doc.-No.
Version:
Date:
B•R•U•S•A•G
INTRA/SUM/1909-BRU
1.01
28-Apr-2010
The second-last line in the windows shown above, reports the version of the firmware build into the
tracker. Additionally, you see the version of IntraCfg at the lower rim of the Intra-Terminal window.
This is important information, because the version of the firmware and of IntraCfg must be combined as
shown in the following table:
ifw version
1.02
1.03
1.04
IntraCfg version
1.01
1.02
1.03
Compatibility ifw and IntraCfg
Comment
we recommend to upgrade to ifw 1.03, Cfg 1.02
please update
most recent versions (INTRA #71 delivered with fw 1.04)
If the versions of your software do not match as indicated above, please update to the most recent
firmware and also get the compatible version of IntraCfg – both from our website www.brusag.ch.
Next is to get the time-date window from the
RemoteCfg-Menu
Enter current time and date (UT please, not local
time) and click Send, then close the Time & Date
window.
Hint: If your PC is running on UT, you may simply
click on SendNow. This reads the time of the PCs
clock and links it up to INTRA.
As next step, you should configure some of the
parameters in the EEPROM. Get the EEPROM
window using the RemoteCfg-Menu. It will display
default values.
File: G:\PROJEKTE\AT91g\Docs\SUM\SUM_IntraCfg_101.doc
3
Doc.-No.
Version:
Date:
B•R•U•S•A•G
INTRA/SUM/1909-BRU
1.01
28-Apr-2010
Now click on the Download-button. This will transfer the contents of the RAMcopy of the INTRAROM-contents to your PC and display it in the IROM window. Especially, you should note that INTRA
serial # now displays the serial number of your tracker e.g. 66.203 where 66 is the number of the
mechanical part of INTRA and 203 the serial number of the controller board.
Next, we recommend to save these original settings for later consultation. Click on the Save button in the
Registry frame. This will write current settings to the registry under the key:
HKEY_LOCAL_MACHINE\SOFTWARE\Brusag\AT91
We recommend to export this entry to a file (*.reg) using regedit and to store it in a safe place.
A tracker comes with its specific settings stored in its flash-rom. Some of these parameters are essential
for the proper working of the tracker. Upon power up, the firmware reads the parameters from flash (the
so called EEPROM data) to RAM. Saving these original settings to a file as described above is essential,
if you ever have to revert to original settings.
In case your tracker has gears 592:1, gear-settings are accordingly and some of the axis parameters of the
control loop are different as shown below:
Now please enter the parameters of your site in the 3 fields inside the Site-frame. Longitude (East is
positive2), latitude (north is positive) and elevation (m above sea level). Then click Send followed by a
click to the Write button in the "EEProm in Flash"-frame. The new settings are now in the RAM of the
controller and also in its ROM (emulated in flash). Hence during subsequent the power ups, INTRA will
come up with these settings read from ROM during power up.
Axis Offsets:
Sun-sensor Offsets:
These values were determined at factory and are specific to your tracker. Do
not change these settings.
These values were determined during initial field tests. You may further edit
these values [°] to adjust pointing for your instruments.
Next is then to help INTRA to set up the position of its axis. Typically, an INTRA is delivered with its
axis at positions 5° , 5°. This situation is depicted below:
2
in contrast to the convention followed in the firmware of the controller version 1.
File: G:\PROJEKTE\AT91g\Docs\SUM\SUM_IntraCfg_101.doc
4
B•R•U•S•A•G
Doc.-No.
Version:
Date:
INTRA/SUM/1909-BRU
1.01
28-Apr-2010
In order to make things more visible, we have positioned
INTRA in such a way to make both its flanges visible. The
one at the bottom is the flange of the primary (vertical) axis
(PA) and the flange to the right is the flange of the secondary
(horizontal) axis (SA with sun sensor). The position shown
here is indeed 5°,5°. One can see that both flanges are
slightly rotated clockwise from their zero position. From this
you may correctly conclude that the PA is (approximately) at
its zero position when the milled groove with the two
threaded holes is parallel to the top surface of the pictured
unit. And similarly for the SA. Its zero is when the milled
groove with the sun sensor is parallel to the top surface.
Clicking on the menu-item Utilities | Position, the "Positions and Modes"-Window opens.
Now let us assume that the position of the axis is not nearly as depicted above. You can move the axis
into the correct position for the FindZeor-Command using the "Run Motors" entries. You can do this for
both motors at the same time or one after the other. The PA- and SA-fields accept an argument in the
range from –999 to +999. –999 is full speed ccw, 999 is full speed cw. Enter a value in one or both
fields, then click on Run. Motors start to run according to the speed set. If you are happy with what you
see, click on Reset to stop the motior(s).
If once both axis are near the 5°-position, click on the Go-button of the FindZero frame. The motors start
running ccw and stop a few seconds later when the zero mark of the encoder disk is encountered. Click
on ChkAxis-button. You should get a message telling you that both positions PA and SA are valid. Click
on GetPos to see the actual position.
A few words of explanation on the FindZero command:
File: G:\PROJEKTE\AT91g\Docs\SUM\SUM_IntraCfg_101.doc
5
B•R•U•S•A•G
Doc.-No.
Version:
Date:
INTRA/SUM/1909-BRU
1.01
28-Apr-2010
The two selection boxes inside the FindZero frame allow to specify in which direction the motors should
move: ccw, cw or – where – means "no movement". Following a click on the Go-button, the motors
move accordingly – until they encounter the zero mark or have made a path of 15° - whichever comes
first. In fact it is possible to repeat the FindZero command many times. Assume the current position is e.
g. 100,35. After 3 FindZero operations, the SA would come up with valid positions (Use ChkAxis to see
this). Then you would select SA – and continue with the FindZero operation until also the PA reports
position valid.
We recommend to perform the FindZero operation always with both axis a few degrees positive of the
zero and use the ccw movement.
Once this find zero operation is successful, time and date properly set, your tracker is ready for use. In
the mode frame, click on Sun. The tracker will move to the position where it expects the sun – this based
on current date, time, site- and misalignment parameters. And if the Sun is really within the field of view
and sufficiently bright, it will start active tracking.
The controller has an onboard battery that keeps the real time clock running when power is down. The
battery will be good for several years. The RTC also includes a few bytes of RAM where essential mode
and position information is stored upon power fail. This information is read back upon power up and
hence, INTRA resumes operation at the position and mode that was in effect upon power fail.
Despite of the fact that essential position information is maintained during power fails, we recommend to
perform a "FindZero" operation following power up – especially when power was removed while the
motors were operating at high speed. In order to facilitate this "FindZero" upon power up, we
recommend to follow the procedure shown below prior to powering down INTRA:
-
Click on Remote in the mode frame
-
Enter 5 in the PA- and SA-fields in the "Go to Position" frame then click SetTarget
-
Wait for INTRA to reach this position – check by clicking the GetPos button.
-
Switch power off
3.3
How to update INTRAs Firmware
Error-free software is a phantom and there may be the need to update INTRAs firmware. Let's assume
you have downloaded the new firmware from our website on to your computer. The firmware is a file
with an srec extension. It is possibly zipped with other files (e. g. readme-file) into a zip-file. If so, please
unpack the zip-file on your system.
For the download to INTRA, you will need a computer with a serial interface operating at 57600,8,1,n.
The computer should have a terminal emulator installed that is capable of downloading files using
ymodem (or zmodem) protocol. Hyperterminal that comes with Windows is an example of such a
program. Proceed as follows:
-
Close the IntraCfg-Application if it is still up.
-
Launch Hyperterminal and make sure it operates with settings 57600,8,1,n
-
Turn INTRAs power off – wait for a few seconds then switch power back on.
-
INTRAs bootloader will display its start message in the Hyperterminal screen. You now have 4
seconds during which you must type Ctrl-C. This brings redboot into the command mode.
-
type the command load –m ymodem<enter> and
File: G:\PROJEKTE\AT91g\Docs\SUM\SUM_IntraCfg_101.doc
6
B•R•U•S•A•G
Doc.-No.
Version:
Date:
INTRA/SUM/1909-BRU
1.01
28-Apr-2010
-
using Hyperterminals menu you specify the file to be sent and the protocol (ymodem) that
should be used.
-
Start the transfer. It will take one or two minutes.
-
Following a successful transfer, you type go 0x114000<enter> and the start message of
the updated firmware and more will be displayed.
-
Close Hyperterminal. You may switch over to IntraCfg and proceed with any related activity
(But watch out – does the version of IntraCfg fit with the new version of the Intra firmware? If
not, get the appropriate version of IntraCfg from our web site.)
Your INTRA is now ready to be used with the new firmware. We recommend to execute a search for the
zero marks on both axis. Of course it helps, if you positioned both axis slightly clockwise from (+) from
the zero mark prior to starting with the download procedure.
3.4
Installation of the tracker
With both axis of the tracker at their zero position, installation should be performed such that the sun
monitor points toward the point of intersection of the south meridian with the horizon.
If an installation is less than perfect, its no problem. INTRA will learn about it and automatically correct
for such misalignments between its system – the tracker system - and the astronomical system. More on
this in the reference section.
INTRA is attached with its PA-flange on a flat horizontal surface. The dimensions of the PA-flange are
given in the figure below3. The M6-threaded holes of the 32 x 32 m grid are intended for attachment of
INTRA to its base. Note that the base must have an opening – preferably of a diameter not smaller than
the Ø60 mm of the flange. The high flex ten-wire-cable that comes with INTRA is fed through this
opening. For the insertion of the cable, you must open the service opening on the top surface of INTRAs
case.
The 10pin Molex connector (X1) of the electronics board is not well accessible. Therefore we deliver
INTRA with a small cable-tail connected to the X1 connector. This tail has the same Molex connector on
its end as the one on the board and hence allows easy connection of the cable. Having connected this
cable you should pay special attention to two things:
-
INTRA rotates and there must be sufficient cable inside its housing to allow for this
movements.
-
You must provide a fixation – somewhere at the base plate – that prevents the cable from
"creeping" out of INTRA housing with time.
Finally, you must take care that INTRAs case is properly grounded. And now you are ready to connect
the 24 VDC power supply, the serial interface of a PC and possibly also the 24 V power supply of the
heater to the cable. See also the § "Connecting your PC with INTRA".
3
The SA-flange is identical – except that it has an opening for the sun monitor.
File: G:\PROJEKTE\AT91g\Docs\SUM\SUM_IntraCfg_101.doc
7
B•R•U•S•A•G
File: G:\PROJEKTE\AT91g\Docs\SUM\SUM_IntraCfg_101.doc
Doc.-No.
Version:
Date:
INTRA/SUM/1909-BRU
1.01
28-Apr-2010
8
B•R•U•S•A•G
4
4.1
4.1.1
Doc.-No.
Version:
Date:
INTRA/SUM/1909-BRU
1.01
28-Apr-2010
Reference Section
The File Menu
save
Selecting save opens a dialog as shown below:
When recording on is selected, the save-menu appears checked and the program records all terminal
input received from INTRA on disk. Periodically, a new file is started. The period may be selected in the
Duration field. The filename generated consists of the date, time and the contents of the Label-field.
4.1.2
path
Selecting this entry opens a path/file selection dialog. Clicking on ok starts recording as described under
"save".
If recording is already in progress, a dialog box requests confirmation that indeed you want to close the
current file and continue with a new one.
4.1.3
exit
Closes all files and terminates program.
File: G:\PROJEKTE\AT91g\Docs\SUM\SUM_IntraCfg_101.doc
9
B•R•U•S•A•G
4.2
4.2.1
Doc.-No.
Version:
Date:
INTRA/SUM/1909-BRU
1.01
28-Apr-2010
RemoteCfg
EEPROM
Opens the EEPROM dialog.
Some of these parameters are informative only, but most of them are actually used in computations by
the firmware. Some of the parameters are defined at the factory (M), some are defined by the user (U)
and some are computed/updated (P) by the firmware during operation.
Parameter
RomVersion
serial #
Site
Alignment
Axis
Gears
Offset
Range low
Range high
Target-Ctrl *
Target-Ctrl /
Speed-Ctrl *
Speed-Ctrl /
Sun-Sensor
Offset PA
Offset SA
Io
sigma
low
by
P
M
U
U,P
Comment
Identifies the format of the IROM-type the firmware expects.
identifies the tracker (70) and its controller (214)
The user defines longitude (N>0), latitude (E>0) and altitude of site.
Missalignment between tracker- and astronomical system. Typically left all zero
by the user and the firmware then updates it according to its analysis of data
collected. If the misalignment is larger than the field of view of the sun senor
(app. ±5°) the user should define appropriate initial values.
zt: Zenith-distance of the pole of the tracker system
at: Azimuth of the pole of the tracker system
ap: rotational misalignment of the primary axis with resp. to south.
U,M
M
M,U
M,U
M
M
M
M
Must be set according to the gears operating in your tracker (66 or 512)
Offset of zero mark of axis from true right angle position with the other axis.
low "end of course" for primary and secondary axis.
high "end of course" for primary and secondary axis
control loop parameter
control loop parameter
control loop parameter
control loop parameter
M, U
M, U
M
M
M
pointing offset primary axis
pointing offset secondary axis
extraterrestrial sum of all quadrants
extinction coefficient
minimum elevation angle under which data are not used for alignment error
File: G:\PROJEKTE\AT91g\Docs\SUM\SUM_IntraCfg_101.doc
10
B•R•U•S•A•G
sunrange low
M
sunrange high
M
sunfrac
M
sun2rad
M
SerCfg
Baud UART0
Baud UART1
M
M
tbits
M
Doc.-No.
Version:
Date:
INTRA/SUM/1909-BRU
1.01
28-Apr-2010
computations (analysis) at the end of the day.
if measured signal is less than this fraction of computed value(I(m), data are not
used for analysis.
if measured signal is higher than this fraction of computed value I(m), data are
not used for analysis.
If collected data are less than sunfrac percent of possible data, no analysis will be
performed with the data collected this day.
factor to convert computed pointing errors to degrees. Depends on geometry of
sun sensor4.
Baudrate of UART0 (fixed)
Baudrate of UART1 (fixed) This serial interface is normally not connected. It is
used for trouble shooting only in case of errors.
bitflags that enable or disable diagnostics output to UART0. Normally tbits = 0,
but during tests it is set as $10338 where the $-sign indicates a hex-number.
At the low rim of the IROM-windows one finds a field where communication status messages are
displayed – as they result from clicking on any of the buttons below this field.
Button
What it does
involves remote procedure calls
EEPROM-Buttons
Read
Read EEPROM-data to RAM-copy
Write
Write RAM-copy to EEPROM
Erase
Clear all data in EEPROM
involves remote procedure calls
communication with RAM-copy
Download
load EEPROM-data from RAM-copy of the intra
firmware to local EEPROM data (on PC)
Send
upload local EEPROM data into RAM-copy of
Intra firmware.
local procedures only
Registry
Save
Write local EEPROM data (PC) to registry
Read
Read EEPROM data from registry into local
EEPROM data of PC
Defaults
Initialize local EEPROM data (PC) with default
values and write them to the registry.
4.2.2
TimeDate
Clicking on this menu entry brings up the time-date window as shown below.
4 Sensors V1 sun2rad = 0.135385 sensors V2 sun2rad = 0.0434. INTRA #70 is the first tracker that was
delivered with a sensor V2.
File: G:\PROJEKTE\AT91g\Docs\SUM\SUM_IntraCfg_101.doc
11
Doc.-No.
Version:
Date:
B•R•U•S•A•G
INTRA/SUM/1909-BRU
1.01
28-Apr-2010
Remote: Read time & date from controller board
of remotely connected INTRA.
Send: Uplink time & date as shown to remote
controller board and set the RTC on the board
accordingly.
Now: Update window to display time & date as
read from the clock of the PC.
SendNow: Combines Now and Send buttons into a
single action. You may use this button to set time
& date of your INTRA, provided your PC is
operating on accurate universal time.
4.2.3
comsettings
You may select the serial interface your PC is using to communicate with
INTRA. The baud rate is fixed to 57600 – no handshake, no parity, 8
data- and 1 start- and 1 stop bit. (57600,n,8,1,1)
4.3
4.3.1
Utilities
WhoAmI
Clicking on this entry will display the ROM-version and the version string as fetched from the remotely
connected INTRA.
4.3.2
Position
This entry brings up a window that allows to control many aspects of INTRA. The Position window is
shown below:
File: G:\PROJEKTE\AT91g\Docs\SUM\SUM_IntraCfg_101.doc
12
B•R•U•S•A•G
Doc.-No.
Version:
Date:
INTRA/SUM/1909-BRU
1.01
28-Apr-2010
Some of the parameters of this window are fetched from INTRA upon start of the program. Other remain
yet undefined until you press one of the relevant buttons.
GetMode: Updates the display of current Mode and Sub-Mode of the tracker. Clicking on any of the
Modes (except TEST) will put the controller in the corresponding mode. Sub-Modes are not
selectable, but controlled by the remote INTRA only – and displayed after pressing GetMode.
SetTarget: The positions specified in the PA- and SA fields are uplinked to the tracker. If Mode is
REMOTE (or later set to REMOTE) it will move to the specified position. Positions specified
are wrt the tracker system – unless the Astro is checked, then positions are wrt the
astronomical system.
Run
Runs the motors with the speed as specified in the PA- and SA-fields in the Run Motors
frame. Speed is specified as a number in the range [-999,999] where – means ccw rotation of
the axis. This command allows to move INTRAs axis under manual control – independently
of the current status of the position and mode of the tracker. When clicking on Run, the
tracker is set into TEST mode and just moves according to the speed specified.
Reset
Stops movement of either axis and restores previous mode of INTRA.
Go
Start movement to locate the zero marks of the PA and SA. The direction of the search is
selected from the resp. selection boxes in the FindZero frame. ccw (counter-clockwise), cw
(clockwise) or – (no search). The FindZero-Command moves an axis until it encounters the
zero mark or it completed a move of 15° - whatever comes first.
GetPos Updates the positions information disaplayed in the 12 fields above.
ChkAxis Fetches flags from the tracker and displays them in the message field at the low rim of the
Positions and Modes window.
The positions displayed include 4 systems of coordinates and target (where it should go) and current
values (where it currently is). The 4 systems are:
Astron
Astronomical system – or better what INTRA assumes as the astronomical system, based on
the misalignment parameters currently in effect.
Tracker Position deduced from the signals of the encoder disk taking into account the offset of the
zero mark from the EEPROM data.
Encoders Raw count of encoder signals – 9380 per 360° The count is cleared when hitting the zero
mark of an axis.
File: G:\PROJEKTE\AT91g\Docs\SUM\SUM_IntraCfg_101.doc
13
Doc.-No.
Version:
Date:
B•R•U•S•A•G
INTRA/SUM/1909-BRU
1.01
28-Apr-2010
Hallsensors:
Raw count of hall sensors. 3 per rotation of the motor. Ratio to encoder counts depends
on gears installed and the ratio of the worm drive (150 nom.). The counts are cleared when
hitting the zero mark of an axis.
4.3.3
Sun
When clicking the Update button, the q0 to q3 fields display the
signals of the 4 quadrant sensor. The Sum displays the sum of q0..q3,
and PA, SA the pointing error as computed from q0..q3. The field at
the low rim is used to display communication status messages.
4.3.4
Memory
This entry is for use by the manufacturer only and is not documented.
4.3.5
ADC
You may select the units (Raw, Volts, Physical),
click update and the 8 channels of the ADC will be
displayed in their respective fields.
The entry at the low rim of the window is used to
display communication status messages (which
result from clicking the Update button).
4.4
Messages
INTRAs controller implements an internal ring buffer (in RAM) where diagnostic messages are stored.
The entries under this menu allow to see and administrate the contents of this (remote) ring buffer.
LoadLog
UpdateLog
ClearLog
4.5
Fetches the remote ring buffer and displays it in a text window.
Fetches possible new data from the ring buffer and displays it in a text window.
Brings up a window that allows to select the remote log-level (Severe, Short, Extensive)
LocalLog
Select loglevel for local program (IntraCfg). (Severe, Short, Extensive). The entry that is currently in
force is checked.
File: G:\PROJEKTE\AT91g\Docs\SUM\SUM_IntraCfg_101.doc
14
Doc.-No.
Version:
Date:
B•R•U•S•A•G
INTRA/SUM/1909-BRU
1.01
28-Apr-2010
- end of text -
File: G:\PROJEKTE\AT91g\Docs\SUM\SUM_IntraCfg_101.doc
15