1
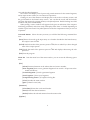
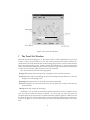
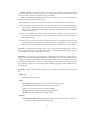
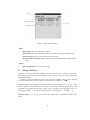
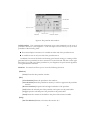
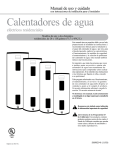
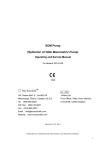
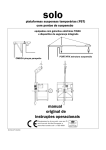
User’s Guide to Grail 2.0
Richard Moot
September 11, 1998
Introduction
The Grail project is an automated deduction system for multimodal categorial logics. It is
developed as part of a PhD project at UiL-OTS (Utrecht, The Netherlands).
The current version is the beta release of version 2.0. It has some minor inconsistencies,
and maybe even some, ahem, undocumented features.
Grail operates from a non-associative base logic, but allows you to plug in user-defined
structural postulates. It operates using a combination of labeled deduction and proof nets
as described in [Moortgat 97, section 7], but can produce output in the more familiar natural
deduction format.
1 The Main Window
Figure 1: The main window.
The main window is your interface to the theorem prover. From here you can parse
grammatical expressions, load and save grammar fragments, and open other windows to
1
view and edit these fragments.
The window will display a list of previously parsed sentences for the current fragment,
and an input section where you can enter new expressions.
Clicking on one of the sentences will display the words in the word entry section, and
the goal formula in the formula entry section. You can edit the words and the formula,
and parse the sentence by pressing (Enter) or the [Parse] button. Double clicking one of the
sentences will parse it immediately.
When parsing, a status window will appear which gives an indication of the computations being performed, and when ready will display either ’done’ or ’failed’ depending on
whether a proof was found. The [Abort] button cancels the computation when you run out
of patience.
Command Buttons below the entry sections you will find the following command buttons:
[Parse] Parses the words in the input entry as a formula described in the formula entry.
The output is sent to LATEX.
[LaTeX] Sends the results of the previous parse to LATEX; this is useful if you have changed
some of the output options.
[Xdvi] Sends the result of the previous parse to LATEX and displays them using the xdvi
previewer.
[Exit] Exits the program.
Menu Bar from the menu bar of the main window, you can access the following operations:
[File]
[About] Prints information on the release date and version number.
[New Fragment] Starts a new grammar fragment from scratch. All previous information will be lost.
[Consult Fragment...] Loads a grammar fragment.
[Save Fragment...] Saves your fragment.
[Compile Prolog Source...] Compiles a Prolog file.
[Close] Iconifies the main window.
[Quit...] Hasta la vista, baby.
[Sentences]
[Clear Entry] Erases the words and formula.
[Parse] Parses the selected sentence.
[Delete] Deletes the selected sentence from the sentence list.
[Options]
2
[Prolog Messages] A choice between Quiet and Verbose. When set to Quiet, only
some information about the time a computation takes will be sent to screen.
When set to Verbose, a lot more information about the state of the computation
will be printed. Defaults to Quiet.
[LaTeX Output Format] A choice between no output, Prawitz style natural deduction and Fitch style natural deduction. Defaults to Prawitz.
[Proofs]
[Eta Long Proofs] When this checkbutton is on, eta long natural deduction
proofs will be produced. Defaults to off.
[Hypothesis Scope] When this checkbutton is on, the scope of a hypothesis in
Fitch style natural deduction will be indicated by a vertical bar. Defaults to
on.
[Labels]
[Output Labels] When this checkbutton is on, labeled deduction proofs will be
produced. Defaults to on.
[Implicit Structural Rules] Structural rule applications will be hidden.
[Collapsed Structural Rules] Successions of multiple structural rules will be collapsed into one.
[Explicit Structural Rules] Each structural rule is portrayed explicitly. This is
the default setting.
[Formulas]
[Reduce Macros] When this checkbutton is on, complex formulas will be reduced by the macro definitions. Defaults to off.
[Semantics]
[Output Semantics] When this checkbutton is on, lambda term semantics will
be printed with the formulas. Defaults to off.
[Reduce Semantics] When this checkbutton is on, lambda term reductions will
be performed whenever possible. Defaults to off.
[Substitute Lexical Semantics] Formulas will be assigned their lexical meaning
recipes instead of semantic variables. Defaults to off.
[Semantics For Unary Connectives] When this checkbutton is off, the semantic
constructors for the unary connectives will be ignored. Defaults to on.
[Restore Default Options] Return the output options to their initial state.
[Window]
[Status/Proof Net Window] Opens the status or proof net window, depending on
whether debugging is turned on or off. See sections 2 and 3.
[Rewrite Window] Opens the rewrite window, only available when debugging is
turned on. See section 4.
[Lexicon Window] Opens the lexicon window. See section 5.
[Postulate Window] Opens the postulate window. See section 6.
[Analysis Window] Opens the analysis window. See section 7.
[Help]
[On This Window] Gives a help message.
3
2 The Status Window
Figure 2: The Status Window.
The status window gives information about the current state of the computation, and
allows you to abort time-consuming parses. It will open automatically during proof search,
or you can open it by selecting [Window/Status Window] or by typing (Control-s).
The white part of the status bar gives an estimate of the number of links which have not
been tried yet.
The status message can be one of the following:
Initializing Garbage collecting, preprocessing.
Linking Performing axiom links.
Rewriting Performing label conversions.
Generating Output Generating LATEX output, and sending it to a file.
Done Computation terminated, one or more derivations were found.
Failed Computation terminated, no derivations were found.
Aborted User got bored and pressed the [Abort] button. If derivations were found, they
can still be viewed.
Menu Bar From the menu bar, we can select the following:
[Window]
[Close] Iconifies this window.
[Debug]
[Automatic] Debugging off. Grail will search for proofs without user guidance.
[Interactive] Switches on the interactive debugger.
4
Figure 3: The Proof Net Window.
3 The Proof Net Window
When the interactive debugger is on, the status window will be replaced by the proof net
window. In the proof net window we see the current partial proof structure, with the decomposition trees of the formulas the current lookup assigns to the words from the sentence
above the corresponding word. Positive atomic formulas drawn in white and negative
atomic formulas drawn in black. Here atomic formulas of opposite polarity are linked until
we find a proof structure which is both acyclic and connected.
The console buttons offer the following options
[Creep] Will perform the next step in the computation, then wait for interaction.
[Leap] Will return after a total linking for the current lookup has been found or to the next
lookup if no such linking exists.
[Nonstop] Will perform the rest of the proof search automatically.
[Fail] Will abandon the current branch of the search space and continue with the next
untried branch.
[Abort] Aborts the current proof attempt.
In addition, you can click on the atomic formulas themselves to have complete control
over the order in which the axioms are linked. As a first step you select any atom not
currently linked by an axiom link. The selected formula will then appear in a black box and
the atoms of opposite polarity which have not been tried before will appear in a white box,
as shown in figure 3. You can then click any of the boxed formulas to perform an axiom
link.
5
If at any time you perform a link which results in a cyclic or disconnected proof structure, you will get a message and the current link will fail.
Menu Bar For the menu bar, we can select the following:
[Window]
[Save Postscript] Saves the current (partial) proof structure to a postscript file.
[Close] Iconifies this window.
[Debug]
[Automatic] Debugging off. Grail will search for proofs without user guidance.
[Interactive] Switches on the interactive debugger.
[Run] Setting this option to [Nonstop] will cause Grail perform all axiom links without
user interaction. Defaults to [Creep].
4 The Rewrite Window
Figure 4: The Rewrite Window.
When the interactive debugger is on, you can open the rewrite window by selecting
[Window/Rewrite Window] or by typing (Control-r).
6
The rewrite window (figure 4 on the page before) displays the current label and allows
you to perform rewrite operations on this label. Clicking on a node of the label will cause
a pop-up menu with the label conversions rooted at that node to appear. You can apply a
conversion by selecting it from the menu. Any alternatives to your choice will be added to
the queue.
The status message gives you an indication of the number of unvisited labels in the
queue and the number of depth
As shown in the figure, some label constructors are drawn in dark grey. These correspond to unsatisfied constraints, which are checked by the following label conversions
i
=i
ni
i
X
X
Y
!Resn
Y
Ji
Ii
X
X
i
!Res
3i
t#i
u#i
3i
X
!Res3
X
X
X
Y
!Res2#
X
X
!Res=
Y
X
For the non-associative base logic, these are all available conversions. However, you can
relax the constraints by specifying your own structural postulates as specified in section 6.
Each structural postulate can be applied backwards as a label conversion.
You can rewrite a label until you reach one where all constraints have been satisfied
and the words are in the order required by the input sentence. Grail will only check if you
meet these conditions when you press the [Creep] or [Leap] button in order to allow you to
continue rewriting a label even if all constraints have been satisfied.
The console buttons offer the following options
[Creep] Will add all one step conversions from the current label to the back of the queue,
then continue with the first element of the queue.
[Leap] Will return only after all label constraints have been satisfied.
[Nonstop] Will perform the rest of the proof search automatically.
[Fail] Will abandon the current branch of the search space and continue with the next item
on the queue.
[Abort] Aborts the current proof attempt.
Menu Bar For the menu bar, we can select the following:
[Window]
[Postulate Window] Opens the postulate window.
[Save Postscript] Saves the current label to a postscript file.
7
[Close] Closes this window.
[Labels]
[No Eager Evaluation] Will prevent Grail from doing any early failure on label conditions.
[Automatic Eager Evaluation] Will cause Grail to perform automatic eager label conversions. This is the default.
[Manual Eager Evaluation] Will allow the user to perform eager label conversions
himself. Be careful, as careless eager conversions may prevent solutions from
being found.
[Run] Setting this option to [Nonstop] will cause Grail perform all label conversions without user interaction. Defaults to [Creep].
5 The Lexicon Window
Figure 5: The lexicon window.
You can open the lexicon window from the menu bar in the main window by selecting
[Window/Lexicon Window], or by typing (Control-l).
The lexicon window (figure 5) displays a list of the words in the fragment and of the
formulas assigned to them. From here you can edit, delete or enter new lexical entries.
Clicking an entry will select it, indicated by the selection bar. The next edit or delete
command will then be applied to that entry.
Double-clicking one of the entries will open the edit lexical entry window, with that
entry displayed in it (see section 5.1 for more on the editing of lexical entries).
Clicking one of the entries with the (Control) key depressed will delete it.
Menu Bar from the menu bar of the lexicon window the following operations are available:
[Window]
8
[Close] Closes the lexicon window.
[Edit]
[New Entry] Opens the edit entry window.
[Edit Entry] Shows the selected lexical entry in the edit entry window.
[Delete Entry] Deletes the selected lexical entry.
[Help]
[On This Window] Gives a help message.
5.1 Editing a Lexical Entry
Figure 6: The edit entry window.
The edit entry window (figure 6) is where you modify existing entries in the lexicon or
create new entries from scratch. You can open the edit entry window by selecting [Edit/New
Entry] or [Edit/Edit Entry] from the lexicon window.
The edits you perform here will only be stored in the lexicon when you press (Control-s)
or select [Edit/Store Entry] from the menu bar, so you don’t have to worry about accidentally modifying your lexicon.
A lexical entry consists of three parts: prosodics, a syntactic formula and semantics.
Formula the formula edit fields take up the upper section of the window.
Selection The formula is displayed as its construction tree. You can select a part of the
formula by clicking on it. The selection cursor appears as a box surrounding the root of the
selected tree.
9
Insertion Points A special constant ‘*’ functions as an insertion point in the formula.
It is not a part of the formula language. By pressing (Control-k) the selected tree will be
replaced by this constant, and copied to the paste buffer.
When an insertion point is selected (as shown in figure 6), you can insert something at
that position in one of the following ways:
[Paste] Pressing (Control-y) will insert the contents of the paste buffer to this position.
[Atom] By clicking on the atom menu, you can insert one of the atomic formulas found in
this fragment. Alternately, you can type in a new atom in the atom entry, followed by
(Enter). Atoms should start with a lower case letter, and be followed by and number
of lower case letters or _.
[Macro] A very simple macro facility is provided, where you can give a name to commonly
occurring formulas. Selecting one of the macros from the macro menu will insert it at
the current position.
[Constructor] You can insert a unary or binary constructor by selecting an index from the
index menu next to the buttons for these constructors (or typing in a new index in the
index entry next to it) and pressing the button for the connective you wish to insert.
Prosodics The prosodics of an entry is the way it will appear in your expressions. You can
enter a Prolog term in the prosodics entry section. The current version does not support
lexical entries consisting of more than one word.
Semantics You can give your lexical entry a Montague-style meaning recipe in the semantics entry section. Editing the semantics in the current version is very cumbersome, as
it requires you to type in the internal semantic representation. It is recommended you leave
the semantics field empty or type in a single constant. If you really want to enter lambda
term meaning recipes you can use table 1 on the following page to convert lambda terms to
Prolog terms.
Menu Bar
bar
In the edit lexical entry window, you can select the following from the menu
[Window]
[Close] Closes this window.
[Edit]
[Clear Entry] Erases the formula, prosodics and semantics fields.
[Store Entry] Stores the current lexical entry in the lexicon.
[Cut] Cuts the current selection to the paste buffer.
[Copy] Copies the current selection to the paste buffer.
[Paste] Pastes the buffer to the current position.
[Macro]
[Store Entry As Macro] Stores the formula of the current entry as a macro. The macro
will take its name from the atom entry field.
10
Lambda Term
variable
constant
(f x)
x:t
hx; y i
1
2
x
x
_t
^t
[t
\t
:x
x^y
x_y
x !y
8x:t
9x:t
x:t
Prolog Term
Prolog variable
Prolog constant
appl(F,X)
lambda(X,T)
pair(X,Y)
pi1(X)
pi2(X)
debox(T)
conbox(T)
dedia(T)
condia(T)
not(X)
bool(X,&,Y)
bool(X,\/,Y)
bool(X,->,Y)
quant(forall,X,T)
quant(exists,X,T)
quant(iota,X,Y)
Table 1: Representation of semantic terms in Prolog
[Store Selection As Macro] Stores the selection as a macro. The macro will take its
name from the atom entry field.
[Help]
[On This Window] Prints a help message.
6 The Postulate Window
The postulate window (figure 7 on the next page) displays the structural postulates in the
current fragment. From here you can delete or edit structural postulates.
You can open the postulate window from the menu bar in the main window by selecting
[Window/Postulate Window], or by typing (Control-p).
Clicking on a postulate will select it. This will cause a selection bar to appear over it,
and allows you to perform the operations in the edit menu on it.
Double clicking a postulate will display that postulate in the edit postulate window.
Clicking a postulate with (Control) depressed will delete that postulate.
Pressing mouse button 2 over a postulate will change the status of the postulate from enabled to disabled or vice versa. This allows you to experiment with the effects of structural
postulates without having to create several versions of the same fragment.
Menu Bar From the menu bar, the following options are available:
[Window]
[Close] Closes the postulate window.
11
Figure 7: The postulate window.
[Edit]
[New Entry] Opens the edit entry window.
[Edit Entry] Shows the selected structural postulate in the edit postulate window.
[Delete Entry] Deletes the selected structural postulate.
[Disable/Enable Postulate] Toggles the selected postulate between enabled and disabled.
[Help]
[On This Window] Gives a help message.
6.1 Editing a Postulate
Editing a postulate is much like editing a formula. There is now a formula on both the
left and the right hand side of the postulate arrow. Selection and cut/copy/paste can be
performed as before.
Instead of atomic formulas we now have structural variables, which can be inserted
from the variable menu, and our choice of constructors is limited to and .
3
Postulate Arrow By clicking on the postulate arrow it will change from ! to $ to . This
makes it easier to store equivalences or inverses of postulates. In the postulate window, all
postulates will appear in their left to right version regardless of the postulate arrow, so
storing a postulate A $ B will in fact be the same as storing both A ! B and B ! A.
Postulate Names You can give a postulate any name which is printable in LATEX math
mode.
12
Figure 8: The postulate edit window.
Valid Postulates The computational architecture poses some limitations on the type of
postulates allowed in your fragments. Grail will report an error when you try to store
postulates of the following form:
There are multiple occurrences of a variable on either side of the postulate arrow.
A variable occurs on only one side of the postulate arrow.
In addition, because of the backward chaining proof search strategy, a warning will be
generated when a postulate has more constructors on the left hand side than on the right
hand side. If you add one of these postulates to your fragment, the proof search algorithm
is not guaranteed to terminate.
Menu Bar the menu bar allows you to access the following functions:
[Window]
[Close] Closes the edit postulate window.
[Edit]
[Clear Postulate] Erases the postulate in this window.
[Store Postulate] Stores the postulate in memory. It will now appear in the postulate
window.
[Reverse Postulate] Swaps the left and right hand sides of the postulate.
[Cut] Deletes the selected part of the postulate, and copies it to the paste buffer.
[Copy] Copies the selected part of the postulate to the paste buffer.
[Paste] Pastes the contents of the buffer to the place of the selected variable.
[Help]
[On This Window] Hmmm, what does this window do?
13
7 The Analysis Window
Figure 9: The analysis window.
The analysis window (see figure 9) is where you can improve the performance of the
theorem prover by setting the parameters for early failure. This can be done either automatically or by hand.
External Modes Sometimes you may want to prevent a mode from occurring in the output, because it is used only as a grammar internal or auxiliary mode. By default all modes
will be external, but you can set modes to internal by turning off their checkbutton here.
Lazy, Transparent and Continuous Modes Three forms of early failure are supported
which apply only to structural postulates satisfying some criteria. See [Moot 96] for descriptions of these criteria. All can be detected by the program, and only the lazy reductions
test is expensive to compute. When the program suspects checking for lazy reductions will
take up an unreasonable amount of time, you will get a choice to set these parameters to
their default, safe settings and only perform the other tests.
Menu Bar From the menu bar, the following options are available:
[Window]
[Close] Closes the analysis window.
[Options]
[Show Status] Gives a description of Grail’s estimate of the current analysis settings.
This can be manual if the settings were performed by the user, safe if performance
is perhaps not optimal but will not prevent solutions from being found, optimal
if a complete analysis has been performed on the current postulates, or unknown
if postulates were added after the last analysis.
[Analyse Postulates] Performs a complete analysis of the postulate set.
14
[Analyse Convergence] Will only check if the label reductions converge for eager
evaluation. This is generally time-consuming.
[Analyse Transparency] Will only check if word order constraints can be applied
eagerly.
[Analyse Continuity] Will only check for which modes continuity labeling applies.
[Safe Settings] Switches off all early failure.
References
[BtM 97]
Benthem, J. van, and A. ter Meulen (eds.) Handbook of Logic and Language.
Elsevier, 1997.
[Danos 90]
´
Danos, V. La Logique Lin´eaire Appliqu´ee a` l’Etude
de Divers Processus de Normalisation at Principalement du Lambda-Calcul. Th`ese de Doctorat, Universit´e
de Paris VII, 1990.
[Gabbay 94]
Gabbay, D. Labeled Deductive Systems. Report MPI-I-94-223, Max-PlanckInstitut fur
¨ Informatik, Saarbrucken.
¨
Oxford University Press, 1994.
[Girard 87]
Girard, J.Y. Linear Logic. Theoretical Computer Science 50, 1987, pp. 1-102.
[Moortgat 97]
Moortgat, M. Categorial Type Logics. Chapter 2 of [BtM 97].
[Moot 96]
Moot, R. Proof Nets and Labeling for Categorial Grammar Logics. MA Thesis,
Utrecht University, 1996.
15