1
 Step2. Install IP device
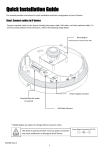
1) Place the installation template (paper) that is included in the package on the desired installation surface. 2) Drill three holes in correct positions based on the template paper, and insert anchor blocks into the holes. 3) Place the waterproof silicon band on the bottom plate of the device and make it align with screw holes. 4) Place the camera body to the installation surface and match three alignment holes with three anchor blocks. Then tighten the surface anchor studs. 5) Connect all the required cables to the camera. 6) Adjust the lens position. 7) Place the dome cover on the main body of the camera. Dome cover has three alignment holes that match camera body’s alignment holes. 8) Once properly placed, insert screws into the three holes of the body and tighten them up. To prevent products from damaging, place the camera on stable and non‐vibrating surfaces If the stability is in doubt, consult with safety personnel for reinforcements, and then proceed with the installation. Caution !
NC3502 Ver1.3 2