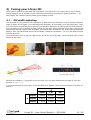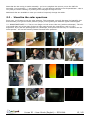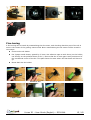
1
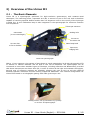
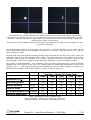
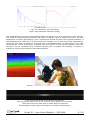
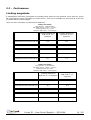
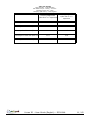
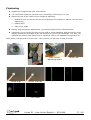
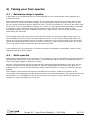
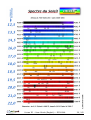
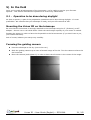
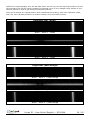
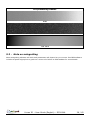
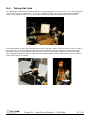
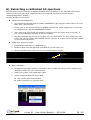
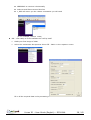
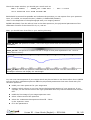
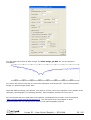
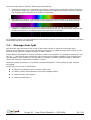
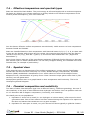
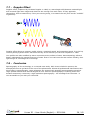
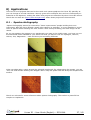
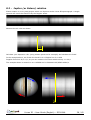
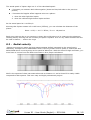
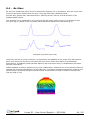
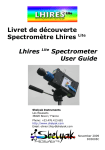
User Guide
Shelyak Instruments
Les Roussets
38420 Revel / France
Phone: +33.476.413.681
http://www.shelyak.com
Email: [email protected]
Ref. DC0004A
December 2006
Lhires III – User Guide (English) – DC0004A
1 / 43
Table of Content
1)Introduction............................................................................................... 4
2)Overview of the Lhires III............................................................................ 5
2.1 -The Basic Elements ............................................................................. 5
2.2 -Performance......................................................................................10
Limiting magnitude................................................................................ 10
3)Tuning your Lhires III................................................................................ 12
3.1 -Slit width adjusting.............................................................................12
3.2 -Visualize the solar spectrum................................................................ 13
3.3 -Adjusting guiding mirror......................................................................14
Rough adjustment................................................................................. 14
Fine tuning........................................................................................... 15
3.4 -Adjusting main mirror.........................................................................16
Simple adjusting....................................................................................16
Finetuning............................................................................................ 17
3.5 -Adjusting grating position....................................................................18
4)Taking your first spectra............................................................................ 19
4.1 -Reference lamp's spectra.................................................................... 19
4.2 -Solar spectra..................................................................................... 19
5)In the field............................................................................................... 21
5.1 -Operation to be done during daylight.................................................... 21
Mounting the Lhires III on the telescope................................................... 21
Focusing the guiding camera................................................................... 21
Focusing the telescope........................................................................... 22
Focusing the acquisition CCD camera....................................................... 22
5.2 -Standard acquisition procedure............................................................ 23
5.3 -Note on autoguiding........................................................................... 26
5.4 -Taking flat field..................................................................................27
6)Extracting a calibrated 1D spectrum............................................................ 28
7)Spectroscopy: introduction......................................................................... 33
7.1 -In the beginning................................................................................ 33
7.2 -Different types of spectra.................................................................... 33
7.3 -Message from light............................................................................. 34
7.4 -Effective temperature and spectral types...............................................35
7.5 -Spectral class.................................................................................... 35
7.6 -Chemical composition and metallicity....................................................35
7.7 -Doppler Effect....................................................................................36
7.8 -Conclusion........................................................................................ 36
8)Applications..............................................................................................37
8.1 -Spectro-Heliography........................................................................... 37
8.2 -Jupiter (or Saturn) rotation..................................................................38
8.3 -Radial velocity................................................................................... 39
8.4 -Be Stars............................................................................................40
9)Troubleshooting / Support..........................................................................41
10)References............................................................................................. 42
10.1 -Books............................................................................................. 42
10.2 -Web links........................................................................................ 42
General................................................................................................ 42
Lhires III – User Guide (English) – DC0004A
2 / 43
Software.............................................................................................. 42
Spectro-heliography...............................................................................43
Projects / Studies.................................................................................. 43
Lhires III – User Guide (English) – DC0004A
3 / 43
1) Introduction
This document is made to help you starting in spectroscopy with Lhires III. It covers the tuning of
the instrument, the first steps to acquire and process spectra, and some examples of observations.
Starting in spectroscopy can be impressive, since there are several elements to put under control.
But thanks to this guide, you will see that none of them is very complex, and just some rigour is
required to make things working together.
We hope that you will enjoy spectroscopy with Lhires III. Join the increasing Lhires III's users and
amateur spectroscopist community on Spectro-L (http://groups.yahoo.com/group/spectro-l/) to
keep us informed of your progress and results. But most importantly, enjoy spectrography!
Olivier Thizy ([email protected])
François Cochard ([email protected])
Lhires III – User Guide (English) – DC0004A
4 / 43
2) Overview of the Lhires III
2.1 - The Basic Elements
Lhires III is a spectrograph optimized for high-resolution spectroscopy with amateur-sized
telescopes. The resolving power, expressed as λ/Δλ, is around 17,000 in the red, and is therefore
capable of resolving spectral details smaller than 0.4 Angstrom units in the vicinity of the hydrogen
H alpha line. A neon calibration lamp is also integrated in the spectrograph for reference emission
line comparison.
Telescope entrance
micrometer
(to set wavelength)
Guiding hole
Access to
the mirror slit
Access door
to focus doublet
Neon lamp knob
Spectrum
imaging hole
Lhires III spectrograph
With a 1-hour exposure, the spectra of stars down to visual magnitude 6 to 8 with the popular SCTs
of 200mm to 300mm diameter and an S/N of 100 can be obtained. The spectrograph can be
connected to most other standard types of telescope, including refractors and Newtonians, provided
that these instruments are slower than f/8, in order to collect all the light and maintain throughput.
Several type of reflection gratings are available, allowing the user to vary at will the trade-off
between spectral resolution and the limiting magnitude attainable. The nominal configuration for
Lhires III is based on a holographic grating with 2400 grooves per mm.
Grating holder can be switched very quickly
on a Lhire III spectrograph
Lhires III – User Guide (English) – DC0004A
5 / 43
LHIRES is an acronym for Littrow High REsolution Spectrograph. A Littrow-mounted spectrograph is
one where the same optical component, in this case a 200mm lens, acts as both the collimator to
render the light beam parallel, and the focusing (or imaging) lens to bring a focused image of the
spectrum onto the detector. This design eliminates the need for separate lenses for the collimating
and focusing compared to "classical" spectrograph mountings such as the Czerny-Turner or Ebert
configurations. Lhires III is therefore compact and economical to produce. The weight of Lhires III
is less than 1.6 kg.
Inside the Lhires III
The usable field where the spectrum is obtained has been deliberately restricted in order to allow the
use of a simple achromatic doublet as the objective lens. The image quality will allow you to obtain a
resolving power of 17,000 only in the highest resolution option for Lhires III (i.e., 2400 lpm grating
and a slit width of 25μm over a linear 8mm field approximately).
Connection to the telescope is either by a standard 50.8mm (2 inch) adapter or the regular screw
adapter for Meade and Celestron SCT's (Schmidt Cassegrain Telescopes). Ideal input focal ratio is
f/10 and the acceptable range is f/8-f/12. For amateurs with faster optical systems a Barlow lens
can be employed to increase the f-number, but you should check that your telescope has sufficient
back-focus, particularly if using a Newtonian reflector.
The adapter on the camera side is a Pentax-type M42 T-ring (42mm x 0.75 screw thread). There is
sufficient back-focus with Lhires III so as to allow the use of a DSLR as the detector (the T-ring is
obviously brand-dependent as so is not supplied). Adapters for the SBIG cameras are supplied with
the basic kit as well as a 1¼ inch (31.75mm) adapter for observing spectra with an eyepiece, a lowlight level video camera or with a webcam such as the ToUcam, for example. Other camera adapters
are available as an option.
The entrance slit to the spectrograph is highly polished and reflective and is inclined at 10º to the
optical axis of the telescope. The slit plays the role of a mirror for objects whose light is not actually
passing through the jaws. Light from this polished surface is reflected back to a guide camera (not
supplied) via a 1¼ inch (31.75mm) adapter ring. Alternatively, it is possible to employ a webcam,
video camera of a second CCD camera for automatic guiding.
Lhires III – User Guide (English) – DC0004A
6 / 43
Images from the guiding camera (here a Watec 120N).
The entrance slit is just perceptible as a darker horizontal line against the slighter brighter sky
background. On the left, the star is not on the slit. On the right, it is correctly positioned on the slit.
The star's intensity has been strongly reduced since most of the light is now passing through the
spectrograph (where it should go!)
An algorithm in IRIS software has been developed for guiding on the halo (blurred) image of a star
(virtual slit algorithm)
The spectrograph employs a fixed mirror slit. However, it can be removed and its width can be
varied. Additional slits are also available as option so it would be more convinient if you need to
often change the width.
Focused light from the telescope passing through the slit meets the flat 45° mirror and is sent the
collimator lens, focal length 200mm, 30mm diam. The collimated beam then passes to the plane
reflection grating that is mounted on a pivoting support. Varying the spectral range of the
spectrograph is achieved by rotation of the grating by adjusting a precise micrometer screw.
The grating is interchangeable. The "standard" type has 2400 grooves per mm, giving a spectral
dispersion of 0.115 A/pixel in the red, for a camera using the Kodak KAF-04XX family of CCD chips
(Audine, ST7,...). Less dispersive gratings are available, the groove density falling in proportion to
light intensity of weaker and weaker objects in order to obtain a spectrum.
Grating – Lhires III (lines/mm)
2400
1200
600
300
150
0.012
0.035
0.074
0.149
0.300
17000
5900
2800
1400
700
5
17
35
75
150
8.5
25
55
110
230
All visual domain in # images
45
15
7
4
2
Limiting magnitude
5.0
6.8
7.5
8.4
9.2
Dispersion (Hα)
nm/pix
Resolving power
Radial Velocity
Km/s
Field of view
nm
Table: parameters based on grating used
(ETCL simulation: 200mm f/10 telescope, 30µm slit,
KAF0400 camera, 1h exposure, Signal/Noise of 100)
Lhires III – User Guide (English) – DC0004A
7 / 43
Lhires III – User Guide (English) – DC0004A
8 / 43
Comparing spectra of Vega
Left: low resolution, 150 lmp grating
Right: high resolution 2400 lpm grating.
The dispersed light from the grating passes back through the lens and is focused on the detector.
This could be an astronomical (cooled) CCD camera, a DSLR or even a webcam. However, for most
applications in stellar spectroscopy, only a cooled CCD camera will have the required sensitivity. A
few application can make use of a video camera for example, one of them being solar observations,
where the Lhires III can easily be converted into a spectroheliograph for observation of the solar
chromosphere. Visual observation of spectra with an eyepiece is also equally possible. Lhires III,
therefore, can be considered and excellent teaching tool to support the teaching of physics in
schools as well as the principles of astronomical optics.
Viewing the solar spectrum through a Lhires III
2-dimensional spectrum of the Be star Gamma Cas.
The very broad, intense line in the centre is the H-alpha line in emission.
The several narrower dark lines on either side are produced
by atmospheric water vapour absorption in the Earth's atmosphere.
Lhires III – User Guide (English) – DC0004A
9 / 43
2.2 - Performance
Limiting magnitude
A spreadsheet had been developped to simulate what would be the expected result with the Lhires
III: the Exposure Time Calculator for Lhires (ETCL). This tool is available on internet and on the CD
provided with the spectrograph.
Here are some exemples of performance obtained:
2400 l/mm Grating
Star type B0V - CCD KAF-0400
Slit Width: 25 µm - Seeing : 4 arcsec.
Resolving Power (R) : 17000
Sampling (KAF-0400) : 0.115 A/pixel
Limiting Magnitude
S/N=50 in 1 h
exposure
Limiting Magnitude
S/N=100 in 1 h
exposure
Telescope D=128 mm F/D=8
6.5
5.6
Telescope D=200 mm F/D=10
6.7
5.9
Telescope D=280 mm F/D=10
7.1
6.2
Telescope D=355 mm F/D=11
7.2
6.3
Telescope D=600 mm F/D=8
8.1
7.2
1200 l/mm Grating
Star type B0V - CCD KAF-0400
Slit Width: 25 µm - Seeing : 4 arcsec.
Resolving Power (R) : 5800
Sampling (KAF-0400) : 0.345 A/pixel
Limiting Magnitude
S/N=50 in 1 h exposure
Limiting Magnitude
S/N=100 in 1 h
exposure
Telescope D=128 mm F/D=8
8.9
8.0
Telescope D=200 mm F/D=10
9.1
8.3
Telescope D=280 mm F/D=10
9.5
8.6
Telescope D=355 mm F/D=11
9.6
8.8
Telescope D=600 mm F/D=8
10.5
9.7
Lhires III – User Guide (English) – DC0004A
10 / 43
300 l/mm Grating
Star type B0V - CCD KAF-0400
Slit Width: 25 µm - Seeing : 4 arcsec.
Resolving Power (R) : 1300
Sampling (KAF-0400) : 1.493 A/pixel
Limiting Magnitude
S/N=50 in 1 h exposure
Limiting Magnitude
S/N=100 in 1 h
exposure
Telescope D=128 mm F/D=8
10.4
9.6
Telescope D=200 mm F/D=10
10.7
9.9
Telescope D=280 mm F/D=10
11.0
10.2
Telescope D=355 mm F/D=11
11.2
10.4
Telescope D=600 mm F/D=8
12.1
11.3
Lhires III – User Guide (English) – DC0004A
11 / 43
3) Tuning your Lhires III
When you've finished to assemble the instrument, you still have to do some tuning. This is made
during daylight, but it requires the full equipement (telecsop, CCD camera, guiding camera...). In
this section, we consider that the 2400 g/mm grating is used.
3.1 - Slit width adjusting
The slit width is a key point of the instrument. It determines the resolution of your spectra. Nominal
width is 25µm. If it's bigger, you'll decrease the resolution. If it's smaller you'll lose some flux. Then
you should tune this parameter as precisely as possible. Measuring a width of 25 µm is not obvious you can make it just by looking at light through the slit with some experience, but we''ve got a more
determinist method: optics rules say that if you send a laser toward the slit, that makes a diffraction
pattern, with a proportionnal size to the slit width. Thanks to the Nature... Do it in the dark to better
see the patterns!
You'll need some time to get the right tuning, but at the end of the day, you'll love that (this is to be
shown to the kids!).
Measure the distance 'x' projected on your screen. You can then deduct the slit width 'a' with the
formula: a = D . λ / x.
λ is the wavelength for your laser, in general 650nm or 680nm. Here are some values for a laser at
650nm:
D
a
50cm
1m
2m
10µm
32mm
65mm
130mm
18µm
18mm
36mm
72mm
30µm
11mm
22mm
43mm
Lhires III – User Guide (English) – DC0004A
12 / 43
Note that the slit tuning is made manually: you've to untighten the screws, move the half-slit
smoothly (very smoothly...), and tighten back. You will be also careful to the slit parallelism - this is
very easy to control visually, by looking at the daylight through the slit!
Additional slits are available in case you need to frequently change slit width.
3.2 - Visualize the solar spectrum
From now, you'll start to see the solar spectrm. This important, not only because it's beautiful, but
also because you'll get the exact position (angle) of the grating for different typical wavelengths.
*** IMPORTANTE NOTE *** There is no danger to look at sun this way (without telescope). The slit
is so small that only a few part of the sun light goes through the instrument, and it is very
dispersed. If you put the spectrograph on a telescope, then point the blue sky or a cloud to see the
solar spectra – do not look directly toward focused solar spectrum.
Lhires III – User Guide (English) – DC0004A
13 / 43
●
Put the eye-piece mount and an eyepiece on the spectro.
●
Adjust the micrmeter to about 20mm.
●
Adjust the main mirror to the middle position (screws M4, on the bottom face of the Lhires
III)
●
Open a side door, and put the collimation lens holder at medium position.
●
Choose a sunny day... or find a powerful light (but for sure, the sun is much better !)
●
Point the spectro towards the sun (the slit must receive direct light from sun).
●
Then you should be able to see your first high resolution spectrum of the sun ! This is a large
band, whose color depends ont the region you'r looking at.
●
At this stage, you can focus the collimation lens. Then you'll see a lot of absorbing lines
across the spectrum.
●
It's possible that you also see deep black lines in the direction of the spectrum dispersion.
This very probably the effect of dust in the slit, or small defects on the slit edge.
●
Move the grating angle (by turning the micrometer), to explore the full solar spectrum. You'll
should recognize major lines such as Ha (6563 A - in my case micrometer position is
21,64mm), sodium doublet (in may case, 19,38mm), and so on. The full spectrum goes
roughly from 13,5mm (deep purple) to 23,5mm (dark red) - which makes about 20 turns,
and hundreds of absorption lines ! How great is spectro, isnt'it ?
●
Then, to complete this color trip, look for the zero order (around position 0 of the
micrometer). You'll see a single line very bright - it's better to point slightly beside the sun.
In this position, the grating works as a mirror, and what you see is the image onf the slit.
Record precisely the micrometer position for each recognized wavelength.
Note: If the weather is bad, you also can do all this step with the neon lamp. In this case, prevent
any parasit from daylight. See the image of the neon spectrum... Note: lines are curved and it's
normal. This is because we work in 3D, and not in a 2D plan. We are working slightly off-axis, thus a
line deformation.
3.3 - Adjusting guiding mirror
The guiding mirror is made to redirect skyfield to the guiding camera. This adjustment have no
effect on the spectrum quality, but it facilitates the guiding (even autoguiding) of the telescop during
the acquisition. The adjutment can be made in two steps:
Rough adjustment
In a first time, it can be adjusted roughly, with the same kind of method used to tune the
collimation of a telescope: Just put the Lhires III on a table, and look at it from the top (your eye
takes place of the telescope). When the position is OK, you should see the guiding camera lens
picture and the slit (black line) well centered in the spectro. You can adjust the position of the mirror
by turning the 4 screws (1 pushing , and 3 pulling) accessible from ouside. At this stage, you must
check that the neon holder can freely move without interferring with the mirror (you can check it
easily by looking into the spectro from the some position).
Lhires III – User Guide (English) – DC0004A
14 / 43
Fine tuning
A fine tuning can be made by materializing the slit center, and checking that this part of the slit is
seen in the center of the guiding camera field. Note: materializing the slit center will be reused in
next steps.
●
Unmount the slit holder
●
Put 2 paper small sheets, spaced by 2-3mm. Use adhesive tape to stick them (on the holder,
not directly on the polished faces of slit !). Ensure that the 2-3mm gap is well positionned in
the mechanical center of the slit. This part shows the area where the star beam will have to
go.
●
Mount back the slit holder.
Remove slit
Paper mask
Lhires III – User Guide (English) – DC0004A
15 / 43
●
Mount the spectro on the telescope (and point it to the sky - not to the sun, with no motion)
●
Install the guiding camera (webcam, video camera...), and visualize the image (monitor,
PC...)
●
Adjust manually the focus of the camera in order to see the slit acurately.
●
Fine tune the mirror, in order to put the slit center image in the center of the picture.
●
The mirror adjustment is done. You can remove the papers, but you can also keep them, for
next steps !
Guiding camera
Slit is OK
Slit is not OK
3.4 - Adjusting main mirror
This adjustment is important for the quality of the spectra produced by your Lhires III. You will turn
the main mirror so that the light beam dispersed by the grating pass right beside the mirror. If the
angle is too small, mirror will block some light and there will be a vignetting effect; if the angle is
too large, the beam will be too far from the optical axis and spectra will be impacted by the doublet
chromatism.
There are two steps: a simple adjusting with naked eye and finetuning with your acquisition camera.
Simple adjusting
●
Materialize the center of the slit (cf previous paragraph)
●
Put an eye piece on the spectrograph (for exemple, a 25mm one)
Note: you can perform this on the telescope pointing toward the sky (but not the Sun
directly) or without a telescope and pointing the spectrograph alone toward the Sun.
●
Position the grating angle so that you can vizualize the zero order of the spectra (you should
have noted this position during your first adjustments). It should be around 0mm on the
micrometer.
●
While looking through the eyepiece, adjust the mirror angle (screw at the bottom of the
chassis) so the center of the slit is at the center of the field of view.
Lhires III – User Guide (English) – DC0004A
16 / 43
Finetuning
●
Replace the eyepiece with your CCD camera
●
run continuous exposures (around 1sec?) eventually in binning 2x2 or 3x3.
●
Position the slit to the center of your image by adjusting:
○
doublet focus if you do not see the slit (changing from eyepiece to camera requires some
adjustment)
○
grating angle
○
main mirror angle
●
Playing with those three adjustments, you should quickly find the ideal positions.
●
Eventually, try to put the slit closer to one edge to avoid vignetting. Shift the mirror screw
slightly toward the slit trappe so the slit image is at 1/3rd of the CCDimage. This way, you
optimize the position and reduce risk of vignetting. This is not mandatory but good to do...
Note where your spectrum is on the CCD - this is where you will have to find your star.
Main mirror
adjusting screw
Screw high
Screw low
Screw nominal
Zero order
Lhires III – User Guide (English) – DC0004A
17 / 43
3.5 - Adjusting grating position
Before taking a stellar spectra, you still have one adjustment to perform. It does require patience.
It's not absolutely mandatory but it will help you afterward.
Goal is to put grating line parallel to the rotation axis of the grating support. when they are not,
lines will follow a conic curve instead of a cylindric one. Projected image on the CCD will shift when
changing the wavelength and move eventually out of the CCD camera. Ideally, your should have the
zero order and the full spectra within your CCD, and even within a small portion of the chip! We will
then check that zero order (close to 0mm) and red portion of the spectra (around 25mm) will be at
the same position.
To correct the position, you have to do the following:
●
Dismantle the grating support
●
Adjust the grating as parallel as possible with the support edge (or rotate depending on your
measurement of the shift)
●
Re-mount the grating support and control it again.
●
After few iterations and some practice, you will obtain a perfect tuning.
●
Eventually, you can now readjust main mirror to put the slit centered on your capteur
Bravo -all adjusting have been completed now. Those adjusting have to be done once for all; you
will have to do them again if you change the mechanical parts of the instrument or if you change the
grating.
You can now do your first spectra of a star. Before, do not forget to remove the papers that marked
the center of the slit!!!
Lhires III – User Guide (English) – DC0004A
18 / 43
4) Taking your first spectra
4.1 - Reference lamp's spectra
A good way to get acquainted with your spectrograph is to do some spectra during daylight and
inside your home.
After having set up the acquisition camera, you can first take a spectrum of the Neon lamp inside
the Lhires III. Connect a 12V power supply to the spectrograph input connector, switch it on, and
turn the knob so the Neon lamp is upfront the slit. Turn the micrometer so you are in the green area
where there is a very bright Neon emission line. Check you have proper focus and adjust he doublet
if necessary. Take a spectrum with enough dynamic but be careful not to to saturate. Your
acquisition software may have a statistic command or status so you can check the maximum level
while taking the spectrum.
Turn the Neon lamp off and remove it from the slit entrance by turning the Neon lamp knob. Try
several lamps you have at home and take spectra of them. Try an energy saving lamp where you
should see two green emission lines in that area (otherwise, turn the micrometer to see them and
redo a Neon lamp calibration spectrum). Those are Mercury («Hg» element) lamp and you can also
see a very bright yellow line and two lines around blue/violet.
Those spectra are a good practice to extract the profile and calibrate in VisualSpec. Refere to this
software manual for more details.
4.2 - Solar spectra
Ideally with a SLR camera using the proper T-ring adapter or with a CCD camera, point the Lhires III
spectrograph toward the sun. Do not mount it on a telescope and put a blurry transparent paper in
front of the spectrograph to diffuse the light in.
Caution: looking the sun through a telescope can cause pemanent dammage to your eyes. Do not
look the sun directly through a telescope nor with the spectrograph at the zero order where the
grating acts like a mirror. In low resolution mode, look at the blue or cloudy sky instead of the sun
directly.
Take images of the spectra and adjust the doublet focus carefuly. Change the position of the
micrometer (thus the grating's angle and the position in the spectral domain) and repeat the process
several times. You will obtain a serie of spectra of the sun and you can put them side by side to
reproduce a very large spectrum of the sun.
Lhires III – User Guide (English) – DC0004A
19 / 43
Lhires III – User Guide (English) – DC0004A
20 / 43
5) In the field
Once you've made all adjustments of the instrument, you're ready to acquire your first star
spectra... This section describes the operations to do at every observation.
5.1 - Operation to be done during daylight
As often is spectro, a part of the preparation operations can be done during daylight - it's even
preferable ! We consider that your telescope is ready, and you CCD camera as well.
Mounting the Lhires III on the telescope
Be sure that the instrument is strongly attached to the telescope using the 2'' (50.8mm) or SCT
adapter. Secure it so it can't slide down. Check the total weight capacity of your mount if needed.
Position the spectro in order to have the slit parallel to the RA movement (if you don't know it yet,
you'll make that later).
And of course, balance your setup very carefully.
Focusing the guiding camera
●
Point the telescope to the sky (not to the sun!).
●
Slide the guiding camera up to have a focused image of the slit. Turn the camera to have the
slit horizontal.
●
Move the camera (and tighten it) in order to have the slit center in the center of the image.
Lhires III – User Guide (English) – DC0004A
21 / 43
Focusing the telescope
●
Point the telescope to the horizon line (our exemple here is Chamrousse ski ressort in the
French Alps!).
●
Focus the telescope up to get an accurate picture of the horizon (trees, moutains...).
Note: during this adjustment, the slit remains focused so do not touch the guiding camera focus!
Focusing the acquisition CCD camera
●
Mount your imaging camera (CCD camera, SLR camera, webcam...) and orient it so that the
spectrum align with the width of your image.
●
Protect the instrument from the day light.
●
Switch on the neon lamp, and put it in front of the slit (turning the button).
●
Adjust the grating angle in a region with neon lines. The easiest is aroud Ha (6563 A), where
there are 2 well known lines - thanks to Nature ! During the tuning of your instrument, you
should have recorded the micrometer value for Ha.
●
Acquire pictures continuously, and identify these lines
●
Open one of the side doors.
●
Focus the spectrum on the CCD picture, by turning the collimation lens holder.
●
If you're in full light, you should have to close the side door between each picture (because of
the parasites).
●
At the end, tighten smoothly the nylon screw, to block the lens holder.
●
At optimum, the FWMH should be around 3 to 4 pixels.
Note: this can also be done on solar spectrum but it's less precise.
Note: If you change the observation wavelength, you may have to re-tune the focus.
Lhires III – User Guide (English) – DC0004A
22 / 43
Focus not OK
Turning the Doublet
Focus OK
5.2 - Standard acquisition procedure
This is a recommended procedure during a normal night session. First, focus your spectrograph:
●
Point toward a bright star.
●
Ensure proper imaging camera orientation (spectrum should be along the width)
●
Turn on the Neon lamp and fine tune the focus
Then point and center a reference stars such as Altair, Castor... whose spectra can be found on the
UVES database: http://www.sc.eso.org/santiago/uvespop/bright_stars_uptonow.html (see also
VisualSpec tutorial: http://www.astrosurf.com/vdesnoux/tutorial8.html)
●
Take 3 spectra of Neon, switch it off, turn the Neon knob
●
Take several bias in 3x3 binning to empty the CCD and remove any remaining trace of Neon
●
Take several spectra of the reference star (long exposure of 5min or 10min for example)
●
Take 3 spectra of Neon, switch it off, turn the Neon knob
Point and center your first target
●
Take 3 spectra of Neon, switch it off, turn the Neon knob
●
Take several bias in 3x3 binning to empty the CCD and remove any remaining trace of Neon
●
Take several spectra of the target (long exposure of 5min or 10min for example)
●
Take 3 spectra of Neon, switch it off, turn the Neon knob
Then repeat this sequence for every target. At the end of your session, you can record the
calibration frames:
●
dark frame for spectra images
●
dark frame for Neon spectra
●
bias frame
●
flat field frame. A flat field frame, in spectrography, is done by taking a spectrum of a
hallogen (whose spectrum is a continuuous one without any absorption line).
Reason why we take Neon calibration before and after each sequence is because the spectrograph is
not stable over temperature and flexion. You can check with the two Neon spectra series by how
much the wavelength calibration changed. Use the average of the two Neon calibration serie as your
main Neon reference spectrum.
The reference star will be used to calculate the response curve of the full setup (telescope,
spectrograph, imaging camera).
Bias, dark, and flat field frames will be used to correct images from those defects. The only
Lhires III – User Guide (English) – DC0004A
23 / 43
difference in spectrography is for the flat field where we will only use the high frequencies to correct
the dust trace but not the overall vignetting of spectral curve of your hallogen lamp. Refere to your
camera manual on how to get those pre-processing frames.
Here are all images of a typical session with a 2400lines/mm grating, with each calibration (dark,
bias, flat, neon) already combined to master frames (using a median function).
Reference star (Altair)
Neon – serie 1 - Altair
Spectrum – Altair (in reallity, we took 3 of those images)
Neon – serie 2 - Altair
Target star (bêta Auriga)
Neon – serie 1 – bêta Auriga
Spectrum – bêta Auriga (in reality, we took 3 of those images)
Neon – serie 2 – bêta Auriga
Lhires III – User Guide (English) – DC0004A
24 / 43
Lhires III – User Guide (English) – DC0004A
25 / 43
Pre-processing frames
Bias
Dark
Flat field
5.3 - Note on autoguiding
Most autoguiding software will work and parameters will depend on your mount. But IRIS software
includes a special algorythm to guide on a mirror slit. Refere to IRIS website for more details.
Lhires III – User Guide (English) – DC0004A
26 / 43
5.4 - Taking flat field
As mentionned, flat field are slightly different in spectrography. Do not try to do it on the skylight as
you will then record a spectrum... of our Sun! Instead, take it during the night with an hallogen
lamp. Use a paper in front of your telescope to diffuse the light as shown in the picture below.
It is also possible to take the flat field without the telescope. Make a hole the size of your f/ ratio of
your telescope. In the example below, the mask is 140mm in front of the slit and we used a f/10
telescope; the size of the mask is then 14mm. The hole is filled with a paper to diffuse the light.
When taking the flat field frame, make sure the spectrograph doesn't allow light to get in. Cover it
with a black tissue if needed.
Lhires III – User Guide (English) – DC0004A
27 / 43
6) Extracting a calibrated 1D spectrum
We will follow here the exemple of SpIRIS software that is provided on our CD-ROM. But similar
technic would work with other softwares that include special function to process spectra
(AudeLA/SpcAudace, PRISM...).
Prepare all files you will need:
●
●
master pre-processing files.
○
Use individual files and apply a median (SMEDIAN) to get a single master frame. Do it for
Bias, Dark, and Flat files.
○
Ensure you do not go over 32767 as SpIRIS only process 16bits signed files. If you have
16 unsigned files, use the CONVERTSX function.
○
Also, ensure all your image are properly oriented (red to the right, blue to the left). If
not, use the MIRRORX function on all your images.
○
Last but not least, get the list of hot spots on your dark frame. For this, LOAD your dark
frame and use the «FIND_HOT COSME 25000» function. A «cosme.lst» file will be created
in your working directory.
LOAD altair spectrum image.
○
Substract the dark frame («SUB dark 0»)
○
Measure which line the spectrum is located at (we will call it Y0)
○
Find the 6575A telluric line (look for the specific pattern below)
6575A
○
●
Measure the column where this line is located (X0). In our example, it is X0=447.
Neon calibration
○
Average the two Neon spectra (one before and one after the serie) to do a master neon
calibration frame for your reference star
○
LOAD your master neon calibration frame
○
select a frame around the X0,Y0 area,
■
click on the right mouse button
■
select «Fenêtre» to crop this area
Lhires III – User Guide (English) – DC0004A
28 / 43
■
MIRRORXY to reorient it horizontally
■
select a small frame around this line
■
L_ORI will return you the «slant» orientation you will need
(in our example, result if 1.393)
●
OK... now ready to let the software do it all by itself!
○
LOAD your first image of Altair
○
select the «traitement des spectres Lhires III – 2400» in the «spectro» menu
fill in all the required data in the processing window
Lhires III – User Guide (English) – DC0004A
29 / 43
Check the output window, you should get a result such as:
RMS = 0.025604
-
lambda_ref = 6522.4277
-
Pas = 0.11570
a2=-3.2122e-006 a1=0.11868 a0=6522.428
RMS should be as small as possible and indicates the precision you can expect from your spectrum.
Here, it's 0.025A, so around 1km/sec (=RMS*λ/c=RMS*6563/300000).
«Pas» is the dispersion of the spectrograph with your imaging camera.
SpIRIS calculated, from the telluric lines in the Altair spectrum, the polynomial parameters of the
calibration function of the Lhires III: a2, a1, and a0.
Now, you should have three files in your working directory:
altair_0b.FIT: 2D spectrum of Altair, sum of all single frames and corrected from geometrical
distorsions.
altair_0c.FIT: 1D spectrum of altair but still in image format (and expanded on the Y axis to
better allow to see it).
altair_1b.DAT: this is the spectrum calibrated with the telluric lines. You can now load it in
VisualSpec software and display the wavelength.
You can now extract spectra of your target which may be too faint to use those telluric lines. SpIRIS
will use the Neon calibration spectrum AND the polynomial parameters that were found with your
reference spectrum.
●
LOAD your neon spectrum for your target star
●
measure which column is one neon line at the horizontal position of your spectrum. In our
exemple, we will use the line on the right (6598.95A neon line) that we measured at column
657.
●
LOAD the first image of your target spectrum serie
●
select a frame around the spectrum
●
select the «traitement des spectres Lhires III – libre»
in the «spectro» menu
●
fill in the parameters
Lhires III – User Guide (English) – DC0004A
30 / 43
Lhires III – User Guide (English) – DC0004A
31 / 43
You get again three files for beta-auriga. The beta-auriga_1b.DAT file can be opened in
VisualSpec.
You notice the telluric lines and of course two absorption lines around Hα. This is because bêta
Auriga is a spectroscopic binary star!
Note that before sharing your spectra, you need to correct it from the response curve (impact of the
telescope, spectrograph, and imaging camera). See VisualSpec manual on how to do it.
We recommend that you subscribe to the Spectro-L distribution list to share your first spectra
(http://groups.yahoo.com/group/spectro-l/). You will benefit from the support of other
spectroscopists and you can get there ideas of new spectrographic projects.
Lhires III – User Guide (English) – DC0004A
32 / 43
7) Spectroscopy: introduction
7.1 - In the beginning
Spectroscopy really started around 1666 when sir Isaac Newton dispersed sunlight with a prism. But
it's in 1802 that William Wollaston discovered "dark" absorption lines, lines studied later by Joseph
von Fraunhofer who published a catalog of several hundred of those lines in 1815. We now have
classified thousands of absorption lines in the solar spectra.
In 1849, Léon Foucault studied emission lines produced by a Sodium lap. Gustav Kirchoff and Robert
Bunsen identified the same lines in the solar spectra in 1857.
solar spectra with a Lhires III (O.Garde)
7.2 - Different types of spectra
Spectrography analyses light from sources away from us. It allows the study if the chemical
composition, temperature, pressure, and movement.
Lhires III – User Guide (English) – DC0004A
33 / 43
There are three types of spectra, following the Kirchoff law:
1. Continuous spectra: it is emitted by any solid or gazeous body under high presure and high
temperature. Stars are, under first approximation, like black body whose continuous spectra
has a shape which depends on its surface temperature.
2. Absorption line spectra: a low pressure low temperature gaz crossed by a continuous light
absorbs some photons. Spectra then shows dark lines in front of the continuous spectra.
3. Emission line spectra: a low pressure high temperature gaz emits a light made of few
radiations, characteristics of the atoms that constitutes this gaz. Each chemical element has
its own line spectra, true identity card of its composition and state.
An important property of those absoprtion and emission spectra is that lines are emitted at the same
wavelength that they are absorbed.
7.3 - Message from light
Spectroscopy was extended to the study of stars and nebulae in which new elements were
discovered. Sir Norman Lockyer and Jule Janssen discovered in 1868, during a solar eclipse, a new
element which has been isolated on Earth in 1895: Helium.
Johann Balmer developed an empiric formula in 1885 for the position of hydrogen emission line (Ha,
Hb, Hg...). This formula was extended to other elements by Johannes Rydberg. But it's Niels Bohr
who brought in 1820 a theory to the spectral line process. The Bohr model is based on quantum
theory and electronic clouds around atomic nucleus.
Astronomy faced a revolution, an evolution toward Astrophysics. The language of light was just
decrypted!
Coded light is rich of lof of information:
●
on effective temperature at the surface (Wien law)
●
on radial, rotation and expansion movement (Doppler effect)
●
on stellar density and pressure
●
on chemical composition
Lhires III – User Guide (English) – DC0004A
34 / 43
7.4 - Effective temperature and spectral types
Stars are almost like black bodies. They emit energy at all wavelengths with a continuous spectra.
Its shape is a Planck curve whose maximum is directly linked to the effective temperature of the
surface (stellar atmosphere); this is the Wien law.
Continuous spectra of several black bodies
Our Sun has an effective surface temperature around 6000K; visible stars to us have temperature
between 3000K and 30000K.
Stars are classified based on their temperature with historical letters O, B, A, F, G, K, M. Stars with
O type are the hottest while M type are the coolest. We memorize this sequence with the famous
"Oh Be A Fine Girl (Guy), Kiss Me". Types R, S, and N have been added later one ("Right Now
Sweetheart"!).
Annie Jump Cannon was one of the most famous assistant of Edward Charles Pickering in Harvard.
She was an expert in stellar classification. For the Henry Drapper catalog, she classified more than
300000 stars, an example of productivity!
7.5 - Spectral class
If the spectral type is a characteristic of the surface temperature, a more precise classification
should take into account their luminosity. In Yerkes, William Morgan, Philip Keenan, and Edith
Kellman (MMK) established a classification I to V which takes into account the shape of some
absoprtion lines, characteristics of gravity forces. Class I stars are super giants while class V (like
the Sun) are sub giants stars.
Astrophysists position stars on a graph based on their temperature and luminosity. This is the
Hertzsprung-Russell diagram.
7.6 - Chemical composition and metallicity
Two stars of same class and same type have a different history, a different genealogy. We note Z
the metallicity or the ratio of atom different than hydrogen and helium. One can position each star
on a 3 dimension HR-Z diagram: temperature, luminosity, and metallicity.
We classify sars in two populations:
1. Population I: stars rich in metal (ie: non hydrogen or helium atoms), often second or third
generation stars. Part of their matter has been created during the explosion of a supernova.
Our Sun and matter that constitutes us is a good exemple.
2. Population II: stars poor in metal, very old. We can find them typically in globular clusters.
Lhires III – User Guide (English) – DC0004A
35 / 43
7.7 - Doppler Effect
Doppler effect, explained by Christian Doppler in 1842, is a wavelength shift between emitted light
and received light when object and observer are moving from each other. If they approach
themselves, shift is toward blue; if they are moving away, it is toward the red (such as the "redshift"
of galaxies).
λ−
λ
λ+
Doppler effect allows to measure radial velocity, rotational speed, and expansion speed. It is the key
to study binary systems and it has been the key of the discovery of the first exoplanet in 1995.
Line profiles are also modified by wave movement at the surface of stars. Asterosismology allow to
better understand the internal structure of stars. Even if one can't see the star surface visually, their
light brings us a message full of learning!
7.8 - Conclusion
Spectrography is like archeology or a criminal case study. With clues included in spectra, the
astrophysist tries to go back to the root of the phenomena. Almost all professional observations are
done today in spectrography. Large telescope are equiped with powerful spectrographs to analyse
large spectral domain and several targets at once. But now spectrography is evolving within the
amateur astronomy community. High resolution spectrography - the message from the stars - is
now accessible to you with your Lhires III.
Lhires III – User Guide (English) – DC0004A
36 / 43
8) Applications
There are a lot of projects that can be done with such spectrograph as the Lhires III, specially as
you can change to several resolution. We only gives some exemples here and we recommend you
subscribe to the Spectro-L mailing list where new projects are described by other Lhires III owners.
Check also our web site (http://www.shelyak.com) where those projects are documented.
8.1 - Spectro-Heliography
Spectro-heliography was so far reserved to "home improvement" people building their own
instrument. With the Lhires III and a small video camera (or webcam), it is now possible to record
video of spectra while scanning the solar surface. After some processing, the solar image can be
rebuilt.
As you can position the grating to any wavelength you want in the visible range, you have not one
but thousands filters available to you! Select the area you want to look at: Hydrogen, Calcium,
Helium, Iron, Magnesium... each will show you something different!
Video recording take a range around the selected wavelength. By substracting the images, you can
"see" the solar surface shifting with Doppler effect: map the speed field and study the complex solar
surface.
Check our web site for some references about spectro-heliography. This technic is powerful but
complex to implement.
Lhires III – User Guide (English) – DC0004A
37 / 43
8.2 - Jupiter (or Saturn) rotation
Planet rotation is a very easy project which can be done with a Lhires III spectrograph. A single
spectra will unveil the tilted line by the Doppler effect.
Measure the tilt «dX» as shown:
dX
Calculate your dispersion «D» (using a Neon spectrum for exemple) and calculate dλ=D*dX
In the exemple above, we found dX=8 and D=0.115A/pixel so dλ=0.92A
Doppler formula is dλ/λ=v/c; so you can measure the linear radial velocity v=c*dλ/λ
The exemple above is around Hα so λ=6563A and v=300000*0.92/6563=42km/s.
λ
Lhires III – User Guide (English) – DC0004A
38 / 43
The actual speed of Jupiter edge is a ¼ of this calculated speed:
●
½ because you measure both sides together (shown as blue/red sides in the previous
picture)
●
½ because the Doppler effect happens twice on a planet:
1. when the solar light hits Jupiter
2. when the reflected light leaves Jupiter surface
So the actual speed is V=10.5km/s.
Knowing that Jupiter rotates in P=9.92 hours (35700s), you can calculate the diameter of the
planet:
Diam = V*P/π = 10.5 * 35700 / 3.14 = 120,000 km
Book gives 140,000 km so our measure is close! We could improve it by improving the telescope
tracking and by ensuring the slit is exactly at Jupiter's equator. Give it a try. Same method can also
be used on Saturn ... and on the rings!
8.3 - Radial velocity
Stars are moving into space and their spectra appear shifted compared to the same lines in
laboratory. Exemple here is SAO104807 which is moving toward us at a speed of 100km/Sec and
SAP112958 which is moving away at the spedd of 99km/sec. With the Lhires III high resolution, you
even have to correct from the Earth movement to do a proper calculation!
Shift in the spectra of those two stars taken with a Celestron 11 and a Lhires III is easily visible
compared to Alair spectra. This is an easy and highly educational project!
Lhires III – User Guide (English) – DC0004A
39 / 43
8.4 - Be Stars
Be stars are hot B stars which shows or has shown emission line in its spectra. they are much more
luminous and more massive than our Sun. They also have high rotational speed.
First Be star, gamma Cas, was discovered in 1867 by Secchi. There a several Be stars in the
Pleïades (M45) cluster.
The emission line is explained by a ring around the star which emits energy to all directions. But
how this ring is created is still a mystery that professional astronomers are working on.
exemples of Be stars (Ha lines)
Lhires III, with its very high resolution, is particularly well adapted to the study of Be star spectra.
Short term as well as long term evolution will bring more usefull information to professional
astronomers. A database, BeSS (Be Star Spectra) has even been setup in collaboration with ParisMeudon observatory.
COROT satellite is another opportunity for such collaboration. Amateurs can record spectra while the
satellite will do precise photometry of some Be stars. Correlation between photometric outburst and
spectroscopic line profile changes could be further studied with the help of amateur astronomers,
with the help of you!
Lhires III – User Guide (English) – DC0004A
40 / 43
9) Troubleshooting / Support
For any issue with your Lhires III, contact us at:
Phone: +33.476.41.36.81
Mobile: +33.689.92.74.23
eMail: [email protected]
Web: http://www.shelyak.com
Address:
Les Roussets
38420 Revel
France
You can also subscribe to the Spectro-L internet list where you will find the support of other Lhires
III users: http://groups.yahoo.com/group/spectro-l/
And regularly look on our website for announcement of technical week-ends; those are the best way
to learn and develop yourself in this wide field that is spectrography!
Lhires III – User Guide (English) – DC0004A
41 / 43
10) References
This is only a few of references that we find useful. If you know others, do not hesitate to drop us a
note ([email protected]) so it can be added in further release of this user guide.
10.1 - Books
Stars and their spectra; James B Kaler, Cambridge edition. Excellent book that goes through the
different spectral classes.
Foundations of Astronomy; Michael A. Seeds, Brooks/Cole edition. This book talk about lot of
astronomical subjects including some related to spectrography.
10.2 - Web links
General
Shelyak Instruments: http://www.shelyak.com
This is our web site where you can find additional information on your Lhires III spectrograph, more
ideas for projects, etc...
ARAS home page: http://www.astrosurf.com/aras/
ARAS is an amateur/professional group with objective to promote spectrography.
Spectro-L list: http://groups.yahoo.com/group/spectro-l/
Christian Buil web site: http://www.astrosurf.org/buil/
Christian's Spectro bookmark: http://astrosurf.com/buil/us/book2.htm
CDS Strasbourg: http://http://cdsweb.u-strasbg.fr/
This is THE reference for any astronomical object. Look for key information, browse through
hundreds of catalogs, and link to professional work done on any specific object.
ADS: http://adsabs.harvard.edu/abstract_service.html
This is THE reference where to find for professional articles. Thousands articles are scanned and
available to the amateur community through that link.
UVES: http://www.sc.eso.org/santiago/uvespop/bright_stars_uptonow.html; see also VisualSpec
tutorial: http://www.astrosurf.com/vdesnoux/tutorial8.html
Software
Iris: http://www.astrosurf.org/buil/us/iris/iris.htm
SpIRIS: http://www.astrosurf.com/aras/spiris/spiris.htm
VisualSpec: http://astrosurf.com/vdesnoux/
Audela: http://www.astrosurf.com/aude/
SpcAudace: http://bmauclaire.free.fr/astronomie/softs/audela/spcaudace/
Lhires III – User Guide (English) – DC0004A
42 / 43
Prism: http://www.astroccd.com/prism/fr/
Spectro-heliography
Christian Buil: http://astrosurf.com/buil/sph2/obs.htm
Jose Ribeiro (includes same technic on the Moon!):
http://www.astrosurf.com/joseribeiro/Eespectrometria.htm
Robin Leadbeater: http://mysite.wanadoo-members.co.uk/astro2/spectra_29.htm
Projects / Studies
Be stars overview: http://astrosurf.com/buil/us/bestar.htm
COROT Be stars program: http:/www.astrosurf.org/buil/corot/data.htm
BeSS: not on-line at the time this document is printed but look for a link on ARAS home page.
Stellar disks: http://www.bartol.udel.edu/~owocki/RDOME/Swarthmore/
Herbig Ae/Be stars with a Lhires III: http://www.astrosurf.com/buil/abaur/obs.htm
C & S stars: http://astrosurf.com/aras/papers/c_s_stars.htm
Lhires III – User Guide (English) – DC0004A
43 / 43