1
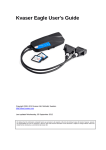
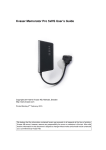
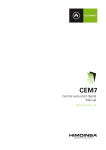
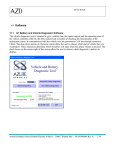
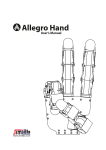
Kvaser Memorator Professional User's Guide Copyright 2001-2009 Kvaser AB, Mölndal, Sweden http://www.kvaser.com Last updated Thursday, 22 April 2010 We believe that the information contained herein was accurate in all respects at the time of printing. Kvaser AB cannot, however, assume any responsibility for errors or omissions in this text. Also note that the information in this document is subject to change without notice and should not be construed as a commitment by Kvaser AB. Kvaser Memorator Professional User's Guide (This page is intentionally left blank.) Kvaser AB, Mölndal, Sweden — www.kvaser.com 2(31) Kvaser Memorator Professional User's Guide 1 Table of Contents Kvaser Memorator Professional User's Guide ......................................................................1 1 Table of Contents ..............................................................................................................3 2 About this manual .............................................................................................................4 3 Introduction........................................................................................................................5 3.1 Welcome to Kvaser Memorator Professional ...............................................................5 3.2 Major features of Kvaser Memorator Professional .......................................................6 3.3 CAN logger Functions ..................................................................................................6 3.4 Real time CAN-USB interface ......................................................................................7 3.5 Kvaser Memorator Tools ..............................................................................................7 3.6 Additional software and documentation .......................................................................7 4 Kvaser Memorator Professional Hardware .....................................................................9 4.1 Hardware installation ....................................................................................................9 4.2 USB connector .............................................................................................................9 4.3 CAN channels ..............................................................................................................9 4.4 Power supply ............................................................................................................. 11 4.5 Flash disks ................................................................................................................ 11 4.6 LED indicators ........................................................................................................... 12 4.7 External trigger input ................................................................................................. 15 4.8 External trigger output ............................................................................................... 16 5 How to use the Kvaser Memorator Professional ........................................................ 18 5.1 Use as a CAN interface ............................................................................................. 18 5.2 Configure for logging ................................................................................................. 18 5.3 Use as a logger ......................................................................................................... 18 5.4 Kvaser Memorator Tools ........................................................................................... 18 5.5 Disk management ..................................................................................................... 19 5.6 Troubleshooting ........................................................................................................ 19 6 Appendices ..................................................................................................................... 20 6.1 System requirements ................................................................................................ 20 6.2 Technical data ........................................................................................................... 20 6.3 Performance comparison .......................................................................................... 21 6.4 Disk capacity ............................................................................................................. 22 6.5 Disk structure ............................................................................................................ 23 6.6 CAN connectors ........................................................................................................ 23 6.7 Updating the firmware ............................................................................................... 25 6.8 Required driver version ............................................................................................. 26 6.9 Write protection switch .............................................................................................. 26 6.10 CAN bus termination ............................................................................................. 27 6.11 CAN bus overrun ................................................................................................... 27 6.12 Daisy-chaining several interfaces .......................................................................... 27 7 Frequently Asked Questions......................................................................................... 28 8 Legal acknowledgements .............................................................................................. 29 8.1 Usage warning .......................................................................................................... 29 8.2 EMC compliance statement ...................................................................................... 30 8.3 WEEE compliance statement.................................................................................... 30 8.4 RoHS compliance statement..................................................................................... 30 8.5 Patents, copyrights and trademarks ......................................................................... 30 9 Document revision history ............................................................................................ 31 Kvaser AB, Mölndal, Sweden — www.kvaser.com 3(31) Kvaser Memorator Professional User's Guide 2 About this manual This manual is intended for the Kvaser Memorator Professional users. This manual contains a description of the hardware‘s properties and general instructions for connecting the device to a computer. The setup software for the Kvaser Memorator Professional is called Kvaser Memorator Tools and is described in detail in its online help. Kvaser AB, Mölndal, Sweden — www.kvaser.com 4(31) Kvaser Memorator Professional User's Guide 3 Introduction This section will describe the functions and features of the Kvaser Memorator Professional. 3.1 Welcome to Kvaser Memorator Professional Figure 1. Kvaser Memorator Professional. Kvaser Memorator Professional is a small, yet advanced portable CAN data logger. The device can be configured in many different ways to achieve the most suitable and effective logging for any occasion. Connecting the logger to a PC provides direct access for configuring baud rates, trigger conditions and filters using the standalone Kvaser Memorator Tools. You can use standard SD or MMC flash disks. These memories are robust, inexpensive and small – about the size of a stamp. Kvaser Memorator Professional can also be used as a powerful two channel real time CAN to USB interface – two products in one! An additional advantage of the Kvaser Memorator Professional is that it is possible to log traffic on J1587, by connecting the Kvaser Linx J1587 to your Kvaser Memorator Professional you will get an even more powerful and versatile data logger. This guide is applicable to the Kvaser Memorator Professional devices listed in Table 1. Table 1: The Kvaser Memorator Professional device and its EAN number. Device Product Number Kvaser Memorator Professional HS/HS 733-0130-00351-4 Kvaser Memorator Professional HS/LS 733-0130-00417-7 Kvaser AB, Mölndal, Sweden — www.kvaser.com 5(31) Kvaser Memorator Professional User's Guide 3.1.1 Triggers Log continuously or create triggers to control when frames are logged. You can create up to 16 trigger conditions. These conditions can include the reception of a specific message, the value of a specific signal in a message, or an external trigger input configured to trigger on either rising or falling edge. Define a posttrigger time to control the amount of data logged after the trigger expression becomes false. Define a pretrigger time to log events leading up to the trigger expression becoming true. 3.1.2 Filters To enhance logging performance, Kvaser Memorator Professional can filter out selected messages to be logged. The identifiers to be filtered can be picked from a database file or entered manually. Three types of filters are provided: stop filters, pass filters, and counting pass filters. Stop filters prevent messages from being logged. Pass filters ensure a message is logged. Counting pass filters log the specified messages at enumerated occurrences so redundant data is reduced. 3.1.3 Memory cards Due to the high demands placed on the SD card used by an industrial product such as the Kvaser Memorator Professional, we can only support cards tested and sold by Kvaser, see 4.5.1. 3.2 Major features of Kvaser Memorator Professional 3.3 CAN interface and data logger – two products in one Quick and easy plug-and-play installation. Supports both 11-bit (CAN 2.0A) and 29-bit (CAN 2.0B active) identifiers. CAN messages are time-stamped with 2 microseconds resolution. Large on-board RAM buffer for CAN messages. Supports silent (listen-only) mode for analyzing tools and data logging. 100% compatible with applications written for Kvaser hardware such as LAPcan, PCIcan, and USBcan with Kvaser CANLIB. Two high-speed CAN channels (compliant with ISO 11898-2), 5 kbit/s up to 1 Mbit/s or one high-speed channel and one low-speed channel (ISO 11898-3), 5-125 kbit/s. Fully compatible with J1939, CANopen, NMEA 2000® and DeviceNet. One USB 2.0 HiSpeed connection with data rates up to 480 Mbit/s. The device can also be used in USB 1.1 slots (with up to 12 Mbit/s). Power is taken from the CAN bus or from the USB bus. The device automatically switches power supply between the CAN (primary) and the USB (secondary), reducing power drain on a laptop‘s battery. Small, light plastic housing with dimensions (W x L x H) approximately 46 x 115 x 22 mm (1.8 x 4.5 x 0.9 inch) – easy to tuck away (e.g. in a vehicle during a test drive) CAN logger Functions One flash disk connector that accepts SD and MMC cards, with the size ranging from 32 MB up to 2 GB. SDHC cards are supported with sizes up to 32 GB as of December 2008. Kvaser AB, Mölndal, Sweden — www.kvaser.com 6(31) Kvaser Memorator Professional User's Guide 3.4 Built-in real time (calendar) clock with battery backup. Easy to use graphic configuration tool Logger status is indicated with five externally visible LEDs. Supports silent mode – you can log bus traffic without interfering with it. Handles 100% bus load at 1 Mbit/s with two channels (>20000 messages per second) Starts up in 60 milliseconds. Upload logged data via USB at 1.2 MB/s when connected via USB 2.0 HiSpeed, or at 14 MB/s when using an external flash disk reader. External trigger input (e.g. pushbutton) External trigger output (e.g. a LED or buzzer) Pretrigger space is limited by available disk space only Select trigger signals from a CAN database, or define them directly in Kvaser Memorator Tools Real time CAN-USB interface 3.5 Uses USB 2.0 HiSpeed, while maintaining compatibility with USB 1.x computers. Supports extreme data throughput, quick reaction times and precise time stamping – removing any bottlenecks. Handles up to 40 000 messages per second. Kvaser MagiSync - automatic time synchronization between all Kvaser products that uses the Kvaser MagiSync feature. Supports silent mode for analyzing tools – listen to the bus without interfering with it. Simultaneous operation of multiple devices. Power supplied through the CAN bus interface or through the USB interface. Kvaser Memorator Tools 3.6 Easy to use graphic configuration tool File manager for organizing and converting log files to a variety of formats, including CSV, ASCII, MDF and Matlab formats Configuration of the CAN controller (bit rate and filters). Configuration of the trigger conditions. Configuration of message filters which controls the messages stored. The configuration is downloaded via USB. Additional software and documentation Kvaser CANLIB SDK, which includes everything you need to develop software for the Kvaser CAN hardware. Includes full documentation and many sample programs, written in C, C++, C#, Delphi, and Visual Basic. All Kvaser CAN interface hardware shares a common software API. Programs written for one board type can run without modifications on the other board types! Kvaser AB, Mölndal, Sweden — www.kvaser.com 7(31) Kvaser Memorator Professional User's Guide On-line documentation in Windows® HTML Help and Adobe Acrobat format. Documentation, software and drivers can be downloaded for free at www.kvaser.com or purchased separately on CD if preferred. Kvaser AB, Mölndal, Sweden — www.kvaser.com 8(31) Kvaser Memorator Professional User's Guide 4 Kvaser Memorator Professional Hardware In this section you can read more about the CAN channels, power supply, flash disks, led indicators, and external triggers. 4.1 Hardware installation The Kvaser Memorator Professional may be inserted in any free USB socket on the host computer. You do not need to switch the power off before inserting or removing the device. For the Kvaser Memorator Professional to communicate with the host computer, the correct version of the Kvaser driver and firmware must be installed. The firmware is downloaded and installed directly on the Kvaser Memorator Professional and the driver is installed on the host computer. For additional information on how to upgrade the firmware, read section 6.7, Updating the firmware. The delivery package of Kvaser Memorator Professional contains: Kvaser Memorator Professional. Software and Driver CD, containing drivers for Windows; Kvaser Memorator Tools; Kvaser CANKing, an easy to use CAN bus monitor; Drivers for RP1210A, LabView and DIAdem; and Kvaser CANlib Software Development Kit. Kvaser Memorator Professional User's Guide. USB cable. SD card. For driver installation information, see the driver and hardware installation guide which can be found at http://www.kvaser.com. 4.2 USB connector The Kvaser Memorator Professional has a standard USB type ―B‖ receptacle connector. Connect it to your PC using any high quality, USB 2.0 certified cable. The maximum USB cable length is 5 meters (approx. 16.5 ft.). If you need a longer cable, you can use USB hubs or USB extension cables with a built-in hub. By chaining up to 5 hubs, you can achieve a cable length of up to 25 meters (approx. 83 ft.) 4.3 CAN channels The standard Kvaser Memorator Professional has two independent CAN channels that are seen in Figure 2. The first CAN channel is marked on the housing with the symbol ‗1‘, where as the second channel (number 2) is not marked. See Figure 3. The CAN connectors are also labeled for easy identification. Kvaser AB, Mölndal, Sweden — www.kvaser.com 9(31) Kvaser Memorator Professional User's Guide 10(31) CAN channel connectors USB device connector Figure 2: Connections on the Kvaser Memorator Professional. The two CAN channels are on the top of the picture and the USB device connector is on the bottom of the picture. Figure 3: The CAN channels on Kvaser Memorator Professional. Kvaser AB, Mölndal, Sweden — www.kvaser.com Kvaser Memorator Professional User's Guide 4.4 11(31) Power supply The Kvaser Memorator Professional can be powered from the CAN side and from the USB side. To operate the Kvaser Memorator Professional in logger mode, you must supply power on the CAN side. When you supply power on the CAN side, provide power on the channel 1 connector. Use pin 9 for V+ and pin 3 for ground. The supply power should be in the range of 6 – 35 V DC. The power requirement is around 1 W (maximum). In the HS/HS case it is safe, but pointless, to supply power on channel 2. The device will tolerate a higher input voltage, up to 48 V DC. 4.4.1 Kvaser Memorator Professional HS/HS To use the device as a CAN interface, or to configure the device for logging, it is sufficient to supply power from the USB side. 4.4.2 Kvaser Memorator Professional HS/LS To use the HS channel as a CAN interface, or to configure the device for logging, it is sufficient to supply power from the USB side. But to use the LS channel (channel 2) as a CAN interface the device needs a reference power, see 6.6.1. 4.5 Flash disks 4.5.1 Supported disk types IMPORTANT: For Memorator Professional, we only support flash disks sold by Kvaser. For more information on available sizes and prices, please contact us. Due to the high demands placed on the SD card used by an industrial product such as the Kvaser Memorator Professional, we can only support cards tested and sold by Kvaser. Other cards might work; especially industrial graded cards, but we cannot guarantee their functionality. If you want to use other disk brands, you can use SDHC (Secure Digital High Capacity) disks, SD (Secure Digital), or MMC (MultiMediaCard) disks with your Kvaser Memorator Professional. The following disk sizes can be used: Table 2: Usable disk sizes. MMC SD SDHC 4.5.2 32 MB – 1 GB 32 MB – 2 GB Up to 32 GB How to handle the disk Insert the flash disk into the slot of the Kvaser Memorator Professional (see Figure 4) with the disk‘s golden connector side up. Do not apply excessive force. The disk should slide smoothly into the socket. When fully inserted, the disk should fit well within the slot. Before removing the disk, we recommend that you either Kvaser AB, Mölndal, Sweden — www.kvaser.com Kvaser Memorator Professional User's Guide Connect the device to a PC via USB, or Remove the power completely (that is, disconnect both CAN 1 and CAN 2.) Figure 4: How to insert a memory card. 4.6 LED indicators The LED indicators (see Figure 5) have somewhat different meaning depending on how your Kvaser Memorator Professional is being used – as a CAN interface or as a CAN logger. The following tables describe how the LEDs behave in these two cases. Table 3: LED indicators overview. Lamp General meaning PWR (Green) Power and general status. CAN 1 (Yellow) Status for CAN channel 1. CAN 2 (Yellow) Status for CAN channel 2. ERR (Red and yellow) Indicates temporary or permanent errors. Note that the ERR lamp is bi-colored and can be both red and yellow. Kvaser AB, Mölndal, Sweden — www.kvaser.com 12(31) Kvaser Memorator Professional User's Guide 13(31) Figure 5. LEDs on the Kvaser Memorator Professional. Table 4: LED indicators when used as a CAN interface. PWR (Green) CAN 1 (Yellow) CAN 2 (Yellow) ERR (Red) Meaning Slow flash Waiting for USB connection with the PC. Steady Power ON (The device is connected to the computer). Short flash CAN traffic on channel 1. Short flash CAN traffic on channel 2. Blink CAN 1 error passive. Blink CAN 2 error passive. Steady CAN 1 bus off. Steady Fast flash CAN 2 bus off. Short flash Error frame on either channel. Steady Self-test failed, wrong bit rate, CAN bus transceiver failure. Firmware configuration error (should not normally happen, so please contact the support). Kvaser AB, Mölndal, Sweden — www.kvaser.com Kvaser Memorator Professional User's Guide 14(31) Table 5: LED indicators when the device is used as a logger. CAN status CAN1/CAN2 emitting short flashes: CAN messages are sent or received CAN1/CAN2 blinking and ERR blinking red: The CAN channel is error passive CAN1/CAN2 blinking slowly and ERR blinking slowly red: The CAN channel is bus off ERR emitting short yellow flashes: Error frames are received on CAN1 or CAN2 Error conditions ERR constant red with one yellow flash: CAN overrun ERR constant red with two yellow flashes: Disk full ERR constant red with three yellow flashes: Configuration file missing or corrupt ERR constant red with four yellow flashes: Disk error ERR constant red with five yellow flashes: Some other major error; please contact the support Logging status PWR 90% on and 10% off: Everything OK; logging started without problems. The device is ―armed‖ and waiting for a trigger. PWR flashing: Everything OK, logging is active and actively logging traffic PWR blinking slowly 50/50: Logging has stopped due to a trigger condition and Kvaser Memorator Professional is off bus. When connected to Kvaser Memorator Tools “Running lights”: The device is communicating with the tool ERR blinking red: Disk activity such as formatting Other blink patterns All lamps blinking slowly: Disk is missing or improperly inserted, and no USB communication is detected. Check the disk or the USB connection. PWR emits a flash every few seconds; the other lamps are dark: No USB communication. Check USB cables and communication. Unplug the device and reconnect it after a few seconds. Check that the device driver is installed correctly. Kvaser AB, Mölndal, Sweden — www.kvaser.com Kvaser Memorator Professional User's Guide PWR flashing, ERR constant red: Firmware configuration error. This should not normally happen. Please contact the support. 4.7 External trigger input The Kvaser Memorator Professional can be set up to trigger on an external signal. There are two ways to create this signal: Connect a switch from pin 4 on CAN channel 1 to ground, which can be found on pin 3 on the same connector. See Figure 7. Connect a signal between 0 and 5 V to pin 4 on CAN channel 1. Internally, pin 4 on CAN channel 1 has a pull-up to +5V. See Figure 6. The trigger can be configured to react on both falling and rising edges. If it is set to trigger on a falling edge, the trigger is activated when pin 4 is connected to ground. If it is set to trigger on a rising edge, the trigger is activated when pin 4 is disconnected from ground. Figure 6: The trigger input inside the Kvaser Memorator Professional. Kvaser AB, Mölndal, Sweden — www.kvaser.com 15(31) Kvaser Memorator Professional User's Guide 16(31) Figure 7: How to connect an external trigger switch. Note: the trigger input is debounced by the firmware. A pulse of shorter length than approximately 30 ms will not be detected. 4.8 External trigger output It is also possible to send an external pulse through channel two‘s CAN connector pin 4 on the Kvaser Memorator Professional. For further information on how to configure the Kvaser Memorator Professional to send an external pulse, please refer to the Kvaser Memorator tools online help. Kvaser AB, Mölndal, Sweden — www.kvaser.com Kvaser Memorator Professional User's Guide Figure 8: The trigger output inside the Kvaser Memorator Professional. Figure 9: Sample circuit for connecting a LED to the trigger output. Kvaser AB, Mölndal, Sweden — www.kvaser.com 17(31) Kvaser Memorator Professional User's Guide 18(31) 5 How to use the Kvaser Memorator Professional The Kvaser Memorator Professional can operate both as a high performance real time USB interface (USB-CAN mode) and as a data logger (logger mode). This section will describe how to use the different modes. 5.1 Use as a CAN interface To use the Kvaser Memorator Professional as a CAN interface; connect the unit to a free USB socket on your PC or USB hub. You do not need to insert a flash disk. If a flash disk is inserted, you do not need to remove it. When used as a CAN interface, the green lamp will be illuminated and the yellow lamps will emit short flashes when CAN messages are transmitted and received. 5.2 Configure for logging To prepare your Kvaser Memorator Professional for logging: 1. Connect the unit to a free USB socket on your PC or USB hub. 2. Insert a flash disk (see Figure 4 ovan) 3. Start the Kvaser Memorator Tools program and press the Connect button. The device should immediately show a running light pattern on the LEDs. 5.3 Use as a logger To use your Kvaser Memorator Professional as a logger: 1. Insert a formatted flash disk that contains a valid configuration 2. Optionally, connect an external trigger switch to the CAN1 connector 3. Optionally, connect the digital output pin on the CAN2 connector to your equipment 4. Supply power on the CAN1 connector Logging should start immediately. If everything is OK, the green PWR lamp should either blink quickly, or be illuminated 90% and dark 10% of the time. If CAN traffic is detected, the CAN1 and CAN2 lamps should be illuminated. 5.4 Kvaser Memorator Tools To log CAN traffic with the Kvaser Memorator Professional, you need to create and download a configuration to the device. The Kvaser Memorator Professional needs to be connected by USB and have a disk inserted to be configured. Start the PC application Kvaser Memorator Tools and press the Connect button in the toolbar. If the LEDs on Kvaser Memorator Professional are flashing in a ―running light‖ pattern, the device is ready to communicate with Kvaser Memorator Tools. For further information about Kvaser Memorator Tools please refer to its online help. Kvaser AB, Mölndal, Sweden — www.kvaser.com Kvaser Memorator Professional User's Guide 5.5 19(31) Disk management Handle the disks with care. They are robust, but better safe than sorry. Avoid removing the disk when the device is powered up from an external power source. You should first remove the external power and then remove the disk. If the device is connected via USB, you should make sure the Kvaser Memorator Tools isn‘t writing to the disk before you remove it. You may remove and reconnect the disk, the external power and the USB in any order you like without damaging the hardware. But if you follow the advice above, you will not damage your logged data. If you need to remove the disk when the device is being used as a logger and you can‘t disconnect the external power, try to connect the USB cable to a running PC first. When the Kvaser Memorator Professional discovers the active USB connection, the device will stop logging and close the log file in an orderly fashion. 5.6 Troubleshooting Use ―Kvaser Hardware‖ in the Control Panel to verify that the computer really can talk to the Kvaser Memorator Professional. Read out the firmware version. If it‘s all zeroes, there are communication problems. Verify that the disk is formatted. If in doubt, reformat it using the Kvaser Memorator Tools. If configuration fails, verify that the Kvaser Memorator Professional is in configuration mode when you are using the Kvaser Memorator Tools. You can see this by looking at the LEDs – they should flash in a ―running light‖ fashion. If the LEDs are flashing or glowing, compare the pattern with the specified led indicators in Table 4 and Table 5. If the LEDs are not flashing or glowing at all, check the power supply. Kvaser AB, Mölndal, Sweden — www.kvaser.com Kvaser Memorator Professional User's Guide 20(31) 6 Appendices In this section you will find technical information about Kvaser Memorator Professional and its connectors. 6.1 System requirements 6.2 A USB interface. Use USB 2.0 HiSpeed for optimum results, although the device will work with a USB 1.1 interface too. Operating system Windows ME, Windows 2000, Windows XP, Windows Server 2003, Windows Vista. Technical data In Table 6 below you will find the Kvaser Memorator Professional‘s technical specifications. Table 6: Kvaser Memorator Professional Technical specifications. CAN Channels 2 (CAN 2.0A and 2.0B active). CAN Transceivers (HS) SN 65251 (Compliant with ISO 11898-2) CAN Transceivers (HS) TJA1054 (Compliant with ISO 11898-3) CAN Controller Built into the M32C Microcontroller Renesas M32C CAN Bit Rate 5 kbit/s to 1 Mbit/s Timestamp resolution 2 μs Error Frame Detection Yes, both channels. Error Frame Generation Yes, when used as a USB-CAN interface. PC interface USB 2.0. Supports HiSpeed (HS) at 480 Mbit/s. Compatible with USB 1.1 at 12 Mbit/s. Power consumption ~ 5V and 130mA if powered from the USB and ~ 850mW if powered from the CAN bus. External power Software requirements Hardware configuration Pin 9 (V+) and pin 3 (GND) on CAN channel 1. Minimum operating voltage 6.2 V DC (cold start) and 5.6 V DC (during operation). Maximum operating voltage 35 V DC. Absolute maximum input voltage 48 V DC. Windows 2000, Windows XP, Windows Server 2003, Windows Vista, Windows 98, Windows ME. – Supported as CAN interface on Linux 2.6 and Windows CE 4.2 and 5.0. Done by software (Plug & Play). Kvaser AB, Mölndal, Sweden — www.kvaser.com Kvaser Memorator Professional User's Guide Dimensions (W x L x H) 46 x 115 x 22 mm (1.8 x 4.5 x 0.9 inch) Operating temperature -40 ºC ... +85 ºC Weight 142 g including cables and connectors. Storage temperature -40 ºC ... +85 ºC Relative Humidity 0% ... 85% (non-condensing.) External trigger Available on CAN connector 1 pin 4. The input is protected by a selfhealing fuse and has a 1 kOhm pull-up to +5V. The firmware can detect both rising and falling edges. The allowed voltage is 0 – 5 V DC. External output Available on CAN connector 2 pin 4. The output is a pull-down to ground and is protected by a self-healing fuse. The allowed voltage is 0 – 5 V DC. 6.3 Performance comparison In Table 7 below the performance of the Kvaser Memorator Professional is compared with its older sibling, the Kvaser Memorator. Kvaser AB, Mölndal, Sweden — www.kvaser.com 21(31) Kvaser Memorator Professional User's Guide 22(31) Table 7: Performance comparison. Kvaser Memorator Professional Kvaser Memorator 20000 messages/s 12000 messages/s 20000 messages/s 6000 messages/s Logging performance 20000 messages/s 5000 messages/s Time stamp accuracy. 2 s 100 s Message filter support. Stop filters Pass filters Counting filters Pass filters SD memory size support. 2 GB 1 GB SDHC memory support 32 GB No Galvanic isolation. Yes No Number of triggers. 16 8 Startup time when used as a logger < 0.25 seconds 2.5 seconds Upload of logged data 1.4 MB/s (when connected via USB 2.0 HiSpeed) 14 MB/s (when using an external disk reader) RX performance per channel (when used as a CAN interface). TX performance per channel (when used as a CAN interface). 6.4 Disk capacity Each CAN message occupies 24 bytes in the log file. The following table gives some approximate values of the capacity for various disk sizes. Table 8: Disk capacity. Disk size Approximate capacity Approximate time to fill the disk (at 500 messages per second) 64 MB 2,700,000 messages 1h 30min 256 MB 10,700,000 messages 6h 512 MB 21,300,000 messages 12h 1 GB 41,700,000 messages 23h 2 GB 83,300,000 messages 46h 30min Kvaser AB, Mölndal, Sweden — www.kvaser.com Kvaser Memorator Professional User's Guide 6.5 23(31) Disk structure You can use an external card reader to read the files on the flash disk. The Kvaser Memorator Tools can read the log data directly via the external card reader, so you don‘t need to copy the files to your hard disk. Note: It is essential that the flash disks be formatted using the Kvaser Memorator Tools. You should not copy any files to the disk using an ordinary flash disk writer. Kvaser Memorator Tools will create several special files on the disk. These files must be contiguous and the structure and position of these files must be determined by the firmware, or the data logging will fail. The Kvaser Memorator Tools will create the following files on the flash disk when formatting it. LOGDATA.KMF LOGDATnn.KMF PARAM.LIF DATABASE.BIN The LOGDATA.KMF and/or LOGDATnn.KMF will by default occupy nearly the whole regardless of whether the file contains any logging data or not. PARAM.LIF and DATABASE.BIN will occupy the rest of the disk. 6.6 CAN connectors The Kvaser Memorator Professional has two CAN channels. Both CAN channels have 9-pin D-SUB connectors (see Figure 10) with the pinning described below (see Table 9 and Table 10). Figure 10: The D-SUB connector pin numbers on a CAN channel. Kvaser AB, Mölndal, Sweden — www.kvaser.com Kvaser Memorator Professional User's Guide 24(31) Table 9: D-SUB pin configuration of the CAN channel 1. The CAN channel 1 has the following pin configuration. (Auto-reset fuses protect Pins 2, 3, 4, 7 and 9.) D-SUB pin number Color code Function HS 1 N/A Not connected. 2 Green CAN_L 3 Brown GND 4 Orange External trigger input 5 Black Shield 6 N/A Not connected. 7 Red CAN_H 8 N/A Not connected. 9 Yellow Power supply to the device. Table 10: D-SUB pin configuration of the CAN channel 2. The CAN channel 2 has the following pin configuration. (Auto-reset fuses protect Pins 2, 3, 4, 7 and 9.) D-SUB pin number Color code Function HS Function LS 1 N/A Not connected Not connected 2 Green CAN_L CAN_L 3 Brown GND GND 4 Orange External trigger output External trigger output 5 Black Shield Shield 6 N/A Not connected Not connected 7 Red CAN_H CAN_H 8 N/A Not connected Not connected 9 Yellow Not connected Reference Power Note: Always connect the ground pin on the D-SUB to the ground of your CAN bus. Kvaser AB, Mölndal, Sweden — www.kvaser.com Kvaser Memorator Professional User's Guide 6.6.1 25(31) Pin 9 – Reference Power Kvaser Memorator Professional HS/LS only. Connect the battery voltage to this pin. It is used by the transceiver to detect whether CAN_H and/or CAN_L are shorted to the system voltage. It may be omitted but the transceiver will then not detect a short circuit properly. The operating input voltage range is 6 – 27V (absolute maximum rating is 40 V). The input is protected from load dumps. 6.7 Updating the firmware Connect the Kvaser Memorator Professional to your PC with the USB cable. A flash disk may be present but not necessary. Double-click on the file ―update.exe‖. The Kvaser Memorator Tools also can update the Kvaser Memorator Professional firmware directly (see the online help if you want to learn more). A small application opens where you should see the device listed if correctly connected to your PC (see Figure 11). Select the device to program and click the Next button. Figure 11: Firmware update, select device. Click on the Start Upgrade button to start programming (see Figure 12). The programming takes approximately 20 seconds. The progress is printed on the screen, and typically looks like this: Kvaser AB, Mölndal, Sweden — www.kvaser.com Kvaser Memorator Professional User's Guide 26(31) Figure 12: Firmware update, start upgrade. No error messages should appear. If you see error messages, try to disconnect and reconnect the device, and then perform the operation again. To verify that the firmware is updated, Double-click on ―Kvaser Hardware‖ in the Control Panel. Select ―Kvaser Memorator Professional‖ in the tree view to the left, and click on either channel. The firmware revision information appears in the right half of the window. 6.8 Required driver version You need at least driver (CANLIB) version 3.9 to use your Kvaser Memorator Professional. 6.9 Write protection switch Kvaser Memorator Professional will disregard the setting of the write protection switch on SD and SDHC memories. This is by design. The intention is to minimize the risk of a logging failure when the write protection switch is set by accident. The setting of the write protection switch on SD and SDHC memories is disregarded. The Kvaser Memorator Professional will write to the disk even if the write protection switch is set. Kvaser AB, Mölndal, Sweden — www.kvaser.com Kvaser Memorator Professional User's Guide 27(31) 6.10 CAN bus termination Every CAN bus must be terminated with a 120 Ohm resistor at each end of the bus. The Kvaser Memorator Professional does not contain any CAN bus terminators, because their inclusion could cause severe disturbance in a system which is already correctly terminated. For laboratory or testing use, the exact value of the termination resistors is not always critical. Sometimes a single terminator is sufficient. For production, proper termination is essential. If you see error frames on the bus, you should check the termination. To save yourself a lot of trouble, always terminate the CAN bus properly. 6.11 CAN bus overrun Under extremely heavy load, high bit rates and long bursts of messages, the Kvaser Memorator Professional can lose messages. This loss should be a rare occasion. If such a loss occurs, the Kvaser Memorator Tools will display a notification message when the file is extracted. Some of the file formats, that support such a feature, will also indicate when the overrun occurred. (See help section in Kvaser Memorator Tools for details about file formats.) To avoid losing important messages during logging, filters can be used. This will decrease the load on the Kvaser Memorator Professional and ensure that important information is not lost. 6.12 Daisy-chaining several interfaces You can daisy chain several Kvaser Memorator Professional units to gain additional logging capacity. To do this, 1. Connect the trigger output of one device to the trigger input of the next device. 2. Using the Kvaser Memorator Tools, configure the trigger output of the first device to emit a pulse when the disk becomes full. 3. Configure the trigger input of the second device to start logging when a falling edge is detected. Set the post-trigger time to 0 (infinite) and the pre-trigger time to 1 second. You now have a setup where the second unit starts logging when the first one becomes full. Kvaser AB, Mölndal, Sweden — www.kvaser.com Kvaser Memorator Professional User's Guide 28(31) 7 Frequently Asked Questions Q: How many messages per second can Kvaser Memorator Professional store on the disk? A: It depends on the flash disk type. Fast disks can typically accommodate 20000 messages per second. For all practical purposes, this means full busload even at 1 Mbit/s. Q: What disk brands are the fastest? A: New models are introduced all the time, but during testing we have had consistent good results from ATP (http://flash.atpinc.com) and TwinMOS Ultra-X 150x (http://www.twinmos.com). Your mileage may vary, of course. Q: I have a very busy J1939 network. Will the Kvaser Memorator Professional be able to handle that? A: Most likely. J1939 operates at 250 kbit/s, which means up to 2000 8-byte messages per second. As a contrast, the measured logging capacity of the Kvaser Memorator Professional is 20000 messages per second, which is around 10 times higher. Q: How many hours will a 256 MB disk last? A: It depends on the CAN bus load. To get a feeling for the numbers involved, see section Disk capacity on page 22. Q: Can I use 2 (4, 8, 16, ...) GB disks? A: Yes. As of December 2008, the largest supported disk size is 32 GB. Be sure to use the latest firmware. Q: Can I use SDHC disks? A: Yes. Q: Can I use any SD/MMC disk? A: Yes, in principal, but due to the high demands placed on the SD card used by an industrial product such as the Kvaser Memorator Professional, we can only support cards tested and sold by Kvaser, see 4.5.1. Q: Can I use an external SD/MMC card reader to read the logged data? A: Yes, the Kvaser Memorator Tools can read data from external disk readers, as well as directly from a connected Kvaser Memorator Professional. Q: I have logged a lot of data on my Kvaser Memorator Professional and now I’m trying to open the list of files inside the Kvaser Memorator Tools, but it seems to hang. What’s up? A: If the logger was interrupted while writing to the disk, the device might, on certain rare occasions, need a long time to extract the list of files. This is because the software needs to rebuild certain internal data structures first. Please be patient – eventually the list of files will appear. Read the Disk management section for advice on how to avoid this situation. Kvaser AB, Mölndal, Sweden — www.kvaser.com Kvaser Memorator Professional User's Guide 29(31) 8 Legal acknowledgements 8.1 Usage warning WARNING FOR ALL USERS WARNING! - YOUR USE OF THIS DEVICE MUST BE DONE WITH CAUTION AND A FULL UNDERSTANDING OF THE RISKS! THIS WARNING IS PRESENTED TO INFORM YOU THAT THE OPERATION OF THIS DEVICE MAY BE DANGEROUS. YOUR ACTIONS CAN INFLUENCE THE BEHAVIOR OF A CAN-BASED DISTRIBUTED EMBEDDED SYSTEM, AND DEPENDING ON THE APPLICATION, THE CONSEQUENCES OF YOUR IMPROPER ACTIONS COULD CAUSE SERIOUS OPERATIONAL MALFUNCTION, LOSS OF INFORMATION, DAMAGE TO EQUIPMENT, AND PHYSICAL INJURY TO YOURSELF AND OTHERS. A POTENTIALLY HAZARDOUS OPERATING CONDITION IS PRESENT WHEN THE FOLLOWING TWO CONDITIONS ARE CONCURRENTLY TRUE: THE PRODUCT IS PHYSICALLY INTERCONNECTED TO A REAL DISTRIBUTED EMBEDDED SYSTEM; AND THE FUNCTIONS AND OPERATIONS OF THE REAL DISTRIBUTED EMBEDDED SYSTEM ARE CONTROLLABLE OR INFLUENCED BY THE USE OF THE CAN NETWORK. A POTENTIALLY HAZARDOUS OPERATING CONDITION MAY RESULT FROM THE ACTIVITY OR NONACTIVITY OF SOME DISTRIBUTED EMBEDDED SYSTEM FUNCTIONS AND OPERATIONS, WHICH MAY RESULT IN SERIOUS PHYSICAL HARM OR DEATH OR CAUSE DAMAGE TO EQUIPMENT, DEVICES, OR THE SURROUNDING ENVIRONMENT. WITH THIS DEVICE, YOU MAY POTENTIALLY: CAUSE A CHANGE IN THE OPERATION OF THE SYSTEM, MODULE, DEVICE, CIRCUIT, OR OUTPUT. TURN ON OR ACTIVATE A MODULE, DEVICE, CIRCUIT, OUTPUT, OR FUNCTION. TURN OFF OR DEACTIVATE A MODULE, DEVICE, CIRCUIT, OUTPUT, OR FUNCTION. INHIBIT, TURN OFF, OR DEACTIVATE NORMAL OPERATION. MODIFY THE BEHAVIOR OF A DISTRIBUTED PRODUCT. ACTIVATE AN UNINTENDED OPERATION. PLACE THE SYSTEM, MODULE, DEVICE, CIRCUIT, OR OUTPUT INTO AN UNINTENDED MODE. ONLY THOSE PERSONS WHO: (A) ARE PROPERLY TRAINED AND QUALIFIED WITH RESPECT TO THE USE OF THE DEVICE, (B) UNDERSTAND THE WARNINGS ABOVE, AND (C) UNDERSTAND HOW THIS DEVICE INTERACTS WITH AND IMPACTS THE FUNCTION AND SAFETY OF OTHER PRODUCTS IN A DISTRIBUTED SYSTEM AND THE APPLICATION FOR WHICH THIS DEVICE WILL BE APPLIED, MAY USE THE DEVICE. PLEASE NOTE THAT YOU CAN INTEGRATE THIS PRODUCT AS A SUBSYSTEM INTO HIGHER-LEVEL SYSTEMS. IN CASE YOU DO SO, KVASER Kvaser AB, Mölndal, Sweden — www.kvaser.com Kvaser Memorator Professional User's Guide 30(31) AB HEREBY DECLARES THAT KVASER AB'S WARRANTY SHALL BE LIMITED TO THE CORRECTION OF DEFECTS, AND KVASER AB HEREBY EXPRESSLY DISCLAIMS ANY LIABILITY OVER AND ABOVE THE REFUNDING OF THE PRICE PAID FOR THIS DEVICE, SINCE KVASER AB DOES NOT HAVE ANY INFLUENCE ON THE IMPLEMENTATIONS OF THE HIGHER-LEVER SYSTEM, WHICH MAY BE DEFECTIVE. THIS PRODUCT CONTAINS A RECHARGEABLE LI-POL BATTERY. MUST BE DISPOSED OF PROPERLY. MAY EXPLODE IF DAMAGED OR DISPOSED OF IN FIRE. DO NOT SHORT CIRCUIT. 8.2 EMC compliance statement EMC Tests The equipment has been tested for compliance with the EN 50 081-2:1993 (emission) and the EN 61000-6-2:1999 (immunity) standards. NOTE: This equipment has been tested and found to comply with the limits for a Class A digital device, pursuant to Part 15 of the FCC Rules. These limits are designed to provide reasonable protection against harmful interference when the equipment is operated in a commercial environment. This equipment generates, uses, and can radiate radio frequency energy and, if not installed and used in accordance with the instruction manual, may cause harmful interference to radio communications. Operation of this equipment in a residential area is likely to cause harmful interference in which case the user will be required to correct the interference at his/her own expense. 8.3 WEEE compliance statement This product is sold in compliance with the directive 2002/96/EC of the European Parliament on Waste Electrical and Electronic Equipment (WEEE.) 8.4 RoHS compliance statement This product is manufactured in accordance with directive 2002/95/EC on the Restriction of the use of certain Hazardous Substances in electrical and electronic equipment (RoHS.) 8.5 Patents, copyrights and trademarks All trademarks are the property of their respective owner. Windows® is a registered trademark of Microsoft Corporation in the United States and other countries. Linux® is the registered trademark of Linus Torvalds in the United States and other countries. MagiSync is a trademark of Kvaser AB. DeviceNet is a Trademark of Open DeviceNet Vendor Association, Inc. NMEA 2000® is the registered trademark of the National Marine Electronics Association, Inc. The products described in this document are protected by U.S. patent 5,696,911. Kvaser AB, Mölndal, Sweden — www.kvaser.com Kvaser Memorator Professional User's Guide 9 Document revision history Revision 1 2 3 4 Date 2006-02 2006-11-10 2008-06-30 2008-12-03 5 2009-09-25 6 2009-10-19 Changes Original revision Reviewed – No major changes. Added Kvaser Memorator HS/LS info. Added paragraph about the external input being debounced. Revised the legal section. Added information about the largest supported disk size. Kvaser Memorator Professional Setup Tool is now known as Kvaser Memorator Tools. Changed battery type in section 8.1. Reviewed – Updated pictures of firmware update. Removed paragraph about Kvaser Dispatcher. Minor editing. Kvaser AB, Mölndal, Sweden — www.kvaser.com 31(31)