1
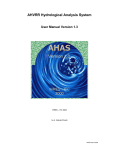
Allegro Hand User's Manual v1.4
Copyright © 2008-2012 SimLab Co., Ltd.
Hyobong8 Bldg 2nd Fl, 1425-9 Seocho-Dong, Seocho-Gu,
Seoul 137-864, Korea
ALLEGRO
HAND
USERS
MANUAL
Allegro, the Allegro logo and all related files and documentation are Copyright © 2008-2012 by
SimLab Co., Ltd. All rights reserved.
Allegro, Allegro Hand, Allegro Application Studio for Allegro Hand, Allegro Hand Application Studio,
and RoboticsLab are trademarks of SimLab Co., Ltd. All other trademarks or registered trademarks
mentioned are the property of their respective owners.
ALLEGRO
HAND
USERS
MANUAL
Copyright & Trademark Notice ................................................................................................................. i
Quick Start Guide .................................................................................................................................... 1
In The Box ........................................................................................................................................ 1
Power Supply ................................................................................................................................... 1
Read these Sections First ................................................................................................................ 1
Allegro Hand Overview ........................................................................................................................... 2
Features ........................................................................................................................................... 2
Technical Specifications .......................................................................................................................... 3
System Requirements ............................................................................................................................. 4
Products .................................................................................................................................................. 4
Installing Allegro Hand Application Studio (AHAS) ................................................................................. 5
AHAS Installation ............................................................................................................................. 5
VC++ Redistributable ..................................................................................................................... 10
USB License Dongle Driver ........................................................................................................... 10
Finishing Installation ...................................................................................................................... 11
AHAS License Registration ........................................................................................................... 11
CAN Driver Installation................................................................................................................... 12
NI USB-8473s CAN ................................................................................................................ 12
Softing CAN-AC2-PCI............................................................................................................. 12
Kvaser PCIcan 4xHS .............................................................................................................. 12
ESD CAN-PCI/266.................................................................................................................. 12
Copyright 2008-2012 SimLab Co., Ltd. All rights reserved.
i
ALLEGRO
HAND
USERS
MANUAL
Using Allegro Hand Application Studio (AHAS) .................................................................................... 13
Running AHAS ............................................................................................................................... 13
Which Hand? ................................................................................................................................. 13
Virtual ...................................................................................................................................... 13
Actual ...................................................................................................................................... 13
Virtual Hand Simulation ................................................................................................................. 14
Home ...................................................................................................................................... 15
Ready ..................................................................................................................................... 15
Grasp 3 ................................................................................................................................... 15
Grasp 4 ................................................................................................................................... 15
Pinching (I) .............................................................................................................................. 15
Pinching (M) ............................................................................................................................ 15
Envelop ................................................................................................................................... 15
Test Encoders (actual hand only) ........................................................................................... 15
Test Motors (actual hand only) ............................................................................................... 15
Sliders ..................................................................................................................................... 16
Actual Hand ................................................................................................................................... 17
Wiring ...................................................................................................................................... 17
Power ...................................................................................................................................... 17
AHAS ............................................................................................................................................. 18
Quitting ........................................................................................................................................... 18
Joint Dimensions ................................................................................................................................... 19
Joint Directions ...................................................................................................................................... 20
Right Hand ..................................................................................................................................... 20
Left Hand ....................................................................................................................................... 20
Copyright 2008-2012 SimLab Co., Ltd. All rights reserved.
ii
ALLEGRO
HAND
USERS
MANUAL
Mounting the Allegro Hand.................................................................................................................... 21
Mounting Block Removal ............................................................................................................... 21
Mounting ........................................................................................................................................ 23
Reassembly ................................................................................................................................... 23
Mount Block Dimensions ............................................................................................................... 24
CAN Protocol ........................................................................................................................................ 25
Baud-Rate ...................................................................................................................................... 25
Non-Periodic Communication ........................................................................................................ 25
Periodic Communication ................................................................................................................ 25
CAN Frames ......................................................................................................................................... 25
Standard CAN Packet .................................................................................................................... 25
ID (Message Identifier)................................................................................................................... 26
Command Identifiers ...................................................................................................................... 26
Source and Destination Identifiers ................................................................................................. 26
Case-study: Softing CAN ...................................................................................................................... 27
Opening the CAN Communication Channel .................................................................................. 27
CAN Initialization............................................................................................................................ 28
Starting Periodic CAN Communication .......................................................................................... 28
Stopping Periodic CAN Communication ........................................................................................ 28
Transmitting Control Torques ........................................................................................................ 29
Receiving Joint Angles................................................................................................................... 30
Technical Support ................................................................................................................................. 31
Copyright 2008-2012 SimLab Co., Ltd. All rights reserved.
iii
ALLEGRO
HAND
USERS
MANUAL
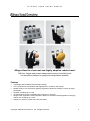
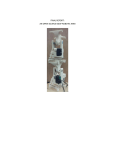
In The Box
Included are the software and hardware necessary to get you started.
1.
2.
3.
4.
5.
Allegro Hand
Allegro Hand Application Studio
2.1 Installation CD
2.2 USB License Dongle
2mm Hex Wrench
M2x5mm socket-head cap screws (extra)
Wires/Connectors
5.1 4-pin wired male connector (power/CAN)
qty 2
qty 1
Note: Only hand end of wire is terminated.
CAN interface end must be terminated by user.
5.2
5.3
4-pin male connector body
Wire terminals (for use with connector)
qty 1
qty 4
Power Supply
Power provided to the Allegro Hand must meet the following specifications:
A power supply meeting these requirements can be purchased along with the Allegro Hand
Voltage:
7.4VDC (7.0V - 8.1V)
Amperage:
5A (minimum)
Read these Sections First
1.
2.
Installing Allegro Hand Application Studio (AHAS)
Using Allegro Hand Application Studio
Wiki for Users
All information provided in this user's manual along with a forum and tutorials is available at
simlab.co.kr/AllegroHand/wiki
Allegro Hand Hard Case
Optionally, a hard-plastic protective case can be purchased from SimLab for storing and transporting
your Allegro Hand. Please ask for details.
Note: The names Allegro Application Studio for Allegro Hand and Allegro Hand Application Studio
both refer to the software included with the Allegro Hand
Copyright 2008-2012 SimLab Co., Ltd. All rights reserved.
1
ALLEGRO
HAND
USERS
MANUAL
Allegro Hand is a low-cost and highly adaptive robotic hand.
With four fingers and sixteen independent current-controlled joints,
it's the perfect platform for grasp and manipulation research.
Features
Lightweight and portable anthropomorphic design
Low-cost dexterous manipulation with applications in research and industry
Multiple ready-to-use sensorless grasping algorithms capable of handling a variety of object
geometries
Capable of holding up to 1.5kg
16 independent current-controlled joints (4 fingers x 4 DOF ea.)
Allegro Hand Application Studio integration allows for simulation based algorithm prototyping
without ever changing your code
Support for real-time control and online simulation
Copyright 2008-2012 SimLab Co., Ltd. All rights reserved.
2
ALLEGRO
HAND
USERS
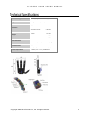
Number of Fingers
Three (3) fingers and a thumb (1) = 4
Degrees of Freedom
4 fingers x 4 = 16 (Active)
Actuation
Weight
Joint Resolution
Communication
Power Requirement
Type
DC Motor
Gear Ratio
1:369
Max. Torque
0.70 (Nm)
Overdrive Torque
0.90 (kg)
Finger
0.17 (kg)
Thumb
0.19 (kg)
Total
1.20 (kg)
Measurement
Potentiometer
Resolution (nominal)
0.002 (deg)
Type
CAN
Frequency
333 (Hz)
MANUAL
7.4VDC (7.0V - 8.1V), 5A Minimum
Copyright 2008-2012 SimLab Co., Ltd. All rights reserved.
3
ALLEGRO
CPU
HAND
USERS
MANUAL
Intel® Core™2 Duo or higher
RAM
at least 2GB
HDD
at least 2GB
Graphics
OpenGL 3.0 H/W Acceleration enabled
with at least 64Mb of video RAM
MS Windows® XP,
OS
MS Windows® Vista,0.19
MS Windows® 7
Additional S/W
MS Visual Studio®
Communication
NI, Softing, Kvaser or ESD CAN
Note: Any CAN interface can be userconfigured for use with the Allegro Hand.
The Allegro Hand comes with its own version of SimLab's Allegro Application Studio (AAS), a robotics
software for developing and testing control algorithms for a variety of commercial robots. AAS for the
Allegro Hand includes a customized kinematics/dynamics simulator based on RoboticsLab.
Algorithms developed can be applied to the virtual hand as well as directly to the real hand without
any changes to the code.
For more information, please visit our Allegro Application Studio website:
www.simlab.co.kr/Allegro-Application-Studio.htm
Paired with our RoboticsLab development environment, the user can take full advantage of robust
dynamics and system control engines as well as out feature-rich controls SDK. RoboticsLab also
enables users to easily model custom robots and test environments in 3D and add built-in and custom
sensors, actuators and other devices. RoboticsLab provides the flexibility necessary to prototype and
test control algorithms for any system.
For more information, please visit our RoboticsLab website:
www.simlab.co.kr/RoboticsLab.htm
Copyright 2008-2012 SimLab Co., Ltd. All rights reserved.
4
ALLEGRO
HAND
USERS
MANUAL
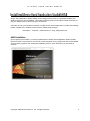
Allegro Hand Application Studio (AHAS) for the Allegro Hand comes as a packaged installer (CD
ROM included) for easy installation. This setup tutorial will guide you through the steps necessary to
get your Allegro Hand up and running for the first time.
Insert the CD into your Windows computer to install AHAS. If the installer does not start automatically,
please navigate to the installer CD to locate the AHAS setup program.
Start Menu > Computer > CD/DVD Drive > setup_AllegroHand.exe
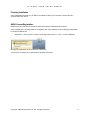
AHAS Installation
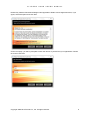
Upon beginning the installer, you will be greeted with the Allegro Hand Application Studio (AHAS)
welcome screen. At this point, if you have any other programs running, please exit the AHAS installer,
close all other programs, then restart the installation process. Click Next when you are ready to
continue.
Copyright 2008-2012 SimLab Co., Ltd. All rights reserved.
5
ALLEGRO
HAND
USERS
MANUAL
Please fully read the RoboticsLab/Allegro Hand Application Studio License Agreement then, if you
agree, select that option and click Next.
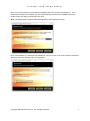
On the next page, you will be prompted to enter the names of yourself and your organization. Please
do so then click Next.
Copyright 2008-2012 SimLab Co., Ltd. All rights reserved.
6
ALLEGRO
HAND
USERS
MANUAL
Next, you will be prompted to select AHAS' installation path. You can leave it as default, or, if you
already have RoboticsLab installed, you can install within the RoboticsLab's installation directory.
Please choose any path you'd like then click Next.
Note: The default path is Program Files\SimLab\Allegro Hand Application Studio
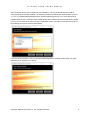
Next, select whether you want shortcuts installed for just you or every user of the computer. Shortcuts
will be placed on the desktop and in the Start Menu.
Copyright 2008-2012 SimLab Co., Ltd. All rights reserved.
7
ALLEGRO
HAND
USERS
MANUAL
The next screen allows you to customize your installation. It is recommended that you install all
components unless already installed. The third party software included with AHAS includes a Visual
C++ (VC++) redistributable package and the Sentinel USB dongle driver. If you have RoboticsLab
installed, both the VC++ package and the USB dongle driver are likely to have already been installed.
If you do not uncheck these options on this configuration screen, you will be given the opportunity on
the following two screens of the AHAS installer.
If you are unsure whether or not you have the USB dongle driver installed, please leave this option
checked as it is required to run AHAS.
Copyright 2008-2012 SimLab Co., Ltd. All rights reserved.
8
ALLEGRO
HAND
USERS
MANUAL
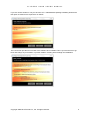
If you are unsure whether or not you have the VC++ redistributable package installed, please leave
this option checked as it is required to run AHAS.
The next screen provides an overview of the software to be installed. This is your last chance to go
back and change any information or quit the installer. Pressing Next will begin the installation.
Copyright 2008-2012 SimLab Co., Ltd. All rights reserved.
9
ALLEGRO
HAND
USERS
MANUAL
VC++ Redistributable
After the installation of Allegro Hand Application Studio is finished, please proceed to install the Visual
C++ (VC++) redistributable package. The installation of this software is necessary to run AHAS.
Note: If you already have VC++ installed and are asked to repair or uninstall, choose Repair.
USB License Dongle Driver
After the installation of VC++ is finished, please proceed to install the Sentinel USB dongle driver. The
installation of this software is necessary to run AHAS.
Copyright 2008-2012 SimLab Co., Ltd. All rights reserved.
10
ALLEGRO
HAND
USERS
MANUAL
Finishing Installation
Once installation has finished, you will be prompted to reboot your computer. Please save any
unsaved work and reboot.
AHAS License Registration
Please insert the USB license dongle included with Allegro Hand Application Studio.
Once inserted into a working USB port, navigate to the newly installed rLicense Manager application
to install the USB device.
Start Menu > All Programs > Allegro Hand Application Studio > Tools > rLicense Manager
Clicking this application should install the USB device.
You should now install your CAN interface hardware and driver.
Copyright 2008-2012 SimLab Co., Ltd. All rights reserved.
11
ALLEGRO
HAND
USERS
MANUAL
CAN Driver Installation
Your CAN interface, either PCI (Softing, ESD, Kvaser) or USB (NI, PEAK), should be installed or
plugged in to you computer before installing the proper drivers.
CAN Hardware drivers, if not included with the hardware, can be downloaded from the respective
manufacturer's website. For the four CAN interfaces available through SimLab, product drivers and
documentation are available at the following websites.
Note: After installation, check in Start Menu > Control Panel > Device Manager to make sure that a
driver has installed successfully.
NI USB-8473s CAN
Product Page:
sine.ni.com/nips/cds/view/p/lang/en/nid/203385
Driver Page:
joule.ni.com/nidu/cds/view/p/id/3152/lang/en
Softing CAN-AC2-PCI
Product Page:
http://www.softing.com/home/en/automotive-electronics/products/can-bus/interfacecards/can/pci-2.php
Driver Page:
http://industrial.softing.com/en/products/functionality/interface-cards-gateways/pciinterface-cards/can/can-dual-channel-pci-interface-card.html
Click "Downloads"
Kvaser PCIcan 4xHS
Product Page:
http://www.kvaser.com/index.php?option=com_php&Itemid=261&eaninput=
7330130000841&lang=en&product=Kvaser%20PCIcan%204xHS
Driver Page:
http://www.kvaser.com/index.php?option=com_php&Itemid=261&eaninput=
7330130000841&lang=en&product=Kvaser%20PCIcan%204xHS
Click "Downloads"
ESD CAN-PCI/266
Product Page:
http://www.esd-electronics-usa.com/CAN-CANopen-J1939-66-MHZ-PC-Board-PCI2.2-1-OR-2-CAN-Interface-CAN-PCI/266.html
Driver Page:
http://esd.eu/en/products/can-pci266
PEAK PCAN-USB
(Drivers available for Windows and Linux)
Product Page:
http://www.peak-system.com/PCAN-USB.199.0.html?&L=1
Driver Page:
http://www.peak-system.com/forum/viewtopic.php?f=119&t=66
Note: You may be required to reboot after your CAN driver installation.
Any of the CAN interface devices mentioned about can be purchased through SimLab.
Copyright 2008-2012 SimLab Co., Ltd. All rights reserved.
12
ALLEGRO
HAND
USERS
MANUAL
If you have not yet installed Allegro Hand Application Studio (AHAS) or your CAN interface and driver,
please see the Installing Allegro Hand Application Studio section before reading this one.
Running AHAS
When installing Allegro Hand Application Studio (AHAS), you were prompted to select an installation
path where all files associated with AHAS would be stored. This installation path will be referred to
as [installPath] from here on out.
Within the installation directory (at the top level), you will find a file titled Allegro.exe. Also, a shortcut
to this executable should have been placed on your desktop during installation. Doubleclick Allegro.exe to launch AHAS for the Allegro Hand.
Which Hand?
When you first run Allegro Hand Application Studio (AHAS), you are prompted to select the hand
(right/left/actual/virtual) you would like to use.
Virtual
If a virtual system is selected, a dynamic simulation is run using the Allegro Hand virtual model. This
simulation includes full physics simulation including contact dynamics. The virtual system can be
simulated without the actual system. This ability is useful for testing algorithms in a dynamics
environment before trying them out of the actual hardware.
Actual
An Actual system refers to the Allegro Hand hardware. If an actual system is selected, AHAS will load
the corresponding (left/right) virtual model and open CAN communication with the actual Allegro Hand.
The virtual Allegro Hand seen along with the Actual System simply mimics the joint kinematics (no
physics or contact dynamics) of the actual system based on the encoder values obtained over CAN.
Motion commands from AHAS are send directly to the actual system while the encoder feedback
controls the AHAS virtual hand.
Copyright 2008-2012 SimLab Co., Ltd. All rights reserved.
13
ALLEGRO
HAND
USERS
MANUAL
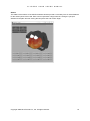
Virtual Hand Simulation
First, we will select the Virtual Left Hand system and click Finish to start the simulation.
Selecting either virtual hand system at the Allegro Hand Application Studio (AHAS) hand selection
prompt will load the AHAS dynamics simulation environment and a virtual hand model. The simulation
begins running as soon as the AHAS simulation window is loaded.
Note: If presented with a Windows Firewall Security Alert, click "Allow access" to run AHAS.
AHAS is provided along with the Allegro Hand for two main purposes. AHAS allows for ease of testing
CAN communication between your PC and the Allegro Hand hardware. Secondly, AHAS provides
several robust grasping algorithms for use with the Allegro Hand. The algorithms provided with AHAS
can grasp a variety of object geometries for demonstration or for use at the end of a manipulator.
The grasping algorithms provided with AHAS can be explored via the graphical user interface (GUI)
buttons at the top-left of the AHAS simulation window. Clicking these buttons will send a command to
the virtual CAN device on the virtual Allegro Hand model.
Copyright 2008-2012 SimLab Co., Ltd. All rights reserved.
14
ALLEGRO
HAND
USERS
MANUAL
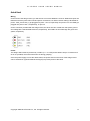
Home
Let's start by clicking the button entitled Home. The position assumed by the Allegro Hand is a
starting position that ensures that all joints are oriented properly for executing a grasp.
Ready
Click the button entitled Ready to prepare for each type of grasping motion.
Note: For the virtual hand, you will notice the finger joints sagging if left in ready mode too long. As the finger tip locations are
controlled, all joint angles do not necessarily matter. Due to the lack of friction found in the actual system, the ready position
does not remain constant. In this case, simply push Home then Ready again to prepare for a grasp.
Grasp 3
Click the buttons entitled Home then Ready to prepare the hand for a grasp.
Now click the button entitled GRASP3. This grasping algorithm is a torque-controlled, three-fingered
grip. This grasp can be used for pick-and-place style object grasping as the object is held between the
tips of the thumb, index and middle fingers.
Grasp 4
Click the buttons entitled Home then Ready to prepare the hand for another type of grasp.
Click the button entitled GRASP4. This grasping algorithm is a torque-controlled, four-fingered grip.
This grasp can be used for pick-and-place style object grasping as the object is held between the tips
of the thumb and three fingers.
Pinching (I)
Click the buttons entitled Home then Ready to prepare the hand for another type of grasp.
Click the button entitled Pinching (I). This grasping algorithm is a torque-controlled, two-fingered pinch.
This grasp can be used for pick-and-place style object grasping and more dexterous manipulation as
the object is held between the tips of the thumb and the index finger.
Pinching (M)
Click the buttons entitled Home then Ready to prepare the hand for another type of grasp.
Click the button entitled Pinching (M). This grasping algorithm is a torque-controlled, two-fingered
pinch. This grasp can be used for pick-and-place style object grasping and more dexterous
manipulation as the object is held between the tips of the thumb and the middle finger.
Envelop
Click the buttons entitled Home then Ready to prepare the hand for another type of grasp.
Click the button entitled Envelop. This grasping algorithm can be used to fully envelop an object within
the hand's four fingers. This algorithm can handle a variety of object geometries.
Test Encoders (actual hand only)
This button is only used when zeroing the hand joints. Pressing this button will print out the current
raw encoder data. (Only available in actual hand AHAS)
Test Motors (actual hand only)
This button is only when checking the positive direction of each motor. Pressing this button multiple
times will send a positive torque value to each motor in succession. (Only available in actual hand
AHAS)
Copyright 2008-2012 SimLab Co., Ltd. All rights reserved.
15
ALLEGRO
HAND
USERS
MANUAL
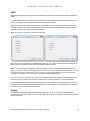
Sliders
The sliders at the bottom of the AHAS simulation window provide a secondary form of visual feedback
for the sixteen joints of the hand. Each column represents a finger with link 1 being the yaw joint
attached to the palm and link 4 being the last joint at the end of each finger.
Copyright 2008-2012 SimLab Co., Ltd. All rights reserved.
16
ALLEGRO
HAND
USERS
MANUAL
Actual Hand
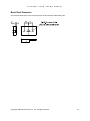
Wiring
On the back of the Allegro Hand, you will see two connectors labeled J1 and J5. While these ports are
identical in that they both offer CAN and power connections, J5 offers a switch making it favorable for
power. CAN_H and CAN_L get plugged into ports 1 and 2, respectively and power VCC and GND get
plugged into ports 3 and 4, respectively, on port J5.
On the connector provided with the Allegro Hand, the wires are color coded such that power ground
and voltage are a standard black and red, respectively, and CAN-Low and CAN-High are green and
yellow, respectively.
Power
The Allegro Hand must be powered by 7.4VDC (7.0 - 8.1 VDC) and at least 5 Amps. If a minimum of
5A is not provided, the motors will brown-out during grasping.
Once the power supply is on at the rated values, the power switch on the back of the Allegro Hand
can be switched on (upward towards the fingers) to provide power to the hand.
Copyright 2008-2012 SimLab Co., Ltd. All rights reserved.
17
ALLEGRO
HAND
USERS
MANUAL
AHAS
With the hand powered on and the CAN connected, it is finally time to run Allegro Hand Application
Studio.
A virtual Allegro Hand, left or right, can be loaded by clicking New in the File drop-down menu (File >
New) or by quitting and reopening Allegro Hand Application Studio.
Again, you will presented with the AHAS hand selection window. This time we will select the Actual
Left Hand System (or a right hand if that's what you have) and click Next to select the type of CAN
interface you are using. Click Finish to start AHAS.
Note: If you have a right hand, proceed accordingly.
While the CAN communication is established at start-up, the motors must be turned on using the On
button before commands can be sent and encoder values received.
Note: You should always straighten out all of the fingers before running Allegro Hand Application
Studio or any other hand control application (think High-Five). This habit poses the fingers as far away
as possible from any collision that could occur in the event of unexpected motion. This pose also
increases the reliability of the encoders in finding the hand's initial position.
Once the On button is pressed, the AHAS hand model is updated to reflect the actual Allegro Hand.
Move the fingers around a bit manually to make sure the communication is, in fact, established.
For the actual hand, the same grasping algorithms can be executed via the GUI interface. You can
use the hand to manipulate reasonably sized objects of many shapes. The virtual hand will continue
to reflect any motion the actual hand makes.
Quitting
You can quit Allegro Hand Application Studio in two ways. First, you can quit by clicking Exit in
the File drop-down menu (File > Exit). You can also quit by click the X button to the right of the AHAS
window's title bar.
Copyright 2008-2012 SimLab Co., Ltd. All rights reserved.
18
ALLEGRO
HAND
USERS
MANUAL
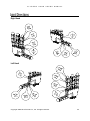
All dimensions are displayed in millimeters (mm) and degrees.
Copyright 2008-2012 SimLab Co., Ltd. All rights reserved.
19
ALLEGRO
HAND
USERS
MANUAL
Right Hand
Left Hand
Copyright 2008-2012 SimLab Co., Ltd. All rights reserved.
20
ALLEGRO
HAND
USERS
MANUAL
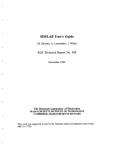
All dimensions are displayed in millimeters (mm) and degrees.
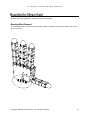
Mounting Block Removal
The mounting block is connected to the Allegro Hand using twelve (12) M2 socket-head cap screws
(6 on each side).
Copyright 2008-2012 SimLab Co., Ltd. All rights reserved.
21
ALLEGRO
HAND
USERS
MANUAL
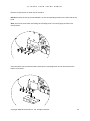
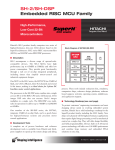
Remove six (6) screws on either side of the hand.
DO NOT remove the two (2) screws labeled A or the corresponding screws on the other side of the
hand.
Note: Secure the hand while unscrewing the mounting block to avoid dropping the hand once
disconnected.
Once the twelve (12) screws have been removed, the mounting block can be removed from the
bottom of the hand.
Copyright 2008-2012 SimLab Co., Ltd. All rights reserved.
22
ALLEGRO
HAND
USERS
MANUAL
Mounting
The block can be mounted to a surface using two (2) M3 socket-head cap screws.
Note: The hand should be mounted to a raised area so as to avoid thumb-mount interference during
hand movement.
Reassembly
Place the hand onto the mounting block and replace the twelve (12) M2 socket-head cap screws
(6 on each side).
Copyright 2008-2012 SimLab Co., Ltd. All rights reserved.
23
ALLEGRO
HAND
USERS
MANUAL
Mount Block Dimensions
The relevant dimensions of the mounting block are presented in millimeters (mm).
Copyright 2008-2012 SimLab Co., Ltd. All rights reserved.
24
ALLEGRO
HAND
USERS
MANUAL
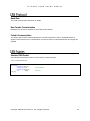
Baud-Rate
The CAN communication baud-rate is 1Mbps.
Non-Periodic Communication
Messages can be sent to initialize or stop CAN communication.
Periodic Communication
The Allegro Hand control software attempts to communicate with the real or simulated hand at a
regular control interval. Every 3 milliseconds, the joint torques are calculated and the joint angles are
updated.
Standard CAN Packet
The standard CAN packet used for communication contains 8 bytes.
Code 1: CAN Packet Structure
typedef struct{
unsigned char STD_EXT;
unsigned long msg_id;
unsigned char data_length;
char
data[8];
} can_msg;
//message identifier
//
// data array
Copyright 2008-2012 SimLab Co., Ltd. All rights reserved.
25
ALLEGRO
HAND
USERS
MANUAL
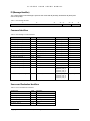
ID (Message Identifier)
The 4 byte integer CAN message is split into the command ID (26 bits), destination ID (3bits) and
source ID (3 bits).
Table 1: CAN Message Identifiers
1
8
16
24
26
Command ID
27
DSTN. ID
29
30
32
Source ID
Command Identifiers
Table 2: CAN Message Command Identifiers
Variable name
Value
Description
Source
Destination
ID_CMD_SET_SYSTEM_ON
0x01
Start periodic communication
ID_DEVICE_MAIN
ID_COMMON
ID_CMD_SET_SYSTEM_OFF
0x02
Stop periodic communication
ID_DEVICE_MAIN
ID_COMMON
ID_CMD_SET_PERIOD
0x03
Set communication frequency
ID_DEVICE_MAIN
ID_COMMON
ID_CMD_SET_MODE_JOINT
0x04
Command Transmission Mode
ID_DEVICE_MAIN
ID_COMMON
ID_CMD_SET_MODE_TASK
0x05
Command Transmission Mode
ID_DEVICE_MAIN
ID_COMMON
ID_CMD_SET_TORQUE_1
0x06
Index finger (1) torque command
ID_DEVICE_MAIN
ID_COMMON
ID_CMD_SET_TORQUE_2
0x07
Middle finger (2) toque command
ID_DEVICE_MAIN
ID_COMMON
ID_CMD_SET_TORQUE_3
0x08
Pinky finger (3) torque command
ID_DEVICE_MAIN
ID_COMMON
ID_CMD_SET_TORQUE_4
0x09
Thumb torque command
ID_DEVICE_MAIN
ID_COMMON
ID_CMD_SET_POSITION_1
0x0a
(unused)
ID_CMD_SET_POSITION_2
0x0b
(unused)
ID_CMD_SET_POSITION_3
0x0c
(unused)
ID_CMD_SET_POSITION_4
0x0d
(unused)
ID_CMD_QUERY_STATE_DATA
0x0e
Request joint state
ID_DEVICE_MAIN
ID_COMMON
ID_CMD_QUERY_STATE_DATA
0x0e
Joint state response
ID_DEVICE_SUB_01
ID_DEVICE_MAIN
ID_DEVICE_SUB_02
ID_DEVICE_SUB_03
ID_DEVICE_SUB_04
ID_CMD_QUERY_CONTROL_DATA
0x0f
Joint state response
ID_DEVICE_SUB_01
ID_DEVICE_SUB_02
ID_DEVICE_SUB_03
ID_DEVICE_SUB_04
ID_DEVICE_MAIN
Source and Destination Identifiers
Table 3: Source and Destination Identifiers
Variable name
Value
Description
ID_COMMON
0x01
Allegro Hand
ID_DEVICE_MAIN
0x02
Control PC
ID_DEVICE_SUB_01
0x03
Index Finger
ID_DEVICE_SUB_02
0x04
Middle Finger
ID_DEVICE_SUB_03
0x05
Little Finger
ID_DEVICE_SUB_04
0x06
Thumb
Copyright 2008-2012 SimLab Co., Ltd. All rights reserved.
26
ALLEGRO
HAND
USERS
MANUAL
In this chapter, sample code demonstrating the implementation of the CAN communication interface
is provide. This is the foundation for Softing PCI CAN.
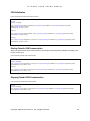
Opening the CAN Communication Channel
Code 2: Opening the CAN Communication Channel
char ch_name[256];
sprintf_s(ch_name, 256, "CAN-ACx-PCI_%d", ch);
INIL2_initialize_channel(&hCAN[ch-1], ch_name);
L2CONFIG L2Config;
L2Config.fBaudrate = 1000.0;
L2Config.bEnableAck = 0;
L2Config.bEnableErrorframe = 0;
L2Config.s32AccCodeStd = 0;
L2Config.s32AccMaskStd = 0;
L2Config.s32AccCodeXtd = 0;
L2Config.s32AccMaskXtd = 0;
L2Config.s32OutputCtrl = GET_FROM_SCIM;
L2Config.s32Prescaler = 1;
L2Config.s32Sam = 0;
L2Config.s32Sjw = 1;
L2Config.s32Tseg1 = 4;
L2Config.s32Tseg2 = 3;
L2Config.hEvent = (void*)-1;
CANL2_initialize_fifo_mode(hCAN[ch-1], &L2Config);
Copyright 2008-2012 SimLab Co., Ltd. All rights reserved.
27
ALLEGRO
HAND
USERS
MANUAL
CAN Initialization
Code 3: Opening the CAN Communication Channel
long Txid;
unsigned char data[8];
Txid = ((unsigned long)ID_CMD_SET_PERIOD<<6) | ((unsigned long)ID_COMMON <<3) | ((unsigned long)ID_DEVICE_MAIN);
data[0] = (unsigned char)period_msec;
canWrite(hCAN, Txid, data, 1, STD);
Sleep(10);
Txid = ((unsigned long)ID_CMD_SET_MODE_TASK<<6) | ((unsigned long)ID_COMMON <<3) | ((unsigned long)ID_DEVICE_MAIN);
canWrite(hCAN, Txid, data, 0, STD);
Sleep(10);
Txid = ((unsigned long)ID_CMD_QUERY_STATE_DATA<<6) | ((unsigned long)ID_COMMON <<3) | ((unsigned long)ID_DEVICE_MAIN);
canWrite(hCAN, Txid, data, 0, STD);
Starting Periodic CAN Communication
When you start periodic CAN communication, joint angles are automatically updated according to the
torque control input.
Code 4: Starting Periodic CAN Communication
long Txid;
unsigned char data[8];
Txid = ((unsigned long)ID_CMD_QUERY_STATE_DATA<<6) | ((unsigned long)ID_COMMON <<3) | ((unsigned long)ID_DEVICE_MAIN);
canWrite(hCAN[ch-1], Txid, data, 0, STD);
Sleep(10);
Txid = ((unsigned long)ID_CMD_SET_SYSTEM_ON<<6) | ((unsigned long)ID_COMMON <<3) | ((unsigned long)ID_DEVICE_MAIN);
canWrite(hCAN[ch-1], Txid, data, 0, STD);
Stopping Periodic CAN Communication
Code 5: Stopping Periodic CAN Communication
long Txid;
unsigned char data[8];
Txid = ((unsigned long)ID_CMD_SET_SYSTEM_OFF<<6) | ((unsigned long)ID_COMMON <<3) | ((unsigned long)ID_DEVICE_MAIN);
canWrite(hCAN[ch-1], Txid, data, 0, STD);
Copyright 2008-2012 SimLab Co., Ltd. All rights reserved.
28
ALLEGRO
HAND
USERS
MANUAL
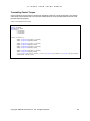
Transmitting Control Torques
Control inputs for the four joints in each finger should be packed in a single CAN frame. The sample
code below demonstrates how to encode four PWM inputs into an 8 byte data buffer and how to set
the CAN frame ID properly.
Code 6: Transmitting Control Torques
long Txid;
unsigned char data[8];
float torque2pwm = 800.0f
short pwm[4] = {
0.1*torque2pwm,
0.1*torque2pwm,
0.1*torque2pwm,
0.1*torque2pwm
};
if (findex >= 0 && findex < 4)
{
data[0] = (unsigned char)( (pwm[0] >> 8) & 0x00ff);
data[1] = (unsigned char)(pwm[0] & 0x00ff);
data[2] = (unsigned char)( (pwm[1] >> 8) & 0x00ff);
data[3] = (unsigned char)(pwm[1] & 0x00ff);
data[4] = (unsigned char)( (pwm[2] >> 8) & 0x00ff);
data[5] = (unsigned char)(pwm[2] & 0x00ff);
data[6] = (unsigned char)( (pwm[3] >> 8) & 0x00ff);
data[7] = (unsigned char)(pwm[3] & 0x00ff);
Txid = ((unsigned long)(ID_CMD_SET_TORQUE_1 + findex)<<6) | ((unsigned long)ID_COMMON <<3) | ((unsigned long)ID_DEVICE_MAIN);
canWrite(hCAN, Txid, data, 8, STD);
}
Copyright 2008-2012 SimLab Co., Ltd. All rights reserved.
29
ALLEGRO
HAND
USERS
MANUAL
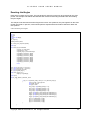
Receiving Joint Angles
Each finger consists of four joints. The joint angles for those four joints can be received via one CAN
packet. The sample code below demonstrates the method for decoding the data buffer and reading
the joint angles.
The sample code assumes that when fingers are in their zero positions, the joint angles from the CAN
packet are 32768. In practice, users should perform experiments and introduce offsets to obtain the
zero position.
Code 7: Receiving Joint Angles
char cmd;
char src;
char des;
int len;
unsigned char data[8];
int ret;
can_msg msg;
PARAM_STRUCT param;
ret = CANL2_read_ac(hCAN, ¶m);
switch (ret)
{
case CANL2_RA_DATAFRAME:
msg.msg_id = param.Ident;
msg.STD_EXT = STD;
msg.data_length = param.DataLength;
msg.data[0] = param.RCV_data[0];
msg.data[1] = param.RCV_data[1];
msg.data[2] = param.RCV_data[2];
msg.data[3] = param.RCV_data[3];
msg.data[4] = param.RCV_data[4];
msg.data[5] = param.RCV_data[5];
msg.data[6] = param.RCV_data[6];
msg.data[7] = param.RCV_data[7];
break;
}
cmd = (char)( (msg.msg_id >> 6) & 0x1f );
des = (char)( (msg.msg_id >> 3) & 0x07 );
src = (char)( msg.msg_id & 0x07 );
len = (int)( msg.data_length );
for(int nd=0; nd<len; nd++)
data[nd] = msg.data[nd];
switch (cmd)
{
case ID_CMD_QUERY_CONTROL_DATA:
{
if (id_src >= ID_DEVICE_SUB_01 && id_src <= ID_DEVICE_SUB_04)
{
int temp_pos[4]; // raw angle data
float ang[4]; // degree
float q[4]; // radian
temp_pos[0] = (int)(data[0] | (data[1] << 8));
temp_pos[1] = (int)(data[2] | (data[3] << 8));
temp_pos[2] = (int)(data[4] | (data[5] << 8));
temp_pos[3] = (int)(data[6] | (data[7] << 8));
ang[0] = ((float)(temp_pos[0]-32768)*(333.3f/65536.0f))*(1);
ang[1] = ((float)(temp_pos[1]-32768)*(333.3f/65536.0f))*(1);
ang[2] = ((float)(temp_pos[2]-32768)*(333.3f/65536.0f))*(1);
ang[3] = ((float)(temp_pos[3]-32768)*(333.3f/65536.0f))*(1);
q[0] = (3.141592f/180.0f) * ang[0];
q[1] = (3.141592f/180.0f) * ang[1];
q[2] = (3.141592f/180.0f) * ang[2];
q[3] = (3.141592f/180.0f) * ang[3];
}
}
}
Copyright 2008-2012 SimLab Co., Ltd. All rights reserved.
30
ALLEGRO
HAND
USERS
MANUAL
The newest versions of all documents found in this manual can be found in the Allegro Hand wiki at
simlab.co.kr/AllegroHand/wiki
A forum is also available on the wiki where users can share problems and solutions with each other
and with SimLab. Upon request, you may be granted editing access to the wiki to host your tutorials
and samples of your work. In fact, we would love to collaborate.
For any further questions please contact us.
Address
Hyobong8 Bldg 2Fl, 1425-9 Seocho-dong
Seocho-gu, Seoul 137-864, Korea
(13, Nambusunhwan-ro 333-gil)
Phone
+82-2-3471-2014
Fax
+82-2-6280-9931
Email
[email protected]
Please enjoy your Allegro Hand,
and feel free to share your success stories and videos!
The Allegro Hand Wiki and User's Manual is written and maintained by Alex Alspach
[email protected]
Copyright 2008-2012 SimLab Co., Ltd. All rights reserved.
31