1
TyDI: Terminology Design Interface – User Guide
version 0.3e
2011-10-20
copyright INRA-MIG 2009, 2010, 2011
2
Table of contents
1 Introduction ......................................................................................................................................... 5 2 General presentation ........................................................................................................................ 5 2.1 Process description .................................................................................................................................. 5 2.2 Application general presentation ........................................................................................................ 5 2.3 Managing windows ................................................................................................................................... 7 3 Basic usage............................................................................................................................................ 7 3.1 Connection ................................................................................................................................................... 8 3.2 User profiles management ..................................................................................................................... 9 3.2.1 User profiles creation and modification ...................................................................................................... 9 3.2.2 User authorizations............................................................................................................................................ 10 3.3 Creating a terminology project...........................................................................................................11 3.3.1 Importing data into projects.......................................................................................................................... 11 3.3.2 Importing multiple extraction results ....................................................................................................... 13 3.4 Term candidate selection .....................................................................................................................13 3.4.1 Filter panel............................................................................................................................................................. 14 3.4.2 Term grid toolbar ............................................................................................................................................... 15 3.4.3 Candidate table .................................................................................................................................................... 17 3.4.4 Displaying candidate features....................................................................................................................... 19 3.4.5 Term candidate validation.............................................................................................................................. 21 3.5 Toolbar summary....................................................................................................................................23 4 Advanced usage................................................................................................................................ 25 4.1 Optional term features: concept, pseudo term..............................................................................25 4.2 Terminology structure design ............................................................................................................25 4.2.1 Semantic class view description................................................................................................................... 25 4.2.2 Adding links between terms and classes.................................................................................................. 27 4.2.3 Removing links among terms and classes, and more.......................................................................... 28 4.2.4 Semantic class tree view description ......................................................................................................... 29 4.2.5 Adding a term ....................................................................................................................................................... 32 4.3 Term Grid Local filter.............................................................................................................................34 4.3.1 Regular expressions........................................................................................................................................... 34 4.3.2 Regular expression short references ......................................................................................................... 34 4.3.3 Local filter examples.......................................................................................................................................... 35 4.4 Term variants ...........................................................................................................................................35 4.4.1 Variant discovery using FastR....................................................................................................................... 36 4.4.2 FastR variant proposals view ........................................................................................................................ 36 4.4.3 FastR variants graphical view ....................................................................................................................... 38 4.5 Modular text import utility ..................................................................................................................39 4.5.1 Input file in text format .................................................................................................................................... 39 4.6 Ontology import.......................................................................................................................................40 4.7 Project export utilities...........................................................................................................................40 4.7.1 Text file export..................................................................................................................................................... 40 4.7.2 OBO flat file export............................................................................................................................................. 41 5 Installation......................................................................................................................................... 43 5.1 Requirement .............................................................................................................................................43 5.2 Client installation ....................................................................................................................................43 5.2.1 OS specific installer............................................................................................................................................ 43 5.2.2 Generic zip archive............................................................................................................................................. 43 5.3 Client update .............................................................................................................................................43 6 Parameterization............................................................................................................................. 44 3
6.1 6.2 6.3 6.4 6.5 Connection configuration .....................................................................................................................44 External link to web browsers ............................................................................................................45 Memory allocation ..................................................................................................................................46 Look and Feel ............................................................................................................................................46 OS specificity .............................................................................................................................................46 7 Appendix............................................................................................................................................. 47 7.1 Term text import file format ...............................................................................................................47 7.2 Term candidate feature list .................................................................................................................48 7.3 References .................................................................................................................................................49 1
Introduction
The Terminology Design Interface (TyDI) is a graphical tool for,
•
The validation of large sets of candidate terms extracted from texts written in natural
language,
•
The selection of a subset of terms in a terminology, relevant for a given application
•
And the structuring of terminologies.
See the TyDI scenario document for more details on TyDI practical goals.
The application architecture follows the client/server model. The server side is mainly in charge of
the data storage (using a relational database), and is described in “TyDI Admin Guide”. The client
side is a graphical user interface that will be detailed in this document.
If TyDI is not already installed on your platform, please follow the installation procedure described
in chapter 5 .
2 General presentation
2.1 Process description
The term validation process is the following: the user browses a list of term candidates and the user
assigns a validation status to each one; the status can range from rejected to fully approved. The
candidate list is provided by a third party application such as a corpus-based term extractor, like
YaTea.
The terminology structuring process is the following: the user assigns synonymy and hyperonymy
relationships to couples of terms.
In both cases, TyDI provides many facilities for selecting and displaying terms that share common
properties such as morphology so that the validation or structuring actions for given terms can be
derived from the observation of other similar terms.
When opened, the windows appear docked at the favourite position within the application main
window. Simple drag and drop move them to another site.
There are also two special buttons in the title bar of the top-level windows:
−
Alternatively sliding the window makes room for other windows,
−
Or pining it down in order to have it always displayed.
Finally you can undock any of the top-level windows if you prefer to work with independent
windows (via the context-sensitive menu in the window title bar or by dragging out the title of the
window).
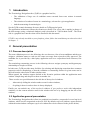
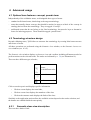
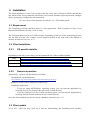
2.2 Application general presentation
The Terminology Design Interface client is a graphical user interface, composed of several top-level
windows, which can be reorganized at the user will. By default, top-level windows appear docked
within the main window workspace (top-level windows have been coloured in the picture below).
Illustration 1: TyDI main windows
The most common top-level windows are:
−
One project window (in blue in the screen capture), displaying all projects that are visible to the
current user in the current database,
−
As many term grids (in yellow) as needed, displaying a selection or all candidate terms of a
specific project in a tabular form. The validation is performed through this screen,
−
One property sheet (in green), a general purpose window displaying detailed information about
the currently select item (e.g. term, project, corpus, link),
−
One context window (in grey), presenting the occurrences of a specific term in its corpus
context,
−
One term link window (in red), displaying the semantic class and the links where the selected
terms appears.
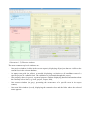
Three toolbars are located just below the menu bar where many action buttons are available. From
left to right: Term navigation tool bar, Project toolbar and User toolbar.
Illustration 2: TyDI toolbar.
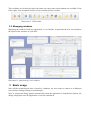
2.3 Managing windows
Managing the windows inside the application is very flexible, in particular the user can customize
the layout of the windows as (s)he likes.
Illustration 3: undocked top-level windows.
3 Basic usage
Since all the terminological data is stored in a database, the user needs to connect to a dedicated
server before starting working on terminologies.
Note: A connection dialog appears automatically when the application is launched (be patient, the
dialog is displayed once the application is correctly initialised).
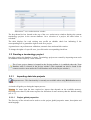
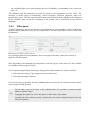
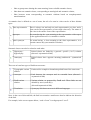
Illustration 4: Project window
The project window is the entry point to work with TyDI. It shows a hierarchical tree of the data
organisation.
Of course, when you are not connected to a database yet, the project window is empty.
Selecting a node in the project window enables specific actions:
Node type
Available actions
The Term Database node (root of the tree)
- Disconnect,
- Create new project
Project nodes: one per project the current
user has been given rights to work with.
- Term free search,
- Import result of a new term extraction,
- View FastR variation proposals,
- View project statistics
Processing nodes: one per processing
performed in the project (e.g. YaTeA
extraction, tab file import, FastR variant
search)
None
Corpus nodes (corpora can be shared by
distinct processing)
- Import FastR variant search results
Text file nodes: list of individual files
contained in a corpus
None
User node: only one node, for the currently
connected user
- Change password,
- Change user right
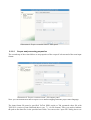
3.1 Connection
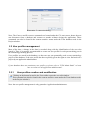
The connect dialog allows the user to choose a database and a user profile at the same time. A
correct password for the application is required to connect to the database.
At a given time, the application is connected to a single database, but a database can contain several
terminology projects that can be opened simultaneously.
Illustration 5: connection dialog
Note: The Connect and Disconnect commands are located under the File main menu; hence the user
can disconnect from a database and connect to another without closing the application. These
commands can also be found in the context-sensitive menu under the Term database node in the
Project window.
3.2 User profiles management
Most of the time, a change in the data is recorded along with the identification of the user who
issued it. Thus, it is strongly recommended to create one user profile for each person taking part in
the terminology building process.
User profiles are stored in the database, so that one user can potentially work on any terminology
project of the database, if the user profile has been explicitly given the rights to view and work on a
project by an application administrator.
If your database does not contain any user profile yet, please refer to “TyDI Admin Guide” to learn
how to connect as an application administrator.
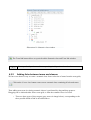
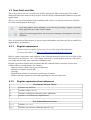
3.2.1
User profiles creation and modification
Clicking on the button located in the User toolbar opens the user edit window.
This command can also be found in the context-sensitive menu under the Term database node
in the Project window).
Note: the user profile management is only granted to Application administrators.
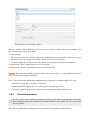
Illustration 6: Users editing window
The User editing window displays the list of the user profiles existing in the current database. The
list is located at the top of the window.
To edit a profile,
− First select it in the list, and then perform the change in the text field below. You can even reset
the password of an existing user, which is useful in case of password loss.
− Confirm changes by clicking on the save button or discard them with the Cancel button).
Clicking on the “New” button creates a new user profile.
Clicking on the “Delete” button deletes the selected user profile.
Warning: Removing user profiles that have been used to create data (e.g. term validation, semantic
class or term link creation) is forbidden.
Note: user profiles with Application administrator privileges have extended rights. They can:
−
Create new user profiles or modify existing ones,
−
Grant or revoke the right of users to work on given terminology projects,
−
Create new terminology project, or import term extraction result into existing ones.
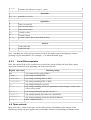
3.2.2
User authorizations
The user authorisation window is opened by clicking on the button located in the User toolbar
This command can also be found in the context-sensitive menu under the User node in the
Project window.
Note: the user authorisation management is only granted to Application administrators.
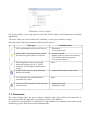
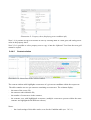
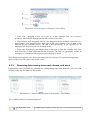
Illustration 7: user authorisations window
The drop-down list box located at the top of the user authorization window displays the current
terminology projects in the current database. On a selection of a project, the table below is
refreshed.
The table displays for each existing user profile an editable check box indicating if the
corresponding user is granted the right to work on a project.
A granted user can perform term validation, semantic class and term link creation.
To change the rights of a specific user, just click on the corresponding check box.
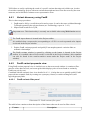
3.3 Creating a terminology project
Just after creation, the database is empty. Terminology projects are created by importing terms such
as candidate terms output by a term extractor.
The Create project button is located in the Project toolbar; it is enabled when the Term
Database node is selected in the Project window (This command can also be found in the
context-sensitive menu under the Term Database node in the Project window).
3.3.1
Importing data into projects
Important note : This functionality is currently not available when using Web Service access.
A wizard will guide you during the import process.
Warning: be aware that the time required to import data depends on the available memory.
Importing more than 25,000 terms requires the allocation of more memory than the default setting
(see 6.3 ).
3.3.1.1
Project global properties
The first step of the wizard can be used to set the project global properties: name, description and
main language.
Illustration 8: Project creation wizard - main panel
3.3.1.2
Corpus and processing properties
The second step of the wizard allows to set properties of the corpus if relevant and of the term input
format.
Illustration 9: Project creation wizard - files import panel
Note: you can indicate here that a corpus is in a distinct language than the project main language.
The input format file must be specified: YaTeA XML results or Tab separated values file with
TyDI v0.2 (version of June 2009 and above) (see 7.1 for file format). Then, you need to indicate
the path to the data files in the provided text fields. You can use the “open file” dialog box to set
these paths (button with the ellipsis mark).
If you import YaTeA data, you can optionally indicate a corpus file. The advantage of importing the
corpus file is that TyDI will then be able to display terms in context.
Note 1: the YaTeA term candidate files can be post-processed by the merging tool
fusion_termino_xml.pl to reduce term redundancy, by gathering flexed forms or close typographic
variants under a representative form of the group. The merged terms are then said to be superseded
by the representative form. Nevertheless, it is still possible to view the superseded terms in TyDI.
Note 2: the YaTeA candidate files can be post-processed by the filtering tool
filtrage_termino_xml.pl to reduce term profusion by removing superfluous terms using simple
regular expression or dictionary based methods. For example we may want to remove already
known named entities like species names in a biological terminology. Nevertheless, it is still
possible to view the dismissed terms in TyDI.
Note 3: the project creator is automatically granted the right to work on the new project. Hence,
grants must be explicitly set to other participating users (see 3.2.2 ).
3.3.2
Importing multiple extraction results
Important note: This functionality is currently not available when using Web Service access.
It is possible to import term extractor results into an already existing project and the corresponding
corpus can be in languages distinct from the main project language.
The result importation is performed using the same wizard described before.
3.4 Term candidate selection
The main activity of TyDI user is to navigate through the list of term candidates of the project for
assigning validation status or relationships. To avoid scanning the list of candidates sequentially, as
this process can be pretty boring and, in addition, really inefficient TyDI provides many facilities to
select, sort and navigate through candidate lists.
Click on the button located in the Project toolbar opens the Term grid window (it is enabled
when a Project node is selected in the Project window).
It can also be opened by a simple double-click on the Project node (this command can also be
found in the context-sensitive menu under the Project node in the Project window)
The Term grid window is used to display all or a selection of term candidates associated to a
project. It is composed of two main panels and a toolbar:
−
the filter criteria panel (upper part) is used to limit the number of term candidates retrieved from
the database by setting some criteria
−
the toolbar contains buttons to perform commands on selected candidates,
−
the candidate table (lower part) displays the list of candidates corresponding to the criteria set
above it.
The validation and the structuring of terms are based on the examination of close terms. The
closeness is mainly based on morphology criteria, frequency, linguistic properties, other user
opinion and context. The filter criteria panel is then used to filter the term candidate to be displayed
in the candidate table so that the command of the toolbar can be performed on the selected
candidates.
3.4.1
Filter panel
A typical terminology project can contain several thousands of term candidates, and it is usually not
useful to display them all at once (not to mention that it can take some time to retrieve them from
the database).
Illustration 10: Filter panel criteria
For selecting a subset of term candidates, the user assigns term feature value to the criteria as
figured in the Filter panel.
Note: depending of the data that was imported to create the project, some criteria are not available
for candidate selection (greyed field).
You can perform approximate filtering by using special wildcard characters in the text fields:
−
*: will match any string (of any length strictly more than zero),
−
?: will match any single character.
If several criteria are specified, the term candidates that are retrieved will match the union of those
criteria (logical AND operator).
Tip: in order to give more space to the candidate table, it is possible to reduce the panel
thanks to splitter widget.
Dragging the splitter bar resizes the panels on both sides of the splitter.
Expand and reduce buttons quickly expand/reduce the panel (triangular buttons at the left
side of the splitter).
There is a reduced panel at the top of the filter panel to indicate if
searches should case sensitive or not (case ignored by default). It also
contains a button to reset the filter panel.
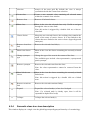
The table below contains a short description of the term features that can be used as filter criteria.
Feature
Description
Form
Surface form of the term candidate, as it is found in the corpus.
Lemma
Lemmatized form of the candidate.
Syntactic category
Part of speech tag (POS tag)
Head
Head form.
Expansion
Expansion form.
Prevalidation
Prevalidation string
is Class member
True if the term belongs to a semantic class.
is Representative
True if the term is the representative term of a semantic class.
Producer
Processing or user who created the term (free selection).
is Inferred
True, if the term is not found in the corpus alone in a maximal noun phrase
(MNP), but has been retained for the syntactic analysis of a larger term.
is Dismissed
True, if the term is detected by the extractor, but has been filtered out
(optional post-YaTeA processing).
is Superseded
True, if the term is detected by the extractor, but has been regrouped with
others under a merged representative (optional post-YaTeA processing).
is Unparsed Phrase
True, if the term extractor has not been able to parse the phrase.
Word count
Number of words in the form.
Nb of occurrences
Number of occurrences of the form with a given syntactic analysis within
the corpus.
Class member /
only representative
Term members of any semantic class (or only the representative amongst
those class members).
Justification
Validation comment
Validation
Validation status(es) (free selection)
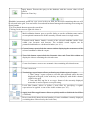
3.4.2
Term grid toolbar
Illustration 11: term grid toolbar
This toolbar contains the following action buttons:
Apply button: Execute the query to the database with the current values of the
criteria.
Short-cut: Enter key
Maskable incremental search bar: type a text in the text field, the first term containing this text will
be selected in the grid. You can browse forward and backward amongst the matching terms using the
arrow buttons
Ctrl-F keyboard shortcut opens the search bar.
Clicking on the cross on right side closes it.
Multi-validation button: open a specific dialog to set the validation status and to
set an optional comment for all the currently selected terms in a single action.
External search button: launch a search of the selected candidate surface form
within your favourite web browser. The available search engines can be
parameterized thanks to a dedicated window (see 6.2 )
Context button: open/refresh the context window displaying the occurrences of the
selected candidate within the corpus.
Term link button: open/refresh the Semantic class and Term link window to
display the classes containing the selected terms.
Create class button: create a new semantic class containing all selected terms.
Create a new term
Terminology export button: allows performing two distinct types of export.
1. Total “image” export: export to a text file (tab separated value) the term
displayed in the grid, in the order they are displayed, with all the columns
visible in the grid.
2. Term and POS tag list in TreeTagger format of the currently displayed
terms that is used as input to FastR processing.
Local filter button: allows to define a local filter by specifying a regular
expression to be applied to one of the visible column (see 4.3 ).
/
Apply local filter toggle button: allows to quickly enable or disable the local filter
(if defined).
Rows count field: shows the total number of terms candidate currently displayed
(excluding those filtered out by the local filter)
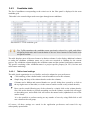
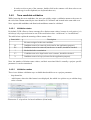
3.4.3
Candidate table
The list of candidates corresponding to the criteria set in the filter panel is displayed in the term
candidate grid.
This table is the central widget used to navigate through term candidates.
Illustration 12: Term candidate grid
Tip: TyDI remembers the candidate terms previously selected in a grid, and allows
navigating backwards and forwards thanks to the two arrow buttons located on the term
navigation toolbar.
The table displays most of the term features in distinct columns. It also display additional columns
to render the candidate validation status set by each user recruited as validator for the current
project. The validation columns display the validation status and the optional justification comment.
The specific rendering of the validation status is a project specific property (in V0.2, list box and
radio-button rendering).
3.4.3.1
Table visual settings
The table visual organisation is very flexible, and can be adapted to your preferences:
●
●
Click and drag of the column header vertical boundaries resize the columns,
Simple drag and drop of the column header reorder the columns,
Columns can be hidden and restored thanks to a specific dialog box, opened by a click on
the top-right corner of the table (or via the context-sensitive menu on any column header)
●
Rows can be sorted following any of the column by a simple click on the column header:
first click on the header to perform ascending sort on the column; second click will toggle
to descending sort; and a third click will restore the natural order (alphabetical sort on the
surface form).
It is also possible to perform sorting on any number of rows by using Shift-click to add
new column to the sort group.
Of course, all these settings are stored in the application preferences and reused for any
subsequently opened table.
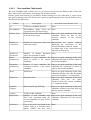
3.4.3.2
Term candidate Table details
The term candidate table contains one row per term retrieved from the database that verifies the
filter. Most of the term features are displayed in the table column.
Besides, quick term browsing is provided by double-clicking on a cell of the table: it opens a new
term grid containing a new list of terms, the content of which depends of the clicked feature cell, as
described in the table below.
Column
Description
Associated action (double-click)
Id
TyDI term candidate identifier
None
Prevalidation
Prevalidation string (from tab None
separated value file import only)
Surface form
Surface form of the term candidate, Open a new grid containing all the term
as found in the corpus
candidates which are part of the
syntactic analysis of the current
candidate
Number of
occurrences
Number of occurrences of the form Open/refresh the context window
within the corpus.
displaying the occurrences of the
selected candidate within the corpus.
(Available only if the corpus has been
imported in the project)
Number of
documents
Number of distinct document None
where the candidate is found.
Head
productivity
Number of term candidates the Open a new grid containing all the term
head of which is the current candidates the head of which is equal to
candidate
the current candidate
Expansion
productivity
Number of term candidates the Open a new grid containing all the term
expansion of which is the current candidates the expansion of which is
candidate
equal to the current candidate
Head
Head form
Open a new grid containing all the term
candidates that have the same head than
the current candidate (i.e. head family)
Expansion
Expansion form
Open a new grid containing all the term
candidates that have the same
Expansion than the current candidate
(i.e. expansion family)
Syntactic
category
Part of speech tag (POS tag)
Open a new grid containing all the term
candidates that have the same POS tag
than the current candidate.
Lemma
Lemma of the candidate.
None
Supersedes
Number of term candidates that Open a new grid containing all the term
have been regrouped under the candidates superseded by the current
current candidates (see post-YaTeA candidate.
processing).
is Inferred
True if the term is not found in the None
corpus alone in a maximal noun
phrase (MNP), but has been
retained for the syntactic analysis
of larger term.
Number of
words
Number of words in the form.
None
is Concept
True when the current term is None
selected as candidate to be the label
of a concept in ontology.
is Dismissed
True if the term is detected by the None
extractor, but has been filtered out
(optional YaTeA post-processing).
Producer
Processing or user who created the None
term.
Is pseudo Term
Is set to true by the user if the term None
candidate is not member of the
target terminology, but should be
kept as an alternative form in a
semantic classes for indexing
purposes.
Unparsed
True for YaTeA unparsed phrase
None
Validation
Validation status and comment
None
Note: if the cooperative validation
mode is set for the project, one
validation column per user is
displayed (see 3.4.5.2 )
3.4.4
Displaying candidate features
3.4.4.1
Property sheet
The property sheet can be opened thanks to the command located in the Windows main
menu.
The property sheet is a general purpose view, that displays in a tabular format, information about
the selected elements.
It can be advantageously used to display features of a candidate, especially when some columns of
the candidate table are hidden.
Properties are separated in two distinct sets: the first one contains the actual properties of the term,
as they are found in the corpus or computed by the term extractor. On the other hand, the “Expert”
set includes user editable properties, such as the “Concept” and “Pseudo-term” tags (see 4.1 ).
Illustration 13: Property sheet (displaying term candidate info)
Note 1: it is possible to tag several terms at once by selecting them in a term grid, and setting a new
value in the property sheet.
Note 2: It is possible to select property text to copy it into the clipboard. Text from the term grid
cannot be copied.
3.4.4.2
Context window
Illustration 14: Occurrence in the context window
The context window table highlights occurrences of a given term candidate within the corpus text.
The table contains one row per sentence containing an occurrence. The columns display:
−
the name of the source file,
−
the sentence rank within the file,
−
the number of occurrences in the sentence,
−
the sentence text with highlighted occurrence (multiple occurrences present within the same
sentence are highlighted with different colours).
Notes:
-
the visual settings of this table can be set as for the Candidate table (see 3.4.3.1 )
-
In order to select a part of the sentence, double-click in the sentence cell, then select a text
part and copy it to the clipboard (use keyboard short-cut).
3.4.5
Term candidate validation
While browsing the term candidates, the user can quickly assign a validation status to the terms in
the cell of the column named by the user identifier or Validation and located in the same table row.
Note: superseded candidates and dismissed candidates cannot be validated.
3.4.5.1
Validation status
By default, TyDI offers to choose amongst five distinct status values, because in real project, it is
not always easy to put each term in one of the two distinct class: “valid terms” or “invalid terms”.
The table below explain the meaning of these status values.
Status label
Description
No status assigned to the term candidate.
D
Candidate term to be removed (irrelevant for the application purpose).
D?
Candidate term to be removed, but the user is unsure, should be checked
?
Not decided after examination
V?
Candidate term to be kept but the user is unsure, should be checked.
V
Candidate term to be kept (relevant for the application purpose).
Note: the number of distinct status values, and their associated label is actually a project specific
parameter. It can be customized.
3.4.5.2
Validation modes
There is two distinct validation ways available that should be set as a project parameter:
−
drop-down list,
−
radio button, where the label status is not displayed, but which is a quicker way to validate long
series of terms.
Illustration 15: drop-down list based validation (blind mode)
−
Illustration 16: radio button based validation (blind mode)
Moreover, there are two distinct validation modes (depending on a project parameter):
−
blind mode: the current user makes his own validation without seeing the validations performed
by other users.
−
cooperative mode: the current user can see the validations performed by other users (if any)
In cooperative mode, the table displays one column per user participating in the project (the column
headers contain the corresponding user name).
Illustration 17: drop down list based validation (cooperative mode)
3.4.5.3
Validation justification
If necessary, users can write a free text comment as a validation justification or as a way to qualify
terms for further processing (e.g. segmentation problem, OCR error, incomplete, named entity).
Clicking on the button located on the left side of the validation widget open the
comment edit window.
- When no comment is set, the button face is empty.
- When a comment is set, the button face contains a purple exclamation mark.
Illustration 1: drop-down list based validation (blind mode)
Note: The tooltip text of the comment button contains the text of the comment. Hence, the comment
can be read just by pointing the button with the mouse pointer and wait for a few seconds for the
tooltip to appear. This is especially useful to read other user comment in the cooperative mode.
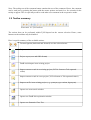
3.5 Toolbar summary
Illustration 18: TyDI toolbars
The actions that can be performed within TyDI depend on the current selection. Hence, some
buttons on the toolbars may be disabled.
Here is a quick summary of the available actions:
Term navigation (backward and forward) over the selected terms
Project statistics
Project export (text and OBO format)
FastR result import in an existing project
Import extractor result in an existing project (YaTeA format or Tab separated
values)
Import extractor result in a new project (YaTeA format or Tab separated values)
Import text file in an existing project (e.g. synonym, typo variant, hyponyms)
Open a new term search window
Open a new FastR link exploration window
Open a new Semantic Class Tree
Change current user password
Edit user authorisations
Edit user profiles
4 Advanced usage
4.1 Optional term features: concept, pseudo term
Independently of the validation status, we distinguish three types of terms:
−
standard well-formed terms, that belong to the target terminology,
−
terms that actually denote concept, that should be marked to appear as label of the concept in
ontology derived from the terminology. They are tagged “Concept”.
−
malformed terms that do not belong to the final terminology, but must be kept as alternative
forms for indexing purposes. These should be tagged “pseudo-term”.
4.2 Terminology structure design
Beyond validating terms, TyDI allows to structure the terminology by creating links between terms
and classes of terms.
All these operations are performed using the Semantic class window, or the Semantic classes tree
view windows (see 4.2.4 ).
The Semantic class window displays a class tree view and a toolbar including all buttons needed to
perform actions on the selected nodes. The nodes are indicated by a
(see Illustration 19).
There are three different types of nodes,
=
terms
with different roles
term classes
and structure nodes
Click on a node open it and displays specific information.
•
Click on a term displays the term links,
•
Click on a term class displays the members of the class
•
Click on the structure node displays the links of the class.
Similarly to the application main toolbar, the available actions depend on the nodes selection, and
the buttons are enabled/disabled consequently.
4.2.1
Semantic class view description
There are three kinds of link:
•
links to group terms sharing the same meaning, hence to build semantic classes,
•
links between semantic classes, corresponding to ontological and semantic relation,
•
links between terms corresponding to semantic relations based on morphosyntactic
transformations.
A semantic class is defined as a set of terms; the role of a term in a class can be of three distinct
types:
class representative
there is always one and only one such representative per class, and a
term can be the representative of one single class only. The name of
the class is the surface form of the representative.
synonym
for terms having the same meaning as the representative with respect
to the application need. It is a transitive relation.
quasi-synonym
for terms having a close meaning to the class representative, in a
certain context only (non-transitive relation).
Semantic classes can also be related to each other:
Hyponymy /
hyperonymy
Linked classes are linked by a general / specific (“is-a”) relation
(directed / asymmetrical link)
Antonymy
Linked classes have opposite meaning (undirected / symmetrical
link).
There are at least four types of link between terms:
Typographic variant
relation
Link used for example to bound misspelled form of the same term.
Acronym
Link between the acronym and its extended form (directed /
asymmetrical link)
FastR variant
relation
Variant relation, as proposed by FastR tool. These links are not
editable by users (read-only).
(directed/asymmetrical link)
Translation
Synonymy link between terms in different languages
Note: in the case of directed link, the link icon contains a small arrow head to indicate the direction
of the link.
For example, in the screen capture below, “seed of corn” is an hyponym of “seed”.
Illustration 19: Semantic class window
The Term link button allows to open/refresh the Semantic class and Term link window.
The expand/collapse button allows expanding / collapse the selected nodes.
4.2.2
Adding links between terms and classes
We have seen that it is easy to create a semantic class from a selection of terms from the term grids,
Click on the Create class button creates a new semantic class containing all selected terms.
Then adding new terms in existing semantic classes is performed by drag and drop gestures.
Dragging can be initiated either from a term grid, or from the semantic class view itself.
− There are three types of drop targets (grey arrows in image below), corresponding to the
three possible kinds of link as described above.
Illustration 20: Drop targets in Semantic class window
− Class node: dropping a term on a class (1) of the semantic class view creates a
synonymy link between the term and the other terms of the class;
− Class-relation node: dropping either a class dragged from the semantic class view or a
representative term dragged from a term grid on the class structure icon (2) adds a link
between the two semantic classes. The link is an hyperonymy, or an hyponymy or an
antonymy link as proposed by the scrolling menu;
− Term node: dropping a term dragged from a term grid or from the semantic class view
on a term node (3) adds a link between the two terms. The link is a typographic variant, an
acronymy or a translation link as proposed by the pop-up menu.
Note that the menu appears once the mouse button has been released. Esc button or dragging the
mouse pointer out of the menu cancels the action.
4.2.3
Removing links among terms and classes, and more
Link deletion can be performed by selecting the corresponding node in the Semantic class view, and
clicking on the relevant button in the toolbar.
Illustration 21: context enabled actions in the Semantic class window
The available actions are summarized below.
/
Synchronize with
Toggle button used to freeze the view to the currently selected
selection
term(s) of the term grid. By default, the view is always
synchronized with the current term selection.
Create class
Create a new semantic class containing all selected terms
within the semantic class window.
Remove class
Remove all selected classes.
Show class
Show in the view the selected class only. Useful to navigate
through the class-to-class links.
Note: this action is triggered by a double click on a class-toclass link.
Classes fusion
Merge the two selected classes: the resulting class contains the
union of the terms of source classes. It is also linked to the
classes that were linked to the source classes (hyper/hypo and
antonyms).
Remove class/class
link
Remove the selected class link(s)
Show term classes
Show in the view the classes containing the currently selected
term.
Change synonym
type
Change the type of the term in the context of the class.
Remove synonym
Remove the selected terms from the class.
The available types include: class representative, synonym and
quasi-synonym.
Note: the class representative cannot be removed from the
class.
Show linked term
classes
Show in the view the classes containing the currently selected
linked term.
Note: this action is triggered by a double click on a linked
term.
Remove term/term
link
Remove the selected term/term link(s)
Expand
Expand the selected node(s) of one level in depth
Note: if a selected node is already open, then it will be
expanded in depth till its leaf(s)
Collapse
4.2.4
Collapse the selected node(s)
Semantic class tree view description
This window displays in a single view the global hyperonym/hyponym hierarchy of a terminology.
Drag and drop gestures are used within this view to create or delete hyperonymy relations between
classes.
Tip: Several Semantic Classes views can be opened at the same time on the same of on
distinct projects.
Semantic classes tree window
The window is divided in two distinct areas:
-
a toolbar at the top, which displays the current terminology project (it can be changed); a
refresh button (to read the data anew from the database); and a search field (use Ctrl-F as a
shortcut, and Enter key to find next occurrence).
-
a panel, which displays the hyperonym/hyponym tree.
The tree can contain 4 different types of node (plus a unique root node), corresponding to semantic
classes contained in the project, as described below:
Root node
This special node as no name, but it displays the total
number of rooted classes.
Rooted lonely class
Class without any hyperonym or hyponym
Rooted hyperonym
class
Class without any hyperonym, but with associated
hyponym(s)
Leaf hyperonym class
Class associated to hyperonym(s), but without any hyponym
Hyponym and
Hyperonym class
Class both associated to hyperonym(s) and hyponym(s)
The label associated to the nodes is the surface form of the representative of the class. If the font
used for this label is bold, it means that the class is associated to several hyperonyms.
Note : Its is possible to jump to another hyperonym thanks to the context sensitive menu.
4.2.4.1
link modification
In this view, all modifications are performed using drag and drop (DnD) gestures.
The default DnD action is a “Copy operation”; it is symbolized by a plus sign that appears in the
mouse pointer when dragging has started.
But is it possible to change the DnD action to the “Move operation”, by pressing the Ctrl-Shift.
When doing so, the dragged hyponym class will be actually moved from one hyperonym to another.
In summary, two distinct operations can be performed:
-
Create a link: the hyponym class must be dragged, and then dropped on its new hyperonym
class. Of course, if the dragged class was not associated to any hyperonyms (i.e. it was a
child of the root node), the gesture will behave like a DnD “Move operation” (regardless of
the mouse pointer aspect).
-
Delete a link: the hyponym class must be dragged, and then dropped on the root node (In
this case, it always behaves like a DnD “Move operation”).
Note: It is strongly advised to open side to side two Semantic Classes views on the same projects to
efficiently work on a project, since it is possible to drag a class on the first view, and drop it in the
second one, allowing to create relation between widely separated classes.
4.2.4.2
Cooperative work and concurrent modification
Since several users can work at the same time on the same terminology project structure, it may
happen that they whish to change the same data independently.
Then, the tree view might not be synchronized with the actual data stored in the database. So, if a
user is about to modify data that has been changed by another user (after the data displayed has
been read from the database), he will be warned via a specific dialog and the modification will not
occur.
Moreover, the tree view will be refreshed to display the new data state, but in some case, you may
need to update the entire view thanks to the refresh button.
4.2.5
Adding a term
When shaping a terminology, it sometimes happens that some level of the hierarchy cannot be
embodied by any already available terms (because the term is not found in the corpus, or for some
reason has not been detected by the term extractor).
Thus it is possible to manually create a new term in a terminology project thanks to the dedicated
button available in the Term Grid toolbar.
To create a new term, the user need to enter the term properties in the dialog box, then click the Ok
button.
Note : Term creation should be scarcely used.
4.3 Term Grid Local filter
The term grid local filter is a second level of filter compared to filter criteria panel. It is used to
temporally hide some terms on the term grid. It can be quickly enabled/disabled thanks to a specific
toggle button.
This is a very powerful tool that can be combined with a first level selection criterion to refine the
list of the terms displayed in the grid.
Local filter button: allows defining a local filter by specifying a regular expression
that is applied to one of the visible columns.
/
Apply local filter toggle button: allows quickly enabling or disabling the local filter
if defined.
Note: it is called local filter because it does not query the database each time the filter is modified or
applied; Hence its quickness.
4.3.1
Regular expressions
The description of regular expressions is beyond the scope of this document.
For more information, see http://en.wikipedia.org/wiki/Regular_expression
Briefly, regular expressions work similarly to the wildcard characters used in the text fields of the
filter panel (as described in 3.4.1 ): the regular expression is tested against each row of the grid; a
row is then showed only if the expression evaluates to true.
Regular expressions include other constructs than the wildcards that are useful to express more
complex filters on string patterns, for instance:
− character classes (short form for sets of characters)
− alternative of pattern (logical OR)
− grouping,
− quantification (number of successive occurrences of pattern)
− anchors (whether a pattern occurs at the beginning or at the end of the line).
4.3.2
Regular expression short references
Predefined Character Classes
.
matches any character
\d
matches a digit ( [0-9] )
\s
matches a whitespace character (space, tabulation)
\w
matches a word character (alphanumeric)
User defined Character Classes
[xyz]
matches x or y or z
[a-g]
matches any character within the interval a to g
[^xyz]
matches any character except x, y and z
Alternative
xyz|abc
matches xyz or abc
Quantifiers
?
once, or not at all
*
zero or more times
+
one or more times
{n}
exactly n times
{n,}
at least n times
{n,m}
at least n times, but no more than m times
Anchors
^
start of the line
$
end of the line
Note: matching any of the special characters used by the regular expression language, requires
prefixing it by an antislash bar. (For example, \$ to match the dollar sign)
4.3.3
Local filter examples
Note: the content of the cell is considered as a whole line, and by default, the local filter regular
expression is anchored at the beginning and at the end of the line.
Regular expression
Matching strings
DNA
Any string strictly equal to DNA
.*DNA.*
any string containing DNA
.*DNA|RNA.*
any string containing DNA or RNA
.*(D|R)NA.*
any string containing DNA or RNA
.*\.
any string finishing by a period
.*[,;:.].*
any string containing at least one punctuation mark amongst: comma, semicolon, colon, period
.*s{1}$
any string finishing by one and only one 's'
^[A-Z]+.*
any string beginning by at least one capital letter
.*[0-9]+.*
any string containing at least one decimal character
.*\d+.*
idem (simplified form)
4.4 Term variants
Most of the time, a term comes upon various distinct forms. Depending on the purpose of the
terminology design, the user might want to reassemble variants corresponding to validated terms.
TyDI allows to easily exploiting the result of a specific variant detecting tool called FastR, in order
to enrich a terminology project with term variants that might not have been discovered by the term
extractor, and to link these variants to one representative term.
4.4.1
Variant discovery using FastR
This is a three steps procedure:
1. FastR must be fed by a certified term list and a corpus. It can be the terms validated through
TyDI and exported in the relevant format (see Terminology export in 3.4.2 ).
2. Import FastR result file in TyDI,
Important note: This functionality is currently not available when using Web Service access.
The FastR import button is located in the Project toolbar.
It is enabled when a corpus node (corresponding to a YaTeA or a tab separated value import)
is selected in the Project window.
3. Explore FastR variant proposals and qualify Fastr morphosyntactic variation links as
semantic relationships.
The FastR variants window is opened by clicking on the button is located in the Project
toolbar; it is enabled when a Project node is selected in the Project window) (this command
can also be found in the context-sensitive menu under the Project node in the Project
window).
4.4.2
FastR variant proposals view
Using FastR variant proposal view is similar in use to the term search window: it contains a filter
panel to refine data retrieval, and a term grid which displays pairs of terms found as variant by
FastR (one pair by row).
Combined with the semantic class view detailed in 4.2.1 , it helps the user to quickly qualify FastR
proposals into semantic links by creating new synonymy classes (or enrich existing ones) and
hyper/hyponymy links.
4.4.2.1
FastR variants filter panel
Illustration 22: FastR variants filter panel
The table below contains a short description of the features that can be used as filter criteria.
Feature
Description
Form
Surface form of the any term (the origin tem or the variant suggested by FastR)
Not in any
semantic class
Check this box to retrieve only terms that are not already part of a semantic
class
Representative
only
Check this box to retrieve only terms that are representative of a semantic class
Term producer
Processing or user who created the term
Delta string
String difference between the origin term and the variant
Delta word count Number of words contained in the delta string
Link producer
Processing who created the variation term link
FastR rule
Rule used by FastR to discover the variant
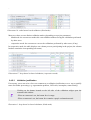
4.4.2.2
FastR variants grid
Each column composing this grid is actually related to one of three distinct objects:
− the variant term (id, form, producer and validation status on the left of the figure 23),
− the variation link (rule, nb word , delta string and producer in the middle of the figure 23),
− the origin term (id, form, producer and validation status on the right of the figure 23).
Hence the currently selected term can be either the variant or the origin term depending on which
cell in the table got the focus, unless you performed a multiple selection by dragging a rectangular
zone over the grid.
Illustration 23: FastR variants grid
Note: Term validation can be performed thanks to this grid.
Note: When a candidate term variant suggested by FastR has not already been validated before, it is
created but marked with a specific term producer (as shown on the figure 23),
4.4.2.3
Variant grid toolbar
This toolbar contains a subset of action buttons available in the Term grid toolbar.
Apply button: execute the query with the current values of the criteria.
Short-cut: enter key
External search button: launch a search of the selected term surface form
Context button: open/refresh the context window displaying the occurrences of
the selected term in the corpus.
Term link button: open/refresh the Semantic class and Term link window to
display the classes containing the selected term.
Create class button: create a new semantic class containing all selected terms.
Graph display button: Display selected terms in a graphical view (see 4.4.3 ).
Rows count field: shows the total number of term candidates currently displayed
(excluding those filtered out by the local filter)
4.4.3
FastR variants graphical view
FastR variants graphical view is a simple graphical view where terms are represented in rectangular
boxes, and linked together by magenta lines representing FastR variation proposals.
Illustration 24: FastR variants graphical view (after manual rearrangement)
A grey box surrounds terms linked to only one other term. Otherwise the boxes are green, and the
most linked terms are represented in bigger boxes: the biggest box is usually the best term
representative for a synonymy class.
Boxes can be moved by a simple dragging gesture. Linked terms can by automatically rearranged
around the currently selected box thanks to a right click.
Like in any other view, terms can be selected in this view. The available actions are a subset of the
ones described before.
Note that the terms belonging to the same subgraph are not necessarily synonyms
(For example “conifer somatic embryo” is a kind of “conifer embryo”);
Likewise, “conifer pre-cotyledonary somatic embryo”, “conifer cotyledonary somatic embryo” and
“conifer mature somatic embryo” are different specific kinds of “conifer somatic embryo”)
Of course, not all FastR candidate term proposals are valid
(for example “embryo are conifer” is obviously not a term!)
4.5 Modular text import utility
Important note: This functionality is currently not available when using Web Service access.
Sometimes a terminology project is built up from distinct resources. The modular text importer can
enrich an existing project in TyDI.
Three distinct categories of data can be imported in a project. If necessary, the import process will
create new terms and new semantic classes, and the corresponding links between these objects.
In the case of hyponym/hyperonym import, newly created terms can optionally tagged as
”Concept”.
Illustration 25: Modular text import wizard
4.5.1
Input file in text format
Text format of input files uses the tabulation character as field separator. The row should not
contain a header. The column should contain a header as described in Appendix 7.1.
The expected columns are:
− Synonyms (2 columns): surface form of the synonym; surface form of the class
representative;
− Quasi-synonyms (2 columns): surface form of the quasi-synonym; surface form of the class
representative;
− Typographic variant (2 to N columns): surface form of variant 1; ... surface form of
variant N;
− Hyponyms/Hyperonyms (2 columns): surface form of the hyponym; surface form of the
hyperonym.
4.6 Ontology import
Not implemented yet
4.7 Project export utilities
Important note: This functionality is currently not available when using Web Service access.
Project export utilities are used to export a whole project in a specific format.
The project export button is located in the Project toolbar.
It is enabled when a project node is selected in the Project window.
4.7.1
Text file export
The text file utility exports several types of data from a terminology project; it produces in a
specified directory a set of text files, containing tab-separated values.
By default, duplicate lines are removed. A global option allows prefixing each field by the internal
term identifier.
The term file settings allow selecting the term to export depending on the validation status, as set by
the current or by any of the other users. The filter can be overridden to always export terms that are
part of a semantic class, whatever their validation status is.
If the non-validated status is selected, the user can choose to export inferred, unparsed or dismissed
terms as well.
The produced columns are:
− Term (2 columns): lemmatized* form of the term; surface form of the term;
− Synonym (2 columns): lemmatized* form of the synonym; surface form of the class
representative;
− Quasi-synonym (2 columns): lemmatized* form of the quasi-synonym; surface form of the
class representative;
− Hyponym (2 columns): surface form of the hyponym; surface form of the hyperonym;
− Merged (2 columns): lemma* of the merged term; lemma* form of the representative term;
− Typographic variant (N columns): surface form of variant 1; …; surface form of variant N;
− Acronym (2 columns): surface form of the merged term; surface form of the representative
term;
(*) Note: if a term has no lemma available, the surface form will be used instead.
4.7.2
OBO flat file export
The OBO flat file export utility exports semantic classes (including synonyms) and hyponymy
relationship in the OBO Edit file format.
It is possible to choose whether the produced file includes semantic classes and/or simple terms.
Specific synonym categories are created and included in the output file in order to distinguish: exact
synonym, quasi-synonym, acronym and typographic variant.
TyDI’s term IDs are also exported and visible in OBO Edit as cross-reference.
Terms belonging to semantic classes (representative and synonyms) are always exported with no
regards for their validation statuses.
On the other hand, simple terms will be exported only if they match the statuses selected in the
export option panel. Actually, the option panel allows to define priorities among users in order to
decide which term to export (For each term, the system search for a validation status, in the order of
user priorities, and compare it to the statuses selected in the option panel).
Terms in conflict (i.e. for which at least 2 users disagree about the validation status) are displayed in
the output window for further analysis.
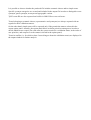
5 Installation
The client installation is easy, but it requires that the server side is already available and that the
user knows some server parameters (host name, access mode, database login & password, amongst
others) to properly configure the data connection.
For more detail about database installation, see “TyDI Admin guide”.
5.1 Requirement
The Terminology Design Interface client is a Java application. Thus it requires at least a Java
Runtime Environment (version 1.6u25 or later).
The JVM must allocate at least 512 Mo memory. Depending of the size of the terminology project
and the kind of usage (for example, several projects opened at the same time), the amount of
memory needed can vary (see 6.3 ).
5.2 Client installation
5.2.1
OS specific installer
Depending on the OS you are using, you may download one of the available installer:
http://bibliome.jouy.inra.fr/TyDI_updateCenter/downloads/tydi_latest-linux.sh
Linux
MacOS X
http://bibliome.jouy.inra.fr/TyDI_updateCenter/downloads/tydi_latest-macosx.tgz
Windows
http://bibliome.jouy.inra.fr/TyDI_updateCenter/downloads/tydi_latest-windows.exe
Once downloaded, execute the installer and follow the installer instructions.
5.2.2
Generic zip archive
Alternatively, a generic zip distribution is available.
−
Download the zip distribution at:
http://bibliome.jouy.inra.fr/TyDI_updateCenter/downloads/tydi_latest.zip
−
Extract it: it will create a subdirectory named tydi
−
Launch the application.
If you are using MS-Windows operating system, you can start the application by
executing bin\tydi.exe located under the newly created directory
−
If you are using an Unix-like or Mac operating system, you can start the application by
executing bin/tydi located under the newly created directory.
−
Once the client installed, you need to set up a database connection (see 6.1 ).
5.3 Client update
As of v0.3, TyDI can keep itself up to date by downloading and installing newer modules
(Checking for new version is performed at every start-up of the application).
TEMPORARIRY DISABLED
When a new version is made available, an icon will appear in the status bar: you just need to click
on the dedicated hyperlink to open the update wizard that will guide you through the update
process.
6 Parameterization
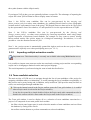
6.1 Connection configuration
The parameters needed to connect to a database instance are grouped and associated to a connection
name in the application preferences (which is saved in a local file). Hence, it is easy to switch from
one database to the other.
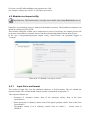
First, launch the application, but do not connect to a database: click the Cancel button when the
login dialog appears.
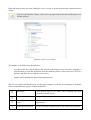
Then, open the named connexions editing window: Tools / Option / Term Validation category /
DataSources tab.
Illustration 26: Datasources option panel
The list located at the top of the window contains the existing named connections.
In order to edit a connection, you need first to select it in the list, and then perform the change in the
fields below.
Confirm the changes by clicking on the save button (or discard them thanks to the Cancel button).
Clicking the New button creates a new named connection.
Clicking the Delete button deletes the currently selected named connection.
Your application administrator should have given you the parameters for your specific
Datasources. See “TyDI Admin Guide” for more details.
Tip: TyDI is shipped with default Datasources. Removing all existing Datasource configurations
and restarting TyDI will restore them.
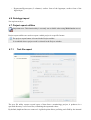
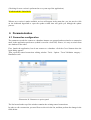
6.2 External link to web browsers
When a term candidate is selected, it is possible to quickly perform a search of the surface form by
launching an external web browser. It is possible to add a new search engine thanks to a dedicated
option panel.
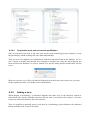
To open the external links editing window: Tools / Option / Term Validation category / External
links tab.
Illustration 27: External links option panel
The list of located at the top of the window contains the existing external links to web browsers.
In order to edit an external link, you need first to select it in the list, and then perform the change in
the fields below.
Confirm the changes by clicking on the save button (or discard them thanks to the Cancel button).
Clicking on the New button creates a new external link.
Click on the Delete button deletes the currently selected external link.
In order to perform the search on the selected term candidate surface form, the url must contain a
specific placeholder (%s), which will be replaced by the actual surface form. You can test the url
you entered by typing a search string in the example field and clicking the “test” button.
Note: new users will not have any external link configured. Some default external search links can
be quickly added by clicking on the “add default links” button.
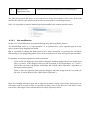
6.3 Memory allocation
The maximum memory size allocated by the JVM is a parameter in the application configuration
file (see “TyDI Admin guide”). The default configuration allows allocating up to 512 MB of
memory.
If this amount is not adequate, it is possible to override the default value by adding a specific
argument on the command line.
For example, to run with 1 GB of memory, type:
tydi -J-Xmx1024m
6.4 Look and Feel
TyDI is a Swing application: hence, its GUI supports pluggable “Look and Feel”s (L&F).
Since TyDI has been designed with the cross platform L&F (called “Metal”), if another L&F is
used you may experience some subtle visual flaws (see “TyDI Admin guide” for more details).
6.5 OS specificity
Even if the application is portable, there is some specificity depending of the operating system you
are running.
The main differences appears in the look and feel (it can also differs from one version of Java to
another)
The table below presents a list of these differences:
Issue
Unix-like OS
command line
execution*
Mac OS
tydi/bin/tydi
MS-Windows
tydi\bin\tydi.exe
(*) path relative to
installation directory
contextual menu
click with the right if you have a single click with the right
button of the mouse
buttoned mouse:
button of the mouse
ctrl + click
application saving ~/.tydi/
directory
(user preferences, ...)
/Users/$LOGNAME/Li %APPDATA%\.tydi
brary/Application\
Support/tydi
7 Appendix
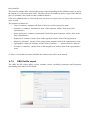
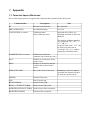
7.1 Term text import file format
The text file import process recognizes the column headers detailed in the table below.
Column header
Description
Note
ID
External term identifier
Not imported
PREVALIDATION
Prevalidation string
Free text
VALIDATION-username
Validation status
(One column per user)
Imported only if there is a
matching username in the term
database.
The default validation statuses
are recognized: “D”, “D?”, “?”,
“V?” and “V”.
A special sixth value “VC” can
be used to tag the term as
“Concept” (see 4.1 ), without
setting any validation status.
COMMENTARY-username
Validation justification
comment (one column per user)
#OCC
Number of occurrences of the
surface form
#DOC
Number of distinct documents
in which the surface form is
found
SURFACE FORM
The surface form of the term
LEMMA
Lemma of the term
POS
Part of speech tag
HEAD LEMMA
Lemma of the head
HEAD++ SURFACE FORM
Surface form of the head
MODIFIER SURFACE FORM Surface form of the expansion
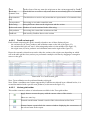
MODIFIER LEMMA
Lemma of the expansion
Mandatory, unless a lemma is
specified (the lemma will then
be used as a surface form).
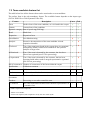
7.2 Term candidate feature list
The table below lists all the features that can be associated to a term candidate.
The surface form is the only mandatory feature. The available feature depends on the import type
(YaTeA XML file or Tab-Separated Value file)
Feature
Description
Yatea
Tab
Form
Surface form of the term candidate, as it is found in the corpus
✓
✓
Lemma
Lemma form of the candidate
✓
✓
Syntactic category Part of speech tag (POS tag)
✓
✓
Head
Head form
✓
✓
Expansion
Expansion form
✓
✓
Prevalidation
Prevalidation string
✗
✓
Analysis
Recursive decomposition of the term candidate in head
expansion elements
✓
✗
is Inferred
True, if the term is not found in the corpus alone in a maximal
noun phrase (MNP), but has been retained for the syntactic
analysis of larger term
✓
✗
is Dismissed
True, if the term is detected by the extractor, but has been
filtered out (optional post-YaTeA processing)
✓
✗
is Superseded
True, if the term is detected by the extractor, but has been
regrouped with others under a merged representative (optional
post-YaTeA processing)
✓
✗
Nb of occurrences Number of occurrences of the form within the corpus
✓
✓
Justification
Validation comment
✗
✓
Validation
Validation status
✗
✓
Word count
Number of words in the form.
-
-
Number of
documents
Number of distinct documents where the candidate is found
-
✗
Producer
Processing or user who created the term
-
-
is Canonical
true if the term has been chosen has canonical representative of
a semantic class
-
-
✓: feature imported from input file,
✗ : feature not available,
- : feature not imported, but computed or set by the user within TyDI
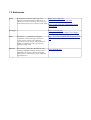
7.3 References
YaTea
S. Aubin and T. Hamon. Improving Term
Extraction with Terminological Resources. In
Advances in Natural Language Processing (5th
International Conference on NLP, FinTAL 2006).
TreeTagger
http://www-lipn.univparis13.fr/~aubin/yatea_en.html
http://search.cpan.org/~thhamon/LinguaYaTeA-0.5/
http://www.ims.unistuttgart.de/projekte/corplex/TreeTagger/
FastR
Jacquemin, C. A Symbolic and Surgical
Acquisition of terms Through Variation. In
Connectionist, Statistical and Symbolic
Approaches to Learning for NLP, Wermter, S.,
Riloff, E. & Scheler, G. (eds), pp. 425-438,
Springer-Verlag, 1996.
http://www.limsi.fr/Individu/jacquemi/FAS
TR/
OBO Edit
Day-Richter J, Harris MA, Haendel M; Gene
Ontology OBO-Edit Working Group, Lewis S.
OBO-Edit--an ontology editor for biologists.
Bioinformatics. 2007 Aug 15;23(16):2198-200.
Epub 2007 Jun 1.
http://oboedit.org/