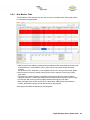
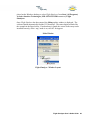
1
Flight Simulyzer
Graphical User Interface
Nov. 2011
v01.03.00
3703 N. 200th Street,
Omaha, NE 68022
Tel: 866.246.1553
402.763.9644
Fax: 402.763.9645
aviftech.com
[email protected]
Flight Simulyzer
Quick Start Guide
Graphical User Interface
v01.03.00
Nov. 2011
Table of Contents
Section 1 Introduction....................................................................................................1
1.1 How This
....................................................................................................................
1
Manual is Organized
1.2 Applicable
....................................................................................................................
2
Documents
Section 2 Installation
....................................................................................................3
2.1 Minimum
....................................................................................................................
3
System Requirements
2.2 API Device
....................................................................................................................
3
Driver Requirements
2.3 Flight Simulyzer
....................................................................................................................
3
Software Installation
2.4 Detecting
....................................................................................................................
5
hardware
....................................................................................................7
Section 3 Basic Operation
Section 4 ARINC-429
....................................................................................................8
4.1 Features
.................................................................................................................... 8
4.1.1 Rate Oriented
......................................................................................................
Transmit Channel
8
4.1.2 Receive Monitor
......................................................................................................
Channel
9
4.2 Board .................................................................................................................... 9
4.3 Channel
....................................................................................................................
10
Settings
4.3.1 Transmitter......................................................................................................
Settings
11
4.3.1.1 ..................................................................................................................
Scheduled Labels
12
4.3.1.2 ..................................................................................................................
Block Transfers
13
4.3.1.3 ..................................................................................................................
Acyclic Transfers
15
4.3.2 Receiver Settings
...................................................................................................... 16
Section 5 ARINC-664 ....................................................................................................19
5.1 Features
.................................................................................................................... 19
5.2 Device.................................................................................................................... 20
5.3 End System
.................................................................................................................... 23
Flight Simulyzer User's Guide Guide
II
5.4 Vl and....................................................................................................................
24
Port Configuration
5.4.1 Port Configuration
...................................................................................................... 26
....................................................................................................29
Section 6 MIL-STD-1553
6.1 Features
.................................................................................................................... 30
6.1.1 Bus Controller
......................................................................................................
Features
30
6.1.2 Remote Terminal
......................................................................................................
Features
30
6.1.3 Bus Monitoring
......................................................................................................
Features
31
6.1.4 Replay Features
...................................................................................................... 31
6.2 Bus Configuration
.................................................................................................................... 31
6.2.1 Bus Settings
...................................................................................................... 32
6.2.2 Bus RT Protocol
...................................................................................................... 33
6.2.3 Saving Bus......................................................................................................
Setup Information
34
6.3 Bus Controller
.................................................................................................................... 35
6.3.1 BC Transfer
......................................................................................................
Scheduling
36
6.3.1.1 ..................................................................................................................
Creating BC to RT Transfers
40
6.3.1.2 ..................................................................................................................
Creating RT to BC Transfers
42
6.3.1.3 ..................................................................................................................
Creating RT to RT Transfers
42
6.3.1.4 ..................................................................................................................
Creating Mode Code Transfers
43
6.3.1.5 ..................................................................................................................
Add a Delay to the Schedule
44
6.3.1.6 ..................................................................................................................
Using Strobe Transfers
45
6.3.2 Saving Bus......................................................................................................
Controller Setup Information
45
6.3.3 Starting the......................................................................................................
Bus Controller
47
6.3.4 Operating the
......................................................................................................
Bus Controller
47
6.3.5 Sending Acyclic
......................................................................................................
Frames
48
6.4 Remote
....................................................................................................................
49
Terminal
6.4.1 Remote Terminal
......................................................................................................
Setup
49
6.4.2 Setup RT Subaddress
......................................................................................................
and Mode Code
51
6.4.3 Saving Remote
......................................................................................................
Terminal Setup Information
53
III
Flight Simulyzer User's Guide Guide
6.4.4 Starting Remote
......................................................................................................
Terminals
54
6.4.5 Operating the
......................................................................................................
RT's
55
6.5 Bus Monitor
.................................................................................................................... 55
6.5.1 Bus Monitor......................................................................................................
Filter Setup
56
6.5.2 Choosing and
......................................................................................................
Configuring Start/Stop Triggers
58
6.5.3 Starting the......................................................................................................
Bus Monitor
60
6.5.4 Bus Monitor......................................................................................................
Table
62
6.5.4.1 ..................................................................................................................
Bus Monitor Capture Searches
64
6.6 Running
....................................................................................................................
65
A Simulation
6.6.1 Menu Bar ...................................................................................................... 68
Section 7 Notes
....................................................................................................69
7.1 Terms.................................................................................................................... 69
7.2 Acronyms
....................................................................................................................
71
and Abbreviations
Flight Simulyzer User's Guide Guide
IV
1
Introduction
The Flight Simulyzer User's Guide is designed to provide an unfamiliar user with a
functional overview of the operation of AIT's Graphical User Interface (GUI) Analyzer
Software. This manual presents the current version of Flight Simulyzer from a feature
overview through initial setup options.
Software installation of the Device Driver and Application Programmer's Interface
(API) requirements are defined followed by a descriptive layout of the Main Window
environment. In the MIL-STD-1553 portion of this document, the basic 1553 Bus
Controller (BC), Remote Terminal (RT), and Chronological Bus Monitor (BM)
functions are discussed in some detail to provide the user with a familiarity of the
functionality of the software. The Arinc664 portion of the document provides
information about creating complete 664 End System configurations. The ARINC-429
portion of the document provides information about creating complete 429 Device and
Transmit/Receive channel configurations.
Document History
1.1
Version
V01.00.00
Date
March 2011
V01.01.00
April 2011
V01.02.00
July 2011
V01.03.00
Nov. 2011
V01.04.00
Nov. 2011
Author
K. Bisson
Description
Creation of document, written for Flight
Simulyzer v01.1.0
T. Troshynski Updated with additional information about BC,
RT, BM operations.
J. Cole
Updated screenshots and added information for
latest features.
J. Cole
Reorganized manual to reflect multiple bus
standards and added Arinc664 configuration
help.
T. Fleissner Updated with screenshots and added additional
information for ARINC-429 features
How This Manual is Organized
This Manual is comprised of the following sections:
·
Introduction: contains an overview of this manual.
·
Installation: describes the steps required to install Flight Simulyzer.
·
Basic Operation: describes the basic functionality of Flight Simulyzer
that is generic to the utilized protocol.
·
1
ARINC-664: describes the Arinc664 portion of the software.
o
Features: gives an overview of the 664 related features
o
Device: describes the Device configuration settings
Flight Simulyzer User's Guide Guide
o
End System: describes the End System configuration settings.
o
Vl and Port Configuration: describes the settings for Virtual
Link and Communications Ports
·
MIL-STD-1553: describes Flight Simulyzer with respect to configuring
and simulating 1553 hardware.
o
Features: gives an overview of the 1553 analyzer features.
o
Bus Configuration: describes the bus configuration settings.
o
Bus Controller: describes BC configuration and simulation
functionality.
o
Remote Terminal: describes RT configuration and simulation
functionality.
o
Bus Monitor: describes BM configuration and simulation
functionality
o
·
Running a simulation: describes starting a 1553 simulation.
Notes: contains industry and product-specific definitions, acronyms and
abbreviations.
1.2
Applicable Documents
The following documents shall be considered to be a part of this document to the extent
that they are referenced herein. In the event of conflict between the documents
referenced and the contents of this document, the contents of this document shall have
precedence.
· MIL-STD-1553B Digital Time Division Command/Response Multiplex Data Bus
(US DOD Sept. 1978
· AIT MIL-STD-1553 Protocol Tutorial
Flight Simulyzer User's Guide Guide
2
2
Installation
This section describes the system requirements, device driver installation, and describes the
installation process for Flight Simulyzer.
2.1
Minimum System Requirements
·
·
·
·
·
·
2.2
x86 300MHz CPU
128 MB RAM
30 MB available Hard disk space
500 MB+ available Hard disk space for recording
Windows XP / Vista / 7
Monitor resolution: 800 x 600 pixels with 256 colors
API Device Driver Requirements
For simulation functionality, Flight Simulyzer requires properly installed AIT Device
Drivers to operate correctly. During the installation process these drivers can be
installed, or they may be installed separately.
Refer to the pertinent AIT Hardware Manual for details on installing the correct
driver files for the specific Operating System and your hardware.
2.3
Flight Simulyzer Software Installation
·
3
To install the Flight Simulyzer software:
1.
Insert the Flight Simulyzer CD into the CD ROM drive.
2.
After a few seconds, the setup application will automatically start. If the
Setup application does not automatically start, you may manually start it
by running the file flight-simulyzer-x.x.x-.exe found on the Flight
Simulyzer CD.
3.
Once the setup has started, step through the Install Wizard to complete
the installation. The wizard will give you the opportunity to choose the
directory in which Flight Simulyzer is installed and the Program Folder
in which the Flight Simulyzer shortcut will be placed. Default locations
can also be used.
Flight Simulyzer User's Guide Guide
Flight Simulyzer Installation Wizard
4.
During installation, it is possible to select which components of the
application are installed.
Flight Simulyzer Componets
The table below summarizes the components of the Flight Simulyzer
installation:
Flight Simulyzer User's Guide Guide
4
Component
Flight Simulyzer
Drivers and Firmware
Visual C++ 2008 SP1 runtime
5.
6.
2.4
Description
The GUI application and its
supporting libraries and documents
The hardware module drivers and
firmware. If the Flight Simulyzer
GUI is NOT going to be used with
the hardware (i.e. it will only be
used to create, export, and edit
configuration files) then this
component may not need to be
installed.
The Windows VC++ runtime
required by the Flight Simulyzer
application. This may be necessary
if your host system is not updated
to the latest OS service pack.
Once the installation is complete, a shortcut to the Flight Simulyzer
application can be launched from the Start menu
(Start | All Programs | Avionics Interface Technologies | Flight
Simulyzer | Flight Simulyzer).
If you purchased a license key for simulation, the license key will
automatically get installed to /Program
Files/AIT/LicenseKeys/FlightSimulyzer.
Detecting hardware
Flight Simulyzer by default allows creation of hardware configuration files without
hardware installed. If no hardware is detected or no Flight Simulyzer license key is
found for your hardware, a message indicating "No Licensed Hardware Available" will
be displayed in the simulation resource window. If you do not need simulation
functionality, you can ignore this section.
If you purchased a license key for Flight Simulyzer, the license key, if included on the
installation CD, will be automatically installed to /Program
Files/AIT/LicenseKeys/FlightSimulyzer at software installation time. If the license key
was installed to this directory and you still see the "No Licensed Hardware Available"
message, or you need a license key, please contact Avionics Interface Technologies. If
you have licensed hardware in your system, and you would like to force Flight
Simulyzer into "No Target Mode", do the following:
5
1.
Right click on the installed Flight Simulyzer Desktop icon or system
Start menu item and select Properties.
2.
Add (space)-ntg to the end of the target file name, as seen in the figure
Flight Simulyzer User's Guide Guide
below. This will prevent Flight Simulyzer from trying to detect
hardware.
No Target Mode Settings
Flight Simulyzer User's Guide Guide
6
3
Basic Operation
Perspectives
Flight Simulyzer has two main "perspectives" for configuring and simulating the various AIT
hardware devices compatible with the software.
Settings
The Settings perspective, navigated to by clicking the Settings button, is available for
configuring hardware directly, or for import or export to xml, binary, or hex format (depending
on the hardware type). Please see the section(s) for the protocol(s) with which you are
working for information on how to configure the hardware.
Simulation
The Simulation perspective, navigated to by clicking the Simulation button, is available for
simulating hardware, as configured in the Settings perspective. In order to perform a
simulation, your hardware must be correctly licensed. See the Detecting hardware section for
information about utilizing hardware with Flight Simulyzer. Not all AIT hardware is currently
supported for simulation.
Within each perspective is the option for the various available protocols. By changing the
protocol tab, you will be able to configure and/or simulate the hardware for your application.
7
Flight Simulyzer User's Guide Guide
4
ARINC-429
The Flight Simulyzer Analyzer Software can currently be used to create configurations
for AIT’s ARINC-429 hardware modules. An easy-to-use GUI allows complete visual
programming that enables users to optimize, plan, and configure complete ARINC-429
channels.
Flight Simulyzer’s Transmit and Receive channel configurations are based on a
common data format (XML) which allows simulation setups created and used within
the Flight Simulyzer application to also be loaded and executed from within the AIT
ARINC-429 LabVIEW Instrument driver and high-level C/C++ application interface
libraries.
AIT ARINC-429 Software Development Kit
4.1
Features
·
·
4.1.1
Visually configure ARINC-429 Devices, including Rate Oriented Transmit and
Receive Monitor Channels
Import and export configuration files for A429 Devices and individual channels.
Rate Oriented Transmit Channel
·
·
Intuitive, easy-to-use user interface for defining rate oriented labels, block
transfers, and acyclic transfers in Milliseconds or Hertz
Programmable High/Low Speed Operation
Flight Simulyzer User's Guide Guide
8
4.1.2
· Internal Receive functionality to transmit and receive data on the same channel
· Automatically calculate parity or use parity bit as data
Receive Monitor Channel
·
·
·
4.2
Chronological Monitor to receive all data on a channel basis
Define label buffers to receive only data for a specific label
Define simple filters to receive only specific label or label/sdi combinations
Board
Configuration Options
This section describes the configuration options for ARINC-429 Devices. In the
Settings perspective, the selection of a Device node changes to the Device configuration
context. There are 3 major configuration blocks related to the configuration at the
Board level: name, speed, and SDI mode.
Item
Description
Name
Data Rate
Low Speed
SDI mode
The name to associate with the given Board
Configures the data rate modifier for high and low speed channels
The low speed selection for all channels id configured for low speed
Indicates whether the SDI is included when the receiver sorts the
received data
Import/Export
Board configurations can be imported and exported to AIT's XML format for use in the
High Level C/C++ APIs or the LabVIEW Instrument Driver. The Export Button allows
the configuration to be saved to a XML or Binary File, while the Import allows a XML
or Binary Configuration File to opened in the GUI for editing.
9
Flight Simulyzer User's Guide Guide
4.3
Channel Settings
Configuration Options
This section describes the configuration options for ARINC-429 Channels. In the
Settings perspective, the selection of a Channels node changes to the Channels
configuration context. There are 4 major configuration blocks related to the
configuration at the Channel level: Enable, Name, Speed, and Function.
Each Channel has the following items that are configurable:
· Enable: Enables the selected channel
· Name: The name to associate with the given Channel
· Speed: Specifies whether the channel is High or Low Speed
Speed
High Speed
Low Speed
Description
Channel configured with a speed of 100 kHz
Channel configured with a speed of 12.5 kHz
· Function: Specifies the type of channel: Transmitter, Receiver, or Transmitter plus
Monitor
Function
Transmitter
Receiver
Transmitter plus Monitor
Description
Channel is configured to transmit the label/data combinations with the
given rates
Channel is configured to receive data in a chronological monitor or on a
per label basis
Channel can act as a transmitter and receiver. The internal loopback
functionality can be used to transmit and receive on the same channel.
Import/Export
Channel configurations can be imported and exported to AIT's XML format for use in the High
Level C/C++ APIs or the LabVIEW Instrument Driver. The Export Button allows the
configuration to be saved to a XML or Binary File, while the Import allows a XML or Binary
Configuration File to opened in the GUI for editing.
Flight Simulyzer User's Guide Guide 10
4.3.1
Transmitter Settings
Configuration Options
This section describes the configuration options for ARINC-429 Transmit Channels. In
the Settings perspective, the selection of a Transmitter node changes to the Transmitter
configuration context. Within the Transmitter configuration context, three different
transfers can be configured: Scheduled Labels, Block Transfers, and Acyclic Transfers.
For each of these transfers, different properties can be configured to achieve the desired
schedule.
Each available Transmit Channel of the hardware device can be individually
configured. Mainly with types of transfers, but there are a couple of other configurable
properties according to the specific configuration:
· Enable Parity: Specifies whether parity should automatically be calculated and
appended to the transfer or the 32 bit is used as data
· Maximum Asynchronous Words: Specifies the maximum size of the asynchronous
buffer that can be allocated for asynchronous sends
Adding and Deleting Transfers
· To Add or Delete transfers, Click the Add or Delete buttons
1.
11
Once the Transfers are added, specify the type, name, delay, rate or
period, and transfer count
Note: If a transfer is added with the same configuration twice, the row
will appear in red
Flight Simulyzer User's Guide Guide
Item
Type
Name
Enabled
Delay
Rate
Period
Count
Description
Type of transfer: Block, Scheduled Label, or Acyclic
The name to associate with the given Transfer
Specifies whether the transfer is initially enabled or disabled
Initial delay(ms) before the transfer starts regular cyclic transmission
Periodic Rate, in Hertz, the transfer will take place
The time interval, in milliseconds, between transfers
Sets the number of times the transfer is transmitted.
Note: Only the Rate or Period should be set, NOT both
· In order to filter the table to only view the certain transfers, check the Filter box and
specify the name or transfer type.
4.3.1.1
Scheduled Labels
Configuration Options
This section describes the configuration options for Scheduled Labels that can be
configured on transmit channels. When the row is clicked in the transfer table shown in
the Transmitter Settings section, additional options will be shown that allow
configuration for the scheduled label. Mainly the Label, Data, and Rate are what is
typically configured for a scheduled label but additional options can also be set.
Transfer Details
Each available Scheduled Label has the following items that are configurable:
·
·
·
·
·
Name: Specifies the name to associate with the scheduled label
Type: This is set to scheduled label for this type of transfer.
Enable: Specifies whether the label is initially enabled or disabled.
Transfer Gap: Sets the width of the inter-message gap in bits.
Transfer Count: Specifies the number of times the message is transmitted. A value
of zero means cyclic transmission
Flight Simulyzer User's Guide Guide 12
· Initial Delay: Initial delay before the transfer starts regular cyclic transmission
· Rate: Specifies the rate/period that the transfer will take place
1) Period: Time Interval in milliseconds between transfers
2) Rate: Periodic Rate in Hertz the transfer occurs
Buffer Details
A buffer is associated with each scheduled label to determine the data that is
transmitted with the label. Within the buffer configuration, the depth, label, sdi, and
data can be specified.
·
·
·
·
Depth: Specifies the number of data combinations are associated with this label
Label: The value of the label that is sent with the data
SDI: The value of the SDI within the data field
Data: Sets the value of the remaining data bits depending if parity is enabled and SDI
is specified.
Note: If the data field is longer than the remaining number of bits available, the
row will appear in red.
Depending on the values specified in configuration, the Complete Word section of the
table will calculate and show the complete data word that will be transmitted.
The Buffer can be viewed in 4 of the following formats: Decimal, Hexadecimal, Octal,
and Binary.
4.3.1.2
Block Transfers
Configuration Options
This section describes the configuration options for Block Transfers that can be
configured on transmit channels. When the row is clicked in the transfer table shown in
the Transmitter Settings section, additional options will be shown that allow
configuration for the block transfer. Mainly the Label, Data, and Rate are what is
typically configured for a block transfer but additional options can also be set.
Additionally, a block transfer can be configured to transfer different Label/Data
combinations, the same label does not have to be used for each buffer entry.
13
Flight Simulyzer User's Guide Guide
Transfer Details
Each available Block Transfer has the following items that are configurable:
·
·
·
·
Name: Specifies the name to associate with the scheduled label
Type: This is set to block for this type of transfer.
Enable: Specifies whether the label is initially enabled or disabled.
Transfer Count: Specifies the number of times the message is transmitted. A value
of zero means cyclic transmission
· Initial Delay: Initial delay before the transfer starts regular cyclic transmission
· Rate: Specifies the rate/period that the transfer will take place
1) Period: Time Interval in milliseconds between transfers
2) Rate: Periodic Rate in Hertz the transfer occurs
Buffer Details
A buffer is associated with each scheduled label to determine the data that is
transmitted with the label. Within the buffer configuration, the depth, label, sdi, and
data can be specified.
·
·
·
·
Depth: Specifies the number of data combinations are associated with this transfer
Label: The value of the label that is sent with the data, unless overwritten in the table
SDI: The value of the SDI within the data field
Data: Sets the value of the remaining data bits depending if parity is enabled and SDI
is specified.
Note: If the data field is longer than the remaining number of bits available, the
row will appear in red.
Depending on the values specified in configuration, the Complete Word section of the
table will calculate and show the complete data word that will be transmitted.
Flight Simulyzer User's Guide Guide 14
The Buffer can be viewed in 4 of the following formats: Decimal, Hexadecimal, Octal,
and Binary.
4.3.1.3
Acyclic Transfers
Configuration Options
This section describes the configuration options for Acyclic Transfers that can be
configured on transmit channels. When the row is clicked in the transfer table shown in
the Transmitter Settings section, additional options will be shown that allow
configuration for the acyclic transfer. Mainly the Label and Data are what is typically
configured for an acyclic transfer but additional options can also be set.
Transfer Details
Each available Block Transfer has the following items that are configurable:
· Name: Specifies the name to associate with the scheduled label
· Type: This is set to Acyclic for this type of transfer.
Buffer Details
A buffer is associated with each scheduled label to determine the data that is
transmitted with the label. Within the buffer configuration, the depth, label, sdi, and
data can be specified.
·
·
·
·
15
Depth: Specifies the number of data combinations are associated with this label
Label: The value of the label that is sent with the data, unless overwritten in the table
SDI: The value of the SDI within the data field
Data: Sets the value of the remaining data bits depending if parity is enabled and SDI
is specified.
Note: If the data field is longer than the remaining number of bits available, the
Flight Simulyzer User's Guide Guide
row will appear in red.
Depending on the values specified in configuration, the Complete Word section of the
table will calculate and show the complete data word that will be transmitted.
4.3.2
The Buffer can be viewed in 4 of the following formats: Decimal, Hexadecimal, Octal,
and Binary.
Receiver Settings
Configuration Options
This section describes the configuration options for ARINC-429 Receive Channels. In
the Settings perspective, the selection of a Receiver node changes to the Receiver
configuration context. There are 2 major configuration blocks related to the
configuration at the Receiver level: Monitor and Label Buffers Settings. A Receive
Channel can be setup to receive the label data in a chronological monitor on a per
channel basis or label buffers can be configured for reception of label or label/sdi
combinations.
Monitor Configuration
The monitor can be configured to receive all the data that has been transmitted or
simple filters can be setup to capture only certain label data.
· To Enable the Simple Filter Click the Enable check box and then add the Label or
Flight Simulyzer User's Guide Guide 16
Label/SDI combinations.
· To Filter the table to only view the simple filters for a particular label, check the
Filter box and specify the label
· To invert the filter select the Inverted Box. This will allow any labels set in the filter
configuration to show up in the monitor, otherwise if this option is not selected any of
the labels specified in the filter configuration will not appear in the monitor
· To Add or Delete filters, Click the Add or Delete buttons
1.
Once the Labels are added, specify the Label with the option of adding a
SDI value to the filter.
Note: If a filter is added with the same configuration twice, the row will
appear in red
Label Buffer Configuration
Additionally, the Receive Channel can be configured with specific buffers for Label or Label/
SDI combinations.
· To Enable the Label Buffer Click the Enable check box and then add the Label or
Label/SDI combinations.
17
Flight Simulyzer User's Guide Guide
· To Filter the table to view a certain label buffer, check the Filter box and specify the
name and/or label
· To Add or Delete label buffers, Click the Add or Delete buttons
1.
Once the Labels are added, specify the Label with the option of adding a
name, SDI value, buffer depth, and/or if parity is enabled.
Notes:
1) If a filter is added with the same configuration twice, the row will
appear in red
2) If parity is not enabled, then the 32 bit will be used as data.
Flight Simulyzer User's Guide Guide 18
5
ARINC-664
The Flight Simulyzer Analyzer Software can currently be used to create configurations
for AIT’s ARINC-664 hardware modules. An easy-to-use GUI allows complete visual
programming that enables users to optimize, plan, and configure complete ARINC-664
End Systems.
Exported configurations are based on a common data format (XML) which can also be
loaded from the AIT 664 ES Configuration Tools Library which in turn can be utilized
to configure AIT 664 hardware programmatically.
5.1
Features
·
·
19
Visually configure Arinc664 Devices, End Systems, In/Out Vl's, and
Communication Ports.
Import and export configuration files for A664 Devices and End Systems.
Flight Simulyzer User's Guide Guide
5.2
Device
Configuration Options
This section describes the configuration options for Arinc664 Devices. In the Settings
perspective, the selection of a Device node changes to the Device configuration context. There
are 3 major configuration blocks related to the configuration at the Device level.
Basic Device Configuration Options
Basic Device Configuration Options:
Item
Name
Mac Group
Network Speed
Previous Sequence Number
Range
Description
The name to associate with the given Device
The constant field used in the first 4 bytes of MAC Destination addresses
The network interface speed
The range utilized by the Redundancy Management algorithm
These options are global to all End Systems, Input/Output Vl's, and communication ports
defined on this Device.
Flight Simulyzer User's Guide Guide 20
Rx Cots Configuration:
Rx Cots Configuration Settings
Item
Port Id
Show Configured Port's Only
Enabled
Name
Mac Address
Mac Address Mask
Buffer Depth
Description
Unique port identifier. Port Id values in the range 0, 31 are allowed
Check this box to hide any unconfigured ports
Enables/Disables the given port. Disabled ports serve no real purpose.
The name to associate with the given port
The MAC address to associate with the port
A mask to apply to the received frame before comparing Mac Addresses.
The number of messages that can be buffered at the port.
Up to 32 Rx Cots ports can be configured per Device. Cots ports are standard ethernet cut
through ports, which can be utilized for generic ethernet traffic. The 'Show Configured Ports's
Only' checkbox is a convenient way to view only the ports which have been previously
configured. When checked, a drop down menu containing the configured port id's with their
associated names is displayed. New ports cannot be configured when this option is selected.
21
Flight Simulyzer User's Guide Guide
Tx Cots Configuration:
Tx Cots Configuration Settings
Item
Network Selection
Enabled
Name
Mac Address
Max Frame Length
Description
Select Network A or B for the given port configuration
Enables/Disables the given port. Disabled ports serve no real purpose.
The name to associate with the given port
The MAC address to associate with the port
The maximum allowed length of the Ethernet Frame
Two Tx Cots ports can be configured per Device. Cots ports are standard ethernet cut through
ports, which can be utilized for generic ethernet traffic.
Import/Export
Device configurations can be imported and exported to AIT's XML and hex formats. The Export
button is disabled by default, unless the current configuration is valid for export. There are
various reasons the Device configuration can be found to be invalid. Certain steps have been
taken in the GUI to indicate when a configuration is invalid. The list below indicates the
requirements for a valid Device configuration:
· If no End Systems are defined, at least one Tx or Rx Cots port must be enabled.
· If any End Systems are enabled, the following must be true:
o At least one Vl must be enabled, with at least one underlying communications port enabled.
o All enabled Vl's must have at least one enabled port.
o OutputVl Id's must be unique among all OutputVl's on all End Systems on a Device.
o All Tx Port Id's must be unique among all OutputVl's on all End Systems on a Device.
o All Rx Port Id's must be unique among all InputVl's on all End Systems on a Device.
Ensuring the validity of the configuration is facilitated with the coloring of the Vl and Port Id
selection widgets. When an Id conflict arises, the id selection widget is colored red and a tool tip
is set indicating the cause of the conflict. If no conflicts exist, the Export button will be enabled.
NOTE: The Device Configuration context allows exporting to both XML and a hex format. The
hex format is for use with the A664 ES API. Exporting a configuration to the hex format does not
currently preserve the name field of any underlying configuration. If preserving the name is
important, export the configuration to xml as well.
Flight Simulyzer User's Guide Guide 22
5.3
End System
Configuration Options
This section describes the configuration options for Arinc664 End Systems. In the Settings
perspective, the selection of an End System node changes to the End System configuration
context:
End System Configuration Options
Item
Es Id
Show Configured Es's Only
Enabled
Name
Mac Address
Description
Unique End System identifier. Id values in the range 0, 31 are allowed
Check this box to hide any unconfigured End Systems
Enables/Disables the given End System. Disabled End Systems serve no
real purpose.
The name to associate with the given End System
The Source MAC address to associate with the End System
These options are global to all underlying Input/Output Vl's and the related communication
ports. The 'Show Configured Es's Only' checkbox is a convenient way to view only the End
Systems which have been previously configured. When checked, a drop down menu containing
the configured End System id's with their associated names is displayed. New End Systems
cannot be configured when this option is selected.
Import/Export
End System configurations can be imported and exported to AIT's XML format. The Export
button is disabled by default, unless the current configuration is valid for export. There are
various reasons the End System configuration can be found to be invalid. Certain steps have
been taken in the GUI to indicate when a configuration is invalid. The list below indicates the
requirements for a valid End System configuration:
· For any End System, the following must be true:
o At least one Vl must be enabled, with at least one underlying communications port enabled.
o All enabled Vl's must have at least one enabled port.
23
Flight Simulyzer User's Guide Guide
5.4
Vl and Port Configuration
Configuration Options
This section describes the configuration options for Arinc664 Input and Output Vl's and their
underlying communications ports. In the Settings perspective, the selection of either an Input or
Output Vl node changes to the Vl and Port configuration context:
OutputVl Configuration
Tx Vl Configuration Settings
Item
Vl Id
Show Configured Vl's Only
Enabled
VL Name
Network
Bag
Sequence Numbering
Max Frame Length
Description
Unique Output Vl identifier. Id values in the range 0, 65535 are allowed
Check this box to hide any unconfigured Vl's
Enables/Disables the given Vl. Disabled Vl's serve no real purpose.
The name to associate with the given Vl
The transmission network
The Bandwidth Allocation Gap
Indicates if the Vl sequence number should be added to frames of this Vl
The maximum frame length in bytes supported by this Vl
The 'Show Configured Vl's Only' checkbox is a convenient way to view only the Output Vl's
which have been previously configured on the current End System. When checked, a drop
down menu containing the configured Vl id's with their associated names is displayed. New
Vl's cannot be configured when this option is selected.
Flight Simulyzer User's Guide Guide 24
InputVl Configuration
Rx Vl Configuration Settings
Item
Vl Id
Show Configured Vl's Only
Enabled
Name
Integrity Checking
Redundancy Management
Skew Max
Description
Vl identifier. Id values in the range 0, 65535 are allowed
Check this box to hide any unconfigured Vl's
Enables/Disables the given Vl. Disabled Vl's serve no real purpose.
The name to associate with the given Vl
Indicates if Vl Integrity Checking is enabled (This option is forced True if
RM is enabled
Indicates if RM is enabled
The max skew allowed by RM
The 'Show Configured Vl's Only' checkbox is a convenient way to view only the Input Vl's
which have been previously configured on the current End System. When checked, a drop
down menu containing the configured Vl id's with their associated names is displayed. New
Vl's cannot be configured when this option is selected.
Import/Export
Import and Export are not currently supported at the Vl level, however, the Vl configuration must
be valid in order to export from the End System or Device contexts. Ensuring the validity of the
configuration is facilitated with the coloring of the Vl Id selection widgets. When an Id conflict
arises, the id selection widget is colored red and a tool tip is set indicating the cause of the
conflict. Vl Id Conflicts are allowed if exporting a single End System but not when exporting at
the Device level. Keep in mind, any Vl configuration is still invalid if enabled with no enabled
underlying communications ports. This will prevent exporting at the End System level. See the
Import/Export sections of the Device and End System Configuration pages for more
information.
25
Flight Simulyzer User's Guide Guide
5.4.1
Port Configuration
Tx Communications Port
Tx Port Configuration Settings
Item
Port Id
Show Configured Ports Only
Enabled
Port Name
Type
subVl
Description
Unique Port identifier. Id values in the range 0, 1023 are allowed
Check this box to hide any unconfigured ports
Enables/Disables the given port. Disabled ports serve no real purpose.
The name to associate with the given port
The port type
The subVl to which the given port is associated
The 'Show Configured Ports Only' checkbox is a convenient way to view only the ports which
have been previously configured on the current Vl. When checked, a drop down menu
containing the configured port id's with their associated names is displayed. New ports cannot
be configured when this option is selected. The other options not listed in the table are port
type specific configuration options.
Flight Simulyzer User's Guide Guide 26
Rx Communications Port
Rx Port Configuration Settings
Item
Port Id
Show Configured Ports Only
Enabled
Port Name
Type
Description
Unique Port identifier. Id values in the range 0, 4095 are allowed
Check this box to hide any unconfigured ports
Enables/Disables the given port. Disabled ports serve no real purpose.
The name to associate with the given port
The port type
The 'Show Configured Ports Only' checkbox is a convenient way to view only the ports which
have been previously configured on the current Vl. When checked, a drop down menu
containing the configured port id's with their associated names is displayed. New ports cannot
be configured when this option is selected. The other options not listed in the table are port
type specific configuration options.
Import/Export
Import and Export are not currently supported at the port level, however, the port configuration
must be valid in order to export from the End System or Device contexts. Ensuring the validity of
the configuration is facilitated with the coloring of the port Id selection widgets. When an Id
conflict arises, the id selection widget is colored red and a tool tip is set indicating the cause of
the conflict. Port Id Conflicts are allowed if exporting a single End System but not when
exporting at the Device level. See the Import/Export sections of the Device and End System
Configuration pages for more information.
27
Flight Simulyzer User's Guide Guide
Flight Simulyzer User's Guide Guide 28
6
MIL-STD-1553
The Flight Simulyzer Analyzer Software can be used in conjunction with AIT’s family
of 1553 interface boards to provide a powerful Windows-based 1553 Analyzer tool. An
easy-to-use GUI allows complete visual programming that enables users to
troubleshoot, optimize, plan and configure MIL-STD-1553 databuses. Low-level and
high-level protocol analysis features work by capturing, filtering, time stamping and
interpreting MIL-STD-1553 databus traffic and then generating advanced statistics for
the users.
Flight Simulyzer’s BC, RT and BM configurations are based on a common data format
(XML) which allows simulation setups created and used within the Flight Simulyzer
application to also be loaded and executed from within the AIT MIL-STD-1553
LabView instrument driver, high-level C++ and C# application interface libraries, and
the MIL-STD-1553 soft front panel application.
AIT MIL-STD-1553 Software Development Kit
29
Flight Simulyzer User's Guide Guide
6.1
Features
·
·
·
·
·
6.1.1
Bus Controller Features
·
·
·
·
·
6.1.2
Concurrent operation of multiple 1553 databuses and boards
Time Correlation with Internal/External IRIG-B across Multiple 1553 databuses
XML setup file for project, Bus Controller, Remote Terminal(s) and Bus
Monitor setups
Full access to 1553 databus memory associated with Bus Controller, Remote
Terminal(s) and Bus Monitor
Comprehensive Trigger and Filter capabilities (ie: on Bus Controller, on
Remote Terminal and Bus Monitor data patterns within received data, errors,
etc...)
Intuitive, easy-to-use user interface for defining major/minor framing schedules
Full support for MIL-STD-1553 A/B mode code operations
Full error injection, definable independently per BC command with full
compliment of errors supported, including:
· Command/Data word sync errors
· Parity errors
· Manchester encoding errors
· Word/Bit count high/low errors
· Gap time errors
· Signal zero crossing errors
Acyclic (on user command) data transfers
View/Edit transfer buffers 'on-the fly'
Remote Terminal Features
·
·
·
·
·
Fully configure Tx/Rx buffers for each subaddress and mode code
Define hardware controlled handling of status responses, including response
time in microseconds
Define response bus (independent of bus command received from)
Full error injection configurable per RT subaddress with full compliment of
errors supported, including:
· Status/Data word sync errors
· Word/Bit count high/low errors
· Responses on wrong bus
· Manchester encoding errors
· Zero crossing errors
· Gap time and parity errors
Independently view and modify RT subaddress data 'on-the-fly'
Flight Simulyzer User's Guide Guide 30
6.1.3
Bus Monitoring Features
·
·
·
·
6.1.4
Replay Features
·
·
6.2
Simple and/or complex start, stop, and strobe triggers
Data filtering based on RT and subaddresses
Illegal RT subaddress/mode code combinations to be flagged as errors by the
BM
Status word conditions to be flagged as errors by the BM
Reconstruct 1553 databus traffic from recorded files in real-time
Filter-specific Remote Terminal response from recorded file during
reconstruction
Bus Configuration
This section describes the MIL-STD-1553 Bus Configuration options available in the GUI.
31
Flight Simulyzer User's Guide Guide
6.2.1
Bus Settings
The MIL-STD-1553 Bus Interface configuration can be accessed by selecting a Bus
(Channel) from the resource window.
Bus Configuration Settings
Each available MIL-STD-1553 Bus Interface of the hardware device can be
individually configured. The following items are configurable:
· Coupling Mode: Specifies the electrical coupling mode used by the bus interface
of the hardware devices. The available coupling modes are dependant on the MILSTD-1553 hardware module.
Coupling Mode
Description
Isolated
The MIL-STD-1553 Bus interface of the
hardware module is isolated from the front
panel connector of the device. That is, it is
isolated from the externally connected bus
Transformer MIL-STD-1553 Transformer mode coupling
Direct
MIL-STD-1553 Direct mode coupling
External
The MIL-STD-1553 hardware device bus
interface provides onboard emulation of a
MIL-STD-1553 bus and an equivalent bus stub
is provided at the front panel of the hardware
device. This mode allows a transformer
coupled device to be directly connected
(without an external bus coupler) to the MIL-
Flight Simulyzer User's Guide Guide 32
Loopback
Fixed
STD-1553 bus interface of the AIT device.
The Digital Loopback mode provides an
internal (onboard) loopback of the MIL-STD1553 signal.
The MIL-STD-1553 hardware device's bus
interface is connected to the front panel
connector of the device. The actual coupling
mode is dependant on the mode(s) supported
by the hardware device (i.e. Transformer or
Direct)
· Global Protocol: Specifies whether the MIL-STD-1553A or MIL-STD-1553B
protocol is used for the bus interface.
· Bus Amplitude: Specifies the voltage amplitude of the output bus signal of the
MIL-STD-1553 device. Amplitude is specified as a percentage. The actual
voltage is dependant on the specifications of the MIL-STD-1553 device. Only
AIT Extended Function devices (PXI-C1553-EF, PCI-C1553-EF, PCIe-C1553EF, and VXI-C1553T) support configurable bus amplitude.
· Response Timeout: Specifies the Remote Terminal response timeout in
microseconds. This is the maximum time for an RT to resond to BC commands
on this bus. If an RT does not respond to commands within this time, a No
Response error is assumed (and reported by the BC and BM).
The operational mode of the MIL-STD-1553 Bus Interface can be selected in the bus
settings.
· Simulation: This mode allows the configuration and simulation of the BC, RT(s),
and the BM
· Replay: This mode allows a previously captured (by the BM) bus recording to be
replayed on the bus interface
6.2.2
For each Remote Terminal of the bus interface, the MIL-STD-1553 protocol variant
(1553A or 1553B) can be configured in the General Rt Configuration area. This
setting dictates how the BC handles commands/responses for the RT and also how the
BM interprets responses from the RT.
Bus RT Protocol
For each Remote Terminal of the bus interface, the MIL-STD-1553 protocol variant
(1553A or 1553B) can be configured in the General Rt Configuration area. This
setting dictates how the BC handles commands/responses for the RT and also how the
BM interprets responses from the RT.
33
Flight Simulyzer User's Guide Guide
RT Bus Protocol Settings
6.2.3
Saving Bus Setup Information
The Bus setup information can be saved as an xml file, or alternatively as a binConfig
file. If you highlight the Bus Interface node in the resource tree, import and export
buttons appear in the lower right hand corner.
Flight Simulyzer User's Guide Guide 34
Saving Bus Configurations
Clicking the Export button will enable you to save the setup configuration of the Bus
interface. The Bus Interface setup configuration includes the setup configuration
information of all components, including the BC, RT(s), and BM setup configurations.
If the XML file format is used, the xml file can be edited using any xml browser/editor.
The binConfig file format should be used when exporting if it will be used in a
LabVIEW Real-Time target.
The Import button enables you to import the Bus setup information.
6.3
Bus Controller
The main function of the Bus Controller (BC) is to provide data flow control for all
transfers on the 1553 databus.
The BC must initiate and coordinate the transfer of information on the data bus. All
information is communicated in command/response mode. The BC sends a command
to the RTs, which reply with a response.
Setting up the BC involves defining individual 1553 transfers. These defined transfers
are then grouped together to create Minor Frames. From this group of Minor Frames,
35
Flight Simulyzer User's Guide Guide
Major Frames are constructed.
Multiple Transfers make up a Minor Frame, and any Transfer can be used multiple
times. One or more Minor Frames make up a Major Frame.
Figure 5 - Frame Topology
6.3.1
BC Transfer Scheduling
·
To set up BC Transfers:
1.
Select the Settings button from the main screen and highlight
busController node in the resource tree. Make sure the Bus Controller
is enabled by checking the box next to Enabled, as seen below.
Bus Controller Settings menu
Flight Simulyzer User's Guide Guide 36
37
Flight Simulyzer User's Guide Guide
2.
Next, highlight the Transfer Scheduler. The BC transfer scheduler
window (shown below) will appear and you can start constructing your
schedule. Minor frames are represented by boxes that allow drag and
drop of transfers from the New or Existing Transfer Toolbox. Transfers
are sent sequentially as shown in the diagram below from left to right.
One or more minor frames make up a major frame. Minor frames are
transmitted sequentially as shown in the display from top to bottom.
Only one major frame can be active at any given time on a Bus
Controller.
BC Transfer Scheduler
3.
To add Minor Frames to the schedule:
·
In the Bus Controller Scheduler window locate the Minor Frames
buttons:
·
Use these buttons to add or delete Minor Frames.
When you add another Minor Frame an additional frame appears as an
additional rectangle in the Frame Scheduler window. You can highlight any
Flight Simulyzer User's Guide Guide 38
Minor Frame to work on the transfers contained within it. The selected
Minor Frame will have a red rectangle around it. Minor frames can be
moved (via drag and drop), copied (control + click), duplicated to another
Major frame via right click, or deleted (via right click).
The transmit count value refers to how many times all of the Minor Frames
contained in the Major frame will be sent. A value of “0” means send the
same Major Frame continuously.
4.
Transfers are added to minor frames and can be moved within minor
frames and between minor frames via drag and drop. Control + clicking a
transfer allows copying within and between minor frames. Deleting
transfers can be done via right click or the Del key.
39
Flight Simulyzer User's Guide Guide
6.3.1.1
Creating BC to RT Transfers
·
To set up a BC to RT Transfer:
1.
Click on the blue BC – RT icon and drag it from the New Transfer
toolbox into a Minor Frame.
BC-RT
Transfer Icon
2.
Select the BC – RT icon in the Minor Frame box and then enter the
transfer data in the Transfer Configuration area. Advanced Transfer
Configuration details (i.e. Error Injection) may be entered by selecting
the Advanced... button of Transfer Configuration area.
Bus Controller Transfer Setup
Flight Simulyzer User's Guide Guide 40
BC Transfer Details
For BC - RT Transfers, the following items may be configured:
·
·
·
·
·
·
·
·
·
·
·
41
Name: user-defined name associated with this transfer
Buffer ID: ID number of the data buffer associated with this transfer (Note: data
inserted in this buffer can be defined in the previous menu)
Address: RT address
Subaddress: RT subaddress
Word Count: number of data words associated with this transfer
Retry check box: whether this transfer should be tried again if an error occurs
Override Default: check box to indicate if the transfer should be sent over
primary or secondary channel based on default configuration setup
Transfer Gap: the time from the start of this message to the next (in
milliseconds)
Expected Response: the expected response from the RT, choices are automatic
and 2 user-defined status words
Status Mask: the status word exception mask bits (1 = accept, 0 = disregard)
Error Injection: this section is used to turn on specific 1553 protocol and
waveform errors associated with the transfer
Flight Simulyzer User's Guide Guide
6.3.1.2
Creating RT to BC Transfers
·
To set up an RT to BC Transfer:
1.
Click on the yellow RT – BC icon and drag it from the New Transfer
toolbox into a Minor Frame.
RT - BC Icon
2.
6.3.1.3
Select the RT – BC icon in the Minor Frame box and then enter the
transfer data in the Transfer Configuration area. As with the BC - RT
transfers, advanced configurations (including error injection) are
possible by selecting the Advanced... button of the Transfer
Configuration area.
Creating RT to RT Transfers
·
To set up an RT to RT Transfer:
1.
Click on the orange RT to RT icon and drag it from the New Transfer
toolbox into a Minor Frame.
RT - RT Icon
2.
Select the RT – RT icon in the Minor Frame box and then enter the
transfer data in the Transfer Configuration area. As with the BC - RT
transfers, advanced configurations (including error injection) are
possible by selecting the Advanced... button of the Transfer
Flight Simulyzer User's Guide Guide 42
Configuration area.
6.3.1.4
Creating Mode Code Transfers
·
To set up a Mode Code Transfer:
1.
Click on the red Mode Code icon and drag it from the New Transfer
toolbox into a Minor Frame.
Mode Code
Transfer Icon
2.
43
Select the Mode Code icon in the Minor Frame box and then enter the
transfer data in the Transfer Configuration area. As with the BC - RT
transfers, advanced configurations (including error injection) are
possible by selecting the Advanced... button of the Transfer
Configuration area.
Flight Simulyzer User's Guide Guide
6.3.1.5
Add a Delay to the Schedule
·
To add a Delay to the Schedule:
1.
Click on the purple Delay icon and drag it from the New Transfer
toolbox into a Minor Frame.
Delay Icon
2.
Select the Delay icon in the Minor Frame box to setup a delay within the
Minor Frame within the Transfer Configuration area. The Delay can
be set up to 16,000 microseconds.
Flight Simulyzer User's Guide Guide 44
6.3.1.6
Using Strobe Transfers
·
To set up a Strobe Transfer:
1.
Click on the green Strobe icon and drag it from the New Transfer
toolbox into a Minor Frame.
Strobe Icon
2.
Select the Strobe icon in the Minor Frame box to setup an output
strobe line within the Transfer Configuration area.
Strobe Transfer Configuration
6.3.2
Saving Bus Controller Setup Information
The Bus Control setup information can be saved as an xml file, or alternatively as a
binConfig file. If you highlight the busController in the resource window, import and
export buttons appear in the lower right hand corner.
Figure 5.3 - Bus Controller Settings
45
Flight Simulyzer User's Guide Guide
Clicking the Export button will enable you to save the setup configuration of the Bus
Controller. If the XML file format is used, the xml file can be edited using any xml
browser/editor. The binConfig file format should be used when exporting if it will be
used in a LabVIEW Real-Time target.
The Import button enables you to import the Bus Controller setup information.
Flight Simulyzer User's Guide Guide 46
6.3.3
Starting the Bus Controller
·
To start the Bus Controller:
1.
Press the Simulation button. The 1553 resources screen enables you to
start the Bus Controller by doing one of the following:
·
Right click on busController in the resource pane, and choose Start
BC.
·
Click on the Bus Controller icon in the Menu Bar, shown in the red
circle below.
Figure 5.4 - Bus Controller Icon
Note: The Start All button enables you to start the BC, Remote Terminals, and Bus
Monitor using a single button.
6.3.4
Operating the Bus Controller
After the BC has been started, it is possible to view the status of the BC Transfers of the
currently active Major Frame.
· To view the active BC Transfers
1. Right click over the busController icon in the resource tree.
2. This will open the BC Activity Display which is shown below.
47
Flight Simulyzer User's Guide Guide
BC Transfer Activity Display
Several BC Operations are possible from inside the BC Activity Display window:
1. The BC can be started and stopped using the button at the lower right corner of the
window.
2. The contents of the buffer associated with a transfer can be viewed (or edited) by
selecting the Buffer button located in the Data column of the display for each transfer.
3. Status information for each individual transfer may be viewed. This includes the message
and error count and additional information.
6.3.5
Sending Acyclic Frames
· To send an Acyclic frame via the BC
1. Right click over the busController in the resource tree, then select Show BC Acyclic
Frames Display
2. In the BC Acyclic Frames Display, select the Acyclic transfer to be sent, the press the
Send button.
Flight Simulyzer User's Guide Guide 48
BC Acyclic Frames Display
6.4
Remote Terminal
The main function of the Remote Terminal (RT) is to provide the information,
including data, for all remote terminals that will be simulated by the AIT board on the
1553 databus.
The RT is a device designed to interface with various subsystems on the 1553 databus.
The interface device may be embedded within the subsystem itself, or may be an
external interface to tie a non-1553 compatible device to the bus. As a function of the
interface requirement, the RT receives and decodes commands from the BC, detects any
errors and reacts to those errors. The RT must be able to properly handle both protocol
errors (missing data, extra words, etc.) and electrical errors (waveform distortion, rise
time violations, etc). RT’s are the largest segment of bus components. Up to 31 remote
terminals can be connected to the data bus and each remote terminal can have 31
subadresses. The remote terminal shall not speak unless spoken to first by the bus
controller and specifically commanded to transmit. The commands may include data or
request for data (including status) from RT’s Command word, Data word and Status
word formats.
Remote Terminal setup consists of setting up the following three components in the
following order:
·
·
·
6.4.1
Setup Remote Terminal
Setup the RT Subaddress or Mode Code
Setup the data associated with RT/SA transmission
Remote Terminal Setup
·
To setup the Remote Terminal(s):
1.
49
Select the Settings button from the main screen and highlight
remoteTerminals in the resource window. The menu tree expands and
displays all 31 possible Remote Terminals that can be simulated, as seen
Flight Simulyzer User's Guide Guide
below:
Remote Terminal Settings
Select any of the Remote Terminal address’ that you wish to simulate by selecting them
in the resource window. Once you have selected the Remote Terminal, the Remote
Terminal Settings windows will appear in the right pane. Check the Enable box to
simulate the Remote Terminal.
Remote Terminal Configuration
Flight Simulyzer User's Guide Guide 50
You have the following options that can be set in this window:
Mode
· Simulation: simulate the Remote Terminal, meaning the AIT board will respond
on the 1553 databus as a Remote terminal when commanded by the Bus
Controller.
· Monitor: monitor all RT activity, but do not respond with an RT status word
databus as a Remote terminal would when commanded by the Bus Controller.
This is useful for test applications when you want to monitor RT activity, while
having the “real” RT also connected to the 1553 databus.
Bus
·
·
·
·
·
·
6.4.2
Primary: respond on the primary bus
Secondary: respond on the secondary bus (Note: if both are checked then
respond to any command when received on either bus)
Response Time: The time used to respond to the Bus Controller Command
Initial Status Word: the value (in hex) of the status word response
RT Address: the RT address that will be used in the RT response word
Flags: the flag bits that can be optionally set in the status word response
Setup RT Subaddress and Mode Code
·
To setup the Remote Terminal subaddress:
1.
Select the Subaddress folder tab. The menu page will change from the
RT to the Subaddress Settings window, as shown below:
Figure 6.2 - Subaddress Tab
51
Flight Simulyzer User's Guide Guide
Two examples are below.
·
To enable Receive Subaddress (SA) 2 to receive 3 data words by:
1. Optionally enter a name to associate with the Subaddress transfer.
2. Select the SA03 icon in the left window.
3. Select the Rx button in the upper right corner (choice is Tx or Rx).
4. Check the Enable box.
5. Select the Rx Buffer Id, and the size of the buffer to store the Received data.
·
To setup RT01 SA10 to transmit 7 data words:
1. Optionally enter a name to associate with the Subaddress transfer.
2. Click on the remote terminal 03 under the remoteTerminals resource in the
left resource pane.
3. Select the Subaddress tab.
4. Select the SA10 icon in the left window.
5. Select the Tx button in the upper right corner (choice is Tx or Rx).
Flight Simulyzer User's Guide Guide 52
6. Check the Enable box.
As a shortcut, it is sometimes easier to turn on all Remote Terminals and their
subaddresses.
·
To Enable All Remote Terminals and Subaddresses:
1.
Select the remoteTerminals resource in the left resource pane.
2.
Select the Enable All button at the top of the remote terminal display.
Figure 6.2-II - Enable All
6.4.3
Saving Remote Terminal Setup Information
The Remote Terminal setup information can be saved as either an xml file or a
binConfig type file. If you highlight the remoteTerminals in the resource window,
import and export buttons appear in the lower right hand corner.
Clicking the Export button will enable you to save the setup configuration of the
Remote Terminals. The xml file can be edited using any xml browser/editor. The
schema of the xml file is defined and documented.
The Import button enables you to import the Remote Terminal setup information.
53
Flight Simulyzer User's Guide Guide
6.4.4
Starting Remote Terminals
· To start a Remote Terminal simulation:
1.
Press the Simulation button. The 1553 resources screen enables you to
start all configured RT’s by doing one of the following:
·
Right click on the remoteTerminals node in the resource tree, and
select Start RT’s.
·
Click on the Start RT's icon in the Menu Bar, shown in the red
circle below.
Remote Terminal Icon
Alternatively, individual RT's can also be started by right clicking the corresponding
RT in the resource tree and selecting Start.
Flight Simulyzer User's Guide Guide 54
6.4.5
Operating the RT's
Each of the configured Remote Terminals can be individually controlled by right clicking over
the RT in the resource tree.
Each RT can be individually stopped or started from the RT Right Click menu.
The transfers set up on an RT can be viewed via the SA Activity Data option:
RT Subaddress Activity
6.5
Bus Monitor
The main functions of the Chronological Bus Monitor (BM) are listening and capture
all the information, including errors, on the 1553 databus.
The BM is passive and collects data for real-time or post capture analysis. The BM can
store all or portions of traffic on the bus, including electrical and protocol errors. BMs
are primarily used for instrumentation and data bus testing. Up to 10 triggers are
provided which can be used in any combination to identify/capture specific
55
Flight Simulyzer User's Guide Guide
command/status/data words or error conditions detected on the bus or start capture
upon an external trigger received via an external digital input. Filters are provided to
command the BM to ignore specific RTs or Subaddresses (Tx, Rx or both directions).
The default BM setup is set to trigger on any data word or error received on the
bus.
Setup of the Bus monitor is not required if you just want to capture all 1553 databus
activity.
6.5.1
Bus Monitor Filter Setup
·
To setup the Bus Monitor Filters:
1.
Highlight the busMonitor in the right resource pane.
2.
Select the Filtering tab in the right Bus Monitor Settings pane.
Bus Monitor Settings
The default is enabling all of the RTs to be captured.
The Invert box will invert the values of the RTs (i.e. from captured to non-captured
state).
Select any RT and the Advanced button to further select capture of RT subaddress
from Tx and Rx, or both.
Bus Monitor Address Selection
Flight Simulyzer User's Guide Guide 56
57
Flight Simulyzer User's Guide Guide
6.5.2
Choosing and Configuring Start/Stop Triggers
The Start Trigger and Stop Trigger tabs in the Bus Monitor Settings pane enables
you to configure trigger conditions that may be used to start or stop the collection of
data by the Bus Monitor. There are four types of trigger conditions that may be defined.
They are:
·
Data Word: selecting a dataword, or a portion of a dataword, or an out of range
value as a trigger condition to the Bus Monitor.
·
Error: selecting an error(s) as a trigger condition to the Bus Monitor.
·
External: selecting an external digital input as a trigger condition to the Bus
Monitor.
Flight Simulyzer User's Guide Guide 58
·
Specified Word: selecting an exact match of a word on the 1553 databus as a
trigger condition to the Bus Monitor.
The Compound tab is used to define multiple triggers linked together in an “and”
condition.
The Strobe tab is used to define trigger conditions from data on the 1553 that result in
an output strobe over a specified discrete.
59
Flight Simulyzer User's Guide Guide
6.5.3
Starting the Bus Monitor
·
To start the Bus Monitor:
1.
Press the Simulation button. The 1553 resources screen enables you to
start the Bus Monitor by doing one of the following:
·
Right click on busMonitor in the resource pane, and choose Start
BM.
·
Click on the Start BM icon in the Menu Bar.
Once the Bus Monitor is started, you can look at the activity of all the RTs on the 1553
databus by selecting the Show RT Activity Display.
To enable the Chronological Bus Monitor, simply select the Show Bus Monitor
Display or use the icon from the toolbar.
Chronological Bus Monitor Display
Flight Simulyzer User's Guide Guide 60
The Bus Monitor also provides an RT Activity display which depicts the current status of the
active RT's detected on the bus. This display may be accessed by selecting Show RT Activity
Display from the Right-click menu for the busMonitor in the resource tree. This display is also
accessible via a toolbar button.
61
Flight Simulyzer User's Guide Guide
6.5.4
Bus Monitor Table
The Bus Monitor Table provides the user with an easy to read data layout and several options
for viewing and navigating data:
· Data is sorted in the table by timestamp and the table provides various data columns that can
be hidden/shown. To show/hide a column, right click on any column header and check/
uncheck
the desired columns. When done, click anywhere off the menu and the columns will update.
Column layouts can also be created to store favorite views, using the Column Layout drop
down menu.
· The flags in the upper left portion of the table (as well as the right click menu) will allow
setting a T0 and a T1 marker that indicates the time delta between selections (bottom right).
· The left and right arrow keys allow jumping between Start triggers in the table.
· Each message (when selected) is shown in a break down table (bottom left and bottom
middle), that shows message control data as well as data payload.
Selecting the Raw Data tab displays the following table:
Flight Simulyzer User's Guide Guide 62
The Raw Data table shows the same data in a data word format. This view allows viewing
network specific data, such as which network each word was received upon.
This view also shows the word at which errors were detected during data capture. Clicking
between the two data views is synchronized in order to easily provide a
means to move back and forth between the views for analyzing specific messages.
63
Flight Simulyzer User's Guide Guide
6.5.4.1
Bus Monitor Capture Searches
The Bus Monitor Capture display is searchable.
Standard Data Table
· To access the Search Tool used to search the BM capture data:
1. Select Edit | Find from the menu (or Ctrl+F). This will cause the Search Tool to appear at
the bottom of the Flight Simulyzer window. Note that the search tool is only available
when F-SIM is in Simulation mode and the Bus Monitor table is the currently active
window.
BM Search Tool
The search tool provides many options to execute easy searches of the captured data.
· To search a column of the capture display for a value:
1. Select the column header or a cell in the desired column.
2. In the search tool edit box, enter the value to search for
Simple BM Capture Search
3. Press the arrow buttons to search forwards and backwards for the value.
Flight Simulyzer User's Guide Guide 64
· To execute a complex capture search:
1. Select the Advanced toggle button of the search tool do display the advanced options
Advanced BM Capture Search
2. Select the Advanced Options check box
3. Select the bus transfer field to search. Possible fields are:
· Command Word1/Word2
· Status Word
· Data Word
· Error
· Command + Data
· Time
4. Enter the data/criteria to search for.
5. Optionally collapse the advanced search data by clicking the advanced button again
6. Press the arrow buttons to search forwards or backwards
Raw Data Table
Raw data searches provide simple search functionality only, jumping to specific values found in
the table.
· To access the Search Tool used to search the BM capture data:
1. Select Edit | Find from the menu (or Ctrl+F). This will cause the Search Tool to appear at
the bottom of the Flight Simulyzer window. Note that the search tool is only available when
F-SIM is in Simulation mode and the Bus Monitor table is the currently active window.
2. Enter the search term, optionally check the search All Columns checkbox, and then click
the forward or back buttons.
To hide the Search Tool, press the escape button or click the red X in the left hand corner of the
dialog.
6.6
Running A Simulation
As long as licensed hardware is available in the system (see Detecting hardware), a
simulation can be started in various ways. By default on startup, Flight Simulyzer will
be configured to simulate a Bus Monitor on each available channel. Otherwise,
configure the hardware in the Settings perspective based on your requirements and then
go to the Simulation perspective by clicking the Simulation button.
To begin using Flight Simulyzer, double click on the Flight Simulyzer icon that was
65
Flight Simulyzer User's Guide Guide
placed on the Windows desktop or select Flight Simulyzer from Start | All Programs |
Avionics Interface Technologies | MIL-STD-1553 SDK vxx.xx.xx | Flight
Simulyzer.
Once Flight Simulyzer has been started, the Main graphics window is displayed. The
software should automatically find the 1553 hardware. The status displayed looks like
the example in the figure below. If no hardware is found, the correct license may not be
installed correctly, or the “-ntg” mode is on, call AIT for support.
Main Window
Flight Simulyzer Window Layout
Flight Simulyzer User's Guide Guide 66
67
Flight Simulyzer User's Guide Guide
6.6.1
Menu Bar
The Menu Bar provides access to all functions available for operation of the Flight
Simulyzer Analyzer software. The Menu Button Bar has quick access icon groups
available for the most commonly used functions. The Menu Bar and Menu Button Bar
are shown below.
The Menu Buttons provide one-click access to setup BC, RT and BM functions, as well
as Start/Stop activity and Display Remote Terminal Activity.
Menu Bar
Flight Simulyzer User's Guide Guide 68
7
Notes
7.1
Terms
Bandwidth Allocation Gap: The maximum rate at which data can be sent on a VL in
an AFDX network.
69
Broadcast:
Commands sent to multiple RT’s at once. The RT’s are
responsible for distinguishing between broadcast and
non-broadcast command
messages
An RT address of 11111 (31) indicates a broadcast
message
Data Buffer:
An area of memory on the 1553 device (global RAM)
assigned by the programmer to accommodate 1553 transfer(s)
to/from the BC or RT (2047 data buffers available)
Driver Command:
Command used by the AIT Target Software to control the
1553 device
Dual Stream:
Indicates the AIT 1553 board supports two dual
redundant MIL-STD-1553 data streams
FLASH:
Page-oriented electrical erasable and programmable
memory intermessage gap the time between 1553 message
transmissions with a minimum gap time, as specified in
MIL-STD-1553, of 4.0
microseconds
Interrupt:
A signal from a device attached to a computer or from a
program within the computer that causes the main program that
operates the computer (the operating system) to stop and figure
out what
to do next
RT Monitoring:
In this mode, the RT will capture RT message data on a
subaddress level without affecting bus traffic (i.e. without
generating a response on the bus). This mode is used to monitor
non-simulated "external" RTs.
Mac Address:
Media Access Control Address. A source or destination
address. As a destination address, this value is used for routing
frames in an ethernet network. In AFDX, the lower 16-bits of
this value
(the VL Id) is used for routing.
Flight Simulyzer User's Guide Guide
Major Frame:
Sequence of minor frames defined for transfer (max 64
minor frames in a major frame)
MIL-STD-1553:
Military specification defining a digital time division
command/response multiplexed databus
Minor Frame:
Sequence of 1553 transfers (max 128 transfers defined in
a minor frame)
Mode Code:
Unique five bit codes that are sent to specific RT’s to
check their status, control their operation and manage the bus.
Response Time:
The time between the BC Command/Data word and the
RT Status word
Response Timeout:
The maximum time the Bus Controller will wait for a
Status word
Value:
Response from the RT before indicating a "Response
Timeout"
Single Stream:
Indicates the AIT 1553 board supports one dual
redundant MIL-STD-1553 data stream
Status Word:
1/2 For RT-to-RT transmissions, Status Word 1 is the
status word sent by the transmitting RT, Status Word 2 is the
status word sent by the receiving RT
Strobe:
A strobe is a signal that is sent that validates data or other
signals on adjacent parallel lines
Transfer Type:
BC-to-RT, RT-to-BC, RT-to-RT
Vector Word:
Transmitted by the RT when requested by the BC with
the Mode Code command "Transmit Vector Word" which is
Mode code 16, the vector word will contain information
indicating the next
action to be taken by the BC
Virtual Link:
A VL (the lower 16-bits of a Destination Mac Address) is
utilized by an AFDX network for routing packets to End
Systems.
Flight Simulyzer User's Guide Guide 70
7.2
Acronyms and Abbreviations
ADC
AFDX
ALBI
ANSI
ARINC
ARM
BAG
BC
BIP
BIU
CM
cPCI
CPLD
CPU
DAC
DC-DC
DIP
DMA
DRAM
DSUB
EDO
EEPROM
EPROM
ES
FIFO
FLASH
FPGA
GND
IEEE
IRIG
IRIG-B
I/O
LCA
LED
MAC
MIL-STD
µsec
OWL
PC
PCI
PCIe
PMC
71
Analog to Digital Converter
Avionics Full Duplex Databus
Local Bus Interface
American National Standards Institute
Aeronautical Radio, Incorporated
Advanced RISC Machine
Bandwidth Allocation Gap
Bus Controller
Bus Interface Processor
Bus Interface Unit
Chronological Bus Monitor
Compact PCI
Coupled
Central Processing Unit
Digital to Analog Converter
Direct Current to Direct Current (power conversion)
Data Interface Processor
Direct Memory Access
Dynamic Random Access Memory
D-Subminiature
Enhanced Data Output
Electrically Erasable and Programmable Read Only Memory
Erasable Programmable Read Only Memory
End System
First in/First out
Page oriented electrical erasable and programmable memory
Field Programmable Gate Array
Ground
Institute of Electric and Electronic Engineers
Inter Range Instrumentations Group
Inter Range Instrumentations Group Time code Format Type B
Input/Output
Logic Cell Array (XILINX - Programmable Gate Array)
Light-emitting Diode
Media Access Control
Military Standard
microsecond
Object Wrapper Library
Personal Computer
Peripheral Component Interconnect
Peripheral Component Interconnect Express
PCI Mezzanine Card
Flight Simulyzer User's Guide Guide
PROM
PSC
PXI
PXIe
RAM
RISC
RMW
RS-232
RT
RTPTP
RXD
SDK
SIMM
SRAM
SSRAM
TBD
TCP
TTL
TXD
UART
USB
VL
VME
VME64
VXI
XMC
Programmable Read Only Memory
PCI and System Controller
PCI Extensions for Instrumentation
PCI Extensions for Instrumentation Express
Random Access Memory
Reduced Instruction Set Computer
Read-Modify-Write
Recommended Standard No.232 (US-Norm)
Remote Terminal
Remote Terminal Production Test Plan
Received Data
AIT's Software Development Kit
Single Inline Memory Module
Static Random Access Memory
Synchronous Static Random Access Memory
To be determined
Time Code Processor
Transistor-Transistor Logic
Transmitted Data
Universal Asynchronous Receiver and Transmitter
Universal Serial Bus
Virtual Link
VERSAmodule Eurocard
VME 64bit extension
VME Extensions for Instrumentation
PCI Express Mezzanine Card
Flight Simulyzer User's Guide Guide 72