1
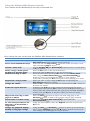
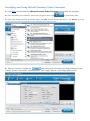
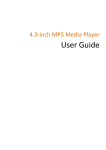
Slimline MP5 Media Player
User Guide
Using the Slimline MP5 Players Controls
The controls on this Media Player are easy to find and use.
Here’s what else you can do with the Slimline MP5 Media Player controls.
To
Do This
Turn on the MP5 Media Player
Power off the MP5 Media Player
Choose a menu item
Select a song / menu option
Go back to a previous menu
Browse for a song or video
Play/Pause a song or video
Change the volume
Enable the repeat function
Skip to the next song or next
page in an eBook
Fast-forward or rewind a song
To view all of your files on the
Micro SD / TF Card within a
single folder
Change any playback, display,
desktop or language settings
Slide the power switch from OFF to ON and press and hold the
Play/Pause
button until the device turns on
Press and hold the Play/Pause
button till the Good-Bye screen
exits and switch OFF the device
Use the Forward
and Backward
buttons to move up and down
in Menu options
Press the M button on the top of the device
Press and hold the M button on the top of the device
From the main menu press the M button to select Music/Video,
then using the Next/Fast-forward
or Previous/Rewind
buttons to move up and down the menus to your selected
track/video, pressing the M button again to start playing your choice
Select the song or video using the M button and pressing the
Play/Pause
button to pause
Press the Vol + button to increase the volume and the Vol - button to
decrease the volume
Looking at the A-B icon at the bottom on the left-hand side of the
screen; press and hold the Vol + button to set the A-point where you
want to start the repeat function and again press and hold the Vol +
button to set the B-point at the place where you want to end the
repeat function
Press the Next
button to skip to the next song/page or the
Previous
button to skip to the previous song or page of eBook
Press and hold Next/Fast-forward
or press and hold
Previous/Rewind
Using the menu options select the Explorer function and press the
M button
Using the Next
or Previous
buttons to move up and down the
menu choose Settings pressing the M button, from here most of the
user settings can be changed to user preference.
Connecting the Slimline MP5 Media Player
You can connect the MP5 Player to your computer to charge the device but in order to add your
music, videos, photos, games, eBooks and other files to your micro SD, simply take out the
Micro SD and use a reader to transfer your required files and then reinsert the micro SD into the
device.
The USB port on most keyboards and monitors do not provide enough power to charge the
MP5 Media Player. Instead either use a USB 2.0 port on your computer or use a USB mains
adaptor (sold separately.)
NOTE:
Disconnecting the Slimline MP5 Media Player
It’s important if connecting the device to a computer not to disconnect this device while it’s
charging. You can see if it’s OK to disconnect by looking at the players screen. Don’t disconnect
the device if you see the player is still in charge mode as this could damage important files on
your device.
If you’re using a Windows PC, you can also eject the device in My Computer or by clicking the
Safely Remove Hardware icon in the Windows system tray and selecting the specific device.
If you’re using a Mac, you can also eject the Slimline player by dragging the icon on the desktop
to the Trash.
About the Players Battery
The Slimline MP5 Media Player has an internal, non-user-replacement battery. For best results,
the first time you use the player, let it charge for about four hours or until the battery icon in the
status area of the display shows that the battery is fully charged. If the device isn’t use for a
while, the battery may need to be charged to bring the device back to life.
As with most battery powered devices, some battery power is consumed whilst the device
is switched off.
NOTE:
The MP5 Player is fully charged in about three hours. If you charge the player while playing
music, watching videos, listening to the radio or even viewing an eBook, this may take longer.
Charging the Slimline MP5 Players Battery
Connect the MP5 Player to a USB 2.0 port on your computer. The computer must be turned on
and not in sleep mode. If the battery icon on the players screen shows the Charging screen, the
battery is charging. If it shows the Charged screen, the battery is fully charged. If you don’t see
the Charging screen, the Slimline MP5 Media Player might not be connected to a high-power
USB port. Try another USB port on your computer or use a USB mains adaptor (sold separately.)
Adding Media Files to your Micro SD
Simply copy your videos, pictures, music and E-books to the ROOT of the micro SD taking into
account the files which are supported and the files that aren’t. A compatible file format list can
be found below:
- Audio formats: MP3 / WMA / WAV / APE / OGG / FLAC / AAC
- Video formats: MPEG-1/ MPEG-2 / MPEG-4 / RM / RMVB / WMV / FLV / 3GP
- Picture formats: JPEG / BMP / GIF
- E-Book formats: TXT
If you are experiencing poor quality video, out of sync audio or just unable to play a
certain formats try converting videos to MPEG-1/-2/-4, 352x288(resolution) at 25 frames per
second for best results.
NOTE:
Transferring your media files using Mini USB:
1. Insert your micro SD / TF Card into the device
2. Connect the MP5 media player to your computer using the included mini USB cable and wait
for the USB icon to appear on the players screen
3. The device should now automatically open as a folder; you may need to open the drive
through My Computer. Copy ALL of your media files to the ROOT of the micro SD and wait for
the transfer to complete. Do NOT copy files into separate folders this will cause the player to
malfunction when updating the file information.
4. Eject the device in My Computer or by clicking the Safely Remove Hardware icon in the
Windows system tray and selecting the specific device
5. Pull out the mini USB connector and your device is now ready to be used.
Transferring your files directly to Micro SD:
1. Insert your micro SD / TF Card and using a compatible card reader copy all of your media
files to the ROOT of the Micro SD and wait for the transfer to complete. Do NOT copy files into
separate folders as this will cause the player to malfunction when updating the file information.
3. Insert your media filled micro SD card into the MP5 media player
4. Turn on the player and wait for the start-up screen; your device is now ready to be used.
iWisoft Free Video Converter
a powerful, high-quality freeware video converter.
It can easily convert video/audio between all popular formats. It can convert
video/audio from one format to another, rip audio from video, convert video to
image series, animated gif.
The free video converter provides you optimised output profiles, you can easily
convert video/audio for not only the Slimline MP5 Media Player but also iPod,
iPhone, PSP, Zune and many other digital devices.
You can adjust codec, bit rate, frame rate, video size, audio channel, sample rate,
audio volume etc. for an output format.
And the video converter provides many useful video editing functions, like
cropping, trimming, merging, adding watermark, subtitle etc.
Key Features
- Convert general video
Convert various videos to AVI, MPEG, WMV, DivX, XviD, MP4, H.264/AVC, FLV, MKV, RM, 3GP, 3G2, MOV,
etc., and extract audio to AAC, AC3, MP3, MP2, OGG, RA, WAV, WMA, M4A from videos.
- Support HD Video conversion
Convert video between multiform High-Definition movies, such as H.264/MPEG-4 AVC, AVCHD Video (*.m2ts,
*.mts), Apple TV h.264 720P, MKV, HD WMV, MPEG2/MPEG-4 TS HD Video, etc., as well as convert video from
High-Definition to Standard-Definition for watching.
- Convert between any audio formats
Convert between MP3, MP2, WMA, WAV, OGG, M4A, AC3, AAC, RA, APE, FLAC, AIFF, MPA audio and more.
- Support all popular digital devices
Directly convert video for playback on iPod, iPhone, Apple TV, PSP, PS3, Xbox 360, Wii, Pocket PC, Blackberry,
Mobile phones, Zune, Creative Zen, Archos, HP iPAQ, iRiver and more digital devices.
- Support batch conversion
Support converting multiple video & audio files in batches to save your time! Not only that, it can handle one file
to multiple formats at the same time.
- Provide optimized video & audio profiles
Luxuriant, optimized and classified video & audio profiles help you easily convert any video and audio to fit your
digital devices.
- User defined video profiles
Allow you to adjust any profiles by setting video codec, video size, video bit rate, audio codec, audio bit rate,
audio channel, audio volume, etc. to convert, and you can save your settings as user defined profiles for future
use.
- Estimate output file size
A smart bit rate calculator tool is built-in in this video converter to estimate the output file size.
- Crop video
Easily crop frame size to keep your wanted area in the frame.
- Trim Video & Audio
Trim your video or audio to convert your favorite movie or music clips.
- Special video effect
Add special effect on output video, such as adjusting gamma, brightness, contrast, saturation, and gray,
emboss, negative, old film effects.
- Add watermark
Add text or graphic logo with customized transparency, size and position onto your created video.
- Preview video effect
Preview the video in real-time while editing effect before conversion.
Installing and Using iWisoft Freeware Video Converter
1. Click here to download the iWisoft Freeware Video Converter and install the program
2. After installing the software, lauch the program and click
to load video files
3. Select the output profile as shown below for best results using this device.
The "Recent" option will
record your recent using automatically and it is convenient to be used afterward.
4. Next you need to change the
tab and type in the values as shown below for best
results. [Codec: divx] [Size: 352x288] [Rate: 29.97 fps] [ Bitrate: 1200 kbps] [Ratio:16:9]
5. Select the output folder at the botton left-hand corner and select the folder where you would
like to save your newly converted videos.
NOTE: I have chosen the E: folder as I do not wish to have separate copies of each video so have elected to save the
videos directly to the micro SD but of course you can save these anywhere.
6. To change the output aspect ratio click
and a new editing window should appear.
Next you need to change the Zoom option down in the bottom left-hand corner from “Keep
original” to “Full Screen” and click “OK”. Your video output preview below on the right-hand
side should now look squashed from the sides compared with the original on the left. Once on
playback this is one of the best quality images and aspect ratio available for this particular
player.
7. Finally you need to convert the video to your selected output folder pressing the “Start”
button and your video will start to convert giving you a report of its progress. Add these files to
the Micro SD if you haven’t already?
Video benchmark
- MPEG-1 VIDEO
[Codec]: MPEG-1
[Resolution[1]]: Max. 768x576 (pixels)
[Bitrate[2]]: No restriction
[Exceptional]: N/A
[Container]: DAT, MPG
[Audio Codec]: MP2
- 3GP VIDEO
[Codec]: H.263
[Resolution[1]]: Max. 800x480(pixels)
[Bitrate[2]]: No restriction
[Exceptional]: N/A
[Container]: 3GP
[Audio Codec]: MP3, AMR-NB
- MPEG-2 VIDEO
[Codec]: MPEG-2 MP@ML
[Resolution[1]]: Max. 768x576 (pixels)
[Bitrate[2]]: No restriction
[Exceptional]: N/A
[Container]: VOB, MPG
[Audio Codec]: MP2
- DV
[Codec]: MPEG-4 SP
[Resolution[1]]: Max. 640x480(pixels)
[Bitrate[2]]: 768kbps
[Exceptional]: N/A
[Container]: ASF (update soon)
[Audio Codec]: PCM
- MPEG-4 VIDEO
[Codec]: XviD, DivX 3/4/5, MS MPEG-4 v3
[Resolution[1]]: Max. 800x480(pixels)
[Bitrate[2]]: No restriction
[Exceptional]: Not Support GMC&QPEL
[Container]: AVI, MP4
[Audio decode]: MP3, AC3, MS-ADPCM
- CMMB
[Codec]: H.264 BP
[Resolution[1]]: Max. 352x288(pixels)
[Bitrate[2]]: 384kbps
[Exceptional]: N/A
[Container]: 3GP(update soon)
[Audio Codec]: AAC+
- REAL MEDIA VIDEO
[Codec]: Real Video Codec 8/9/10
[Resolution[1]]: Max. 800x480(pixels)
[Bitrate[2]]: No restriction
[Exceptional]: Not Support G2
[Container]: RM/RMVB
[Audio Codec]: Real Audio
- WMV VIDEO
[Codec]: WMV 7/8/9
[Resolution[1]]: Max. 720x480(pixels)
[Bitrate[2]]: No restriction
[Exceptional]: Not Support high profile, VC-1
[Container]: WMV, ASF
[Audio Codec]: WMA
- FLASH VIDEO
[Codec]: Sorenson H.263
[Resolution[1]]: Max. 640x480(pixels)
[Bitrate[2]]: No restriction
[Exceptional]: Not Support O2 VP6
[Container]: FLV
[Audio Codec]: MP3
[1][2] The resolution and bitrates shown are the
maximum benchmark this media player can process.
Larger video sizes using higher bitrates doesn’t
always give the best results. If you are experiencing
problems either finding compatible file types,
outputting aspect ratios or having issues syncing
audio/video; please download iWisoft Free Video
Converter which can be found above and read the
installation and user instructions.
Audio Decoding benchmark
- MP3 AUDIO
[Codec]: MPEG1/2/2.5 Audio Layer 3
[Channel]: 2
[Bitrate]: CBR - 16~224Kbps, VBR - 8~320Kbps
[Sample]; 8-44KHz
[Exceptional]: No
[Container]: MP3
- WMA AUDIO
[Codec]: Version 7, 8, 9,
[Channel]: 2
[Bitrate]: 8Kbps~320kbps
[Sample]; 8-48KHz
[Exceptional]: WMA Pro and WMA lossless
[Container]: WMA
- WAV AUDIO
[Codec]: MS-ADPCM,IMA-ADPCM,PCM
[Channel]: 2 [compressed]: 4bit MS-ADPCM, IMAADPCM
[Bitrate]: 4
[Sample]; 8-48KHz
[Exceptional]: No
[Container]: WAV
- APE AUDIO
[Codec]: Ver. 3.95, 3.97, 3.98, 3.99
[Channel]: 2
Image benchmark
- JPEG
[Compressed]: Baseline
[Resolution]: 8000*8000
[Exceptional]: Progressive jpeg
[Container]: JPG
- BMP
[Codec]: BMP
[Resolution]: All
[Exceptional]: No
[Container]: BMP
- GIF
[Codec]: GIF
[Resolution]: 1000*1000
[Exceptional]: No
[Container]: GIF[Sample]; 8-48KHz
[Container]: APE
- OGG AUDIO
[Codec]: Q-1- Q10
[Channel]: 2
[Bitrate]:
[Sample]; 8-48KHz
[Exceptional]: No
[Container]: OGG
- FLAC AUDIO
[Codec]: FLAC
[Channel]: 2
[Bitrate]:
[Sample]; 8-48KHz
[Exceptional]: No
[Container]: FLA
- AAC AUDIO
[Codec]: ADIF ,ATDS Header AAC-LC and AACHE
[Channel]: 2
[Sample]; 8-48KHz
[Container]: AAC
Safety and Cleaning
Read all safety information below and operating instructions before using the Media Player to
avoid injury.
WARNING:
Failure to follow these instructions could result in fire, electric shock, or other injury or
damage.
Important Safety Information
Handling the Media Player
Do not drop, disassemble, open, crush, bend, deform, puncture, shred, microwave, incinerate,
paint, or insert foreign objects into the device.
Avoiding water and wet locations
Do not use this device in the rain, or near washbasins or other wet locations. Take care not to
spill food or liquid onto the device. In case the device gets wet, unplug all cables, turn the device
off, and slide the Power switch to off before cleaning, and allow it to dry thoroughly before
turning it on again. Do not attempt to dry the Slimline MP5 Player with an external heat source
such as a microwave oven or hair dryer. If your device has been damaged as a result of exposure
to liquids this is not covered by the warranty nor makes the device serviceable.
Repairing the Slimline MP5 Media Player
Never attempt to repair this player yourself as this device does not contain any user-serviceable
parts. If the MP5 Player has been submerged in water, punctured, or subjected to a severe fall,
do not use it.
Avoiding hearing damage
Permanent hearing loss may occur if the earbuds or headphones are used at high volume. You
can adapt over time to a higher volume of sound that may sound normal but can be seriously
damaging your hearing. If you experience ringing in your ears or muffled speech, stop listening
and have your hearing checked. The louder the volume, the less time is required before your
hearing could be affected. Hearing experts suggest that to protect your hearing limit the amount
of time you use earbuds or headphones at high volume. Avoid turning up the volume to bloke
out noisy surroundings and turn the volume down if you can’t hear people speaking near you.
Driving and riding safely
Use of this Media player alone, or with headphones (even if used in only one ear) while operating
a vehicle is not recommended and is illegal in some areas. Check and obey the laws and
regulations on the use of mobile devices in areas where you drive or ride. Be careful and
attentive while driving or riding a bicycle. Stop using the device if you find it disruptive or
distracting while operating any type of vehicle, or performing any other activity that requires
your full attention.
Important Handling Information
Failure to follow these handling instructions could result in damage to your Media Player
or other property.
NOTICE:
Carrying the Slimline MP5 Player
This electrical device contains sensitive components, including, in some cases, a hard drive. Do
not bend, drop, or crush the device itself. If you are concerned about scratching your device, you
can use one of the many cases sold separately.
Using connectors and ports
Never force a connector into a port. Check for obstructions on the port. If the connector and port
don’t join with reasonable ease, they probably don’t match. Make sure that the connector
matches the port and that you have positioned the connector correctly in relation to the port.
Operating your device in acceptable temperatures
Operate your device in a place where the temperature is always between 0º and 35º C (32º to 95º
F). In low-temperature conditions, this device play time may temporarily shorten and battery
charge time may temporarily lengthen. Store your device in a place where the temperature is
always between -20º and 45º C (-4º to 113º F). Don’t leave this player in your car, because
temperatures in parked cars can well exceed this range. When you’re using your player or
charging the battery, it is normal for the device to get warm. The exterior of this device functions
as a cooling surface that transfers heat from inside the unit to the cooler air outside.
Keeping the outside of device clean
To clean this device, unplug all cables, turn the device off, and slide the Power switch to OFF.
Then use a soft, slightly damp, lintfree cloth. Avoid getting moisture in openings. Don’t use
window cleaners, household cleaners, aerosol sprays, solvents, alcohol, ammonia, or abrasives
to clean any electrical device.