1
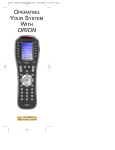
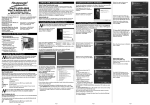
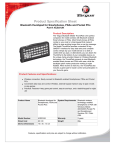
System Requirements
Hardware
• Intel® Pentium® 4 or equivalent with USB port.
• CD-ROM drive (for installation software).
Operating System
• Windows® XP (Home or Pro).
Install your REMOTE WONDER™ PLUS
1
Open the battery container on the back of the REMOTE WONDER™ PLUS, and
then insert two AAA batteries.
2
Insert the included ATI Installation CD into your CD-ROM drive.
3
Click the REMOTE WONDER™ icon on the ATI CD Install screen. Follow the
on-screen instructions, and then allow the computer to restart.
4
Plug the remote receiver into any available USB port on your computer. The
REMOTE WONDER™ PLUS icon will appear on the Windows taskbar.
The REMOTE WONDER™ PLUS range depends upon the environment. For best
results, the receiver should be placed as far as possible from the computer’s case and
monitor.
Product Registration
To receive Customer Service you must register your product with ATI within 30 days of
purchase. An Online Product Warranty Registration form is available at:
ati.com/online/registration
Warranty Service
For warranty information, limitations and service instructions visit:
ati.com/online/warranty or contact one of our Customer Service Representatives using
one of the aforementioned means
REMOTE WONDER™ PLUS
Installation and User Guide
.
Button
1
Cyberlink PowerCinema ATI Edition
Button
Cyberlink PowerCinema ATI Edition
Programmable buttons A - F. To
program the buttons, right-click the
REMOTE WONDER™ PLUS icon in the
system tray.
15
Display Help
16
Power Off
2
Activate TV
17
Not Used
3
Start FM
18
Not Used
4
Maximize / Restore the foreground
window if possible.
19
Launch system default DVD player
5
Thumbpad controls cursor movement
in all modes.
20
Not Used
21
Right mouse button
6
Left mouse button
22
Go To Main Menu
7
Increase / Decrease volume
23
Channel Up / Down
8
Rewind TV/Video
24
Toggle Audio Mute
9
Record TV
25
Fast-forward TV/Video
10
Not Used
26
Play TV/Video
11
Up / Down / Left / Right arrows
27
Stop Video Playback
12
Enter
28
Pause TV/Video
13
Number Pad
29
Not Used
14
Not Used
30
Open Setup Menu
Printed in Canada
117-70132-00