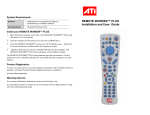
1
SEE APPLICABLE COVERAGE SHEETS FOR VEHICLE APPLICATIONS
Ford Vehicle
Communication Manual
September 2011
Use in conjunction with the applicable Scanner User’s Reference Manual
and Diagnostic Safety Manual.
1
Before operating this unit, please read this manual
and any applicable Scanner User Manual.
Safety Notices..................................... Refer Diagnostic Safety Manual
Quick Reference Contents Listing .... page 5
Using the Scanner Module ................ Refer to relevant
User’s Manual for
more information
2
Ford Vehicle
Communication Manual
September 2011
BEFORE OPERATING THIS UNIT,
PLEASE READ THIS MANUAL CAREFULLY,
ALSO PAY PARTICULAR ATTENTION TO THE SAFETY
PRECAUTIONS IN THIS MANUAL AND THE
DIAGNOSTIC SAFETY MANUAL.
3
The information, specifications, and illustrations
in this manual are based on the latest information
available at the time of publication. The SCANNER
manufacturer and the vehicle manufacturers
reserve the right to make equipment changes at
any time without notice.
Copyright © 2011 Snap-on Technologies Inc.
4
Quick Reference Contents
Detailed Contents are at the beginning of each part
Special Notes.............................................................................. 6
Part 1 — Ford Test Selection and Vehicle Identification
Ford Vehicle Identification............................................................................ 10
Connecting the SCANNER for Engine, Transmission,
ABS, SRS and Other Systems Testing......................................................... 13
Part 2 — Testing Ford Engine Control Systems
Main Menu.................................................................................................... 26
Ford Service Codes..................................................................................... 26
Service Code Tests (KOEO and KOER)....................................................... 33
Vehicles with a separate Auto Trans ECU.................................................... 40
Functional Tests — Codes only systems..................................................... 42
Functional Tests — Live data systems......................................................... 52
Falcon etc. Service Indicator Reset............................................................. 53
Falcon BA Transmission “Green” Reset Strategy........................................ 54
Part 3 — Ford vehicles with Mazda Electronic Control Systems
(MECS) Engine, Automatic Transmission and ABS tests
Main Menu Selections.................................................................................. 57
Functional Tests............................................................................................ 60
Codes and Data .......................................................................................... 61
Part 4 — ABS Systems, GEM, Airbag and Other Systems
(except BEM and Security Systems)
ABS Control Systems................................................................................... 65
Bendix LC5................................................................................................... 71
Generic Electronic Module (GEM)............................................................... 75
SRS – Airbag Systems................................................................................. 77
Other Systems – A/C, Audio & ICM............................................................. 81
Part 5 — Body Electronics Module (BEM) and Security
Systems, SmartLock and SmartShield
Body Electronics Module (BEM).................................................................. 84
Body Electronics Module (BEM) AU & BA Series....................................... 85
Falcon Series Security Systems Introduction.............................................. 87
SmartLock System Procedures (including key coding).............................. 89
SmartShield System Procedures (including key coding)........................... 92
Appendix B – Vehicle Does Not Communicate...................................96
Ford Code Descriptions ....................................................................110
General Note For All Vehicles
All SCANNER and Reference Manual directions
are as if the operator is
standing at the back of the vehicle facing forward.
5
Special Notes
Special Notes
Note: Functional tests and key coding are not applicable to Ethos.
CAN-1A or CAN-1B adapter
(for VCI or Legacy software use only)
When testing certain Ford vehicles the CAN-1A or CAN-1B adapter will
need to be used. When the CAN adapter is used the Scanner will need
to “download” an operating program to it to enable it to communicate
with the vehicle being tested, this may take up to 30 seconds during
which time the Scanner may appear to be inactive. This is normal
operation with the CAN adapter.
If more than 1 minute has passed and the Scanner is still displaying
“IN PROGRESS” remove the adapter from the vehicle for 10 seconds,
reinstall the adapter, re-ID the vehicle and re-attempt communication.
Using Legacy software, this download is required for each different
system eg: Engine, AIT, Instrument etc. Follow Scanner on-screen
instructions informing you to disconnect the CAN adapter from the
vehicle’s diagnostic socket and reconnect before entering new system
to be checked. Failure to do this will produce incorrect readings.
What is CAN?
Controller Area Network, or CAN for short, is a system employed
when multiple electronic controllers are used and they need to share
information. It is used in many different areas apart from automotive
applications. It is however becoming popular among the automotive
manufacturers and is appearing on more vehicles. In order for a scan
tool to communicate with the CAN system it must become part of the
CAN system, so a special adapter is used as an “interface” between the
vehicle and the scan tool.
Ford started using CAN on it BA series models as a “next step” in
automotive development and will continue to expand the use of CAN
among other vehicles.
6
Special Notes
CAN Adapter & Vehicle Low Battery Voltage
If the Scanner and CAN adapter are being used on a vehicle where
the vehicle battery may not be at full charge and the vehicle is started
the vehicle system voltage may drop low and cause the CAN adapter
to reset and lose the download program. It may cause the Scanner to
appear to be “frozen” or not updating data information. To recommence
communication exit to the MAIN MENU for the vehicle being tested
and reselect TEST MENU. Then select CODES or DATA, this will
reprogram the CAN-1A adapter (which can take up to 30 seconds) and
recommence communication.
BA/BF Series – SPARK ADV°
When viewing the live data parameter SPARK ADV° on some BA
series models the displayed values may appear to be inaccurate.
This will only happen within approximately 2½ minutes of initiating
communication with the vehicle when started from cold, after this time
the communications will stabilise and the readings displayed will be
valid.
The inaccurate values are transmitted by the vehicle and are not a fault
with the Scanner software.
BA/BF Series Throttle Parameters (APP#, TPS#)
Some BA series may display false readings for the Accelerator Pedal
Position (APP) parameters and the Throttle Position parameters. This
is a characteristic of the PCM for that vehicle and may be rectified by
reprogramming the PCM. The reprogramming procedure can only be
carried out by Ford dealerships.
Resetting Air Conditioning System after Re-gassing or
Repairs
If there are fault codes present in the air conditioning system then the
system may not operate until these are cleared from the system. Codes
can be caused through incorrect re-gassing procedures, accident
damage or genuine system faults.
NOTE: There may also be codes in the Powertrain Control Module that
will prevent the air conditioner from operating. These will also need to be
cleared.
7
Special Notes
Aborted Tests - Error 22
When performing some tests on some vehicles a message similar to this
may appear:
TEST WAS ABORTED
ERROR 22 – CONDITIONS NOT CORRECT
VERIFY KEY IS ON, WAIT 10s THEN RETRY
PRESS N TO RETURN TO MENU
Error 22 is a general message from the vehicle to the Scanner to report
that a test cannot be performed for some reason, for example, the
ignition has not been cycled between tests, the engine is not running for
a Key On Engine Running test or the vehicle does not support the test
being requested.
Transit Diesel Turbo
These vehicles do not support the Key On Engine Off (KOEO) test, the
Key On Engine Running (KOER) test or any Functional Tests. The items
will appear on the menu but are not supported by the vehicles PCM. If a
KOEO or KOER test is attempted an error message will be displayed on
the Scanner screen that the test is “Not Supported”, it may also indicate
ERROR 22 see previous note on Aborted Tests Error 22.
5.0L Cylinder Balance Test 1992 - 1998
Once the test is completed and the vehicle has passed the test, pass
code 90 is transmitted by the vehicle to the Scanner and the message
“TEST COMPLETE” will be displayed on the Scanner screen.
Service Request Reset
Falcon/Fairmont/Fairlane/LTD – Service Request Spanner
From 1994 onwards (models EF/DF/NF) Ford introduced a dash
mounted service reminder, “Service Request Spanner” which appears
as a spanner symbol in the instrument cluster.
To reset the reminder hold down the trip meter reset button for 10
seconds with the ignition ON and the engine OFF. A beep will indicate
the reset has been successful.
Special Notes on Graph Mode
Note that not all vehicle systems will be able to be displayed in the
Graph Mode due to the communication type. It may also take several
attempts to establish communication in Graph Mode. This is not a fault
of the scan tool or the vehicle.
8
PAGE INTENTIONALLY
LEFT BLANK
9
Part 1 — Ford Test Selection and
Vehicle Identification
Contents
Ford Vehicle Identification...................................................................11
SCANNER Connection Message................................................12
Connecting the SCANNER for Engine, Transmission,
ABS and SRS Testing..............................................................................13
Festiva WF Engine and Auto Transmission Hookup .........................16
Identifying the STI Connector (MECS)................................................17
Figures
2-1. Example of Falcon XF engine............................................ 14
2-2. Example of Falcon EA engine............................................ 14
2-3. Example of Falcon EF engine............................................ 15
2-4. Example of Falcon AU engine............................................ 15
2-5. Example of Laser KF engine.............................................. 15
2-5a.Festiva WF engine and auto transmission......................... 16
2-6. Example of Telstar AV engine............................................ 17
2-7. Early Falcon Auto Trans..................................................... 18
2-8. Example of Falcon EF 4.0L Auto Trans.............................. 19
2-9. Example of Falcon EF 5.0L Auto Trans.............................. 19
2-10.Example of Falcon AU Auto Trans..................................... 20
2-11.Example of Laser KJ Auto Trans........................................ 20
2-12.Example of Telstar AT Auto Trans...................................... 20
2-13.Example of Falcon ED ABS................................................ 21
2-14.Example of Falcon EF ABS................................................ 21
2-15.Example of Falcon AU ABS................................................ 22
2-16.Example of Telstar AY ABS................................................. 22
10
Vehicle Identification
Ford Vehicle Identification
Entering the Vehicle Identification Characters
When the SCANNER displays the following message, select the model
year:
SELECT MODEL YEAR
MODEL:
VEHICLE: 1984 FORD
ENGINE:
Scroll the thumbwheel or press the thumbpad up or down to display the
correct year for the vehicle you are testing. Then press Y to enter the
model year. The display now shows the model year that you selected in
the previous step and asks you to select the model name:
SELECT MODEL
MODEL: CAPRI
VEHICLE: 1991 FORD
ENGINE:
Scroll the thumbwheel or press the thumbpad up or down and press
Y to select the model name. The display now shows the model name
that you selected in the previous step and asks you to select the engine
displacement:
SELECT ENGINE DISPLACEMENT
MODEL: FAIRLANE NC
VEHICLE: 1991 FORD
ENGINE: 5.0L V8
Scroll the thumbwheel or press the thumbpad up or down and press Y to
select the engine displacement. The display now shows the engine that
you selected in the previous step.
Other Possible Identification Information
Depending on the vehicle you are testing, the SCANNER also may
ask other questions, such as: is the car a turbo, or is the engine a
single overhead cam (SOHC). If other information is not needed, the
SCANNER will skip this step. If any other question appears, press Y or N
to answer it.
11
Vehicle Identification
Transmission and Air Conditioning Information
At the end of the vehicle identification, the SCANNER may display the
complete model and engine identification, similar to this:
SELECT VEHICLE OPTIONS:
A/T WITH A/C
A/T WITHOUT A/C
M/T WITH A/C
M/T WITHOUT A/C
Scroll arrow to select correct option of vehicle being tested and press Y.
Note: A/T = Automatic Transmission
M/T = Manual Transmission
A/C = Air Conditioning
If the identification is correct, press Y to store the identification in
memory. If the identification is not completely correct, press N to return
to the start of the identification steps.
SCANNER Connection Message
After you press Y to confirm the vehicle identification the SCANNER
displays a message similar to:
ENGINE & A/TRANS CONNECT FORD 5-AU
ADAPTER TO 20-PIN CONNECTOR LOCATED UNDER
DASH TO THE RIGHT OF STEERING COLUMN.
PRESS Y TO CONTINUE.
Connect the data cable to the vehicle, as instructed on the screen.
Press Y to continue.
After the connector message is displayed and Y has been pressed, the
SCANNER will display the Systems Menu which will look similar to this:
PRESS Y TO SELECT SYSTEM IF FITTED
>ENGINE & A/TRANS
ABS
AIRBAG
SELECT NEW ID
There may be another connector message depending on what system is
selected.
12
SCANNER Connection
Connecting the SCANNER for Engine,
Transmission, ABS, SRS and
Other Systems Testing
1. Be sure the ignition is off.
2. Attach the test adapter — Select the adapter for the vehicle to be
tested and attach it to the data cable using the two captive screws.
3. Attach the power cable to the test adapter if needed — Select
either the battery power cable or the cigarette lighter power cable
and attach it to the socket on the test adapter.
4. Connect the test adapter to the vehicle — The screen will instruct
you where to connect the adapter. See following figures for vehicle
connectors and adapters to use on Engine Automatic Transmission
and ABS.
NOTE for Legacy software only: For vehicles that use the CAN adapter,
the Scanner on-screen instruction informing you to disconnect the CAN
adapter from the vehicle’s diagnostic socket and reconnect before entering
new system to be checked MUST be performed. Failure to do this will
product incorrect readings.
13
SCANNER Connection – Engine
Each SCANNER test adapter fits into the vehicle connector only in
one way.
Engine Connection
FORD-5AU
FORD-6AU
Figure 2-1. Example of Falcon XF engine.
VEHICLE CONNECTORS
MT2500-20A FORD-1A
or MT2500-20B FORD-1B
with battery power cable
Figure 2-2. Example of Falcon EA engine.
in side of adapter
VEHICLE CONNECTORS
Refer to SCANNER for connector locations.
14
SCANNER Connection – Engine
Engine Connection
VEHICLE CONNECTOR
FORD-5AU ADAPTER
Figure 2-3. Example of Falcon EF.
DL-16 ADAPTER
Use key as directed by SCANNER.
VEHICLE CONNECTOR
Figure 2-4. Example of Falcon AU.
Refer to SCANNER for connector locations.
15
SCANNER Connection – Engine
Festiva WF Engine and Auto Transmission
Engine Connection
Yellow
Green
Black lead
of adaptor
to ground
s
s
s
White
Use Multi-1
with battery power cable in side of adapter.
Automatic Transmission Connection
Black
s
s
Blue
s
s
Red
Use Multi-1
with battery power cable in side of adapter.
Figure 2-5a.
16
SCANNER Connection – Engine
GROUND
MAZDA & FORD
E
B
MAZDA & FORD
MULTI-2 ADAPTER
CONNECT MULTI-2-E TO:
GREEN CONNECTOR 1-PIN
(STI)
CONNECT MULTI-2-B TO:
GREEN CONNECTOR 6-PIN
PLUS CONNECT
GROUND EXTENSION
TO CHASSIS
WHITE TACH CONNECTOR
– DO NOT CONNECT TO THIS
LEFT SIDE REAR OF ENGINE COMPARTMENT
CAUTION: Make sure this is the STI connector and
not TACHO connector. Read “Identifying the
STI Connector” for more details.
CHASSIS
Figure 2-6. Example of Telstar AV.
Identifying the STI Connector — MECS
Most MECS engine controllers with the 6-pin self-test connector have
two similar single-wire connectors in the engine compartment. One is
the self-test input connector (STI); the other is a TACH connector. You
have to connect the Multi-2 E connector to the vehicle STI lead to trigger
the self-tests.
CAUTION: Do not connect the SCANNER to the TACH connector. Doing
so can severely damage the SCANNER.
Identifying the STI connector can be difficult. Connector color, wire
colors, and connector location varies, depending on model, year, and
engine. You MUST identify the STI connector before connecting the
SCANNER. The SCANNER will give you on-screen instructions to help
you locate the proper connector.
To confirm STI connector identification, connect one lead of a 12-volt
test lamp to the connector terminal and the other lead to ground; then
crank the engine. If the test light flashes, you are connected to the TACH
connector. If the test light doesn’t flash while cranking the engine, you’re
probably connected to the STI connector. This is where you connect the
SCANNER.
17
SCANNER Connection – Auto Transmission
Falcon Transmission Connection
3.9L and early 5.0L
FORD-5AU
FORD-6AU
White transmission
ST input.
White transmission
ST output.
These are
for engine only.
Figure 2-7. The transmission diagnostic connector on earlier Falcons are
located in the engine compartment.
Refer to SCANNER for connector locations.
18
SCANNER Connection – Auto Transmission
Automatic Transmission Connection,
Falcon
VEHICLE CONNECTOR
FORD-5AU
4.0L Auto Trans
Figure 2-8. Example of Falcon EF 4.0L.
VEHICLE CONNECTOR
FORD-5AU
5.0L AUTO TRANS
FORD-6AU
Figure 2-9. Example of Falcon EF 5.0L.
Refer to SCANNER for connector locations.
19
SCANNER Connection – Auto Transmission
Automatic Transmission Connection
VEHICLE CONNECTOR
Figure 2-10. Example of Falcon AU.
VEHICLE CONNECTOR
DL-16
Use key as directed by SCANNER.
DL-17
Use key as directed by SCANNER.
NOTE: Use battery power cable if “key off” testing required.
WARNING: Do not use battery power cable to side of adaptor
with engine running.
Figure 2-11. Example of Laser KJ.
Connect
to Ground
VEHICLE CONNECTOR
Figure 2-12. Example of Telstar AT.
Refer to SCANNER for connector locations.
20
Multi-2
adapter with
battery power
cable
connected
to side
of adapter.
SCANNER Connection – ABS
ABS Connection
VEHICLE CONNECTOR
FORD-5AU
Bendix ABS
EBII and ED
Figure 2-13. Example of Falcon ED.
VEHICLE CONNECTOR
FORD-5AU
Bosch ABS
EF and EL.
FORD-6AU
Not Used
Figure 2-14. Example Falcon EF.
Refer to SCANNER for connector locations.
21
SCANNER Connection – ABS
ABS Connection
VEHICLE CONNECTOR
DL-16
Use key as directed by SCANNER.
Figure 2-15. Example of Falcon AU.
Refer to SCANNER for connector locations.
22
PAGE INTENTIONALLY
LEFT BLANK
23
Part 2 – Testing Ford Engine Control Systems
Introduction
Contents
Codes Only and Live Data Systems....................................................... 25
OBD-II and the 16-pin Connector........................................................... 25
Service Code Menu................................................................................. 27
Ford Troubleshooting Sequence............................................................ 28
Ignition Key Cycles.................................................................................. 29
3-Digit Service Codes.............................................................................. 30
5-Digit Diagnostic Trouble Codes (DTC’s).............................................. 30
Slow Codes and Fast Codes.................................................................. 31
Code Clearing......................................................................................... 32
Key-On, Engine-Off (KOEO) Self-Test..................................................... 33
Key-On, Engine-Running (KOER) Self-Test............................................. 35
Review Codes.......................................................................................... 39
Connecting the SCANNER...................................................................... 40
Accessing the Tests................................................................................. 40
KOEO Test............................................................................................... 40
Main Menu – Engine...............................................................................26
Ford Service Codes..............................................................................26
Vehicles with a separate Auto Trans ECU...........................................40
Functional Tests – Codes only systems..............................................42
Computed Timing.................................................................................... 42
Wiggle Test (Engine Off)......................................................................... 43
Wiggle Test (Engine Running)................................................................ 44
Output State Test..................................................................................... 46
Cylinder Balance..................................................................................... 46
Idle Speed Adjustment............................................................................ 49
Functional Tests — Live Data Systems...............................................52
Output State Test..................................................................................... 52
PCM Module ID Test................................................................................ 52
Service Request Reset.........................................................................53
Falcon BA Transmission “Green” Reset Strategy .............................54
Part 2 of this manual is divided into the following major sections:
• Main Menu Selections
• Testing Ford live systems
• Testing Ford codes only systems
Part 3 contains instructions for testing Ford-Mazda electronic control
systems (MECS)
Part 4 contains instructions for testing ABS, Airbag, GEM and other
systems.
Part 5 contains instructions for testing BEM and security systems
including key coding.
24
Introduction
Introduction:
Codes Only & Live Data Systems
Early Ford Engine and Automatic Transmission contollers, up to 1998
for Falcon, are of a Codes Only type and do not have live data. These
include EEC-IV and some EEC-V systems. The SCANNER will present
the applicable tests for vehicles equipped with codes only systems.
Later type Engine and Automatic Transmission controllers, 1998 and
later for Falcon, use Live Data for diagnosis. Live data was introduced on
the Mondeo in 1995 and has been introduced with other models since.
Again the SCANNER will present the applicable tests for vehicles with
live data systems.
Ford EEC-IV systems are a Codes only type. Early Falcon EEC-V
systems (EF & EL models) were also Codes Only but late model EEC-V
systems have Live Data (including Falcon AU).
This Manual will refer to “Codes Only systems” and “Live Data systems”
in the following descriptions of the various tests and how they operate.
The SCANNER will give you the correct tests for the vehicle entered, so
make sure the vehicle is entered correctly. An incorrect vehicle entered
into the SCANNER may cause damage to the SCANNER so be sure
the ID is correct for the vehicle to be tested and the correct adapters
(and applicable Personality Keys) are selected before connecting the
SCANNER and commencing testing.
OBD-II and the 16-PIN Connector
Not all vehicles fitted with a 16-pin OBD-II style connector support OBDII functions.
ODB-II is for the USA market only at this time and does not apply to
vehicles sold outside of the USA. Some vehicles sold in Australia are
OBD-II compliant but be aware that OBD-II applies only to the Engine
and does not cover Automatic Transmissions, ABS, Airbags or Body
Computers (GEM).
Some vehicles that meet the OBD-II standard can give fault codes
that are specific to OBD-II only and may have no diagnostic value for
Australian applications.
25
Main Menu Selections
Main Menu – Engine
After you select ENGINE CONTROL SYSTEMS and enter the requested
details, the Ford MAIN MENU is displayed. A typical MAIN MENU for a
Ford vehicle appears like this:
MAIN MENU — FORD
>SERVICE CODES
FUNCTIONAL TESTS
CUSTOM SETUP
OTHER SYSTEMS
DATA ONLY
The SCANNER presents menu selections only for the specific vehicle
being tested. For example, data appears for Ford systems that support
data.
Refer to the Scanner Plug-in User’s Manual for more information on
types of menus. Move the cursor to the desired operation using the
thumpad or thumbwheel and then press Y.
Ford Service Codes
For vehicles with a separate automatic transmission ECU see later this
section.
Ford refers to service codes as on-demand codes and continuous
codes. On-demand codes are “hard” codes that occur during a key-on,
engine-off (KOEO) self-test, or a key-on, engine-running (KOER) self-test.
Continuous codes are “soft” memory codes from the powertrain control
module (PCM). These indicate intermittent problems that have occurred
in the past, during normal vehicle operation. Memory codes cannot
be set while running a self-test. Some vehicles do not have memory
codes. Some codes can only set as continuous (memory) codes.
During the KOEO self-test, some systems transmit hard (on-demand) codes
first, followed by soft (continuous) memory codes. Vehicles do not transmit
continuous memory codes during the KOER self-test. Live data systems
do not generate continuous memory codes during the KOEO or KOER
self-test. Instead, continuous memory codes are generated by selecting
MEMORY CODES from the SERVICE CODE MENU.
26
Service Codes
Wiggle Tests — The engine-off and engine-running wiggle tests are
available from the FUNCTIONAL TEST MENU on some vehicles. Wiggle
tests place the SCANNER and the PCM in a standby mode that allows
you to check for an intermittent problem caused by wiggling electrical
harnesses. If a fault occurs during a wiggle test, it is recorded in
PCM memory as a memory code. The KOEO test must be repeated
to read codes set during a wiggle test. See Functional Tests for more
information.
Service Code Menu
When you select SERVICE CODES from the MAIN MENU for codes only
systems, the SCANNER displays another menu similar to this:
SERVICE CODE MENU
>KOEO SELF-TEST
KOER SELF-TEST
REVIEW CODES
(CODE SPEED = FAST)
CODE SPEED
CLEAR CODES
PRINT CODES
For live data vehicles, the SERVICE CODE MENU looks similar to this:
SERVICE CODE MENU
>KOEO SELF-TEST
KOER SELF-TEST
REVIEW CODES
MEMORY CODES
CLEAR CODES
PRINT CODES
Depending on the vehicle, the SERVICE CODE MENU selections are:
Key-on, engine-off (KOEO) test — This test displays on-demand hard
codes present with the ignition on, but the engine not running. These
are usually electrical open and short circuits and must be serviced
first, before any other codes. For some non-data systems, the KOEO
test also displays continuous memory codes of intermittent faults from
PCM memory. For live data systems, continuous memory codes are
accessed by selecting MEMORY CODES. Memory codes should be
serviced last, after any other hard codes.
Key-on, engine-running (KOER) test — This test displays on-demand
hard codes present with the engine running. These should be serviced
second, after any KOEO hard codes and before any memory codes.
Some Ford vehicles will not perform a KOER test if any KOEO hard
codes are present and uncorrected.
27
Service Codes
CODE SPEED – Available on codes only systems only, this selection
allows you to choose the desired code-reading speed. The CODE
SPEED selection also lets you choose automatic or manual clearing of
continuous memory codes.
MEMORY CODES – Available on codes and data systems only, this
selection displays continuous memory codes of intermittent faults from
PCM memory. Memory codes should be serviced last, after any other
hard codes. For codes only systems, memory codes are gathered at the
end of the KOEO self-test.
CLEAR CODES – This selection allows you to manually clear
continuous memory codes of intermittent faults from PCM memory. On
codes only systems, you can also clear memory codes automatically at
the end of the KOEO self-test. (See CODE SPEED above.)
Ford Troubleshooting Sequence
Ford test procedures are very specific about the order in which self-tests
should be performed and codes should be diagnosed and serviced.
Figure 3-1 gives you a flowchart of the recommended sequence for codes
only systems, and figure 3-2 gives you the sequence for codes and data
systems.
Troubleshoot Ford codes in the order in which they are listed by the
SCANNER. After fixing a problem, repeat the self-tests to be sure the code
does not reappear. Some codes may be present as both hard and soft
codes. Fixing the hard codes first may also correct problems that caused
soft codes.
Ford systems control a variety of engine functions, but basic fuel,
ignition, and electrical tests should be made before, or along with,
control system testing. Be sure that these systems and parts are in good
working order:
• Fuel delivery
• Battery condition, electrical connectors, and wiring harnesses
• Ignition primary and secondary circuits
• Vacuum lines and connectors
• Cooling system
• General engine mechanical condition.
28
Service Codes
Ignition Key Cycles— Codes only systems
A basic guideline for Ford testing is to turn the ignition key off, wait 10
seconds, and then turn it back on before repeating any particular test.
This is not absolutely required on all vehicles, but it is good practice in
order to avoid erroneous self-test actions by the PCM.
Instructions on the SCANNER screen will tell you when it is advisable
to turn the key off and then turn it back on or restart the engine before
proceeding. You may choose whether or not to follow these instructions.
If test results appear erroneous or incomplete, or if the PCM does not
respond to the SCANNER, turn the key off and wait 10 seconds before
restarting the test.
Figure 3-1. Recommended Ford codes only troubleshooting sequence.
Figure 3-2. Recommended Ford codes and data troubleshooting sequence.
29
Service Codes
3-Digit Service Codes— Codes only systems
Many 1991 and later vehicles transmit 3-digit service codes. The
SCANNER receives and displays these 3-digit codes similarly to
comparable 2-digit codes. Self-test procedures are basically the same
for vehicles that transmit either 2-digit or 3-digit codes.
5-Digit Diagnostic Trouble Codes (DTC’s)— Codes and
data sytems
Diagnostic trouble codes (DTC’s) are displayed in a 5-digit alpha-numeric
format. The first character, a letter, defines the system where a code was
set. Four letters are currently assigned: “P” for powertrain, “B” for body,
“C” for chassis, and “U” for undefined.
The second character will be a 0, 1, 2, or 3. If the second character is 0, it
is an SAE defined (generic) code, while 1 indicates a manufacturer-defined
(enhanced OBD-II) code. The meaning of a 2 or 3 varies according to
the system character (P, B, C, or U). A 2 or a 3 with a powertrain code
(P) is reserved by SAE for future use. A 2 with a body or chassis code is
reserved for manufacturers, and 3 with a body or chassis code is reserved
for SAE.
Some vehicles may display a code:
“P1000 OBDII SYSTEM CHECKS INCOMPLETE”
This code is only relevant for USA domestic vehicles and is not applicable
to vehicles sold in Australia.
The third DTC character indicates the system where the fault occured:
• 1 — fuel or air metering problem
• 2 — fuel or air metering problem
• 3 — ignition malfunction or engine misfire
• 4 — auxiliary emission control system problem
• 5 — vehicle or idle speed control system problem
• 6 — computer or output circuit fault
• 7 — transmission control problem
• 8 — transmission control problem
The final characters in the DTC tell you the conditions that triggered
the code. Different sensors, actuators, and circuits are assigned blocks
of numbers; and the lowest number in a block indicates a general
malfunction. Higher numbers in the block – called enhanced codes
– provide more specific information, such as low or high voltage, slow
response, or an out-of-range signal. For example, the DTC “P1352”
indicates a powertrain (P), Ford defined code (1), and an ignition
malfunction or engine misfire (3). The full Ford definition is “Ignition coil
A primary circuit malfunction.”
30
Service Codes
Slow Codes and Fast Codes— Codes only systems
Most codes only systems transmit both slow codes and fast codes,
and the SCANNER can read either. The only difference between the
slow and fast codes is the transmission speed from the system PCM.
Typically, fast code transmission provides the quickest accurate way
to perform the service code tests. A few vehicles may not transmit fast
codes reliably, however. On others, signal interference may cause the
SCANNER to receive invalid service codes.
Use the CODE SPEED selection on the SERVICE CODE MENU to
choose the desired code-reading speed. The CODE SPEED selection
also lets you choose automatic or manual clearing of continuous
memory codes.
Move the cursor to CODE SPEED and press Y. The SCANNER displays:
SELECT CODESPEED:
[N TO EXIT]
>FAST CODES W/AUTOMATIC CODE CLEARING
FAST CODES (NO AUTOMATIC CODE CLEARING)
SLOW CODES (NO AUTOMATIC CODE CLEARING)
The cursor arrow shows the current code speed selection. To change it,
move the cursor to the new selection and press Y. The SCANNER will
return to the SERVICE CODE MENU, and the top line will indicate the
selected code speed.
SERVICE CODE MENU (CODE SPEED = FAST)
The selection will stay in SCANNER memory until you change it or until
you change the internal battery. If you press N from the CODE SPEED
selection menu, you will return to the SERVICE CODE MENU with the
previous code speed selection unchanged.
If you choose fast codes with automatic code clearing, the SCANNER
automatically clears memory codes from the PCM after reading the fast
code transmission cycle during the KOEO test. You can use the clear codes
option, however, to clear codes without repeating the entire quick test
sequence. If you choose slow codes, you must clear codes manually by
using the CLEAR MEM CODES selection on the SERVICE CODE MENU.
After reading either fast or slow codes, the SCANNER stores all codes in
its own memory. You can review or print the code list by selecting REVIEW
CODES or PRINT CODES from the SERVICE CODE MENU as explained
later.
31
Service Codes
Code Clearing
The CLEAR CODES selection appears on the SERVICE CODE menu for
all systems. This selection allows you to clear memory codes only.
NOTE: On codes only systems, you must use this method if you have
set the CODE SPEED selection to read slow codes. See Slow Codes and
Fast Codes earlier in this part for more information.
CLEAR CODES lets you manually clear the PCM code memory. When you
press Y from the SERVICE CODE MENU, the SCANNER displays:
*CLEAR MEMORY CODES*
PRESS Y, THEN TURN KEY ON. DO NOT START
THE ENGINE.
When you press Y, the display will change to:
SELF TEST INITIATED
WAIT FOR CODE CLEARING
This display remains on the screen for 40 to 60 seconds, followed by:
CODES CLEARED
PRESS N TO EXIT.
The SCANNER actually repeats the KOEO test and then interrupts the selftest input line to clear the PCM memory. If the CODES CLEARED message
does not appear after about 1 minute, refer to Appendix B to diagnose a
vehicle self-test failure. Press N to return to the SERVICE CODES MENU.
Ford service procedures state that you should clear all codes after making
repairs and then repeat the self-test to verify the repair. Be sure, however,
to note any continuous codes displayed during the self-test or saved in
SCANNER memory. If codes are cleared and a problem does not reoccur as
an on-demand code when a self-test is repeated, the PCM will not transmit
the code. Repeating a self-test will erase the code list from a previous test
in SCANNER memory – including continuous memory codes – and replace
it with a new list. Remember that only soft (continuous memory) codes can
be cleared. If a code reappears when you clear codes and repeat a test,
it is a hard (on-demand) code that must be serviced.
32
Service Code Tests
Key-On, Engine-Off (KOEO) Self-Test
When you enter the KEY ON ENGINE OFF TEST on a codes only
vehicle, the SCANNER displays:
*KEY ON, ENGINE OFF SELF-TEST
PRESS Y, THEN TURN KEY ON. DO NOT
START THE ENGINE
When you enter the KEY ON ENGINE OFF TEST on a codes and data
vehicle, the SCANNER displays:
*KEY ON, ENGINE OFF SELF-TEST
TURN KEY ON. DO NOT START ENGINE.
WITH KEY ON PRESS Y TO CONTINUE.
Follow the instructions on the screen. The SCANNER displays the following
message for a few seconds as the PCM performs the system self-test:
SELF TEST INITIATED...WAIT FOR CODES
........................................
IF NO RESPONSE IN 60 SECONDS, SEE FORD
REFERENCE MANUAL -- APPENDIX B.
The entire KOEO test should take 45 to 60 seconds if you are reading
fast codes. It may take more than a minute if you are reading slow
codes, depending on the number of codes present. The message:
SELF TEST INITIATED...WAIT FOR CODES means that the
SCANNER has attempted to start the test. It does not mean that the
vehicle has responded. If the message stays on the screen for more
than 2 to 3 minutes, the test probably did not start.
Refer to Appendix B to diagnose the cause of a vehicle self-test failure.
Caution: Do not press N to exit from the KOEO test until the SCANNER
receives the last soft code pulse. Wait at least 5 to 10 seconds after
the last LED flash before pressing N to exit. Pressing N sooner will
clear codes from PCM memory and may result in failure to receive
all soft (memory) codes.
When the PCM finishes the test, the display will change and be similar to
this:
REVIEW FAST CODES
** KEY ON, ENGINE OFF CODES-FIX FIRST **
11 SYSTEM PASS
** CONTINUOUS MEMORY CODES-FIX LAST **
33
Service Code Tests
The SCANNER displays hard, on-demand codes first, followed by
continuous memory codes. This is the order in which they must be fixed.
If codes are not present in either group, the SCANNER displays 11
SYSTEM PASS. If codes are present, the SCANNER displays them by
number and description, similar to this:
33 EGR VALVE NOT OPENING
71 IDLE TRACKING SW STUCK OR CKT PROBLEM
95 FUEL PUMP CKT OPEN - ECA TO GROUND
The top line of the display — REVIEW CODES — remains fixed. You
must scroll the thumbwheel to view additional lines of the display on
lines 2, 3, and 4. When you reach the end of the list, the last line will
say:
*** END OF LIST ***
Press N to return to the SERVICE CODE MENU from the KOEO self-test.
Some Ford systems built since 1988 require that hard, on-demand
codes found during the key-on, engine-off test be corrected before you
can do the engine-running self-test.
Reading Slow Codes
If you choose to read slow codes during the KOEO test, it will take
slightly longer to receive all codes. LED #1 on the SCANNER will flash
as the SCANNER receives code pulses. The LED will flicker briefly as
the PCM transmits fast codes. It will then pulse evenly as the SCANNER
receives the slow code transmission.
The PCM transmits hard (on-demand) codes first, followed by soft (memory)
codes. All code digit pulses are 1/2 second on and 1/2 second off. A 2-second
pause separates the digits of each code, and a 4-second pause separates
one code from another. The last hard code LED flash is followed by a 6- to
9-second pause, then a single flash as a separator code, and another 6- to
9-second pause. The PCM then transmits soft codes from its memory.
34
Service Code Tests
Key-On, Engine-Running (KOER) Self-Test
When you enter the ENGINE RUNNING TEST, the SCANNER displays:
*ENGINE RUNNING SELF-TEST
START ENGINE AND RUN AT 2000 RPM FOR
2 MINUTES, OR UNTIL O2 SENSOR(S) WARM.
PRESS Y WHEN DONE [0:00]
WARNING: Keep hands and test leads away from the fan and other
engine parts during all engine tests.
Follow the instructions on the screen. The engine must be fully warm for
the test results to be valid. The timer at the right side of the bottom line
will count minutes and seconds continuously from the time you entered
this test. It counts up to 9:59 and then repeats from 0:00 Use it to keep
track of engine-running time. After the engine has run for two minutes
and the exhaust gas oxygen (EGO or O2) sensor is fully warm, press Y
to continue. The SCANNER will display:
*ENGINE RUNNING SELF-TEST
START ENGINE AND RUN AT IDLE. DO NOT
ACCELERATE. PRESS Y TO CONTINUE (OR
PRESS Y BEFORE STARTING ENGINE).
If you performed the engine-off test before the engine-running test, the
SCANNER will display the following message if you did not turn the
ignition key off:
WARNING: SELF-TEST OUTPUT IS ENERGIZED.
IF YOU HAVE RUN ANY SELF-TEST, TURN KEY
OFF, WAIT. IF NO TEST HAS BEEN RUN,
PRESS Y TO CONTINUE.
This message means that the self-test output (STO) circuit to the PCM is
still energized from a previous test. For some vehicles you can ignore
this message and press Y to enter the engine-running test immediately.
If you are uncertain about how the vehicle will respond, turn the key off
wait 10 seconds, and restart the engine before entering the test.
When the vehicle PCM begins the test, the SCANNER will display:
SELF TEST INITIATED...WAIT FOR CODES
........................................
IF NO RESPONSE IN 60 SECONDS, SEE FORD
REFERENCE MANUAL -- APPENDIX B.
35
Service Code Tests
Test Duration
The entire engine-running test usually takes approximately 1 to 3 minutes
if you are reading fast codes. The time varies depending on the particular
engine system and the number of codes present. The test will take longer if
you are reading slow codes. The message: SELF TEST INITIATED...
WAIT FOR CODES means that the SCANNER has attempted to start the
test. It does not mean that the vehicle has responded. If the message
stays on the screen for more than 2 to 3 minutes with no code response,
the test probably did not start. Also, you should hear engine speed change
with most systems during the test if the test is progressing normally. Refer
to Appendix B to diagnose a self-test failure.
Sensor and Actuator Checks
The ECA will put the engine through a series of tests to check various sensors
and actuators in the system. Depending on the particular engine being tested,
these operations may include changing the ignition timing, changing the
idle speed, and operating the EGR. After a few seconds, the SCANNER will
display the following instruction for many vehicles:
TESTING — ECU MODULE ID CODE = 30
FOR 1992 AND LATER VEHICLES,
TURN STEERING WHEEL 180° THEN RELEASE,
AND SNAP THROTTLE.
On many vehicles, the ECU checks power steering switch, brake switch,
and overdrive or clutch circuits during the engine-running test. If you do
not operate the throttle and power steering switches during the test, the
ECU will transmit codes. If the SCANNER displays a code indicating a
fault in either of these areas, repeat the test and snap the throttle and
turn the steering wheel at any time after the first 10 seconds of the test.
If a power steering or throttle or other switch code reappears after doing
this, it is a valid code.
Caution: Do not press and hold the accelerator to the floor. Engine
damage may result. Snap the throttle open sharply and release it
quickly, before the engine reaches high rpm.
The snap acceleration, or “goose,” test checks the throttle position
sensor (TPS), the manifold absolute pressure (MAP) sensor, and other
dynamic sensors. If you do not snap the throttle open quickly and sharply
within a few seconds after the instruction, the test results will report:
77 OPERATOR ERROR (THROTTLE NOT SNAPPED)
If this happens, repeat the test and quickly snap the throttle fully open
immediately when the instruction appears.
36
Service Code Tests
SEFI Engines
The snap acceleration test is not required for most sequential electronic
fuel injection (SEFI) engines and a few other late-model Ford vehicles.
Do not perform the snap-acceleration test unless the SCANNER directs
you to do so. Refer to a later section of this manual for additional
engine-running tests on SEFI engines.
Special Instructions
Other engine systems may require other operator actions during the
engine-running test. Some systems, for example, require you to hold
engine speed at a specified rpm during the test. The SCANNER will
display any special instructions on the screen when required.
End of Test Sequence — Codes
When the PCM finishes the test, the SCANNER display will change and
be similar to this:
REVIEW FAST CODES
** ENGINE RUNNING CODES-FIX SECOND **
11 SYSTEM PASS
........................................
The SCANNER displays only hard, on-demand codes for faults present
during the engine-running test. Diagnose and repair problems in the
order in which codes are displayed. Repair any hard, on-demand codes
from the key-on, engine-off test before diagnosing any codes from the
engine-running test.
If codes are not present, the SCANNER displays 11 SYSTEM PASS.
If codes are present, the SCANNER displays them by number and
description, similar to this:
33 EGR VALVE NOT OPENING
71 IDLE TRACKING SW STUCK OR CKT PROBLEM
95 FUEL PUMP CKT OPEN - ECA TO GROUND
The top line of the display — REVIEW CODES — remains fixed. You
must press the thumbpad up or down to view additional lines of the
display on lines 2, 3, and 4. When you reach the end of the list, the last
line will say:
*** END OF LIST ***
See the instructions that follow for reading slow codes during an enginerunning test.
37
Service Code Tests
Reading Slow Codes
If you choose to read slow codes during the KOER test, it will take
longer to receive all codes. One of the LED’s on the screen will flash as
the SCANNER receives code pulses.
The LED will flash two or more times at the beginning of the test as the
PCM transmits the cylinder identification number. It will flash once during
the test if the snap acceleration test is required. At the end of the test, the
LED will flicker briefly as the PCM transmits fast codes. It will then pulse
out the codes as the SCANNER receives the slow code transmission.
The PCM transmits hard (on-demand) codes. All code digit pulses are
1/2 second on and 1/2 second off. A 2-second pause separates the
digits of each code, and a 4-second pause separates one code from
another. The entire test may take several minutes, depending on the
number of codes present. For example, the PCM requires almost 30
seconds to transmit code 577 from a 1991 vehicle with 3-digit codes.
Caution: Do not press N to exit from the KOER test until the SCANNER
receives the last code pulse. Wait at least 5 to 10 seconds after
the last LED flash before pressing N to exit. Pressing N sooner will
interrupt code transmission and result in failure to receive all codes.
Engine-Running Test — will not start
On some models, the vehicle PCM will not enter the engine-running test
if any hard codes found during the engine-off test are not corrected. In
most cases, the SCANNER will display the following message before the
TEST IN PROGRESS display
998 FIX ALL HARD CODES BEFORE CONTINUING
Select REVIEW CODES to check for previous hard codes that have not
been repaired.
If no uncorrected hard codes are present, reset the SCANNER to recall
the vehicle identification from memory. Verify that the identification is
entered correctly.
38
Service Code Tests
Review Codes
When you return to the SERVICE CODE MENU from the engine-off or
the engine-running self-test, the display appears like this:
SERVICE
KEY ON
ENGINE
>REVIEW
CODE MENU (CODE SPEED = FAST)
ENGINE OFF TEST
CLEAR CODES
RUNNING TEST
CODE SPEED
CODES
PRINT CODES
The SCANNER has now recorded codes in its memory from either, or
both, the engine-off and the engine-running tests. You can review the
code list. If you select REVIEW CODES, the SCANNER displays a code
list similar to the lists displayed at the end of the self-tests:
REVIEW CODES
** KEY ON, ENGINE OFF CODES-FIX FIRST **
xx - - code description - xx - - code description - ** ENGINE RUNNING CODES-FIX SECOND **
xx - - code description - xx - - code description - ** CONTINUOUS MEMORY CODES-FIX LAST **
xx - - code description - xx - - code description - *** END OF LIST ***
Fix the problems in the order listed. Also, remember these important
points about the REVIEW CODES list:
1. To review all codes, you must press the thumbpad up until *** END
OF LIST *** appears.
2. If you have selected fast codes w/automatic code clearing, the
SCANNER automatically clears codes from the vehicle after a test
but saves them in the SCANNER memory.
3. The SCANNER saves the codes from the most recent engine-off or
engine-running test for display under REVIEW CODES. If you repeat
either test, previous codes from that test will be replaced with a new
list.
4. Always record soft (continuous memory) codes after any test. They
will be cleared from the PCM, and subsequent tests may not display
them.
5. If you have read slow codes, the SCANNER saves them in its
memory, but you must use the CLEAR CODES selection to clear the
PCM.
Press N to return to the SERVICE CODE MENU from REVIEW CODES.
39
Vehicles with Separate Auto Trans ECU
Vehicles with a Separate AutoTrans ECU
Falcon, Fairmont, Fairlane & LTD 3.9L & 5.0L (Not AU)
In 1989 Falcon EA, Fairmont EA, Fairlane NA and LTD DA 3.9L 6-cylinder
vehicles began to be fitted with an Electronically Controlled Automatic
Transmission. These vehicles are fitted with two separate ECU’s, one
for the engine and one for the Automatic Transmission. Falcon/Fairmont
(EB11, ED, EF & EL) models up to 1998, Fairlane/LTD (NC/DC, NF/DF
& NL/DL) models up to 1999 and Falcon Ute XH fitted with the 5.0L V8
engine also have a seperate Auto Trans ECU.
Falcon/Fairmont and Fairlane/LTD models fitted with the 4.0L engine
use a combined engine/transmission ECU known as a PCM (Powertrain
Control Module). This section does not apply to these vehicles.
Connecting the SCANNER
To test the Auto Trans ECU on these vehicles the SCANNER needs to be
connected to the Auto Trans ECU for testing.
3.9L Engine
The 3.9L engines have two connectors located under the bonnet of
the vehicle in the right rear of the engine bay. One is a white two pin
connector the other is a white single pin connector. Do not use the grey
single pin connector – that is used for engine code reading. Connect the
Ford-5AU and Ford -6AU adapters to the white 2-pin connector and the
white 1-pin connector.
40
Vehicles with Separate Auto Trans ECU
5.0L Engine
Early build 5.0L vehicles, up to April 1992, use the same connectors as
the 3.9L above.
Later build vehicles, after April 1992, use the 20-pin connector under
the drivers side dash - this is the same connector for Engine, Auto Trans
and ABS. Connect the Ford-5AU and Ford -6AU adapters to the 20-pin
connector under the dash or in the dash board fuse box.
Accessing the Tests on the SCANNER
The vehicle menu will appear similar to this:
PRESS Y TO SELECT A SYSTEM IF FITTED
ENGINE/AUTOTRANS
>3.9&5.O A/TRANS ONLY
SELECT NEW ID
3.9&5.0 A/TRANS ONLY must be selected for these vehicles to access
the correct tests and connector messages. Do not use the ENGINE/
AUTOTRANS selection.
Service Codes - KOEO Test
The only code gathering test available on these vehicles is a KOEO
test. The ECU transmits codes in both fast code format and slow code
format. The fast code format can be unreliable on these vehicles.
Test using slow codes if you are unsure about codes that are output
by the vehicle.
The KOEO test gathers Hard codes and Memory codes from the ECU.
Memory codes can be cleared by using the Clear Codes option on
the menu or by selecting the FAST CODES WITH AUTOMATIC CLEAR
option in the CODE SPEED selection.
The Auto Trans ECU will output codes in this order the ECU ID, Hard Codes then Memory Codes.
All other Ford EEC type systems with Automatic Transmissions use a
combined Engine & AutoTrans PCM, so Engine and Auto Trans tests
are located together under the ENGINE/AUTOTRANS selection on the
SCANNER.
41
Functional Tests
Functional Tests — Codes only systems
(Not applicable to Ethos)
The FUNCTIONAL TESTS mode For code only systems lets you perform
engine operating (functional) tests programmed into the powertrain
control module (PCM) of the vehicle. The ignition key should be OFF
when you select FUNCTIONAL TESTS from the MAIN MENU.
When you select FUNCTIONAL TESTS from the MAIN MENU, the
SCANNER displays another menu similar to this:
SCROLL TO SELECT TEST.
>COMPUTED TIMING
WIGGLE (ENGINE OFF)
WIGGLE (RUNNING)
OUTPUT STATE CHECK
IDLE SPEED ADJUST
Move the cursor using the thumbpad to the desired test and press Y to
enter the selection.
Computed Timing
The COMPUTED TIMING test lets you check ignition timing with the
engine running at a controlled idle speed. It also verifies the ability of the
PCM to advance and retard timing. For some vehicles the PCM provides
a fixed advance of 20° above the base timing specification in this test
mode.
Before entering this test, connect a timing light or a magnetic timing
meter to the engine. When you select COMPUTED TIMING from the
FUNCTIONAL TESTS menu, the SCANNER displays:
REFER TO REFERENCE MANUAL PART 3 FOR
SPECIFIC COMPUTED TIMING PROCEDURES AND
TIMING SPECIFICATIONS.
PRESS N TO EXIT.
If you enter this test while the engine is running or if you do not turn off
the ignition before entering the test, the SCANNER displays:
WARNING: SELF-TEST OUTPUT IS ENERGIZED.
IF YOU HAVE RUN ANY SELF-TEST, TURN KEY
OFF, WAIT. IF NO TEST HAS BEEN RUN,
PRESS Y TO CONTINUE.
Codes only vehicles
(Except Falcon EF, EL, XG and XH, see below.)
1.
If a self test has been run or you are unsure, stop the engine for at
least 10 seconds and then restart it, allow the idle speed to settle.
2.
Be sure the engine is fully warm and allow it to run at normal idle
speed with all accessories switched off, eg air conditioning, rear
demister, etc.
42
Functional Tests
3.
Exit the Functional Tests Menu and select the KOER test. Press Y
to initiate the test. Once the test has started the timing is fixed at
base timing for about 2 minutes. It is recommended to wait for the
engine revs to drop down again after the initial fast idle period at
the beginning of the KOER test.
4.
Check the timing with a timing light or timing meter. Examine the
timing marks with the timing light and ensure they have stablised at
base timing before making any adjustments.
5.
Timing specifications.
Falcon EA, EB, ED
Fairlane/LTD NA, NC, DA, DC
Fairlane/LTD NC & DC
Falcon EB & ED
Bronco and F-Series
3.9L & 4.0L
3.9L & 4.0L
5.0L
5.0L
all engines
+10°
+10°
+30°
+30°
+10°
Falcon EF, EL, XG and XH
1.
If a self test has been run or you are unsure, stop the engine for at
least 10 seconds and then restart it, allow the idle speed to settle.
2.
Be sure the engine is fully warm and allow it to run at normal idle
speed with all accessories switched off, eg air conditioning, rear
demister etc.
3.
Exit the Functional Tests Menu and select the KOER test. Press Y to
initiate the test. Follow the SCANNER on-screen instructions, when
the KOER test has finished and LED 1 is flashing, the ignition timing
will be set to base timing for approximately 2 minutes.
4.
Check the timing with a timing light or timing meter. Examine the
timing marks with the timing light and ensure they have stablised at
base timing before making any adjustments.
5.
Timing specifications.
Falcon EF*, EL, XG, XH
4.0L
0°
Falcon EF, EL, XH
5.0L
+30°
Fairlane/LTD NF*, NL, DF, DL 4.0L
0°
Fairlane/LTD NF, NL, DF, DL
5.0L
+30°
*EF & NF 4.0L vehicles do not have a timing adjustment. Incorrect
timing may require replacement of the engine front pulley and/or
crank sensor assembly.
Wiggle Test (Engine Off)
The WIGGLE (ENGINE OFF) test puts the codes only system into
a program that will record intermittent service codes that occur as
you wiggle or tap on various engine sensors, actuators, and wiring
connectors with the ignition on and the engine off.
43
Functional Tests
When you select WIGGLE (ENGINE OFF) from the FUNCTIONAL TESTS
menu, the SCANNER displays:
*WIGGLE TEST - KEY ON, ENGINE OFF*
TURN KEY ON. DO NOT START ENGINE.
WITH KEY ON, PRESS Y TO CONTINUE.
........................................
If the engine is running, turn it off and wait 10 seconds. Then turn the
key on and press Y. After a brief test startup message, the SCANNER
will display:
MOVE, WIGGLE AND TAP THE HARNESS,
SENSORS, AND CONNECTORS. DO NOT TURN
KEY OFF DURING TEST! PRESS N TO EXIT.
........................................
The bottom line of the screen is blank until a fault occurs as you wiggle
the engine components. The SCANNER will beep if a fault occurs, and
all four LED’s will light. The bottom line of the screen will display this
message:
**MEMORY CODE STORED - RUN KOEO TEST**
Do not wiggle the SCANNER adapter loose from the self-test connector
during this test, or a false code will be indicated. Always exit the test
before turning off the ignition, or a false code may be indicated.
To read the service codes from this WIGGLE test, select the KEY ON
ENGINE OFF SELF TEST from the SERVICE CODES menu.
Press N to return to the FUNCTIONAL TESTS menu from the WIGGLE
(ENGINE OFF) test.
Wiggle Test (Engine Running)
The WIGGLE (ENGINE RUNNING) test puts the codes only system
into a program that will record intermittent service codes that occur
as you wiggle or tap on various engine sensors, actuators, and wiring
connectors with the engine running or during a test drive.
When you select WIGGLE (ENGINE RUNNING) from the FUNCTIONAL
TESTS menu, the SCANNER displays:
*WIGGLE TEST - ENGINE RUNNING*
START ENGINE AND RUN AT IDLE. DO NOT
ACCELERATE. PRESS Y TO CONTINUE (OR
PRESS Y BEFORE STARTING ENGINE).
44
Functional Tests
If you enter this test while the engine is running or if you do not turn off
the ignition before entering the test, the SCANNER displays:
WARNING: SELF-TEST OUTPUT IS ENERGIZED.
IF YOU HAVE RUN ANY SELF-TEST, TURN KEY
OFF, WAIT. IF NO TEST HAS BEEN RUN,
PRESS Y TO CONTINUE.
This means that the self-test output (STO) circuit to the PCM is still
energized from a previous test. For some vehicles you can ignore this
message. and press Y to enter the test immediately. If you are uncertain
about how the vehicle will respond, turn the key off wait 10 seconds, and
restart the engine before entering the test.
Be sure the engine is fully warm and allow it to run at normal idle speed.
Then press Y to enter the test mode. The SCANNER will display:
TEST INITIATED . . . WAIT
IF NO RESPONSE IN 30 SECONDS, SEE FORD
REFERENCE MANUAL -- APPENDIX B.
After a few seconds, the display will change to:
MOVE, WIGGLE AND TAP THE HARNESS,
SENSORS, AND CONNECTORS. DO NOT TURN
KEY OFF DURING TEST! PRESS N TO EXIT.
........................................
The bottom line of the screen is blank until a fault occurs as you wiggle
the engine components. The SCANNER will beep if a fault occurs, and
all LED’s will light. The bottom line of the screen displays this message:
**MEMORY CODE STORED - RUN KOEO TEST**
Do not wiggle the SCANNER adapter loose from the self-test connector
during this test, or a false code will be indicated. Always exit the test
before turning off the ignition, or a false code may be indicated.
To read the service codes from this WIGGLE test, select the KEY ON
ENGINE OFF SELF TEST from the SERVICE CODES menu, and scroll to
CONTINUOUS CODES to view any stored codes.
Press N to return to the FUNCTIONAL TESTS menu from the WIGGLE
(ENGINE RUNNING) test.
45
Functional Tests
Output State Test— Codes only
The OUTPUT STATE test lets you switch the PCM signals to the engine
actuators on and off so that you can test them with a voltmeter. If the
engine is running, turn it off before selecting the OUTPUT STATE test.
When you select this test from the FUNCTIONAL TESTS menu, the
SCANNER displays the following message:
*OUTPUT STATE TEST*
PRESS Y, THEN TURN KEY ON.
THE ENGINE.
DO NOT START
Follow the instructions on the screen. When you press Y, the SCANNER
displays this message:
SELF TEST INITIATED
WAIT FOR OUTPUT STATE TEST.
IF NO RESPONSE IN 60 SECONDS, SEE FORD
REFERENCE MANUAL -- APPENDIX B.
After a minute or two, the display will change to this:
TO TOGGLE ACTUATORS ON/OFF, SNAP THE
THROTTLE. CHECK THE ACTUATORS
INDIVIDUALLY WITH A DVOM
** ACTUATORS OFF **
When you begin the test, all actuators should be off and the control
circuits from the PCM should be high (above 10 volts). Depress the
throttle to wide-open throttle (WOT) to switch all engine actuators from
off to on (high to low) or from on to off. The actuators will stay on or off
until you depress the throttle again. Use a digital volt-ohmmeter (DVOM)
to test the actuators in one state or the other as required.
Each time you press the throttle, the SCANNER will beep to indicate the
change of state. Also, the bottom line of the SCANNER display will switch
between:
** ACTUATORS ON **
and
** ACTUATORS OFF **
to indicate the state of the actuators. Press N to return to the
FUNCTIONAL TESTS menu.
46
Functional Tests
Cylinder Balance (SEFI Engines) 5.0L only
The CYLINDER BALANCE test lets you check the operation of individual
fuel injectors for sequential electronic fuel injection (SEFI) systems. The
vehicle ECU disables each injector individually and compares the engine
speed drop from cylinder to cylinder. At the end of the test stages, the
SCANNER will display the results recorded by the vehicle ECU. Pressing
N at any point during these tests will abort the test and return you to the
FUNCTIONAL TESTS menu. Proceed as follows:
1. Press Y to select CYLINDER BALANCE from the FUNCTIONAL
TESTS menu. The SCANNER will display the following message:
*INJECTOR CYLINDER BALANCE TEST*
START ENGINE AND RUN AT 2000 RPM
FOR 2 MINUTES, OR UNTIL EGO IS WARM
PRESS Y WHEN DONE. [0:00]
2. Follow the instructions on the screen. The engine must be fully
warm for the test results to be valid. The timer at the right side of the
bottom line will count minutes and seconds up to 9:59 from the time
you entered this test. After the engine has run for two minutes and
the EGO sensor is fully warm, press Y to continue. The SCANNER
will display:
*INJECTOR CYLINDER BALANCE TEST*
START ENGINE AND RUN AT IDLE. DO NOT
ACCELERATE. PRESS Y TO CONTINUE (OR
PRESS Y BEFORE STARTING ENGINE).
If you performed another test before this test, the SCANNER may
display the following message if you did not turn the ignition key off:
WARNING: SELF-TEST OUTPUT IS ENERGIZED.
IF YOU HAVE RUN ANY SELF-TEST, TURN KEY
OFF, WAIT. IF NO TEST HAS BEEN RUN,
PRESS Y TO CONTINUE.
This means that the self-test output (STO) circuit to the ECU is
still energized from a previous test. For some vehicles you can
ignore this message and press Y to enter the engine-running test
immediately. If you are uncertain about how the vehicle will respond,
turn the key off wait 10 seconds, and restart the engine before
entering the test.
3. Press Y to continue. As the ECU begins the test, the SCANNER
displays:
TEST INITIATED ... WAIT
IF NO RESPONSE IN 30 SECONDS, SEE FORD
REFERENCE MANUAL — APPENDIX B.
47
Functional Tests
The ECU actually repeats the engine-running self-test. During this
period, the SCANNER displays the cylinder identification as well as
messages instructing you to press the brake pedal, turn the steering
wheel, or snap the throttle. These actions are not necessary to
continue, however, doing them will speed the self-test sequence. All
service codes must be transmitted. After a minute or two, the display
will change to this:
*INJECTOR CYLINDER BALANCE TEST*
INCREASE ENGINE SPEED TO 1600 RPM FOR
A FEW SECONDS, THEN RELEASE. PRESS Y
WHEN ENGINE HOLDS FAST IDLE.
4. Increase the engine speed for several seconds. Then press Y when
the engine speed stays at high, fast idel. The ECU starts the test and
the SCANNER displays:
PERFORMING STAGE 1 TEST — WAIT
After disabling all injectors in firing order sequence, the display
changes to one of the following.
The SCANNER displays something similar to one of these messages
if all cylinders pass:
or
or
90 ALL CYLINDERS PASS STAGE 1
PRESS Y TO CONTINUE.
TEST COMPLETE
PRESS N FOR TEST MENU.
If any cylinder, or cylinders, fail the test, the SCANNER displays the
cylinder number. These are the actual cylinder numbers, not the
firing order:
01 CYL FAIL
02 CYL FAIL
04 CYL FAIL
05 CYL FAIL
07 CYL FAIL
08 CYL FAIL
PRESS Y TO CONINUE.
03 CYL FAIL
06 CYL FAIL
Cylinder “failure” is based on test limits programmed into the EEC
system, not on limits provided by the SCANNER.
5. Press Y to continue. The SCANNER will tell you to wait 10 seconds;
then display the following messages:
INCREASE ENGINE SPEED TO 1600 RPM
FOR A FEW SECONDS. THEN RELEASE
PERFORMING STAGE 2 TEST — WAIT
90 ALL CYLINDERS PASS STAGE 2
PRESS Y TO CONINUE.
48
Functional Tests
6. Press Y to continue or N for the FUNCTIONAL TESTS menu.
PERFORMING STAGE 3 TEST — WAIT
90 ALL CYLINDERS PASS STAGE 3
TEST COMPLETE. PRESS N TO EXIT.
If any cylinder fails at stage 2 or 3, the display at the end of that
stage identifies the cylinder. A weak cylinder may fail stage 1 or 2
and pass stage 2 or 3. A dead cylinder usually fails all three stages.
Once the test is completed and the vehicle has passed the test,
pass code 90 is transmitted by the vehicle to the Scanner and the
message “TEST COMPLETE” will be displayed on the Scanner
screen.
7. Press N to return to the FUNCTIONAL TESTS menu.
Idle Speed Adjustment
You can use the SCANNER to assist in idle speed adjustment on certain
engines.
Before adjusting idle speed, make sure that the throttle body and the idle
speed control (ISC) device are clean, and that the throttle linkage is not
sticking or binding. (Certain throttle bodies and ISC’s cannot be cleaned.
Also, turn all accessories off and make sure that the exhaust oxygen sensor
is working properly, ignition timing is correct, and no vacuum leaks exist.
Then, place the transmission in park or neutral and proceed as follows.
CAUTION: If any service codes other than 11 — NO FAULTS PRESENT
are displayed after the engine-running test, troubleshoot and correct
those problems before proceeding with idle adjustment.
1. Select IDLE SPEED ADJUST from the functional tests menu. The
SCANNER displays:
*IDLE
START
FOR 2
PRESS
SPEED ADJUSTMENT*
ENGINE AND RUN AT 2000 RPM
MINUTES, OR UNTIL EGO IS WARM.
Y WHEN DONE
[0:00]
If you performed another test before this test, the SCANNER may
display the following message if you did not turn the ignition key off:
WARNING: SELF-TEST OUTPUT IS ENERGIZED.
IF YOU HAVE RUN ANY SELF-TEST, TURN KEY
OFF, WAIT. IF NO TEST HAS BEEN RUN,
PRESS Y TO CONTINUE.
49
Functional Tests
This means that the self-test output (STO) circuit to the PCM is still
energized from a previous test. For some vehicles you can ignore this
message and press Y to enter the engine running test immediately. If
you are uncertain about how the vehicle will respond, turn the key off,
wait 10 seconds, and restart the engine before entering the test.
2. Start the engine and run at 2000 RPM for two minutes. There is a
clock displayed in the lower right corner of the SCANNER display.
You can skip this warmup period if the engine is already warm.
3. After two minutes have elapsed, press Y. The SCANNER displays:
*IDLE SPEED ADJUSTMENT*
START ENGINE AND RUN AT IDLE. DO NOT
ACCELERATE. PRESS Y TO CONTINUE (OR
PRESS Y BEFORE STARTING ENGINE).
4. Press Y and the SCANNER displays:
TEST INITIATED ... WAIT.
IF NO RESPONSE IN 30 SECONDS, SEE FORD
REFERENCE MANUAL — APPENDIX B.
The SCANNER starts the engine-running test and waits for a signal
from the system indicating that the engine running self-test is
complete. During this waiting period, the SCANNER displays the
cylinder identification as well as messages instructing you to press
the brake pedal, turn the steering wheel, or snap the throttle. These
actions are not necessary to continue, however, doing them will
speed the self-test sequence.
5. When the engine-running test completes, the SCANNER sends a
start-idle-test signal to the EEC computer and displays:
ENGINE RUNNING TEST COMPLETE. READY FOR
IDLE SPEED TEST. IF NO RESPONSE IN 15
SECONDS, IDLE TEST MAY NOT BE AVAILABLE
IN THIS EEC (SEE FORD REFERENCE MANUAL).
6. When the idle speed test signal is received, the SCANNER displays:
TURN THROTTLE STOP SCREW TO ADJUST RPM.
PRESS N WHEN DONE AND RPM IS IN SPEC.
CURRENT CONDITION IS:
** IDLE RPM ________ **
50
Functional Tests
In most cases, the display will indicate that the idle speed is either
TOO HIGH, TOO LOW, or CORRECT. If the display indicates TPS
OUT OF ADJUSTMENT - FIX FIRST, then the throttle position sensor
must be fixed before proceeding.
During this test, LED 1 on the screen will pulse at different intervals,
depending on the idle speed. If the idle speed is CORRECT, LED 1
will stay lit. If the setting is TOO HIGH, the LED will pulse four times
each second. If the setting is TOO LOW, the LED will pulse once
each second. If the TPS is out of adjustment, the LED will pulse
eight times each second. If the idle speed is CORRECT, skip to step
8. If the setting is TOO HIGH or TOO LOW, proceed to step 7.
Ten minutes after the idle speed test signal is received, the EEC
computer will stop communicating with the SCANNER. Normally,
10 minutes is enough time to complete the test and adjustment.
However, if this occurs, exit the test, return to the FUNCTIONAL
TESTS menu, and repeat this procedure.
7. Turn the throttle stop screw to adjust the RPM until the SCANNER
display indicates IDLE RPM CORRECT.
8. When the idle RPM is correct, press N. The SCANNER displays:
RUN ENGINE AT 1500 RPM FOR 10 SECONDS.
WHEN DONE, PRESS Y TO RECHECK BASE IDLE,
OR PRESS N TO EXIT.
[0:00]
If N is pressed and the idle is not correct, the SCANNER will display:
WARNING: BASE IDLE NOT SET!
**IDLE RPM TOO _____**
PRESS N TO EXIT.
9. Run the engine at 1500 rpm for 10 seconds. Then return to idle,
press Y, and repeat steps 6 through 8.
10. When the idle is properly adjusted, Press N to exit from the idle
adjustment mode.
51
Functional Tests
Functional Tests — Live data system
(Not applicable to Ethos)
The FUNCTIONAL TESTS mode For live data systems lets you perform
engine operating (functional) tests programmed into the powertrain
control module (PCM) of a vehicle. The tests available will vary,
depending on the vehicle. Two tests are available for vehicles. The
ignition key should be OFF when you select FUNCTIONAL TESTS from
the MAIN MENU.
When you select FUNCTIONAL TESTS from the MAIN MENU for a live
data vehicle, the SCANNER displays:
SCROLL TO SELECT
>OUTPUT STATE TEST
MODULE ID
Move the cursor using the thumbpad to the desired test and press Y to
enter the selection.
Output State Test— Live data system
The OUTPUT STATE test lets you switch the PCM signals to the engine
actuators on and off so that you can test them with a voltmeter. If the
engine is running, turn it off before selecting OUTPUT STATE test.
Some vehicles do not support all tests.
CAUTION: Make sure the fuel system is intact and not being serviced
before proceeding. Selecting all outputs on causes the electric fuel
pump to briefly energize. Also, make sure fan blades are clear of
obstruction before selecting low or high speed fan on.
To perform the OUTPUT STATE TEST, proceed as follows:
1. Select OUTPUT STATE TEST from the FUNCTIONAL TESTS menu,
the SCANNER displays the following message:
KOEO OUTPUT STATE TEST INSTRUCTIONS:
SCROLL TO SELECT, PRESS Y TO ACTIVATE
AND DEACTIVATE MODE, PRESS N TO EXIT
PRESS Y TO CONTINUE
This screen gives you the test instructions.
2. Press Y, the SCANNER displays the test list:
>NORMALLY ON OUTPUTS OFF
ALL OUTPUTS ON
LOW FAN ON ONLY
HIGH FAN ON ONLY
52
Functional Tests
3. Move cursor to the desired output test and press Y. If the
vehicle performs the selected test, the SCANNER will display
***ACTIVATED*** to the right of the selected test. For example:
>NORMALLY ON OUTPUTS OFF
ALL OUTPUTS ON
LOW FAN ON ONLY
HIGH FAN ON ONLY
***ACTIVATED***
The selected test will remain activated until you press Y to deactivate
it. If the vehicle does not perform the selected test, the SCANNER
displays ***ERROR***. For example:
>NORMALLY ON OUTPUTS OFF
ALL OUTPUTS ON
LOW FAN ON ONLY
HIGH FAN ON ONLY
***ERROR***
The actuators will stay on or off until you press Y again. The actuators
will default to their normal state after 10 minutes, after the vehicle is
started, or after cycling the key off and on.
PCM Module ID Test — Live data system
Selecting the MODULE ID TEST causes the SCANNER to display a
screen that includes the PCM module software file and part number.
SOFTWARE FILE:
CCAQAB3.HEX
MODULE PART #:
F4WFBD
Copyright Ford Motor Co. 1993
Service Request Reset
Falcon/Fairmont/Fairlane/LTD – Service Request Spanner
From 1994 onwards (models EF/DF/NF) Ford introduced a dash
mounted service reminder, “Service Request Spanner” which appears
as a spanner symbol in the instrument cluster.
Do not connect SCANNER to vehicle for the following procedure.
To reset the reminder hold down the trip meter reset button for 10
seconds with the ignition ON and the engine OFF. A beep will indicate
the reset has been successful.
53
Green Reset Strategy
Falcon BA Transmission “Green” Reset Strategy
TO RESET TRANSMISSION “GREEN” STRATEGY
1.
Ensure ignition is off.
2.
Disconnect the battery for approximately one minute.
3.
Reconnect battery.
4.
Place the T bar in the D position.
5.
Turn on the ignition to the run position (key on engine off) with T
bar in D for 10 seconds.
6.
Move the T bar to the Park position for 10 seconds.
7.
Move the T bar to the Neutral position for 10 seconds.
8.
After 10 seconds the PRNDL display will fast flash N on the
display to confirm that the “green” strategy has been activated.
9.
It is now safe to either start the engine or turn the key off.
10.
If it fails to complete the sequence, restart from No. 1. It has
been noted it may have to be done a couple of times from the
beginning to get the computer to flash the N light to confirm that
the “green” strategy has been activated.
54
PAGE INTENTIONALLY
LEFT BLANK
55
Part 3 – Ford vehicles with Mazda
Electronic Control Systems (MECS)
Engine, Automatic Transmission
and ABS tests
Contents
Main Menu Selections............................................................................57
Code Functions Menu..........................................................................58
Functional Tests...................................................................................58
Oxygen Sensor Test................................................................................ 59
Switch Test............................................................................................... 59
Base Timing Check................................................................................. 60
Codes and Data ...................................................................................61
56
Main Menu
Enter the vehicle details as already described in Part 1 of this Reference
Manual. After the vehicle ID has been entered the SCANNER will display
a screen similar to this:
SELECT SYSTEM:
>ENGINE
TRANSMISSION
ANTI-LOCK BRAKES
When a system is selected the SCANNER displays the Main Menu
selection. Each of the systems are tested the same way.
NOTE: MECS SYSTEMS DO NOT TRANSMIT ANY CODES
IF THERE ARE NO CODES PRESENT. TO TEST THAT THE
DIAGNOSTIC SYSTEM IS FUNCTIONING, REMOVE THE
CONNECTOR OF A SENSOR, EG THROTTLE POSITION AND WAIT
FOR THE CODE TO BE TRANSMITTED.
MAIN MENU Selections
The MAIN MENU options will vary, depending on the vehicle’s onboard
computer. A typical MAIN MENU appears like this:
MAIN MENU — FORD [PRESS N FOR HELP]
>CODE FUNCTIONS
CUSTOM SETUP
FUNCTIONAL TESTS
The SCANNER presents menu selections only for the specific vehicle
being tested.
Refer to the Scanner Plug-in User’s Manual for more information on
types of menus. Move the cursor to the desired operation using the
thumbpad and then press Y.
The code functions and code gathering are the same for ENGINE,
AUTOTRANS and ABS.
57
Code Functions Menu
Using the CODE FUNCTIONS Menu
The main function available with MECS systems is CODE FUNCTIONS.
A typical CODE FUNCTIONS menu appears like this:
AUTO CODE READ
CLEAR CODES
PRINT CODES
>MANUAL CODE ENTRY
HOW TO GET CODES
NOTE: MECS SYSTEMS DO NOT TRANSMIT ANY CODES
IF THERE ARE NO CODES PRESENT. TO TEST THAT THE
DIAGNOSTIC SYSTEM IS FUNCTIONING, REMOVE THE
CONNECTOR OF A SENSOR, EG THROTTLE POSITION AND WAIT
FOR THE CODE TO BE TRANSMITTED.
Also some late MECS vehicles have 4 digit codes that can take several
minutes for the vehicle to transmit.
MECS Systems Functional Tests – Engine only
(Not applicable to Ethos)
The FUNCTIONAL TESTS selection is available for some MECS system
vehicles. If this option is available for the vehicle you are testing,
FUNCTIONAL TESTS will be displayed on the MAIN MENU. When
you select FUNCTIONAL TESTS from the main menu, the SCANNER
displays:
FUNCTIONAL TEST MENU:
>OXYGEN SENSOR TEST
SWITCH TEST
BASE TIMING CHECK
58
Functional Tests
Oxygen Sensor Test
When you select OXYGEN SENSOR TEST from the FUNCTIONAL
TESTS menu, the SCANNER displays:
MAKE SURE ENGINE IS RUNNING AND WARM
(IN CLOSED LOOP) BEFORE MONITORING THE
EXHAUST OXYGEN CONTENT.
PRESS Y TO CONTINUE
This function lets you monitor the feedback signal from the exhaust
gas oxygen sensor. After you start the engine and warm it to normal
operating temperature, press Y. The SCANNER displays:
HOLD ENGINE AT 2000 RPM TO MONITOR
EXHAUST OXYGEN SENSOR.
.....................................
EXHAUST_____________LEAN
As instructed, accelerate the engine to 2000 rpm and hold it there. LEAN
is displayed on the SCANNER when the exhaust is lean, and RICH is
displayed when the exhaust is rich. LED 3 on the screen will flash to
indicate that the SCANNER is receiving a signal from the exhaust gas
oxygen sensor. Press N to return to the FUNCTIONAL TESTS menu.
Switch Test
Select this function and the SCANNER displays:
WITH KEY ON AND ENGINE OFF, TEST EACH
SWITCH. AS ANY SWITCH STATE CHANGES,
DISPLAY ALTERNATES HIGH/LOW & LED 3 GOES
OFF/ON. PRESS Y TO CONTINUE, N TO EXIT.
This function lets you check certain on-off switch circuits. Press N to
return to the FUNCTIONAL TEST MENU. Press Y and the SCANNER
displays:
TEST ANY SW: NEUTRAL/CLUTCH, INHIBITOR,
IDLE, HEADLAMP, BRAKE LAMP, BLOWER, A/C,
REAR DEFROSTER, WATER THERMO.
SWITCH STATE____________HIGH
Not all switches displayed apply to every vehicle. Refer to service
procedures and specifications for availability of specific vehicle switch
tests.
59
Functional Tests
As you test each switch, the SWITCH STATE parameter should
alternately display HIGH or LOW each time a switch status changes.
Also, screen LED 4 turns on when this parameter displays LOW, and off
when HIGH. See the table below for individual switch test instructions.
Press N to return to the FUNCTIONAL TESTS MENU.
SWITCH
TEST INSTRUCTIONS
Neutral/Clutch
Make sure the engine is off. With the transmission in gear, the
SWITCH STATE parameter will alternate HIGH/LOW as the
clutch is engaged and disengaged. Return the transmission to
neutral after the test.
Inhibitor
(A/T only) Make sure the engine is off. The SWITCH STATE
parameter will alternate HIGH/LOW as the transmission is
placed in gear and returned to neutral.
Idle
The SWITCH STATE parameter will alternate HIGH/LOW as the
gas pedal is pressed and released.
Headlamp
The parameter will alternate HIGH/LOW as the headlamps are
turned on and off. Turn off the headlamps after the test.
Brake Lamp
The SWITCH STATE parameter will alternate HIGH/LOW as the
brake pedal is pressed and released.
Blower
Turn the blower switch to the high position. The SWITCH
STATE parameter will alternate HIGH/LOW as the blower
switch position changes. Turn the blower off after the test.
A/C
With the blower set low, the SWITCH STATE parameter will
alternate HIGH/LOW as the air conditioner is turned on and off.
Turn off the blower and air conditioner after the test.
Rear Defroster
The SWITCH STATE parameter will alternate HIGH/LOW as the
rear defroster is turned on and off. Turn off the rear defroster
after the test.
Water Thermo
The SWITCH STATE parameter will alternate HIGH/LOW as the
water thermo switch is disconnected. Reconnect the switch
after the test.
Base Timing Check
In this mode, the SCANNER grounds the vehicle check connector. This
causes the ECU to place the engine in the base timing mode so that you
can check or adjust ignition timing.
When you select BASE TIMING CHECK from the FUNCTIONAL TESTS
menu, the SCANNER displays:
THE VEHICLE CHECK CONNECTOR HAS BEEN
GROUNDED BY THE SCANNER. BASE IGNITION
TIMING CAN NOW BE CHECKED.
PRESS N WHEN DONE.
60
Codes and Data
Codes and Data
For live Codes & Data vehicles there is one SCANNER Engine test menu
available. This TEST MENU has a few different options when selected.
The screen will automatically display the correct one for the vehicle
being tested. An example of each follows:
MAIN MENU-ENGINE
>TEST MENU
CUSTOM SETUP
TEST MENU
>CODES ONLY
DATA INPUTS
*DATA MISC.
OTHER SYSTEMS
When TEST MENU is selected, the screen will then display:
DATA (NO CODES)
DATA FUEL/AIR
*Vehicles in 1995 & 1996 do not have DATA MISC.
CODES ONLY
This selection will display any codes transmitted by the vehicle. All
codes are displayed with the code’s number and description.
NOTE: When a code is transmitted by the vehicle to the SCANNER
the code will indicate there may be a problem either in the WIRING
between the ECU and the indicated sensor/actuator or in the
indicated sensor/actuator.
DATA (NO CODES)
This selection displays engine data that is transmitted to the SCANNER
by the vehicle. Note: This selection does not display every parameter
available.
DATA INPUTS
This data selection displays engine data related to sensor inputs to
the PCM, for example: RPM readings, coolant readings, intake air
temperature. Various vehicles wil display different parameters and not
necessarily the examples mentioned.
DATA FUEL/AIR
This data selection displays parameters related to fuel and air readings,
for example: Airflow, air temperature, oxygen sensor. Various vehicles
will display different parameters and not necessarily the examples
mentioned.
DATA MISC.
This data selection displays various parameters that do not fit the other
data categories, for example: Air conditioner switch, power steering
pressure switch. Various vehicles will display different parameters and
not necessarily the examples mentioned.
61
Codes and Data
Automatic Transmission
Codes & Data Test Menu
MAIN MENU-TRANS
>TEST MENU
CUSTOM SETUP
OTHER SYSTEMS
When TEST MENU is selected, the Scanner will then display:
TEST MENU
>CODES ONLY
DATA INPUTS
DATA
(NO CODES)
CODES ONLY
This selection will display any codes transmitted by the vehicle. All
codes are displayed with descriptions.
NOTE: When a code is transmitted by the vehicle to the SCANNER
the code will indicate there may be a problem either in the WIRING
between the ECU and the indicated sensor/actuator or in the
indicated sensor/actuator.
DATA (NO CODES)
This menu selection displays transmission data parameters that are
transmitted from the vehicle to the Scanner.
Note: This selection does not display every parameter available.
DATA INPUTS
This data selection displays data related to sensor inputs to the PCM,
for example: Gear lever positions and engine RPM. Various vehicles
will display different parameters and not necessarily the examples
mentioned.
62
PAGE INTENTIONALLY
LEFT BLANK
63
Part 4 – ABS Systems, GEM, Airbag and Other
Systems (except BEM and Security Systems)
Contents
ABS Control Systems...........................................................................65
Main Menu — ABS Bosch Systems............................................65
DATA (NO CODES) — Bosch......................................................65
ABS Service Codes — Bosch.....................................................66
Key-on, Engine-off (KOEO) Self-Test — Bosch...........................67
Memory Codes — Bosch............................................................68
Clear Codes — Bosch.................................................................69
Review Codes — Bosch..............................................................70
Bendix LC5...........................................................................................71
Main Menu — Bendix LC5...........................................................71
ABS Codes & Data Guidelines — Bendix LC5............................71
Clear ABS Codes — Bendix LC5................................................72
Bendix LC5 ABS Codes & Data...................................................72
Actuator Tests — Bendix LC5......................................................73
Generic Electronic Module (GEM)......................................................75
GEM System Selection................................................................75
GEM Service Code Menu............................................................75
GEM Data(No Codes) Menu........................................................76
SRS — Airbag Systems.......................................................................77
Manual Code Systems.................................................................78
Main Menu — Airbag and Codes & Data....................................80
Data (no codes)...........................................................................80
Other Systems (except BEM and Security Systems - see Part 5) ....81
Air Conditioning ..........................................................................81
Audio and Control Centre . .........................................................81
Instrument Cluster Module (ICM) ...............................................81
Instrument Cluster Module (ICM) AU Series ..............................81
Part 4 of this manual contains instructions for testing antilock brake
system (ABS) controls, generic body controls (GEM), airbag (SRS) and
other systems. For MECS ABS systems see Part 3 of this manual.
64
Antilock Brake Systems (ABS)
CAUTION FOR ABS AND SRS SYSTEMS
Before operating the SCANNER on airbag or ABS
systems you need to be a competent airbag or ABS
technician.
Before attempting any repairs on vehicles fitted with
ABS or SRS Airbag systems observe all precautions the
manufacturer specifies for these systems.
Ford ABS Systems
Main Menu — ABS Bosch Systems
(for Bendix LC5 ABS System see later this section.)
After you select ABS the Ford ABS MAIN MENU is displayed. ABS MAIN
MENU selections will vary, depending on the model and year. A typical
ABS MAIN MENU for a late-model Ford vehicle appears like this:
MAIN MENU — FORD(ABS) OTHER SYSTEMS
>SERVICE CODES
DATA (NO CODES)
CUSTOM SETUP
The Ford ABS MAIN MENU lets you select the following general
functions:
• Data lets you monitor various ABS sensor, switch, and actuator inputs
and outputs on many late-model Ford vehicles equipped with ABS.
• Service Codes selections let you perform a key-on, engine-off
(KOEO) self-test memory codes and review codes after performing
code tests.
• Custom Setup lets you set up your SCANNER for your specific
needs.
• Other Systems lets you exit the MAIN MENU and select a different
system test. For more information on menus also refer to the
Scanner Plug-in User’s Manual.
DATA (NO CODES) Test Selection – Bosch
The DATA (NO CODES) test selection is available on all Bosch equipped
vehicles. The ABS DATA (NO CODES) test selection operates similarly to
DATA (NO CODES) for Ford engine testing. In this mode, the SCANNER
displays ABS system operating data available on the ABS datastream.
65
Main Menu – Bosch
ABS Service Codes – Bosch
Ford refers to ABS service codes as on-demand codes and continuous
codes. On-demand codes are “hard” codes that occur during a key-on,
engine-off (KOEO) self-test. Continuous codes are memory codes from
the ABS control module. These indicate intermittent problems that have
occurred in the past, during normal vehicle operation. Memory codes
cannot be set while running a self-test.
During the KOEO self-test, the ABS control system transmits hard (ondemand) codes. Continuous memory codes are gathered by selecting
MEMORY CODES from the SERVICE CODE MENU for ABS systems. EL
models do not support the KOEO test. EF vehicles will not perform a KOEO
test with memory codes present.
Service Code Menu
When you select SERVICE CODES from the ABS MAIN MENU, the
SCANNER displays another menu similar to this:
SERVICE CODE MENU
>KOEO SELF-TEST
MEMORY CODES
CLEAR CODES
The ABS Service Code Menu selections are:
Key-on, engine-off (KOEO) test – Falcon EL models do not have
KOEO ABS codes even though the test appears on the menu. This test
displays on-demand hard codes present with the ignition on, but the
engine not running. These are usually electrical open and short circuits
and must be serviced first, before any memory codes.
MEMORY CODES – This selection displays continuous memory codes
of intermittent faults from ABS controller memory. Memory codes should
be serviced last, after any other hard codes generated during the KOEO
self-test.
CLEAR CODES – This selection allows you to clear continuous memory
codes of intermittent faults from ABS system memory.
66
ABS Service Codes – Bosch
Key-On, Engine-Off (KOEO) Self-Test – Bosch
Falcon EL models do not have KOEO ABS codes even though the test
appears on the menu. When you select KOEO SELF-TEST for a Ford
ABS system, the SCANNER displays:
*ON-DEMAND SELF-TEST
TURN KEY ON. DO NOT START ENGINE.
WITH KEY ON PRESS Y TO CONTINUE.
Follow the instructions on the screen. The SCANNER displays the
following message for a few seconds as the ABS controller performs the
system self-test:
SELF TEST INITIATED...WAIT FOR CODES
........................................
IF NO RESPONSE IN 60 SECONDS, SEE FORD
REFERENCE MANUAL -- APPENDIX B.
The message: SELF TEST INITIATED...WAIT FOR CODES
means that the SCANNER has attempted to start the test. It does not
mean that the vehicle has responded. If the message stays on the
screen for more than 2 to 3 minutes, the test probably did not start.
Refer to Appendix B to diagnose the cause of a vehicle self-test failure.
When the ABS controller finishes the test, the display will change and be
similar to this:
SERVICE CODES:
** ON-DEMAND SELF-TEST CODES-FIX FIRST **
C1210 OPEN/SHORT RF DUMP VALVE SOL
C1096 HYDRAULIC PUMP MOTOR OPEN
If codes are not present, the SCANNER displays:
P0000 NO FAULTS PRESENT.
The top line of the display – REVIEW CODES: – remains fixed. You must
press the thumbpad up to view additional lines of the display on lines 2,
3, and 4. When you reach the end of the list, the last line will say:
*** END OF LIST ***
Press N to return to the SERVICE CODE MENU from the KOEO self-test.
NOTE: If there is a Memory Code present EF vehicles will not perform a
KOEO test.
67
ABS Service Codes – Bosch
Memory Codes – Bosch
This selection displays continuous memory codes of intermittent faults
from ABS controller memory. Memory codes should be serviced last,
after any other hard codes found during the KOEO self-test.
Select MEMORY CODES from the ABS SERVICE CODE MENU and the
SCANNER displays:
*CONTINUOUS MEMORY CODES*
KEY MUST BE ON WITH ENGINE OFF OR
RUNNING.
PRESS Y TO CONTINUE.
This test can be run with the key-on, engine-off, or with the key-on,
engine-running. Make sure the key is on and press Y to continue. The
SCANNER displays:
SELF TEST INITIATED...WAIT FOR CODES
........................................
IF NO RESPONSE IN 60 SECONDS, SEE FORD
REFERENCE MANUAL -- APPENDIX B.
When the ABS controller finishes the test, the display will change and be
similar to this:
SERVICE CODES:
** CONTINUOUS MEMORY CODES-FIX LAST **
P0000 NO CODES PRESENT
*** END OF LIST ***
The top line of the display – SERVICE CODES: – remains fixed. You must
press the thumbpad up to view additional lines of the display on lines 2,
3, and 4. When you reach the end of the list, the last line will say:
*** END OF LIST ***
Press N to return to the SERVICE CODE MENU.
68
ABS Service Codes – Bosch
Clear Codes – Bosch
CLEAR CODES lets you clear the ABS controller code memory. When you
press Y from the SERVICE CODE MENU, the SCANNER displays:
*CLEAR CODES*
KEY MUST BE ON WITH ENGINE OFF OR
RUNNING. PRESS N TO EXIT WITHOUT
CLEARING. PRESS Y TO CLEAR CODES.
This test can be run with the key-on, engine-off, or with the key-on,
engine-running. Make sure the key is on and press Y to continue. The
SCANNER displays:
SELF TEST INITIATED
WAIT FOR CODE CLEARING.
IF NO RESPONSE IN 60 SECONDS, SEE FORD
REFERENCE MANUAL -- APPENDIX B.
When the ABS controller finishes the test, the display will change and be
similar to this:
CODES CLEARED
PRESS N TO EXIT.
If the CODES CLEARED message does not appear after about 1
minute, refer to Appendix B to diagnose a vehicle self-test failure.
Press N to return to the SERVICE CODES MENU.
Remember that only continuous memory codes can be cleared. If a
code reappears when you clear codes and repeat the KOEO self-test, it
is a hard (on-demand) code that must be serviced.
Clearing SCANNER Code Memory
The SCANNER retains codes in its memory that it receives from the vehicle.
SCANNER (not vehicle) memory is cleared in three ways:
• By repeating the test, which overwrites the previous code list
• By selecting a different system for testing
• By entering a new vehicle ID.
69
ABS Service Codes – Bosch
Review Codes – Bosch
When you return to the ABS SERVICE CODE MENU from the engine-off
self-test or the memory code test, the display appears like this:
SERVICE CODE MENU
>KOEO SELF-TEST
REVIEW CODES
MEMORY CODES
CLEAR CODES
PRINT CODES
The SCANNER has now recorded codes in its memory from either, or
both, the engine-off and the memory codes tests. You can review the
code list. If you select REVIEW CODES, the SCANNER displays a code
list similar to the lists displayed at the end of the self-tests:
REVIEW CODES
** KEY ON, ENGINE OFF CODES-FIX FIRST **
XX - - code description - XX - - code description - ** CONTINUOUS MEMORY CODES-FIX LAST **
XX - - code description - XX - - code description - *** END OF LIST ***
Fix the problems in the order listed. Also, remember these important
points about the REVIEW CODES list:
1. To review all codes, you must press the thumbpad up until *** END
OF LIST *** appears.
2. The SCANNER saves the codes from the most recent engine-off test
for display under REVIEW CODES. If you the test, previous codes
from that test will be replaced with a new list.
3. Always record continuous memory codes after any test.
4. If you have read memory codes, the SCANNER saves them in its
memory, but you must use the CLEAR CODES selection to clear the
them from the ABS controller.
Press N to return to the SERVICE CODE MENU from REVIEW CODES.
70
Main Menu – Bendix LC5
Bendix LC5 ABS – Main Menu Selections
The MAIN MENU for ABS testing provides the following general
functions. Selection titles on the menu will be:
•
Codes & Data selections let you read fault codes and view
information from the controller on vehicles with ABS control
systems.
•
Actuator Test selections let you perform specific actuator operating
tests on vehicles with ABS control systems.
•
Movie recording capability to record and save ABS system
operating data for review and printing.
•
Custom Setup programs to set your SCANNER for your specific
needs.
•
Other Systems lets you exit the Main Menu and return to the
System Selection screen to select a different control system and
enter a new vehicle identification.
For more information on menus also refer to the Scanner Plug-in User’s
Manual.
ABS Codes & Data Guidelines – Bendix LC5
The ABS CODES & DATA selection is available for Falcon EBII-ED,
Fairlane NC and LTD DC vehicles equipped with ABS. In this mode, the
SCANNER reads trouble codes and all data available on the ABS data
stream.
When you press Y from the MAIN MENU to select ABS CODES & DATA,
the SCANNER establishes communication with the ABS module or
electronic control unit (ECU).
71
Exit Options – Bendix LC5
Clear ABS Codes – Bendix LC5
CLEAR CODES appears as an EXIT menu. Press the thumbpad up or
down to the selection and press Y.
After problems have been repaired, the SCANNER will clear the codes
and return to the previous ABS CODES & DATA display. If faults are
repaired, the SCANNER display will indicate NO CODES PRESENT.
If the code-clearing operation fails for any reason, previous codes will
reappear in the ABS CODES & DATA display. Press N to return to the
exit menu and repeat the CLEAR ABS CODES operation. In addition,
ABS codes are automatically cleared by the ABS controller after 50
ignition cycles.
Bendix LC5 ABS Codes & Data
The ABS CODES & DATA display available for vehicles with Bendix LC5
ABS systems will appear like this:
PUMP___OFF
PUMP (V)___0.1
SOL (V)___12.1
** CODES & DATA. OK TO DRIVE. **
NO CODES PRESENT
WARNING LAMP_____OFF
STOP LAMP__________OFF
LF WHEEL__________66
RF WHEEL____________66
LR WHEEL__________66
RR WHEEL____________66
SYSTEM RELAY_____OFF
MTR PUMP RELAY_____OFF
In the ABS CODES & DATA diagnostic mode, the antilock functions of
the Bendix system are fully functional, and new trouble codes can be
set. The car can driven safely for testing.
CAUTION: Before driving a vehicle with an ABS complaint, especially if
the red BRAKE warning lamp is on, test the brakes at low speed to
make sure tha tthe car will stop normally. An illuminated red BRAKE
warning lamp can indicate reduced braking ability.
The topline of the display remains fixed. The second and all other lines
can be scrolled backward and forward through the ABS CODES & DATA
list.
72
Actuator Tests – Bendix LC5
Actuator Tests – Bendix LC5
For vehicles with Bendix LC5 systems the ABS MAIN MENU looks
similar to this:
MAIN MENU (CHRY ABS)
CODES & DATA
CUSTOM SETUP
ACTUATOR TESTS
OTHER SYSTEMS
Scroll the thumbpad or thumbwheel to the ATM TESTS selection and
press Y. The SCANNER displays a list similar to this:
SCROLL TO SELECT A TEST-ENGINE OFF ONLY!
>STOP ALL TESTS
ABS WARNING LIGHT
SYSTEM RELAY
The actuator test mode (ATM) lets you check the operation of switches,
solenoids, relays, valves and lamps controlled by the ABS controller
you are testing. Specific ATM tests vary for different ABS systems. All
operate in basically the same way.
The complete list of actuator tests for a Bendix system looks like this:
SCROLL TO SELECT A TEST-ENGINE OFF ONLY!
>STOP ALL TESTS
ABS WARNING LIGHT
SYSTEM RELAY
MOTOR PUMP
LF BUILD/DECAY VALVE
LR BUILD/DECAY VALVE
RR BUILD/DECAY VALVE
FRONT ISOLATION VALVE
REAR ISOLATION VALVE
LF BUILD/DECAY PRESSURE
RF BUILD/DECAY PRESSURE
REAR BUILD/DECAY PRESSURE
Press the thumbpad up or down to move the cursor and press Y to
select the desired test.
73
Actuator Tests – Bendix LC5
The SCANNER display will be similar to this:
SHOULD SWITCH REGULARLY FOR 5 MINUTES
PRESS Y FOR NEXT TEST.
PRESS N FOR ATM TEST MENU.
The selected actuator name is on the top line. For most actuator tests,
the ABS controller will pulse the actuator regularly for 5 minutes, or until
you stop the test. Actual ON and OFF times will vary, depending on the
selected actuator; three seconds for some, four seconds for others,
and so on. The important thing is whether or not the selected actuator
responds to the ABS controller.
Hydraulic actuator tests vary slightly from the general rule of actuator
operation. These tests simply cycle the selected actuator once. A
hydraulic actuator cycle consists of a 250 millisecond pressure decay,
followed by a 1 second pressure build.
Press Y to end the test and proceed to the next sequential test on the
actuator test selection list. If you started with the first test on the list, you
can automatically proceed through the entire sequence by pressing Y. If
you started with any other actuator test, you can proceed to the next test
on the list by pressing Y.
Actuator Exit Display
This feature allows you to exit the actuator test mode and turn off the
actuator, or exit and leave the actuator on. During troubleshooting, this
is useful when you want to exit test, leave an actuator on, and use the
SCANNER to monitor related data parameters.
To exit an ATM test, press N and the SCANNER displays:
TO EXIT AND TURN OFF ACTUATOR,
PRESS N.
TO EXIT AND LEAVE ACTUATOR ON,
PRESS Y.
Press N to exit and turn off the actuator. Press Y to exit and leave the
actuator on. In either case, the SCANNER returns to the actuator test
selection screen. To go to CODES & DATA, continue to press N until the
MAIN MENU is displayed with the CODES & DATA selection. To turn off
an actuator that has been left on after exiting, select a new actuator test
or select STOP ALL TESTS.
74
Generic Electronic Module (GEM)
Generic Electronic Module (GEM)
Service Codes
The Generic Electronic Module (GEM) module controls numerous vehicle
body functions including but not limited to power door locks, chimes, interior
lighting, 4x4 transfer case, and wiper control. The circuits controlled by
GEM vary, depending on the vehicle. The SCANNER allows you to perform
a GEM KOEO self-test, retrieve and clear memory codes, and display data
parameters. You can also review and print GEM codes, after codes have
been retrieved.
Ford refers to service codes as on-demand codes and continuous
codes. On-demand codes are “hard” codes that occur during a keyon, engine-off (KOEO) self-test. Continuous codes are memory codes
from the GEM module. These indicate intermittent problems that have
occurred in the past, during normal vehicle operation. Memory codes
cannot be set while running a self-test.
During the KOEO self-test, the GEM module transmits hard (on-demand)
codes. Continuous memory codes are generated by selecting MEMORY
CODES from the GEM SERVICE CODE MENU.
GEM System Selection
When you have entered the vehicle ID, the system test selection display
offers these choices:
PRESS Y TO SELECT SYSTEM IF FITTED
>ENGINE & A/TRANS
ABS
AIRBAGGEM
SELECT NEW ID
Select GEM from the system test selection menu and the SCANNER
displays the GEM Main Menu.
GEM Main Menu
After connecting the SCANNER to the vehicle, turn the ignition ON and
press Y to continue. The SCANNER displays the GEM MAIN MENU:
MAIN MENU - GEM
>SERVICE CODES
OTHER SYSTEMS
DATA(NO CODES)
CUSTOM SETUP
GEM Service Code Menu
Select SERVICE CODES from the GEM MAIN MENU and the SCANNER
displays the GEM SERVICE CODE MENU:
75
Generic Electronic Module (GEM)
SERVICE CODE MENU
>KOEO SELF-TEST
MEMORY CODES
CLEAR CODES
The GEM Service Code Menu selections are:
Key-on, engine-off (KOEO) test – This test displays on-demand hard
codes present with the ignition on, but the engine not running. These
are usually electrical open and short circuits and must be serviced first,
before any memory codes. NOTE: During this KOEO self-test, various
GEM circuits may be momentarily enabled.
MEMORY CODES – This selection displays continuous memory codes of
intermittent faults from GEM memory. Memory codes should be serviced
last, after any other hard codes generated during the KOEO self-test.
CLEAR CODES – This selection allows you to clear continuous memory
codes of intermittent faults from GEM memory.
In addition, REVIEW CODES will appear on the Service Code Menu after
GEM codes have been retrieved.
Although GEM Service Code Tests are specific to GEM-controlled electronics,
SCANNER operation is the same as Bosch ABS Service Code Tests. Refer
to ABS Service Code Tests earlier in this part and the Scanner Plug-in User’s
Manual for detailed instructions.
GEM Data(No Codes) Menu
Select DATA(NO CODES) from the GEM MAIN MENU and the
SCANNER displays a sub-menu of data list selections, allowing you to
select groups of related parameters for data viewing:
SCROLL TO SELECT:
>TRANSMISSION DATA
ACCESSORIES DATA
Viewing GEM Datalists
On vehicles that support GEM, select DISPLAY DATA or press N from
the CUSTOM DATA LIST menu and a scrollable screen like the following
appears:
FORD GEM
FACTORY PID IS DISPLAYED IN UPPERCASE
VEHICLE MAY NOT SUPPORT ALL PIDS
DTC CouNT______13 4x4 Switch______Low
The top line remains fixed. The second line tells you how to identify the
Ford name for a particular data parameter by reading only the upper-case
letters. The data parameters available in the Driveability and Transmission
data lists may vary from one vehicle to another.
76
SRS – Airbags
You can scroll the second line and all following lines forward and backward
with the thumbpad up or down. When you reach the end of the list, one
or two blank lines will appear or the last line will not scroll if lines 2 and 3
are fixed.
SRS – Airbag Systems
Warning #1: Before operating the SCANNER on airbag
systems you need to be a competent airbag technician.
Warning #2: Diagnosis and repair of the SRS Airbag
system should be carried out by qualified personnel
using appropriate workshop manuals and using
the precautions detailed by the manufacturer of the
vehicle.
If you are unsure of any aspect of SRS airbag repair procedures seek
further professional advice from a “qualified source”. It’s recommended
that the appropriate service manual are used.
Vehicle Identification
This is the same as for ABS, refer to vehicle identification for details of
this procedure.
77
SRS – Airbags
Manual Code Systems
Falcon/Fairmont EF-EL, Fairlane NF-NL and LTD DF-DL.
The SRS (Supplementary Restraint System), or Airbag, on these vehicles
are manual or flash code read only. The SRS ECU constantly monitors the
SRS AIRBAG system looking for faults, and if any are detected the ECU
signals the driver by flashing the ‘AIRBAG’ lamp on the dash. It will first
flash the code number of the fault that has been detected 6 times, then it
will remain on constantly until the fault is rectified. Every time the ignition is
switched on the lamp will light for 6 seconds, to test the lamp is operative,
then if there are any hard (or current) codes they will be displayed. Once a
hard fault is rectified it becomes a memory (or intermittent) code. To read
memory codes the procedure listed below must be used. Repair hard
fault codes first and memory fault codes last.
Using the SCANNER for Diagnosis
The SRS/Airbag fault codes are listed on the SCANNER, as well as the
below procedures for gathering and clearing the fault codes.
Repair Hard Fault Codes First
1) To READ HARD FAULT CODES:
a) Turn ignition on.
b) Wait for 6 second AIRBAG lamp prove out.
(The lamp will then go out.)
c) If any hard faults are detected the lamp will flash a
hard fault code.
d) Only one hard fault code will be displayed at a time
even though there may be more than one fault present.
Airbag Memory Clear
Figure B-3. Testing the self-test connector.
78
SRS – Airbags
2) To CLEAR HARD FAULT CODES
a) Hard fault codes are cleared automatically when the fault is
rectified.
Repair Memory Fault Codes Last
Memory Fault Codes 52, 53 and 54 are displayed as HARD fault codes,
BUT they must be cleared using the below procedure “4) to CLEAR
Memory Fault Codes”. Some early build EF Falcons and Fairmonts
(prior to Nov 1994) may not have Memory Fault Codes.
3) To READ MEMORY FAULT CODES
a) With the ignition off, ground the Airbag Memory Clear
terminal located in the diagnostic connector in the fuse
box, located to the right of the steering column on the
dash.
b) While the terminal is grounded, turn the ignition to on.
c) Wait for the 6 second AIRBAG warning lamp prove out,
then remove the ground from the Airbag Memory Clear
terminal.
d) The Airbag module will beep three times and if there
are any memory codes in the system and they will be
displayed on the AIRBAG warning lamp.
NOTE: The codes will only be displayed one at a time, if there is more
than one code, the code being displayed must be cleared
before the next one will be displayed. Before clearning the
code, write the code down for later reference. (See following for
Code Clearing.)
4) To CLEAR MEMORY FAULT CODES:
a) The code must be read first using the above procedure
before it can be cleared.
b) After the code is displayed once or twice on the AIRBAG
warning lamp, ground the Airbag Memory Clear terminal
again until the Airbag module beeps 5 times.
c) If any more codes are present, the next one will now be
displayed, continue clearing codes until the airbag lamp
stops flashing codes.
d) All codes are cleared when the lamp stops flashing.
79
SRS – Airbags
Main Menu — Airbag Codes and Data
AIRBAG MAIN MENU selections may vary, depending on the model and
year. A typical AIRBAG MAIN MENU for a codes and data Ford vehicle
appears like this:
MAIN MENU — AIRBAG
>SERVICE CODES
OTHER SYSTEMS
DATA (NO CODES)
CUSTOM SETUP
The Ford AIRBAG MAIN MENU lets you select the following general
functions:
• Service Codes selections let you perform a key-on, engine-off
(KOEO) self-test, retrieve memory codes, and clear codes.
• Data (No Codes) lets you monitor various airbag sensor, switch, and
actuator inputs and outputs.
• Custom Setup lets you set up your SCANNER for your specific
needs.
• Other Systems lets you exit the MAIN MENU and select a different
system test.
Refer to Part 2 for descriptions of how to use these functions.
DATA (NO CODES) Test Selection
The DATA (NO CODES) test selection is available on all Codes and Data
vehicles. This selection operates similarly to DATA (NO CODES) for Ford
engine testing. Here, the SCANNER displays airbag system data parameters
available on the airbag control module datastream.
Once the SCANNER establishes communication with the airbag controller,
the SCANNER displays an airbag data list:
FORD AIRBAG
FACTORY PID IS DISPLAYED IN UPPERCASE
VEHICLE MAY NOT SUPPORT ALL PIDS
DTC CouNT____0
D_Airbag_____0.0
The data items available will vary from one airbag system to another.
You can scroll the lines forward and backward with the thumbwheel or
thumbpad. When you reach the end of the list, one or two blank lines
will appear.
80
Other Systems
Air Conditioning (HIM)
The Air Conditioner (or HIM – Heater, ventilation, air conditioner
Integrated Module) controls the heating, cooling and ventilation in the
vehicle. It consists of an electronic control unit, electric motors and gear
drives to control blend door positions. It also controls the blower fan
speed.
The Scanner is able to read and clear codes and display data from the
HIM system. The HIM can be part of the vehicle’s CAN network which
links modules together to share information.
Resetting Air Conditioning System after Re-gassing or Repairs
If there are fault codes present in the air conditioning system then the
system may not operate until these are cleared from the system. Codes
can be caused through incorrect re-gassing procedures, accident
damage or genuine system faults.
NOTE: There may also be codes in the Powertrain Control Module that
will prevent the air conditioner from operating. These will also need to be
cleared.
Audio and Control Centre
The Audio and Control Centre controls the central display and controls
in the console and the audio system.
The Scanner is able to read and clear codes and display data from the
Audio and Control Centre. The Audio and Control Centre can be part
of the vehicle’s CAN network which links modules together to share
information.
Instrument Cluster Module (ICM)
The ICM (Instrument Cluster Module) controls the gauges, warning
lamps and trip computer functions.
The Scanner is able to read and clear codes and display data from the
ICM. The ICM can be part of the vehicle’s CAN network which links
modules together to share information.
AU Series Instrument Cluster Module (ICM)
On AU series 1 vehicles there are no codes available as the ICM
(Instrument Cluster Module) does not support code reading.
AUII and AUIII ICM’s support codes and clear codes.
81
Other Systems
Actuator Tests
Actuator tests are available for the AU series ICM. Select the tests from
the ACTUATOR TEST menu and follow the on-screen instructions.
Some tests may require Y to be pressed twice to instigate the test. When
exiting the test the test will cease if it has not been stopped already.
Note: When performing the ICM Functional Tests on AU Models you
may need to cycle the ignition between tests.
Glossary
TermMeaning
PCM
BEM
ICM
PID
VCI
CAN
82
Powertrain Control Module
Body Electronics Module
Instrument Cluster Module
Parameter IDentification (live data parameter)
Vehicle Communication Interface (cartridge)
Communication Area Network
PAGE INTENTIONALLY
LEFT BLANK
83
Part 5 – Body Electronics Module (BEM) and
Security Systems (SmartLock and SmartShield)
Contents
Body Electronics Module (BEM).........................................................84
Body Electronics Module (BEM) AU & BA Series
AU series 1 (up to 5/1999) (incorporating SmartLock)...............85
AU series 1 (6/1999 on) AUII and AUIII
(incorporating SmartShield)........................................................86
Falcon Series Security Systems Introduction....................................87
(Important to read this Introduction)
SmartLock System Procedures for:
EBII/NC/DC Series, ED Series, EF/NF/DF Series,
EL/NL/DL Series
Diagnosing SmartLock.............................................................89
Replacement Procedures........................................................90
AU Series 1 up to 6/1999
Diagnosing SmartLock ...........................................................91
Replacement Procedures .......................................................91
SmartShield System Procedures for:
AU series 1 after 6/99, AUII, AUIII, BA, BAII
Diagnosing SmartShield..........................................................92
SmartShield Key Coding & Replacement
Procedures Overview...........................................................92
SmartShield Coding New or Replacement
Keys (with Scan Tool) ..........................................................92
SmartShield Adding Another Key (without Scan Tool) . .........93
SmartShield Parameter Reset (Linking the BEM to the PCM)
AU & BA Series Parameter Reset . ......................................93
SmartShield Coding New or Replacement keys to a vehicle
using VCI, SOLUS, MODIS or SOLUS PRO . ......................94
Coding a Key to the BEM . ......................................................94
SmartShield Parameter Reset – Linking the BEM to the PCM .95
Parameter Reset Procedure for AU & BA Series vehicles ......95
Body Electronics Module (BEM)
The BEM (Body Electronics Module) controls various functions in
the vehicle including the security system, electric windows, wipers,
automatic headlamps (on some models), interior lights and a battery
saver feature.
The Scanner is able to read and clear codes and display data from the
BEM. The BEM can be part of these vehicle’s CAN network which links
modules together to share information.
84
BEM AU & BA Series
Body Electronics Module (BEM) AU & BA Series
AU series 1 from September 1998 to May 1999
(incorporating SmartLock)
The BEM fitted to these early models incorporated the SmartLock
security system. The BEM shows the fault codes for the SmartLock
system as part of the data list. On the data list they are called
“Diagnostic PID’s”. PID is short for “Parameter IDentification”. If the
PID indicates YES then there is a code set for that PID. The code can
be cleared by using the “CLEAR CODES” option on the data list EXIT
MENU.
Diagnostic PID Code Definitions
PIDDescription
BEM DISCONNECTED(Indicates open circuit between BEM and
electronic ignition lock assembly)
NOISE ERRORS
(Indicates a correct signal was not properly
received by the BEM from the electronic ignition
lock assembly)
NOT PROGRAMMED (Indicates the BEM and electronic ignition lock
assembly are not programmed)
WRONG DATA
(Indicates wrong data was received by the BEM
from the electronic ignition lock assembly)
HARDWARE FAULT
(Indicates a possible hardware fault, check all
power and ground circuits for the BEM and
electronic lock ignition assembly)
Actuator Tests
Actuator tests are available for the AU BEM. Select the tests from the
ACTUATOR TEST menu and follow the on-screen instructions. Some
tests may require Y to be pressed twice to instigate the test. When
exiting the test the test will cease if it has not been stopped already.
Note: When performing the BEM Functional Tests on AU Models you
may need to cycle the ignition between tests.
85
AU series 1 from June 1999, AUII and AUIII
AU series 1 from June 1999,
AUII and AUIII
(incorporating SmartShield)
The BEM fitted to these models incorporate the SmartShield security
system. The BEM shows the fault codes for the SmartShield system as
part of the data list. On the data list they are called “Diagnostic PID’s”.
PID is short for “Parameter IDentification”. If the PID indicates YES then
there is a code set for that PID. The code can be cleared by using the
“CLEAR CODES” option on the data list EXIT MENU.
Diagnostic PID Code Definitions
PID
Description
KEY DELETED
(Indicates a key placed in the ignition has been
deleted from the system)
KEY UNKNOWN
(Indicates a key placed in the ignition has not
been coded to the system)
KEY FAULT
(Indicates a fault with a key that has been placed
in the ignition)
MESSAGE FAULT
(Indicates a faulty message has been received
by the BEM)
KEY RECIEVER FAULT(Indicates the key code receiver may be faulty)
Actuator Tests
(Not applicable to Ethos)
Actuator tests are available for the AUI, AUII & AUIII BEM. Select
the tests from the ACTUATOR TEST menu and follow the on-screen
instructions.
Some tests may require Y to be pressed twice to instigate the test. When
exiting the test the test will cease if it has not been stopped already.
Note: When performing the BEM Functional Tests on AU Models you
may need to cycle the ignition between tests.
86
Falcon Series Security Systems
Falcon Series Security Systems
Including Key Coding Information and Procedures
(Not applicable to Ethos)
Introduction
Ford Falcon/Fairmont and Fairlane/LTD vehicles use two types of
security systems as follows:
1)
a)
b)
c)
d)
e)
“SmartLock” system – used on
Falcon/Fairmont EBII, Fairlane NC & LTD DC Series
Falcon/Fairmont ED Series
Falcon/Fairmont EF, Fairlane NF & LTD DF Series
Falcon/Fairmont EL, Fairlane NL & LTD DL Series
Falcon/Fairmont/Fairlane AU series 1 from September 1998 to May
1999.
These systems do not require the use of a scan tool to code keys or link
the PCM (Powertrain Control Module) to the SmartLock module or BEM
(Body Electronics Module).
This manual provides information on procedures used when diagnosing
and also replacing SmartLock components. The keys for these systems
DO NOT have a transponder (“chip”) inbuilt in the key.
2)
a)
b)
c)
“SmartShield” system – used on
Falcon/Fairmont, Fairlane & LTD AU series 1 from June 1999.
Falcon/Fairmont, Fairlane & LTD AUII and AUIII series.
Falcon/Fairmont, Fairlane & LTD BA series.
These systems do require the use of a scan tool to code keys and link
the PCM (Powertrain Control Module) to the BEM.
This manual provides information to be used in conjunction with the
VCI cartridge, SOLUS or MODIS units when performing these recoding
procedures.
The keys for these systems DO have a transponder (“chip”) inbuilt in the
key.
87
Falcon Series Security Systems
!! IMPORTANT INFORMATION !!
If coding new keys to the vehicle you MUST HAVE TWO keys that
can be coded to the vehicle, coding only one key will result in failure
and the vehicle will be immobilised.
!! IMPORTANT INFORMATION !!
To code a new key a new key “blank” must be purchased and then
cut by a locksmith to suit the ignition barrel. Once this has been
done the Scanner/SOLUS/MODIS can be used to code the new key
to the vehicle – see following procedures.
Refer to the following pages for specific information on
the vehicle being tested.
Important: Ensure the correct AU vehicle ID is used.
Check production date on vehicle compliance plates.
(Hint: some AU series vehicles have a label on one of the
rear side windows specifying which system it has.)
88
SmartLock
SmartLock System Procedures for:
EBII/NC/DC Series (uses a SmartLock module)
ED Series (uses a SmartLock module)
EF/NF/DF Series (uses a BEM)
EL/NL/DL Series (uses a BEM)
The SmartLock system utilises 3 codes from the Electronic Ignition Lock
Assembly that are transmitted to the SmartLock module or BEM (Body
Electronics Module) each time the ignition is switched on. At least 2 of
these codes must match between Electronic Ignition Lock Assembly and
the SmartLock module/BEM for the vehicle to be able to be started.
Diagnosing SmartLock
The SmartLock system is diagnosed using the SmartLock warning lamp
in the instrument cluster. If the SmartLock system detects a fault a code
is flashed on the warning lamp. The system will only flash one code at
a time, once this fault is rectified and the ignition has been cycled off for
30 seconds and back on again then if there is another code it then be
displayed.
See the following tables for SmartLock warning lamp flash meanings
and code definitions.
SmartLock Flash Code Reading
89
SmartLock
SmartLock Flash Code Table
CodeDescription
2
Wrong data received (1 or 2 codes wrong)
3
Wrong data received (all 3 codes are wrong)
4
No signal from Electronic Lock Assembly
(open circuit to BEM or no power to Lock Assy)
5
Electronic Lock Assy clock circuit or ground circuit open.
6
Starter motor safety circuit failure
(inside SmartLock module or BEM).
7
Boot or Tailgate solenoid circuit open or shorted.
8
Lock data error (all codes wrong).
SmartLock Replacement Procedures
If the SmartLock module/BEM or Electronic Ignition Lock Assembly
has been replaced these codes will need to downloaded into the
SmartLock module/BEM for the vehicle to be started and operated.
This is done using the following procedure:
SmartLock Learning Procedure (Except AU series 1)
1. Ensure the vehicle battery is fully charged as the ignition must be left
ON for 30 minutes during this procedure.
2. Turn off all of the vehicle accessories.
3. Ensure the SmartLock warning lamp is flashing the ‘armed’ state
(refer previous table).
4. Turn the ignition to the ON position and ensure the SmartLock
warning lamp flashes error code ‘3’ (refer previous table).
5. Leave the ignition ON (in the RUN position) for 30 minutes.
6. After 30 minutes the Electronic Ignition Lock Assembly will download
the codes to the SmartLock module/BEM. The door locks will cycle
twice to indicate a successful download. The SmartLock warning
lamp will then go out.
7. Turn the ignition OFF for at least 30 seconds until the SmartLock
warning lamp starts flashing the ‘armed’ state.
8. Start the vehicle to ensure correct operation.
90
SmartLock
SmartLock System Procedures for:
AU Series 1 to June 1999 (uses BEM)
(For vehicles after June 1999 see SmartShield procedures.)
Diagnosing SmartLock (for AU)
Diagnosis of the SmartLock system is incorporated with BEM (Body
Electronics Module) diagnosis. See BEM section for further information.
SmartLock Replacement Procedures (for AU)
If the BEM or Electronic Ignition Lock Assembly has been replaced
these codes will need to downloaded into the SmartLock module/BEM
for the vehicle to be started and operated.
This is done using the following procedure:
SmartLock Learning Procedure (For AU series 1)
1. Ensure the vehicle battery is fully charged as the ignition must be left
ON for 61 minutes during this procedure.
2. Turn off all of the vehicle accessories.
3. Ensure the SmartLock system is free from errors. Use the Scanner/
SOLUS/MODIS to check the BEM data list Diagnostic PID’s. (See
previous information on BEM Diagnostic PID’s)
4. Turn the ignition to the ON (or RUN) position and leave the ignition
ON for 61 minutes.
5. After 61 minutes the Electronic Ignition Lock Assembly will download
the codes to the BEM. The door locks will cycle twice to indicate a
successful download.
6. Turn the ignition OFF for at least 30 seconds.
7. Start the vehicle to ensure correct operation.
91
SmartShield
SmartShield System Procedures for:
AU series 1 after June 1999
AU series 2 & 3
BA series 1 & 2
The SmartShield system uses ignition keys that have been coded to the
BEM (Body Electronics Module). The BEM and the PCM (Powertrain
Control Module) are also coded to each other. If new keys are required
or the BEM or PCM has been replaced then use the follwing procedures.
For AU & BA series vehicles that use the Ford SmartShield system the
two following procedures can be performed using the VCI cartridge,
SOLUS or MODIS units:
Diagnosing SmartShield
Diagnosis of the SmartShield system is incorporated with BEM (Body
Electronics Module) diagnosis. See BEM section for further information.
SmartShield Key Coding and
Replacement Procedures
1) Coding keys to the Body Electronics Module.
This may need to be performed if
a) New keys are required or
b) The BEM has been replaced.
Note that if there are two existing keys that are already coded to the
vehicle extra keys can be added using a manual procedure that does
not require a scan tool.
This manual procedure does not require the BEM and PCM to be relinked.
See below for the manual procedure. Scan tool procedure can be
found in detail on the Key Code Instructions in the Operator’s CD
and also in paper form in every kit.
92
SmartShield
SmartShield adding another key to a vehicle
without using a scan tool
The following procedure can be used to add another key to an AU series
or BA series Falcon/Fairmont/Fairlane/LTD without using a scan tool.
Two existing coded keys are required to perform this procedure.
The BEM/PCM PARAMETER RESET linking procedure does not need to
be performed after adding a key with this method.
Adding Key Procedure
1. Ensure two code keys are present and any extra keys have been
cut by a locksmith.
2. Insert one of the coded keys into the ignition and switch as
follows: OFF > ACCESSORIES > OFF
3. Remove 1st key and insert 2nd coded key into the ignition and
switch as follows: OFF > IGNITION ON. The door locks will
cycle to indicate key training state has been entered.
4. Within 5 seconds remove the 2nd key and place then new key
into the ignition and turn to the IGNITION ON position. The door
locks will cycle to indicate the key has been coded.
5. Switch the IGNITION OFF to exit the training state.
2) PARAMETER RESET - Linking the Powertrain Control
Module (PCM) to the Body Electronics Module (BEM).
This will need to be performed if the BEM or PCM has been replaced or
if keys have been coded to the BEM.
This is called a “Parameter Reset” by Ford and can only be performed
using a scan tool.
93
SmartShield
SmartShield Coding New or Replacement
keys to a vehicle using VCI, SOLUS,
MODIS or SOLUS PRO
This procedure erases ALL keys and security information from the BEM.
The PCM will need to be linked to the BEM using the Parameter Reset
function.
IMPORTANT: AT LEAST TWO KEYS MUST BE
CODED TO THE VEHICLE.
!!WARNING!!
Two keys minimum are required for this procedure
to be successful.
Two keys minimum MUST be programmed to the BEM
or the procedure will fail.
IF YOU ONLY PROGRAM ONE KEY THE VEHICLE WILL
NOT BE ABLE TO BE STARTED.
!!ATTENTION!!
After programming two new keys to a vehicle a
PARAMETER RESET must be performed to link the BEM
to the PCM (Powertrain Control Module).
This function is performed from the Engine Actuator Test Menu.
Coding a Key to the BEM (Body Electronics Module)
Refer to Key Code Instructions in the Operator’s CD or in paper form in
every kit for detailed procedures on Key Coding and Parameter Reset
linking.
94
SmartShield
SmartShield Parameter Reset
– Linking the BEM to the PCM
The BEM (Body Electronics Module) must recognise the PCM
(Powertrain Control Module) to enable the vehicle to be started.
1. A new BEM will not recognise the current PCM so they need to be
‘linked’.
2. A new PCM will not be recognised by the BEM so they need to be
‘linked’.
3. When keys are programmed to the BEM it loses its recognition of the
PCM so they need to be ‘re-linked’.
Performing a PARAMETER RESET links the modules together to enable
the vehicle to be started.
This procedure is used in three situations:
1. When a BEM has been replaced.
2. When a PCM has been replaced.
3. When keys have been coded to the BEM using a scan tool.
Parameter Reset Procedure For AU & BA Series vehicles
Ensure the vehicle has a fully charged battery, as the
vehicle’s ignition must be left on uninterrupted for 10 minutes
during this procedure.
Refer to Key Code Instructions in the Operator’s CD or in paper form in
every kit for detailed procedures on Key Coding and Parameter Reset
linking.
95
Appendix B — Vehicle Does Not Communicate
Contents
Common Symptom Index....................................................................96
Mazda Electronic Control System (MECS).........................................97
Checklist (Check These Points First)..................................................97
Isolate the Problem to the Vehicle or the SCANNER.........................98
Starting a KOEO Test (Ignition Key Position)...................................100
Starting a KOER Test..........................................................................100
Engine Will Not Start or Starts and Runs Poorly —
Does Not Perform KOEO Test.....................................................101
Engine Runs But Will Not Perform One or More
Self-Tests......................................................................................102
Testing the Self-Test Connector.........................................................102
Open Ground .....................................................................................104
Vehicle Will Not Transmit Data..........................................................105
Common Symptoms With NO COMMUNICATION...........................105
Checking the Data Link Connectors.................................................107
For live data communication problems, refer to the section “Vehicle Will
Not Transmit Data” later in this appendix.
To perform a Ford self-test on codes only vehicles, the SCANNER acts
as a switch to turn on the programs built into the Ford electronic control
unit (ECU). If a problem exists with the wiring or other circuit parts on the
vehicle, the SCANNER may not be able to switch the self-test circuit.
Common Symptom Index
The following list identifies some common symptoms of self-test failures
with references to sections of this appendix for specific troubleshooting.
In addition to these points, check the eight points listed in the next
section, “Checklist (Check These Points First).”
1. SCANNER stays at TEST INITIATED — WAIT FOR CODES
indefinitely after starting a test. Check:
a. Make sure you are connected to the correrct connectors
– see section 1.
b. Ignition key and Y button sequence. See Checklist items 2 and
3 and “Starting a KOEO or KOER Test.”
c. Vehicle ground or wiring fault. See Checklist items 5, 6, and 7
and “Testing the Self-Test Connector.”
96
Appendix B — Vehicle Does Not Communicate
2. Solenoids or relays do not click when starting a KOEO test or engine
speed does not change when starting a KOER test. Check:
a. Ignition key and Y button sequence. See Checklist items 2, 3,
and 4 and “Testing the Self-Test Connector.”
3. SCANNER shuts down when the ignition key is turned on. Check:
a. Ground terminal at self-test connector. See Checklist items 5
and 6 and “Testing the Self-Test Connector.”
4. SCANNER does not receive codes from the vehicle, but the engine
seems to go through self-test. Check:
a. Check self-test output (STO) line. See “Testing the Self-Test
Connector.” Also check the SCANNER data cable.
See the Contents at the beginning of this appendix for other vehicle
symptoms and specific problems.
Mazda Electronic Control System (MECS)
The MECS controllers on Ford products do not communicate with the
SCANNER unless a service code is present. See “MECS Tests” in Part 3
for details.
Checklist (Check These Points First)
Begin troubleshooting the self-test initialization failure by determining
if the SCANNER is working normally. If your SCANNER works properly
on other vehicles, particularly other Ford products, the problem is
most likely in the vehicle, not the SCANNER. Failure to perform either a
key-on, engine-off (KOEO) or key-on, engine-running (KOER) self-test
may be due to the way in which the test is started. Always follow the
on-screen prompts exactly. Test failure also may be caused by a basic
power or ground problem on the vehicle. Check these points first:
1. Be sure the ignition is off when connecting the SCANNER.
2. To begin a KOEO test, press Y to start the test; then turn the ignition
on. See “Starting A KOEO Test” for more information.
3. To begin a KOER test, turn the ignition off for a full 10 seconds.
Then restart the engine and press Y to start the test. See “Starting a
KOER Test” for more information.
4. Determine if solenoids and relays click when starting a KOEO test
or if engine speed changes when doing a KOER test. See “Starting
a KOEO Test” and “Starting a KOER Test” for more information.
MECS Self Tests do not activate solenoids or relays.
97
Appendix B — Vehicle Does Not Communicate
5. Check for an ECU main ground problem at the single-wire
connector at the battery ground cable. A bad ground at this point
also may cause a no-start condition, prevent closed-loop operation,
or cause faulty SCANNER operation.
6. Check the exhaust gas oxygen (EGO) sensor circuit ground (orange
wire from PCM to cylinder head). Some engines will run but not
perform a self-test with a loose or bad EGO ground.
7. Check for voltage and ground at the self-test connector. See
“Testing The Self-Test Connector” later in this section for
instructions.
8. Depending on whether the engine starts and runs or will not
start, refer to the appropriate section in this appendix for more
instructions.
Isolate the Problem to the Vehicle or the SCANNER
(Start A Self-Test Without the SCANNER)
If the previous checks do not correct the condition, isolate the problem
to the vehicle or to the SCANNER by running the self-test with a jumper
wire and a voltmeter or a test light.
First, connect an analog voltmeter to the self-test output (STO) terminal
in the self- test connector. Connect the meter negative (–) lead to the
STO terminal and the positive (+) lead to the battery positive terminal,
figure B-2.
Figure B-2. Starting a self-test with a jumper wire.
98
Appendix B — Vehicle Does Not Communicate
If using a test light, connect it between the STO terminal and battery
positive voltage. Then connect a jumper wire from the self-test input
(STI) terminal to the ground terminal in the self-test connector. Finally,
turn the ignition on. Jumpering the STI terminal to ground starts the keyon, engine-off (KOEO) test for all codes only systems.
For a KOEO test, the voltmeter should show some uniform voltage
pulses or the test light should flash evenly after 45 to 60 seconds if the
ECU has run the test and is transmitting codes. If the ECU runs the
self-test and transmits codes, the communication problem is probably
in the SCANNER. If the SCANNER readings are unsteady, check the
SCANNER cable and adapter connections. Use an ohmmeter to check
continuity of the SCANNER data cable from pin to pin between the Dshaped connectors at either end of the cable. If the ECU fails to run the
self test when you use a jumper wire and a voltmeter, read the following
sections to troubleshoot and fix the problem.
99
Appendix B — Vehicle Does Not Communicate
Starting a KOEO Test (Ignition Key Position)
For the most reliable test operation on all codes only systems, first press
the SCANNER Y button to start the test; then turn the key on last.
When you start a KOEO test on most Ford engines, you should hear
solenoids and relays click as the test begins. The idle speed control
motor also may operate. A few engines will stay completely silent,
however, during the KOEO test. If you do not hear any solenoids and
relays operate on most engines, it may be an immediate sign that the
test did not start. The KOEO test should take about 1 minute or less.
To start the KOEO test, the ECU reads the low-voltage change on the STI
line as the SCANNER switches the self-test input (STI) line to ground.
Most ECU systems monitor the STI voltage continuously. Therefore, it
is possible to turn the key on before pressing the SCANNER Y button to
start the test. There are no clearcut lists of which Ford systems operate
in which way to read the STI signal.
The SCANNER message: SELF TEST INITIATED. . .WAIT FOR CODES
does not mean that the self-test has definitely started. It means that the
SCANNER has attempted to start the test and is ready to receive codes.
Starting a KOER Test
To start a KOER test, the SCANNER again grounds the STI line. When
you start a KOER test, you should hear a noticeable increase in engine
rpm for most systems. If the test runs properly, you should hear engine
speed change several times as the ECU operates the idle speed control,
the EGR valve, and other system actuators.
The entire KOER test may take from 1 to 3 minutes, depending on the
system and the number of codes that may be output.
Some systems can go directly from a KOEO test to a KOER test.
However, most Ford systems will not go directly from a KOEO test to a
KOER test with the ignition on. These systems allow only one self-test
per ignition cycle. You must turn the key off after finishing a KOEO test;
then turn it back on to begin the KOER test. Leave the key off for 10
seconds. On many vehicles a timed relay keeps power on the ECU for
a few seconds after the key is turned off. Some carbureted and throttlebody-injected systems also must reset the idle speed control motor
before they will perform another self-test.
Some 1987 and later Ford systems will not perform a KOER test if any
hard, on-demand, faults are detected during a KOEO test. In this case,
100
Appendix B — Vehicle Does Not Communicate
the ECU will transmit a code 98 (or 998 on many 1991 and later models)
before it transmits the ECU ID code, and the test will be aborted. Code
98 or 998 means fix the engine-off hard faults first, before doing the
engine-running test. Ford test procedures specifically say to fix KOEO
hard faults first, before troubleshooting KOER codes.
Engine Will Not Start or Starts and Runs Poorly —
Does Not Perform KOEO Self-Test
If a fuel-injected engine will not start, it may not perform a KOEO test. A
carbureted engine may start and run but fail to perform a self-test. It may
run poorly, however, because it will be running without feedback fuel
control or ECU spark advance control. If a vehicle has either of these
symptoms and will not do the KOEO test, begin with these basic checks.
You should have a wiring diagram of the vehicle.
1. Check the battery state of charge and capacity. The MODIS and
SOLUS are self-powered so the SCANNER may appear to operate
normally even if the battery does not have enough power to crank
the engine or operate the ECU.
2. Check the EEC power relay and fuel pump relay. Check the
operation of these two system relays. The ECU for an EEC system
receives battery voltage (B+) through a main EEC power relay. If
the relay does not close, the ECU will not operate. The power relay
usually has a brown cover with a black top or a black cover with a
white top. It may be in the engine compartment or under the dash.
For a no-start problem, check the fuel pump relay. You should hear
the fuel pump run for about 2 seconds when you turn the ignition
on. If it does not the relay may not be closing. The fuel pump relay
usually has a green plastic cover with a black top. It may be in
the engine compartment, under the dash, or in the trunk on some
models. Remember, the ECU must receive power through the main
power relay before it can energize the pump relay.
The fuel pump inertia switch is a convenient place to check fuel
pump relay voltage on many cars. Also be sure that the switch is not
open.
3.Check ECU supply voltage. On most Ford vehicles, the ECU
receives battery voltage (B+) through a fusible link in the wiring
harness. Some may receive B+ voltage through a fuse. Check a
wiring diagram for the location of a fusible link or fuse and test for an
open circuit. You can make a quick check for ECU supply voltage by
testing for voltage at the self-test input (STI) terminal as described in
the section on “Testing The Self-Test Connector.”
101
Appendix B — Vehicle Does Not Communicate
4. Check the ECU ground (signal return). The ECU on most Ford
systems is grounded remotely through a circuit in the main ECU
harness. Use a wiring diagram to identify the ground circuit number
and the location of the ground connection. An open ground can
keep a fuel-injected engine from starting. A high-resistance, or
“dirty,” ground can cause overall poor operation. A common
problem area is the bullet connector in the pigtail on the battery
ground cable.
Engine Runs But Will Not Perform One or More SelfTests – Codes Only System
The way in which the engine runs can help to identify the cause of a selftest failure. If the engine seems to run normally but will not complete a
self-test, the cause may be a wiring problem to the self-test connector
that does not affect the rest of the system. If the engine runs poorly, the
cause may be an ECU voltage problem that affects the entire system, a
poor EEC system ground, or an open ground at the exhaust gas oxygen
(EGO) sensor.
Radiofrequency interference (RFI) also can prevent or interfere with a
self-test. If a KOER test fails halfway through the test, or if code output is
erratic or invalid, use an oscilloscope to check for ignition RFI.
Failure to run a self-test also may be caused by the way in which you start
the test. Refer to the instructions on starting a KOEO or KOER test.
Testing the Self-Test Connector
Make the following voltage tests at the self-test connector on codes only
systems to help determine why a Ford vehicle will not perform a self-test.
Use a digital voltmeter and refer to figures B-3 and B-4 to check an MCU
or an EEC-IV system.
1. Self-test input (STI) – Turn the ignition key on and connect the
voltmeter positive (+) lead to the STI terminal. Connect the negative
(–) lead to the battery negative (–) terminal. Either battery voltage
(about 12 volts) or 5 volts should be present on the STI terminal
with the key on. If the STI line is open, the ECU cannot receive the
self-test signal from the SCANNER. The vehicle can still run normally,
however, with an open circuit to the STI terminal at the connector.
2.Ground – With the ignition on, connect the voltmeter positive (+)
lead to the ground terminal in the self-test connector. Connect the
negative (–) lead directly to the battery negative (–) terminal. Do not
connect the voltmeter lead to an engine or chassis ground. This test
measures the voltage drop across the ground side of the self-test
102
Appendix B — Vehicle Does Not Communicate
GROUND
STO
TERMINAL
STI
TERMINAL
STI
TERMINAL
STI
V8 A/TRANS
ONLY
STO
TERMINAL
STO
V8 A/TRANS
ONLY
GROUND
STO
TERMINAL
STI
TERMINAL
GROUND
Figure B-3. Codes only self test connectors.
connector, the ECU, and most sensors. The ground voltage-drop test
is important for several reasons.
The SCANNER switches the STI line to ground at the self-test
connector. A high-resistance ground can prevent the test from
running. This is particularly true on vehicles that use a 5-volt STI
signal. The SCANNER may operate normally, but there will not be
enough signal voltage drop on the STI line when it is grounded.
Ford specifications may allow up to a 0.5-volt drop across the system
ground. In many cases, however, this may be too high and can cause
overall poor performance, as well as failure to self-test. An ideal
system
103
Appendix B — Vehicle Does Not Communicate
ground should have a voltage drop of 0.1 volt or less. A high-resistance,
or “dirty,” ground can cause overall poor operation. A common problem
area is the bullet connector in the pigtail on the battery ground cable.
The ground terminal at the self-test connector is a convenient
location to check the ECU ground and the ground reference for most
engine sensors. A poor, high-resistance ground connection can
cause the engine to run poorly or prevent the self test from running,
or both. For example, a 0.5-volt drop across this common ground
can produce a 10-percent error in sensor voltage signals. Depending
on the self-test programs and sensor calibrations, a high-resistance
system ground may or may not produce fault codes.
Open Ground – To check for an open circuit at the self-test
connector ground terminal, connect a voltmeter positive (+) lead to
battery positive and the negative (–) lead to the ground terminal. The
meter should indicate battery voltage. If the meter reads zero, the
ground terminal is open.
3. Self-test output (STO) – If voltage at the STI lead is correct and the
system ground is good, the system still may not complete a self-test if
the STO line is open. After the vehicle ECU runs a self-test, it transmits
codes as voltage pulses on the STO line. If the STO line is open, the
ECA cannot transmit fault codes to the SCANNER.
104
To check STO continuity, turn the ignition on and connect the
voltmeter positive (+) lead to the STO terminal at the self-test
connector. Connect the negative (‑) lead to the battery negative
terminal. On 1987 and earlier models, the meter should indicate
battery voltage. On 1988 and later models, the meter should read 0.0
volt until you activate the self-test. If the meter reading is incorrect,
trace and repair the open circuit to the STO terminal. An open circuit
in this line should not affect normal engine operation.
Appendix B — Vehicle Does Not Communicate
Vehicle Will Not Transmit Data
– Live Data Systems
Some common problems that may prevent a Ford vehicle from
communicating with the SCANNER are listed below:
1. Vehicle identification – Check the vehicle identification is entered
correctly. Make sure you answer all questions correctly. The SCANNER
must know exactly what year and model PCM it is connected to. If the
SCANNER thinks it is receiving data from one car and it is connected to
another (through incorrect identification), it will either not communicate
at all or will display data readings that are incorrect. Always enter a new
vehicle identification when testing a new vehicle, even if two vehicles
are exactly the same model with the same engine.
2. SCANNER connections – See “Check SCANNER Connection and
Operation” for information on SCANNER cables and connections.
3. Loss of power to the computer – The PCM receives battery voltage
through one or more fuses or fusible links in the wiring harness. Use
a wiring diagram to check PCM connections for battery voltage and
ground. If a fuse or fusible link is open, the PCM cannot communicate
with the SCANNER.
4. Ignition off when connecting SCANNER – Be sure the ignition is
off when connecting and disconnecting the SCANNER. If the ignition
is on when the SCANNER is connected or disconnected, SCANNER
memory may be disrupted. Erase and reenter vehicle identification if
this occurs.
Common Symptoms With NO COMMUNICATION
The following sections list some common symptoms that often
accompany a NO COMMUNICATION message. References to other
sections in this appendix are also listed. You may need a wiring diagram
for the specific vehicle and Ford troubleshooting procedures for some
of the following checks. When testing live data cars with the 16-pin
connector, make sure the S7 Personality Key is installed in the DL-16
adapter, or S2 key for Mondeo HA/HB.
105
Appendix B — Vehicle Does Not Communicate
Engine Will Not Start and PCM Will Not Communicate With Ignition
On
If the engine does not start and the PCM will not communicate with the
ignition on, make these basic tests:
Battery — Check the battery state of charge and cranking capacity. The
MODIS is self-powered therefore the SCANNER may appear to operate
normally even if the battery does not have enough power to crank the
engine or operate the vehicle computer.
PCM supply voltage — Check a wiring diagram for the location of the
PCM fuses or fusible links and test for an open circuit.
PCM ground — Use a wiring diagram to identify the location of the ground
connection. An open ground can keep a fuel-injected engine from starting.
A high-resistance, or “dirty,” ground can cause overall poor operation.
An open ground or battery voltage (B+) circuit on a fuel-injected engine
will remove power from the PCM and keep the engine from starting. A
carbureted engine may start and run even if the power circuit to the
PCM is open. It probably will run very poorly, however, because it will be
running without feedback fuel control or spark advance control.
Engine Runs But Will Not Communicate
The way the engine runs can be a clue to the cause of a test problem.
If the engine seems to run normally but the PCM will not communicate
with the SCANNER, try selecting DATA with the key on and the engine
off, then after establishing communication start the engine. If the
vehicle still won’t communicate, the cause may be a wiring problem
to the vehicle connector that does not affect the rest of the system. If
the engine runs poorly, the cause may be a poor system ground or a
voltage problem that affects the PCM or the entire system. Refer to the
section, “Check the DLC Connector” for troubleshooting instructions.
SCANNER Does Not Operate (Light Up) When Connected to Vehicle
Power
The SCANNER is grounded through the ground terminal in the vehicle
connector. An open circuit in this line will prevent the SCANNER from
operating. Depending on the vehicle, test the connector ground terminal
as explained in, “Checking The Data Link Connectors.” Also check the
following points:
106
Appendix B — Vehicle Does Not Communicate
1. Use an ohmmeter to test the continuity of the SCANNER data cable.
Measure continuity pin to pin from the D-shaped connectors at each
end of the cable.
2. On vehicles with the 16-pin DLC connector, make sure you are using
the S7 Personality Key in the DL-16 adapter, or S2 key on Mondeo
HA/HB.
Check SCANNER Connection and Operation
Begin troubleshooting the test or communication problem by
determining if the SCANNER is working normally. If the SCANNER
works properly on other vehicles, particularly similar Ford products, the
problem is probably in the vehicle, not the SCANNER. If the SCANNER
readings are unsteady, the SCANNER may be at fault or there may be a
power problem on the vehicle.
If the SCANNER intermittently resets or goes blank, a wire may be
opening intermittently in one of the cables or in the adapter. Use an
ohmmeter to check continuity of the SCANNER data cable from pin to
pin between the D-shaped connectors at either end of the cable.
Checking the Live Data Link Connectors
Use the following voltage tests at the diagnostic connector to help
determine the reason that a vehicle will not receive. Use a highimpedance digital voltmeter and refer to figure B-7 on the next page.
1. Ground — Connect the voltmeter positive (+) lead to the ground
terminal in the diagnostic connector. Connect the negative (‑) lead
directly to the battery negative (‑) terminal. Do not connect the voltmeter
negative lead to an engine or chassis ground. This test measures the
voltage drop across the ground side of the diagnostic connector. An
ideal system ground should have a voltage drop of 0.1 volt or less.
If the wiring is open to the ground terminal of the diagnostic
connector, or at the connector itself, it may not affect engine
operation. It will affect SCANNER operation, however, because the
SCANNER uses this terminal as a ground point.
107
Appendix B — Vehicle Does Not Communicate
BUS -
GROUND
BUS +
Mondeo HA/HB 16-pin Connector
Ford 16-pin Connector
Figure B-7. Checking the Falcon AU,Taurus,Explorer, Mondeo HC, Transit Data
Link Connectors.
BUS +
BUS NOT USED
GROUND
Festiva WB/WD 1997 1.5L only.
108
To check for an open circuit at the diagnostic connector ground
terminal, connect the voltmeter positive (+) lead to battery positive
and the negative lead to the connector ground terminal. You should
read battery voltage. If the meter reads zero, the ground terminal is
open.
Appendix B — Vehicle Does Not Communicate
2. Battery voltage (16-pin only) – Connect the voltmeter positive (+)
lead to the battery voltage terminal at the diagnostic connector.
Connect the negative (‑) lead to the battery ground terminal. You
should read battery voltage. This tests the battery voltage supply to
the computer.
3. Bus bias voltage – Connect the voltmeter positive (+) lead to either
bias terminal in the diagnostic connector. Connect the negative (-)
lead to the ground terminal in the diagnostic connector. With the
ignition key on and no bus activity, nominal voltage should be, as
follows:
Mondeo HA/HB only
All others
BUS +
5-volts
0-volts
BUS —
0-volts
5-volts
With an active bus, these readings can be varying from 0 to 5-volts,
depending on the amount of bus activity. Perform this check for both
bus terminals in the diagnostic connector.
109
Ford Code Descriptions
Ford Code Descriptions
Please refer to Diagnostic Trouble Codes (DTC’s) reference manual
found on the Operator’s CD for Ford code descriptions.
110
PAGE INTENTIONALLY
LEFT BLANK
111
®SNAP-ON TOOLS (AUSTRALIA) PTY LTD
ABN 55 010 793 683
112 ZEEMAUFOR114
Form
E.&O.E.
9/11