1
Coriolis User’s Guide
Contents
Credits & License . . . . . . . . . . . .
Release Notes . . . . . . . . . . . . . .
Release 1.0.1475 . . . . . . . . . . . . .
Release 1.0.1963 . . . . . . . . . . . . .
Release 1.0.2049 . . . . . . . . . . . . .
Release v2.0.0 . . . . . . . . . . . . . .
Installation . . . . . . . . . . . . . . .
Fixed Directory Tree . . . . . . . . . . .
Building Coriolis . . . . . . . . . . . . .
Packaging Coriolis . . . . . . . . . . . .
Hooking up into Alliance . . . . . . . . .
Environment Helper . . . . . . . . . . .
Documentation . . . . . . . . . . . . .
Coriolis Configuration & Initialisation
Configuration Helpers . . . . . . . . . .
Alliance Helper . . . . . . . . . . . .
Tools Configuration Helpers . . . . .
CGT - The Graphical Interface . . . . .
Viewer & Tools. . . . . . . . . . . . . .
Stratus Netlist Capture . . . . . . . . . .
The Hurricane Data-Base . . . . . . . .
Mauka -- Placer . . . . . . . . . . . . . .
Knik -- Global Router . . . . . . . . . . .
Kite -- Detailed Router . . . . . . . . . .
Kite Configuration Parameters . . . .
Executing Python Scripts in Cgt . . . . .
Printing & Snapshots. . . . . . . . . . .
Memento of Shortcuts in Graphic Mode
Cgt Command Line Options . . . . . . .
Miscellaneous Settings . . . . . . . . . .
The Controller . . . . . . . . . . . . . .
The Look Tab . . . . . . . . . . . . . . .
The Filter Tab . . . . . . . . . . . . . . .
The Layers&Go Tab. . . . . . . . . . . .
The Netlist Tab . . . . . . . . . . . . . .
The Selection Tab. . . . . . . . . . . . .
The Inspector Tab . . . . . . . . . . . .
The Settings Tab . . . . . . . . . . . . .
A Simple Example: AM2901 . . . . . .
.
.
.
.
.
.
.
.
.
.
.
.
.
.
.
.
.
.
.
.
.
.
.
.
.
.
.
.
.
.
.
.
.
.
.
.
.
.
.
.
.
.
.
.
.
.
.
.
.
.
.
.
.
.
.
.
.
.
.
.
.
.
.
.
.
.
.
.
.
.
.
.
.
.
.
.
.
.
.
.
.
.
.
.
.
.
.
.
.
.
.
.
.
.
.
.
.
.
.
.
.
.
.
.
.
.
.
.
.
.
.
.
.
.
.
.
.
.
.
.
.
.
.
.
.
.
.
.
.
.
.
.
.
.
.
.
.
.
.
.
.
.
.
.
.
.
.
.
.
.
.
.
.
.
.
.
1
.
.
.
.
.
.
.
.
.
.
.
.
.
.
.
.
.
.
.
.
.
.
.
.
.
.
.
.
.
.
.
.
.
.
.
.
.
.
.
.
.
.
.
.
.
.
.
.
.
.
.
.
.
.
.
.
.
.
.
.
.
.
.
.
.
.
.
.
.
.
.
.
.
.
.
.
.
.
.
.
.
.
.
.
.
.
.
.
.
.
.
.
.
.
.
.
.
.
.
.
.
.
.
.
.
.
.
.
.
.
.
.
.
.
.
.
.
.
.
.
.
.
.
.
.
.
.
.
.
.
.
.
.
.
.
.
.
.
.
.
.
.
.
.
.
.
.
.
.
.
.
.
.
.
.
.
.
.
.
.
.
.
.
.
.
.
.
.
.
.
.
.
.
.
.
.
.
.
.
.
.
.
.
.
.
.
.
.
.
.
.
.
.
.
.
.
.
.
.
.
.
.
.
.
.
.
.
.
.
.
.
.
.
.
.
.
.
.
.
.
.
.
.
.
.
.
.
.
.
.
.
.
.
.
.
.
.
.
.
.
.
.
.
.
.
.
.
.
.
.
.
.
.
.
.
.
.
.
.
.
.
.
.
.
.
.
.
.
.
.
.
.
.
.
.
.
.
.
.
.
.
.
.
.
.
.
.
.
.
.
.
.
.
.
.
.
.
.
.
.
.
.
.
.
.
.
.
.
.
.
.
.
.
.
.
.
.
.
.
.
.
.
.
.
.
.
.
.
.
.
.
.
.
.
.
.
.
.
.
.
.
.
.
.
.
.
.
.
.
.
.
.
.
.
.
.
.
.
.
.
.
.
.
.
.
.
.
.
.
.
.
.
.
.
.
.
.
.
.
.
.
.
.
.
.
.
.
.
.
.
.
.
.
.
.
.
.
.
.
.
.
.
.
.
.
.
.
.
.
.
.
.
.
.
.
.
.
.
.
.
.
.
.
.
.
.
.
.
.
.
.
.
.
.
.
.
.
.
.
.
.
.
.
.
.
.
.
.
.
.
.
.
.
.
.
.
.
.
.
.
.
.
.
.
.
.
.
.
.
.
.
.
.
.
.
.
.
.
.
.
.
.
.
.
.
.
.
.
.
.
.
.
.
.
.
.
.
.
.
.
.
.
.
.
.
.
.
.
.
.
.
.
.
.
.
.
.
.
.
.
.
.
.
.
.
.
.
.
.
.
.
.
.
.
.
.
.
.
.
.
.
.
.
.
.
.
.
.
.
.
.
.
.
.
.
.
.
.
.
.
.
.
.
.
.
.
.
.
.
.
.
.
.
.
.
.
.
.
.
.
.
.
.
.
.
.
.
.
.
.
.
.
.
.
.
.
.
.
.
.
.
.
.
.
.
.
.
.
.
.
.
.
.
.
.
.
.
.
.
.
.
.
.
.
.
.
.
.
.
.
.
.
.
.
.
.
.
.
.
.
.
.
.
.
.
.
.
.
.
.
.
.
.
.
.
.
.
.
.
.
.
.
.
.
.
.
.
.
.
.
.
.
.
.
.
.
.
.
.
.
.
.
.
.
.
.
.
.
.
.
.
.
.
.
.
.
.
.
.
.
.
.
.
.
.
.
.
.
.
.
.
.
.
.
.
.
.
.
.
.
.
.
.
.
.
.
.
.
.
.
.
.
.
.
.
.
.
.
.
.
.
.
.
.
.
.
.
.
.
.
.
.
.
.
.
.
.
.
.
.
.
.
.
.
.
.
.
.
.
.
.
.
.
.
.
.
.
.
.
.
.
.
.
.
.
.
.
.
.
.
.
.
.
.
.
.
.
.
.
.
.
.
.
.
.
.
.
.
.
.
.
.
.
.
.
.
.
.
.
.
.
.
.
.
.
.
.
.
.
.
.
.
.
.
.
.
.
.
.
.
.
.
.
.
.
.
.
.
.
.
.
.
.
.
.
.
.
.
.
.
.
.
.
.
.
.
.
.
.
.
.
.
.
.
.
.
.
.
.
.
.
.
.
.
.
.
.
.
.
.
.
.
.
.
.
.
.
.
.
.
.
.
.
.
.
.
.
.
.
.
.
.
.
.
.
.
.
.
.
.
.
.
.
.
.
.
.
.
.
.
.
.
.
.
.
.
2
3
3
3
3
4
5
5
6
6
6
7
8
8
8
8
10
11
13
13
13
14
14
14
15
16
16
17
18
19
20
20
20
21
22
23
24
26
27
Documentation SoC
March 2014
Credits & License
HURRICANE . . . . . . . . . . . . . . . . . . . . . . . . . . . . . . . . . . . . . . . Rémy ESCASSUT & Christian
MAUKA . . . . . . . . . . . . . . . . . . . . . . . . . . . . . . . . . . . . . . . . . . . . . . . . Christophe ALEXANDRE
STRATUS . . . . . . . . . . . . . . . . . . . . . . . . . . . . . . . . . . . . . . . . . . . . . . . . . . . . . . Sophie BELLOEIL
KNIK . . . . . . . . . . . . . . . . . . . . . . . . . . . . . . . . . . . . . . . . . . . . . . . . . . . . . . . . . . Damien DUPUIS
KITE, UNICORN . . . . . . . . . . . . . . . . . . . . . . . . . . . . . . . . . . . . . . . . . . . . . . Jean-Paul CHAPUT
c BULL 2000-2014 and is released under the terms of
The HURRICANE data-base is copyright
c UPMC 2008-2014 and released under the GPL
the LGPL license. All other tools are copyright
license.
c Chris C. N. CHU from
The KNIK router makes use of the FLUTE software, which is copyright
the Iowa State University (http://home.eng.iastate.edu/~cnchu/).
UPMC/ LIP 6/SoC
2
Documentation SoC
March 2014
Release Notes
Release 1.0.1475
This is the first preliminary release of the CORIOLIS 2 framework.
This release mainly ships the global router KNIK and the detailed router KITE. Together they
aim to replace the ALLIANCE NERO router. Unlike NERO, KITE is based on an innovating routing
modeling and ad-hoc algorithm. Although it is released under GPL license, the source code will
be avalaible later.
Contents of this release:
1. A graphical user interface (viewer only).
2. The KNIK global router.
3. The KITE detailed router.
Supported input/output formats:
• ALLIANCE vst (netlist) & ap (physical) formats.
• Even if there are some references to the CADENCE LEFDEF format, its support is not included
because it depends on a library only available to SI2 affiliated members.
Release 1.0.1963
Release 1963 is alpha. All the tools from CORIOLIS 1 have been ported into this release.
Contents of this release:
1. The STRATUS netlist capture language (GENLIB replacement).
2. The MAUKA placer (still contains bugs).
3. A graphical user interface (viewer only).
4. The KNIK global router.
5. The KITE detailed router.
6. Partially implemented python support for configuration files (alternative to XML).
7. A documentation (imcomplete/obsoleted in HURRICANE’s case).
Release 1.0.2049
Release 2049 is Alpha.
Changes of this release:
1. The HURRICANE documentation is now accurate. Documentation for the Cell viewer
and CRLCORE has been added.
2. More extensive Python support for all the components of CORIOLIS.
3. Configuration is now completly migrated under Python.
useds for compatibilty.
XML
loaders can still be
4. The cgt main has been rewritten in Python.
UPMC/ LIP 6/SoC
3
Documentation SoC
March 2014
Release v2.0.0
1. Migrated the repository from svn to git, and release complete sources. As a consequence, we drop the distribution packaging support and give public read-only access
to the repository.
2. Deep rewrite of the KATABATIC database and KITE detailed router, achieve a speedup
factor greater than 20...
UPMC/ LIP 6/SoC
4
Documentation SoC
March 2014
Installation
Note
As the sources are being released, the binary packaging is dropped. You still may
find older version here: http://asim.lip6.fr/pub/coriolis/2.0 .
In a nutshell, building source consist in pulling the git repository then running the ccb installer.
Main building prerequisites:
• cmake
• g++
• boost
• libxml2
• yacc & lex.
• Qt 4
• LEF/DEF (optional).
• hMetis (optional).
• doxygen.
• latex
• latex2html.
• python-docutils (for reStructuredText).
Fixed Directory Tree
In order to simplificate the work of the ccb installer, the source, build and installation tree is
fixed. To successfully compile CORIOLIS you must follow it exactly. The tree is relative to the
home directory of the user building it (noted ~/ or $HOME/ ). Only the source directory needs
to be manually created by the user, all others will be automatically created either by ccb or the
build system.
Sources
Sources root
under git
~/coriolis-2.x/src
~/coriolis-2.x/src/coriolis
Architecture Dependant Build
Linux, SL 6, 32 bits
Linux, SL 6, 64 bits
FreeBSD 8, 32 bits
FreeBSD 8, 64 bits
~/coriolis-2.x/Linux.slsoc6x/Release.Shared/build/<tool>
~/coriolis-2.x/Linux.slsoc6x_64/Release.Shared/build/<tool>
~/coriolis-2.x/FreeBSD.8x.i386/Release.Shared/build/<tool>
~/coriolis-2.x/FreeBSD.8x.amd64/Release.Shared/build/<tool>
Architecture Dependant Install
Linux, SL 6, 32 bits
UPMC/ LIP 6/SoC
~/coriolis-2.x/Linux.slsoc6x/Release.Shared/install/
5
March 2014
Documentation SoC
FHS Compliant Structure under Install
Binaries
Libraries (Python)
Include by tool
Configuration files
Doc, by tool
.../install/bin
.../install/lib
.../install/include/coriolis2/<project>/<tool>
.../install/etc/coriolis2/
.../install/share/doc/coriolis2/en/html/<tool>
Note
Alternate build types: the Release.Shared means an optimized build with shared
libraries. But there are also available Static instead of Shared and Debug instead
of Release and any combination of them.
Static do not work because I don’t know yet to mix statically linked binaries and
Python modules (which must be dynamic).
Building Coriolis
The first step is to create the source directory and pull the git repository:
dummy@lepka:~$
dummy@lepka:~$
dummy@lepka:~$
dummy@lepka:~$
mkdir -p ~/coriolis-2.x/src
cd ~/coriolis-2.x/src
git clone https://www-soc.lip6.fr/git/coriolis.git
cd coriolis
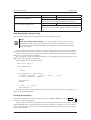
Second and final step, build & install:
dummy@lepka:src$ ./bootstrap/ccp.py --project=coriolis --make="-j4 install"
dummy@lepka:src$ ./bootstrap/ccb.py --project=coriolis --doc --make="-j1 install"
We need two steps because the documentation do not support to be generated with a parallel build. So we compile & install in a first step in -j4 (or whatever) then we generate the
documentation in -j1
The complete list of ccb functionalities can be accessed with the --help argument. It also
may be run in graphical mode (--gui).
Packaging Coriolis
Packager should not uses ccb, instead bootstrap/Makefile.package is provided to emulate a
top-level autotool makefile. Just copy it in the root of the CORIOLIS git repository (~/corriolis-2.x/src/coriolis/)
and build.
Sligthly outaded packaging configuration files can also be found under bootstrap/:
• bootstrap/coriolis2.spec.in for rpm based distributions.
• bootstrap/debian for DEBIAN based distributions.
Hooking up into ALLIANCE
CORIOLIS relies on ALLIANCE for the cell libraries. So after installing or packaging, you must configure it so that it can found those libraries.
This is done by editing the one variable cellsTop in the ALLIANCE helper (see Alliance Helper).
This variable must point to the directory of the cells libraries. In a typical installation, this is
generally /usr/share/alliance/cells.
UPMC/ LIP 6/SoC
6
Documentation SoC
March 2014
Environment Helper
To simplify the tedious task of configuring your environment, a helper is provided in the bootstrap
source directory:
~/coriolis-2.x/src/bootstrap/coriolisEnv.py
Use it like this:
dummy@lepka:~> eval ‘~/coriolis-2.x/src/bootstrap/coriolisEnv.py‘
UPMC/ LIP 6/SoC
7
March 2014
Documentation SoC
Documentation
The general index of the documentation for the various parts of Coriolis are avalaibles here
Coriolis Tools Documentation.
Note
Python Documentation: Most of the documentation is related to the C++ API
and implemetation of the tools. However, the PYTHON bindings have been created so they mimic as closely as possible the C++ interface, so the documentation
applies to both languages with only minor syntactic changes.
General Software Architecture
CORIOLIS has been build with respect of the classical paradigm that the computational instensive parts have been written in C++, and almost everything else in PYTHON. To build the
PYTHON interface we used two methods:
• For self-contained modules boost::python (mainly in vlsisapd).
• For all modules based on HURRICANE, we created our own wrappers due to very specific requirements such as shared functions between modules or C++/PYTHON secure bidirectional object deletion.
Coriolis Configuration & Initialisation
All configuration & initialization files are Python scripts, despite their .conf extention. From a
syntactic point of view, there is no difference between the system-wide configuration files and
the user’s configuration, they may use the same Python helpers.
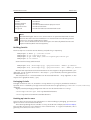
The initialization process is done by executing, in order, the following file(s):
Order
Meaning
File
1
The system initialization
2
The user’s global initialization
3
The user’s local initialization
/etc/coriolis2/<TOOL>.conf
${HOME}/.coriolis2.conf
<CWD>/.coriolis2.conf
Note
The loading policy is not hard-coded. It is implemented at Python level in
/etc/coriolis2/coriolisInit.py, and thus may be easyly be amended to
whatever site policy.
The truly mandatory requirement is the existence of coriolisInit.py which
must contain a coriolisConfigure() function with no argument.
Configuration Helpers
To ease the writing of configuration files, a set of small helpers is available. They allow to setup
the configuration parameters through simple assembly of tuples. The helpers are installed under the directory:
<install>/etc/coriolis2/
Where <install>/ is the root of the installation.
ALLIANCE Helper
The configuration file must provide a allianceConfig tuple of the form:
UPMC/ LIP 6/SoC
8
March 2014
Documentation SoC
cellsTop = ’/usr/share/alliance/cells/’
allianceConfig = \
( ( ’SYMBOLIC_TECHNOLOGY’,
, ( ’REAL_TECHNOLOGY’
,
, ( ’DISPLAY’
,
, ( ’CATALOG’
,
, ( ’WORKING_LIBRARY’
,
, ( ’SYSTEM_LIBRARY’
,
,
,
,
,
,
,
,
,
,
)
(
(
(
(
(
(
(
(
(
’SCALE_X’
’IN_LO’
’IN_PH’
’OUT_LO’
’OUT_PH’
’POWER’
’GROUND’
’CLOCK’
’BLOCKAGE’
,
,
,
,
,
,
,
,
,
helpers.sysConfDir+’/technology.symbolic.xml’
)
helpers.sysConfDir+’/technology.cmos130.s2r.xml’)
helpers.sysConfDir+’/display.xml’
)
’CATAL’)
’.’)
( (cellsTop+’sxlib’
, Environment.Append)
, (cellsTop+’dp_sxlib’, Environment.Append)
, (cellsTop+’ramlib’ , Environment.Append)
, (cellsTop+’romlib’ , Environment.Append)
, (cellsTop+’rflib’
, Environment.Append)
, (cellsTop+’rf2lib’ , Environment.Append)
, (cellsTop+’pxlib’
, Environment.Append) ) )
100)
’vst’)
’ap’)
’vst’)
’ap’)
’vdd’)
’vss’)
’^ck.*’)
’^blockageNet*’)
The example above shows the system configuration file, with all the available settings. Some
important remarks about thoses settings:
• In it’s configuration file, the user do not need to redefine all the settings, just the one he
wants to change. In most of the cases, the SYSTEM_LIBRARY, the WORKING_LIBRARY and
the special net names (at this point there is not much alternatives for the others settings).
• SYSTEM_LIBRARY setting: Setting up the library search path. Each library entry in the tuple
will be added to the search path according to the second parameter:
• Environment::Append: append to the search path.
• Environment::Prepend: insert in head of the search path.
• Environment::Replace: look for a library of the same name and replace it, whithout
changing the search path order. If no library of that name already exists, it is appended.
A library is identified by it’s name, this name is the last component of the path name.
For instance: /soc/alliance/sxlib will be named sxlib. Implementing the ALLIANCE
specification, when looking for a Cell name, the system will browse sequentially trought the
library list and returns the first Cell whose name match.
• For POWER, GROUND, CLOCK and BLOCKAGE net names, a regular expression (GNU regexp) is
expected.
• The helpers.sysConfDir variable is supplied by the helpers, it is the directory in which
the system-wide configuration files are locateds. For a standard installation it would be:
/soc/coriolis2.
• Trick and naming convention about SYMBOLIC_TECHNOLOGY, REAL_TECHNOLOGY and DISPLAY.
In the previous releases, thoses files where to read by XML parsers, and still do if you triggers the XML compatibility mode. But now, they have Python conterparts. In the configuration files, you still have to name them as XML files, the Python file name will be deduced
from this one with thoses two translation rules:
UPMC/ LIP 6/SoC
9
March 2014
Documentation SoC
1. In the filename, all dots, except for the last (the file extention), are replaced by
underscores.
2. The .xml extention is substituted by a .conf.
For the symbolic technology, it would give:
/soc/coriolis2/technology.symbolic.xml
--> /soc/coriolis2/technology_symbolic.conf
A typical user’s configuration file would be:
import os
homeDir = os.getenv(’HOME’)
allianceConfig = \
( (’WORKING_LIBRARY’
, (’SYSTEM_LIBRARY’
, (’POWER’
, (’GROUND’
)
,
,
,
,
homeDir+’/worklib’)
( (homeDir+’/mylib’, Environment.Append) ) )
’vdd.*’)
’vss.*’)
Tools Configuration Helpers
All the tools uses the same helper to load their configuration (a.k.a. Configuration Helper). Currently the following configuration system-wide configuration files are defined:
• misc.conf: commons settings or not belonging specifically to a tool.
• nimbus.conf: for the NIMBUS tool.
• hMetis.conf: for the HMETIS wrapper.
• mauka.conf: for the MAUKA tool.
• kite.conf: for the KITE tool.
• stratus1.conf: for the STRATUS1 tool.
Here is the contents of mauka.conf:
# Mauka parameters.
parametersTable = \
( (’mauka.annealingBinMult’ ,
, (’mauka.annealingNetMult’ ,
, (’mauka.annealingRowMult’ ,
, (’mauka.ignorePins’
,
, (’mauka.insertFeeds’
,
, (’mauka.plotBins’
,
, (’mauka.searchRatio’
,
, (’mauka.standardAnnealing’,
)
layoutTable = \
( (TypeTab
,
# Mauka part.
, (TypeOption,
, (TypeOption,
, (TypeOption,
UPMC/ LIP 6/SoC
TypePercentage,
TypePercentage,
TypePercentage,
TypeBool
,
TypeBool
,
TypeBool
,
TypePercentage,
TypeBool
,
5
90
5
False
True
True
50
False
)
)
)
)
)
)
)
)
’Mauka’, ’mauka’)
"mauka.standardAnnealing", "Standart Annealing"
"mauka.ignorePins"
, "Ignore Pins"
"mauka.plotBins"
, "Plot Bins"
, 0 )
, 0 )
, 0 )
10
March 2014
Documentation SoC
,
,
,
,
,
,
)
(TypeOption, "mauka.insertFeeds"
(TypeOption, "mauka.searchRatio"
(TypeOption, "mauka.annealingNetMult"
(TypeOption, "mauka.annealingBinMult"
(TypeOption, "mauka.annealingRowMult"
(TypeRule ,)
,
,
,
,
,
"Insert Feeds"
, 0 )
"Search Ratio (%)"
, 1 )
"Annealing Net Mult (%)", 1 )
"Annealing Bin Mult (%)", 1 )
"Annealing Row Mult (%)", 1 )
Taxonomy of the file:
• It must contains, at least, the two tables:
• parametersTable, defines & initialise the configuration variables.
• layoutTables, defines how the various parameters will be displayed in the configuration window (The Settings Tab).
• The parametersTable, is a tuple (list) of tuples. Each entry in the list describe a configuration parameter. In it’s simplest form, it’s a quadruplet (TypeOption, ’paramId’,
ParameterType, DefaultValue) with:
1. TypeOption, tells that this tuple describe a parameter.
2. paramId, the identifier of the parameter. Identifiers are defined by the tools.
The list of parameters is detailed in each tool section.
3. ParameterType, the kind of parameter. Could be:
•
•
•
•
•
•
TypeBool, boolean.
TypeInt, signed integer.
TypeEnumerate, enumerated type, needs extra entry.
TypePercentage, percentage, expressed between 0 and 100.
TypeDouble, float.
TypeString, character string.
4. DefaultValue, the default value for that parameter.
CGT - The Graphical Interface
The CORIOLIS graphical interface is split up into two windows.
• The Viewer, with the following features:
• Basic load/save capabilities.
• Display the current working cell. Could be empty if the design is not yet placed.
• Execute Stratus Scripts.
• Menu to run the tools (placement, routage).
Features are detailed in Viewer & Tools.
UPMC/ LIP 6/SoC
11
Documentation SoC
March 2014
• The Controller, which allows:
• Tweak what is displayer by the Viewer. Through the Look, Filter and Layers&Gos tabs.
• Browse the netlist with eponym tab.
• Show the list of selected objects (if any) with selection
• Walk through the Database, the Cell or the Selection with Inspector. This is an advanced feature, reserved for experimented users.
• The tab Settings which give access to all the settings. They are closely related to Configuration & Initialisation.
UPMC/ LIP 6/SoC
12
Documentation SoC
March 2014
Viewer & Tools
STRATUS Netlist Capture
STRATUS is the replacement for GENLIB procedural netlist capture language. It is designed as a
set of PYTHON classes, and comes with it’s own documentation (Stratus Documentation)
The HURRICANE Data-Base
The ALLIANCE flow is based on the MBK data-base, which has one data-structure for each view.
That is, Lofig for the logical view and Phfig for the physical view. The place and route tools were
responsible for maintaining (or not) the coherency between views. Reflecting this weak coupling
between views, each one was stored in a separate file with a specific format. The logical view is
stored in a vst file in VHDL format and the physical in an ap file in an ad-hoc format.
The CORIOLIS flow is based on the HURRICANE data-base, which has a unified structure for logical and physical view. That data structure is the Cell object. The Cell can have any state between
pure netlist and completly placed and routed design. Although the memory representation of
the views has deeply changed we still use the ALLIANCE files format, but they now really represent views of the same object. The point is that one must be very careful about view coherency
when going to and from CORIOLIS.
As for the first release, CORIOLIS can be used only for two purposes :
• Routing a design, in that case the netlist view and the layout view must be present and
layout view must contain a placement. Both views must have the same name. When
saving the routed design, it is advised to change the design name otherwise the original
unrouted placement in the layout view will be overwritten.
• Viewing a design, the netlist view must be present, if a layout view is present it still must
have the same name but it can be in any state.
UPMC/ LIP 6/SoC
13
Documentation SoC
March 2014
Mauka -- Placer
MAUKA was originally designed to be a recursive quadri-partionner. Unfortunatly it is was based
on the hMETIS library (not METIS) which is no longer maintained (only an old binary 32 bits
version is available).
So now it is only working in simulated annealing, with performances identical to the ALLIANCE
placer ocp. In other words, it is slow...
Note
Instance Duplication Problem: a same logical instance cannot have two different
placements. So, either you manually make a clone of it or you supply a placement
for it. This is currently a drawback of our folded hierarchy approach.
Reseting the Placement
Once a placement has been done, the placer cannot reset it (will be implemented later). To
perform a new placement, you must restart cgt. In addition, if you have saved the placement
on disk, you must erase any .ap file, which are automatically reloaded along with the netlist
(.vst).
Knik -- Global Router
The quality of KNIK global routing solutions are equivalent to those of FGR 1.0. For an in-depth
description of KNIK algorithms, you may download the thesis of D. DUPUIS avalaible from here~:
Knik Thesis.
The global router is (not yet) deterministic. To circumvent this limitation, a global routing
solution can be saved to disk and reloaded for later uses.
A global routing is saved into a file with the same name as the design and a kgr extention. It
is in Box Router output format.
Menus:
• P&R → Step by Step → Save Global Routing .
• P&R → Step by Step → Load Global Routing .
Kite -- Detailed Router
KITE no longer suffers from the limitations of NERO. It can route big designs as its runtime and
memory footprint is almost linear (with respect to the number of gates). It has successfully
routed design of more than 150K gates.
However, this first release comes with the temporary the following restrictions:
• Works only with SXLIB standard cell gauge.
• Works always with 4 routing metal layers (M2 through M5).
• Do not allow (take into account) pre-routed wires on signals other than POWER or GROUND.
Note
Slow Layer Assignment. Most of the time, the layer assignment stage is fast
(less than a dozen seconds), but in some instances it can take more than a dozen
minutes. This is a known bug and will be corrected in later releases.
After each run, KITE displays a set of completion ratios which must all be equal to 100% if
the detailed routing has been successfull. In the event of a failure, on a saturated design, you
may decrease the edge saturation ratio (argument --edge) to balance more evenly the design
saturation. That is, the maximum saturation decrease at the price of a wider saturated area
and increased wirelength. This is the saturation of the global router KNIK, and you may increase/decrease by steps of 5%, which represent one track. The maximum capacity of the SXLIB
gauge is 10 tracks in two layers, that makes 20 tracks by KNIK edge.
UPMC/ LIP 6/SoC
14
March 2014
Documentation SoC
Routing a design is done in three ordered steps:
1. Global routing P&R → Step by Step → Global Route .
2. Detailed routing P&R → Step by Step → Detailed Route .
3. Finalize routing P&R → Step by Step → Finalize Route .
After the detailed routing step the KITE data-structure is still active. The wiring is thus represented in a way that allows KITE to manage it but which is not completly finished. The finalize
step performs the removal of the KITE data-structure and finish/cleanup the wiring so that its
connex in the sense of HURRICANE. Do not try to save your design before that step, you would
get gaps in it.
You may visualize the density (saturation) of either KNIK (on edges) or KITE (on GCells) until
the routing is finalized. Special layers appears to that effect in the The Layers&Go Tab.
Kite Configuration Parameters
As KNIK is only called through KITE, it’s parameters also have the kite. prefix.
The KATABATIC parameters control the layer assignment step.
Parameter Identifier
Type
Default
Katabatic Parameters
katabatic.globalLengthThreshold
katabatic.saturateRatio
katabatic.saturateRp
TypeInt
1450
This parameter is used by a layer assignment method
which is no longer used (did not give good results)
TypePercentage
80
If M(x) density is above this ratio, move up feedthru
global segments up from depth x to x+2
TypeInt
8
If a GCell contains more terminals (RoutingPad) than that
number, force a move up of the connecting segments to
those in excess
Knik Parameters
kite.edgeCapacity
TypePercentage
85
Adjust the maximum capacity of the global router’s
edges. The GCells would be too saturated for the detailed
router if the edge capacity is left to 100%.
Kite Parameters
kite.eventsLimit
kite.ripupCost
TypeInt
4000002
The maximum number of segment displacements, this is
a last ditch safety against infinite loop. It’s perhaps a little
too low for big designs
TypeInt
3
Differential introduced between two ripup cost to avoid a
loop between two ripped up segments
kite.strapRipupLimit
TypeInt
16
Maximum number of ripup for strap segments
kite.localRipupLimit
TypeInt
9
Maximum number of ripup for local segments
... continued on next page
UPMC/ LIP 6/SoC
15
March 2014
Documentation SoC
Parameter Identifier
kite.globalRipupLimit
kite.longGlobalRipupLimit
Type
Default
TypeInt
5
Maximum number of ripup for global segments, when
this limit is reached, triggers topologic modification
TypeInt
5
Maximum number of ripup for long global segments,
when this limit is reached, triggers topological modification
Executing Python Scripts in Cgt
Python/Stratus scripts can be executed either in text or graphical mode.
Note
How Cgt Locates Python Scripts: cgt uses the Python import mechanism to
load Python scripts. So you must give the name of your script whitout .py extention and it must be reachable through the PYTHONPATH. You may uses the dotted
module notation.
A Python/Stratus script must contains a function called StratusScript with one optional
argument, the graphical editor into which it may be running (will be set to None in text mode).
Asides for this requirement, the python script can contains anything valid in PYTHON, so don’t
hesitate to use any package or extention.
Any script given on the command line will be run immediatly after the initializations and
before any other argument is processed.
Small example of Python/Stratus script:
from status import *
def doSomething ():
# ...
return
def StratusScript ( editor=None ):
if globals().has_key ( "__editor" ): editor = __editor
if editor: setEditor ( editor )
doSomething()
return
if __name__ == "__main__" :
StratusScript ()
This script could be run directly with Python (thanks to the two last lines) or through cgt in
both text and graphical modes.
Printing & Snapshots
Printing or saving into a PDF is fairly simple, just uses the File -> Print menu or the CTRL + p
shortcut to open the dialog box.
The print functionality uses exactly the same rendering mechanism as for the screen, beeing
almost WYSIWYG. Thus, to obtain the best results it is advisable to select the Coriolis.Printer
look (in the Controller), which uses a white background and much suited for high resolutions
32x32 pixels patterns
UPMC/ LIP 6/SoC
16
March 2014
Documentation SoC
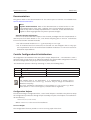
There is also two mode of printing selectable through the Controller Settings -> Misc ->
Printer/Snapshot Mode:
Mode
DPI (approx.)
Intended Usage
Cell Mode
150
For single Cell printing or very small designs. Patterns
will be bigger and more readable.
Design Mode
300
For designs (mostly commposed of wires and cells outlines).
Note
The pdf file size Be aware that the generated PDF files are indeed only pixmaps. So
they can grew very large if you select paper format above A2 or similar.
Saving into an image is subject to the same remarks as for PDF.
Memento of Shortcuts in Graphic Mode
The main application binary is cgt.
Category
Keys
Moves
Action
Shift the view in the according direction
Up , Down
Left , Right
Fit
f
Fit to the Cell abutment box
Refresh
CTRL + l
Triggers a complete display redraw
Goto
G
apperture is the minimum side of the area displayed
around the point to go to. It’s an alternative way of setting the zoom level
z, m
Respectively zoom by a 2 factor and unzoom by a 2 factor
Zoom
You can perform a zoom to an area. Define the zoom
area by holding down the left mouse button while moving
the mouse.
Area Zoom
You can select displayed objects under an area. Define
the selection area by holding down the right mouse button
while moving the mouse.
Selection
Area Selection
You can toggle the selection of one object under the
Toggle Selection
mouse position by pressing CTRL and pressing down
the right mouse button. A popup list of what’s under the
position shows up into which you can toggle the selection state of one item.
... continued on next page
UPMC/ LIP 6/SoC
17
March 2014
Documentation SoC
Category
Keys
Controller
Rulers
Action
S
Toggle the selection visibility
CTRL + i
Show/hide the controller window.
It’s the Swiss Army Knife of the viewer. From it, you can
fine-control the display and inspect almost everything in
your design.
k , ESC
One stroke on k enters the ruler mode, in which you
can draw one ruler. You can exit the ruler mode by
pressing ESC . Once in ruler mode, the first click on the
left mouse button sets the ruler’s starting point and the
second click the ruler’s end point. The second click exits
automatically the ruler mode.
Print
K
Clears all the drawn rulers
CTRL + p
Currently rather crude. It’s a direct copy of what’s displayed in pixels. So the resulting picture will be a little
blurred due to anti-aliasing mechanism.
CTRL + o
Opens a new design. The design name must be given
without path or extention.
CTRL + w
Close the current viewer window, but do not quit the
application.
CTRL + q
CTRL+Q quit the application (closing all windows).
CTRL + Down
Go one hierarchy level down. That is, if there is an instance under the cursor position, load it’s model Cell in
place of the current one.
CTRL + Up
Go one hierarchy level up. if we have entered the cur-
Open/Close
Hierarchy
rent model through CTRL + Down , reload the previous model (the one in which this model is instanciated).
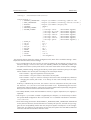
Cgt Command Line Options
Appart from the obvious --text options, all can be used for text and graphical mode.
Arguments
Meaning
-t|--text
Instruct cgt to run in text mode.
-L|--log-mode
Disable the uses of ANSI escape sequence on the tty.
Useful when the output is redirected to a file.
-c <cell>|--cell=<cell>
The name of the design to load, without leading path
or extention.
-g|--load-global
Reload a global routing solution from disk. The file containing the solution must be named <cell>.kgr.
--save-global
Save the global routing solution, into a file named <design>.kgr.
-e <ratio>|--edge=<ratio>
Change the edge capacity for the global router, between 0 and 1 (KNIK).
-G|--global-route
Run the global router (KNIK).
-R|--detailed-route
Run the detailed router (KITE).
... continued on next page
UPMC/ LIP 6/SoC
18
March 2014
Documentation SoC
Arguments
Meaning
-s|--save-design=<routed>
The design into which the routed layout will be saved.
It is strongly recommanded to choose a different name
from the source (unrouted) design.
--events-limit=<count>
The maximal number of events after which the router
will stops. This is mainly a failsafe against looping. The
limit is sets to 4 millions of iteration which should suffice to any design of 100K. gates. For bigger designs you
may wants to increase this limit.
--stratus-script=<module>
Run the Python/Stratus
Python Scripts in Cgt.
script
module.
See
Some Examples :
• Run both global and detailed router, then save the routed design :
> cgt -v -t -G -R --cell=design --save-design=design_kite
• Load a previous global solution, run the detailed router, then save the routed design :
> cgt -v -t --load-global -R --cell=design --save-design=design_kite
• Run the global router, then save the global routing solution :
> cgt -v -t -G --save-global --cell=design
Miscellaneous Settings
Parameter Identifier
Type
Default
Verbosity/Log Parameters
misc.info
misc.bug
misc.logMode
TypeBool
False
Enable display of info level message (cinfo stream)
TypeBool
False
Enable display of bug level message (cbug stream), messages can be a little scarry
TypeBool
False
If enabled, assume that the output device is not a tty and
suppress any escaped sequences
misc.verboseLevel1
TypeBool
True
First level of verbosity, disable level 2
misc.verboseLevel2
TypeBool
False
Second level of verbosity
Development/Debug Parameters
misc.traceLevel
misc.catchCore
UPMC/ LIP 6/SoC
TypeInt
0
Display trace information below that level (ltrace stream)
TypeBool
False
By default, cgt do not dump core. To generate one set
this flag to True
19
Documentation SoC
March 2014
The Controller
The Controller window is composed of seven tabs:
1. The Look Tab to select the display style.
2. The Filter Tab the hierarchical levels to be displayed, the look of rubbers and the
dimension units.
3. The Layers&Go Tab to selectively hide/display layers.
4. The Netlist Tab to browse through the netlist. Works in association with the Selection
tab.
5. The Selection Tab allow to view all the currently selected elements.
6. The Inspector Tab browse through either the DataBase, the Cell or the current selection.
7. The Settings Tab access all the tool’s configuration settings.
The Look Tab
You can select how the layout will be displayed. There is a special one Printer.Coriolis specifically designed for Printing & Snapshots. You should select it prior to calling the print or snapshot
dialog boxes.
The Filter Tab
The filter tab let you select what hierarchical levels of your design will be displayed. Hierarchy
level are numbered top-down: the level 0 correspond to the top-level cell, the level one to the
instances of the top-level Cell and so on.
UPMC/ LIP 6/SoC
20
Documentation SoC
March 2014
There are also check boxes to enable/disable the processing of Terminal Cell, Master Cells
and Compnents. The processing of Terminal Cell (hierarchy leaf cells) is disabled by default
when you load a hierarchical design and enabled when you load a single Cell.
You can choose what kind of form to give to the rubbers and the type of unit used to display
coordinates.
Note
What are Rubbers: HURRICANE uses Rubbers to materialize physical gaps in net
topology. That is, if some wires are missing to connect two or more parts of net,
a rubber will be drawn between them to signal the gap.
For example, after the detailed routing no rubbers should remains. They have
been made very visibles as big violet lines...
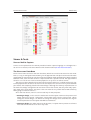
The Layers&Go Tab
Control the individual display of all layers and Gos.
• Layers correspond to a true physical layer. From a HURRICANE point of view they are all the
BasicLayers (could be matched to GDSII).
• Gos stands from Graphical Objects, they are drawings that have no physical existence but
are added by the various tools to display extra information. One good exemple is the
density map of the detailed router, to easily locate congested areas.
For each layer/Go there are two check boxes:
• The normal one triggers the display.
• The red-outlined allows objects of that layer to be selectable or not.
UPMC/ LIP 6/SoC
21
Documentation SoC
March 2014
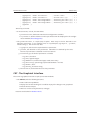
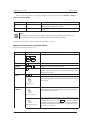
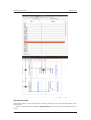
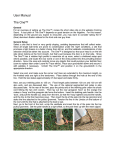
The Netlist Tab
The Netlist tab shows the list of nets... By default the tab is not synched with the displayed Cell.
To see the nets you must check the Sync Netlist checkbox. You can narrow the set of displayed
nets by using the filter pattern (supports regular expressions).
An very useful feature is to enable the Sync Selection, which will automatically select all the
components of the selected net(s). You can select multiple nets. In the figure the net auxsc35 is
selected and is highlited in the Viewer.
UPMC/ LIP 6/SoC
22
Documentation SoC
March 2014
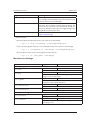
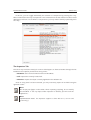
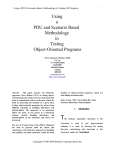
The Selection Tab
The Selection tab list all the components currently selecteds. They can be filtered thanks to the
filter pattern.
Used in conjunction with the Netlist Sync Selection you will all see all the components part
of net.
UPMC/ LIP 6/SoC
23
Documentation SoC
March 2014
In this list, you can toggle individually the selection of component by pressing the t key.
When unselected in this way a component is not removed from the the selection list but instead
displayed in red italic. To see where a component is you may make it blink by repeatedly press
the t key...
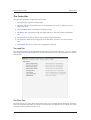
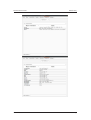
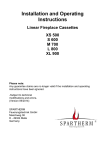
The Inspector Tab
This tab is very useful, but mostly for CORIOLIS developpers. It allows to browse through the live
DataBase. The Inspector provide three entry points:
• DataBase: Starts from the whole HURRICANE DataBase.
• Cell: Inspect the currently loaded Cell.
• Selection: Inspect the object currently highlited in the Selection tab.
Once an entry point has been activated, you may recursively expore all it’s fields using the
right/left arrows.
Note
Do not put your fingers in the socket: when inspecting anything, do not modify
the DataBase. If the any object under inspection is deleted, you will crash the
application...
Note
Implementation Detail: the inspector support is done with Slot, Record and
getString().
UPMC/ LIP 6/SoC
24
Documentation SoC
UPMC/ LIP 6/SoC
March 2014
25
Documentation SoC
March 2014
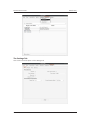
The Settings Tab
Here comes the description of the Settings tab.
UPMC/ LIP 6/SoC
26
Documentation SoC
March 2014
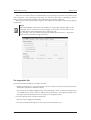
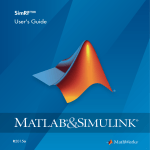
A Simple Example: AM2901
To illustrate the capabilities of CORIOLIS tools and PYTHON scripting, a small example, derived
from the ALLIANCE AM2901 is supplied.
This example contains only the synthetized netlists and the design.py script which perform
the whole P&R of the design. Just lanch cgt then execute design.py.
UPMC/ LIP 6/SoC
27