1
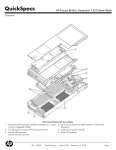
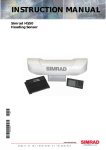
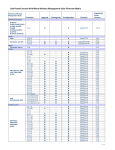
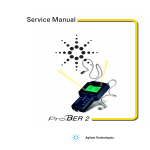
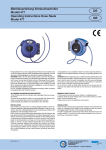
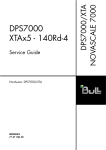
ROI-S05605-051E
January, 2005
PASOLINK V4
Installation Manual
7-38GHz 4/8/17/34MB
DIGITA L MICROWAVE RADIO SYSTEM
(1+0/1+1 SYSTEM)
NEC Corporation
TOKYO, JAPAN
©2005 NEC Corporation
CONTENTS
CONTENTS
TITLE
PAGE
TITLEPAGE
1
GENERAL ••••••••••••••••••••••••••••••••••••••••••••••••••••••••••••• 1-1
2
OVERVIEW FOR INSTALLATION ••••••••••••••••••••••••••••••• 2-1
2.1
Detailed Work Flow Chart ••••••••••••••••••••••••••••••••••••• 2-2
2.2
Pasolink System Standard Overview •••••••••••••••••••••• 2-3
3
UNPACKING•••••••••••••••••••••••••••••••••••••••••••••••••••••••••• 3-1
3.1
Checking Cargo •••••••••••••••••••••••••••••••••••••••••••••••••• 3-1
3.2
Unpacking ••••••••••••••••••••••••••••••••••••••••••••••••••••••••• 3-1
3.3
Checking Installing Component ••••••••••••••••••••••••••••• 3-7
4
MOUNTING ••••••••••••••••••••••••••••••••••••••••••••••••••••••••••• 4-1
4.1
IDU Mounting ••••••••••••••••••••••••••••••••••••••••••••••••••••• 4-1
4.2
ODU Mounting••••••••••••••••••••••••••••••••••••••••••••••••••• 4-11
4.2.1
Pole Mounting ••••••••••••••••••••••••••••••••••••••••••••••••••• 4-14
4.2.2
Wall Mounting ••••••••••••••••••••••••••••••••••••••••••••••••••• 4-35
4.2.3
19-inch Rack Mounting ••••••••••••••••••••••••••••••••••••••• 4-42
4.3
Waveguide Connection ••••••••••••••••••••••••••••••••••••••• 4-46
4.4
Rack Installation •••••••••••••••••••••••••••••••••••••••••••••••• 4-49
4.5
Cable Rack Installation ••••••••••••••••••••••••••••••••••••••• 4-50
5
FRAME GROUNDING •••••••••••••••••••••••••••••••••••••••••••••• 5-1
6
CABLE TERMINATION •••••••••••••••••••••••••••••••••••••••••••• 6-1
6.1
Terminating Supervisory Cables
with D-Sub Connector •••••••••••••••••••••••••••••••••••••••••• 6-3
6.2
Terminating Coaxial (IF Signal)
with N-P Connector (L Angle Type) ••••••••••••••••••••••••• 6-8
6.3
Terminating Coaxial (IF Signal) Cables
with N-P Connector (Straight Type)
6.4
Terminating Power Supply Cables
with Molex Connector •••••••••••••••••••••••••••••••••••••••• 6-14
6.5
Cable and Terminal Connections •••••••••••••••••••••••••• 6-16
6-11
7
WATERPROOF PROTECTION••••••••••••••••••••••••••••••••••• 7-1
8
INITIAL LINEUP•••••••••••••••••••••••••••••••••••••••••••••••••••••• 8-1
8.1
Start-up••••••••••••••••••••••••••••••••••••••••••••••••••••••••••••• 8-1
8.2
Shut-down ••••••••••••••••••••••••••••••••••••••••••••••••••••••••• 8-2
8.3
Radio Freqency and TX Output Power Setting •••••••••• 8-3
8.3.1
Setting Procedure from LCT•••••••••••••••••••••••••••••••••• 8-4
8.4
Antenna Orientation ••••••••••••••••••••••••••••••••••••••••••• 8-16
CONTENTS
8.5
Lineup Test•••••••••••••••••••••••••••••••••••••••••••••••••••••••••• 8-8
GENERAL
1. GENERAL
This manual describes information on the installation, and initial lineup of
the NEC Pasolink 7/8/13/15/18/23/26/38 GHz 2/4/8/16 × 2 MB and/or 10/
100BASE-T(X) point-to-point digital radio system.
This system consists of TRP-[ ]G-[ ] Transmitter-Receiver (Outdoor Unit
(ODU) ) and MDP-[ ]MB-[ ] Modulator-Demodulator (Indoor Unit
(IDU) ).
Outline of the ODU is shown in Fig. 1-1.
Outlines of the IDUs are shown in Fig. 1-2 and 1-3.
RX LEV
MON
IFL
FG
Fig. 1-1 Outline of the ODU
1-1
GENERAL
EOW
IF
IN/OUT
SC LAN
CALL
PASOLINK
ODU IDU
RESET PWR
MAINT
NMS LAN
FUSE (7.5A)
−
TRAFFIC IN/OUT (CH1 to CH4)
ALM/AUX ALM
OW/DSC/ASC
NMS/RA
+
SELV
LA PORT
(a) 4 × 2MB Fix Bit Rate Composition
EOW
100M
IF
IN/OUT
100M
PORT1 PORT2
SC LAN
CALL
PASOLINK
ODU IDU
RESET PWR
MAINT
NMS LAN
FUSE (7.5A)
−
TRAFFIC IN/OUT (CH1 to CH4)
ALM/AUX ALM
OW/DSC/ASC
NMS/RA
+
SELV
LA PORT
(b) 4 × 2MB Fix Bit Rate with LAN Interface Composition
TRAFFIC IN/OUT (CH9 to CH16)
EOW
IF
IN/OUT
CALL
PASOLINK
ODU IDU
RESET PWR
MAINT
WS/SC LAN NMS LAN
FUSE (7.5A)
−
TRAFFIC IN/OUT (CH1 to CH8)
ALM/AUX ALM
OW/DSC/ASC
NMS/RA
+
SELV
LA PORT
(c) 2/4/8/16 × 2MB Free Bit Rate Composition
TRAFFIC IN/OUT (CH9 to CH16)
EOW
100M
IF
IN/OUT
100M
PORT1 PORT2
CALL
PASOLINK
ODU IDU
RESET PWR
MAINT
WS/SC LAN NMS LAN
FUSE (7.5A)
−
TRAFFIC IN/OUT (CH1 to CH8)
ALM/AUX ALM
OW/DSC/ASC
NMS/RA
LA PORT
+
SELV
(d) 2/4/8/16 × 2MB Free Bit Rate with LAN Interface Composition
Fig. 1-2 Outline of the IDUs in 1+0 System
1-2
GENERAL
PASOLINK
IF
IN/OUT
! -43V OUTPUT
Power down IDU
before disconnection
or connection of
Cable
FUSE (7.5A)
RESET PWR
ODU IDU
MAINT
−
EOW CALL
SC LAN
+
SELV
LA PORT
PASOLINK
RESET
OPR
SEL
No.1
NMS LAN
OPR
ALM
TX RX TX
RX
1
−
TRAFFIC IN/OUT (CH1 to CH8)
AUX ALM
ALM
OW/DSC/ASC
NMS/RA
2
LA PORT
No.2
PASOLINK
IF
IN/OUT
! -43V OUTPUT
Power down IDU
before disconnection
or connection of
Cable
RESET PWR
ODU IDU
MAINT
FUSE (7.5A)
−
(a) 4 × 2MB Fix Bit Rate Composition
+
SELV
LA PORT
PASOLINK
! -43V OUTPUT
IF
IN/OUT
Power down IDU
before disconnection
or connection of
Cable
FUSE (7.5A)
RESET PWR
ODU IDU
MAINT
−
100M
EOW CALL
100M
SC LAN
PORT1 PORT2
+
SELV
LA PORT
PASOLINK
RESET
OPR
SEL
No.1
NMS LAN
OPR
ALM
TX RX TX
RX
1
−
TRAFFIC IN/OUT (CH1 to CH8)
ALM
AUX ALM
OW/DSC/ASC
NMS/RA
2
LA PORT
No.2
PASOLINK
! -43V OUTPUT
IF
IN/OUT
Power down IDU
before disconnection
or connection of
Cable
RESET PWR
ODU IDU
MAINT
FUSE (7.5A)
−
+
SELV
LA PORT
(b) 4 × 2MB Fix Bit Rate with LAN Interface Composition
PASOLINK
! -43V OUTPUT
IF
IN/OUT
Power down IDU
before disconnection
or connection of
Cable
FUSE (7.5A)
RESET PWR
ODU IDU
MAINT
−
TRAFFIC IN/OUT (CH9 to CH16)
EOW CALL
SC LAN
+
SELV
LA PORT
RESET
OPR
SEL
No.1
NMS LAN
PASOLINK
OPR
ALM
TX RX TX
RX
1
−
TRAFFIC IN/OUT (CH1 to CH8)
ALM
AUX ALM
OW/DSC/ASC
NMS/RA
2
LA PORT
No.2
PASOLINK
IF
IN/OUT
! -43V OUTPUT
Power down IDU
before disconnection
or connection of
Cable
FUSE (7.5A)
RESET PWR
ODU IDU
MAINT
−
+
SELV
LA PORT
(c) 2/4/8/16 × 2MB Free Bit Rate Composition
PASOLINK
IF
IN/OUT
! -43V OUTPUT
Power down IDU
before disconnection
or connection of
Cable
FUSE (7.5A)
RESET PWR
ODU IDU
MAINT
−
TRAFFIC IN/OUT (CH9 to CH16)
100M
EOW CALL
100M
PORT1 PORT2
SC LAN
+
SELV
LA PORT
RESET
OPR
SEL
No.1
NMS LAN
PASOLINK
OPR
ALM
TX RX TX
RX
1
−
TRAFFIC IN/OUT (CH1 to CH8)
ALM
AUX ALM
OW/DSC/ASC
NMS/RA
LA PORT
2
No.2
PASOLINK
IF
IN/OUT
! -43V OUTPUT
Power down IDU
before disconnection
or connection of
Cable
FUSE (7.5A)
RESET PWR
ODU IDU
MAINT
−
LA PORT
+
SELV
(d) 2/4/8/16 × 2MB Free Bit Rate with LAN Interface Composition
Fig. 1-3 Outline of the IDUs in 1+1 System
1-3
GENERAL
(This page is intentionally left blank)
1-4
4 pages
OVERVIEW FOR INSTALLATION
2. OVERVIEW FOR INSTALLATION
The standard installation is summarized in this section. Included herein is
information on typical installation work flow and installation guide for
IDU installation, ODU installation, antenna (ANT) installation, waveguide
connection and cable connections.
This product is a part of radio link system, and is intended to be connected
with a external antenna.
This product will be installed and operated by professional.
After installation, the professional person shall make sure that the system
shall comply with the relevant limits for general public exposure specified
as basic restrictions or reference levels in the council Recommendation
1999/519/EC.
2-1
OVERVIEW FOR INSTALLATION
2.1 Detailed Work Flow Chart
The installation flow chart is shown below.
Start
Unpacking of IDU
(see para 3.2)
Unpacking of
Antenna/Bracket
Unpacking of ODU
(see para 3.2)
Unpacking of
Accessories
(see para 3.2)
*1
Antenna/Bracket
Mounting
(see para 4.2)
•
ODU Mounting
(see para 4.2)
IDU Mounting
(see para 4.1)
Cable Terminating
(see para 6)
*2
Coaxial/Waveguide/IF Signal
Cable Connection
(see para 4.3)
•
•
Frame Grounding
(see para 5)
•
Cable and Terminal
*1 Please change before mounting
Connections
when the polarization change is
(see para 6.5)
necessary.
Waterproof
Protection
(see para 7)
*2 The direct mount type becomes
a connection only of IF signal
cable. (para 6.2).
Initial Line up
(see para 9)
End
Fig. 2-1 Typical Installation Flow Diagram
2-2
OVERVIEW FOR INSTALLATION
2.2 Pasolink System Standard Overview
(1)Pasolink Installation Overview
MAIN EARTH CABLE
EARTH
CABLE
FG
FEEDER RACK
GROUNDING
CABLE
IDU (1+0)
DATA CBLE
ANT ODU
(1+0)
GROUNDING
CABLE
ANT
MOUNT
IF CABLE
DC POWER CABLE
INDOOR
OUTDOOR
TOWER
19 INCH OPEN RACK
DDP
DC PDB
DC TERMINAL
CABLE RACK & STRUCTURE
DC IN
The standaed overall configuration of the Pasolink system is shown below.
Fig. 2-2 Pasolink standrd installation overview(1+0 system)
2-3
OVERVIEW FOR INSTALLATION
(2)Indoor Installation Overview
A general layout for indoor installation of the Pasolink is shown below.
19-inch Rack
IDU
DC PDB
Fig. 2-3 Indoor Installation Overview
Fig. 2-3
2-4
UNPACKING
3. UNPACKING
3.1 Checking Cargo
Detailed procedure is as follows:
STEP
1 Check the number of containers on the packing list.
Fig. 3-1 Example of packing list
2 Check the station name is correct.
Check to see if the station name on the packing list shown in Fig.3-1. Note
that the contents of the packing list depend on the contract.
3.2 Unpacking
The procedures to unpack the IDU and ODU arre shown Fig.3-2 and
Fig.3-3.
3-1
UNPACKING
(This page is intentionally left blank.)
3-2
UNPACKING
TOP PAT
PRECAUTION MARK
PRECAUTION MARK
POLY SHEET
SHIPPING LABEL
TOP COVER
SHIPPING LABEL
ODU
CARTON
PACKING LABEL
CARTON
CARTON
Step 1. Open top cover of the carton.
Step 2. Take out top pat from carton,
Step 3. Remove poly sheet,
Step 4. Take out the ODU from carton,
Step 5. Inspect ODU.
ODU
Fig. 3-2 Unpacking Method of ODU
3-3/4
UNPACKING
PRECAUTION LABEL
CUSHIONING
MATERIAL
P.P TAPE
IDU
CUSHIONING
MATERIAL
SHIPPING LABEL
1+0 IDU
ANTISTATIC BAG
(COLORED BLACK)
P.P. TAPE
SHIPPING LABEL
1+0 IDU
PRECAUTION LABEL
1+1 IDU
ANTISTATIC BAG
(COLORED BLACK)
1+1 IDU
Step 3.
Cut P.P. tape at top of carton. And then open carton.
Step 6.
Take out IDU with antistatic bag from carton.
Step 4.
Take out carton, cushioning material and carton.
Step 7.
Take out IDU from antistatic bag.
Step 5.
Cut P.P. tape at top of carton. And then open carton.
Step 8.
Inspect IDU.
SEALING MATERIAL
Step 1.
Cut sealing material.
Step 2.
Take out carton from sealing material.
Note: Accessories are sacked or boxed with the IDU.
Fig. 3-3 Unpacking Method of IDU
3-5/6
UNPACKING
3.3 Checking Installing Component
Each unnpacked component of the pasolink System must be checked as
shown below.
(1) IDU and ODU
Table 3-1 Standard Installing compornent of ODU/IDU
QUANTITY
No.
DESCRIPTION
Remarks
1+0
1+1
TRP-( )G( )MB-( )A (ODU)
1
2
O-Ring (Attached to the waveguide type ODU)
1
2
MDP-( )MB-( ) (IDU)
1
1
Power Connector (Molex Housing M5557-4R)
1
2
Cable Terminal (Molex 5556T)
4
8
7.5 A Fuse (SMP75)
2
4
3
7-8 GHz HYB , with N-type coaxial connectors
0
1
*2, *3
4
13-38 GHz HYB
0
1
*3
1
2
*1
Note :*1 Use O-ring which is attached to the antenna for the antenna
direct mount ODU.
*2 Not available for SD system.
*3 The type and specificationof the Hybrid Combiner/Divider NEC
model will be described on page 4-13 of Chapter 4.
3-7
UNPACKING
(This page is intentionally left blank.)
3-8
UNPACKING
1
MDP-( )MB-( )A
INDOOR UNIT
NEC Corporation TOKYO JAPAN
TRP-13G-3A
0678
OUTDOOR UNIT
(H0330)
SHIFT FREQUENCY
TX HIGH/LOW
MHz SUB BAND
CH
MHz
TX
SERIAL No.
DATE
WEIGHT kg/ - 43V
0.5A
MADE IN JAPAN
NEC Corporation TOKYO JAPAN
! CAUTION
SERIAL No. ____________
DATE _____ , _____
WEIGHT: kg (WITH OPTION)
20-60V
- A (WITH ODU & OPTION)
HOT SURFACE
MADE IN JAPAN
Avoid contact.
NAME PLATE
CAUTION
Non-ionizing
radiation
The conductive disturbance of LAN Port is class A. In connection with
a domestic ITE, this product may cause disturbance interference
in which case the user may be required to take adequate measures.
TRP-13G-3A
OUTDOOR UNIT
SHIFT FREQUENCY
RX LEV
MON
! WARNING
IFL
FG
-43V OUTPUT
TURN OFF POWER
BEFORE DISCONNECTING
I/F CABLE
!
Non-ionizing
radiation
Non-ionizing
radiation
0678
(H0330)
MHz SUB BAND
TX HIGH/LOW
MADE IN JAPAN
TRP-13G-3A
OUTDOOR UNIT
SHIFT FREQUENCY
Turn off power
at IDU before
disconnecting cable.
(H0330)
CAUTION
Non-ionizing
radiation
Power down before
disconnection or
connection of cable.
O-ring
0678
MHz SUB BAND
SERIAL No.
DATE
WEIGHT kg/ - 43V
0.5A
NEC Corporation TOKYO JAPAN
-43V INPUT
1
CAUTION
CAUTION
-43V INPUT
Power down before
disconnection or
connection of cable.
SERIAL No.
DATE
WEIGHT kg/ - 43V
0.5A
NEC Corporation TOKYO JAPAN
CAUTION
TRP-13G-3A
0678
OUTDOOR UNIT
(H0330)
SHIFT FREQUENCY
MHz SUB BAND
TX HIGH/LOW
CH
MHz
TX
SERIAL No.
DATE
WEIGHT kg/ - 43V
0.5A
MADE IN JAPAN
NEC Corporation TOKYO JAPAN
TX HIGH/LOW
MADE IN JAPAN
WAVEGUIDE TYPE
CAUTION
Turn off power
at IDU before
disconnecting cable.
-43V OUTPUT
Power down IDU
before disconnection
or connection of
cable.
1
1
2
4
The conductive disturbance of LAN Port is class A. In connection with
a domestic ITE, this product may cause disturbance interference
in which case the user may be required to take adequate measures.
!
-43V OUTPUT
! CAUTION
Power down IDU
before disconnection
or connection of
cable.
7/8 GHz TYPE
HOT SURFACE
3
ANTENNA DIRECT
MOUNTING TYPE
Avoid contact.
! WARNING
-43V OUTPUT
TURN OFF POWER
BEFORE DISCONNECTING
I/F CABLE
2
Power connector
Fuse
MDP-8MB-13A
SER. No.
0678
(H0161A)
DATE
WEIGHT 11kg (WITH OPTION)
AA(WITH ODU & OPTION)
20-60V
NEC Corporation TOKYO JAPAN
MADE IN JAPAN
NAME PLATE
Fig. 3-4 Installation compornent for IDU and ODU
3-9/10
IFL
FG
IFL
FG (M5)
1
(Front)
Notes:
2
*
TRAFFIC IN/OUT (CH1 to CH8)
IF
IN/OUT
TRAFFIC IN/OUT (CH9 to CH16)
ALM/AUX ALM
PORT1 PORT2
100M
100M
NMS/RA
WS/SC LAN NMS LAN
OW/DSC/ASC
*
LA PORT
CALL
FUSE (7.5A)
EOW
SELV
*
D-SUB CONNECTOR (MALE)
D-SUB CONNECTOR (MALE)
D-SUB CONNECTOR (MALE)
D-SUB CONNECTOR (MALE)
D-SUB CONNECTOR (MALE)
MOLEX CONNECTOR (4PIN) (MALE)
−
+
ODU IDU
PASOLINK
MAINT
RESET PWR
MODULAR CONNECTOR (MALE)
MODULAR CONNECTOR (MALE)
D-SUB CONNECTOR (MALE)
Fig. 3-5 Compornent of Installing 1+0 System (1/2)
3. The number corresponds to
No. of Table 3-1.
2. Use ISO standardized
screw (mm unit) for D-SUB
connector.
1. *Applies only to the 16 × 2
MB System.
*N-P CONNECTOR (MALE)
RX LEV
MON
ODU
O-ring
1
(Rear)
UNPACKING
3-11
3-12
1 (Front)
FG
IFL
FG (M5)
RX LEV
MON
2
IFL
FG
! -43V OUTPUT
Power down IDU
before disconnection
or connection of
Cable
IF
IN/OUT
ALM
PORT1 PORT2
100M
100M
AUX ALM
SC LAN
OW/DSC/ASC
NMS LAN
NMS/RA
LA PORT
Fig. 3-5 Compornent of Installing 1+1 System (2/2)
3. The
number
cotresponds to No. of
Table 3-1.
2. Use ISO standardized
screw (mm unit) for DSUB connector.
Power down IDU
before disconnection
or connection of
Cable
! -43V OUTPUT
TRAFFIC IN/OUT (CH1 to CH8)
*
TRAFFIC IN/OUT (CH9 to CH16)
IF
IN/OUT
IFL
FG (M5)
1 (Front)
1. *Applies only to the
16 × 2 MB System.
N-P CONNECTOR (MALE)
IFL
Notes:
*
RX LEV
MON
ODU
O-ring
1
(Rear)
FUSE (7.5A)
LA PORT
−
EOW CALL
FUSE (7.5A)
PASOLINK
RX
ALM
TX RX TX
OPR
PASOLINK
SELV
SELV
+
2
1
+
*
D-SUB CONNECTOR (MALE)
D-SUB CONNECTOR (MALE)
D-SUB CONNECTOR (MALE)
D-SUB CONNECTOR (MALE)
D-SUB CONNECTOR (MALE)
D-SUB CONNECTOR (MALE)
MOLEX CONNECTOR (4PIN)
(MALE)
−
RESET PWR
ODU IDU
MAINT
No.2
OPR
SEL
No.1
RESET
−
RESET PWR
ODU IDU
MAINT
PASOLINK
MODULAR CONNECTOR (MALE)
MODULAR CONNECTOR (MALE)
D-SUB CONNECTOR (MALE)
UNPACKING
UNPACKING
(2)Mounting Bracket
There are four kinds the ODU mounting bracket by the mounting type,
shown as follows.
1
2
3
4
QUANTITY
No.
DESCRIPTION
Remarks
1+0
1+1
1
Pole Mounting Waveguide Type
1
1
Fig4-5
See Para 4.3
2
Antenna Direct Pole Mounting Bracket
1
1 or 2
Fig 4-11
3
Wall Mounting Bracket
1
1 or 2
Fig4 -17
4
19"-rack Mounting Bracket
1
1 or 2
Fig4-19
Fig. 3-6 Packing List of Mounting Bracket(This page is intentionally left blank.)
3-13
UNPACKING
(This page is intentionally left blank.)
3-14
MOUNTING
4. MOUNTING
4.1 IDU Mounting
The installation procedure for the IDU is shown below.
(a) Accessories Required
• Screwdriver
(b) Procedure for Mounting and Dismounting
(1) Mounting
Mounting method of IDU is shown in Fig. 4-1 and Fig 4-2.
Note: When the IDU is mounted on the center position, refer to
Fig. 4-1 (2/2) and Fig. 4-2 (2/2).
(2) Dismounting
For dismounting IDU (if necessary), use the following procedure.
Step
Procedure
1
Hold the IDU so that it does not drop, and remove two screws
each from both sides,
2
Dismount the IDU from the 19-inch rack.
Note : Please rreftr to paragraph 4.4 or 4.5 when Rack Inatallation
and Cable Rack Installation is necessary.
4-1
MOUNTING
(This page is intentionally left blank.)
4-2
MOUNTING
Step 1. Align the IDU to the mount position
on the 19-inch rack.
SCREW
FLAT WASHER
SCREW
Step 2. Fix each side of the IDU to the rack
with the two screws (M5).
FLAT WASHER
Step 3. To mount the IDU in a 19-inch rack,
allow space more than 200 mm to the
rear section and space for one unit to
the top and bottom.
At least
one rack unit*
At least
one rack unit*
Note: * Normal setting for free space. When free space is closed
within one rack unit, check the environmental temperature is
lower than +40°C.
Fig. 4-1 (1/2) Mounting of IDU for 1+0 System
4-3/4
MOUNTING
SCREW
Step 1. Mount the two brackets to IDU with
the four screws.
SCREW
Step 3. To mount the IDU in a 19-inch rack,
allow space more than 200 mm to the
rear section and space for one unit to
the top and bottom.
Step 2. Align the IDU to the mount position
on the 19-inch rack.
At least
one rack unit *
More than
200 mm
WALL
At least
one rack unit *
SCREW
FLAT WASHER
SCREW
Note: * Normal setting for free space. When free space is closed
within one rack unit, check the environmental temperature is
lower than +40°C.
FLAT WASHER
Fig. 4-1 (2/2) Mounting of IDU for 1+0 System
4-5/6
MOUNTING
Step 1. Align the IDU to the mount position
on the 19-inch rack.
Step 2. Fix each side of the IDU to the rack
with the two screws (M5).
SCREW
FLAT WASHER
SCREW
FLAT WASHER
Step 3. To mount the IDU in a 19-inch rack,
allow space more than 200 mm to the
rear section and space for one unit to
the top and bottom.
More than *
one rack unit
More than
200 mm
WALL
More than *
one rack unit
Note: * Normal setting for free space. When free space is closed
within one rack unit, check the environmental temperature is
lower than +40°C.
Fig. 4-2 (1/2) Mounting of IDU for 1+1 System
4-7/8
MOUNTING
Step 1. Mount the two brackets to IDU with
the four screws.
SCREW
SCREW
Step 3. To mount the IDU in a 19-inch rack,
allow space more than 200 mm to the
rear section and space for one unit to
the top and bottom.
Step 2. Align the IDU to the mount position
on the 19-inch rack.
More than *
one rack unit
More than
200 mm
WALL
SCREW
FLAT WASHER
More than *
one rack unit
SCREW
Note: * Normal setting for free space. When free space is closed
within one rack unit, check the environmental temperature is
lower than +40°C.
FLAT WASHER
Fig. 4-2 (2/2) Mounting of IDU for 1+1 System
4-9/10
MOUNTING
4.2 ODU Mounting
There are three types of mounting for the ODU: pole mounting, wall
mounting and 19-inch rack mounting types. The tools for installation are
listed in Table 4-1.
Table 4-1 Tools
TOOLS
1
STANDARD
Torque wrench or
Wrench set
SKETCH
M5, M6,
M8,
M10
2
Hexagon
wrench
M5, M6
3
Screw driver
M2.6,
M3, M4,
M5
4
Measure*
-
5
Center punch*
-
6
Hammer *
-
7
Electric drill *
-
Note: * Used for wall mounting.
4-11
MOUNTING
How to use small and large O-rings
Caution: 1. How to use small and large O-rings are shown in the
following table. Two (small and large) O-rings are
attached in 18-38 GHz band Andrew/RFS direct mount
antenna. 13/15 GHz band antenna does not have small
O-ring (Small O-ring is not used for Andrew/RFS direct
mount antenna). If the small O-ring is used for ODU
direct mount installation, a gap may occur between
ODU and antenna for RF interface. This may cause
transmit or receive level down.
O-RING OF
ATTACHEMENT
OF ANTENNA
O-RING
REMARKS
SMALL SIZE
LARGE SIZE
ANT ⎯ ODU
Not used
Used
Antenna direct mounting
ANT ⎯ WG/ODU
(18-38 GHz BAND)
Used
Not used
Waveguide connection
Note: 13/15 GHz antenna for direct mount is not possible to connect the
ordinary waveguide flanges.
POSITION OF
LARGE O-RING*
POSITION OF
SMALL O-RING*
13-23 GHz BAND
35
m
m
32
m
m
Notes: 1. * Do not use both small O-ring and large O-ring
simultaneously.
2. Large O-ring size is different with frequency band as follows:
26-38 GHz BAND
Caution: 2. Don’t apply silicon grease to O-ring.
Fig. 4-3 O-ring Size
4-12
MOUNTING
Hybrid Combiner/Divider
NEC has developed Hybrid Combiner/Divider over the full range of
microwave frequencies for PASOLNK Series digital microwave radio
point-to-point fixed wireless systems, This Hybrid Combiner/Divider
comprises directional coupler, antenna interface, radio mounting interfaces
and polarizers. The RF signal power received by the single polarized
antenna is equally distributed and sent to two outdoor units through the
Hybrid Combiner/Divider for 1+1 protected systems.
There are two types of NEC Hybrid Combiner/Divider, one is coaxial
cable connection type for 7/8GHz Bands and the other is WG connection
type for 11-38GHz Bands .NEC Hybrid Combiner/Divider is suited for
Andrew or RFS Antenna, and all NEC ODUs.
4-13
MOUNTING
4.2.1 Pole Mounting
Procedure for mounting and demounting are described below.
(a) Mounting
The method of mounting is listed in Table 4-2.
Note: Remove protection metallic plate covering waveguide
hole on the ODU.
Table 4-2 Pole Mounting
POLE MOUNTING
13-52 GHz BAND ODU
7/8 GHz BAND
ODU
WAVEGUIDE
TYPE
ANTENNA DIRECT MOUNTING
TYPE
Coaxial Cable
Type Fig. 4-4 *
With PBR
adapter Fig4-5
(See Para 4.3
Waveguide
Connection)
Fig. 4-10 and Fig. 4-11
—
—
(With HYB) Fig. 4-12
(b) Dismounting
For dismounting ODU (if necessary), use the following procedure.
Step
Procedure
1
Remove the four fixed screws from the ODU,
2
Then dismount the ODU,
Procedure for polarization change are descrided below.
Table 4-3 Polarization Change
Polarization Change
4-14
Antenna
ODU
HYB
Fig.4-6
Fig.4-7
Fig.4-9
Fig.4-8
MOUNTING
7/8 GHz ODU MOUNTING (Connecting Coaxial Cable)
MOUNTING BRACKET
Step 1. Mount the bracket to the pole, point
to the opposite station and tighten it
with two U-bolts,
Note: The diameter of pole is from 48.5 to
114.5 millimeters.
THIN NUT
THICK NUT
SPRING WASHER
U-BOLT
FLAT WASHER
M6
Step 2. Mount the ODU on to the bracket
and tighten four bolts (M6) at upper
and lower parts of the ODU,
Tightening torque: 4.5
4.23N·m
N·m
(Recommended)
Step 3. Check that the ODU and the bracket
are fixed firmly,
Caution: Before connecting the I/F cable between
the IDU and ODU, using the circuit tester,
check that the resistance of the I/F cable
between center conductor and insulation is
more than 100 MΩ.
Fig. 4-4 7/8 GHz Band ODU, Pole Mounting (1/3)
4-15
MOUNTING
BRACKET
ODU
COAXIAL
CABLE
Step 4. Connect the Coaxial cable to
the RF IN/OUT connector
of the ODU,
Step 5. Down the cable fix bracket
to fix the Coaxial cable, then
tighten the two bolts,
TIGHTEN BOLTS (M5)
Tightening torque: 3.14 N·m
(Recommended)
POLE
Step 6. Install the Coaxial cables
between the antenna and
ODU.
Note: Fix the coaxial cable to the pole or
member with cable hanger or cable
ties after antenna orientation has
been completed.
ODU
COAXIAL
CABLE
Caution: Wrap the coaxial cable
connection points with a selfbonding tape for waterproof.
Fig. 4-4 7/8 GHz Band ODU, Pole Mounting (2/3)
4-16
MOUNTING
BOLT
ANT
HYB
N-Type *
No.1 ODU
ODU
COAXIAL
CABLE*
BRACKET
COAXIAL
CABLE
POLE
No.2 ODU
TIGHTEN BOLTS (M5)
Tightening torque: 3.14 N·m
(Recommended)
SIDE VIEW
Note: * When coaxial cable with SMA connector is
used, the connectors are supplied by NEC.
Caution: Wrap the coaxial cable connection points with a self-bonding
tape for waterproof.
USING HYB FOR 1+1 SYSTEM
Fig. 4-4 7/8 GHz Band ODU, Pole Mounting (3/3)
4-17
MOUNTING
13-38GHz POLE MOUNTING WAVEGUIDE TYPE
Step 1. Mount the attachment with adapter
to the ODU bracket using ten bolts,
ODU BRACKET
SPRING WASHER
Note: Color of adapter is white.
Tightening torque:
3.14 N·m
BOLT (M5 ×10)
WASHER
PBR ADAPTER
ATTACHMENT
ODU BRACKET
U-BOLT
Step 2. Loosen eight nuts and remove the
two U-bolts from the ODU bracket,
NUT
Step 3. Mount the ODU bracket to the pole
with two U-bolts,
POLE
ODU BRACKET
FLAT WASHER
Note: The diameter of pole is from 48.5 to
114.5 millimetres.
SPRING WASHER
THICK NUT (M10)
THIN NUT (M10)
U-BOLT
Tightening torque:
33.93 N·m
Fig. 4-5 Pole Mounting Bracket for 13-38 GHz Waveguide Connection, Assembling
4-18
MOUNTING
ANTENNA POLARIZATION CHANGE
Note:
The details are referred to the installation
manual which is attached to the antenna.
ANTENNA
Step 1. Keep the antenna stand horizontally,
Step 2. Loosen screws with Allen wrench,
Note: Do not remove the screw complete
from the screw hole.
Hold the feed horn with hand.
Step 3. Holding the feed horn with hand,
rotate the feed horn by 90 degrees,
Top
Top
Polarization
V
Polarization
H
Step 4. Fix the feed horn, with screws that
were loosened in step 2,
Fig. 4-6 Antenna Polarization Change (Example)
4-19
MOUNTING
ANTENNA DIRECT MOUTING POLARIZATION CHANGE
Step
Procedure
Note:
-The details are referred to the installation manual which
is attached to the antenna.
-The antenna is set to V-polarization when shipped from
the factory.
1
If you change to H polarization, loosen the four screws with the
Allen key wrench and then rotate the antenna connection unit,
keeping the antenna stand horizontal.
SCREW
ANTENNA
CONNECTION
UNIT
SCREWS
V POLARIZATION
Note: A large and a small gasket are included in the antenna package.
Please use the large one (The small gasket is not used in antenna
mount).
Fig. 4-7 13-38 GHz Band ODU Antenna Polarization Change for Direct Mounting (1/2)
4-20
MOUNTING
Step
2
Procedure
Check that the aperture part of the connection unit is rotated
by 90 degrees, then fix it with the screws that were loosened
in step 1.
APERTURE
H POLARIZATION
Fig. 4-7 13-38 GHz Band ODU Antenna Polarization Change for Direct Mounting (2/2)
4-21
MOUNTING
HYBRID POLARIZATION CHANGE
Step
Procedure
Note: The hybrid is set to V-polarization when shipped from the factory.
1
If you change to H polarization, loosen two screws, rotate the
antenna connection unit and put the HYB horizontally.
GUIDE PIN
HYB
ANTENNA
CONNECTION UNIT
V POLARIZATION
2
Check that aperture of the connection unit is rotated as shown
below, then fix it with the two screws that were loosened in
step 1.
SCREW (M2.6, 2EA)
V POLARIZATION
H POLARIZATION
Fig. 4-8 13-38 GHz Band HYBRID Polarization Change
4-22
MOUNTING
ODU POLARIZATION CHANGE
GUIDE PIN
Step 1. When vertical polarization is
required, rotate the ODU so as to
go up the plate marked V,
PLATE MARKED WITH V
Step 2. When horizontal polarization is
required, remove the guide pin
fixed on the plate marked with V,
GUIDE PIN
Step 3. Screw in the guide pin removed in
step 2 to the screw hole of the plate
marked H,
Step 4. Rotate the ODU so as to go up the
plate marked H,
PLATE MARKED WITH H
Note: When the ODU is mounted on to the
NEC HYB, only V polarization is
applied.
PLATE MARKED WITH V
PLATE MARKED WITH H
UP
UP
RX LEV
MON
IFL
RX LEV
MON
IFL
FG
FG
V POLARIZATION
H POLARIZATION
Fig. 4-9 13-38 GHz Changing V/H Polarization for Antenna/HYB Direct Mounting ODU
4-23
MOUNTING
ANTENNA DIRECT MOUNTING
Step
Procedure
Note:
The details are referred to the installation manual which
is attached to the antenna.
INSTALLATION BRACKET
1
Install the bracket to the antenna pole,
2
Mount antenna to the bracket,
ANDREW VHLP TYPE BRACKET
WASHER
LOCK WASHER
NUT
HOLE FOR GUIDE PIN
GUIDE PIN
Fig. 4-10 13-38 GHz Band ODU Antenna Direct Mounting (1/6)
4-24
MOUNTING
RFS SB1 TYPE BRACKET
Fig. 4-10 13-38 GHz Band ODU Antenna Direct Mounting (2/6)
4-25
MOUNTING
RFS SB2 TYPE BRACKET
RFS SB2 TYPE BRACKET
Fig. 4-10 13-38 GHz Band ODU Antenna Direct Mounting (3/6)
4-26
MOUNTING
Step
3
Procedure
Fix the ODU to the bracket by tightening the M6 screws (four
locations),
Notes: 1. Figure shows V polarization.
2. Be careful not to damage the O-ring (Antenna).
3. The tightening torque is 4.0 N·m ± 10%.
HOLE FOR GUIDE PIN
GUIDE PIN
O-RING
ODU
Fig. 4-10 13-38 GHz Band ODU Antenna Direct Mounting (4/6)
HOLE FOR GUIDE PIN
ODU
O-RING
RFS SB1 TYPE BRACKET
Notes: 1. Figure shows V polarization.
2. Be careful not to damage the O-ring (Antenna).
3. The tightening torque is 4.0 N·m ± 10%.
Fig. 4-10 13-38 GHz Band ODU Antenna Direct Mounting (5/6)
4-27
MOUNTING
Note: Set the ODU to the bracket after
polarization of the ODU is
confirmed.
O Ring
Notes: 1. Figure shows V polarization.
2. Be careful not to damage the O-ring (Antenna).
3. The tightening torque is 4.0 N·m ± 10%.
Fig. 4-10 13-38 GHz Band ODU Antenna Direct Mounting (6/6)
Step 4. Insert guide pin on the hole of
bracket to set the position of screws,
GUIDE PIN
Fig. 4-11 Mounting of ODU for Antenna Direct Mounting Type (1/3)
4-28
MOUNTING
ANTENNA FLANGE
ODU FLANGE
Caution: Align flanges on antenna and
ODU correctly, and fix the
ODU with four screws.
ODU
ANTENNA
Fig. 4-11 Mounting of ODU for Antenna Direct Mounting Type (2/3)
4-29
MOUNTING
Step 5. Fix the ODU to the bracket with four
screws.
Note: Torque: 4.23 N·m
SCREWS
SCREWS
Fig. 4-11 Mounting of ODU for Antenna Direct Mounting Type (3/3)
4-30
MOUNTING
ANTENNA DIRECT MOUNTING WITH HYB
Note:
The details are referred to the installation
manual which is attached to the antenna.
HOLE FOR GUIDE PIN
O-RING
GUIDE PIN
MOUNTING HOLE FOR
HYB
The tightening torque is 4.0 N·m ± 10%.
Be careful not to damage the O-ring(Antenna).
ANDREW VHLP TYPE BRACKET
HOLE FOR GUIDE PIN
O-RING
MOUNTING HOLE FOR
HYB
Note: The tightening torque is 4.0 N·m ± 10%.
Be careful not to damage the O-ring (Antenna).
RFS SB1 TYPE BRACKET
Fig. 4-12 13-38 GHz Band ODU Mounting Using NEC Hybrid (1/3)
4-31
MOUNTING
Step
Procedure
1
Fix the bracket and handle to the HYB.
2
Check the polarization and fix the HYB to the antenna by
tightening the M6 screws (four locations).
M5 HEAD CAP SCREW
Note; Tightening torque is
from 2 to 4
N·m(Recommended)
FLAT WASHER
GUIDE PIN
M6 SCREW
ANT
HYB
MOVE THE
SHORT PLATE
O-ring
SHORT PLATE
3
Move short plates as shown in figure (both sides).
Fig. 4-12 13-38 GHz Band ODU Mounting Using NEC Hybrid (2/3)
4-32
MOUNTING
Step
Procedure
4
Insert the O-rings to the two ODU ports of the HYB.
5
Fix the two ODUs with hex screws (four locations) using the
Allen key wrench.
Note: Be careful not to damage the O-rings (Hybrid).
ODU
O-ring
ODU
O-ring
ODU
Fig. 4-12 13-38 GHz Band ODU Mounting Using NEC Hybrid (3/3)
4-33
MOUNTING
ODU DEMOUNTING FROM HYB
Step
Procedure
1
Remove the four (or six) fixed bolts from the ODU.
2
Then demount the ODU.
Note: When demounting the ODU from HYB, mount the attached
SHORT PLATE to the demounted port of the HYB to avoid RF
power leaking from the hybrid and for waterproofing.
MOUNTING HOLE
FOR SHORT
PLATE
SHORT
PLATE
MOUNTING SHORT
PLATE TO THE ODU
PORT
Fig. 4-13 13-38 GHz Band ODU Demounting
4-34
MOUNTING
4.2.2 Wall Mounting
Procedure for mounting and demounting are described below.
(a) Mounting
The method of mounting is listed in Table 4-4.
Table 4-4 Wall Mounting
Notes
WALL
MOUNTING
1
Fig. 4-14
2
Fig. 4-15
1. When the ODU is mounted on the opposite side,
reassemble the bracket to the right position by the
procedure described in Fig. 4-16.
2. 7/8 GHz band ODU does not apply for waveguide
interface.
(b) Demounting
For demounting ODU (if necessary), use the following procedure.
Step
Procedure
1
Remove the four fixed bolts from the ODU,
2
Then demount the ODU.
4-35
MOUNTING
Step 1. Using a center punch and hammer,
mark the ODU wall for drilling
holes with dimensions shown at
left,
220
100
100
Unit : mm
Step 2. Using an electric drill, drill the
guide holes (φ4.8),
60
Unit : mm
Step 3. Also,drill
(φ18),
60
the
Unit : mm
Fig. 4-14 ODU, Waveguide Type of Wall Mounting (1/2)
4-36
specified
holes
MOUNTING
PLUG BOLT
Step 4. Remove debris from the specified
hole and insert a plug-bolt into it,
Step 5. Make sure to insert the plug-bolt
fully,
Step 6. Screw the bolt using a wrench or
monkey wrench,
BOLT
Step 7. Remove the bolt only.
Fig. 4-14 ODU, Waveguide Type of Wall Mounting (2/2)
4-37
MOUNTING
(This page is intentionally left blank)
4-38
MOUNTING
Step 2. Mount the ODU on the mounting bracket with four bolts (M6) on
the ODU, after the guide pin of the ODU and the guide holl of the
braket is matched.
Step 1. Fix the wall mounting bracket to
the wall with the six bolts (M6).
Note: When the ODU is mounted on the
opposite side, reassemble the ODU
to the right position by the
procedure described in Fig. 4-16.
Step 3. Check that the ODU and mounting
bracket are fixed firmly and
vertically.
FLAT WASHER *
SPRING WASHER *
BOLT *
Note: Tighten to 4.23 N·m torque.
(Recommended)
Note: *Anchor bolts of 10 mm dia. shall be prepared by
the customer.
Fig. 4-15 ODU, Waveguide Type of Wall Mounting
4-39/40
MOUNTING
Step 1. Loosen four screws, remove
bracket-1 from wall mounting type
bracket,
SCREW
BRACKET-1
SCREW
Step 2. Loosen two screws, remove
bracket-2 from the bracket-1,
SCREW
BRACKET-2
Fig. 4-16 Wall Mounting Bracket, Reassembly (1/2)
4-41
MOUNTING
Step 3. Turn the bracket-1 as shown at left,
SCREW
SPRING WASHER
WASHER
Step 4. Mount the bracket shown at left
with four screws.
FLAT WASHER
SPRING WASHER
SCREW (M6)
Fig. 4-16 Wall Mounting Bracket, Reassembly (2/2)
4-42
MOUNTING
4.2.3 19-inch Rack Mounting
Procedure for mounting and demounting are described below.
(a) Mounting
The method of mounting is shown in Fig. 4-17.
(b) Demounting
For demounting ODU (if necessary), use the following procedure.
Step
Procedure
1
Remove the four fixed bolts from the ODU,
2
Then demount the ODU.
4-43
MOUNTING
(This page is intentionally left blank)
4-44
MOUNTING
Step 2. Mount the ODU on the bracket
with four fixing screws after the
guide pin of the guide holl of the
bracket is matched.
Step 1. Fix the bracket on the 19-inch
rack with six fixing screws.
Step 3. Check that the ODU and mounting bracket
are fixed firmly, and vertically.
Note: Tighten to 4.23 N·m torque.
(Recommended)
SCREW (M6)
FLAT WASHER
SPRING WASHER
Fig. 4-17 ODU, 19-inch Rack Mounting
4-45/46
MOUNTING
4.3 Waveguide Connection
The connection method of the waveguide type ODU is described in
following procedure.
Step
Procedure
1
Insert the O-ring to the flange face of the ODU.
2
Conect the waveguide to the ODU, fix the waveguide to the
ODU with four bolts. (M4).
Note: -Be careful not to damage the O-ring.
-Four bolts are tightened so that there is space on
the flange face by even torque.
O- RING
BOLT (M4)
SPRING WASHER
Notes:
WAVEGUIDE
WASHER
1. Use suitable flange adapter between ODU and waveguide
depending on the waveguide type.
2. Connection of the waveguide is the same way as ODU is
wall mounted or 19-inch rack mounted.
The connection method of the antenna direct mounting type ODU is
referred to the following procedure.
Step
1
Procedure
Mount the ODU bracket to the pole with two U-bolts,
Note: The diameter of the pole is from 48.5 to 114.5 millimeters.
4-47
MOUNTING
Procedure
Step
POLE
ODU BRACKET
FLAT WASHER
SPRING WASHER
THICK NUT (M10)
THIN NUT (M10)
Tightening torque: 33.93 N·m
U-BOLT
2
O-RING
(Note)
Mount the ODU to the ODU bracket with attached four bolts
(Align the guide pins on the ODU and the guide holes on the
bracket),
GUIDE PIN
Antenna direct
mounting type ODU
with NEC special
flange.
ODU BRACKET
Note: Be careful not to damage the O-ring.
3
4-48
Make sure that the ODU and the ODU bracket are fixed at
specified values.
MOUNTING
Procedure
Step
4
Mount the waveguide to the ODU with four bolts.
Note: Be careful not to damage the O-ring attached to the PBR adapter.
O-RING
WASHER
SPRING WASHER
BOLT (M4)
WAVEGUIDE
WITH PBR( ) FLANGE
4-49
MOUNTING
4.4 Rack Installation
This paragraph describes the rack installation procedure. For tools and
materials necessary for installation.
Step
1
Procedure
Mark and drill the floor as shown Fig.4-18.
Fig. 4-18 Marking and Drilling
Step
2
Procedure
Insert four anchor bolts (M10) into the floor as shown in Fig.419.
Fig. 4-19 Mounting of Anchor Bolts
4-50
MOUNTING
4.5 Cable Rack Installation
This paragraph describes the cable rack installation procedure. Before
installing, check the materials according to Table 4-5 and Fig.4-19. Typical
installation method is shown in Fig.4-20.
Step
Procedure
1
Perform marking, leveling and drilling to the wall and ceiling.
2
Prepare the cable rack by cutting and driling according to the
engineering drawing and perpare the C-45 channel for the
desinated dimensions of wall or ceiling fixtwes.
3
Secure the PY-4005 anchor bolts.
4
Fasten the wall and ceiling fixtures and secure the supporting
metals.
5
Secure the cables.
Note Numbers in circle for materials can be identifier by Table 4-5.
Fig. 4-20 Cable Rack Installation Method
4-51
MOUNTING
Table 4-5 Typical Inatallation Materials for Cable Rack
No.
4-52
Name
1
Cable Rack
2
Longitudinal Joint
3
Wall Support
4
L-Joint (B)
5
Wall Fixtur
6
Corner Clamp
7
U-Clamp
8
Cable Rack Clamp
9
J-Bolt
10
PY-4005 Anchor Bolt
11
C-45 Channel
12
Univer Nut
13
F-19 Hanger
14
Bolt (M10-1.5x20)
15
Hanger Bolt (M10-1.5)
16
C-45 Washer
17
L-Joint
18
Bolt (M8-1.25x25)
19
Nut (M8-1.25)
20
Flat Washer (for M10)
21
Flat Washer (for M8)
22
Spring Washer (for M8)
23
Nut (M10-1.5)
24
Spring Washer (for M10)
Remarks
FRAME GROUNDING
5. FRAME GROUNDING
In mounting IDU and ODU, perform frame grounding. Location of frame
grounding in each of the IDU and ODU is shown in Fig. 5-1, and
connection for frame grounding is shown in Fig. 5-2.
Note: Connections for frame grounding are examples.
IF
IN/OUT
(IDU for 1+0 System)
Connect the wrist strap.
(FG to be used as ESP)
! -43V OUTPUT
IF
IN/OUT
Power down IDU
before disconnection
or connection of
Cable
MD UNIT (1)
TRAFFIC IN/OUT (CH9 to CH16)
(IDU for 1+1 System)
SW UNIT
TRAFFIC IN/OUT (CH1 to CH8)
IF
IN/OUT
! -43V OUTPUT
Power down IDU
before disconnection
or connection of
Cable
MD UNIT (2)
RX LEV
MON
IFL
FG
FG
Fig. 5-1 Location of Frame Ground
5-1
FRAME GROUNDING
LIGHTNING ROD
OUTDOOR EARTH TERMINAL
(EXISTING OR CUSTOMER SUPPLIED
PROTECT AREA
30°
30°
ODU
EARTH LINE
INDOOR EARTH TERMINAL
COAXIAL
CABLE
IDU
EARTH LINE
GROUND
LEVEL
EARTH LINE (Grounding-resistance less than 10 ohms)
Caution 1: Install the ODU within the area protected by lightning rod.
Caution 2: To avoid surge currents caused by lightning circulating in the equipment
earth system, connect the equipment earth system (frame ground) to
ground of lightning rod at ground level.
Note: This connection is an example.
Fig. 5-2 Connection for Frame Grounding (1/2)
5-2
FRAME GROUNDING
LIGHTNING ROD
ODU
FG
Grounding cable for ODU should be
connected to the nearest EP of the tower.
EP
EARTH LINE
ISOLATED FROM
TOWER
(Grounding-resistance:
less than 10 ohms)
EARTH LINE*
(Grounding-resistance:
less than 10 ohms)
(Grounding-resistance of tower:
less than 10 ohms)
COAXIAL CABLE
INDOOR EARTH
TERMINAL
IDU
GROUND
LEVEL
Note: * NEC recommends that frame ground of ODU should be connected to earth line as
NEC’s standard installation.
EP : Earthing Point of tower
FG : Frame Ground terminal
This connection is an example.
Fig. 5-2 Connection for Frame Grounding (2/2)
5-3
FRAME GROUNDING
(This page is intentionally left blank)
5-4
CABLE TERMINATION
6. CABLE TERMINATION
This section describes the cable termination method. The necessary tools
and materials are summarized in Table 6-1. The following cables are
described for reference.
• D-sub connector
• N-P connector of the L angle type
• N-P connector of the straight type
• Molex M5557-4R connector
Note: Use ISO standardized screw (mm unit) for D-SUB connector.
Table 6-1 Tools and Material List
No.
NAME
1
Soldering Iron
2
Knife
3
Measure
4
Screw driver
5
Wire Stripper
REMARKS
6-1
CABLE TERMINATION
Table 6-1 Tools and Material List
No.
6
7
8
6-2
NAME
REMARKS
Adjustable Wrench
CL250-0012-2/
CL250-0013-5
For D-Sub connector
57026-5000/
57027-5000
For Molex connector
Hand Crimping Tool
Solder
CABLE TERMINATION
6.1 Terminating Supervisory Cables with D-Sub Connector
Step 1. Strip back the cable sheath, taking
care not to damage the braided
shield,
50 mm
CABLE
Step 2. Fold back the braided shield (do
not separate the strands) and trim
it as shown,
WIRE
4 mm
Step 3. Remove the insulation over a
length of 4 mm from the end of
the wire,
CONFORMABLE
WIRE
SOCKET CONTACT
AWG#20-24 :
CD-PC-111
AWG#24-28 :
CD-PC-121
WIRE
Step 4. Insert the cable into the socket
contact,
WIRE
SOCKET CONTACT
Step 5. Cable should be fitted, so that
insulation and bare wire are
arranged as shown,
6-3
CABLE TERMINATION
Step 6. Mount the socket contact using a
hand crimping tool,
CONFORMING
WIRE
SOCKET CONTACT
AWG#20-24 :
TC-CD-111
AWG#24-28 :
TC-CD-121
HAND CRIMPING TOOL
(HRS TC-CD-111/TC-CD-121)
Step 7. Recheck that the wire position is
as shown in step 5 before
crimping the socket contact (see
illustration at left),
WIRE SIDE
SOCKET CONTACT
WIRE
6-4
CABLE TERMINATION
Step 8. Wind the metallic shield tape on
the braided shield,
METALLIC SHIELD TAPE
CABLE CLAMPER
Step 9. Set the cable into the plug case as
shown in figure,
Then, fit the cable using the cable
clamper and two screws,
PLUG CASE
6-5
CABLE TERMINATION
Step 10. Referring to circle A, fix drain
wire with screw,
Step 11. Referring to circle B, insert each
wire to the specified position,
Insert the socket contacts into the
upper and lower row positions
while taking care that the socket
contacts are inserted the right way
round,
CIRCLE A
(refer to para 3.1 Interface
Terminal and Jacks in the MDP
Modulator-Demodulator in MDP
equipment description)
SCREW
DRAIN WIRE
CIRCLE B
6-6
CABLE TERMINATION
SCREW
Step 12. Fix the plug case with two
screws, as shown in the figure.
PLUG CASE
6-7
CABLE TERMINATION
6.2 Terminating Coaxial (IF Signal) with N-P Connector (L Angle
Type)
KOMINE made
Step 1. First fit the tying metal, washer
and gasket on the cable,
GASKET
WASHER
TYING METAL
CABLE
CLAMP
Step 2. Strip back the cable sheath, taking
care not to damage the braided
shield, and fit the clamp,
9 mm
Step 3. Fold back the braided shield
(separating the strands of the
braid) and trim it,
Note: Pay attention not to damage the plait.
6-8
CABLE TERMINATION
Step 4. Insert the ferrule,
FERRULE
Step 5. Fit the bush,
BUSH
Step 6. Cut the aluminium fail and inner
insulator away along the bush and
remain the inner conductor,
Step 7. Taper the edge of the center
conductor using a file as shown in
the circle,
Note : Pay attention not to occur
protrusions and indents.
6-9
CABLE TERMINATION
INSULATOR
CONTACT
Step 8. Mount the contact onto the center
conductor and mount insulator
onto the contact,
Step 9. Insert the cable into the shell,
Step 10. Tighten tying metal with wrench
point by wrench (Tighten with
torque 4 to 10 N·m).
LESS THAN 0.1 mm
(USUALLY NO GAPS)
WRENCH POINT
6-10
CABLE TERMINATION
6.3 Terminating Coaxial (IF Signal) Cables with N-P Connector
(Straight Type)
In case of marking “NDK” on connector, please ask NEC for cable
processing.
LOCK NUT
WASHER
GASKET
Step 1. First fit the lock nut, washer and
gasket on the cable as shown,
CABLE
CLAMP A
Step 2. Strip back the cable sheath, taking
care not to damage the braided
shield, and fit the clamp A,
CONNECTOR
L
4.0 mm
CUT
CLAMP B
CABLE
TYPE
LENGTH
(L)
N260
5D-FB
25 mm
N227
8D-FB
25 mm
N228
10D-FB
27 mm
N229
12D-FB
27 mm
Step 3. Fold back the braided shield
(separating the strands of the
braid) and trim it,
Step 4. Cut away the insulation from the
center conductor and fit the clamp
B. Be sure not to cut or scratch
the conductor while stripping the
insulation,
6-11
CABLE TERMINATION
Step 5. Cut the center conductor. Taper
the end of the center conductor
using a file as shown in the circle,
12 mm
Step 6. Mount the center contact onto the
center conductor as shown,
1.5 mm
CENTER CONTACT
TAPERING SIDE
INSULATION
6-12
Note: Insert the center contact into
insulator (1.5 mm).
Step 7. Mount the insulation onto the
center contact,
CABLE TERMINATION
Step 8. Insert the cable into the connector
shell,
CONNECTOR SHELL
Less than 0.5 mm
Step 9. Tighten the lock nut.
LOCK NUT
6-13
CABLE TERMINATION
6.4 Terminating Power Supply Cables with Molex Connector
Step 1. Remove 3.0 to 3.5 mm of
insulation,
CABLE
AWG#18-24
3.0 to 3.5 mm
POWER SUPPLY CABLE
FOR 48 V, 1A
1
2
Step 2. Set the socket contact to the
following position onto a hand
crimping tool,
HAND CRIMPING OUTSIDE DIAMETER SET
TOOL TYPE
OF CABLE
POSITION
57026-5000
HAND CRIMPING TOOL
57026-5000 Molex
or 57027-5000
(
6-14
)
57027-5000
φ 1.5 to 1.8
1
φ 1.8 to 2.2
2
φ 2.3 to 2.6
1
φ 2.6 to 3.1
2
CABLE TERMINATION
Step 3. Squeeze the handle of the hand
crimping tool, insert cable into
socket contact,
INSULATION BARREL
Step 4. Cable should fit, so insulation
and bare wire are arranged as
shown,
WIRE BARREL
Step 5. Squeeze the handle of the hand
crimping tool until ratchet is
released,
WIRE STRIP LENGTH
Step 6. Insert socket contacts into the
power connector till they lock.
-48V
POWER CONNECTOR
0V
6-15
CABLE TERMINATION
6.5
Cable and Terminal Connections
Set up as in Fig. 6-1 and Fig 6-2 referring to the following connecting
method.
Caution: In back -to-back connection, the interface conditions of the
PM CARD must be matched between two IDUs. Then,
check the setting of the interface if it is RS-485 or RS-232C
before connecting the cable.
(a) Connect baseband signal cable(s)
Take care to connect the D-sub connector and fix it with two
screws (M3).
(b) Connect 10/100BASE-T(X) LAN cable
Take care to connect the Modular connector and check that it is
locked.
(c) Connect IF signal cable
Connect the connector and tighten it by turning the tightening ring
clockwise.
(d) Connect supervisory cable(s)
Take care to connect the D-sub connector and fix it with two
screws (M3).
(e) Connect power supply cable
Take care to catch the Molex connector.
(f)
Connect terminal
Take care to connect the D-sub connector and fix it with two
screws (M3).
Note: Use ISO standardized screw (mm unit) for D-SUB connector.
For the details of pin assignment in the IDU and ODU, refer to para 3.1
Interface Terminal and Jacks in the MDP Modulator-Demodulator and
TRP Transmitter-Receiver equipment description.
6-16
IFL
FG
IFL
FG (M5)
(*) Not provided for 4 × 2MB fix
rate system.
ALM/AUX ALM
PORT1 PORT2
100M
100M
OW/DSC/ASC
NMS/RA
WS/SC LAN NMS LAN
LA PORT
Fig. 6-1 Connections of IDU and ODU
TRAFFIC IN/OUT (CH1 to CH8)
(*)
TRAFFIC IN/OUT (CH9 to CH16)
IF
IN/OUT
Notes:*1. Tighten 196 N·cm torque.
P-N CONNECTOR *1
RX LEV
MON
CALL
FUSE (7.5A)
EOW
SELV
D-SUB CONNECTOR
(MALE)
D-SUB CONNECTOR
(MALE)
D-SUB CONNECTOR
(MALE)
D-SUB CONNECTOR
(MALE)
MOLEX CONNECTOR
(4PIN) (MALE)
−
+
ODU IDU
PASOLINK
MAINT
RESET PWR
RJ45 (8PIN)
RJ45 (8PIN)
RJ45 (8PIN)
D-SUB CONNECTOR
(MALE)
D-SUB CONNECTOR
(MALE)
EXTERNAL
EQUIPMENT
POWER
SUPPLY
WS
TERMINAL
EQUIPMENT
or SC LAN
LAN
Network
LAN
Network
DATA
TERMINAL
EQUIPMENT
CABLE TERMINATION
6-17
6-18
IFL
FG
IFL
! -43V OUTPUT
IF
IN/OUT
Power down IDU
before disconnection
or connection of
Cable
! -43V OUTPUT
TRAFFIC IN/OUT (CH1 to CH8)
(*)
TRAFFIC IN/OUT (CH9 to CH16)
Power down IDU
before disconnection
or connection of
Cable
(*) Not provided for 4 × 2MB fix
rate system.
Notes:*1. Tighten 196 N·cm torque.
P-N CONNECTOR *1
RX LEV
MON
FG (M5)
IF
IN/OUT
100M
AUX ALM
SC LAN
OW/DSC/ASC
NMS LAN
NMS/RA
Fig. 6-2 Connections of IDU and ODU
ALM
PORT1 PORT2
100M
LA PORT
FUSE (7.5A)
LA PORT
−
EOW CALL
FUSE (7.5A)
PASOLINK
RX
ALM
TX RX TX
OPR
PASOLINK
SELV
SELV
+
2
1
+
D-SUB CONNECTOR
(MALE)
D-SUB CONNECTOR
(MALE)
D-SUB CONNECTOR
(MALE)
D-SUB CONNECTOR
(MALE)
D-SUB CONNECTOR
(MALE)
MOLEX CONNECTOR
(4PIN) (MALE)
−
RESET PWR
ODU IDU
MAINT
No.2
OPR
SEL
No.1
RESET
−
RESET PWR
ODU IDU
MAINT
PASOLINK
RJ45 (8PIN)
RJ45 (8PIN)
RJ45 (8PIN)
D-SUB CONNECTOR
(MALE)
D-SUB CONNECTOR
(MALE)
EXTERNAL
EQUIPMENT
POWER
SUPPLY
WS
TERMINAL
EQUIPMENT
or SC LAN
LAN
Network
LAN
Network
DATA
TERMINAL
EQUIPMENT
CABLE TERMINATION
Fig. 6-3 Pin/Assignment for IDU (1+0) connectors
CABLE TERMINATION
6-19
Fig. 6-4 Pin/Assignment for IDU (1+1) connectors
CABLE TERMINATION
6-20
WATERPROOF PROTECTION
7. WATERPROOF PROTECTION
After cable connection, the following part should be wrapped by selfbonding tape for waterproof (see Fig. 7-1),
ANT
POLE
This part should be wrapped by
self-bonding tape for waterproof.
ANT
ODU
HYB
POLE
ODU
This part should be wrapped by
self-bonding tape for waterproof.
ODU
7/8 GHz BAND
Fig. 7-1 Location of Connector for Waterproof (1/2)
7-1
WATERPROOF PROTECTION
This part should be wrapped by
self-bonding tape for waterproof.
ODU
IFL CONNECTOR
IF CABLE
ODU
SELF-BONDING TAPE
SELF-BONDING TAPE
ODU
IF CABLE
IN CASE OF L−ANGLE
Note: The self-bonding tape should be prepared by customer.
7-38 GHz BAND
Fig. 7-1 Location of Connector for Waterproof (2/2)
7-2
INITIAL LINEUP
8. INITIAL LINEUP
This paragraph provides instructions for initial lineup of the [ ] GHz [ ]
MB digital radio system. Included is information on start-up, shut-down,
antenna orientation and lineup test for the equipment.
If orderwire communication is required, connect the X0818A OW/RX
LEV MONITOR to the ODU. The OW/RX LEV MONITOR is operated
with a dry battery (6F22/9V).
Notes:
1. Insert the battery with correct polarity.
2. Do not charge the dry battery.
3. When the OW/RX LEV MONITOR is not being used for long
period of time, remove the battery to avoid damage from
battery leakage and corrosion.
4. Set to the OW switch to ON when orderwire is used. If the
OW indicator is not lit even after the OW switch is set to
ON, replace the battery since the battery becomes weak.
8.1 Start-up
Caution: It is recommended that you connect the IDU to ODU after
the TX/RX frequency and TX power control setting has
been set on the IDU.
This process is most important for the following ODUs that
may be emitted TX power if you set the channel number to
"0ch" which is not defined (excepting 13/26/38 GHz band)
by the Radio Frequency Assignment.
Code No. of Corresponding ODU:
H0738 (7 GHz), H0739 (8 GHz), H0330 (13 GHz),
H0331 (15GHz), H0332 (18GHz), H0333 (23 GHz),
H0334 (26 GHz), H0335 (38 GHz)
Test Equipment and Accessories Required
• Agilent 34401A Digital Multimeter (or equivalent) with Test Leads
Step
1
Procedure
Check that the LINE IN voltage is between +20 V to +60 V/
−20 V to −60 V with the digital multimeter, before connecting
the power connector to the IDU,
Note: The range of DC power input depends on system
requirement.
8-1
INITIAL LINEUP
2
Turn on the POWER switch on the IDU (refer to Fig. 8-1),
Note: In 1+ 1 system,
When neither No.1 nor No.2 channel is working, first set
the OPE SEL switch to the desired (No.1 or No.2)
position and power on the selected MD Unit or set the
OPE SEL switch to neutral (Auto) position and power on
both MD units.
When either No.1 or No.2 channel is working, perform
MAINTE ON condition with the LCT, set the OPR SEL
No.1-No.2 switch on the IDU to the working channel side,
then, turn on the power switch of the not working
channel.
3
Allow equipment to warm up for at least 30 minutes.
EOW
ODU IDU
RESET PWR
MAINT
NMS LAN
IDU for 1+0 System
FUSE (7.5A)
−
NMS/RA
Power Switch
LINE IN Connector
PASOLINK
CALL
+
SELV
LA PORT
No.1 Power Switch
LINE IN Connector
PASOLINK
FUSE (7.5A)
RESET PWR
ODU IDU
MAINT
−
EOW CALL
IDU for 1+1 System
+
OPR SEL No.1 - No.2 Switch
SELV
LA PORT
OPR
SEL
No.1
MS LAN
PASOLINK
RESET
OPR
ALM
TX RX TX
RX
1
−
DSC/ASC
NMS/RA
LA PORT
2
No.2
PASOLINK
FUSE (7.5A)
No.2 Power Switch
LINE IN Connector
RESET PWR
ODU IDU
MAINT
−
+
SELV
LA PORT
Fig. 8-1 Front View of the IDU for Powering Up
8.2 Shut-down
Step
Procedure
For 1+0 system
1
Turn off the POWER switch on the front of the IDU.
For 1+1 system
8-2
1
Perform the setting for MAINT ON condition with the LCT,
2
Set the OPR SEL No.1 - No.2 switch to the channel position to
INITIAL LINEUP
be on-line,
3
Turn off the power switch on the channel of off-line.
Note: In 1+1 system, before turn off the POWER switch of No.1
or No. 2 channel, perform MAINT ON condition with the
LCT.
8.3 Radio Freqency and TX Output Power Setting
Test Equipment and Accessories Required
• Personal Computer
• RS-232C cable
• Screw Driver
The control of the IDU and ODU digital radio system can be carried out
via the LA PORT or NMS/RA of the IDU. Connect a Personal Computer
to the IDU with an RS-232C cable. The specifications of the required
communication port condition of the personal computer are listed below.
• Baud rate :
9600
• Data Length :
8
• Parity Check :
None
• Stop bit :
2
• Flow control:
None
• Emulation :
VT100 Video Terminal
• Transmission:
HyperTerminal*: Send line ends with line feeds : Yes
Local echo : No
• Receiving:
CR : No
Return on the right edge : Yes
Force incoming data to 7-bit ASCII : No
Notes: 1. HyperTerminal : Microsoft
* For Windows 95/98/Me/NT4.0/2000/XP
2. When Windows NT4.0 and HyperTerminal is used,
“Program Download” function is not available.
In this case, please use other terminal software.
(e.g. TeraTerm Pro 2.3:
http://hp.vector.co.jp/authors/VA002416/teraterm.html)
8-3
INITIAL LINEUP
The pin assignment is shown in Fig. 8-2. The cable length of RS-232C
between the personal computer and IDU equipment shall be less than 15
m.
IDU SIDE
LA PORT/NMS/RA CONNECTOR
PIN
SIGNAL
No.
NAME
PERSONAL COMPUTER SIDE
SIGNAL
NAME
PIN
No.
GND
DTR
DSR
RTS
CTS
TXD
RXD
5
4
6
7
8
3
2
D-SUB CONNECTOR (9 PIN)
(BLACK)
2
GND
5
4
3
1
CTS
RTS
RXD
TXD
D-SUB CONNECTOR (15 PIN)
Interface Terminal (9 pin - 15 pin)
Fig. 8-2 RS-232C Cable Pin Assignment
8.3.1 Setting Procedure from LCT
The setting of each item for the IDU is performed by the PC as follows:
Caution:
When login is not possible, check if settings of the
communication format are proper.
Caution:
Do not turn on the power of the IDU leaving cable
connection between the PC and RA PORT of the IDU.
Step
1
8-4
Procedure
Connect the personal computer (PC) to the LA PORT or NMS/
RA terminal of the IDU using an RS-232C cable as shown in
Fig. 8-3,
INITIAL LINEUP
EOW
RS-232C
CABLE(BLACK)
CALL
PASOLINK
ODU IDU
RESET PWR
MAINT
FUSE (7.5A)
−
NMS/RA
+
SELV
LA PORT
IDU
PASOLINK
FUSE (7.5A)
RESET PWR
ODU IDU
MAINT
−
+
SELV
LA PORT
PERSONAL COMPUTER
EOW CALL
RESET
OPR
SEL
No.1
PASOLINK
OPR
ALM
TX RX TX
RX
1
−
NMS/RA
LA PORT
2
No.2
PASOLINK
FUSE (7.5A)
RESET PWR
ODU IDU
MAINT
−
+
SELV
LA PORT
IDU
Note: When the controlling or setting of own station are performed,
connect the cable to the LA PORT. When the controlling or
setting of opposite station are performed, connect the cable to the
NMS/RA port. But, if the following cases are applied, the NMS/
RA terminal can not be used.
• When the PM CARDs are mounted on Local and Remote
equipment.
• When BER is degraded.
Fig. 8-3 Equipment and Monitoring Setup
Step
Procedure
Note: The keys, “0” to “9” are used for selection of the menu
or entering values. “Enter” key is used for confirmation
of entering values. “Esc” key is used for cancellation of
entering values and display the higher rank menu.
2
Turn on the power on the PC. Then, start the communication
software (e.g. HyperTerminal),
Note: At the end of LCT operation log out from LCT menu by
keying "99" and then exit from the communication
software. In case if you have exit from the communication
software without logging out from LCT, repeat connecting
and disconnecting of the RS 232C cable once to reset.
3
Press the “CTRL” and “D” keys at the same time,
8-5
INITIAL LINEUP
Step
Procedure
4
Enter the specified password from the keyboard and press the
“Enter” key,
Password
:
Note: When the PC is connected to the NMS/RA terminal to
control the opposite station, enter password of the
opposite station.
5
Press the “0” key and “Enter” key. Then, perform step 8. If the
password should be changed, press the “1” key and “Enter” key,
Password
:*********
Change Password? (no:0 / yes:1) :
6
Enter the new password from the keyboard and press the
“Enter” key,
Password
:*********
Change Password? (no:0 / yes:1) : 1
New Password
:
Note: For password, “0” to “9”, “A” to “Z” and “a” to “z”
are available (31 letters maximum).
7
To confirm the password, re-enter the password from the
keyboard and press the “Enter” key,
Password
:*********
Change Password? (no:0/yes:1) : 1
New Password
:**********
New Password (Re-enter) :**********
8
1.
2.
3.
99.
Following menu item is displayed,
Setting
Maintenance
Monitoring
Exit
Select function No. :
8-6
INITIAL LINEUP
9
Press the “2” key and “Enter” key, then, following item is
displayed,
Step
Procedure
For 1+0 System
Maintenance
1. MAINT
2. FE loop back ctrl 1-16
3.
NE loop back ctrl 1-16
4.
5.
6.
7.
00.
99.
BER ALM >> AIS
CW
Power mute
ATPC manual ctrl
Menu
Exit
Select item No.
(NORM)
(ctrl :*Z#(ans :*--(ctrl :*-#(ans :*--(on)
(off)
(off)
(off)
-------------
-------------
----)
----)
----)
----)
-------------
-------------
----)
----)
----)
----)
:
For 1+1 System
Maintenance
1. MAINT
2. FE loop back ctrl 1-16
3.
NE loop back ctrl 1-16
4.
5.
6.
7.
8.
9.
10.
00.
99.
BER ALM >> AIS
CW
Power mute 1
Power mute 2
TX SW ctrl
RX SW ctrl
ATPC manual ctrl
Menu
Exit
Select item No.
(NORM)
(ctrl :*Z#(ans :*--(ctrl :*-#(ans :*--(on)
(off)
(off)
(on)
(AUTO)
(AUTO)
(off)
:
Notes: 1. “-” indication signifies control off condition,
2. “*” indication signifies control on condition,
3. “#” signifies E1 channel which is inhibited by the
hardware restriction or LAN signal transmission,
4. In case the FE loop back is applied from the opposite
station, the “Z” is displayed,
5. The FE loopback control is unavailable if the channel is
inhibited by “Not used” in Main channel usage.
6. Item ATPC manual ctrl is not displayed in MTPC mode.
8-7
INITIAL LINEUP
Step
10
Procedure
Press the “6” key and “Enter” key in the Maintenance menu
shown in step 9,
For 1+0 System
6.
Power mute (off)
Power mute (off:0 / on:1):
11
Press the “1” key and “Enter” key to mute TX power, if not,
press the “Esc” key,
For 1+1 System
12
Press the “6” key for No. 1CH or “7” key for No. 2CH and
“Enter” key, then the following appears,
For No. 1 CH ODU
6.
Power mute 1 (off)
Power mute (off:0 / on:1)
:
For No. 2 CH ODU
7.
Power mute 2 (off)
Power mute (off:0 / on:1)
13
Press the “1” key and “Enter” key to mute TX power, if not,
press the “Esc” key,
14
Enter 00 and press the "Enter" key to go back to the main menu,
then, the following appears,
1.
2.
3.
99.
Setting
Maintenance
Monitoring
Exit
Select Function No.:
8-8
INITIAL LINEUP
Step
15
Procedure
Press the “1” key and “Enter” key, then, following setting menu
is displayed,
Setting
1. Bit rate (4×2MB)
2. AIS RCVD alarm/status (status)
3. AIS SEND alarm/status (status)
4. TX/RX frequency (5ch)
5. TX power ctrl(0dB)
6. Main channel usage 1-16 (used: UNNN NNNN #### ####)
7. BER alarm threshold (10-4)
8. Frame ID (0)
9. WS channel usage (not used)
10. DSC 1 (232)
11. DSC 2 (232)
12. DEM invert (off)
13. Alarm table
14. Next items
00. Menu
99. Exit
Select item No. :
Notes: 1. In item No. 1, the required bit rate is indicated in the
parenthesis ( ) on “Bit rate”.
Bit rate 2x2MB / 4x2MB / 8x2MB / 16x2MB
Changing the bit rate will cause temporary
communication loss until the bit rate of the opposite
site is changed. The buzzer may be issued until then.
16x2MB bit rate is not supported on MDP-17MB-3/4A.
2. In item No. 2 and item No. 3, setting for alarm
indication of AIS RCVD/AIS SEND as follows,
alarm: to include ALARM LED indication item,
status: to exclude ALARM LED indication item.
3. In item No. 4, both channel numbers are indicated as
No.1: *ch / No.2: *ch if twin path configuration is
selected.
4. In item No. 5 shows in case of MTPC system,
TX power ctrl (ATPC) *1 or
TX power ctrl (No. 1: ATPC / No. 2: ATPC)*2 is
indicated.
In case of ATPC system,
Note: *1 1+0 or Hot standby system.
*2 Twin path system.
5. In item No. 6, following significant symbol letters are
used to display the status for each channel.
“#” : signifies E1 channel which is inhibited by the
hardware restriction or LAN signal
transmission.
8-9
INITIAL LINEUP
Step
Procedure
“N” : signifies not used channel.
“U” : signifies E1 channel which is used.
6. In item No. 10 and item No. 11, 232 (i.e. RS232C) is
standard.
16
Press the “4” key and “Enter” key, then, following item is
displayed,
For 1+0 / HS System
4.
TX/RX frequency (5ch)
TX/RX frequency (0ch – 255ch):
17
8-10
Enter the channel No. and press the “Enter” key, if not, press the
“Esc” key,
INITIAL LINEUP
Step
Procedure
For 1+1 Twin Path System
4. TX/RX frequency (No.1:5ch / No.2:10ch)
1.
2.
00.
99.
No.1 TX/RX frequency (5ch)
No.2 TX/RX frequency (10ch)
Menu
Exit
Select item No.
18
1.
:
Press the “1” key and “Enter” key, then, following setting is
displayed,
No.1 TX/RX frequency (5ch)
No.1 TX/RX frequency (0ch – 255ch):
19
Enter the channel No. and press the “Enter” key, if not, press the
“Esc” key,
20
Press the “2” key and “Enter” key, then, enter the channel
number for No.2 and press the “Enter” key,
2.
No.2 TX/RX frequency (10ch)
No.2 TX/RX frequency (0ch – 255ch):
21
Press twice the “Esc” key to go back to setting menu in step 15,
22
Press the “5” key and “Enter” key, then, following item is
displayed,
5. TX power ctrl (0dB)
1.
2.
3.
4.
5.
00.
99.
ATPC/MTPC
MTPC TX power
ATPC power range
ODU ALM mode
RX threshold
Menu
Exit
(MTPC)
(0dB)
(MAX : 0dB / MIN : -30dB)
(hold)
(-60dBm)
8-11
INITIAL LINEUP
Step
23
1.
Procedure
Press the “1” key and “Enter” key, then, following item is
displayed,
ATPC/MTPC (MTPC)
ATPC/MTPC (MTPC:0 / ATPC:1):
24
2.
Press the “0” key and “Enter” key, when the “0” key is pressed
to select MTPC TX power setting, press the “2” key and “Enter”
key, the following appears,
MTPC TX power (0dB)
MTPC TX power (-30dB to 0dB):-0
25
Enter the MTPC TX power level for setting and press the
“Enter” key, if not, press the “Esc” key,
26
When the “1” key is pressed to select ATPC TX power setting in
step 23, press “3” key and “Enter” key to select ATPC TX
power range setting, the following appears,
3.
ATPC TX power range(MAX : 0dB / MIN : -30dB)
MAX power (-30 to 0dB):-0
MIN power (-30 to 0dB):-30
Notes: 1. The MAX power must be set to a value larger than MIN
power,
2. When the TX power control mode is changed from
MTPC to ATPC, if the MAX power is set to -30dB in
MTPC, both MAX and MIN power may be set to -30dB.
27
8-12
Enter the ATPC TX power maximum level and minimum level
and press the “Enter” key for setting, if not, press the “Esc” key,
INITIAL LINEUP
Step
28
9.
Procedure
Press the “9” key and “Enter” key in the Maintenance menu
shown in step 15,
RX SW ctrl (AUTO)
RX SW ctrl (AUTO:0 / No.1:1 /No.2:2):
29
Press the “1” key and “Enter” key for No.1 RX selection or the
“2” key and “Enter” key for No.2 RX selection, if not, press the
“Esc” key,
30
Press the “7” key and “Enter” key for 1+0 system or “10” key
and “Enter” key for 1+1 system, in the Maintenance menu
shown in step 15,
For 1+0 /Hot standby System
10. ATPC manual ctrl (off)
ATPC manual ctrl (off:0 / on:1):
31
Press the “1” key and “Enter” key for ATPC manual control, if
not, press the “Esc” key,
ATPC manual ctrl (off:0 / on:1):1
ATPC current (-15dB)
ATPC current (-30 to 0dB):
32
Enter attenuation value and “Enter” key,
For Twin path System
10. ATPC manual ctrl (No.1:off /No.2:off)
1.
2.
00.
99.
No.1 ATPC manual ctrl (off)
No.2 ATPC manual ctrl (off)
Menu
Exit
Select item No. :
8-13
INITIAL LINEUP
Step
33
1.
Procedure
Press the “1” key and “Enter” key for No.1 TX selection or the
“2” key and “Enter” key for No.2 TX selection, if not, press the
“Esc” key,
No.1 ATPC manual ctrl (off)
No.1 ATPC manual ctrl (off:0 / on:1):
2.
No.2 ATPC manual ctrl (off)
No.2 ATPC manual ctrl (off:0 / on:1):
34
Press the “1” key and “Enter” key to ATPC manual control, if
not, press the “Esc” key,
No.1 ATPC manual ctrl (off:0 / on:1):1
ATPC current (-15dB)
ATPC current (-30 to 0dB):
No.2 ATPC manual ctrl (off:0 / on:1):1
ATPC current (-15dB)
ATPC current (-30 to 0dB):
Note: 1. The MAX power must be set to a value larger than MIN
power.
2. When the TX power control mode is changed from ATPC
to MTPC, current value in ATPC is applied to the
MTPC.
8-14
35
Enter attenuation value and “Enter” key,
36
Restore all setting items which are changed in setting
maintenance in referring to step 4 to step 35,
INITIAL LINEUP
Step
Procedure
37
Press the “0” key and “Enter” key to reset status from
maintenance to normal in step 8,
38
Then, MAINT indicator goes off,
For 1+0 System
Maintenance
1. MAINT
2. FE loop back ctrl 1-16
3.
NE loop back ctrl 1-16
4.
5.
6.
7.
00.
99.
BER ALM >> AIS
CW
Power mute
ATPC manual ctrl
Menu
Exit
Select item No.
(NORM)
(ctrl :*Z#(ans :*--(ctrl :*-#(ans :*--(on)
(off)
(off)
(off)
-------------
-------------
----)
----)
----)
----)
-------------
-------------
----)
----)
----)
----)
:
For 1+1 System
Maintenance
1. MAINT
2. FE loop back ctrl 1-16
3.
NE loop back ctrl 1-16
4.
5.
6.
7.
8.
9.
10.
00.
99.
BER AIS ALM >> AIS
CW
Power mute 1
Power mute 2
TX SW ctrl
RX SW ctrl
ATPC manual ctrl
Menu
Exit
Select item No.
39
(NORM)
(ctrl :*Z#(ans :*--(ctrl :*-#(ans :*--(on)
(off)
(off)
(on)
(AUTO)
(AUTO)
(off)
:
Press the “99” keys and press the “Enter” key to exit
maintenance mode.
8-15
INITIAL LINEUP
8.4 Antenna Orientation
(a) Test Equipment and Accessories Required
• Agilent 34401A Digital Multimeter (or equivalent) with test leads
or X0818A OW/RX LEV MONITOR
• Screwdriver
(b) Procedure for the ODU
Step
8-16
Procedure
1
At each station, remove the cap from the RX LEV MON jack
(see Fig. 8-4),
2
At each station, set up as in Fig. 8-4 (Connect cables to RX LEV
MON jack in that order using F-type plug),
3
At each station, adjust azimuth and elevation angle for the
antenna direction alternately so that the voltage measuring value
becomes maximum,
INITIAL LINEUP
Step
Procedure
A. USING ANDREW VHLP TYPE BRACKET
AZIMUTH ANGLE ADJUSTMENT
3-1
Loosen bolts (1 in Fig. 8-5 (1/3)),
3-2
Adjust the azimuth angle by bolt (2 in Fig. 8-5 (1/3)),
3-3
Secure bolts loosened in step 8-1,
ELEVATION ANGLE ADJUSTMENT
3-4
Loosen bolts (3 in Fig. 8-5 (1/3)),
3-5
Adjust the elevation angle by bolt (4 in Fig. 8-5 (1/3)),
3-6
Secure bolts loosened in step 3-4,
B. USING RFS SB1 TYPE BRACKET
AZIMUTH ANGLE ADJUSTMENT
3-7
Loosen nuts of the U-bolt (3 in Fig. 8-5 (2/3)),
3-8
Loosen nuts (4 in Fig. 8-5 (2/3)),
3-9
Adjust the azimuth angle by nuts (5 in Fig. 8-5 (2/3)),
3-10
Secure nuts loosened in step 3-15 and 16,
ELEVATION ANGLE ADJUSTMENT
3-11
Loosen bolts (1 in Fig. 8-5 (2/3)),
3-12
Adjust the elevation angle by nuts (2 in Fig. 8-5 (2/3)),
3-13
Secure bolts loosened in step 3-19,
C. USING RFS SB2 TYPE BRACKET
AZIMUTH ANGLE ADJUSTMENT
3-14
Loosen nuts (4 in Fig. 8-5 (3/3)),
3-15
Adjust azimuth angle by adjusting nuts (3 in Fig. 8-5 (3/3)),
3-16
Secure nuts loosened in step 3-22,
8-17
INITIAL LINEUP
ELEVATION ANGLE ADJUSTMENT
3-17
Loosen bolts (1 in Fig. 8-5 (3/3)),
3-18
Adjust elevation angle by adjusting nut (2 in Fig. 8-5 (3/3)),
3-19
Secure bolts loosened in step 3-25,
4
At each station, disconnect digital multimeter or OW/RX LEV
MONITOR from RX LEV MON jacks,
5
At each station, reconnect the cap removed in step 1.
OW/RX LEV MONITOR
0
1
3
2
4
5
V
OW
6.5 ± 0.3 mm
RX LEV MON
RX LEV
MON
RX LEV/OW IN
IFL
FG
0.8 ± 0.05 mm
F connector, Type C15 Male
DIGITAL MULTIMETER
Caution: Connect an RF cable with F connectors (Type C15 Male) to the RX LEV MON
terminal when the RX LEV is measured with the digital multimeter or OW/RX LEV
MONITOR unit. The measurement of pin contact of the F connector (Type C15 Male)
is specified as shown in the figure. Do not connect the connectors of other type nor
insert the probe of the voltmeter as this may cause connector damage.
Following translating connector (optional) is to provide facilities when the F connector
(Type C15 Female) is translated to the BNC connector (Female).
Name of product : 1821K091 F(C15)[F]-BNC[F]
Fig. 8-4 Antenna Orientation Test Setup
8-18
INITIAL LINEUP
1. Loosen (1/2 turn) bolts
for adjusting azimuth (top
and bottom)
3. Loosen (1/2 turn) bolts
for adjusting elevation
4. Adjust elevation
2. Adjust azimuth
ANDREW VHLP TYPE BRACKET
Fig. 8-5 Location of Adjusting Nuts (1/3)
8-19
INITIAL LINEUP
4.
5.
3.
0.3 φ m Antenna
C. RFS SB1 TYPE BRACKET
Fig. 8-5 Location of Adjusting Nuts (2/3)
8-20
INITIAL LINEUP
2. Adjust elevation
1. Loosen bolts for
adjusting elevation
3. Adjust azimuth
4. Loosen for adjusting azimuth
0.6 φ m Antenna
D. RFS SB2 TYPE BRACKET
Fig. 8-5 Location of Adjusting Nuts (3/3)
8-21
INITIAL LINEUP
8.5 Lineup Test
BER measurement can not be performed on channels which are occupied
with LAN signal, therefore change the setting from LAN to 2MB signal
transmission using LCT before the measurement. (Refer to para 3.4
Equipment Setting and Monitoring of the Modulator-Demodulator
description)
Procedures for BER measurement between two stations are described for
both (1+0) and (1+1) systems as follows.:
(a) Test Equipment and Accessories Required
• Agilent 34401A Digital Multimeter (or equivalent) with test leads
or X0818A OW/RX LEV MONITOR
• Screwdriver
• HP E7580A BER test set (or equivalent)
• Headset
• Personal Computer
(b) Procedure
Step
Procedure
1
Set up as in Fig. 8-6,
2
At station A, the output signal from BER test set (SENDING
UNIT) is set as follows:
• Bit rate:
2.048 Mbps
• Code format:
HDB-3 code
• Level:
2.37 Vo-p or 3.0 Vo-p
• Impedance:
75 ohms, unbalanced or 120 ohms,
balanced
Note: The Traffic IN/OUT interface impedance for each channel is
selectable with Dip switches.
Caution: Do not turn on the power of the IDU leaving cable
connection between the PC and RA PORT of the IDU.
Caution: Before the start of maintenance, including operation of the
OPR SEL SW on the front panel of the equipment, select
the equipment to maintenance mode using the LCT.
After all operation for maintenance have been completed,
perform MAINT OFF setting.
8-22
INITIAL LINEUP
Step
3
Procedure
At station B, the input signal mode to BER test set
(RECEIVING UNIT) is set as follows:
• Bit rate:
2.048 Mbps
• Code format:
HDB-3 code
• Impedance:
75 ohms, unbalanced or 120 ohms,
balanced
Table 8-1 Meter Reading of the ODU
CHECK ITEM
ALLOWABLE RANGE
TX power
0
Depends on transmitter power (0 to 4.6 V DC)
RX level
1
Depends on received signal level (0.8 to 4.4 V DC)
8-23
INITIAL LINEUP
Step
Procedure
Meter Reading of the ODU
4
Remove the cap from the RX LEV MON jack (see Fig. 8-3),
5
Connect an RF cable with F connectors (Male) to RX LEV
MON jack. With the digital multimeter or OW/RX LEV
Monitor unit, confirm that the meter indication is as described in
Table 8-2,
6
Disconnect RF cable, the digital multimeter or OW/RX LEV
MONITOR and reconnect the cap removed in step 4,
Table 8-2 Meter Reading of the ODU
CHECK ITEM
RX level
ALLOWABLE RANGE
Depends on received signal level (0.8 to 4.4 V DC)
OW/RX LEV MONITOR
0
1
2
3
4
5
V
OW
6.5 ± 0.3 mm
RX LEV MON
RX LEV
MON
RX LEV/OW IN
IFL
FG
0.8 ± 0.05 mm
F connector, Type C15 Male
DIGITAL MULTIMETER
Caution: Connect an RF cable with F connectors (Type C15 Male) to the RX LEV MON terminal
when the RX LEV is measured with the digital multimeter or OW/RX LEV MONITOR
unit. The measurement of pin contact of the F connector (Type C15 Male) is specified
as shown in the figure. Do not connect the connectors of other type nor insert the probe
of the voltmeter as this may cause connector damage.
Following translating connector (optional) is to provide facilities when the F connector
(Type C15 Female) is translated to the BNC connector (Female).
Name of product : 1821K091 F(C15)[F]-BNC[F]
Fig. 8-6 Lineup Test Setup
8-24
BER TEST SET
RX
DEM
SENDING
UNIT
BER TEST SET
TRAFFIC IN/OUT (CH1 to CH8)
TRAFFIC IN/OUT (CH9 to CH16)
IF
IN/OUT
TEST CABLE
RECEIVING
UNIT
TEST CABLE
TRAFFIC IN/OUT (CH1 to CH8)
TRAFFIC IN/OUT (CH9 to CH16)
IF
IN/OUT
ODU
Fig. 8-7 Lineup Test Setup (1+0 System)
ODU
IDU
IDU
RECEIVING
UNIT
TX
MOD
BER TEST SET
SENDING
UNIT
STATION B
BER TEST SET
STATION A
INITIAL LINEUP
8-25
8-26
SENDING
UNIT
BER TEST SET
SENDING
UNIT
BER TEST SET
! -43V OUTPUT
TEST CABLE
No.2
IF
IN/OUT
RX
! -43V OUTPUT
Power down IDU
before disconnection
or connection of
Cable
IF
IN/OUT
Power down IDU
before disconnection
or connection of
Cable
! -43V OUTPUT
Fig. 8-8 Lineup Test Setup (1+1 System)
RECEIVING
UNIT
IF
IN/OUT
Power down IDU
before disconnection
or connection of
Cable
! -43V OUTPUT
TRAFFIC IN/OUT (CH1 to CH8)
BER TEST SET
HYB/
COMB
ODU
TRAFFIC IN/OUT (CH1 to CH8)
Power down IDU
before disconnection
or connection of
Cable
No.2
HYB/
COMB
No.1
TRAFFIC IN/OUT (CH9 to CH16)
IF
IN/OUT
TX
ODU
No.1
STATION B
TRAFFIC IN/OUT (CH9 to CH16)
TEST CABLE
MOD
IDU
STATION A
DEM
IDU
RECEIVING
UNIT
BER TEST SET
INITIAL LINEUP
INITIAL LINEUP
Step
Procedure
Meter Reading of IDU
7
Connect the personal computer to the LA PORT of the IDU
using an RS-232C cable as shown in Fig. 8-9,
Note: At the end of LCT operation log out from LCT menu by
keying "99" and then exit from the communication
software. In case if you have exit from the communication
software without logging out from LCT, repeat connecting
and disconnecting of the RS 232C cable once to reset.
EOW
RS-232C
CABLE(BLACK)
CALL
PASOLINK
ODU IDU
RESET PWR
MAINT
FUSE (7.5A)
−
NMS/RA
+
SELV
LA PORT
IDU
PASOLINK
FUSE (7.5A)
RESET PWR
ODU IDU
MAINT
−
+
SELV
LA PORT
EOW CALL
RESET
OPR
SEL
No.1
PERSONAL COMPUTER
PASOLINK
OPR
ALM
TX RX TX
RX
1
−
NMS/RA
LA PORT
2
No.2
PASOLINK
FUSE (7.5A)
RESET PWR
ODU IDU
MAINT
−
+
SELV
LA PORT
IDU
Fig. 8-9 Meter Reading Setup
8
Turn on the power on the PC and press the “CTRL” and “D”
keys at the same time. The following menu appears,
Password
9
10
:
Press “Enter” key,
Press “0” key and “Enter” key.
Password
:********
Change Password? (no:0 / yes:1):
8-27
INITIAL LINEUP
Step
11
1.
2.
3.
99.
Procedure
Following display appears,
Setting
Maintenance
Monitoring
Exit
Select function No. :
12
Press the “3” key and “Enter” key, the following appears,
For 1+0 System
Monitoring
1. Monitoring voltage
2. Monitoring voltage (continuous mode)
3. Alarm/status
4. Inventory
00. Menu
99. Exit
Select item No. :
For 1+1 System
Monitoring
1. Monitoring voltage
2. Alarm/Status
3. Inventory
00. Menu
99. Exit
Select item No.
13
:
Press the “1” key and “Enter” key, the following results are
displayed,
Note: TX Power indicated in dB is a relative level to the
nominal output power.
For 1+0 System
1. Monitoring voltage
TX power
RX level
8-28
: 4.33V (-1 dB)
: 3.55V (-32 dBm)
INITIAL LINEUP
Step
Procedure
For 1+1 System
1.
Monitoring voltage
TX power 1
RX level 1
TX power 2
RX level 2
:
:
:
:
4.33V
2.98V
4.33V
2.18V
(-1 dB)
(-46 dBm)
(-1 dB)
(-66 dBm)
14
When the Pasolink is in normal working condition, results may
be appeared within the values shown in Table 8-3,
15
Press the “9”,“9” keys to exit,
Table 8-3 Meter Reading from IDU
CHECK ITEM
ALLOWABLE RANGE
TX power
Depends on transmitter power
• 0 to 4.6 V DC *
RX level
Depends on received signal level
• 0.8 to 4.4 V DC **
Notes: 1. * When 0.5 (V) or less is indicated, check the following
before suspecting of any ODU damage;
(1) When the TX frequency is changed, the relation of the
TX/RX frequency is correct for the Sub Band and
ODU type (High/Low).
(2) The TX Power mute is not performed.
2. ** To keep satisfactory channel quality, RX level is
required more than 2 (V).
8-29
INITIAL LINEUP
Step
Procedure
Orderwire Test
16
Connect the OW/RX LEV MONITOR to the RX LEV MON
jack on the ODU (see Fig. 8-10),
17
Connect headset(s) to the EOW jack on the front panel of the
IDU and/or to EOW jack on the OW/RX LEV MONITOR (see
Figs. 8-9 and 8-10),
18
Press the CALL button switch on the front panel of the IDU,
Requirement: At opposite station, the buzzer on the IDU is
activated,
19
Check that orderwire telephone between stations can be
connected by using headsets,
20
Set OW switch on the OW/RX LEV MONITOR to ON (OW
indicator on the OW/RX LEV MONITOR is turned on),
21
Check that orderwire telephone between IDU and ODU can be
connected by using headsets,
22
Set OW switch on the OW/RX LEV MONITOR to OFF (OW
indicator on the OW/RX LEV MONITOR is turned off),
Notes: 1. The battery becomes weak if the OW switch is kept ON.
8-30
23
Disconnect headset(s) from EOW jack on the front panel of the
IDU, and/or from EOW jack on the OW/RX LEV MONITOR,
24
Disconnect the OW/RX LEV MONITOR from the RX LEV
MON jack on the ODU.
INITIAL LINEUP
PASOLINK
FUSE (7.5A)
RESET PWR
ODU IDU
MAINT
−
EOW CALL
PASOLINK
EOW CALL
MAINT
+
LA PORT
SELV
LA PORT
ALM
TX RX TX
RX
−
NMS/RA
NMS/RA
PASOLINK
OPR
1
FUSE (7.5A)
−
RESET
OPR
SEL
No.1
ODU IDU
RESET PWR
+
SELV
LA PORT
2
No.2
PASOLINK
IDU
FUSE (7.5A)
RESET PWR
ODU IDU
MAINT
−
+
SELV
LA PORT
IDU
Fig. 8-10 Lineup Test Setup for IDU
ODU
0
1
3
2
4
5
V
OW
RX LEV MON
RX LEV
MON
IFL
HEADSET
FG
RX LEV/OW IN
6.5 ± 0.3 mm
0.8 ± 0.05 mm
OW/RX LEV MONITOR
F connector, Type C15 Male
Note: Use a connection cable which is attached to the OW/RX LEV MON unit.
Fig. 8-11 OW Test Setup for ODU
8-31
INITIAL LINEUP
(This page is intentionally left blank)
8-32