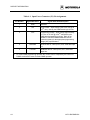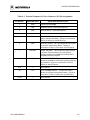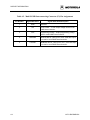
1
HC711E9PGMR/AD1
May 1991
M68HC711E9PGMR
PROGRAMMER BOARD
USER’S MANUAL
Information contained in this document applies to
REVision (A) M68HC711E9PGMR Programmer Boards.
© Motorola Inc., 1991; All Rights Reserved
Motorola reserves the right to make changes without further notice to any products herein to
improve reliability, function or design. Motorola does not assume any liability arising out of the
application or use of any product or circuit described herein; neither does it convey any license
under its patent rights nor the rights of others. Motorola products are not designed, intended, or
authorized for use as components in systems intended for surgical implant into the body, or other
applications intended to support or sustain life, or for any other application in which the failure of
the Motorola product could create a situation where personal injury or death may occur. Should
Buyer purchase or use Motorola products for any such unintended or unauthorized application,
Buyer shall indemnify and hold Motorola and its officers, employees, subsidiaries, affiliates, and
distributors harmless against all claims, costs, damages, and expenses, and reasonable attorney
fees arising out of, directly or indirectly, any claim of personal injury or death associated with
such unintended or unauthorized use, even if such claim alleges that Motorola was negligent
regarding the design or manufacture of the part.
IBM-PC is a registered trademark of International Business Machines Corp.
Apple is a trademark of Apple Computer, Inc.
Macintosh is a trademark licensed to Apple Computer, Inc.
Macintosh is a trademark of Macintosh Laboratory, Inc.
Hayes is a registered trademark of Hayes Microcomputer Products, Inc.
Motorola and the Motorola logo are registered trademarks of Motorola Inc.
Motorola Inc. is an Equal Opportunity/Affirmative Action Employer.
PREFACE
The M68HC711E9PGMR Programmer Board (PGMR) was
designed to program MC68HC711E9 OTPROM/EPROM MCU
devices.
Unless otherwise specified, all address references are in
hexadecimal throughout this manual.
CONTENTS
CONTENTS
CHAPTER 1
1.1
1.2
1.3
1.4
1.5
1.6
GENERAL INFORMATION
INTRODUCTION............................................................................................................. 1-1
FEATURES....................................................................................................................... 1-1
SPECIFICATIONS ........................................................................................................... 1-1
GENERAL DESCRIPTION ............................................................................................. 1-3
EQUIPMENT REQUIRED............................................................................................... 1-3
CUSTOMER SUPPORT .................................................................................................. 1-4
CHAPTER 2
HARDWARE PREPARATION AND INSTALLATION
2.1
2.2
2.3
INTRODUCTION............................................................................................................. 2-1
UNPACKING INSTRUCTIONS...................................................................................... 2-1
HARDWARE PREPARATION ....................................................................................... 2-1
2.3.1 Standalone PGMR Select Header (J1)....................................................................... 2-3
2.3.2 Multi-PGMR Programming Address Select Headers (J2 thru J4)............................. 2-3
2.4 INSTALLATION INSTRUCTIONS................................................................................ 2-5
2.4.1 Power Supply - PGMR Board Interconnection ......................................................... 2-5
2.4.2 Personal Computer - PGMR Board Interconnection ................................................. 2-7
2.4.3 Multi-Programming - PGMR Board Interconnection.............................................. 2-10
CHAPTER 3
3.1
3.2
3.3
INTRODUCTION............................................................................................................. 3-1
LIMITATIONS ................................................................................................................. 3-1
OPERATING PROCEDURES ......................................................................................... 3-1
3.3.1 Standalone PGMR Board Programming.................................................................... 3-1
3.3.2 Multi-PGMR Board Programming ............................................................................ 3-4
CHAPTER 4
4.1
4.2
4.3
4.4
OPERATING INSTRUCTIONS
SUPPORT INFORMATION
INTRODUCTION............................................................................................................. 4-1
CONNECTOR SIGNAL DESCRIPTIONS...................................................................... 4-1
PARTS LIST..................................................................................................................... 4-5
DIAGRAMS...................................................................................................................... 4-8
HC711E9PGMR/AD1
v
CONTENTS
APPENDIX A
A.1
A.2
A.3
A.4
A.5
S-RECORD INFORMATION
INTRODUCTION.............................................................................................................A-1
S RECORD CONTENT....................................................................................................A-1
S-RECORD TYPES..........................................................................................................A-2
S-RECORDS CREATION................................................................................................A-3
S-RECORD EXAMPLE ...................................................................................................A-4
FIGURES
2-1.
2-2.
2-3.
2-4.
2-5.
4-1.
4-2.
4-2.
PGMR Board Connector, Switch, and Jumper Header Location Diagram....................... 2-2
Personal Computer Cable Assembly Diagram.................................................................. 2-8
PGMR Board Preparation ............................................................................................... 2-11
PGMR Board Interconnection......................................................................................... 2-12
Multi-PGMR Board Interconnections............................................................................. 2-13
PGMR Board Parts Location Diagram.............................................................................. 4-7
PGMR Board Schematic Diagram (Sheet 1 of 2) ............................................................ 4-9
PGMR Board Schematic Diagram (Sheet 2 of 2) .......................................................... 4-10
TABLES
1-1.
1-2.
4-1.
4-2.
4-3.
4-4.
vi
PGMR Board Specifications ............................................................................................. 1-2
External Equipment Requirements ................................................................................... 1-3
Input Power Connector (P1) Pin Assignments.................................................................. 4-2
Personal Computer I/O Port Connector (P2) Pin Assignments......................................... 4-3
Multi-PGMR Interconnecting Connector (P3) Pin Assignments...................................... 4-4
PGMR Board Parts List..................................................................................................... 4-5
HC711E9PGMR/AD1
GENERAL INFORMATION
CHAPTER 1
GENERAL INFORMATION
1.1 INTRODUCTION
This manual provides general information, hardware preparation and installation
instructions, operating instructions, and support information for the
M68HC711E9PGMR Programmer Board (hereafter referred to as PGMR board).
Appendix A contains PGMR board downloading S-record information.
1.2 FEATURES
PGMR board features include:
• Economical means of programming MC68HC711E9 one-time
programmable read only memory (OTPROM)/erasable programmable read
only memory (EPROM) MCU devices
• 52-lead plastic leaded chip carrier (PLCC) MCU socket circuitry
• RS-232C compatible personal computer (PC) I/O port
• Multi-PGMR programming interconnection circuitry
1.3 SPECIFICATIONS
Table 1-1 lists the PGMR board specifications.
HC711E9PGMR/AD1
1-1
GENERAL INFORMATION
Table 1-1. PGMR Board Specifications
Characteristics
Specifications
MCU
MC68HC711E9 EPROM MCU
Internal Clock
8 MHz ceramic resonator
PC I/O Port:
RS-232C compatible
Temperature:
Operating
Storage
+25 degrees C (nominal)
-40 to +85 degrees C
Relative humidity
0 to 90% (non-condensing)
Power requirements:
+5 V
VPP
+4.9 to 5.5 Vdc @ 50 mA(1) (max)
Approximately +11.75 to 12.75 Vdc @ 5 mA(1) (max)
Refer to the MC68HC711E9 OTPROM/EPROM MCU device
technical summary for the appropriate programming voltage (VPP)
specifications.
Dimensions
1.
1-2
5.0 x 3.0 inches (12.7 x7.62 centimeters)
For multi-PGMR programming operation the current value is multiplied by the number of PGMRs
connected in series for multi-PGMR operation.
HC711E9PGMR/AD1
GENERAL INFORMATION
1.4 GENERAL DESCRIPTION
The PGMR board is designed to program MC68HC711E9 OTPROM/EPROM
MCU devices. The PGMR board requires a user-supplied +5 Vdc and VPP power
supply for operation. An RS-232C compatible personal computer (PC), such as
an IBM-PC or Apple Macintosh, can be used to download user assembled code to
the PGMR. Programming the MC68HC711E9 OTPROM/EPROM MCU device
is accomplished via the MCU bootloader.
The PGMR board is shipped with an installed 52-lead PLCC MCU programming
socket. Each PGMR board can only program one OTPROM/EPROM MCU
device at a time.
Multi-PGMR programming is accomplished by connecting additional PGMRs
connected in series. Multi-programming allows up to eight OTPROM/EPROM
MCU devices to be programmed at one time. When interconnecting PGMRs for
multi-programming operations, the user must adhere to the specified +5V and
VPP voltage and current specifications as listed in Table 1-1.
Refer to the MC68HC711E9 Technical Summary (BR775/D) for additional
information pertaining to the MC68HC711E9 OTPROM/EPROM MCU device.
1.5 EQUIPMENT REQUIRED
Table 1-2 lists the external equipment requirements for PGMR board operation.
Table 1-2. External Equipment Requirements
External Equipment
+5 Vdc power supply(1)
VPP power supply(1)
Terminal/PC (RS-232C compatible)(1)
Terminal/PC - PGMR board RS-232C cable assembly(1)
(1) User supplied, refer to Chapter 2 for details.
HC711E9PGMR/AD1
1-3
GENERAL INFORMATION
1.6 CUSTOMER SUPPORT
For information about a Motorola distributor or sales office near you call:
AUSTRALIA, Melbourne – (61-3)887-0711
Sydney – 61(2)906-3855
BRAZIL, Sao Paulo – 55(11)815-4200
CANADA, B. C., Vancouver – (604)606-8502
ONTARIO, Toronto – (416)497-8181
ONTARIO, Ottawa – (613)226-3491
QUEBEC, Montreal – (514)333-3300
JAPAN, Fukuoka – 81-92-725-7583
Gotanda – 81-3-5487-8311
Nagoya – 81-52-232-3500
Osaka – 81-6-305-1802
Sendai – 81-22-268-4333
Takamatsu – 81-878-37-9972
Tokyo – 81-3-3440-3311
KOREA, Pusan – 82(51)4635-035
Seoul – 82(2)554-5118
CHINA, Beijing – 86-10-68437222
MALAYSIA, Penang – 60(4)2282514
DENMARK – (45)43488393
FINLAND, Helsinki – 358-9-6824-400
MEXICO, Mexico City – 52(5)282-0230
Guadalajara – 52(36)21-8977
FRANCE, Paris – 33134 635900
PUERTO RICO, San Juan – (809)282-2300
GERMANY,
Langenhagen/Hannover – 49(511)786880
Munich – 49 89 92103-0
Nuremberg – 49 911 96-3190
Sindelfingen – 49 7031 79 710
Wiesbaden – 49 611 973050
SINGAPORE – (65)4818188
HONG KONG, Kwai Fong – 852-6106888
Tai Po – 852-6668333
SPAIN, Madrid – 34(1)457-8204
SWEDEN, Solna – 46(8)734-8800
SWITZERLAND, Geneva – 41(22)799 11 11
Zurich – 41(1)730-4074
TAIWAN, Taipei – 886(2)717-7089
INDIA, Bangalore – (91-80)5598615
THAILAND, Bangkok – 66(2)254-4910
ISRAEL, Herzlia – 972-9-590222
UNITED KINGDOM, Aylesbury – 441(296)395-252
ITALY, Milan – 39(2)82201
UNITED STATES, Phoenix, AZ – 1-800-521-6274
For a list of the Motorola sales offices and distributors:
http://www.mcu.motsps.com/sales/soffice.html
1-4
HC711E9PGMR/AD1
HARDWARE PREPARATION AND INSTALLATION
CHAPTER 2
HARDWARE PREPARATION AND INSTALLATION
2.1 INTRODUCTION
This chapter provides unpacking instructions, hardware preparation, and
installation instructions for the PGMR board.
ELECTROSTATIC DISCHARGE PRECAUTION
Ordinary amounts of static electricity from clothing or work
environment can damage or degrade electronic devices and
equipment. For example, the electronic components installed on
this printed circuit board are extremely sensitive to electrostatic
discharge (ESD). Always wear a grounding wrist strap whenever
handling any printed circuit board. This strap provides a
conductive path for safely discharging static electricity to ground.
2.2 UNPACKING INSTRUCTIONS
NOTE
Should the product arrive damaged, save all packing material and
contact the carrier’s agent.
Unpack PGMR board from shipping carton. Refer to packing list and verify that
all items are present. Save packing material for storing or shipping the PGMR
board.
2.3 HARDWARE PREPARATION
This portion of text describes the inspection/preparation of PGMR board
components prior to programming operations. This description will ensure the
user that the PGMR board components are properly configured for operation. The
PGMR board has been factory-tested and is shipped with one factory-installed
jumper.
PGMR board should be inspected/prepared for jumper placements prior to
operation. Figure 2-1 illustrates the PGMR board connector, switch, and jumper
header locations.
HC711E9PGMR/AD1
2-1
HARDWARE PREPARATION AND INSTALLATION
Connector P1 facilitates interconnection of an external power supply to the
PGMR board. Connector P1 also facilitates interconnection of RS-232C transmit
(TXD) and receive (RXD) serial data lines between PGMR boards for multiPGMR programming operations. Connector P2 facilitates interconnection of the
PGMR board to external personal computer (PC) equipment. Connector P3 is
used to interconnect multiple PGMR boards for multi-programming operations.
Switch SW1 controls external +5 Vdc power to the PGMR board. Switch SW2
controls external VPP to the PGMR board.
Jumper header J1 provides single-programming selection capabilitiy for the
PGMR board. Jumper headers J2 through J4 provide multi-programming address
selection capabilities for the PGMR board.
POWER SUPPLY
CONNECTOR
+5V
SWITCH
P1
VPP
SWITCH
SW2
SW1
P2
GND
+5V
VPP
RXD
PD0
TXD
PD1
OFF
ON OFF
+5V
ON
VPP
J1
STANDALONE
PGMR
SELECT
RS-232C
PC I/O PORT
CONNECTOR
U3
MULTI-PGMR
PROGRAMMING
ADDRESS
SELECT
J2
J3
J4
GND
+5V
VPP
RXD
PD0
TXD
PD1
P3
MULTI-PGMR
INTERCONNECTING
CONNECTOR
(USER SUPPLIED)
52-LEAD PLCC
PROGRAMMING
SOCKET
Figure 2-1. PGMR Board Connector, Switch, and Jumper Header Location Diagram
2-2
HC711E9PGMR/AD1
HARDWARE PREPARATION AND INSTALLATION
2.3.1
Standalone PGMR Select Header (J1)
Jumper header J1 is used for single-board (standalone) programming operations
only. The PGMR board is factory configured for standalone MC68HC711E9
OTPROM/EPROM MCU programming operation. The standalone operation is
accomplished via a fabricated jumper installed on jumper header J1 as shown
below.
J1
1
2
NOTE
Jumper must be installed for standalone operation.
When multi-PGMR programming is required, the fabricated jumper remains
installed on the applicable PGMR board having the PC RS-232C cable assembly
installed. For all other PGMR boards connected for multi-PGMR programming,
fabricated jumpers installed on J1 jumper headers must be removed.
2.3.2
Multi-PGMR Programming Address Select Headers (J2 thru J4)
Multi-PGMR programming requires each PGMR board to have an assigned
address. Jumper headers J2 through J4 are used to select the applicable PGMR
board address as shown below. As shipped from the factory, jumper headers J2
through J4 do not have fabricated jumpers installed. The user must supply the
fabricated jumpers required for multi-PGMR programming.
J2
J4
1
1
2
2
PD2
HC711E9PGMR/AD1
J3
PD3
PD4
2-3
HARDWARE PREPARATION AND INSTALLATION
Up to eight PGMR boards can be connected for multi-PGMR programming
operations. When connecting PGMR boards for multi-PGMR programming
operations, each PGMR board must have a unique address assigned for proper
programming operations. The following table lists the recommended PGMR
board address assignments configured by jumper headers J2 through J4.
NOTE
When multi-PGMR programming more than two boards, short
across R3 on all boards except the one connected to the power
supply.
J2
J3
J4
PD2
PD3
PD4
HEX
DEC
1
IN
IN
IN
000
00
2
OUT
IN
IN
001
01
3
IN
OUT
IN
010
02
4
OUT
OUT
IN
011
03
5
IN
IN
OUT
100
04
6
OUT
IN
OUT
101
05
7
IN
OUT
OUT
110
06
8
OUT
OUT
OUT
111
07
PGMR
2-4
ADDRESS
HC711E9PGMR/AD1
HARDWARE PREPARATION AND INSTALLATION
2.4 INSTALLATION INSTRUCTIONS
The PGMR board is designed for table top operation. A user supplied power
supply and RS-232C compatible personal computer (PC) cable assembly is
required.
2.4.1
Power Supply - PGMR Board Interconnection
The PGMR board requires +4.9 to 5.5 Vdc @ 50 mA and GND for operation.
The PGMR board also requires approximately +11.75 to 12.75 Vdc @ 5 mA
(max) programming voltage VPP applicable to the MC68HC711E9
OTPROM/EPROM MCU device. Refer to the MC68HC711E9
OTPROM/EPROM MCU device technical summary for the appropriate
programming voltage (VPP) specifications.
NOTE
To determine the current required for multi-PGMR programming:
1. Multiply the number of PGMRs by 50 mA (+5v), and
2. Multiply the number of PGMRs by 5 mA (VPP).
Interconnection of the power supply wiring to the PGMR board power supply
connector P1 is shown below. The power supply cable consists of three 20-22
AWG wires that interconnect GND, +5 VDC, and VPP, from the user supplied
power supply to the PGMR board connector P1.
BLK
RED
BLUE
WHT
WHT
GND
P1
+5V
VPP
RXD/PD0
TXD/PD1
HC711E9PGMR/AD1
2-5
HARDWARE PREPARATION AND INSTALLATION
NOTE
The RXD/PD0 and TXD/PD1 connections for connector P1 are
only used for multi-PGMR board interconnections.
For standalone PGMR board operation, the RXD/PD0 and TXD/PD1 connections
for connector P1 are not used. The RXD/PD0 and TXD/PD1 connections are
made via the personal computer I/O port connector P2 for the standalone PGMR
board operation.
2-6
HC711E9PGMR/AD1
HARDWARE PREPARATION AND INSTALLATION
2.4.2
Personal Computer - PGMR Board Interconnection
Interconnection of an RS-232C compatible personal computer (PC) to the PGMR
board is accomplished via a user supplied 20 or 25 conductor flat ribbon cable
assembly as shown in Figure 2-2. One end of the cable assembly is connected to
the PGMR board I/O port connector P2 (shown below). The other end of the
cable assembly is connected to the user supplied PC. For connector pin
assignments and signal descriptions of the PGMR board PC I/O port connector
P2, refer to Chapter 4.
P2
GND 1
TXD 2
14 NC
15 NC
RXD 3
NC 4
CTS 5
16 NC
17 NC
DSR 6
SIG-GND 7
18 NC
19 NC
20 DTR
DCD 8
NC 9
NC
NC
NC
NC
21
22
23
24
25
10
11
12
13
NC
NC
NC
NC
NC
PERSONAL COMPUTER
I/O PORT CONNECTOR
A Hayes compatible modem cable, purchased from your local computer store, can
be used to connect the PGMR board to the personal computer.
HC711E9PGMR/AD1
2-7
HARDWARE PREPARATION AND INSTALLATION
20 OR 25 CONDUCTOR
FLAT RIBBON
CABLE
3M #3365-20
OR
3M #3365-25
25 "D" SUBMINIATURE
MALE(PIN)
CONNECTORPART #’S:
25 "D" SUBMINIATURE
FEMALE(SOCKET)
CONNECTORPART #’S:
1. CIRCUIT ASSEMBLY CORP
#CA•25•SMD•P
1. CIRCUIT ASSEMBLY CORP
#CA•25•SMD•S
2. ITT CANNON #DBSP-B25P
2. ITT CANNON #DBSP-B25S
3. ANSLEY #609•25P
3. ANSLEY #609•25S
4. WINCHESTER #49•1125P
4. WINCHESTER #49•1125S
25 PIN "D" SUBMINIATURE CONNECTOR
1
2
14
3
15
4
16
5
17
6
18
7
19
8
20
9
21
10
22
11
23
12
24
13
25
1
2
14
3
15
4
16
5
17
6
18
7
19
DCD
NOT CONNECTED
DTR
SIGNAL GND
DSR
CTS
RTS
RXD
TXD
RED WIRE
8
20
9
21
10
22
11
23
12
24
13
25
25 PIN "D" SUBMINIATURE CONNECTOR
Figure 2-2. Personal Computer Cable Assembly Diagram
2-8
HC711E9PGMR/AD1
HARDWARE PREPARATION AND INSTALLATION
The PGMR board is wired as data communication equipment (DCE) whereas
most serial modem ports on personal computers are wired as data terminal
equipment (DTE). This should allow a straight-through cable to be used in most
setups.
If an unknown cable is used to connect the PGMR board to a host computer, a
null modem adapter (shown below) may be required to match the cable to the
PGMR board PC I/O port connector.
A null modem adapter is used to reverse the roles of various data and control
signals to make a DTE device appear as a DCE device or vice verse.
DB-25S
DB-25P
GND
1
1
GND
TXD
2
2
TXD
RXD
3
3
RXD
RTS
4
4
RTS
CTS
5
5
CTS
DSR
6
6
DSR
SIG-GND
7
7
SIG-GND
DCD
8
8
DCD
DTR
20
20
DTR
NULL MODEM ADAPTER
HC711E9PGMR/AD1
2-9
HARDWARE PREPARATION AND INSTALLATION
2.4.3
Multi-Programming - PGMR Board Interconnection
Up to eight PGMR boards can be connected for multi-PGMR programming
operations. When connecting PGMR boards for multi-PGMR programming
operations, each PGMR board must have a unique address assigned for proper
programming operations. PGMR board address assignments are configured by
jumper headers J2 through J4.
Connecting PGMR boards for multi-PGMR programming operations is
accomplished by using user-supplied fabricated terminal strips shown below. One
end of the terminal strip is soldered to connector P3 as shown in Figure 2-3. The
other end of the terminal strip is inserted and fastened into the second PGMR
board connector P1 as shown in Figure 2-4.
TERMINAL STRIP
SAMTEC PART # TSW-205-08-T-S-RA
NOTES
The user can also fabricate the terminal strip by using insulated 2022 AWG solid wires. Using wire larger than the recommended
size wire will result in damage to the connector.
When multi-PGMR programming more than two boards, short
across R3 on all boards except the one connected to the VPP power
supply.
2-10
HC711E9PGMR/AD1
HARDWARE PREPARATION AND INSTALLATION
Figures 2-3 through 2-5 illustrate the PGMR preparation and interconnection
techniques. For multi-PGMR programming operations, the fabricated jumper
installed on jumper header J1 must remain installed on the applicable PGMR
board having the RS-232C personal computer cable assembly installed on
connector P1. For the remainder of the PGMR boards connected for multi-PGMR
programming, fabricated jumpers installed on J1 jumper headers must be
removed.
The RXD/PD0 and TXD/PD1 connections for connector P1 are only used for
multi-PGMR board interconnections. For standalone PGMR board operation, the
RXD/PD0 and TXD/PD1 connections for connector P1 are not used. The
RXD/PD0 and TXD/PD1 connections are made via the RS-232C personal
computer cable assembly connected to connector P2 as shown in Figure 2-4.
M68HC711E9 PGMR
BOARD
J1
GND
V PP +5V
RXD/PD0
TXD/PD1
P1
TERMINAL STRIP
GND
P2
+5V
V PP
P3
RXD/PD0
TXD/PD1
Figure 2-3. PGMR Board Preparation
HC711E9PGMR/AD1
2-11
HARDWARE PREPARATION AND INSTALLATION
Figure 2-4. PGMR Board Interconnection
2-12
HC711E9PGMR/AD1
HARDWARE PREPARATION AND INSTALLATION
Figure 2-5. Multi-PGMR Board Interconnections
HC711E9PGMR/AD1
2-13
HARDWARE PREPARATION AND INSTALLATION
2-14
HC711E9PGMR/AD1
OPERATING INSTRUCTIONS
CHAPTER 3
OPERATING INSTRUCTIONS
3.1 INTRODUCTION
This chapter provides the necessary information to program MC68HC711E9
OTPROM/EPROM MCU devices with the PGMR board. The PGMR board was
designed to program only MC68HC711E9 OTPROM/EPROM MCUs.
The PGMR board operates in conjunction with two software programs which are
provided with the PGMR board. The first program interfaces the PGMR board
with an International Business Machines personal computer (IBM-PC). The
second program interfaces the PGMR board with an Apple Macintosh computer.
Both software programs support either the standalone or multi-PGMR
programming operations.
3.2 LIMITATIONS
User generated programs cannot initialize any RAM values, this destroys the
PGMR/host computer interface program.
3.3 OPERATING PROCEDURES
The following paragraphs describe how to configure the PGMR board for the
standalone and multi-programming operations. Step-by-step operating procedures
are also provided for the standalone and multi-PGMR programming.
3.3.1
Standalone PGMR Board Programming
To configure one PGMR board for standalone programming, perform the
following steps:
1. Place PGMR board VPP switch (SW2) to the OFF position.
2. Place PGMR board +5V switch (SW1) to the OFF position.
3. Install fabricated jumper on PGMR board jumper header J1.
HC711E9PGMR/AD1
3-1
OPERATING INSTRUCTIONS
4. Remove fabricated jumpers (if installed) from PGMR board jumper
headers J2 through J4.
5. Connect external power supply to PGMR board connector P1.
6. Connect personal computer (PC) to PGMR board connector P2.
7. Apply power to PC.
8. Install applicable PGMR board software program (IBM-PC or MAC) into
the PC.
9. Invoke PC software program.
10. Follow the HELP and/or menu instructions provided.
To program one MC68HC711E9 OTPROM/EPROM MCU device, perform the
following steps:
1. Ensure that PGMR board VPP switch (SW2) is placed in the OFF
position.
2. Ensure that PGMR board +5V switch (SW1) is placed in the OFF
position.
3. Install OTPROM/EPROM MCU device into PGMR board programming
socket U3. When programming the MCU device, the device must be
installed upside down (belley-up) in socket U3 as shown below
40
NOTCH
6
39
7
29
17
28
18
MCU INSTALLED UPSIDE DOWN (HORIZONTAL FLIP)
(DEVICE NOTCH LOCATED AT UPPER-RIGHT CORNER)
3-2
HC711E9PGMR/AD1
OPERATING INSTRUCTIONS
4.
Place PGMR board +5V switch (SW1) to the ON position. Red light
emitting diode (LED) illuminates when power is applied.
5. Place PGMR board VPP switch (SW2) to the ON position.
6. Invoke PC software program.
a. Red LED remains illuminated during normal programming operations.
b. Red LED is extinguished for non-verification programming operations.
c. Red LED blinks when sample program is in progress.
NOTE
Sample program is contained in the PC software program.
7. Place PGMR board VPP switch (SW2) to the OFF position.
8. Place PGMR board +5V switch (SW1) to the OFF position.
HC711E9PGMR/AD1
3-3
OPERATING INSTRUCTIONS
3.3.2
Multi-PGMR Board Programming
Configure PGMR boards for multi-programming operation as follows:
1. Interconnect up to eight PGMR boards using terminal strips as shown in
Chapter 2.
2. On first PGMR board, place VPP switch (SW2) to the OFF position.
3. On remaining PGMR boards, place VPP switches (SW2) to the ON
position.
4. On first PGMR board, place +5V switch (SW1) to the OFF position.
5. On remaining PGMR boards, place +5V switches (SW1) to the ON
position.
6. On the first PGMR board, install fabricated jumper on jumper header J1.
7. On remaining PGMR boards, remove fabricated jumpers installed on
jumper headers J1.
8. Install fabricated jumpers on jumper headers J2 through J4 to establish
address assignments for each PGMR board in use.
NOTE
The table on the following page lists the recommended fabricated
jumper placements for multi-programming operations.
9. Install a jumper wire to short across R3 on all boards except the one
connected to the VPP power supply.
10. Connect external power supply to the first PGMR board connector P1.
11. Connect personal computer PC to the first PGMR board connector P2.
12. Apply power to PC.
13. Install applicable PGMR board software program (IBM-PC or MAC) into
the PC.
14. Invoke PC software program.
15. Follow the HELP and/or menu instructions provided.
3-4
HC711E9PGMR/AD1
OPERATING INSTRUCTIONS
J2
J3
J4
PD2
PD3
PD4
HEX
DEC
1
IN
IN
IN
000
00
2
OUT
IN
IN
001
01
3
IN
OUT
IN
010
02
4
OUT
OUT
IN
011
03
5
IN
IN
OUT
100
04
6
OUT
IN
OUT
101
05
7
IN
OUT
OUT
110
06
8
OUT
OUT
OUT
111
07
PGMR
ADDRESS
MULTI-PROGRAMMING PGMR BOARD JUMPER PLACEMENTS
NOTE
Up to eight PGMR boards can be connected for multi-PGMR
programming operations. When connecting PGMR boards for
multi-PGMR programming operations, each PGMR board must
have a unique address assigned for proper programming
operations.
HC711E9PGMR/AD1
3-5
OPERATING INSTRUCTIONS
To program multiple MC68HC711E9 OTPROM/EPROM MCU devices, perform
the following steps:
1. Ensure that the first PGMR board VPP switch (SW2) is placed in the OFF
position.
2. Ensure that the first PGMR board +5V switch (SW1) is placed in the OFF
position.
3. Install OTPROM/EPROM MCU devices into PGMR boards via
programming sockets U3. When programming the MCU device, the
device must be installed upside down (belley-up) in socket U3 as shown
below.
40
NOTCH
6
39
7
29
17
28
18
MCU INSTALLED UPSIDE DOWN (HORIZONTAL FLIP)
(DEVICE NOTCH LOCATED AT UPPER-RIGHT CORNER)
4. d.
Place PGMR board +5V switch (SW1) to the ON position. Red
light emitting diodes (LED) illuminates when power is applied.
5. Place PGMR board VPP switch (SW2) to the ON position.
6. Invoke PC software program.
7. Follow PC display instructions for programming operations.
a. Red LED remains illuminated during normal programming operations.
b. Red LED is extinguished for non-verification programming operations.
c. Red LED blinks when sample program is in progress.
3-6
HC711E9PGMR/AD1
OPERATING INSTRUCTIONS
NOTE
Sample program is contained in the PC software program.
8. Follow PC display instructions to exit programming operations.
9. Place PGMR board VPP switch (SW2) to the OFF position.
10. Place PGMR board +5V switch (SW1) to the OFF position.
HC711E9PGMR/AD1
3-7
OPERATING INSTRUCTIONS
3-8
HC711E9PGMR/AD1
SUPPORT INFORMATION
CHAPTER 4
SUPPORT INFORMATION
4.1 INTRODUCTION
This chapter provides the connector signal descriptions, parts list with associated
parts location diagram, and schematic diagrams for the PGMR board.
4.2 CONNECTOR SIGNAL DESCRIPTIONS
Connector P1 interconnects an external power supply to the PGMR board.
Connector P2 is used to facilitate interconnection of a personal computer to the
PGMR board. Connector P3 is used to interconnect multiple PGMR boards for
multi-programming operations.
Pin assignments for the above connectors (P1, P2, and P3) are identified in Tables
4-1 through 4-3, respectively. Connector signals are identified by pin number,
signal mnemonic, and signal name and description.
HC711E9PGMR/AD1
4-1
SUPPORT INFORMATION
Table 4-1. Input Power Connector (P1) Pin Assignments
1.
4-2
Pin Number
Signal Mnemonic
Signal Name And Description
1
GND
GROUND
2
+5V
+5 Vdc Power – Input voltage (+4.9 to 5.5 Vdc @ 50
mA(1) max.) used by the PGMR board logic circuits.
3
VPP
Programming Voltage – Input voltage (approximately
+11.75 to 12.75 Vdc @ 5 mA(1) max)used by the
PGMR board programming circuits. Refer to the
MC68HC711E9 OTPROM/EPROM MCU device
technical summary for the appropriate programming
voltage (VPP) specifications.
4
RXD/PD0
RECEIVE DATA – MCU port D, bit 0, serial data input
line.
5
TXD/PD1
TRANSMIT DATA – MCU port D, bit 1, serial data
output line.
For multi-PGMR programming operation the current value is multiplied by the number of
PGMRs connected in series for multi-PGMR operation.
HC711E9PGMR/AD1
SUPPORT INFORMATION
Table 4-2. Personal Computer I/O Port Connector (P2) Pin Assignments
Pin Number
Signal Mnemonic
1
GND
PROTECTED GROUND
2
TXD
TRANSMIT DATA – Serial data output line.
3
RXD
RECEIVE DATA – Serial data input line.
4
—
5
CTS
CLEAR TO SEND – An output signal used to indicate a
ready-to-transfer data status. This pin is connected to
DSR pin 6, DCD pin 8, and DTR pin 20.
6
DSR
DATA SET READY – An output signal used to indicate
an on-line/in-service/active status. This pin is
connected to CTS pin 5, DCD pin 8, and DTR pin 20.
7
SIG-GND
SIGNAL GROUND – This line provides signal ground
or common return connection (common ground
reference) between the PGMR board and RS-232C
compatible personal computer.
8
DCD
9-19
—
20
DTR
21-25
—
HC711E9PGMR/AD1
Signal Name And Description
Not connected.
DATA CARRIER DETECT – An output signal used to
indicate an acceptable received line (carrier) signal has
been detected. This pin is connected to CTS pin 5,
DSR pin 6, and DTR pin 20.
Not connected.
DATA TERMINAL READY – An input line used to
indicate an on-line/in-service/active status. This pin is
connected to CTS pin 5, DSR pin 6, and DCD pin 8.
Not connected.
4-3
SUPPORT INFORMATION
Table 4-3. Multi-PGMR Interconnecting Connector (P3) Pin Assignments
4-4
Pin Number
Signal Mnemonic
Signal Name And Description
1
GND
GROUND
2
+5V
+5 Vdc Power – +5 Vdc output voltage used for multiPGMR interconnection.
3
VPP
Programming Voltage – Output programming voltage
used for multi-PGMR interconnection.
4
RXD/PD0
RECEIVE DATA – MCU port D, bit 0, serial data output
line used for multi-PGMR interconnection.
5
TXD/PD1
TRANSMIT DATA – MCU port D, bit 1, serial data input
line used for multi-PGMR interconnection.
HC711E9PGMR/AD1
SUPPORT INFORMATION
4.3 PARTS LIST
Table 4-4 lists the components of the PGMR board by reference designation
order. The reference designation is used to identify the particular part on the parts
location diagram (Figure 4-1) that is associated with the parts list table. This parts
list reflects the latest issue of hardware at the time of printing.
Table 4-4. PGMR Board Parts List
Reference Designation
Component Description
Printed Wiring Board (PWB), M68HC711E9PGMR
C1, C2
C3, C5, C11
C4, C6, C9, C10
C7, C8
D1
J1–J4
Capacitor, axial, ceramic, 0.1 uF @ 50 VDC, +/- 20%
Capacitor, axial, electrolytic, 10 uF @ 16 VDC, +/- 20%
Not used – Capacitor, 27 pF @ 50 Vdc,
+/-20%(1)
Red light emitting diode (LED)
Header, jumper, single row post, 2 pin, Aptronics #
929705-01-02
P1
Terminal block, 2S series, Augat RDI # 2SV-05 (power
supply connector)
P2
Connector, cable, 25 pin, DB25 Dupont # 86858-325
(personal computer I/O port connector)
P3
Not installed – Terminal strip, Samtec # TSW-205-08T-S-RA
R1, R2, R3
Resistor, 100 ohm, 5%, 1/4W
R4
Resistor, 10k ohm, 5%, 1/4W
R5
Resistor, 10M ohm, 5%, 1/4W
RN1
S1, S2
1.
Capacitor, axial, electrolytic, 47 uF, +/- 20%, @ 35 Vdc
Resistor Network, nine 22k ohm SIP, CTS # 770-10122K
Switch, slide, SPDT, C&K # 1103M2CQE
For custom MCU operating frequency, replace ceramic resonator X1 with crystal and install
C8 and C9 capacitors. (27 pF values are for 8 MHz operation.)
HC711E9PGMR/AD1
4-5
SUPPORT INFORMATION
Table 4-4. PGMR Board Parts List (continued)
Reference Designation
Component Description
U1
I.C., MC145407P, RS-232C driver/receiver
U2
I.C., MC34064P, voltage detector, 3.80-4.20 Vdc
U3
I.C., MC68HC711E9P, EPROM MCU, PLCC
XU3
Y1
Socket, surface mount, 52-lead, PLCC, Plastronics #
P2052SP
Ceramic resonator, MCU, 8.0 MHz,
Panasonic # EFO-GC8004A4 or Fox # FSC8.00
Fabricated jumper, Aptronics # 929955-00 (use with
jumper header J1). For jumper headers J2-J4 - User
installed. (User supplied for multi-PGMR programming
operations.)
4-6
HC711E9PGMR/AD1
SUPPORT INFORMATION
P1
SW1
SW2
R3
R2
R1
P2
C1
C2
+
+
D1
R4
C5
C4
+
J1
C6
U1
+
U2
C9
C10
+
+
RN1
R5
C7
U3
C8
C3
Y1
J2
J3
J4
C11
P3
Figure 4-1. PGMR Board Parts Location Diagram
HC711E9PGMR/AD1
4-7
SUPPORT INFORMATION
4.4 DIAGRAMS
Figure 4-2 is the PGMR board schematic diagram.
4-8
HC711E9PGMR/AD1
SUPPORT INFORMATION
Figure 4-2. PGMR Board Schematic Diagram (Sheet 1 of 2)
HC711E9PGMR/AD1
4-9
SUPPORT INFORMATION
Figure 4-2. PGMR Board Schematic Diagram (Sheet 2 of 2)
4-10
HC711E9PGMR/AD1
S-RECORD INFORMATION
APPENDIX A
S-RECORD INFORMATION
A.1 INTRODUCTION
The S-record format for output modules was devised for the purpose of encoding
programs or data files in a printable format for transportation between computer
systems. The transportation process can thus be visually monitored and the Srecords can be more easily edited.
A.2 S RECORD CONTENT
When viewed by the user, S-records are essentially character strings made of
several fields which identify the record type, record length, memory address,
code/data and checksum. Each byte of binary data is encoded as a 2-character
hexadecimal number; the first character representing the high-order 4 bits, and the
second the low-order 4 bits of the byte.
The five fields which comprise an S-record are shown below:
TYPE
RECORD LENGTH
HC711E9PGMR/AD1
ADDRESS
CODE/DATA
CHECKSUM
A-1
S-RECORD INFORMATION
Where the fields are composed as follows:
Field
Printable
Characters
Contents
Type
2
S-records type -- S0, S1, etc.
Record length
2
The count of the character pairs in the record, excluding type and
record length.
Address
4, 6, or 8
The 2-, 3-, or 4-byte address at which the data field is to be loaded into
memory.
Code/Data
0-n
From 0 to n bytes of executable code, memory-loadable data, or
descriptive information. For compatibility with teletypewriters, some
programs may limit the number of bytes to as few as 28 (56 printable
characters in the S-record).
Checksum
2
The least significant byte of the one’s complement of the sum of the
values represented by the pairs of characters making up the records
length, address, and the code/data fields.
Each record may be terminated with a CR/LF/NULL. Additionally, an S-record
may have an initial field to accommodate other data such as line numbers
generated by some time-sharing systems. An S-record file is a normal ASCII text
file in the operating system in which it resides.
Accuracy of transmission is ensured by the record length (byte count) and
checksum fields.
A.3 S-RECORD TYPES
Eight types of S-records have been defined to accommodate the several needs of
the encoding, transportation and decoding functions. The various Motorola
upload, download and other records transportation control programs, as well as
cross assemblers, linkers and other file-creating or debugging programs, utilize
only those S-records which serve the purpose of the program. For specific
information on which S-records are supported by a particular program, the user’s
manual for the program must be consulted. CPU32Bug supports S0, S1, S2, S3,
S7, S8, and S9 records.
A-2
HC711E9PGMR/AD1
S-RECORD INFORMATION
An S-record format module may contain S-records of the following types:
S0
The header record for each block of S-records, The code/data field may
contain any descriptive information identifying the following block of Srecords. The address field is normally zeros.
S1
A record containing code/data and the 2-byte address at which the
code/data is to reside.
S2
A record containing code/data and the 3-byte address at which the
code/data is to reside.
S3
A record containing code/data and the 4-byte address at which the
code/data is to reside.
S5
A record containing the number of S1, S2, and S3 records transmitted in a
particular block. This count appears in the address field. There is no
code/data field.
S7
A termination record for a block of S3 records, The address field may
optionally contain the 4-byte address of the instruction to which control is
passed. There is no code/data field.
S8
A termination record for a block of S2 records. The address field may
optionally contain the 3-byte address of the instruction to which control is
passed. There is no code/data field.
S9
A termination record for a block of S1 records. The address field may
optionally contain the 2-byte address of the instruction to which control is
passed. If not specified, the first entry point specification encountered in
the object module input will be used. There is no code/data field.
Only one termination record is used for each block of S-records. S7 and S8
records are usually used only when control is to be passed to a 3 or 4 byte address.
Normally, only one header record is used, although it is possible for multiple
header records to occur.
A.4 S-RECORDS CREATION
S-record format files may be produced by dump utilities, debuggers, linkage
editors, cross assemblers or cross linkers. Several programs are available for
downloading a file in S-record format from a host system to a microprocessorbased system.
HC711E9PGMR/AD1
A-3
S-RECORD INFORMATION
A.5 S-RECORD EXAMPLE
Shown below is a typical S-record format module, as printed or displayed:
S00600004844521B
S1130000285F245F2212226A000424290008237C2A
S11300100002000800082629001853812341001813
S113002041E900084E42234300182342000824A952
S113003000144ED492
S9030000FC
The module consists of one S0 record, four S1 records, and an S9 record.
The S0 record is comprised of the following character pairs:
S0
S-record type S0, indicating that it is a header record.
06
Hexadecimal 06 (decimal 6), indicating that six character pairs (or ASCII
bytes) follow.
00
00
Four-character, 2-byte, address field; zeros in this example.
48
44
52
ASCII H, D and R - "HDR".
1B
The checksum.
The first S1 record is explained as follows:
A-4
S1
S-record type S1, indicating that it is a code/data record to be
loaded/verified at a 2-byte address.
13
Hexadecimal 13 (decimal 19), indicating that 19 character pairs,
representing 19 bytes of binary data, follow.
00
00
Four-character, 2-byte, address field; hexadecimal address 0000, where
the data which follows is to be loaded.
HC711E9PGMR/AD1
S-RECORD INFORMATION
The next 16 character pairs of the first S1 record are the ASCII bytes of the actual
program code/data. In this assembly language example, the hexadecimal opcodes
of the program are written in sequence in the code/data fields of the S1 records:
OPCODE
INSTRUCTION
285F
245F
2212
226A0004
24290008
237C
MOVE.L
MOVE.L
MOVE.L
MOVE.L
MOVE.L
MOVE.L
(A7)+,A4
(A7)+,A2
(A2),D1
4(A2),A1
FUNCTION(A1),D2
#FORCEFUNC,FUNCTION(A1)
(The balance of this code is continued in the code/data fields of the
remaining S1 records and stored in memory.)
The checksum of the first S1 record.
2A
The second and third S1 records also each contain $13 (19) character pairs and are
ended with checksums 13 and 52 respectively. The fourth S1 record contains 07
character pairs and has a checksum of 92.
The S9 record is explained as follows:
S9
S-record type S9, indicating that it is a termination record.
03
Hexadecimal 03, indicating that three character pairs (3 bytes) follow.
00
00
The address field, zeros.
FC
The checksum of the S9 record.
Each printable character in an S-record is encoded in a hexadecimal (ASCII in this
example) representation of the binary bits which are actually transmitted. For
example, the first S1 record above is sent as:
TYPE
S
5
LENGTH
1
3
3
1
1
3
ADDRESS
3
1
3
0
3
3
0
0
3
CODE/DATA
0
0
3
0
0
3
2
0
3
8
2
3
CHECKSUM
5
8
3
F
5
4
•••
6
•••
2
3
A
2
4
1
0101 0011 0011 0001 0011 0001 0011 0011 0011 0000 0011 0000 0011 0000 0011 0000 0011 0010 0011 1000 0011 0101 0100 0110 ••• 0011 0010 0100 0001
HC711E9PGMR/AD1
A-5
S-RECORD INFORMATION
A-6
HC711E9PGMR/AD1
HC711E9PGMR/L1
CUSTOMER LETTER
May 1991
Dear M68HC711E9 PGMR Customer
The Macintosh software shipped with the M68HC711E9 PGMR will not program in multiprogramming mode when using a Macintosh Computer. By the time you receive your PGMR
this error should be corrected. The software correction will be available June 1, 1991 on the
Motorola "Freeware" electronic bulletin board system (BBS).
To access the BBS requires:
1. 1200/2400 baud modem.
2. Macintosh Computer with communications software.
3. Telephone line.
Use the following procedure to log onto the freeware line:
1. Set system character format to 8-bit, no parity, 1 stop bit.
2. Dial freeware number (512) 891-FREE (891-3733).
3. Enter the requested information to log on. You are now a registered user.
4. The M68HC711E9 PGMR software update file is in the MAC directory, the filename
is PROGE9.SIT. Online help is available.
Macintosh is a registered trademark of Apple Computer, Inc.
1