1
Handbook for the SXVR-H16
Issue 1 June 2009
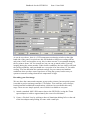
As can be seen above, there is a CCD temperature monitoring window at the right
hand side of the panel. At switch-on, this will default to full power cooling with an
end point of -40C and, needless to say, this is rather extreme. I recommend changing
the set point to about -10C for normal use, but you can go much colder if you are
imaging during the winter months. Under indoor conditions, the low airflow will limit
the cooling capability, and you should use a set point of no lower than -5C for stable
cooling. You can determine the optimum settings for your camera and ambient
conditions when you have some experience of using the system, but do not try to
operate at extreme cooling when the air temperature is high.
Recording your first image:
We now have the camera and computer set up to take pictures, but an optical system
is needed to project an image onto the CCD surface. You could use your telescope,
but this introduces additional complications, which are best avoided at this early
stage. There are two simple options, one of which is available to everyone:
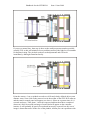
1) Attach a standard ‘M42’ SLR camera lens to the SXVR-H16, using the 27mm
spacer/adaptor to achieve approximately the correct focal distance.
2) Create a ‘Pin hole’ lens by sticking a sheet of aluminium baking foil over the end
of the lens adaptor and pricking its centre with a small pin.
6