1
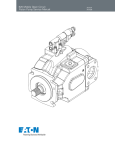
220 Piston Pump Service Manual Table of Contents Part Identification ........................................................................................................................................................................................3 Exploded Assembly.....................................................................................................................................................................................4 Optional Assembly......................................................................................................................................................................................5 Typical Cross Section...................................................................................................................................................................................6 Shaft, Drive and Key....................................................................................................................................................................................7 End Cover S/A.............................................................................................................................................................................................8 Valve Plate...................................................................................................................................................................................................9 Housing..................................................................................................................................................................................................... 10 Rotating Group.......................................................................................................................................................................................... 10 Swash Plate............................................................................................................................................................................................... 10 Shaft Seal.................................................................................................................................................................................................. 10 Compensator............................................................................................................................................................................................. 11 Plug Subassemblies.................................................................................................................................................................................. 11 Pump Repair.............................................................................................................................................................................................. 12 Inspection, Repair and Part Replacement.................................................................................................................................................. 16 Assembly................................................................................................................................................................................................... 19 Assembly Torque Values............................................................................................................................................................................22 2 EATON 220 Piston Pump Service Manual E-PUMC-RR001-E2 February 2014 Part Identification 220 Series Pumps Item Part Number Quantity 1 See table 1 1 2 6028118-XXX AR 3 See table 1 1 4 See Table 2 1 5 16026-610 1 6 See table 3 1 7104166-156 1 8 See table 4 1 9 388153 1 10 02-335336 1 11 6026924-001 2 12 114995-010 2 13 5992034-001 1 14 6026917-001 1 15 6026982-001 1 16 114977-035 4 17 16253-218 1 18 16077-032 1 19 See Table 8 1 20 107275-011 4 21 107275-017 1 22 114953-030 4 23 6030097-001 1 24 16103-312 1 2516103-302 3 26 See table 9 3 27 See table 9 1 28 See table 9 1 29 6026914-001 1 30 114995-010 1 31 5990203-001 1 32 54999158 1 33 104166-021 1 34 6024371-002 1 35 6027085-001 2 36 16026-406 1 37 6030096-350 1 38 692866 1 3916133-12 1 40 937166 2 Description Page Number Shaft, Drive Spacer, Bearing / Bearing Shim Kit Key, Driveshaft End Cover S/A Roll Pin Valve Plate O-Ring l Housing Bearing Assembly, Shaft (Front) Bearing Assembly, Shaft (Rear) Bearing, Swash Plate Screw, Cap, Socket Spring, Bias Swash Plate Rotating Group S/A Screw, Cap (Housing / End cover) Seal, Shaft, Fluorocarbon l Ring, Retaining, Internal (Shaft Seal) l Compensator S/A O-Ring (Secondary Compensator / Housing) l O-Ring (Compensator / Housing) l Screw, Cap (Compensator Mounting) Piston, Control Plug, Fixed Volume Stop u Plug Plug (Bottom, Top and Side Case Drain Ports) Plug (Vertical Case Drain Port) Plug (Diagnostic Port) Link, Feedback (Feedback Sensor Option) Screw, Cap, Socket, Flat, Countersunk (Feedback Sensor Option) Magnet Carrier (Feedback Sensor Option) Adapter, Swash Sensor (Feed Sensor Option) O-Ring (Adapter / Swash Sensor Assy) l (Feedback Sensor Option) Feedback Sensor, Non-Contact (Feedback Sensor Option) Screw, Cap S/A (Swash Sensor) (Feedback Sensor Option) Pin, Roll (Feedback Link) (Feedback Sensor Option) Screw, Cap u (Adjustable Maximum Stop Option) Nut Sealing u (Adjustable Maximum Stop Option) O-Ring u (Adjustable Maximum Stop Option) Tamper Proof Cap 7 18 7 8 – 9 – 10 – – – – – 10 10 – 10 – 11 – – – – – 11 11 11 11 5 5 5 5 5 5 5 5 5 5 5 – lStandard Seal Kit: 9900959-000 uAdjustable Maximum Displacement Volume Stop Kit: 9900958-000 Shaft bearing Shim Kit: 9900961-000 EATON 220 Piston Pump Service Manual E-PUMC-RR001-E2 February 2014 3 Exploded Assembly 220 Series Pump Part Item Number 4 EATON 220 Piston Pump Service Manual E-PUMC-RR001-E2 February 2014 Optional Assembly 220 Series Pumps Part Item Number Feedback Sensor Option Adjustable Maximum Stop Option 24 EATON 220 Piston Pump Service Manual E-PUMC-RR001-E2 February 2014 5 Typical Cross Section 220 Series Pumps Side View 6 EATON 220 Piston Pump Service Manual E-PUMC-RR001-E2 February 2014 Shaft, Drive and Key - Item 1 & 3 Table 1 Table 1 - Shaft, Drive and Key (Items 1 & 3) Code Position 4,5,6 8,9 24,25 Key (Item 3) Part Number Description 028 028 028 028 00 00 00 00 24500-619 - 16246-516 - 6026704-003 6026704-001 6026704-002 6026704-004 Shaft, Shaft, Shaft, Shaft, 05 09 31 34 Drive, Drive, Drive, Drive, 22.2 Dia. Straight Key, 41 mm Ext. Input 13 Tooth 16/32, 41 mm Ext. 25.4 Dia. Straight Key, 46 mm Ext. Input 15 Tooth 16/32, 46 mm Ext. 220 Series Mobile Piston Pump Drive Shaft EATON 220 Piston Pump Service Manual E-PUMC-RR001-E2 February 2014 7 End Cover S/A - Item 4 Table 2 Table 2 - End Cover S/A (Item 4) Code Position 4,5,6 7 10,11 13 24,25 Part Number Description 028 028 028 028 028 028 AA AB AC AD AE AF 00 00 00 00 00 00 6026786-002 6026786-001 6026786-006 6026786-005 6026786-004 6026786-003 End End End End End End L,R L,R L,R L,R L,R L,R 1 1 2 2 1 1 Cover Cover Cover Cover Cover Cover S/A, S/A, S/A, S/A, S/A, S/A, Rear Port 28 cc (O-ring Port) Side Port 28 cc (O-ring Port) Rear Port 28 cc Metric Side Port 28 cc Metric Rear Port 28 cc (4 Bolt Flange Port) Side Port 28 cc (4 Bolt Flange Port) 220 Series Mobile Piston Pump End Cover views Side Port 8 EATON 220 Piston Pump Service Manual E-PUMC-RR001-E2 February 2014 Rear Port Valve Plate - Item 6 Table 3 Table 3 - Valve Plate (Item 6) Code Position 4,5,6 7 Part Number Description 028 028 6029630-001 6029630-002 Plate, Valve (RH 28 cc) Plate, Valve (LH 28 cc) R L 220 Series Mobile Piston Pump Valve Plate Identification RH LH EATON 220 Piston Pump Service Manual E-PUMC-RR001-E2 February 2014 9 Housing - Item 8 Rotating Groups - Item 15 Swash Plate - Item 14 Shaft Seal - Item 17 Tables 4, 5, 6 & 7 Table 4 - Housing (Item 8) Code Position 8,9 12 27,28 05,09,31,34 A,B,G AB 05,09,31,34A,B,E,G 00 05,09,31,34 C,D,F,H 00 Part Number Description 6026919-001 6026919-002 6026919-003 Housing (Feedback Sensor) Housing Housing Metric Drain Port Table 5 - Rotating Group (Item 15) Code Position 4,5,6 Part Number Description 028 6026982-001 Rotating Group S/A (28 cc) Table 6 - Swash Plate (Item 14) Code Position 4,5,6 Part Number Description 028 6026917-001 Swash Plate (28 cc) 220 Series Mobile Piston Pump Swash Plate View Table 7 - Shaft Seal (Item 17) Code Position 4,5,6 Part Number Description 1 16253-218 Seal, Shaft, Fluorocarbon 220 Series Mobile Piston Pump Shaft Seal View 10 EATON 220 Piston Pump Service Manual E-PUMC-RR001-E2 February 2014 Compensator - Item 19 Plug Subassemblies - Item 26, 27 & 28 Table 8, 9 Table 8 - Compensator (Pump Controls) (Item 19) Control Code 14 Code 15,16 Pressure Limit Setting Code 17,18 Flow Setting Code 21,22 Kit Number A A A A A A A A A A A A A A A A A A A 27 28 28 28 28 28 28 32 35 36 36 40 40 42 42 43 43 43 43 199.9-206.8 bar [2900-3000 lbf/in2] 206.8-213.7 bar [3000-3100 lbf/in2] 206.8-213.7 bar [3000-3100 lbf/in2] 206.8-213.7 bar [3000-3100 lbf/in2] 206.8-213.7 bar [3000-3100 lbf/in2] 206.8-213.7 bar [3000-3100 lbf/in2] 206.8-213.7 bar [3000-3100 lbf/in2] 226.5-233.4 bar [3285-3385 lbf/in2] 241.3-248.2 bar [3500-3600 lbf/in2] 246.5-253.4 bar [3575-3675 lbf/in2] 246.5-253.4 bar [3575-3675 lbf/in2] 262.0-268.9 bar [3800-3900 lbf/in2] 262.0-268.9 bar [3800-3900 lbf/in2] 272.4-279.3 bar [3950-4050 lbf/in2] 272.4-279.3 bar [3950-4050 lbf/in2] 275.8-282.7 bar [4000-4100 lbf/in2] 275.8-282.7 bar [4000-4100 lbf/in2] 275.8-282.7 bar [4000-4100 lbf/in2] 275.8-282.7 bar [4000-4100 lbf/in2] 25 10 14 14 23 24 30 16 14 14 22 14 10 10 10 14 14 16 24 23.44-26.89 bar [340-390 lbf/in2] 9.65-12.41 bar [140-180 lbf/in2] 12.41-15.17 bar [180-220 lbf/in2] 12.41-15.17 bar [180-220 lbf/in2] 23.10-25.17 bar [335-365 lbf/in2] 22.75-25.51 bar [330-370 lbf/in2] 28.27-31.72 bar [410-460 lbf/in2] 13.79-16.55 bar [200-240 lbf/in2] 12.41-15.17 bar [180-220 lbf/in2] 12.41-15.17 bar [180-220 lbf/in2] 20.68-23.44 bar [300-340 lbf/in2] 12.41-15.17 bar [180-220 lbf/in2] 9.65-12.41 bar [140-180 lbf/in2] 9.65-12.41 bar [140-180 lbf/in2] 9.65-12.41 bar [140-180 lbf/in2] 12.41-15.17 bar [180-220 lbf/in2] 12.41-15.17 bar [180-220 lbf/in2] 13.79-16.55 bar [200-240 lbf/in2] 22.75-25.51 bar [330-370 lbf/in2] 00 0A 00 0A 00 00 00 00 00 00 0A 0A 00 00 0A 00 0A 00 00 9900512-003 9900512-013 9900512-022 9900512-026 9900512-001 9900512-032 9900512-017 9900512-002 9900512-028 9900512-014 9900512-031 9900512-005 9900512-027 9900512-007 9900512-006 9900512-010 9900512-015 9900512-008 9900512-018 B B B 28 28 43 206.8-213.7 bar [3000-3100 lbf/in2] 206.8-213.7 bar [3000-3100 lbf/in2] 275.8-282.7 bar [4000-4100 lbf/in2] 24 28 24 22.75-25.51 bar [330-370 lbf/in2] 26.20-28.96 bar [380-420 lbf/in2] 22.75-25.51 bar [330-370 lbf/in2] 00 0A 00 9900512-012 9900512-019 9900512-011 C C C C C C 12 19 21 28 43 45 137.9-144.8 bar [2000-2100 lbf/in2] 168.9-175.8 bar [2450-2550 lbf/in2] 179.3-186.2 bar [2600-2700 lbf/in2] 206.8-213.7 bar [3000-3100 lbf/in2] 275.8-282.7 bar [4000-4100 lbf/in2] 306.8-313.7 bar [4450-4550 lbf/in2] 00 00 00 00 00 00 No No No No No No 00 00 00 00 00 00 9900512-021 9900512-023 9900512-029 9900512-016 9900512-009 9900512-004 Kit Contents Comp. Comp. Comp. Comp. Comp. Comp. Setting Setting Setting Setting Setting Setting 40 22 4x Torque 8.2±0.8 Nm 21 20 Flow Flow Flow Flow Flow Flow 19 Table 9 - Plug Subassemblies (Items 26, 27 & 28) Code Position 12 13 27,28 Part Number Description A,B,E,G C,D,F A,B,E C,D,F - - - - - - 1 2 00,AB 00,AB - - - - 16103-310 9237-005 16103-308 9237-004 16103-304 9237-002 Plug Plug Plug Plug Plug Plug (Bottom, Side and Top Case Drain) .875-14 UNF-2B Thd. (Bottom, Side and Top Case Drain) M22 X 1.5 Thd. (Vertical Case Drain) .750-16 UNF-2B Thd. (Vertical Case Drain) M18 X 1.5 Thd. (Diagnostic Ports) .4375-20 UNF-2B Thd. (Diagnostic Ports) M12 X 1.5 Thd. EATON 220 Piston Pump Service Manual E-PUMC-RR001-E2 February 2014 11 Pump Repair Cut Section 12 EATON 220 Piston Pump Service Manual E-PUMC-RR001-E2 February 2014 Pump Repair Cut Section 1. Remove Control Piston Plug Assembly 2. Install Swash Plate Locator Tool Adjustment will take place in step 11. 3. Remove Compensator 4. Remove End Cover Mark the housing and end cover to ensure orientation. Remove the four cap screws that hold the end cover in place. Note: The valve plate may stick to end cover. Use caution so valve plate does not fall off. 5. Remove O-ring Seal 6. Remove Valve Plate 7. Remove Bearing Race The bearing race is pressed in and will require the use of a sliding bearing removal hammer or similar tool to remove it. 8. Remove Bearing EATON 220 Piston Pump Service Manual E-PUMC-RR001-E2 February 2014 13 Pump Repair Cont. 9. Remove Housing O-rings 11. Swashplate adjustment locator with the hold down tool in place, tighten the adjustment screw so the control piston spring is compressed. Note: This step is designed to force the swashplate to a neutral position to enable easy removal of the rotating group, and to retain the swashplate. 10. Install Swashplate retainer install the swash plate hold down tool and tighten the cap screw. This will prevent the swash plate from moving. 12. Install Shaft Retainer Tool and tighten the set screw while being careful not to damage shaft. 13. Remove rotating group 14. Remove shaft remove shaft retainer tool and lift out shaft. Use caution when moving shaft through shaft seal. 15. Remove Swashplate Locator 16. Remove Swashplate Retainer 14 EATON 220 Piston Pump Service Manual E-PUMC-RR001-E2 February 2014 Pump Repair Cont. 17. Remove Control Piston 18. Remove Swashplate 19. Remove Bias Spring 20. Remove Bearing 21. Remove Cradle Bearing Screws Caution: Socket head cap screws are easily damaged during repair with improper tool. 22. Remove Cradle Bearings Note: The cradle bearings are asymmetrical. Note: Proper orientation shown in picture. 23. Remove Front Bearing Race 24. Remove Shaft Seal With the seal retaining ring removed use a punch or similar tool to knock out the shaft seal. EATON 220 Piston Pump Service Manual E-PUMC-RR001-E2 February 2014 15 Inspection, Repair and Part Replacement Inspection Inspection Before inspection of parts, clean with a solvent that is compatible with system fluid. Piston Block Rotating Group Parts 1. Inspect cylinder block face for wear, scratches, and/or erosion. If cylinder block condition is questionable, replace the entire rotating group. Shoe Retainer 2. R emove the pistons, shoe retainer, and pivot from piston block. The piston block assembly doesn’t need to be disassembled unless the internal pins or spring are damaged. 3. C heck each cylinder block bore for excessive wear. Use the piston and shoe S/A for this purpose. The pistons should be a very close fit and slide in and out of the cylinder block bores. NO BINDING CAN BE TOLERATED. If binding occurs, clean the cylinder block and pistons. Lubricate the cylinder block bores with clean fluid and try again. Even minor contamination of the fluid may cause a piston to freeze up in a cylinder bore. Piston (9) and Shoe S/A Pivot Note: Do not lap the face of piston block assembly. 4. Inspect each of the nine piston and shoe S/A for a maximum end play of 0.005 inch between the piston and shoe. Also check the face dimension of each shoe. The face dimension must be within 0.001 inch. 5. Inspect shoe retainer and pivot for wear and/or scratches. If condition is questionable, replace entire rotating group. Piston S/A Tolerances This dimension must be maintained on all nine shoes within 0.001 inch. ± 0.001” Between Piston Shoes (9) Shoe Piston Shoe face rides on swash plate. Shoe must swivel smoothly on ball. End play must not exceed 0.005 inch. Movement up to 0.005” 16 EATON 220 Piston Pump Service Manual E-PUMC-RR001-E2 February 2014 Inspection, Repair and Part Replacement 1.Inspect end cover for erosion, cracks, and burrs. Clean up minor burrs with an India stone. If erosion or cracks are found, replace the end cover. 3. Inspect valve plate for erosion, excessive wear, heavy scratches, and cracks. If any of the above conditions are found, replace the valve plate. 2. Inspect roller bearing and bearing race for nicks and pitting. Make sure the roller bearing turns freely within the bearing race. If the roller bearing needs replacement, both the roller bearing and the bearing race must be replaced. 4. Inspect control piston and maximum displacement screw for burrs, scratches and cracks. Clean up minor scratches with 500 grit paper. Remove burrs with an India stone. The control piston should move freely in the bore. Swashplate Parts 1. Inspect swashplate face for wear, roughness or scoring. Check the swashplate hubs and bearing surfaces for wear and cracks. Replace if defective. 2. Inspect saddle bearing surfaces for wear, pitting, and smooth operation. Replace if necessary. Shaft/Housing Parts 1. Inspect drive shaft for wear, stripped splines, and burrs. Remove burrs with an India stone. Inspect the contact area of bearing and shaft seal). Replace the drive shaft if wear or scoring is greater than 0.005 T.I.R. (total indicator reading). 3. Inspect housing mounting flange for nicks and burrs. Remove minor nicks and burrs with an India stone. Also check the housing for damaged or stripped threads. If any thread is damaged, replace the housing. 2. Inspect drive shaft bearing for roughness, pitting of rollers, and excessive end play. Replace, if defective. If the bearing needs to be replaced, the bearing race also requires replacement. 4. C heck remaining pump parts for excessive wear, damaged threads, burrs, cracks and erosion. Replace any part that is in questionable condition. End Cover & Associated Parts EATON 220 Piston Pump Service Manual E-PUMC-RR001-E2 February 2014 17 Inspection, Repair and Part Replacement Shimming Process End Cover 4 Cap Screw 16 Bearing Spacer 2 Shafty Bearing Shim Kit 9900961-000 Shimming Process Installation Information This skim kit is to replace the bearing spacer within the pump housing. If the housing, drive shaft, shaft bearings or end cover is replaced during servicing, the original bearing spacer can no longer be used to assure proper bearing set. Rear Bearing 10 Shaft 1 Front Bearing 9 Shim Kit 9900961-000 2 Housing 8 Shimming Procedures 1.Measure the thickness of the existing bearing spacer. 2.To obtain a starting point, stack shims to a few thousandth of an inch less than the measurement of existing bearing spacer. Then insert shims into the end cover in the same location as the removed bearing spacer. 3.Assemble the housing (without interface 0-ring seals), shaft bearings, shaft and end cover. Install the end cover cap screws and torque to 114±11 Nm. 18 4.Using a dial indicator, measure drive shaft end play. Target bearing set range is .0005" to .003" clearance (no preload). Add or remove shims to achieve proper bearing set. If no movement of the shaft is observed, shims will need to be removed and steps 3 and 4 repeated. 5.Finish the assembly of the pump. EATON 220 Piston Pump Service Manual E-PUMC-RR001-E2 February 2014 Assembly 1. Install Snap Ring and Shaft Seal 2. Insert the Shaft Bearing Race 3. Install Cradle Bearings 4. Install Cradle Bearing Screws Note: The cradle bearings are asymmetrical. Install as shown in picture. Note: The old cap screws cannot be reused and must be replaced with new ones because the screws will be damaged during disassembly. The new cap screw threads will be coated with loctite. (2) bearings item 11 and (2) screws item 12. 5. Install Bearing 6. Install Bias Spring 7. Install Swashplate 8. Install Control Piston Note: With the bias spring in place, tilt the swash plate toward the spring and install the swash plate. EATON 220 Piston Pump Service Manual E-PUMC-RR001-E2 February 2014 19 Assembly 9. Install Swashplate Retainer 10. Install Swashplate Locator Note: Adjust the screw until the swashplate is near neutral (will look flat in housing). 11. Install Shaft 12. Install Shaft Retainer Tool Caution: Use care while inserting shaft end through shaft seal. 13. Install the Rotating Group 14. Remove Swashplate Locator 15. Remove Swashplate Retainer 16. Install O-ring Seal 20 EATON 220 Piston Pump Service Manual E-PUMC-RR001-E2 February 2014 Assembly 17. Install Housing O-rings 18. Install Bearing Race into End Cover 19. Install Valve Plate 20. Install Bearing onto Shaft Locating Pin Note: Lightly coat the back plate side of the valve plate with petroleum jelly for retention during assembly. Install the valve plate over the bearing race aligning the small slot on the outside of the valve plate with the roll pin in the end cover. 21. Install End Cover 22. Install Compensator Note: Ensure correct orientation. Use caution so valve plate does not fall off. 23. Testing Perform functional test on pump according to Eaton test procedure. Contact your area sales manager for more information. EATON 220 Piston Pump Service Manual E-PUMC-RR001-E2 February 2014 21 Assembly Torque Values Instructions Adjustable Maximum Stop Option Assembly Torque Values Instructions Feedback Sensor Option 22 EATON 220 Piston Pump Service Manual E-PUMC-RR001-E2 February 2014 Notes EATON 220 Piston Pump Service Manual E-PUMC-RR001-E2 February 2014 23 Eaton Hydraulics Group USA 14615 Lone Oak Road Eden Prairie, MN 55344 USA Tel: 952-937-9800 Fax: 952-294-7722 www.eaton.com/hydraulics © 2014 Eaton All Rights Reserved Printed in USA Document No. E-PUMC-RR001-E2 February 2014 Eaton Hydraulics Group Europe Route de la Longeraie 7 1110 Morges Switzerland Tel: +41 (0) 21 811 4600 Fax: +41 (0) 21 811 4601 Eaton Hydraulics Group Asia Pacific Eaton Building No.7 Lane 280 Linhong Road Changning District, Shanghai 200335 China Tel: (+86 21) 5200 0099 Fax: (+86 21) 2230 7240