1
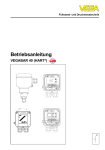
Installation and
Instruction Manual
Please keep in a safe place for future use! Please hand
over to the operator. Read carefully before installing/
starting up!
We reserve the right to make technical changes.
BiOSTAT 2000
Type 25 E/110V
Typ 50 E/110V
2
Manufacturer:
Judo-Wasseraufbereitung GmbH
Postfach 380, D-71351 Winnenden
Hohreuschstrasse 39-41, D-71364 Winnenden
Telephone: +49-*7195/6 92-0
Facsimile: +49-*7195/6 92-188
Type:
Maintenance free descaler BiOSTAT 2000
Type 25 E/110V, Type 50 E/110V
Model
Part No.
Type 25 E/110V
821 0316
Type 50 E/110V
821 0321
Judo Wasseraufbereitung provides a one-year guarantee/warranty for the function of
these devices.
Please ensure that you always precisely observe the details given in this manual, as otherwise any guarantee and liability claims shall expire.
All figures, dimensions and design information were correct at the time of going to press.
We reserve the right to make changes, which serve technical progress and further
development. We are unable to accept any claims to a particular model and design.
Instructions from Page 3
Machine number:
.........................................................
3
Dear Customer,
Thank you for the trust you have shown in us by purchasing this device. With this descaler
you have purchased a unit that is state of the art and with its test mark has proven that it
is exemplary with respect to its effect, device safety and with respect to hygienic aspects.
All the functions of this descaler were carefully and conscientiously examined before delivery. Should difficulties nevertheless occur, please contact your nearest customer service giving the device number 1 (see also Chapter “Malfunction, customer service").
Contents
1
General ........................................................................................................................ 5
1.1 Intended use .......................................................................................................... 5
1.2 Units and symbols used ......................................................................................... 5
1.3 Extent of delivery.................................................................................................... 6
1.4 Accessories............................................................................................................ 7
1.5 Shipping brace ....................................................................................................... 8
1.6 Field of application ................................................................................................. 9
1.7 Use limitations........................................................................................................ 9
2 Safety ......................................................................................................................... 10
3 Technical Data ........................................................................................................... 11
4 Installation Location Requirements ............................................................................ 12
5 Installation .................................................................................................................. 14
5.1 Installed dimensions and weights ........................................................................ 14
5.2 Assembly.............................................................................................................. 14
5.2.1 Installation of the connecting flange JUDO Quickset E (JQE):....................... 15
5.2.2 In-line arrangement of a Quickset-X single-lever bypass valve (JQX), only for
Type 25 E:.................................................................................................................. 16
5.2.3 Install descaler ............................................................................................... 16
5.2.3.1 Install Type 25 E (1“): ............................................................................... 16
5.2.3.2 Install Type 50 E (1 ½“): ........................................................................... 17
6 System in operation ................................................................................................... 19
6.1 Functional description .......................................................................................... 19
6.2 Commissioning..................................................................................................... 20
6.3 Operation ............................................................................................................. 22
6.4 Interruption, shutdown.......................................................................................... 22
6.5 Flushing................................................................................................................ 23
6.6 Cleaning ............................................................................................................... 23
7 Description of the Electric Controls ............................................................................ 24
7.1 Display, keyboard................................................................................................. 24
7.2 Status display....................................................................................................... 25
7.3 Menu overview: .................................................................................................... 26
7.4 Description of the sub-menus .............................................................................. 28
7.4.1 Operating data ............................................................................................... 28
7.4.2 Water consumption Page 1 ............................................................................ 28
7.4.2.1 Menu: Water consumption previous year................................................. 28
7.4.2.2 Menu: water consumption page 2 ............................................................ 28
7.4.3 Diagrams........................................................................................................ 29
7.4.4 Settings .......................................................................................................... 30
7.4.4.1 Date/ Time................................................................................................ 30
1
The number of this device is noted down on the first page of this manual. Also it is
engraved in front of the device and visible after lift up the cover.
4
7.4.4.2 Unit data ................................................................................................... 30
7.4.4.3 Language selection .................................................................................. 31
7.4.4.4 Display...................................................................................................... 31
7.4.5 Flushing.......................................................................................................... 32
7.4.5.1 Flushing interval time ............................................................................... 32
7.4.5.2 Flushing interval – water quantity............................................................. 32
7.4.6 Customer service ........................................................................................... 33
7.4.6.1 Change customer service data................................................................. 33
7.4.6.2 Event minutes........................................................................................... 33
7.5 Hoppla function .................................................................................................... 33
8 Warning messages .................................................................................................... 34
8.1 Notes on flushing the treatment chamber ............................................................ 34
9 Malfunction, customer service.................................................................................... 35
9.1 Malfunction........................................................................................................... 35
9.2 customer service .................................................................................................. 36
10 Spare parts list BiOSTAT 2000 E............................................................................ 39
11 Table for entering the Telephone Number and the Customer Service Firm ........... 40
5
1 General
1.1 Intended use
The BiOSTAT 2000 reduces the tendency of the water to precipitate surplus lime and
thus protects water pipes and hot water heaters against limescale deposits, which inhibit
the flow of water and lead to a high power consumption. The devices and fittings are
spared and thus expensive repairs are avoided. Lime edges and water stains are easier
to wipe off.
The types 25 E and 50 E have been tested by the DVGW (Deutsche Vereinigung des
Gas- and Wasserfaches e.V. – German Gas and Water Association) in accordance with
the requirements of the DVGW code of practice W 512 and the DVGW regulations 8-9/100 and 8-9/4-99 and exceed the minimum requirements for the effect, safety and
compatibility of the plastics, some by significant amounts.
They are therefore entitled to bear the DVGW mark.
In addition to the descaling function the display can be used to enquire the operating
data, the water consumption and the customer service address. The system settings and
the flushing interval can be entered.
1.2 Units and symbols used
The following symbols are used in this manual for improved clarity and understanding:
!
!
Warning!
This symbol indicates an item, which must always be observed for reliable
operation or for safety reasons.
Important!
This symbol denotes tips for use and other useful information.
Deviating from the official SI units, the following units and terms are used:
Unit
bar
Conversion
1 bar = 105 Pa = 0.1
N/mm2
Unit
Inch
Conversion
1“ = DN 25
1 ½“ = DN 40
6
1.3 Extent of delivery
Type 25 E
Installation and instruction
manual
Type 50 E
Installation and instruction
manual
Ready assembled device
Device left (with display),
Device right (without display), both devices are
joined with the preassembled bypass valves (JQX)
via the tandem piece (JQT,
see Figure).
Cable for connecting the
two sets of electronics.
Wall bracket for Type 50
JQT
7
- Connecting flange for Type 25 E:
JQE 1” with screwed connection
JQE mV
- Connecting flange for Type 50 E:
JQE 1 ½“ with internal screw thread
JQE
-Wall bracket and Raw plugs
For Type 25 E: 1x
For Type 50 E: 2x
1.4 Accessories
For Type 25 E:
JQR Quickset extension for series connection of two water
treatment devices (e.g. filter and descaler).
JQX single lever bypass valve
Part No. 8250041
Part No. 873 5210
8
For Type 25 E and Type 50 E:
Connection cable for external, potential
free fault signal,
Part No. 221 0244.
The electric circuits of the Types 25 E and 50 E contain a relay with changeover function
for potential-free transmission of the fault signal.
It has the following control statuses:
-for operating voltage “On“ picked up
-for operating voltage “Off“ or malfunction released
Loadability: 24V / 0.5A
To connect the potential-free fault signal, insert the polarised connector in the socket labelled with “ext. Störmeld.“. The socket is located on the underside of the electronics, in
Type 50 E it is located on the underside of the left-hand electronics.
For operating voltage “On“ the connection in the relay between the white and green cables are closed, for operating voltage “Off“ or malfunction, the connections in the relay
between the green and brown cables are closed.
1.5 Shipping brace
The BiOSTAT 2000 Type 25 E/ Type 50 E is screwed onto a wooden board to protect it
from transport damage. This board must be dismantled by removing the two crosshead
screws before the device is installed.
A white plastic cover protects the sealing edges of the connecting flange (JQE) and prevents dirt from penetrating. This cover must also be removed before installation.
9
1.6 Field of application
Type 25 E/110V
The output of this system is designed that it
is sufficient for a detached house with up to
6-8 people.
Up to 40 litres of treated water per minute
are available.
Type 50 E/110V
The output of this system is designed so
that it is sufficient for multiple unit housing,
large residential units and office buildings.
Up to 80 litres treated water per minute are
available.
1.7 Use limitations
!
This descaler has been developed for use in cold drinking water, which complies
with the German Drinking Water Ordinance. The manufacturer must always be consulted before installing the descaler in other media than water or in water with additives!
The descaler can be used in the whole drinking water sector as long as the water to be
treated is not aggressive to lime.
!
In case of mains pressures above the max. operating pressure of 8 bar (even for
short periods) a pressure reducer must be installed upstream of the device.
!
In case of mains pressures above 7 bar, we recommend that you install a pressure
reducer upstream of the device.
The BiOSTAT 2000 must not be installed in circuits/loops.
10
2 Safety
The materials and protective covers used are resistant to the physical, chemical and
corrosive stresses to be expected in the water.
All materials, protective covers and resources are hygienically and physiologically safe.
Plastics and non-metallic materials fulfil the requirements of the Federal Health Office
(KTW recommendations).
!
This descaler has been developed for use in cold (up to 30°C) drinking water (water
from the municipal water supply). The manufacturer must always be consulted before installing the descaler in other media than water or in water with additives!
!
The water to be treated must not contain substances with a marked polar character,
such as alcohols, concentrated mineral acids, formic acid, phenol, m-cresol, tetrahydro furan, pyridine, dimethyl formamide and mixtures of chloroform and methanol.
They lead to brittleness through to fracture of the plastic parts.
Only gentle soap solutions or water may be used for external cleaning.
The operating and maintenance instructions specified in this instruction manual must be
strictly observed.
Independent modifications and changes are prohibited for safety reasons! The test marks
printed on the devices are only valid when original Judo parts are used.
The mains voltage of 230 V is transformed to a safe extra-low voltage of 24 V with the aid
of a completely encapsulated power pack (Class of protection IP 65). The electronic
housing must only be opened by trained qualified personnel after the mains plug has
been removed from the socket. The main power cable must only be completely replaced
with the power pack by the manufacturer, the manufacturer’s customer service or
qualified trained personnel.
11
3 Technical Data
Rated pressure:
The rated pressure denotes the maximum pressure, up to which the safety of the device
has been tested. The maximum operating pressure is lower, to ensure optimum function.
Type 25 E/110V
Type 50 E/110V
Rated flow
2.5 m3/h
5 m3/h
Pipe connection
1“
1 ½“
Nominal pressure
PN 10
PN 10
Operating pressure max.
8 bar
8 bar
Pressure loss for rated flow
0.4 bar
0.5 bar
Electrical connection
230 V/50 Hz
2 x 230 V/50 Hz
Max. power consumption
120 W
240 W
Max. ambient and water temperature
30°C
30°C
12
4 Installation Location Requirements
!
To be able to ensure trouble-free operation, the requirements named in the following must be complied with.
A shut off valve must be installed upstream of the device.
To protect the descaler against dirt, a protective filter should be installed upstream of the
system (back washable or as tube filter) with a mesh size not larger than 0.1 mm.
The mains pressure should not fall below 1.5 bar, as other wise the rinsing can be impaired.
In the case of mains pressures above the max. operating pressure of 8 bar (pressure
peaks during the night must also be noted!) a pressure reducer must be available
upstream of the device. Pressure reducers are available as individual devices or in
combination with a protective filter.
The room used for the installation must be dry and frostproof. Unauthorised persons
should not have access to the room.
The ambient temperature must not exceed 30 °C. Avoid direct insolation.
The device must not be exposed to any strong impacts.
The device can be installed in each flow direction in all proprietary drinking water pipes.
Please note the cast in flow direction arrow on the connecting flange.
A socket (230 V, 50 Hz) is required for operation of the BiOSTAT 2000 Type 25 E. Two
sockets are required for the Type 50 E. The sockets must not be able to be switched off
by a light switch or similar. The length of the power cable is approx. 1.5 m.
For the case that major damage could occur at the installation location due to a leak in the
device or the feed pipe (e.g. in offices, doctor’s practice, etc.), it must be ensured that the
water and current supply are interrupted upstream of the device when the personnel are
absent.
Alternatively, the central water monitoring fitting, the Judo Zewa Water Stop (Part No.
8140002) can also be installed upstream of the descaler. It monitors the water flow for
unwanted tapping/removal and shuts down the water according to the parameters set
when necessary.
The installation height depends on the pipe route, the minimum overall height from the
floor to the rotating flange: 645 mm.
The flushing water can be fed to an outlet or be collected in a bucket. Discharge with a
free outlet to DIN 1988 can also be above the device.
13
An adequately dimensioned wastewater connection (e.g. floor drain) to DIN 1986 must be
available for the flushing water. The dimensioning is oriented to the local circumstances
(e.g. wastewater pipe longfall, number of changes in direction, length of the wastewater
pipe, etc.). However it must also be large enough that all the flushing water can be carried away at the same time.
The extent of delivery of the BiOSTAT 2000 Type 25 E/Type 50 E includes a wall bracket
(see p. 6), which prevents the device from twisting, but does not hold its weight. The
water pipes should therefore be supported at the connecting flange with two pipe clips,
especially in case of small pipe cross-section and soft pipe materials.
The extent of delivery of the BiOSTAT 2000 Type 50 E also includes a wall bracket,
which takes the weight of the device.
Keep to the given installation spacings (at least 100 mm to the top and below) to ensure
comfortable operation and servicing.
14
5 Installation
5.1 Installed dimensions and weights
Device dimensions (mm)
Type 25 E/110V
Type 50 E/110V
A = Depth to centre of pipe
(without/with JQX1))
B = Width
243/308
-/330
330
525
5.2 Assembly
The devices are DVGW tested, i.e. they can be connected without a safety fitting (e.g.
pipe disconnector).
1)
JQX (by-pass) for Typ 25 E/110V as accessories available, for Typ 50 E/110V standard
aquipment. Part-No. 873 5210
15
5.2.1 Installation of the connecting flange JUDO Quickset E (JQE):
The JUDO Quickset E (JQE) is used as a connecting element between many Judo devices and the domestic water installation. It is the flange connection between the water
pipe and the descaler.
The JQE 1“ with screwed connection (mV) for the
Type 25 E consists of the rotating flange with
external thread, union nut, pipe sockets with
external thread, ring seal and assembly cover.
The connection width for the Type E is specified at
1” by the pipe sockets.
The rotating flange must be suitable both for
horizontal as well as vertical pipes, and must be
installed in the direction of flow. This is denoted by
a cast in arrow. The flange surface or the rotating
flange must be vertically upright. The pipe can be
tested for leaks before the BiOSTAT 2000 is
installed.
JQE mV
The JQE 1 ½“ with internal screw thread for the
Type 50 E consists of the rotating flange with
internal screw thread, ring seal and assembly
cover.
The rotating flange, suitable both for horizontal
and vertical pipes, must be installed in the
direction of flow. This is denoted by a cast in
arrow. The flange surface of the rotating flange
must stand vertically. The pipe can be tested for
leaks before the BiOSTAT 2000 is installed.
JQE
The ring seal between the rotating flange and connecting flange of the BiOSTAT 2000
must be installed so that the shaped side points towards the rotating flange. If there are
no impressions in the rotating flange for these raised surfaces, e.g. as can be the case in
older rotating flanges, the flat packing included in the accessories bag must be used as a
ring seal.
16
5.2.2 In-line arrangement of a Quickset-X single-lever bypass valve
(JQX), only for Type 25 E:
(Accessory Part No. 873 5210)
The JQX allows easy decoupling of the connected descaler from the pipe network, without the water supply being interrupted for the consumers.
The JQX does not have a bayonet connection. Therefore the cheese head screws M6x88
in the descaler’s flange must be replaced by the threaded rods in the accessories bag.
A section flange seal with four screws and nuts is prefitted to the flange of the JQX denoted by the cast in letter >>R<< (pipe). Screw this flange to the JQE rotating flange.
Screw the BiOSTAT 2000 to the other flange with the cast in letter >>G<< (device) using
the nuts from the accessories bag.
Fit the JQX so that the hand lever either stands pointing upwards or to the side. The installation should be carried out so that the hand lever is easily accessible according to the
local circumstances.
In the >bypass< setting the BiOSTAT
2000 is separated from the water mains
and can be flanged off by the bypass
valve.
To
make
switching
from
>operation< to >bypass< easier, open the
test valve (W) briefly so that the pressure
in the device falls.
W
JQX
JQE
5.2.3 Install descaler
5.2.3.1 Install Type 25 E (1“):
Before the installation, remove the shipping brace (see Chapter “Field of application“):
• Remove the wooden panel by removing the two cross head screws,
• Remove the white plastic cover by undoing the four screws in the flange of the BiOSTAT 2000 (do not completely remove!), until the cover can be removed by rotating it
in a clockwise direction. This shipping brace protects the flange from damage when
the device is dismantled.
The wall bracket (Part No. 220 0500, refer to the enclosed installation instructions) can
bet fitted between 200 and 290 mm in the middle below the JQE (measured from the
middle of the pipe).
17
Connection with bayonet:
Remove the assembly cover of the
JQE. Insert the device with the 4
screws in the bayonet drill wholes of
the rotating flange. Turn the device in a
clockwise direction until it stops and
then tighten the screws.
Connection without bayonet:
Undo the cheese head screws M6x88. Then replace the cheese head screws with the
threaded rods included in the accessories bag.
Remove the assembly cover of the JQE. Insert the threaded rods in the connecting flange
of the descaler through the ring seal and the holes in the connection piece (e.g. JQE) and
then tighten them using the nuts from the accessories bag.
5.2.3.2 Install Type 50 E (1 ½“):
Before the installation, remove the shipping brace (see Chapter “Field of application“):
• Remove the wooden panel by removing the two cross head screws,
• Remove the white plastic cover by undoing the four screws in the flange of the
BiOSTAT 2000. This shipping brace protects the flange from damage when the device
is dismantled.
The Type 50 E consists of two treatment devices, which are connected in parallel via a
tandem piece (JQT). Two single lever bypass valves (JQX) are fitted to the tandem
pieces (triple flange) are preassembled as a standard (see Figure).
Left-hand device with display
Right-hand device without display
18
Unscrew the assembly cover from the
JQE. Hold the JQE bracket immediately
in the middle below the rotating flange of
the JQE 1½“. Draw the drilling holes and
drill the hole so that the Rawl plug no
longer protrudes. After drilling the bracket
is placed to the side.
Screw the triple flange (T-piece) to the rotating flange 1 ½“ with the two preassembled
JQX. To do this you can use the screws and the ring seal, with which the assembly cover
was fixed to the rotating flange. Then the JQE bracket can be fitted using the hexagonal
screws supplied 8x60 and the Rawl plugs ∅ 10 mm.
To prevent twisting, fit the two wall brackets (No. 220 0500, read the enclosed installation
instructions) between 200 and 290 mm beneath the JQE (measured from the middle of
the pipe). The spacing on both sides should be around 20 cm from the middle of the
rotating flange.
The Type 50 E is equipped with threaded rods in the connecting flange as a standard.
Use the section flange seals supplied and the nuts to fit it to the flange of the left-hand
JQX of the BiOSTAT with display, to the flange of the right-hand JQX of the BiOSTAT
without display.
Then connect the two sets of electronics using the enclosed connection cable.
The cover hoods do not have to be removed to insert the cable, as there are recesses in
the panelling at the appropriate locations. The connecting sockets are located to the right
next to the electronics’ housing.
19
6 System in operation
6.1 Functional description
The BiOSTAT 2000 is fundamentally different from other water treatment devices available on the market. It releases extremely small seed crystals, on which the lime can deposit itself.
The following processes take place:
In the treatment space there is an anode coated with a precious metal (plus pole) and the
cathode (minus pole) is made from round stainless steel brushes. As soon as water flows,
a pulsating direct voltage is applied to these two electrodes, a current flows between the
electrodes. The dissolved lime deposits on the cathode (the round stainless steel brushes)
in the form of calcium carbonate crystals. At the same time this lime that has deposited on
the round brushes is removed again by rotating stripper around the brush circumference –
by bending and subsequent acceleration of the brushes.
The crystals formed in this way are minute micro crystals. Any larger crystals that have
formed sink to the floor and can be removed via the drain tap by regular flushing. They
can be seen in the flushing water as very fine “sand“. The aforementioned microcrystals
remain in suspension and function as seed crystals, on which lime can deposit. Above all
in hot water areas, the growth can be identified by the slight turbidity of the water. The
crystals grow and slowly become of a size in which they scatter light. They are then thousandths of a millimetre in size. But even these crystals are still so small that they remain
in suspension and are flushed out with the current. The same procedure takes place in
cold water only the lime depositing potential is normally much smaller.
As the surplus lime now deposits on the seed crystals, other surfaces (pipes, boiler, etc.)
mainly remain free of limescale deposits, e.g. electric heating rods.
The formation of the crystals reduces the hardness of the water slightly. This reduction is
so slight that it cannot be detected using simple measuring equipment.
In the device’s inlet there is an impeller wheel water meter, which detects even very small
flows of around 0.5 l/min. Together with microprocessor-controlled electronics it ensures
that depending on the water composition, the current pulses can be adjusted so that optimum water treatment always takes place, from very small flows through to the nominal
flow.
The stripping of the microcrystals from the cathode and the flushing of larger lime crystals
via the drain tap means that the cartridge does not have to be regularly replaced.
The operating data and the water consumption in the household can be enquired at the
display, the adjustments to the system can be made, flushing intervals specified and the
address of the customer service enquired.
The description of the display function is given in the Chapter Description of the electric
controls.
20
6.2 Commissioning
Mains “ON“
1.Commiss
ioning ?
No
Self-test
Yes
Display:
JUDO water treatment
approx. 3 seconds
Enquiry and enter the language
Message:
BiOSTAT OK
approx. 1 second
or error message
Enter:
-Assembly by a specialist firm
Yes/ No
-Commissioning by specialist
firm / Judo
-Date / Time
Status display
No
!
Key menu
2s confirmed?
Yes
Main menu
For safety reasons the descaler must be vented immediately after being connected to the water network (bypass valve in operating position). Opening a water
tap downstream of the device does this.
21
Insert the mains plug in the socket (in the case of Type 50 E both plugs). The mains
plugs must be freely accessible.
After connecting the power supply the switching carries out a test of all the functions and
parameters stored in the electronics.
After completing the self test the display “BiOSTAT OK“ appears for approx. 1 second.
If a malfunction has been detected the error is displayed. In addition the red LED is
continuously lit indicating the malfunction too.
When starting up for the first time/commissioning the following display appears after the
self-test has been carried out:
** Sprachauswahl
deutsch
English
espanol
francais
italiano
nederlands
continue
**
ü
The language currently set is indicated with a ü.
If another language is to be set the bar must be
moved to the required language using the
After confirming with
key.
this input is accepted.
>OK
The following display then appears:
** First start-up **
ASSEMBLED by qualified
craftsman:
Please enter whether the installation has been carried out by a qualified craftsman.
Please confirm using the appropriate function key.
ß YES
ß NO
The following display then appears:
**First start-up**
FIRST OPERATION
by qualified craftsman:
Please enter whether the commissioning is being
carried out by a qualified craftsman.
Please confirm using the appropriate function key.
ß Yes
ß No
**First start-up**
FIRST OPERATION
by JUDO:
ß Yes
ß No
If you answered the previous menu with “No“, the enquiry to the left appears.
Please confirm with “Yes“, if the commissioning is being carried out by JUDO, or “No“, if the commissioning is being carried out by a private person.
22
In the final commissioning display window you can enter the current date or time.
Change: Date/Time
Date:
03.11.00
_OK
Time:
13:05
_OK
back
>OK
The current date of the internal clock at the time the first water is drawn off is stored as
the commissioning date.
The status display (see Chapter “Status display”)
If the device is restarted following a shutdown (or even after a power failure), proceed as
for the first commissioning.
Please note that the language selection and the commissioning and installation inputs no
longer appear.
After the self-test has been carried out on the electric circuit without errors the display
changes directly to the display mode “Status display“, the system is ready to run.
6.3 Operation
To adjust the treatment effect to the water flow and thus optimise the effect, the BiOSTAT
2000 is equipped with a water meter for precise flow measurement.
The water meter delivers electric impulses to the BiOSTAT 2000’s controls. The
electronics recognises from the frequency of the impulses how must water is flowing and
adjusts the treatment current accordingly. The electronics deduce from the level of the
treatment flow what the water composition is and optimises the treatment current
accordingly.
Depending on the water composition and operating mode a small quantity of sand-like
lime particles form in the treatment area as well. To flush these out, the BiOSTAT 2000
should be flushed every 3 - 6 months depending on the water consumption (see Chapter
“Flushing„).
6.4 Interruption, shutdown
If the water supply to the descaler is interrupted (main tap closed or bypass open), the
system’s mains plug must also be removed from the socket.
A dismantled system must be stored in a dry, frostproof place. The connecting flange
must be protected against soiling and damage. The white cover can be used for this (see
Chapter „Shipping brace“).
23
If a dismantled system is reinstalled and restarted, the system must always be vented by
opening a water tap downstream of the device.
If the device is restarted after a shutdown (or even after a power failure), then proceed as
for the first commissioning/start up.
Please note that the language selection and the inputs for the commissioning and installation no longer appear.
After the self-test has been carried out on the electric circuit without errors the display
changes directly to the display mode “Status display“, the system is ready to run.
6.5 Flushing
As there are no consuming or blocking components in the system, no regular maintenance is needed.
You only have to flush out any sand-like lime particles that may have formed, every 3 - 6
months, see also Chapter “Operation“ and the relevant chapter in the sub-menu.
To flush the system, open the ball valve at the lower end of the panelling and allow around
3 litres of water to flow out. If you collect the flushing water in a bucket, you can see how
much lime has been flushed out. If there is an easily visibly covering of the base of the
bucket, the flushing interval should be reduced. If the flushing water only contains a little
lime, the flushing interval can be extended or retained.
!
In the case of high network pressures and fully opened ball valve the water can
splash out of the bucket. In such a case close the ball valve a bit.
You can also connect a hose to the ball valve. The hose must be firmly connected with the
wastewater connection to prevent a wagging pressure.
Please also read the Chapter 6.5“, here you can enter the various time intervals until the
next flushing. The display reminds you that flushing is due after the given time has expired.
If a flushing is carried out outside of the given time interval, this should be entered in the
Chapter “Flushing“. The given time interval starts again from new.
6.6 Cleaning
The external surfaces of the device can be cleaned with a normal household soap-based
cleaner (soft soap).
!
Solvents, solvent vapours, varnishes and cleaners containing alcohol lead to
brittleness and to severe surface crack formation through to fracture of the plastic
parts.
!
Standard household all-purpose cleaners and glass cleaners can contain up to 25%
solvent or alcohol (methylated spirits). Such cleaners must not be used!
24
7 Description of the Electric Controls
7.1 Display, keyboard
The operating data and water consumption can be enquired via the display and the
system settings changed, the flushing intervals can be specified and the customer service
address enquired.
The following is a description of this device’s keyboard:
Power
Alarm
1
2
ABC
3
DEF
4
GHI
5
JKL
6
MNO
7
PQRS
8
TUV
9
WXYZ
*
0
#
F1
F2
F3
Menu
Menu
Back
Back
OK
Use this key to change from the status display to the main menu.
Press briefly = one menu step back
Press continuous (approx. 3 seconds): = back to the status display
Page down in the menu field. The momentary line of text is shown in inverse colours (light coloured writing on a dark background)
The following functions are possible:
OK
>OK
-OK
For menu lines with the end symbol “>OK“, press
submenu denoted by the bar
to jump into the
For menu lines with the end symbol “_OK“ the values or data shown in
these menu lines can be overwritten.
After pressing
the changed data is accepted.
25
The alphanumeric keyboard can be used to change or enter new values in
the menu lines marked with the end symbol “_OK“.
When entering letters the relevant key has to be pressed briefly several
times. E.g. to enter an “s“ press the
key
4x briefly and consecutively.
In addition to the characters printed on the keyboard other symbols can be
used when entering the telephone number and name of the firm. These
characters are listed in the Table Tab1 on the left-hand side.
The changed data is accepted after pressing
.
For menu lines with the end symbol “_OK“ this key can be used to move
the cursor along the line to be changed.
For menu lines with the end symbol “>OK“ this key can be used to select
the value shown from a specified list.
F1
The function keys F1.F3 are required in several menus to select the possible inputs. The precise meaning of these keys is described on the display.
F2
F3
LED
Green “Power“: device is connected to the power supply (230V).
Red “Alarm“: there is a fault signal or warning message.
7.2 Status display
After the self-test has been carried out without errors, the display changes into the display
mode “status display“.
The following image appears on the display:
In the 1st line the name of the water treatment device
appears.
The 2nd line shows the momentary water flow in l/min.
waterflow:
There is a picture of a water tap in the middle. While
water is being taken from the system the short lines
within the water pipe move to the right.
The bottom line shows the number of litres of water
currently being drawn off through the system, inside the
pot symbol.
waterquantity:
The water flow quantity displayed is reset to zero 15s
after the water is no longer drawn off.
The value of the water quantity is reset to zero after 40
seconds.
After pressing
you come to the main menu of the BiOSTAT 2000.
26
Main menu
By pressing the
key you arrive in the main menu of the BiOSTAT 2000 E.
Operating data
>OK
Water consumption>OK
-Diagrams
>OK
Settings
>OK
Flushing
>OK
Customer service >OK
Page with the
key and then press the key
reach the sub-menu marked by the bar.
to
Operating display>OK
Use the key
or the bottom line in the menu “operating display“ to arrive back in
the operating display.
The various sub-menus are described in the Chapter “Description of the sub-menus“.
7.3 Menu overview:
To get from the status display to the main menu, press
.
From there you can select the following sub-menus:
Operating data (Chapter 7.4.1)
Water consumption Page 1 (Chapter 7.4.2)
Diagrams (Chapter 7.4.3)
Settings (Chapter 7.4.4)
Flushing (Chapter 7.4.5)
Customer service (Chapter 7.4.6)
By pressing
you move back from the main menu to the operating display.
The following page shows the flow diagram with the general display functions (Menu
overview).
27
Flow Diagram – General Display Functions – Menu Overview
Operating data:
7.4.1
Operating
display 7.2
Main menu
7.2
Water consumption
7.4.2
Consumption
diagrams
7.4.3
Settings
7.4.4
Operating data:
- Total water quantity
- Operating time
- Treatment time
7.4.1
Water consumption:
- Previous year
- Current year
- Current month
- Present day
- Comparison with
same month last
Date/Time
7.4.4.1
Device type
Device number
Version number
7.4.4.2
Language
7.4.4.3
Display
7.4.4.4
Flushing
7.4.5
Flushing interval
- max. time
- max. water quantity
7.4.5
Carry out next flushing on:
7.4.5
Customer service
7.4.6
Customer service address: - Name
- Phone number
7.4.6
Commissioning
7.4.6
Event log
7.4.6
Diagrams
- Current year
- Previous years
- Current month
- Previous months
7.4.3
Change:
- Date
- Time
Change language:
- German
- English
- French
- Flemish
- Italian
- Spanish
Display settings:
- Contrast
- Background lighting
Change
Customer service address: 7.4.6.1
Commissioning:
- Date
- Installation by
- Commissioning by
7.4.6.1
List
- Flushings
- Fault messages
7.4.6.2
28
7.4 Description of the sub-menus
7.4.1 Operating data
****Operating data ****
Total water quantity:
175 m3
Operating time:
350 days
Treatment time:
160 h
back
>OK
In this the accumulated operating data over the whole
operating period of the BiOSTAT is displayed.
Total water quantity:
Total water quantity to flow since the BiOSTAT was
started up /commissioned for the first time.
Operating time:
Total time since the commissioning
Treatment time:
Total time that the treatment current has flown in the BiOSTAT. For the Type 50 E the values displayed are the
sum of the measured values from both devices.
7.4.2 Water consumption Page 1
Water consumption:P.1
Last year
175 m3
>OK
This year
259 m3
This month
11.4 m3
Today
521 litre
To page 2
back
The water consumption values are displayed here related
to the various time intervals.
The water consumption of the previous year in line 2 can
be changed by selecting the line and pressing the key
(see Chapter “Menu: Water consumption previous
year“).
>OK
>OK
7.4.2.1 Menu: Water consumption previous year
After selecting the menu line “change“ the total water
consumption for the previous year (see water consumpChange:
tion
billing) can be re-entered or changed.
Water consumption
This is only interesting in the first year of commissioning,
Last year
175 m3
as otherwise there are no comparative values in the “water consumption“ to compare with. This menu no longer
Change
m3
appears from the following year.
_OK
If a value is entered here, an average consumption value
is calculated which is used for the water consumption
back
>OK
diagram up to the day until the commissioning.
7.4.2.2 Menu: water consumption page 2
Here the water consumption of the last month can be
Water consumption:p.2
compared with the water consumption of the corresponding month in the previous year.
Compare with water
consumption of last
year (last 30 days)
back
-5.7%
>OK
29
7.4.3 Diagrams
******Diagrams******
Month: 02/2001
ß Month back
Year: 2001
ß Year back
back
>OK
>OK
>OK
After selecting the menu line “Diagrams“ you can use the
F2 and F3 keys to select a monthly or annual diagram.
Each time a function key is pressed the screen changes to
the respective previous month or year.
The key
can be used to switch between the monthly
and yearly diagrams.
The F2 and F3 keys can also be used to directly switch
between the annual diagram and the monthly diagram.
The selected diagram flashes and is shown after you
press the key
.
Example: monthly diagram
Taken
The values are shown in litres.
The maximum value is 2500 litres.
The scaling is calculated depending on the largest consumption value.
The monthly diagram data for the last 14 months are
permanently stored in the EEPROM.
Example: monthly diagram
Taken
Use the key
The values are shown in m3.
The maximum value is 99 m3.
The scaling is calculated depending on the largest consumption value.
The yearly diagram data for the last 10 years are permanently stored in the EEPROM.
to display the respective previous diagram.
Use the key
to return back to the “diagrams“ menu or the key
back to the main menu.
to return
30
7.4.4 Settings
**** Settings
****
Date:
03.11.00 >OK
Time:
13:05
>OK
Unit data
>OK
Language: english >OK
Display
>OK
back
>OK
By selecting the lines “Date“ or “Time“ your reach
the “Date/ Time“ menu for changing this data.
By selecting the line “device data“ you arrive in the
“Unit data“ menu for displaying the exact device
name.
By selecting the line “language“ your arrive in the
menu for changing the language of the text displayed. The currently set language is displayed.
By selecting the line “Display“ you arrive in the
“Language selection“ menu for changing the display
setting
7.4.4.1 Date/ Time
The current date or the time can be entered in the
last commissioning display window.
Change: Date/Time
Date: 03.11.00
_OK
Time:
_OK
13:05
back
>OK
7.4.4.2 Unit data
****Device data****
Type: BiOSTAT 2000-25 E
Device No.:
12134
Version
1.0/0210/c
MMT:
not inst.
back
>OK
The exact data for identifying the treatment device is
displayed in this window.
31
7.4.4.3 Language selection
** Select Language**
deutsch
English
ü
espanol
francais
italiano
nederlands
The currently set language is marked with a ü.
If you want to set another language, use the key
to move the bar to the required language.
Confirm with
to accept this input.
7.4.4.4 Display
***** Display
*****
The display menu shows the contrast and lighting
display.
Contrast:
50%
>OK
the
illumination 100%: >OK After selecting and confirming with the key
respective
set
value
can
be
changed
using
the
afterglow time
4 Minutes
>OK respective function keys.
back
>OK
7.4.4.4.1 Contrast setting
The function key F2 can be used to increase the
contrast, the function key F3 is used to reduce it
*Contrast setting*
Contrast
50 %
ß plus
ß minus
back
>OK
7.4.4.4.2 Background lighting - intensity
***
***
Background
lighting
illumination
ß plus
ß minus
Back
***
***
50 %
>OK
The function key F2 can be used to set the background
lighting lighter, with the function key F3 it becomes
darker.
32
7.4.4.4.3 Background lighting persistence
*** Background
***
lighting
reducer after
4 Minutes
ß plus
ß minus
back
***
***
The function key
can be used to extend the persistence (i.e. how long it continues to light) of the display
background lighting, the function key
reduces it.
>OK
7.4.5 Flushing
The time interval until the next flushing of the treatment
***** Flushing ***** chamber can be entered here as well as the max. quantity
Flushing interval:
of water until the next flushing.
- time 2 Months
>OK
Based on the average water consumption the screen then
displays when the next flushing should take place. The
- water qty 100 m3>OK
minimum time of one month cannot be reduced.
next flushing
If a flushing is carried out before this time has expired for
due on: 60days
ß execute flushing
the BiOSTAT Type 25 E or 50 E the key
must be
Back
>OK
pressed.
To check whether flushing has actually been carried out approx 0.5 l water must have
flowed in the period of 3 minutes before or after pressing this key. After this condition has
been fulfilled the next flushing date is calculated.
7.4.5.1 Flushing interval time
Change flush.interval By setting the bar on the line “time“ and confirming with
time until flushing:
the key
you arrive in this menu.
1 Month
Here you can enter the time intervals until the next flush2 Months
ü
ing. Set the bar with the key on the required interval and
6 Months
9 Months
.
confirm with the key
12 Months
back
>OK
7.4.5.2 Flushing interval – water quantity
Change flush.interval
W.qty. until flushing
10 m3
50 m3
100 m3
ü
3
150 m
200 m3
back
>OK
By setting the bar on the line “Water qty“ and confirming
with the key
you arrive in this menu.
Here you can enter the quantity of water until the next
flushing. Set the bar with the key on the required interval
and confirm with the key
.
33
7.4.6 Customer service
* Customer service
frm. Judo GmbH
phn. 07195/692-116
Change ?
*
>OK
Events protocol
Start-up
Back
>OK
>OK
>OK
The data important for the customer service is displayed here.
The name and telephone number of the firm responsible for customer service is shown in the lines
2 and 3. This data can be changed after selecting
the relevant menu line in the menu ”Change customer service data“.
After selecting the menu line “Event minutes“ you
arrive in the menu.“ Event minutes “
7.4.6.1 Change customer service data
** Change customer **
** service data:
**
frm. Judo GmbH
_OK
phn. 07195/692-116 _OK
back
>OK
7.4.6.2 Event minutes
*Eventprotocol 1*
A list of the events important for the customer service is
Error 3
displayed here in the order they occurred.
Date:
09.10.00
The following is displayed:
Time:
09:30
Malfunction mesage with fault number.
Flushing
Date and time of the malfunction messages
Executed
Yes
Warnings e.g. note of the flushing of the treatment
Date:
22.12.00
chamber with date and time.
Time:
07:44
Note, whether e.g. a required flushing has been carback
>OK
ried out.
The event log can be up to 5 pages long. If further events occur, the respective oldest
page is deleted. The key
can be used to page down in the event log.
7.5 Hoppla function
By pressing the key
and the key “*1“ the contrast is reset to the standard value
of 30 % then the screen jumps back to the language selection menu.
This function is used if the display has become illegible due to incorrect contrast entries
or the wrong language is selected.
34
8 Warning messages
Warning messages are displayed by the corresponding text.
This warning message changes with the status display at intervals of 5 seconds.
The red malfunction LED also flashes.
8.1 Notes on flushing the treatment chamber
****** caution ******
please rinse the
treatment chamber!
Open top, flush with
approx. 2 litres water,
close top and press OK
The electrodes chamber of the BiOSTAT 2000 must
be flushed in regular intervals. Following the expiry of
the preset flushing interval or exceeding of the preset
water quantity the warning message shown on the left
appears.
This warning message continues to be displayed until
the flushing has been carried out and the key
has been pressed.
In addition, a water consumption of at least 0.5 litres must have been recorded by the
BiOSTAT 2000 in the period of 3 minutes before or after pressing the OK key.
The display then changes back to the status display.
35
9 Malfunction, customer service
9.1 Malfunction
A fault signal is indicated by the continuously lit red LED on the “Alarm” display. In
addition, the cause of the fault signal is shown on the display. This display alternates
every 5 seconds with the address of the customer service (see also Chapter „Customer
service“).
!
As long as there is a fault signal, no water treatment takes place!
Delete the fault signal:
Remove the mains plug from the socket for approx. 10 seconds.
If the fault signal no longer occurs when you put the plug back in, the system has
independently returned to normal mode.
If the signal occurs again after a short time, check all the cable connections except the
electric control cable. To do this, you must remove the front cover hood: undo the four
plastic screws at the sides of the cover hoods by 1-2 turns and pull the hood down and to
the front and remove it upwards.
If you cannot find an error and the fault signal occurs again after going out, inform the
customer service giving the device number. The device number is located on the righthand side of the reactor chamber, it can only be read off when the hood has been
removed.
!
The housing of the electrical controls may only be opened by qualified electricians.
Remove the mains plug before opening the housing.
Display
****** caution ******
Fault message!
Fault 1
Electrolysis flowrate
too great!
****** caution ******
Fault message!
Possible cause
What to do?
• Short circuit between the • Inform customer
wire brushes and the
service
precious metal anode
• The BiOSTAT 2000
• The water to be treated
cannot be used
has a conductivity of >
here.
2500 µS/cm (drinking
water has max. 2000
µS/cm)
•
Too much air in the reac- •
tor chamber
•
Interrupted cable at the
electrodes
Fault 2
No
electrolysis flow!
Remove mains plug.
Vent by opening a water tap downstream of
the device. Push the
plug back in.
• Reconnect the cable
36
Display
****** Attention ******
Fault message!
Fault 3
Possible cause
• Electronic fault
•
Malfunction due to fluctuations in the electricity
mains/grid
What to do?
• Inform customer
service
.
• Delete fault signal
Elektronics defective!
In the Type 50 E the screen also displays in which circuit the malfunction has occurred,
e.g. Fault 3, Circuit left.
• Inform customer
****** Attention ****** • Electronic fault
service
Fault message!
.
• Malfunction due to fluc•
Delete fault signal
tuations
in
the
electricity
Fault 3
mains/grid
Elektronics defective!
Circuit left
9.2 customer service
We wish you a continuous trouble-free operation. However should problems occur or
should you have any questions, our customer service department will be pleased to help
your with the relevant information. The telephone numbers are given in the manufacturer’s
address or in Chapter „Customer service“. Please always quote the imprinted device
number. When your look at the device it is located on the device on the right hand side on
the hexagonal cover.
You must remove the front cover hood first: Undo the four plastic screws on the sides of
the cover hood by 1-2 turns and pull the hood forwards and down and then lift it off upwards.
!
Guarantee and liability claims can only be granted if the instructions given in the
instruction manual have been precisely observed.
37
38
Illustration of the spare parts is not to scale!
39
10 Spare parts list BiOSTAT 2000 E
No
Name
Part No.
1
1
1
2
10
10
11
20
30
31
32
33
34
35
36
36
37
40
41
42
43
44
45
46
47
48
49
60
61
62
63
64
65
66
67
68
69
70
71
72
73
Cover hood
Cover hood left
Cover hood right
Panelling
Electronics Type 25 E/ 50 E-li
ElectronicsType 50 E-re
Fuse 1.25 A-T
Treatment chamber
Water meter
Contact maker terminal
Self-tapping screw 2.2x9.5
Self-tapping screw 2.9x13
Tension relieving bracket
HE-contact maker
Cheese head screwM6x88
Threaded rod
Section flange seal
Cheese head screw M5x35
WZ-cover
WZ-magnetic bracket
WZ-Gear insert
WZ-Housing insert
WZ-impeller wheel
O-Ring 63.22x1.78
WZ-housing
Nut M5
Nut M6
Nipple ¾“
Ball valve
Hose piece
Synchronomotor
Seal
Screw
Ring screen/filter
Ring magnet
Fixing rod
Flat round screw
Power pack
Motor cable
Electrodes cable
Connection cable Type 50 E
221 0258
221 0133
221 0131
114 0083
221 0121
221 0234
190 0125
221 0207
212 0089
160 9113
160 9173
160 9172
160 9114
150 0044
201 0198
165 0016
120 0218
163 3141
163 3006
115 0009
260 9139
160 9112
163 3083
120 0211
112 0441
163 3147
163 3145
144 0124
161 0006
220 0321
150 0225
120 0275
165 0201
112 0490
150 0229
116 0018
165 0282
150 0263
150 0245
150 0238
150 0242
Type 25 E
/110V No
1
1
1
1
1
1
1
2
2
1
1
4
2
6
1
1
1
1
1
1
1
6
4
1
1
1
1
1
4
1
1
2
4
1
1
1
-
Type 50 E
/110V No
1
1
2
1
1
2
2
2
2
4
4
2
2
8
4
12
2
2
2
2
2
2
2
12
16
2
2
2
2
2
8
2
2
4
8
2
2
2
1
VE/Each
310
310
310
136
1280
515
2
1610
491
12
1
1
2
49
3
4
5
1
51
28
121
14
10
1
123
1
1
11
24
2
250
2
3
7
16
16
1
140
18
14
25
1
2
3
4
5
6
7
8
9
0
*
#
Key
2. Firm
*
#
0
1
key
1
“space“
a
d
g
j
m
p
t
w
,
*
+
1
*
#
0
1
1. Telephone number
2
1
b
e
h
k
n
q
u
x
:
/
c
f
i
l
o
r
v
y
?
(
_
3
2
/
+
,
“space“
A
D
G
J
M
s
T
z
!
)
?
4
3
(
:
Press
B
E
H
K
N
P
U
W
`
>
?
5
4
)
_
?
C
F
I
L
O
Q
V
X
0
=
Press
6
!
5
=
ä
è
4
5
ö
R
ü
Y
7
6
>
Ä
ê
ó
7
ù
9
ñ
S
Ü
Z
9
à
é
8
8
6
ç
3
10
2
11
11 Table for entering the Telephone Number and the Customer Service
Firm
170 1115 • 03/2003