1
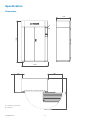
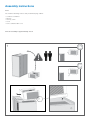
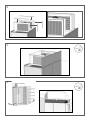
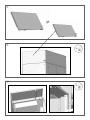
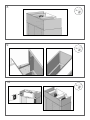
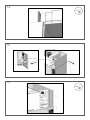
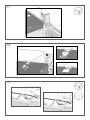
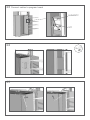
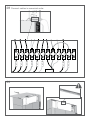
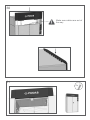
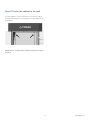
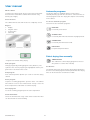
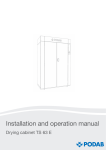
Installation and operation manual
Drying cabinet TS 63 VP
Thank you for choosing this drying cabinet TS 63 VP from PODAB.
We hope that it will be of great use for you and ask you kindly to
read the instructions carefully.
IMPORTANT!
FOR YOUR SAFETY, the information in this manual must be followed to prevent property damage and personal injury.
NOTE: The paragraphs marked “WARNING” and “CAUTION” appearing in this manual are not meant to cover all possible
conditions and situations that may occur. It is very important that water and electricity are handled with great care and
respect, by both installation technicians and end users.
©PODAB 2013
2
Contents
Safety regulations
4
Important safety instructions
5
Specification
6
Dimensions
Technical information
6
7
Assembly instructions
8
Installation of the cabinet
20
Step 1: Put the cabinet in place
Step 2: Fasten the cabinet to the wall
Step 3: Connect condensate pipe
Step 4: Connect the drying cabinet to the main switch
20
21
22
23
User manual
24
Automatic programs
Select drying time manually
24
24
Maintenance
25
Installation during winter
Take good care of the cabinet
Once-a-year cleaning
Keep your cabinet efficient and economical
25
25
25
25
Notes
26
3
©PODAB 2013
Safety regulations
Throughout this manual you will find text warnings in text boxes: “WARNING” and “CAUTION”. In these boxes you’ll find the
safety measurements you’ll have to take; end user, service staff
or installation staff.
WARNING
Indicates hazardous situation that, if not avoided, could cause
severe personal injury.
You will also find precautions marked: IMPORTANT and NOTE.
These are followed by information of what should be considered.
IMPORTANT: to inform the reader of special steps that must
be taken in order to prevent injuries on the cabinet.
NOTE: to inform what is important to know, but it cannot
cause personal injuries or injury on the cabinet.
©PODAB 2013
4
Important safety instructions
WARNING
To minimize the risk of fire, electrical shock, personal injuries
or death when the cabinet is in use the following precautions
must be followed:
1.
Read the instruction before using the drying cabinet.
2.
Follow the installation instructions for proper grounding.
3.
Never dry textiles that have been washed, dipped or exposed to fire dangerous substances or fluids.
4.
Never add fire dangerous or explosives substances in the
cabinet.
5.
The cabinet is not a toy. Look after the children who are
around the cabinet.
6.
Never connect the cabinet with an extension cable.
7.
Only use the cabinet for what it is designed for: drying
clothes.
8.
Always turn off the main switch before performing any service on the cabinet. Only authorized service technicians
should perform service.
9.
Always follow the installation manual. The electrical connections must be done by authorized personnel.
10. Keep after the cabinet. If it is exposed for violence there
is a risk that certain security functions will stop working.
Please contact your nearest service partner if you are unsure of the cabinet’s status.
11. If the electrical cable is damaged, it must immediately be
changed by a person with electrical authorization.
12. The doors shall always be shut when the cabinet is in use.
Don’t try to manipulate the lock of the doors. It can lead
to personal injuries. If the cabinet doesn’t stop when the
doors are opened during the drying phase, call for service.
The cabinet shall not be used if the drying program is active when the doors are open!
13. To get the best drying result, follow the garments washing
& drying advice.
14. Never use the cabinet if any panel is broken or removed.
15. Never use the cabinet if any parts are broken or if the inside
is broken.
16. Never try to manipulate or connect past any safety functions.
17. If the cabinet isn’t assembled after the manufacturer’s instructions, there is a risk that the cabinet can cause personal injuries or injuries on property.
5
©PODAB 2013
Specification
Dimensions
650
A
1995
B
1200
657
1465
350
A = Electrical connection
B= Exhaust
©PODAB 2013
6
Technical information
Loading capacity, kg (lb)
8 (17,6)
Drying capacity, g/min (oz/min)*
38 (1,34)
Hanging length, m (ft)
16 (52,5)
Drying time, min*
Condensate pipe ø, mm
Refrigerant
Amount of refrigerant, gram (oz)
Electrical connection
Total effect, kW
Energy consumption, kWh/kg
(kWh/lb)*
68
12
R407C
1050 (37)
3~N, 400 V, 50 Hz
1,5
0,25 (0,11)
Fuse, A
10
Art No
131031
*Drying of 6 kg (13,2 lb) cotton (dry weight), washed and high-spinned to 43%
residual moisture. Dried to 0% residual moisture.
7
©PODAB 2013
Assembly instructions
Tools
You need the following tools to easily install the drying cabinet:
•
•
•
•
•
Cordless screwdriver
Wrench
Hex key 5 mm
Level
Torx screwdriver bit no. 25
Time for assembly is approximately 1 hour.
1
©PODAB 2013
8
2
3
4x
4
4x
9
©PODAB 2013
5
6
3x
7
3x
©PODAB 2013
10
8
3x
9
3x
10
3x
11
©PODAB 2013
11
2x
12
2x
13
4x
©PODAB 2013
12
14
2x
15
16
3x
13
©PODAB 2013
17
3x
18
19
1x
©PODAB 2013
14
20
1x
21
X11
22
Humidity sensor cable
Relay board -> program board
cable
15
©PODAB 2013
23 Connect cables to program board
HUMIDITY
X11
24
2x
25
©PODAB 2013
16
26
1x
1x
1x
1x
1x
27
1x
17
©PODAB 2013
x 1 / 7-9
29
©PODAB 2013
18
x1 - 11
x1 - 01
x1 - 6
x1 - 5
x1 - 4
x1 - 3
x1 - 2
x1 - 1
28 Connect cables in numerical order
30
Make sure cables are out of
the way
31
2x
19
©PODAB 2013
Installation of the cabinet
Step 1: Put the cabinet in place
Place the cabinet with enough space in front of the cabinet and
on the sides to be able to open the doors.
The feet of the cabinet can be adjusted from the inside with
the help of a Hex key. The feet must stand free on the floor and
have an even weight distribution. Use a leveler and control that
the cabinet is leveled; horizontally and vertically.
NOTE: We recommend that the cabinet is installed on a firm
and leveled floor.
Please observe that there must be at least 50 mm of free space
above the cabinet, in order to perform service.
Narrow spaces
If the cabinet must be transported through narrow spaces, we
recommend that you take off the doors first. It will simplify the
handling and reduces the risk for damages on the doors.
©PODAB 2013
20
Step 2: Fasten the cabinet to the wall
Use the stoppers, screws and washers to secure the cabinet
through the back plates. Fastening holes are pre-drilled in the
back plates.
NOTE: Please control that the cabinet is leveled and cannot
be tilted.
21
©PODAB 2013
Step 3: Connect condensate pipe
The condensate drain pipe can be installed into a standpipe
with siphon, inserted through a hose elbow in a sink or introduced in a floor drain.
The dimensions of the pipe is ø 12/17 x 2500 mm.
IMPORTANT: Make sure that the condensate drain hose is
carefully installed without traction of any kind. If the hose
is installed too tightly and is being pulled, it may develop
kinks or sharp bends, and the cabinet will no longer be able
to lead the water successfully through the hose into the
drain.
©PODAB 2013
22
Step 4: Connect the drying cabinet to the
main switch
To prevent that fire and electric shock appear, the cabinet MUST
be connected according to the color codes on the cables. Only
an authorized electrician is allowed to install the electrical connection. The cabinet is prepared for one of the following electrical connections depending on specification:
IMPORTANT: The drying cabinet must be connected in
the correct phase sequence in order to start. TS 63 VP is
equipped with a phase sequence protection relay. A green
light will be lit on the relay when the sequence is correct.
The drying cabinet is prepared for 400V, 3~N, 50Hz.
WARNING
It is always the buyer that has the responsibility to check that
an authorized electrician makes the electrical connections of
the cabinet.
WARNING
To prevent personal injuries, the cabinet shall always be connected permanently through an all pole main switch. Always
ground the cabinet.
Also check that the connecting cable has a strain relief bushing. If not, there is a risk that the cabinet will be live.
23
©PODAB 2013
User manual
Fill the cabinet
Automatic programs
To get the best drying result: dry the same type of material at
the same time. Never fill the cabinet with more than 8 kg
laundry (dry weight).
The drying cabinet is equipped with the function HTS –
Humidity Tracking System. This function is activated in the automatic program mode. The drying time adjusts to the laundry
in the cabinet
Close the doors
To choose automatic program
The cabinet will not start until the door is completely closed.
TS 63 VP has four automatic programs:
Keypad
1.
2.
3.
4.
Display
Program select*
Increase time
Start/stop
IRON DRY
For laundry to be ironed.
SLIGHTLY DRY
For laundry that will not be ironed or only lightly ironed.
1
CABINET DRY
For laundry that will not be ironed.
2
EXTRA DRY
3
For particularly thick fabrics.
4
Select drying time manually
TIMED DRYING
* Program fast forward during drying.
The cabinet has a timed drying program for the user
who prefers to set the time manually.
Select program
Change program by pushing program select (button 2). The
symbol of the chosen program gets highlighted and the program name is showed on the screen.
Set the time
The default drying time when entering Timed drying program is
0:15h. Increase the drying time with the plus button. The drying
time can be increased to a maximum of 4:00h.
Start program
Push start/stop button (button 4) in order to start the drying
cabinet.
Pause program
To pause a working programme, open the doors. The cabinet
will continue to run for one minute before it stops. Close the
doors and push the start button to continue drying.
Cancel program
To cancel a working program push the start-/stop button.
Clean the lint filter
Check the lint filter after usage. Clean when needed. The filter
can be removed for easier handling.
©PODAB 2013
24
Maintenance
Installation during winter
If the cabinet is installed on a cold winter day (below 0°C) and
has been left outside we recommend that it is left for a couple
of hours in room temperature before start up.
Take good care of the cabinet
Only use a damp cloth with a mild detergent when cleaning the
cabinet.
Never use solvent to clean the display.
Once-a-year cleaning
We recommend that the area around the fan, the heat pump
condenser and the evaporator is cleaned thoroughly once a
year. Be careful so that the lamellas on the heat pump components are not damaged.
IMPORTANT: Always switch off the electricity before starting to work with the cabinet.
Keep your cabinet efficient and economical
•
•
•
•
The ventilation channels shall be as short as possible.
If possible, dry the same type of textiles at the same time.
Clean the lint filter regularly.
Keep the heat pump unit free from dust.
25
©PODAB 2013
Notes
©PODAB 2013
26
27
©PODAB 2013
SERVICE/SUPPORT
Phone +46 31 752 01 00
Fax
+46 31 752 01 50
E-mail [email protected]
www.podab.com
AB PODAB, Ekonomivägen 9, 436 33 Askim, SWEDEN
Tel +46 (0)31-752 01 00, Fax +46 (0) 31-752 01 50 E-post: [email protected], www.podab.se
©PODAB 2013-09-11