1
Xcalibur®
SEQUEST Cluster
®
Installation and Operation Manual
XCALI-97160 Revision B
July 2007
© 2007 Thermo Fisher Scientific Inc. All rights reserved.
BioWorks™ and Finnigan™ are trademarks and Xcalibur® is a registered trademark of Thermo Fisher Scientific.
Microsoft® and Microsoft Windows® are registered trademarks of Microsoft Corporation. SEQUEST®/
SEQUEST® and ICAT® are registered trademarks of the University of Washington. PVM™ is a trademark of
Oak Ridge National Laboratory.
Thermo Fisher Scientific Inc. provides this document to its customers with a product purchase to use in the
product operation. This document is copyright protected and any reproduction of the whole or any part of this
document is strictly prohibited, except with the written authorization of Thermo Fisher Scientific Inc.
The contents of this document are subject to change without notice. All technical information in this
document is for reference purposes only. System configurations and specifications in this document supersede
all previous information received by the purchaser.
Thermo Fisher Scientific Inc. makes no representations that this document is complete, accurate or errorfree and assumes no responsibility and will not be liable for any errors, omissions, damage or loss that might
result from any use of this document, even if the information in the document is followed properly.
This document is not part of any sales contract between Thermo Fisher Scientific Inc. and a purchaser. This
document shall in no way govern or modify any Terms and Conditions of Sale, which Terms and Conditions of
Sale shall govern all conflicting information between the two documents.
Release history:
Software requirements: BioWorks 3.3.1 SP1 and Xcalibur 2.0.6.
For Research Use Only. Not regulated for medical or veterinary diagnostic use by U.S. Federal Drug
Administration or other competent authorities.
WEEE Compliance
This product is required to comply with the European Union’s Waste Electrical & Electronic
Equipment (WEEE) Directive 2002/96/EC. It is marked with the following symbol:
Thermo Fisher Scientific has contracted with one or more recycling or disposal companies in each
European Union (EU) Member State, and these companies should dispose of or recycle this product.
See www.thermo.com/WEEERoHS for further information on Thermo Fisher Scientific’s compliance
with these Directives and the recyclers in your country.
WEEE Konformität
Dieses Produkt muss die EU Waste Electrical & Electronic Equipment (WEEE) Richtlinie 2002/96/EC
erfüllen. Das Produkt ist durch folgendes Symbol gekennzeichnet:
Thermo Fisher Scientific hat Vereinbarungen mit Verwertungs-/Entsorgungsfirmen in allen EUMitgliedsstaaten getroffen, damit dieses Produkt durch diese Firmen wiederverwertet oder entsorgt
werden kann. Mehr Information über die Einhaltung dieser Anweisungen durch Thermo Fisher
Scientific, über die Verwerter, und weitere Hinweise, die nützlich sind, um die Produkte zu
identifizieren, die unter diese RoHS Anweisung fallen, finden sie unter www.thermo.com/
WEEERoHS.
Conformité DEEE
Ce produit doit être conforme à la directive européenne (2002/96/EC) des Déchets d'Equipements
Electriques et Electroniques (DEEE). Il est marqué par le symbole suivant:
Thermo Fisher Scientific s'est associé avec une ou plusieurs compagnies de recyclage dans chaque état
membre de l’union européenne et ce produit devrait être collecté ou recyclé par celles-ci. Davantage
d'informations sur la conformité de Thermo Fisher Scientific à ces directives, les recycleurs dans votre
pays et les informations sur les produits Thermo Electron qui peuvent aider la détection des substances
sujettes à la directive RoHS sont disponibles sur www.thermo.com/WEEERoHS.
C
Contents
Preface . . . . . . . . . . . . . . . . . . . . . . . . . . . . . . . . . . . . . . . . . . . . . . . . . . . . . . . . . . . . . . xi
About This Guide. . . . . . . . . . . . . . . . . . . . . . . . . . . . . . . . . . . . . . . . . . . . . . . .xi
Related Documentation . . . . . . . . . . . . . . . . . . . . . . . . . . . . . . . . . . . . . . . . . . .xi
Safety and Special Notices . . . . . . . . . . . . . . . . . . . . . . . . . . . . . . . . . . . . . . . . .xi
Contacting Us . . . . . . . . . . . . . . . . . . . . . . . . . . . . . . . . . . . . . . . . . . . . . . . . . xii
Assistance . . . . . . . . . . . . . . . . . . . . . . . . . . . . . . . . . . . . . . . . . . . . . . . . . . . xii
Changes to the Manual and Online Help . . . . . . . . . . . . . . . . . . . . . . . . . . . xii
Thermo Scientific
Chapter 1
Introduction to Clusters . . . . . . . . . . . . . . . . . . . . . . . . . . . . . . . . . . . . . . . . . . . . . . . . .1
What are Clusters?. . . . . . . . . . . . . . . . . . . . . . . . . . . . . . . . . . . . . . . . . . . . . . . . 1
How SEQUEST Cluster Works . . . . . . . . . . . . . . . . . . . . . . . . . . . . . . . . . . . . . 2
Chapter 2
Setting Up the SEQUEST Cluster . . . . . . . . . . . . . . . . . . . . . . . . . . . . . . . . . . . . . . . . .5
Required Software . . . . . . . . . . . . . . . . . . . . . . . . . . . . . . . . . . . . . . . . . . . . . . . . 6
Customer Supplied Software . . . . . . . . . . . . . . . . . . . . . . . . . . . . . . . . . . . . . . 6
Thermo Scientific Supplied Software. . . . . . . . . . . . . . . . . . . . . . . . . . . . . . . . 6
Setting Up the Master Node . . . . . . . . . . . . . . . . . . . . . . . . . . . . . . . . . . . . . . . . 6
Installing and Configuring Microsoft Windows 2000 Server . . . . . . . . . . . . . . 7
Installing and Configuring Microsoft Windows 2003 Server . . . . . . . . . . . . . 12
Installing Master Node Software . . . . . . . . . . . . . . . . . . . . . . . . . . . . . . . . . . 16
Setting Up the Slave Nodes: Microsoft Windows 2000 Professional . . . . . . . . . 20
Installing and Configuring Microsoft Windows 2000 Professional . . . . . . . . 20
Installing Slave Node Software . . . . . . . . . . . . . . . . . . . . . . . . . . . . . . . . . . . 25
Updating the Microsoft Windows Registry . . . . . . . . . . . . . . . . . . . . . . . . . . 27
Setting Up the Slave Nodes: Microsoft Windows XP Professional. . . . . . . . . . . 28
Installing and Configuring Microsoft Windows XP Professional . . . . . . . . . . 28
Installing Slave Node Software . . . . . . . . . . . . . . . . . . . . . . . . . . . . . . . . . . . 32
Setting Up the Slave Nodes: Red Hat Linux (Version 8.0) . . . . . . . . . . . . . . . . 35
Installing Red Hat Linux 8.0 . . . . . . . . . . . . . . . . . . . . . . . . . . . . . . . . . . . . . 35
Configuring Red Hat Linux 8.0 . . . . . . . . . . . . . . . . . . . . . . . . . . . . . . . . . . 37
Setting Up the Slave Nodes: Red Hat Linux (Version 9.0) . . . . . . . . . . . . . . . . 40
Installing Red Hat Linux 9.0 . . . . . . . . . . . . . . . . . . . . . . . . . . . . . . . . . . . . . 40
Configuring Red Hat Linux 9.0 . . . . . . . . . . . . . . . . . . . . . . . . . . . . . . . . . . 42
Setting Up the Slave Nodes: Red Hat Enterprise Linux 3.0 . . . . . . . . . . . . . . . . 45
Installing Red Hat Enterprise Linux 3.0 ES. . . . . . . . . . . . . . . . . . . . . . . . . . 45
Configuring Red Hat Enterprise Linux 3.0 ES . . . . . . . . . . . . . . . . . . . . . . . 47
SEQUEST Cluster Installation and Operation
vii
Contents
Setting Up the Slave Nodes: Red Hat Enterprise Linux 4.0 . . . . . . . . . . . . . . . . 49
Installing Red Hat Enterprise Linux 4.0 ES. . . . . . . . . . . . . . . . . . . . . . . . . . 49
Configuring Red Hat Enterprise Linux 4.0 ES . . . . . . . . . . . . . . . . . . . . . . . 51
Setting Up the Slave Nodes: Fedora 3.0 . . . . . . . . . . . . . . . . . . . . . . . . . . . . . . 53
Installing Fedora 3.0 . . . . . . . . . . . . . . . . . . . . . . . . . . . . . . . . . . . . . . . . . . . 54
Configuring Fedora 3.0 . . . . . . . . . . . . . . . . . . . . . . . . . . . . . . . . . . . . . . . . . 56
Setting Up the Slave Nodes: Fedora 4.0 . . . . . . . . . . . . . . . . . . . . . . . . . . . . . . 58
Installing Fedora 4.0 . . . . . . . . . . . . . . . . . . . . . . . . . . . . . . . . . . . . . . . . . . . 58
Configuring Fedora 4.0 . . . . . . . . . . . . . . . . . . . . . . . . . . . . . . . . . . . . . . . . . 60
Setting Up the Slave Nodes: Fedora 5.0 . . . . . . . . . . . . . . . . . . . . . . . . . . . . . . 62
Installing Fedora 5.0 . . . . . . . . . . . . . . . . . . . . . . . . . . . . . . . . . . . . . . . . . . . 62
Configuring Fedora 5.0 . . . . . . . . . . . . . . . . . . . . . . . . . . . . . . . . . . . . . . . . . 64
Setting Up the Slave Nodes: Fedora 6.0 . . . . . . . . . . . . . . . . . . . . . . . . . . . . . . 67
Installing Fedora 6.0 . . . . . . . . . . . . . . . . . . . . . . . . . . . . . . . . . . . . . . . . . . . 67
Configuring Fedora 6.0 . . . . . . . . . . . . . . . . . . . . . . . . . . . . . . . . . . . . . . . . . 69
Updating from SEQUEST Cluster 3.1 or SEQUEST Cluster 3.1 SR1 to
SEQUEST Cluster 3.3.1 . . . . . . . . . . . . . . . . . . . . . . . . . . . . . . . . . . . . . . . . 71
Final Configuration. . . . . . . . . . . . . . . . . . . . . . . . . . . . . . . . . . . . . . . . . . . . . . 72
Configuration Using the Administrator Login. . . . . . . . . . . . . . . . . . . . . . . . 72
Configuration Using the Proteomics Login . . . . . . . . . . . . . . . . . . . . . . . . . . 78
After the Final Configuration . . . . . . . . . . . . . . . . . . . . . . . . . . . . . . . . . . . . . . 80
Files Modified During the Installation. . . . . . . . . . . . . . . . . . . . . . . . . . . . . . . . 80
viii
Chapter 3
Using the SEQUEST Cluster. . . . . . . . . . . . . . . . . . . . . . . . . . . . . . . . . . . . . . . . . . . . .81
SEQUEST Cluster Manager . . . . . . . . . . . . . . . . . . . . . . . . . . . . . . . . . . . . . . . 81
Starting and Stopping the PVM Software . . . . . . . . . . . . . . . . . . . . . . . . . . . 82
Managing Databases . . . . . . . . . . . . . . . . . . . . . . . . . . . . . . . . . . . . . . . . . . . 83
Submitting SRF Files to the Cluster for Processing . . . . . . . . . . . . . . . . . . . . 84
Configuring BioWorks for Use with SEQUEST Cluster . . . . . . . . . . . . . . . . . . 85
Configuring BioWorks on the Cluster Master Node . . . . . . . . . . . . . . . . . . . 86
Configuring BioWorks on a Remote Client Computer . . . . . . . . . . . . . . . . . 88
Running a SEQUEST Search on the Cluster. . . . . . . . . . . . . . . . . . . . . . . . . . . 90
Starting a Search Using the SEQUEST Search Dialog Box . . . . . . . . . . . . . . 90
Starting a Search Using the SEQUEST Batch Search Dialog Box . . . . . . . . . 93
Starting a Search Using the Search Selected Samples Dialog Box. . . . . . . . . . 94
PVM Console . . . . . . . . . . . . . . . . . . . . . . . . . . . . . . . . . . . . . . . . . . . . . . . . . . 96
Chapter 4
Troubleshooting. . . . . . . . . . . . . . . . . . . . . . . . . . . . . . . . . . . . . . . . . . . . . . . . . . . . . .101
Computer Name and Login Account Name Are the Same . . . . . . . . . . . . . . . 102
Account Name and WRSHD Login Are Not the Same. . . . . . . . . . . . . . . . . . 102
AutoLogon Feature of Microsoft Windows 2000 Is Not Set . . . . . . . . . . . . . . 102
Need Additional Linux Subsets . . . . . . . . . . . . . . . . . . . . . . . . . . . . . . . . . . . . 103
Extra Configuration Entries in WRSHD. . . . . . . . . . . . . . . . . . . . . . . . . . . . . 104
WRSHD Cannot Create Service . . . . . . . . . . . . . . . . . . . . . . . . . . . . . . . . . . . 104
WRSHD Will Not Start on Microsoft Windows 2000 / Windows XP . . . . . . 105
SEQUEST Cluster Installation and Operation
Thermo Scientific
Contents
RSH Does Not Work Between Microsoft Windows 2000 Server / Windows 2003
Server and Linux Nodes . . . . . . . . . . . . . . . . . . . . . . . . . . . . . . . . . . . . . . . 105
RSH Is Not Working Correctly. . . . . . . . . . . . . . . . . . . . . . . . . . . . . . . . . . . . 106
PVM Will Not Start . . . . . . . . . . . . . . . . . . . . . . . . . . . . . . . . . . . . . . . . . . . . 108
Extra Files From an Aborted PVM Session . . . . . . . . . . . . . . . . . . . . . . . . . . . 109
Poor Cluster Performance . . . . . . . . . . . . . . . . . . . . . . . . . . . . . . . . . . . . . . . . 110
Cluster Searches Will Not Run Through SEQUEST Queue . . . . . . . . . . . . . . 110
Appendix A Installation Checklists . . . . . . . . . . . . . . . . . . . . . . . . . . . . . . . . . . . . . . . . . . . . . . . .111
Master Computer Checklist: Windows 2000 Server . . . . . . . . . . . . . . . . . . . . 112
Master Computer Checklist: Windows 2003 Server . . . . . . . . . . . . . . . . . . . . 113
Slave Computer: Microsoft Windows 2000 Checklist . . . . . . . . . . . . . . . . . . . 114
Slave Computer: Microsoft Windows XP Checklist. . . . . . . . . . . . . . . . . . . . . 115
Slave Computer: Red Hat Linux / Fedora Checklist . . . . . . . . . . . . . . . . . . . . 116
Thermo Scientific
SEQUEST Cluster Installation and Operation
ix
Contents
x
SEQUEST Cluster Installation and Operation
Thermo Scientific
P
Preface
About This Guide
Welcome to Thermo Fisher Scientific, Xcalibur SEQUEST® Cluster. This SEQUEST Cluster
Installation and Operation manual provides information on how to set up and use your
SEQUEST Cluster with BioWorks 3.3.1 SP1.
Related Documentation
In addition to this guide, Thermo Fisher Scientific provides the following documents for
SEQUEST Cluster:
• BioWorks User Guide
Safety and Special Notices
Make sure you follow the precautionary statements presented in this guide. The safety and
other special notices appear in boxes.
Safety and special notices include the following:
CAUTION Highlights hazards to humans, property, or the environment. Each CAUTION
notice is accompanied by an appropriate CAUTION symbol.
IMPORTANT Highlights information necessary to prevent damage to software, loss of
data, or invalid test results; or may contain information that is critical for optimal
performance of the system.
Note Highlights information of general interest.
Tip Helpful information that can make a task easier.
Thermo Scientific
SEQUEST Cluster Installation and Operation
xi
Preface
Contacting Us
There are several ways to contact Thermo Fisher Scientific.
Assistance
For new product updates, technical support, and ordering information, contact us in one of
the following ways:
Visit Thermo Scientific on the Web
www.thermo.com/finnigan
Contact Technical Support
Phone:
Fax:
E-mail:
Knowledge base:
1-800-685-9535
1-561-688-8736
[email protected]
http://www.thermokb.com
Find software updates and utilities to download at http://sjsupport.thermo.com.
Contact Customer Service
For ordering information in the U.S. and Canada:
Phone:
1-800-532-4752
Fax:
1-561-688-8731
Web site:
www.thermo.com/finnigan
Changes to the Manual and Online Help
To suggest changes to this guide or to the Help, use one of the following:
• Fill out a reader survey online at www.thermo.com/lcms-techpubs.
• Send an e-mail message to the Technical Publications Editor at
[email protected].
xii
SEQUEST Cluster Installation and Operation
Thermo Scientific
1
Introduction to Clusters
The SEQUEST® Cluster is an optional utility that is accessible from BioWorks™, a Thermo
Scientific post-processing software application. SEQUEST Cluster is licensed separately from
the main BioWorks application. This chapter provides a basic introduction to cluster
technology.
Contents
• What are Clusters?
• How SEQUEST Cluster Works
What are Clusters?
Cluster-based supercomputers have been around since the mid 1990s. These systems have
provided a more economical path to extreme computing power for larger groups of users than
was possible with the earlier proprietary supercomputers.
The basic setup of a cluster involves multiple computers that are connected together using
networking technology and specialized software such as Parallel Virtual Machine (PVM™) or
Message Passing Interface (MPI).
The design of the SEQUEST Cluster follows the “Beowulf ” design model. Beowulf was the
outgrowth of the research work of Thomas Sterling and Donald Becker at NASA. The
Beowulf design model is a design for high-performance parallel computing clusters on
inexpensive personal computer hardware.
Clusters have been built by using nearly every computer operating system that is currently
available. Thermo Scientific supports several operating systems with the SEQUEST Cluster
product: Microsoft® Windows® 2000, Microsoft Windows XP, Red Hat Linux, Red Hat
Enterprise Linux, and Fedora.
Thermo Scientific
SEQUEST Cluster Installation and Operation Manual
1
1
Introduction to Clusters
How SEQUEST Cluster Works
How SEQUEST Cluster Works
SEQUEST Cluster software uses PVM software to pass data from one node in the cluster (the
master, or management node) to another node or nodes in the cluster (the slave, or compute
nodes).
The master node of the SEQUEST Cluster contains all of the data files from mass
spectrometers and FASTA databases, plus the DTA and OUT or SRF files that are generated
by SEQUEST. The slave nodes contain only the FASTA databases. All of the search data that
is needed by the slave nodes is passed between the master and slave nodes through software
connections known as sockets. Thus, this data is never stored on the hard disk of a slave
nodes.
When you start SEQUEST search on the master node of the cluster, the program
sequest_master is launched. This program identifies all of the slave nodes that have been
configured and licensed to run with the SEQUEST Cluster and then launches at least one
copy of the sequest_slave program on these nodes.
The actual number of copies of sequest_slave that are launched on each slave node depends
upon how many CPUs are present and on how many CPUs are licensed through Thermo
Scientific. If these systems are dual CPU computers, then two copies of sequest_slave are
launched on each slave node. The master node of the cluster also starts a single copy of the
sequest_slave program, even if it has two CPUs. For example, in a 16-node cluster where each
node contains a dual CPU computer, there would be 33 instances of sequest_slave running.
The sequest_master program reads the SEQUEST search parameters file (sequest.params file),
and then passes the search parameters to the slave nodes. When all of the slave nodes are
ready, the sequest_master program starts reading the DTA files and passes this information to
the slave nodes. Because the master computer waits to be requested for information by the
slave nodes before sending the information, the sequest_master program is said to be acting in
a passive mode.
As each slave node receives the DTA data from the master node, the master node keeps a
record of which node has what data. When a sequest_slave program is finished processing the
data, it sends a message back to the master node that it has finished processing that DTA data,
and then it asks for more data. The sequest_master program updates the internal record for the
previous data to indicate that the data has been processed, and then sends the information
from another DTA file to that slave node. This process is repeated until of the DTA files have
been processed.
At this point, the sequest_master program checks the internal list of processed DTA files to
ensure that all of the files are completely processed. If any of the files are not completely
processed, this indicates a problem with one of the slave nodes. The sequest_master then
resubmits these DTA files to other nodes in the cluster to be processed again.
The design of the sequest_master program helps the overall processing of the DTA files in the
event that any nodes in the cluster became unavailable. If a node becomes unavailable, the
sequest_master program does not receive a message requesting more data from the node, and
2
SEQUEST Cluster Installation and Operation Manual
Thermo Scientific
1
Introduction to Clusters
How SEQUEST Cluster Works
therefore does not try to send any more DTA data to this node. While this occurrence does
result in a longer search time (because there are fewer nodes processing the data), it does not
cause the entire search to fail.
In addition, the sequest_master programs receives the contents of the OUT file from the slave
nodes through PVM and then writes the output to the hard disk of the master node. The slave
nodes do not directly write the output to the hard disk of the master node because writing
files across a network connection can be extremely slow, which would slow down DTA file
processing.
Thermo Scientific recommends that the FASTA databases be stored on each node of the
cluster instead of using a shared directory or folder on the master node of the cluster. If you
use a shared directory or folder for the FASTA databases, you might experience nodes
dropping out of the search. This increases the overall time for the search.
Thermo Scientific
SEQUEST Cluster Installation and Operation Manual
3
2
Setting Up the SEQUEST Cluster
This chapter guides you through the process of setting up the SEQUEST Cluster.
Contents
• Required Software
• Setting Up the Master Node
• Setting Up the Slave Nodes: Microsoft Windows 2000 Professional
• Setting Up the Slave Nodes: Microsoft Windows XP Professional
• Setting Up the Slave Nodes: Red Hat Linux (Version 8.0)
• Setting Up the Slave Nodes: Red Hat Linux (Version 9.0)
• Setting Up the Slave Nodes: Red Hat Enterprise Linux 3.0
• Setting Up the Slave Nodes: Red Hat Enterprise Linux 4.0
• Setting Up the Slave Nodes: Fedora 3.0
• Setting Up the Slave Nodes: Fedora 4.0
• Setting Up the Slave Nodes: Fedora 5.0
• Setting Up the Slave Nodes: Fedora 4.0
• Final Configuration
• After the Final Configuration
• Files Modified During the Installation
IMPORTANT When you load the operating system and configure the master and slave
nodes, consistency is extremely important. Set up each slave node in an identical fashion.
This will make subsequent maintenance of the system much easier.
Thermo Scientific
SEQUEST Cluster Installation and Operation Manual
5
2
Setting Up the SEQUEST Cluster
Required Software
Required Software
To set up the SEQUEST cluster, you need the software listed in this section.
Customer Supplied Software
Some or all of this software may be available from your computer hardware vendor:
• Master node:
Microsoft Windows 2000 Server with Service Pack 4 or Microsoft Windows 2003 Server
with Service Pack 1
• Slave nodes:
Microsoft Windows 2000 Professional with Service Pack 4 or Microsoft Windows XP
Professional with Service Pack 2
or
Red Hat Linux 8.0 or 9.0, or Red Hat Enterprise Server 3.0 or 4.0, or Fedora 3.0 or 4.0
Thermo Scientific Supplied Software
The following software is supplied by Thermo Fisher Scientific:
• Parallel Virtual Machine (PVM™) 3.4.3 for Microsoft Windows 2000/XP
• WRSHD RSH for Microsoft Windows NT/2000/XP
• Xcalibur® Bioworks™ 3.3.1 SP1
• SEQUEST Cluster 3.3.1
Note Xcalibur 1.4 SR1 or 2.0.6 is required to install Bioworks 3.3.1 SP1, but it is not
needed to run the SEQUEST Cluster.
Setting Up the Master Node
The master node must be configured with the Microsoft Windows 2000 Server or Microsoft
Windows 2003 Server operating system.
This section assumes that the master node has not been configured with the Microsoft
Windows 2000 Server or Microsoft Windows 2003 Server operating system. If the master
node has already been configured, then skip the corresponding steps in the procedure below.
This section also assumes that you are familiar with installing Microsoft Windows 2000
Server or Microsoft Windows 2003 Server.
6
SEQUEST Cluster Installation and Operation Manual
Thermo Scientific
2
Setting Up the SEQUEST Cluster
Setting Up the Master Node
This section contains the following topics:
• Installing and Configuring Microsoft Windows 2000 Server
• Installing and Configuring Microsoft Windows 2003 Server
• Installing Master Node Software
Installing and Configuring Microsoft Windows 2000 Server
Y To install and configure the Microsoft Windows 2000 Server operating system
1. Install Microsoft Windows 2000 Server on the master computer.
More information about installing Microsoft Windows 2000 Server can be found in
Chapters 3 and 4 of the Getting Started manual that comes with Microsoft Windows
2000 Server.
2. Install additional drivers for Microsoft Windows 2000 Server to recognize the hard
disk(s) in your system, if required. If any special drivers are required, then consult the
manual that comes with the computer hardware.
3. Define disk partitions for the operating system: Create a small 4 GB partition for the
operating system, and then commit the rest of the space on the hard disk to a separate
partition that will store the FASTA databases, and DTA and OUT or SRF files. You will
set up this unused portion of the drive later.
4. Format the drive using the NTFS file system.
After you install the server software, the computer restarts and opens the Microsoft
Windows 2000 Server Setup program.
5. Use the Microsoft Windows 2000 Server Setup program to set up the server software.
During the setup, you are asked to enter the base operating system license, license mode
and number of licenses that were purchased. Additional information on choosing the
license mode can be found on pages 46-47 and page 76 of the Microsoft Windows 2000
Server Getting Started manual.
Note When you choose a name for the system during configuration, do not use your
user account name, or the PVM software will not work correctly.
Do not configure this server to be a network server (that is, DHCP, DNS, WINS,
Print Server, Application Server, and so on) for the other computers on your network.
If you want to run Proteomics Browser on the master computer, then you need to
install the Internet Information Server (IIS) software. Refer to the BioWorks
Installation Guide for more information on installing IIS and Proteomics Browser.
The Microsoft Windows 2000 Server Setup program restarts the computer after all of the
basic setup has been completed.
Thermo Scientific
SEQUEST Cluster Installation and Operation Manual
7
2
Setting Up the SEQUEST Cluster
Setting Up the Master Node
6. Configure the Microsoft Windows 2000 Server software:
a. Log into the master computer.
b. Configure the network cards.
Configure the primary network card to work with your corporate computer network,
and configure the secondary network card to work with the dedicated network setup
between the master and slave computers.
Note When you are configuring the network, do not disable the Client for
Microsoft Networks option. This option is required to share drives between
individual computers that are running Microsoft Windows 2000.
Use a private address space number for the network containing the slave computers
(that is, a secondary network card). For example, use 192.168.66.250 with the master
computer. Then, use the IP addresses 192.168.66.1 through 192.168.66.xxx with
each second slave computer that is part of the cluster.
c. Because the slave computers will not be a part of a domain, edit the
C:\WINNT\system32\drivers\etc\hosts file and add the name and IP address for each
slave node in your cluster as shown in Figure 1.
7. Install Service Pack 4 for Microsoft Windows 2000 Server. After the installation is
complete, the computer restarts.
8. Log in as administrator.
8
SEQUEST Cluster Installation and Operation Manual
Thermo Scientific
2
Figure 1.
Setting Up the SEQUEST Cluster
Setting Up the Master Node
Master node hosts file
# Copyright (c) 1993-1999 Microsoft Corp.
#
# This is a sample HOSTS file used by Microsoft TCP/IP for Microsoft Windows.
#
# This file contains the mappings of IP addresses to host names. Each
# entry should be kept on an individual line. The IP address should
# be placed in the first column followed by the corresponding host name.
# The IP address and the host name should be separated by at least one
# space.
#
# Additionally, comments (such as these) may be inserted on individual
# lines or following the machine name denoted by a '#' symbol.
#
127.0.0.1 localhost
192.168.66.250master
192.168.66.1node1
192.168.66.2node2
192.168.66.3node3
192.168.66.4node4
192.168.66.5node5
192.168.66.6node6
192.168.66.7node7
192.168.66.8node8
9. Format the unused portion of the hard disk and set the drive letter for this partition to
D:\ as follows:
a. Choose
Start > Settings > Control Panel to open the Control Panel.
b. Double-click Administrative Tools to open the Administrative Tools.
c. Double-click Computer Management to open the Computer Management tool. See
Figure 2.
d. Format the drive using the NTFS file system.
e. In the right pane, right-click on the CD-ROM (D:) entry and choose Change Drive
Letter and Path from the shortcut menu.
f.
Thermo Scientific
Select an open/unused drive letter for the CD-ROM. You can now format the unused
portion of the hard drive as D:\.
SEQUEST Cluster Installation and Operation Manual
9
2
Setting Up the SEQUEST Cluster
Setting Up the Master Node
Figure 2.
Computer Management tool
10. After you format the D:\ drive, create a directory named Database on that drive. You will
use this directory to store the FASTA databases that are needed by SEQUEST.
11. Configure the graphics card.
12. Create a new user named proteomics:
a. Choose
Start > Settings > Control Panel to open the Control Panel.
b. Double-click Administrative Tools to open the Administrative Tools.
c. Double-click Computer Management to open the Computer Management tool. See
Figure 3.
d. In the left pane, double-click Local Users and Groups, and then select Users.
10
SEQUEST Cluster Installation and Operation Manual
Thermo Scientific
2
Figure 3.
Setting Up the SEQUEST Cluster
Setting Up the Master Node
Computer Management tool
e. Choose Action > New User and fill in the information in the dialog box. Enter
“proteomics” as a user name. Click Create.
13. Add the new user proteomics to the Power Users and Administrators groups.
a. Click proteomics tab.
b. Choose Action > Properties to open the Proteomics Properties dialog box.
c. Click Member Of tab and click Add to open the Select Groups dialog box.
d. In the upper pane, click on the Power Users group to select it, and then click Add.
e. Click OK to close the Select Groups dialog box.
f.
Click OK to close the Proteomics Properties dialog box.
g. Close the Computer Management tool.
14. Install the Thermo Fisher Scientific-supplied software for the master node, use the
procedure described in “Installing Master Node Software” on page 16.
Thermo Scientific
SEQUEST Cluster Installation and Operation Manual
11
2
Setting Up the SEQUEST Cluster
Setting Up the Master Node
Installing and Configuring Microsoft Windows 2003 Server
Y To install and configure the Microsoft Windows 2003 Server operating system
1. Install Microsoft Windows 2003 Server on the master computer.
More information about installing Microsoft Windows 2003 Server can be found in
Chapters 3 and 4 of the Getting Started manual that comes with Microsoft Windows
2003 Server.
2. Install additional drivers for Microsoft Windows 2003 Server to recognize the hard
disk(s) in your system, if required. If any special drivers are required, then consult the
manual that comes with the computer hardware.
3. Define disk partitions for the operating system: Create a small 6 GB partition for the
operating system, and then commit the rest of the space on the hard disk to a separate
partition that will store the FASTA databases, and DTA and OUT or SRF files. You will
set up this unused portion of the drive later.
4. Format the drive using the NTFS file system.
After you install the server software, the computer restarts and opens the Microsoft
Windows 2003 Server Setup program.
5. Use the Microsoft Windows 2003 Server Setup program to set up the server software.
During the setup, you are asked to enter the base operating system license, license mode
and number of licenses that were purchased. Additional information on choosing the
license mode can be found on pages 46-47 and page 76 of the Microsoft Windows 2003
Server Getting Started manual.
Note When you choose a name for the system during configuration, do not use your
user account name, or the PVM software will not work correctly.
Do not configure this server to be a network server (that is, DHCP, DNS, WINS,
Print Server, Application Server, and so on) for the other computers on your network.
If you want to run Proteomics Browser on the master computer, then you need to
install the Internet Information Server (IIS) software. Refer to the BioWorks
Installation Guide for more information on installing IIS and Proteomics Browser.
The Microsoft Windows 2003 Server Setup program restarts the computer after all of the
basic setup has been completed.
6. Configure the Microsoft Windows 2003 Server software.
a. Log into the master computer.
b. Configure the network cards.
Configure the primary network card to work with your corporate computer network,
and configure the secondary network card to work with the dedicated network setup
between the master and slave computers.
12
SEQUEST Cluster Installation and Operation Manual
Thermo Scientific
2
Setting Up the SEQUEST Cluster
Setting Up the Master Node
Note When you are configuring the network, do not disable the Client for
Microsoft Networks option. This option is required to share drives between
individual computers that are running Microsoft Windows 2003.
Use a private address space number for the network containing the slave computers
(that is, a secondary network card). For example, use 192.168.66.250 with the master
computer. Then, use the IP addresses 192.168.66.1 through 192.168.66.xxx with
each second slave computer that is part of the cluster.
c. Because the slave computers will not be a part of a domain, edit the
C:\WINNT\system32\drivers\etc\hosts file and add the name and IP address for each
slave node in your cluster as shown in Figure 4.
7. Install Service Pack 1 for Microsoft Windows 2003 Server. After the installation is
complete, the computer restarts.
8. Log in as administrator.
Figure 4.
Master node hosts file
# Copyright (c) 1993-1999 Microsoft Corp.
#
# This is a sample HOSTS file used by Microsoft TCP/IP for Microsoft Windows.
#
# This file contains the mappings of IP addresses to host names. Each
# entry should be kept on an individual line. The IP address should
# be placed in the first column followed by the corresponding host name.
# The IP address and the host name should be separated by at least one
# space.
#
# Additionally, comments (such as these) may be inserted on individual
# lines or following the machine name denoted by a '#' symbol.
#
127.0.0.1 localhost
192.168.66.250master
192.168.66.1node1
192.168.66.2node2
192.168.66.3node3
192.168.66.4node4
192.168.66.5node5
192.168.66.6node6
192.168.66.7node7
192.168.66.8node8
9. Format the unused portion of the hard disk and set the drive letter for this partition to
D:\.
a. Choose
Thermo Scientific
Start > Settings > Control Panel to open the Control Panel.
SEQUEST Cluster Installation and Operation Manual
13
2
Setting Up the SEQUEST Cluster
Setting Up the Master Node
b. Double-click Administrative Tools to open the Administrative Tools.
c. Double-click Computer Management to open the Computer Management tool. See
Figure 5.
d. Format the drive using the NTFS file system.
e. In the right pane, right-click on the CD-ROM (D:) entry and choose Change Drive
Letter and Path from the shortcut menu.
f.
Select an open/unused drive letter for the CD-ROM. You can now format the unused
portion of the hard drive as D:\.
10. After you format the D:\ drive, create a directory named Database on that drive. Use this
directory to store the FASTA databases that are needed by SEQUEST.
11. Configure the graphics card.
Figure 5.
Computer Management tool
12. Create a user named proteomics.
a. Choose
Start > Settings > Control Panel to open the Control Panel.
b. Double-click Administrative Tools to open the Administrative Tools.
c. Double-click Computer Management to open the Computer Management tool. See
Figure 6.
d. In the left pane, double-click Local Users and Groups, and then select Users.
14
SEQUEST Cluster Installation and Operation Manual
Thermo Scientific
2
Figure 6.
Setting Up the SEQUEST Cluster
Setting Up the Master Node
Computer Management tool
e. Choose Action > New User and fill in the information in the dialog box. Enter
“proteomics” as a user name. Click Create.
13. Add the new user proteomics to the Power Users and Administrators groups.
a. Right-click on proteomics and choose Properties from the shortcut menu to open
the Proteomics Properties dialog box.
b. Click Member Of tab and click Add to open the Select Groups dialog box.
c. In the upper pane, click on the Power Users group to select it, and click Add.
d. Click OK to close the Select Groups dialog box.
e. Click OK to close the Proteomics Properties dialog box.
f.
Close the Computer Management tool.
14. Install the Thermo Fisher Scientific-supplied software for the master node, use the
procedure described in “Installing Master Node Software” on page 16.
Thermo Scientific
SEQUEST Cluster Installation and Operation Manual
15
2
Setting Up the SEQUEST Cluster
Setting Up the Master Node
Installing Master Node Software
Install the following necessary software onto the master node as described in the procedures in
this topic:
• Installing Xcalibur, BioWorks, and the FASTA Databases
• Installing PVM
• Installing RSH
• Installing SEQUEST Cluster Software
Installing Xcalibur, BioWorks, and the FASTA Databases
Y To install Xcalibur, BioWorks and the FASTA databases on the master node
1. Insert the Xcalibur 1.4 SR1 or 2.0.6 CD into the computer and install Xcalibur onto the
C: drive. Remove the Xcalibur CD.
2. Insert the BioWorks 3.3.1 SP1 CD into the computer and install Bioworks 3.3.1 SP1
onto the C: drive.
When you are prompted for the location of the FASTA database and SEQUEST results,
if you created a D: drive on the system, then select a directory in that drive. For example:
D:\Database(Fasta Database Location)
D:\Sequest(SEQUEST Results)
3. Install the FASTA databases.
4. Remove the BioWorks 3.3.1 SP1 CD.
Note For more detailed instructions for installing BioWorks and the FASTA
databases, refer to the BioWorks Installation Guide.
Installing PVM
Y To install PVM on the master node
1. Insert the SEQUEST Cluster CD into the computer. This CD contains the SEQUEST
Cluster, PVM, and RSH software.
2. In Microsoft Windows Explorer ( Start > Programs > Accessories >
Windows Explorer) open the PVM folder on the CD.
3. Double-click Setup.exe to open the Parallel Virtual Machine Setup dialog box. See
Figure 7.
4. On the Choose Destination Location page, choose C:\Cluster and click Next. The
installer creates the C:\Cluster folder and the correct sub-folders.
5. On the Start Copying Files page, click Next to begin the installation.
16
SEQUEST Cluster Installation and Operation Manual
Thermo Scientific
2
Figure 7.
Setting Up the SEQUEST Cluster
Setting Up the Master Node
PVM Setup dialog box
6. In Microsoft Windows Explorer, locate C:/Cluster/temp folder.
7. Select the folder and then, right-click to access the shortcut menu. Click Properties from
the shortcut menu.
8. Click Security tab.
9. Set the Users Group to Full Control, select the Allow checkbox.
10. Click OK to accept the changes.
Installing RSH
Y To install RSH on the master node
1. In Microsoft Windows Explorer, open the RSH folder on the SEQUEST Cluster CD.
2. Double-click setup.exe to open the RSH Installer. See Figure 8.
3. On the Choose Destination Location page, select the C:\Cluster folder.
4. Click Next to begin the installation.
5. When the installation is complete, the Setup Complete page is displayed. You do not
need to select either of the check boxes on this page. Click Finish.
Thermo Scientific
SEQUEST Cluster Installation and Operation Manual
17
2
Setting Up the SEQUEST Cluster
Setting Up the Master Node
Figure 8.
Windows RSHD Setup dialog box
6. Open an MS-DOS Console window (
Command Prompt).
Start > Programs > Accessories >
7. Change to the directory c:\cluster\wrshd and type the command:
rshd.exe –install
This command installs the rshd daemon as a service.
8. Type the command:
configure –add proteomics proteomics 192.168.66.*
You are prompted for the password for the proteomics account.
9. Enter the password twice. See Figure 9.
10. Close the MS-DOS console window.
18
SEQUEST Cluster Installation and Operation Manual
Thermo Scientific
2
Figure 9.
Setting Up the SEQUEST Cluster
Setting Up the Master Node
Output from configure –add command
Installing SEQUEST Cluster Software
Y To install SEQUEST Cluster software on the master node
1. In Microsoft Windows Explorer, open the Cluster folder on the SEQUEST Cluster CD.
2. Double-click setup.exe to open the SEQUEST Cluster Installer.
3. Accept all of the default settings.
4. Remove the SEQUEST Cluster CD.
The configuration of the master node is now complete.
5. Restart your computer.
You can now configure the slave nodes as described in the next sections:
• To configure the slave nodes with Microsoft Windows 2000 Professional, go to “Setting
Up the Slave Nodes: Microsoft Windows 2000 Professional” on page 20.
• To configure the slave nodes with Microsoft Windows XP Professional, go to “Setting Up
the Slave Nodes: Microsoft Windows XP Professional” on page 28.
• To configure the slave nodes with Red Hat Linux 8.0, go to “Setting Up the Slave Nodes:
Red Hat Linux (Version 8.0)” on page 35.
• To configure the slave nodes with Red Hat Linux 9.0, go to “Setting Up the Slave Nodes:
Red Hat Linux (Version 9.0)” on page 40.
• To configure the slave nodes with Red Hat Enterprise Linux 3.0 ES, go to “Setting Up
the Slave Nodes: Red Hat Enterprise Linux 3.0” on page 45.
Thermo Scientific
SEQUEST Cluster Installation and Operation Manual
19
2
Setting Up the SEQUEST Cluster
Setting Up the Slave Nodes: Microsoft Windows 2000 Professional
• To configure the slave nodes with Red Hat Enterprise Linux 4.0 ES, go to “Setting Up
the Slave Nodes: Red Hat Enterprise Linux 4.0” on page 49.
• To configure the slave nodes with Fedora 3.0, go to “Setting Up the Slave Nodes: Fedora
3.0” on page 53.
• To configure the slave nodes with Fedora 4.0, go to “Setting Up the Slave Nodes: Fedora
4.0” on page 58.
• To configure the slave nodes with Fedora 5.0, go to “Setting Up the Slave Nodes: Fedora
5.0” on page 62.
• To configure the slave nodes with Fedora 6.0, go to “Setting Up the Slave Nodes: Fedora
6.0” on page 67.
Setting Up the Slave Nodes: Microsoft Windows 2000 Professional
This procedure assumes that the slave nodes have not been configured with the Microsoft
Windows 2000 Professional operating system. If the slave nodes have already been configured,
then you can skip the corresponding steps in the procedure below.
This section contains the following topics:
• Installing and Configuring Microsoft Windows 2000 Professional
• Installing Slave Node Software
• Updating the Microsoft Windows Registry
Note The following procedures must be repeated for each slave node in the cluster.
Configure each slave node identically to the other nodes.
Installing and Configuring Microsoft Windows 2000 Professional
Y To install and configure the Microsoft Windows 2000 Professional operating system
1. Install Microsoft Windows 2000 Professional on each slave computer.
More information about installing Microsoft Windows 2000 Professional can be found in
Chapters 3 and 4 of the Getting Started manual that comes with Microsoft Windows
2000.
2. Install additional drivers for Microsoft Windows 2000 to recognize the hard disk(s) in
your system, if required. If any special drivers are required, then consult the manual that
comes with the computer hardware.
20
SEQUEST Cluster Installation and Operation Manual
Thermo Scientific
2 Setting Up the SEQUEST Cluster
Setting Up the Slave Nodes: Microsoft Windows 2000 Professional
3. Define the disk partitions for the operating system. Create a small 4GB partition for the
operating system and then commit the rest of the space on the hard disk to a separate
partition that will store the fasta databases, dta and out files. You will set up this unused
portion of the drive later.
4. Format the drive using the NTFS file system.
After you install the server software, the computer restarts and opens the Microsoft
Windows 2000 Professional Setup program.
5. Use the Microsoft Windows 2000 Professional Setup program to set up the software.
During the setup, you are asked to enter the base operating system license. Enter the
license that was provided with the Microsoft Windows 2000 software.
6. When you are asked for a name for this computer, name the first slave node in your
cluster node1, then use name node2 for the second node in the cluster, and so on for the
remaining nodes.
When you are finished with the setup, the Microsoft Windows 2000 Professional Setup
program restarts the computer. You can now configure the Microsoft Windows 2000
software.
7. When the Microsoft Windows 2000 Professional software restarts, the Network
Identification Wizard dialog box appears. The dialog box prompts:
“Who can log on to this computer”.
Select the option titled Microsoft Windows always assumes the following user has
logged onto this computer and enter the user account “Administrator” and the password
for the administrator account. These steps activate the AutoLogon feature. Later, you will
change the account used with the AutoLogon feature.
8. Configure the network card. The slave computers are connected to the secondary
network card in the master computer through the Ethernet hub, and therefore they
should have IP address in the same group as the secondary network card in the master
computer.
Use a private address space number for the network containing the slave computers. For
example: use 192.168.66.1 for the first slave computer, 192.168.66.2 for the second slave
computer, and so on until all of the slave computers have been set up.
Note When you are configuring the network, do not disable the Client for Microsoft
Networks option. This option is required in order to share drives between individual
computers running Microsoft Windows 2000.
9. Because the slave computers are not be a part of a domain, edit the
C:\WINNT\system32\drivers\etc\hosts file and add the name and IP address for the
master computer and each slave node in your cluster (see Figure 10).
Thermo Scientific
SEQUEST Cluster Installation and Operation Manual
21
2
Setting Up the SEQUEST Cluster
Setting Up the Slave Nodes: Microsoft Windows 2000 Professional
Figure 10. Slave node hosts file
# Copyright (c) 1993-1999 Microsoft Corp.
#
# This is a sample HOSTS file used by Microsoft TCP/IP for
# Microsoft Windows.
#
#
#
#
#
This file contains the mappings of IP addresses to host names. Each
entry should be kept on an individual line. The IP address should
be placed in the first column followed by the corresponding host
name.
# The IP address and the host name should be separated by at least
# one space.
#
# Additionally, comments (such as these) may be inserted on
# individual lines or following the machine name denoted by
# a '#' symbol.
#
127.0.0.1
192.168.66.250
192.168.66.1
192.168.66.2
192.168.66.3
192.168.66.4
192.168.66.5
localhost
master
node1
node2
node3
node4
node5
10. Install Service Pack 4 for Microsoft Windows 2000 onto the slave computer. When the
installation of Service Pack 4 is finished, the computer will restart.
11. Log in as administrator.
12. Configure the graphics card.
13. Create a user named proteomics:
a. Choose
Start > Settings > Control Panel to open the Control Panel.
b. Double-click Administrative Tools to open administrative tools.
c. Double-click Computer Management to open the Computer Management tool. See
Figure 11.
d. In the left pane, double-click Local Users and Groups, and then select Users.
22
SEQUEST Cluster Installation and Operation Manual
Thermo Scientific
2 Setting Up the SEQUEST Cluster
Setting Up the Slave Nodes: Microsoft Windows 2000 Professional
Figure 11. Computer Management tool
e. Choose Action > New User and fill in the information in the dialog box. Enter
“proteomics” as a user name. Ensure that you select the Password Never Expires
check box. Click Create.
14. Add the new user proteomics to the Power Users group.
a. Click proteomics.
b. Choose Action > Properties to open the Proteomics Properties dialog box.
c. Click Member Of tab and click Add to open the Select Groups dialog box.
d. In the upper pane, click on the Power Users group to select it, and then click Add.
e. Click OK to close the Select Groups dialog box.
f.
Click OK to close the Proteomics Properties dialog box.
g. Close the Computer Management tool.
15. Format the unused portion of the hard disk and set the drive letter for this partition to
D:\ as follows:
a. Choose
Start > Settings > Control Panel to open the Control Panel.
b. Double-click Administrative Tools to open administrative tools.
c. Double-click Computer Management to open the Computer Management tool. See
Figure 12.
Thermo Scientific
SEQUEST Cluster Installation and Operation Manual
23
2
Setting Up the SEQUEST Cluster
Setting Up the Slave Nodes: Microsoft Windows 2000 Professional
Figure 12. Computer Management tool
d. Format the drive using the NTFS file system.
e. In the right pane, right-click on the CD-ROM (D:) entry and choose Change Drive
Letter and Path from the shortcut menu.
f.
Select an open/unused drive letter for the CD-ROM. You can now format the unused
portion of the hard drive as D:\.
16. After you format the D:\ drive, create a directory named Database on that drive. You will
use this directory to store the FASTA databases that are needed by SEQUEST.
17. Create a directory on the C:\ drive named Cluster. This will be used when loading the
PVM software. Share the C:\Cluster directory as Cluster.
18. The Database and Cluster directories must be shared for the Cluster Manager program to
work correctly. When you share these directories, ensure that the proteomics account has
permission to access these share points.
24
SEQUEST Cluster Installation and Operation Manual
Thermo Scientific
2 Setting Up the SEQUEST Cluster
Setting Up the Slave Nodes: Microsoft Windows 2000 Professional
Installing Slave Node Software
Install the following necessary software onto the slave node as described in the procedures in
this topic:
• Installing PVM
• Installing RSH
Note The Xcalibur, Bioworks Browser, SEQUEST Cluster, and IIS web server software
programs do not need to be installed on the slave nodes.
Installing PVM
Y To install PVM on each of the slave nodes
1. Insert the SEQUEST Cluster CD into the computer. This CD contains the SEQUEST
Cluster, PVM, and RSH software.
2. In Microsoft Windows Explorer ( Start > Programs > Accessories >
Windows Explorer) open the PVM folder on the CD.
3. Double-click Setup.exe to open the Parallel Virtual Machine Setup dialog box. See
Figure 13.
4. On the Choose Destination Location page, choose C:\Cluster and click Next. The
installer creates the C:\Cluster folder and the correct sub-folders.
5. On the Start Copying Files page, click Next to begin the installation.
Figure 13. PVM Setup dialog box
Thermo Scientific
SEQUEST Cluster Installation and Operation Manual
25
2
Setting Up the SEQUEST Cluster
Setting Up the Slave Nodes: Microsoft Windows 2000 Professional
Installing RSH
Y To install RSH on each of the slave nodes
1. In Microsoft Windows Explorer, select the RSH folder on the SEQUEST Cluster CD.
2. Double-click setup.exe to open the RSH Installer. See Figure 14.
3. On the Choose Destination Location page, select the C:\Cluster folder.
4. Click Next to begin the installation.
5. When the installation is complete, the Setup Complete page is displayed. Do not select
either of the check boxes on this page. Click Finish.
Figure 14. Windows RSHD Setup Dialog Box.
6. Open an MS-DOS Console window (
Command Prompt).
Start > Programs > Accessories >
7. Change to the directory C:\Cluster\wrshd and type the command:
rshd.exe –install
This command installs the rshd daemon as a service.
8. Type the command:
configure –add proteomics proteomics 192.168.66.*
You are prompted for the password for the proteomics account.
9. Enter the password twice. See Figure 15.
26
SEQUEST Cluster Installation and Operation Manual
Thermo Scientific
2 Setting Up the SEQUEST Cluster
Setting Up the Slave Nodes: Microsoft Windows 2000 Professional
10. Close the MS-DOS console window.
Figure 15. Output from configure –add command
Updating the Microsoft Windows Registry
The user name that is used with the AutoLogin feature of Microsoft Windows needs to be
updated to the user proteomics.
Y To update the AutoLogin user name
1. Choose
Start > Run to open the Run dialog box.
2. Type “regedit” and then click OK to open the Registry Editor.
3. Browse to the folder:
HKEY_LOCAL_MACHINE\SOFTWARE\Microsoft\Windows NT\CurrentVersion\Winlogon
4. Choose Edit > New String Value to add a new string value.
5. Name the new string value DefaultUserName.
6. Click DefaultUserName to select it and choose Edit > Modify.
7. Type the user name that you want to use to automatically log on. For example:
proteomics.
8. Add a new string value and name it DefaultPassword.
9. Modify DefaultPassword: set it to the password for the user entered in step 7. For
example, the password for proteomics.
10. Add a new string value and name it AutoAdminLogon.
Thermo Scientific
SEQUEST Cluster Installation and Operation Manual
27
2
Setting Up the SEQUEST Cluster
Setting Up the Slave Nodes: Microsoft Windows XP Professional
11. Modify AutoAdminLogon: set it to 1 to enable auto logon.
12. Close the Registry Editor.
The configuration of the slave node is now complete.
13. Restart the computer.
When all of the slave nodes have been configured, go to “Final Configuration” on page 72.
Setting Up the Slave Nodes: Microsoft Windows XP Professional
This procedure assumes that the slave nodes have not been configured with the Microsoft
Windows XP Professional operating system. If the slave nodes have already been configured
then you can skip the corresponding steps in the procedure below.
This procedure assumes that you are familiar with installing Microsoft Windows XP
Professional.
This section contains the following topics:
• Installing and Configuring Microsoft Windows XP Professional
• Installing Slave Node Software
Note The following procedures must be repeated for each slave node in the cluster.
Configure each slave node identically to the other nodes.
Installing and Configuring Microsoft Windows XP Professional
Y To install and configure the Microsoft Windows XP Professional operating system
1. Install Microsoft Windows XP Professional on each slave computer.
More information about installing Microsoft Windows XP Professional can be found in
Chapters 3 and 4 of the Getting Started manual that comes with Microsoft Windows XP.
2. Install additional drivers for Microsoft Windows XP to recognize the hard disk(s) in your
system, if required. If any special drivers are required, then consult the manual that comes
with the computer hardware.
3. Define the disk partitions for the operating system. Create a small 6GB partition for the
operating system and then commit the rest of the space on the hard disk to a separate
partition that will store the FASTA databases, and DTA and OUT or SRF files. You will
set up this unused portion of the drive later.
4. Format the drive using the NTFS file system.
After you install the server software, the computer restarts and opens the Microsoft
Windows XP Professional Setup program.
28
SEQUEST Cluster Installation and Operation Manual
Thermo Scientific
2 Setting Up the SEQUEST Cluster
Setting Up the Slave Nodes: Microsoft Windows XP Professional
5. Use the Microsoft Windows XP Professional Setup program to set up the software.
During the setup, you are asked to enter the base operating system license. Enter the
license that was provided with the Microsoft Windows XP software.
6. When you are asked for a name for this computer, name the first slave node in your
cluster node1, then use name node2 for the second node in the cluster, and so on for the
remaining nodes.
When you are finished the setup, the Microsoft Windows XP Professional Setup program
restarts the computer. You can now proceed configuring the Microsoft Windows XP
software.
7. When the Microsoft Windows XP Professional software restarts, the Network
Identification Wizard dialog box appers. The Network Identification Wizard dialog box
prompts:
“Who can log on to this computer”.
Select the option titled Microsoft Windows always assumes the following user has
logged onto this computer and enter the user account Administrator and the password
for the administrator account. These steps activate the AutoLogon feature. Later the
account used with the AutoLogon feature will be changed.
8. Configure the network card. The slave computers are connected to the secondary
network card in the master computer through the Ethernet hub, and therefore they
should have IP address in the same group as the secondary network card in the master
computer.
Use a private address space number for the network containing the slave computers. For
example: use 192.168.66.1 for the first slave computer, 192.168.66.2 for the second slave
computer, and so on until all of the slave computers have been set up.
Note When you are configuring the network, do not disable the Client for Microsoft
Networks option. This option is required in order to share drives between individual
computers running Microsoft Windows XP.
9. Because the slave computers are not part of a domain, edit the
C:\WINNT\system32\drivers\etc\hosts file and add the name and IP address for the
master computer and each slave node in your cluster (see Figure 16).
Thermo Scientific
SEQUEST Cluster Installation and Operation Manual
29
2
Setting Up the SEQUEST Cluster
Setting Up the Slave Nodes: Microsoft Windows XP Professional
Figure 16. Slave node hosts file
# Copyright (c) 1993-1999 Microsoft Corp.
#
# This is a sample HOSTS file used by Microsoft TCP/IP for
# Microsoft Windows.
#
#
#
#
#
This file contains the mappings of IP addresses to host names. Each
entry should be kept on an individual line. The IP address should
be placed in the first column followed by the corresponding host
name.
# The IP address and the host name should be separated by at least one
# space.
#
# Additionally, comments (such as these) may be inserted on
# individual lines or following the machine name denoted by
# a '#' symbol.
#
127.0.0.1
localhost
192.168.66.250
192.168.66.1
192.168.66.2
192.168.66.3
192.168.66.4
192.168.66.5
master
node1
node2
node3
node4
node5
10. Install Service Pack 2 for Microsoft Windows XP onto the slave computer. When the
installation of Service Pack 2 is finished, the computer will restart.
11. Log in as administrator.
12. Configure the graphics card.
13. Create a user named proteomics:
a. Choose
Start > Settings > Control Panel to open the Control Panel.
b. Double-click Administrative Tools to open administrative tools.
c. Double-click Computer Management to open the Computer Management tool. See
Figure 17.
d. In the left pane, double-click Local Users and Groups, and then select Users.
30
SEQUEST Cluster Installation and Operation Manual
Thermo Scientific
2 Setting Up the SEQUEST Cluster
Setting Up the Slave Nodes: Microsoft Windows XP Professional
Figure 17. Computer Management tool
e. Choose Action > New User and fill in the information in the dialog box. Enter
“proteomics” as a user name. Ensure that you select the Password Never Expires
check box. Click Create.
14. Add this proteomics user to the Power Users group:
a. Click proteomics.
b. Choose Actions > Properties to open the Proteomics Properties dialog box.
c. Click Member Of tab and click Add to open the Select Groups dialog box.
d. In the upper pane, click the Power Users group to select it, and then click Add.
e. Click OK to close the Select Groups dialog box.
f.
Click OK to close the Proteomics Properties dialog box.
g. Close the Computer Management tool.
15. Format the unused portion of the hard disk and set the drive letter for this partition to
D:\ as follows:
a. Choose
Start > Settings > Control Panel to open the Control Panel.
b. Double-click Administrative Tools to open administrative tools.
c. Double-click Computer Management to open the Computer Management tool. See
Figure 18.
Thermo Scientific
SEQUEST Cluster Installation and Operation Manual
31
2
Setting Up the SEQUEST Cluster
Setting Up the Slave Nodes: Microsoft Windows XP Professional
Figure 18. Computer Management tool
d. Format the drive using the NTFS file system.
e. In the right pane, right-click on the CD-ROM (D:) entry and choose Change Drive
Letter and Path from the shortcut menu.
f.
Select an open/unused drive letter for the CD-ROM. You can now format the
unused portion of the hard drive as D:\.
16. After you format the D:\ drive, create a directory named Database on that drive. You will
use this directory to store the FASTA databases that are needed by SEQUEST.
17. Create a directory on the C:\ drive named Cluster. This will be used when loading the
PVM software. Share the C:\Cluster directory as Cluster.
18. The Database and Cluster directories must be shared for the Cluster Manager program to
work correctly. When you share these directories, ensure that the proteomics account has
permission to access these share points.
Installing Slave Node Software
Install the following necessary software onto the slave node as described in the procedures in
this topic:
• Installing PVM
• Installing RSH
Note The Xcalibur, Bioworks Browser, SEQUEST Cluster, and IIS web server software
programs do not need to be installed on the slave nodes.
32
SEQUEST Cluster Installation and Operation Manual
Thermo Scientific
2 Setting Up the SEQUEST Cluster
Setting Up the Slave Nodes: Microsoft Windows XP Professional
Installing PVM
Y To install PVM on each of the slave nodes
1. Insert the SEQUEST Cluster CD into the computer. This CD contains the SEQUEST
Cluster, PVM, and RSH software.
2. In Microsoft Windows Explorer ( Start > Programs > Accessories >
Windows Explorer) open the PVM folder on the CD.
3. Double-click Setup.exe to open the Parallel Virtual Machine Setup dialog box. See
Figure 19.
4. On the Choose Destination Location page, choose C:\Cluster and click Next. The
installer creates the C:\Cluster folder and the correct sub-folders.
5. On the Start Copying Files page, click Next to begin the installation.
Figure 19. PVM Setup dialog box
Installing RSH
Y To install RSH on each of the slave nodes
1. In Microsoft Windows Explorer, select the RSH folder on the SEQUEST Cluster CD.
2. Double-click setup.exe to open the RSH Installer. See Figure 20.
3. On the Choose Destination Location page, select the C:\Cluster folder.
4. Click Next to begin the installation.
Thermo Scientific
SEQUEST Cluster Installation and Operation Manual
33
2
Setting Up the SEQUEST Cluster
Setting Up the Slave Nodes: Microsoft Windows XP Professional
5. When the installation is complete, the Setup Complete page is displayed. Do not select
either of the check boxes on this page. Click Finish.
Figure 20. Windows RSHD Setup Dialog Box.
6. Open an MS-DOS Console window (
Command Prompt).
Start > Programs > Accessories >
7. Change to the directory C:\Cluster\wrshd and type the command:
rshd.exe –install
This command installs the rshd daemon as a service.
8. Type the command:
configure –add proteomics proteomics 192.168.66.*
You are prompted for the password for the proteomics account.
9. Enter the password twice. See Figure 21.
10. Close the MS-DOS console window.
34
SEQUEST Cluster Installation and Operation Manual
Thermo Scientific
2 Setting Up the SEQUEST Cluster
Setting Up the Slave Nodes: Red Hat Linux (Version 8.0)
Figure 21. Output from configure –add command
Setting Up the Slave Nodes: Red Hat Linux (Version 8.0)
This procedure assumes that you are familiar with installing Red Hat Linux 8.0. Additional
information regarding Red Hat Linux can be found in Red Hat Linux 8 UNLEASHED by Bill
Ball (ISBN #067232458X).
This section contains the following topics:
• Installing Red Hat Linux 8.0
• Configuring Red Hat Linux 8.0
Note Repeat the following procedures for each slave node in the cluster. Configure each
slave node identically to the other nodes.
Installing Red Hat Linux 8.0
This procedure assumes that the Red Hat Linux operating system has not already been
installed on the slave nodes. If Red Hat Linux has already been installed then skip to
“Configuring Red Hat Linux 8.0” on page 37.
Y To install Red Hat Linux
1. Insert the Red Hat Linux 8.0 Installation 1 of 3 CD into your computer and then restart
your computer.
2. When you are prompted for an installation mode, select the graphical mode by pressing
ENTER or by waiting for a few seconds.
Thermo Scientific
SEQUEST Cluster Installation and Operation Manual
35
2
Setting Up the SEQUEST Cluster
Setting Up the Slave Nodes: Red Hat Linux (Version 8.0)
3. In the Welcome to Red Hat Linux 8.0 page, click Next.
4. In the Language Selection page, select the language you want to use and click Next.
5. In the Keyboard Configuration page, select what type of keyboard is connected to the
computer and click Next.
6. In the Mouse Configuration page, select what type of mouse is connected to the
computer and click Next.
7. In the Installation Type page, select Custom from the list and click Next.
8. In the Disk Partitioning Setup page, unless you are familiar with installing Red Hat
Linux, select the Automatically partition option and click Next.
9. In the Automatic Partitioning page, select the Remove All Partitions On This System
option and click Next.
10. In the Partitioning page, click Next.
11. In the Boot Loader Configuration page, select the GRUB boot loader and click Next.
12. In the Network Configuration page, set up the network configuration parameters:
a. Click Edit in the Network Devices box.
b. Deselect the Configure using DHCP option and enter the IP address and netmask
for this computer.
The slave computers will be connected to the secondary network card in the master
computer through the Ethernet hub. They should have IP addresses in the same
group as the secondary network card in the master computer.
Use a private address space (AS) number for the network containing the slave
computers. For example: use 192.168.66.1 for the first slave computer, 192.168.66.2
for the second slave computer, and so on until all of the slave computers have been
set up. The Netmask is automatically entered.
c. Click OK to save the changes.
d. Select the Manually Set the Hostname option and enter the hostname.
Name the first slave node in your cluster node1, then use name node2 for the second
node in the cluster, and so on for the remaining nodes.
e. Enter a gateway address for this network and then click Next to save these changes.
f.
A warning box appears, but because the slave computers do not need DNS, click
Continue in the warning box.
13. In the Firewall Configuration page, select the No Firewall option and then click Next.
14. In the Additional Language Support page, click Next.
15. In the Time Zone Selection page, select the correct time zone for your location and click
Next.
36
SEQUEST Cluster Installation and Operation Manual
Thermo Scientific
2 Setting Up the SEQUEST Cluster
Setting Up the Slave Nodes: Red Hat Linux (Version 8.0)
16. In the Account Configuration page, enter the root password for the system and click
Next.
The Account Configuration page allows a user account to be created but it limits the
length of the account to 8 characters. Therefore, the name proteomics cannot be used.
Because of this limitation, do not create an account at this point.
17. In the Authentication Configuration page, click Next.
The installation program takes a few moments to build the list of packages that make up
Red Hat Linux.
18. In the Package Group Selection page, deselect the options:
• X Window, GNOME Desktop Environment
• Graphical Internet, Text Based Internet
Office/Productivity, Sound and Video
• Graphics
• Printing Support
19. Enable the FTP Server option.
20. Enable the Scientific and Engineering option. Then display the sub-packages dialog
box. Enable the PVM option, and de-select all of the other options.
21. Enable the Networking Servers option, and then display the sub-packages dialog box.
Enable the RSH Server option.
22. Click Next to install the RedHat Linux software.
23. Skip the Boot Diskette Creation and go to the Congratulations screen. Follow the
instructions to complete the installation.
Configuring Red Hat Linux 8.0
Y To configure Red Hat Linux
1. Log into your computer as root.
2. Run the service configuration program:
/usr/sbin/ntsysv
3. Scroll down the list and make sure the rexec, rsh, and vsftpd options are active. You can
toggle an option by pressing SPACE on the keyboard.
4. Disable the sendmail option.
5. Press TAB to select the OK option and press ENTER.
Thermo Scientific
SEQUEST Cluster Installation and Operation Manual
37
2
Setting Up the SEQUEST Cluster
Setting Up the Slave Nodes: Red Hat Linux (Version 8.0)
6. While the previous operation enabled the FTP software, it will not allow inbound FTP
until the /etc/xinetd.d/vsftpd file is modified. Open the existing file with this command:
vi /etc/xinetd.d/vsftpd
7. Change yes to no in the line that begins with disable (see Figure 22).
Figure 22. vsftpd configuration file for Red Hat Linux 8.0
# default: off
# description: The vsftpd FTP server serves FTP connections. It \
# uses normal, unencrypted usernames and passwords for \
# authentication.
service ftp
{
disable
socket_type
wait
user
server
nice
=
=
=
=
=
=
no
stream
no
root
/usr/sbin/vsftpd
10
}
8. Save the file.
9. Create the proteomics user account with this command:
adduser proteomics
10. Set the password for this account with this command:
passwd proteomics
11. Create a directory for the FASTA databases and change the permissions on that directory:
mkdir /usr/database
chmod 777 /usr/database
12. Change the permissions of the /usr/share/pvm3/bin/LINUX directory with this command:
chmod 777 /usr/share/pvm3/bin/LINUX
13. Create a configuration file (sequest.ini) for the SEQUEST executable program:
vi /usr/share/pvm3/sequest.ini
14. Add the following line to the configuration file and then save the file:
DatabasePath: /usr/database
15. Create the hosts.equiv file:
vi /etc/hosts.equiv
16. Add the following lines to the file and then save the file:
Master_computer_name proteomics
38
SEQUEST Cluster Installation and Operation Manual
Thermo Scientific
2 Setting Up the SEQUEST Cluster
Setting Up the Slave Nodes: Red Hat Linux (Version 8.0)
Where Master_computer_name is replaced with the name you used for the master
computer.
17. Create the .rhosts file:
vi ~proteomics/.rhosts
18. Add the following line to the file and then save the file:
+ proteomics
19. Update the permissions for the .rhosts file:
chmod 600 /.rhosts
20. Because the slave computers will not be set up in a domain, modify the existing /etc/hosts
file (see Figure 23) to include the host names of each slave node:
vi /etc/hosts
Figure 23. /etc/hosts file
# Do not remove the following line, or various programs
# that require network functionality will fail.
127.0.0.1
localhost.localdomain localhost
192.168.66.250
192.168.66.1
192.168.66.2
192.168.66.3
192.168.66.4
192.168.66.5
master
node1
node2
node3
node4
node5
21. Add the PVM environment variables to the existing .bashrc file that is in the proteomics
account with this command (see Figure 24 for edits):
vi ~proteomics/.bashrc
Figure 24. .bashrc file for Red Hat Linux 8.0
# .bashrc
# User specific aliases and functions
# Source global definitions
if [ -f /etc/bashrc ]; then
. /etc/bashrc
fi
PVM_ARCH=LINUX
PVM_ROOT=/usr/share/pvm3
PVM_RSH=/usr/bin/rsh
PVM_TMP=/tmp
PVM_VERSION=3.4.4
export PVM_ARCH PVM_ROOT PVM_RSH PVM_TMP PVM_VERSION
22. Save the changes to the file. The slave node is now configured.
Thermo Scientific
SEQUEST Cluster Installation and Operation Manual
39
2
Setting Up the SEQUEST Cluster
Setting Up the Slave Nodes: Red Hat Linux (Version 9.0)
23. Restart the computer with this command:
shutdown –r now
24. Repeat steps 1 through 23 for each of the remaining nodes.
When all of the slave nodes have been configured, go to “Final Configuration” on page 72.
Setting Up the Slave Nodes: Red Hat Linux (Version 9.0)
This procedure assumes that you are familiar with installing Red Hat Linux 9.0. Additional
information regarding Red Hat Linux can be found in Red Hat Linux 9 UNLEASHED by Bill
Ball (ISBN #0672325888).
This section contains the following topics:
• Installing Red Hat Linux 9.0
• Configuring Red Hat Linux 9.0
Note Repeat the following procedures for each slave node in the cluster. Configure each
slave node identically to the other nodes.
Installing Red Hat Linux 9.0
This procedure assumes that the Red Hat Linux operating system has not already been
installed on the slave nodes. If Red Hat Linux has already been installed then skip to
“Configuring Red Hat Linux 9.0” on page 42.
Y To install Red Hat Linux
1. Insert the Red Hat Linux 9.0 Installation 1 of 3 CD into your computer and then restart
your computer.
2. When you are prompted for an installation mode, select the graphical mode by pressing
ENTER or by waiting for a few seconds.
3. If you are prompted to test the CD-ROM, select Skip.
4. In the Welcome to Red Hat Linux 9.0 page, click Next.
5. In the Language Selection page, select the language you want to use and click Next.
6. In the Keyboard Configuration page, select what type of keyboard is connected to the
computer and click Next.
7. In the Mouse Configuration page, select what type of mouse is connected to the
computer and click Next.
8. In the Installation Type page, select Custom from the list and click Next.
40
SEQUEST Cluster Installation and Operation Manual
Thermo Scientific
2 Setting Up the SEQUEST Cluster
Setting Up the Slave Nodes: Red Hat Linux (Version 9.0)
9. In the Disk Partitioning Setup page, unless you are familiar with installing Red Hat
Linux, select the Automatically partition option and click Next.
10. In the Automatic Partitioning page, select the Remove All Partitions On This System
option and click Next.
11. In the Partitioning page, click Next.
12. In the Boot Loader Configuration page, select the GRUB boot loader and click Next.
13. In the Network Configuration page, set up the network configuration parameters:
a. Click Edit in the Network Devices box.
b. Deselect the Configure using DHCP option and enter the IP address and netmask
for this computer.
The slave computers will be connected to the secondary network card in the master
computer through the Ethernet hub. They should have IP addresses in the same
group as the secondary network card in the master computer.
Use a private address space (AS) number for the network containing the slave
computers. For example: use 192.168.66.1 for the first slave computer, 192.168.66.2
for the second slave computer, and so on until all of the slave computers have been
set up. The Netmask will automatically be entered.
c. Click OK to save the changes.
d. Select the Manually Set the Hostname option and enter the hostname.
Name the first slave node in your cluster node1, then use name node2 for the second
node in the cluster, and so on for the remaining nodes.
e. Enter a gateway address for this network and then click Next to save these changes.
f.
A warning box appears, but because the slave computers do not need DNS, click
Continue in the warning box.
14. In the Firewall Configuration page, select the No Firewall option and then click Next.
15. In the Additional Language Support page, click Next.
16. In the Time Zone Selection page, select the correct time zone for your location and click
Next.
17. In the Account Configuration page, enter the root password for the system and click
Next.
The Account Configuration page allows a user account to be created but it limits the
length of the account to 8 characters. Therefore, the name proteomics cannot be used.
Because of this limitation, do not create an account at this point.
18. In the Authentication Configuration page, click Next.
The installation program will take a few moments to build the list of packages that make
up Red Hat Linux.
Thermo Scientific
SEQUEST Cluster Installation and Operation Manual
41
2
Setting Up the SEQUEST Cluster
Setting Up the Slave Nodes: Red Hat Linux (Version 9.0)
19. In the Package Group Selection page, deselect the options:
• X Window, GNOME Desktop Environment
• Graphical Internet, Text Based Internet
Office/Productivity, Sound and Video
• Graphics
• Printing Support
20. Enable the FTP Server option.
21. Enable the Scientific and Engineering option. Then display the sub-packages dialog
box. Enable the PVM option and deselect all of the other options
22. Enable the Networking Servers option and then display the sub-packages dialog. Enable
the RSH Server option.
23. Click Next to install the Red Hat Linux software.
24. Skip the Boot Diskette Creation and go to the Congratulations screen. Follow the
instructions to complete the installation.
Configuring Red Hat Linux 9.0
Y To configure Red Hat Linux
1. Log into your computer as root.
2. Run the service configuration program:
/usr/sbin/ntsysv
3. Scroll down the list and make sure the rexec, rsh, and vsftpd options are active. You can
toggle an option by pressing SPACE on the keyboard.
4. Disable the sendmail option.
5. Press TAB to select the OK option and press ENTER.
6. While the previous operation enabled the FTP software, it will not allow inbound FTP
until the necessary file is modified. Open the /etc/vsftpd/vsftpd.conf file, type:
vi /etc/vsftpd/vsftpd.conf
7. In the vsftpd.conf file, change yes to no in the line that begins with anonymous enable (see
Figure 25).
42
SEQUEST Cluster Installation and Operation Manual
Thermo Scientific
2 Setting Up the SEQUEST Cluster
Setting Up the Slave Nodes: Red Hat Linux (Version 9.0)
Figure 25. vsftpd configuration file for Red Hat Linux 9.0
# default: off
# description: The vsftpd FTP server serves FTP connections. It \
# uses normal, unencrypted usernames and passwords for \
# authentication.
service ftp
{
anonymous enable
socket_type
wait
user
server
nice
=
=
=
=
=
=
no
stream
no
root
/usr/sbin/vsftpd
10
}
8. Save the file.
9. Create the proteomics user account with this command:
adduser proteomics
10. Set the password for this account with this command:
passwd proteomics
11. Create a directory for the FASTA databases and change the permissions on that directory:
mkdir /usr/database
chmod 777 /usr/database
12. Change the permissions of the /usr/share/pvm3/bin/LINUXI386 directory with this
command:
chmod 777 /usr/share/pvm3/bin/LINUXI386
13. Create a configuration file (sequest.ini) for the SEQUEST executable program:
vi /usr/share/pvm3/sequest.ini
14. Add the following line to the configuration file and then save the file:
DatabasePath: /usr/database
15. Create the hosts.equiv file:
vi /etc/hosts.equiv
16. Add the following line to the file and then save the file:
Master_computer_name proteomics
Where Master_computer_name is replaced with the name you used for the master
computer.
17. Create the .rhosts file:
vi ~proteomics/.rhosts
Thermo Scientific
SEQUEST Cluster Installation and Operation Manual
43
2
Setting Up the SEQUEST Cluster
Setting Up the Slave Nodes: Red Hat Linux (Version 9.0)
18. Add the following line to the file and then save the file:
+ proteomics
19. Update the permissions for the .rhosts file:
chmod 600 ~proteomics/.rhosts
20. Because the slave computers will not be set up in a domain, modify the existing /etc/hosts
file (see Figure 26) to include the host names of each slave node:
vi /etc/hosts
Figure 26. /etc/hosts file
# Do not remove the following line, or various programs
# that require network functionality will fail.
127.0.0.1
localhost.localdomain localhost
192.168.66.250
192.168.66.1
192.168.66.2
192.168.66.3
192.168.66.4
192.168.66.5
master
node1
node2
node3
node4
node5
21. Add the PVM environment variables to the existing .bashrc file that is in the proteomics
account with this command (see Figure 27 for edits):
vi ~proteomics/.bashrc
Figure 27. .bashrc file for Red Hat Linux 9.0
# .bashrc
# User specific aliases and functions
# Source global definitions
if [ -f /etc/bashrc ]; then
. /etc/bashrc
fi
PVM_ARCH=LINUXI386
PVM_ROOT=/usr/share/pvm3
PVM_RSH=/usr/bin/rsh
PVM_TMP=/tmp
PVM_VERSION=3.4.4
export PVM_ARCH PVM_ROOT PVM_RSH PVM_TMP PVM_VERSION
22. Save the changes to the file. The slave node is now configured.
23. Restart the computer with this command:
shutdown –r now
24. Repeat steps 1 through 23 for each of the remaining nodes.
44
SEQUEST Cluster Installation and Operation Manual
Thermo Scientific
2 Setting Up the SEQUEST Cluster
Setting Up the Slave Nodes: Red Hat Enterprise Linux 3.0
When all of the slave nodes have been configured, go to “Final Configuration” on page 72.
Setting Up the Slave Nodes: Red Hat Enterprise Linux 3.0
This procedure assumes that you are familiar with installing Red Hat Enterprise Linux 3.0
ES. This section contains the following topics:
• Installing Red Hat Enterprise Linux 3.0 ES
• Configuring Red Hat Enterprise Linux 3.0 ES
Note Repeat the following procedures for each slave node in the cluster. Configure each
slave node identically to the other nodes.
Installing Red Hat Enterprise Linux 3.0 ES
This procedure assumes that the Red Hat Enterprise Linux operating system has not already
been installed on the slave nodes. If Red Hat Enterprise Linux has already been installed then
skip to “Configuring Red Hat Enterprise Linux 3.0 ES” on page 47.
Y To install Red Hat Enterprise Linux
1. Insert the Red Hat Enterprise Linux Installation 1 of 4 CD into your computer and then
restart your computer.
2. When you are prompted for an installation mode, select the graphical mode by pressing
ENTER or by waiting for a few seconds.
3. If you are prompted to test the CD-ROM, select Skip.
4. In the Welcome to Red Hat Enterprise Linux page, click Next.
5. In the Language Selection page, select the language you want to use and click Next.
6. In the Keyboard Configuration page, select what type of keyboard is connected to the
computer and click Next.
7. In the Mouse Configuration page, select what type of mouse is connected to the
computer and click Next.
8. In the Disk Partitioning Setup page, unless you are familiar with installing Red Hat
Enterprise Linux, select the Automatically partition option and click Next.
9. In the Automatic Partitioning page, select the Remove All Partitions On This System
option and click Next.
10. In the Partitioning page, click Next.
11. In the Boot Loader Configuration page, select the GRUB boot loader and click Next.
12. In the Network Configuration page, set up the network configuration parameters:
Thermo Scientific
SEQUEST Cluster Installation and Operation Manual
45
2
Setting Up the SEQUEST Cluster
Setting Up the Slave Nodes: Red Hat Enterprise Linux 3.0
a. Click Edit in the Network Devices box.
b. Deselect the Configure using DHCP option and enter the IP address and netmask
for this computer.
The slave computers will be connected to the secondary network card in the master
computer through the Ethernet hub. They should have IP addresses in the same
group as the secondary network card in the master computer.
Use a private address space (AS) number for the network containing the slave
computers. For example: use 192.168.66.1 for the first slave computer, 192.168.66.2
for the second slave computer, and so on until all of the slave computers have been
set up.
Enter the netmask if it is not entered automatically.
c. Click OK to save the changes.
d. Select the Manually Set the Hostname option and enter the hostname.
Name the first slave node in your cluster node1, then use name node2 for the second
node in the cluster, and so on for the remaining nodes.
e. Enter a gateway address for this network and then click Next to save these changes.
f.
A warning box appears, but because the slave computers do not need DNS, click
Continue in the warning box.
13. In the Firewall Configuration page, select the No Firewall option and then click Next.
14. In the Additional Language Support page, click Next.
15. In the Time Zone Selection page, select the correct time zone for your location and click
Next.
16. In the Set Root Password page, enter the root password for the system and click Next.
17. In the Package Defaults page, select Customize the set of packages to be installed and
click Next.
18. Make the following selections and deselections:
a. In the Package Group Selection page, deselect the following options if they are
selected:
• Desktops - X Window, GNOME Desktop Environment
• Applications - Editors, Graphical Internet, Text Based Internet,
Office/Productivity, Graphics, Games and Entertainment
• Servers - Server Configuration Tools, Web Server, Windows File Server
• Development - Development Tools
• System - Printing Support, Administration Tools
b. Select the following options in the Servers section:
46
SEQUEST Cluster Installation and Operation Manual
Thermo Scientific
2 Setting Up the SEQUEST Cluster
Setting Up the Slave Nodes: Red Hat Enterprise Linux 3.0
• Applications - Scientific and Engineering Programs
• Servers - FTP Server, Legacy Network Server.
c. After selecting the Legacy Network Server option, click Details and select
rsh-server.
d. After selecting the Scientific and Engineering Programs option, click Details and
select PVM. Deselect all other options.
e. Click Next.
19. Click Next to install the Red Hat Linux software.
20. In the Congratulations screen, follow the instructions to finish the installation.
Configuring Red Hat Enterprise Linux 3.0 ES
Y To configure Red Hat Enterprise Linux
1. Log into your computer as root.
2. Run the service configuration program:
/usr/sbin/ntsysv
3. Scroll down the list and make sure the rexec, rsh, and vsftpd options are active. You can
toggle an option by pressing SPACE on the keyboard.
4. Disable the sendmail option.
5. Press TAB to select the OK option and press ENTER.
6. Create the proteomics user account use this command:
adduser proteomics
7. Set the password for this account use this command:
passwd proteomics
8. Create a directory for the fasta databases and change the permissions on that directory:
mkdir /usr/database
chmod 777 /usr/database
9. Change the permissions of the /usr/share/pvm3/bin/LINUXI386 directory with this
command:
chmod 777 /usr/share/pvm3/bin/LINUXI386
10. Create a configuration file (sequest.ini) for the SEQUEST executable program:
vi /usr/share/pvm3/sequest.ini
11. Add the following line to the configuration file and then save the file:
DatabasePath: /usr/database
Thermo Scientific
SEQUEST Cluster Installation and Operation Manual
47
2
Setting Up the SEQUEST Cluster
Setting Up the Slave Nodes: Red Hat Enterprise Linux 3.0
12. Create the hosts.equiv file:
vi /etc/hosts.equiv
13. Add the following line to the file and then save the file:
Master_computer_name proteomics
Where Master_computer_name is replaced with the name you used for the master
computer.
14. Create the .rhosts file:
vi ~proteomics/.rhosts
15. Add the following line to the file and then save the file:
+ proteomics
16. Update the permissions for the .rhosts file:
chmod 600 ~proteomics/.rhosts
17. Because the slave computers will not be set up in a domain, modify the existing /etc/hosts
file (see Figure 28) to include the host names of each slave node:
vi /etc/hosts
Figure 28. /etc/hosts file
# Do not remove the following line, or various programs
# that require network functionality will fail.
127.0.0.1
localhost.localdomain localhost
192.168.66.250
192.168.66.1
192.168.66.2
192.168.66.3
192.168.66.4
192.168.66.5
master
node1
node2
node3
node4
node5
18. Add the PVM environment variables to the existing .bashrc file that is in the proteomics
account with this command (see Figure 29 for edits):
vi ~proteomics/.bashrc
48
SEQUEST Cluster Installation and Operation Manual
Thermo Scientific
2 Setting Up the SEQUEST Cluster
Setting Up the Slave Nodes: Red Hat Enterprise Linux 4.0
Figure 29. .bashrc file for Red Hat Enterprise Linux 3.0 ES
# .bashrc
# User specific aliases and functions
# Source global definitions
if [ -f /etc/bashrc ]; then
. /etc/bashrc
fi
PVM_ARCH=LINUXI386
PVM_ROOT=/usr/share/pvm3
PVM_RSH=/usr/bin/rsh
PVM_TMP=/tmp
PVM_VERSION=3.4.4
export PVM_ARCH PVM_ROOT PVM_RSH PVM_TMP PVM_VERSION
19. Save the changes to the file. The slave node is now configured.
20. Restart the computer with this command:
shutdown –r now
21. Repeat steps 1 through 20 for each of the remaining nodes.
When all of the slave nodes have been configured, go to “Final Configuration” on page 72.
Setting Up the Slave Nodes: Red Hat Enterprise Linux 4.0
This procedure assumes that you are familiar with installing Red Hat Enterprise Linux 4.0
ES. This section contains the following topics:
• Installing Red Hat Enterprise Linux 4.0 ES
• Configuring Red Hat Enterprise Linux 4.0 ES
Note Repeat the following procedures for each slave node in the cluster. Configure each
slave node identically to the other nodes.
Installing Red Hat Enterprise Linux 4.0 ES
This procedure assumes that the Red Hat Enterprise Linux 4.0 ES operating system has not
already been installed on the slave nodes. If Red Hat Enterprise Linux 4.0 ES has already been
installed then skip to “Configuring Red Hat Enterprise Linux 4.0 ES” on page 51.
Y To install Red Hat Enterprise Linux
1. Insert the Red Hat Enterprise Linux Installation 1 of 4 CD into your computer and then
restart your computer.
Thermo Scientific
SEQUEST Cluster Installation and Operation Manual
49
2
Setting Up the SEQUEST Cluster
Setting Up the Slave Nodes: Red Hat Enterprise Linux 4.0
2. When you are prompted for an installation mode, select the graphical mode by pressing
ENTER or by waiting for a few seconds.
3. If you are prompted to test the CD-ROM, select Skip.
4. In the Welcome to Red Hat Enterprise Linux page, click Next.
5. In the Language Selection page, select the language you want to use and click Next.
6. In the Keyboard Configuration page, select what type of keyboard is connected to the
computer and click Next.
7. In the Disk Partitioning Setup page, unless you are familiar with installing Red Hat
Enterprise Linux, select the Automatically partition option and click Next.
8. In the Automatic Partitioning page, select the Remove All Partitions On This System
option and click Next.
9. In the Partitioning page, click Next.
10. In the Boot Loader Configuration page, select the GRUB boot loader and click Next.
11. In the Network Configuration page, set up the network configuration parameters:
a. Click Edit in the Network Devices box.
b. Disable the Configure using DHCP option and enter the IP address and netmask
for this computer.
The slave computers will be connected to the secondary network card in the master
computer through the Ethernet hub. They should have IP addresses in the same
group as the secondary network card in the master computer.
Use a private address space (AS) number for the network containing the slave
computers. For example: use 192.168.66.1 for the first slave computer, 192.168.66.2
for the second slave computer, and so on until all of the slave computers have been
set up.
Enter the netmask if it is not entered automatically.
c. Click OK to save the changes.
d. Select the Manually Set the Hostname option and enter the hostname.
Name the first slave node in your cluster node1, then use name node2 for the second
node in the cluster, and so on for the remaining nodes.
e. Enter a gateway address for this network and then click Next to save these changes.
f.
A warning box appears, but because the slave computers do not need DNS, click
Continue in the warning box.
12. In the Firewall Configuration page, select the No Firewall option and change the Enable
SELinux option to Disabled. Click Next.
13. In the Additional Language Support page, click Next.
50
SEQUEST Cluster Installation and Operation Manual
Thermo Scientific
2 Setting Up the SEQUEST Cluster
Setting Up the Slave Nodes: Red Hat Enterprise Linux 4.0
14. In the Time Zone Selection page, select the correct time zone for your location and click
Next.
15. In the Set Root Password page, enter the root password for the system and click Next.
16. In the Package Defaults page, select Customize the set of packages to be installed and
click Next.
17. Make the following selections and deselections:
a. In the Package Group Selection page, deselect the following options if they are
selected:
• Desktops - X Window, GNOME Desktop Environment
• Applications - Editors, Graphical Internet, Text Based Internet,
Office/Productivity, Graphics, Games and Entertainment, Sound and Video
• Servers - Server Configuration Tools, Web Server, Windows File Server
• Development - Development Tools
• System - Printing Support, Administration Tools
b. Select the following options in the Servers section:
• Applications - Scientific and Engineering Programs
• Servers - FTP Server, Legacy Network Server.
c. After selecting the Legacy Network Server option, click Details and select
rsh-server.
d. After selecting the Scientific and Engineering Programs option, click Details and
select PVM. Deselect all other options.
e. Click Next.
18. Click Next to install the Red Hat Linux software. An installation progress dialog box
appears. The dialog box prompts which CDs are required during the software loading
process.
19. In the Congratulations screen, follow the instructions to finish the installation.
Configuring Red Hat Enterprise Linux 4.0 ES
Y To configure Red Hat Enterprise Linux
1. Log into your computer as root.
2. Run the service configuration program:
/usr/sbin/ntsysv
Thermo Scientific
SEQUEST Cluster Installation and Operation Manual
51
2
Setting Up the SEQUEST Cluster
Setting Up the Slave Nodes: Red Hat Enterprise Linux 4.0
3. Scroll down the list and make sure the rexec, rsh, and vsftpd options are active. You can
toggle an option by pressing SPACE on the keyboard.
4. Disable the sendmail option.
5. Press TAB to select the OK option and press ENTER.
6. Create the proteomics user account with this command:
adduser proteomics
7. Set the password for this account with this command:
passwd proteomics
8. Create a directory for the FASTA databases and change the permissions on that directory:
mkdir /usr/database
chmod 777 /usr/database
9. Change the permissions of the /usr/share/pvm3/bin/LINUXI386 directory with this
command:
chmod 777 /usr/share/pvm3/bin/LINUXI386
10. Create a configuration file (sequest.ini) for the SEQUEST executable program:
vi /usr/share/pvm3/sequest.ini
11. Add the following line to the configuration file and then save the file:
DatabasePath: /usr/database
12. Create the hosts.equiv file:
vi /etc/hosts.equiv
13. Add the following line to the file and then save the file:
Master_computer_name proteomics
Where Master_computer_name is replaced with the name you used for the master
computer.
14. Create the .rhosts file:
vi ~proteomics/.rhosts
15. Add the following line to the file and then save the file:
+ proteomics
16. Update the permissions for the .rhosts file:
chmod 600 ~proteomics/.rhosts
17. Because the slave computers will not be set up in a domain, modify the existing /etc/hosts
file (see Figure 30) to include the host names of each slave node:
vi /etc/hosts
52
SEQUEST Cluster Installation and Operation Manual
Thermo Scientific
2 Setting Up the SEQUEST Cluster
Setting Up the Slave Nodes: Red Hat Enterprise Linux 4.0
Figure 30. /etc/hosts file
# Do not remove the following line, or various programs
# that require network functionality will fail.
127.0.0.1
localhost.localdomain localhost
192.168.66.250
192.168.66.1
192.168.66.2
192.168.66.3
192.168.66.4
192.168.66.5
master
node1
node2
node3
node4
node5
18. Add the PVM environment variables to the existing .bashrc file that is in the proteomics
account with this command (see Figure 30 for edits):
vi ~proteomics/.bashrc
Figure 31. .bashrc file for Red Hat Enterprise Linux 4.0 ES
# .bashrc
# User specific aliases and functions
# Source global definitions
if [ -f /etc/bashrc ]; then
. /etc/bashrc
fi
PVM_ARCH=LINUXI386
PVM_ROOT=/usr/share/pvm3
PVM_RSH=/usr/bin/rsh
PVM_TMP=/tmp
PVM_VERSION=3.4.4
export PVM_ARCH PVM_ROOT PVM_RSH PVM_TMP PVM_VERSION
19. Save the changes to the file. The slave node is now configured.
20. Restart the computer with this command:
shutdown –r now
21. Repeat steps 1 through 20 for each of the remaining nodes. When all of the slave nodes
have been configured, go to “Final Configuration” on page 72.
Thermo Scientific
SEQUEST Cluster Installation and Operation Manual
53
2
Setting Up the SEQUEST Cluster
Setting Up the Slave Nodes: Fedora 3.0
Setting Up the Slave Nodes: Fedora 3.0
This procedure assumes that you are familiar with installing Fedora 3.0. This section contains
the following topics:
• Installing Fedora 3.0
• Configuring Fedora 3.0
Note Repeat the following procedures for each slave node in the cluster. Configure each
slave node identically to the other nodes.
Installing Fedora 3.0
This procedure assumes that the Fedora Linux operating system has not already been installed
on the slave nodes. If Fedora Linux has already been installed then go to “Configuring Fedora
3.0” on page 56.
Y To install Fedora 3.0
1. Insert the Fedora Linux Installation 1 of 4 CD into your computer and then restart your
computer.
2. When you are prompted for an installation mode, select the graphical mode by pressing
ENTER or by waiting for a few seconds.
3. If you are prompted to test the CD-ROM, select Skip.
4. In the Welcome to Fedora Linux page, click Next.
5. In the Language Selection page, select the language you want to use and click Next.
6. In the Keyboard Configuration page, select what type of keyboard is connected to the
computer and click Next.
7. In the Installation Type page, select Custom and click Next.
8. In the Disk Partitioning Setup page, unless you are familiar with installing Fedora, select
the Automatically partition option and click Next.
9. In the Automatic Partitioning page, select the Remove All Partitions On This System
option and click Next.
10. In the Partitioning page, click Next.
11. In the Boot Loader Configuration page, select the GRUB boot loader and click Next.
12. In the Network Configuration page, set up the network configuration parameters:
a. Click Edit in the Network Devices box.
b. Deselect the Configure using DHCP option and enter the IP address and netmask
for this computer.
54
SEQUEST Cluster Installation and Operation Manual
Thermo Scientific
2 Setting Up the SEQUEST Cluster
Setting Up the Slave Nodes: Fedora 3.0
The slave computers will be connected to the secondary network card in the master
computer through the Ethernet hub. They should have IP addresses in the same
group as the secondary network card in the master computer.
Use a private address space (AS) number for the network containing the slave
computers. For example: use 192.168.66.1 for the first slave computer, 192.168.66.2
for the second slave computer, and so on until all of the slave computers have been
set up.
Enter the netmask if it is not entered automatically.
c. Click OK to save the changes.
d. Select the Manually Set the Hostname option and enter the hostname.
Name the first slave node in your cluster node1, then use name node2 for the second
node in the cluster, and so on for the remaining nodes.
e. Enter a gateway address for this network and then click Next to save these changes.
f.
A warning box appears, but because the slave computers do not need DNS, click
Continue in the warning box.
13. In the Firewall Configuration page, select the No Firewall option and change the Enable
SELinux option to Disabled. Click Next.
14. In the Additional Language Support page, click Next.
15. In the Time Zone Selection page, select the correct time zone for your location and click
Next.
16. In the Set Root Password page, enter the root password for the system and click Next.
17. Make the following selections and deselections:
a. In the Package Group Selection page, deselect the following options if they are
selected:
• Desktops - X Window, GNOME Desktop Environment
• Applications - Editors, Graphical Internet, Text Based Internet,
Office/Productivity, Graphics, Games and Entertainment, Sound and Video
• Servers - Server Configuration Tools, Web Server, Windows File Server
• Development - Development Tools
• System - Printing support, Language Support
b. Select the following options in the Servers section:
• Applications - Science and Engineering Programs
• Servers - FTP Server, Legacy Network Server.
c. After selecting the Legacy Network Server option, click Details and select
rsh-server.
Thermo Scientific
SEQUEST Cluster Installation and Operation Manual
55
2
Setting Up the SEQUEST Cluster
Setting Up the Slave Nodes: Fedora 3.0
d. After selecting the Scientific and Engineering Programs option, click Details and
select PVM. Deselect all other options.
e. Click Next.
18. Click Next to install the Red Hat Linux software. An installation progress dialog box
appears. The dialog box will prompt which CDs are required during the software loading
process.
19. In the Congratulations screen, follow the instructions to finish the installation.
Configuring Fedora 3.0
Y To configure Fedora 3.0
1. Log into your computer as root.
2. Run the service configuration program:
/usr/sbin/ntsysv
3. Scroll down the list and make sure the rexec, rsh, and vsftpd options are active. You can
toggle an option by pressing SPACE on the keyboard.
4. Disable the sendmail option.
5. Press TAB to select the OK option and press ENTER.
6. Create the proteomics user account with this command:
adduser proteomics
7. Set the password for this account with this command:
passwd proteomics
8. Create a directory for the fasta databases and change the permissions on that directory:
mkdir /usr/database
chmod 777 /usr/database
9. Change the permissions of the /usr/share/pvm3/bin/LINUXI386 directory with this
command:
chmod 777 /usr/share/pvm3/bin/LINUXI386
10. Create a configuration file (sequest.ini) for the SEQUEST executable program:
vi /usr/share/pvm3/sequest.ini
11. Add the following line to the configuration file and then save the file:
DatabasePath: /usr/database
12. Create the hosts.equiv file:
vi /etc/hosts.equiv
56
SEQUEST Cluster Installation and Operation Manual
Thermo Scientific
2 Setting Up the SEQUEST Cluster
Setting Up the Slave Nodes: Fedora 3.0
13. Add the following line to the file and then save the file:
Master_computer_name proteomics
Where Master_computer_name is replaced with the name you used for the master
computer.
14. Create the .rhosts file:
vi ~proteomics/.rhosts
15. Add the following line to the file and then save the file:
+ proteomics
16. Update the permissions for the .rhosts file:
chmod 600 ~proteomics/.rhosts
17. Because the slave computers will not be set up in a domain, modify the existing /etc/hosts
file (see Figure 32) to include the host names of each slave node:
vi /etc/hosts
Figure 32. /etc/hosts file
# Do not remove the following line, or various programs
# that require network functionality will fail.
127.0.0.1
localhost.localdomain localhost
192.168.66.250
192.168.66.1
192.168.66.2
192.168.66.3
192.168.66.4
192.168.66.5
master
node1
node2
node3
node4
node5
18. Add the PVM environment variables to the existing .bashrc file that is in the proteomics
account with this command (see Figure 33 for edits):
vi ~proteomics/.bashrc
Figure 33. .bashrc file for Fedora 3.0
# .bashrc
# User specific aliases and functions
# Source global definitions
if [ -f /etc/bashrc ]; then
. /etc/bashrc
fi
PVM_ARCH=LINUXI386
PVM_ROOT=/usr/share/pvm3
PVM_RSH=/usr/bin/rsh
PVM_TMP=/tmp
PVM_VERSION=3.4.4
export PVM_ARCH PVM_ROOT PVM_RSH PVM_TMP PVM_VERSION
Thermo Scientific
SEQUEST Cluster Installation and Operation Manual
57
2
Setting Up the SEQUEST Cluster
Setting Up the Slave Nodes: Fedora 4.0
19. Save the changes to the file.
The slave node is now configured.
20. Restart the computer with this command:
shutdown –r now
21. Repeat steps 1 through 20 for each of the remaining nodes.
When all of the slave nodes have been configured, go to “Final Configuration” on page 72.
Setting Up the Slave Nodes: Fedora 4.0
This procedure assumes that you are familiar with installing Fedora 4.0. This section contains
the following topics:
• Installing Fedora 4.0
• Configuring Fedora 4.0
Note Repeat the following procedures for each slave node in the cluster. Configure each
slave node identically to the other nodes.
Installing Fedora 4.0
This procedure assumes that the Fedora 4.0 operating system has not already been installed
on the slave nodes. If Fedora 4.0 has already been installed then skip to “Configuring Fedora
4.0” on page 60.
Y To install Fedora 4.0
1. Insert the Fedora Installation 1 of 4 CD into your computer and then restart your
computer.
2. When you are prompted for an installation mode, select the graphical mode by pressing
ENTER or by waiting for a few seconds.
3. If you are prompted to test the CD-ROM, select Skip.
4. In the Welcome to Fedora Linux page, click Next.
5. In the Language Selection page, select the language you want to use and click Next.
6. In the Keyboard Configuration page, select what type of keyboard is connected to the
computer and click Next.
7. In the Installation Type page, select Custom and click Next.
8. In the Disk Partitioning Setup page, unless you are familiar with installing Fedora, select
the Automatically partition option and click Next.
58
SEQUEST Cluster Installation and Operation Manual
Thermo Scientific
2 Setting Up the SEQUEST Cluster
Setting Up the Slave Nodes: Fedora 4.0
9. In the Automatic Partitioning page, select the Remove All Partitions On This System
option and click Next.
10. In the Partitioning page, click Next.
11. In the Boot Loader Configuration page, select the GRUB boot loader and click Next.
12. In the Network Configuration page, set up the network configuration parameters:
a. Click Edit in the Network Devices box.
b. Disable the Configure using DHCP option and enter the IP address and netmask
for this computer.
The slave computers will be connected to the secondary network card in the master
computer through the Ethernet hub. Therefore, they should have IP addresses in the
same group as the secondary network card in the master computer.
Use a private address space (AS) number for the network containing the slave
computers. For example: use 192.168.66.1 for the first slave computer, 192.168.66.2
for the second slave computer, and so on until all of the slave computers have been
set up.
Enter the netmask if it is not entered automatically.
c. Click OK to save the changes.
d. Select the Manually Set the Hostname option and enter the hostname.
Name the first slave node in your cluster node1, then use name node2 for the second
node in the cluster, and so on for the remaining nodes.
e. Enter a gateway address for this network and then click Next to save these changes.
f.
A warning box appears, but because the slave computers do not need DNS, click
Continue in the warning box.
13. In the Firewall Configuration page, select the No Firewall option and change the Enable
SELinux option to Disabled. Click Next.
14. In the Time Zone Selection page, select the correct time zone for your location and click
Next.
15. In the Set Root Password page, enter the root password for the system and click Next.
16. In the Package Defaults page, select Customize the set of packages to be installed and
click Next.
17. Make the following selections and deselections:
a. In the Package Group Selection page, deselect the following options if they are
selected:
• Desktops - X Window, GNOME Desktop Environment
• Applications - Editors, Graphical Internet, Text Based Internet,
Office/Productivity, Graphics, Games and Entertainment, Sound and Video
Thermo Scientific
SEQUEST Cluster Installation and Operation Manual
59
2
Setting Up the SEQUEST Cluster
Setting Up the Slave Nodes: Fedora 4.0
• Servers - Server Configuration Tools, Web Server, Windows File Server
• Development - Development Tools
• System - Printing Support, Language Support
b. Select the following options in the Servers section:
• Applications - Scientific and Engineering Programs
• Servers - FTP Server, Legacy Network Server.
c. After selecting the Legacy Network Server option, click Details and select
rsh-server.
d. After selecting the Scientific and Engineering Programs option, click Details and
select the PVM option. Deselect all other options.
e. Click Next.
18. Click Next to install the Fedora software. An installation progress dialog box appears.
The dialog box will prompt which CDs are required during the software loading process.
19. In the Congratulations screen, follow the instructions to finish the installation.
Configuring Fedora 4.0
Y To configure Fedora 4.0
1. Log into your computer as root.
2. Run the service configuration program:
/usr/sbin/ntsysv
3. Scroll down the list and make sure the rexec, rsh, and vsftpd options are active. You can
toggle an option by pressing SPACE on the keyboard.
4. Deselect the sendmail option.
5. Press TAB to select the OK option and press ENTER.
6. Create the proteomics user account with this command:
adduser proteomics
7. Set the password for this account with this command:
passwd proteomics
8. Create a directory for the FASTA databases and change the permissions on that directory:
mkdir /usr/database
chmod 777 /usr/database
60
SEQUEST Cluster Installation and Operation Manual
Thermo Scientific
2 Setting Up the SEQUEST Cluster
Setting Up the Slave Nodes: Fedora 4.0
9. Change the permissions of the /usr/share/pvm3/bin/LINUXI386 directory with this
command:
chmod 777 /usr/share/pvm3/bin/LINUXI386
10. Create a configuration file (sequest.ini) for the SEQUEST executable program:
vi /usr/share/pvm3/sequest.ini
11. Add the following line to the configuration file and then save the file:
DatabasePath: /usr/database
12. Create the hosts.equiv file:
vi /etc/hosts.equiv
13. Add the following line to the file and then save the file:
Master_computer_name proteomics
Where Master_computer_name is replaced with the name you used for the master
computer.
14. Create the .rhosts file:
vi ~proteomics/.rhosts
15. Add the following line to the file and then save the file:
+ proteomics
16. Update the permissions for the .rhosts file:
chmod 600 ~proteomics/.rhosts
17. Because the slave computers will not be set up in a domain, modify the existing /etc/hosts
file (see Figure 34) to include the host names of each slave node:
vi /etc/hosts
Figure 34.
/etc/hosts file
# Do not remove the following line, or various programs
# that require network functionality will fail.
127.0.0.1
localhost.localdomain localhost
192.168.66.250
192.168.66.1
192.168.66.2
192.168.66.3
192.168.66.4
192.168.66.5
master
node1
node2
node3
node4
node5
18. Add the PVM environment variables to the existing .bashrc file that is in the proteomics
account with this command (see Figure 35 for edits):
vi ~proteomics/.bashrc
Thermo Scientific
SEQUEST Cluster Installation and Operation Manual
61
2
Setting Up the SEQUEST Cluster
Setting Up the Slave Nodes: Fedora 5.0
Figure 35. .bashrc file for Fedora 4.0
# .bashrc
# User specific aliases and functions
# Source global definitions
if [ -f /etc/bashrc ]; then
. /etc/bashrc
fi
PVM_ARCH=LINUXI386
PVM_ROOT=/usr/share/pvm3
PVM_RSH=/usr/bin/rsh
PVM_TMP=/tmp
PVM_VERSION=3.4.4
export PVM_ARCH PVM_ROOT PVM_RSH PVM_TMP PVM_VERSION
19. Save the changes to the file. The slave node is now configured.
20. Restart the computer with this command:
shutdown –r now
21. Repeat steps 1 through 20 for each of the remaining nodes.
When all of the slave nodes have been configured, go to “Final Configuration” on page 72.
Setting Up the Slave Nodes: Fedora 5.0
This procedure assumes that you are familiar with installing Fedora 5.0. This section contains
the following topics:
• Installing Fedora 5.0
• Configuring Fedora 5.0
Note Repeat the following procedures for each slave node in the cluster. Configure each
slave node identically to the other nodes.
Installing Fedora 5.0
This procedure assumes that the Fedora 5.0 operating system has not already been installed
on the slave nodes. If Fedora 5.0 has already been installed then go to “Configuring Fedora
5.0” on page 64.
Y To install Fedora 5.0
1. Insert the Fedora Installation 1 CD into your computer and then restart your computer.
2. When you are prompted for an installation mode, select the graphical mode by pressing
ENTER or by waiting for a few seconds.
62
SEQUEST Cluster Installation and Operation Manual
Thermo Scientific
2 Setting Up the SEQUEST Cluster
Setting Up the Slave Nodes: Fedora 5.0
3. If you are prompted to test the CD-ROM, select Skip.
4. In the Welcome to Fedora Linux page, click Next.
5. In the Language Selection page, select the language you want to use and click Next.
6. In the Keyboard Configuration page, select what type of keyboard is connected to the
computer and click Next.
7. In the Disk Partitioning Setup page, unless you are familiar with installing Fedora, select
the Automatically partition option. Click Next.
8. In the Automatic Partitioning page, select the Remove All Partitions On This System
option. Click Next.
9. In the Partitioning page, click Next.
10. In the Network Configuration page, set up the network configuration parameters:
a. Click Edit in the Network Devices box.
b. Disable the Configure using DHCP option and enter the IP address and netmask
for this computer.
The slave computers will be connected to the secondary network card in the master
computer through the Ethernet hub. They should have IP addresses in the same
group as the secondary network card in the master computer.
Use a private address space (AS) number for the network containing the slave
computers. For example: use 192.168.66.1 for the first slave computer, 192.168.66.2
for the second slave computer, and so on until all of the slave computers have been
set up.
Enter the netmask if it is not entered automatically.
c. Click OK to save the changes.
d. Select the Manually Set the Hostname option and enter the hostname.
Name the first slave node in your cluster node1, then use name node2 for the second
node in the cluster, and so on for the remaining nodes.
e. Enter a gateway address for this network and then click Next to save these changes.
f.
A warning box appears, but because the slave computers do not need DNS, click
Continue in the warning box.
11. In the Time Zone Selection page, select the correct time zone for your location and click
Next.
12. In the Set Root Password page, enter the root password for the system and click Next.
13. In the Package Defaults page, disable the Office Package option and select Customize
Now option. Click Next.
Thermo Scientific
SEQUEST Cluster Installation and Operation Manual
63
2
Setting Up the SEQUEST Cluster
Setting Up the Slave Nodes: Fedora 5.0
14. In the Package Group Selection page, deselect the following options:
• Desktop Environments - All items in this section should be deselected.
• Applications - All items in this section should be deselected except for Engineering
and Scientific.
• Development - All items in this section should be deselected.
• Servers - All items in this section should be deselected except FTP Servers and Legacy
Network Servers.
• Base - All items in this section should be deselected except for Base and Legacy
Software Support.
• Language - All items in this section should be deselected.
15. Select the Scientific and Engineering Programs option. Click Details and select the
PVM option. Deselect all other options.
16. Select the Legacy Network Server option. Click Details and select telnet and rsh-server.
17. Select the Legacy Software Server option. Click Details and select capability library
options.
18. Click Next.
19. Click Next to install the Fedora software. An installation progress dialog box appears.
The dialog box will prompt which CDs are required during the software loading process.
20. In the Congratulations screen, follow the instructions to finish the installation.
Configuring Fedora 5.0
Y To configure Fedora 5.0
1. After the computer reboots and if the Setup Agent displays, complete the following:
a. Select the Firewall option and disable the firewall.
b. Select the Systems Services option and enable the rexec, rsh, and vsfptd options.
c. Disable the sendmail option.
d. Select OK and press ENTER.
2. Log into your computer as root. If you ran the Setup Agent in step 1 then go to step 9.
Step 9 modifies the selinux configuration file.
3. Run the service configuration program:
/usr/sbin/ntsysv
4. Scroll down the list and make sure the rexec, rsh, and vsftpd options are active. You can
toggle an option by pressing SPACE on the keyboard.
64
SEQUEST Cluster Installation and Operation Manual
Thermo Scientific
2 Setting Up the SEQUEST Cluster
Setting Up the Slave Nodes: Fedora 5.0
5. Disable the sendmail option.
6. Press TAB to select OK and press ENTER to save the changes.
7. Disable the firewall with this command:
system-config-securitylevel-tui
8. Select the disable firewall option and press TAB to select OK and press ENTER to save
the changes.
9. Change the selinux (Security Enhanced Linux) configuration file to enable FTP uploads:
a. Access the configuration file with this command:
vi /etc/selinux/config
b. Change the line that begins with SELINUX to:
SELINUX=permissive
c. Save the file and the changes.
10. Create the proteomics user account with this command:
adduser proteomics
11. Set the password for this account with this command:
passwd proteomics
12. Create a directory for the FASTA databases and change the permissions on that directory:
mkdir /usr/database
chmod 777 /usr/database
13. Change the permissions of the /usr/share/pvm3/bin/LINUX directory with this command:
chmod 777 /usr/share/pvm3/bin/LINUX
14. Create a configuration file (sequest.ini) for the SEQUEST executable program:
vi /usr/share/pvm3/sequest.ini
15. Add the following line to the configuration file (sequest.ini) and then save the file:
DatabasePath: /usr/database
16. Create the hosts.equiv file:
vi /etc/hosts.equiv
17. Add the following line to the file and then save the file:
Master_computer_name proteomics
Where Master_computer_name is replaced with the name you used for the master
computer.
18. Create the .rhosts file:
vi ~proteomics/.rhosts
19. Add the following line to the file and then save the file:
Thermo Scientific
SEQUEST Cluster Installation and Operation Manual
65
2
Setting Up the SEQUEST Cluster
Setting Up the Slave Nodes: Fedora 5.0
+ proteomics
20. Update the permissions for the .rhosts file:
chmod 600 ~proteomics/.rhosts
21. Because the slave computers will not be set up in a domain, modify the existing /etc/hosts
file (see Figure 36) to include the host names of each slave node:
vi /etc/hosts
Figure 36. /etc/hosts file
# Do not remove the following line, or various programs
# that require network functionality will fail.
127.0.0.1
localhost.localdomain localhost
192.168.66.250
192.168.66.1
192.168.66.2
192.168.66.3
192.168.66.4
192.168.66.5
master
node1
node2
node3
node4
node5
22. Add the PVM environment variables to the existing .bashrc file that is in the proteomics
account with this command (see Figure 37 for edits):
vi ~proteomics/.bashrc
Figure 37. .bashrc file for Fedora 5.0
# .bashrc
# User specific aliases and functions
# Source global definitions
if [ -f /etc/bashrc ]; then
. /etc/bashrc
fi
PVM_ARCH=LINUX
PVM_ROOT=/usr/share/pvm3
PVM_RSH=/usr/bin/rsh
PVM_TMP=/tmp
PVM_VERSION=3.4.4
export PVM_ARCH PVM_ROOT PVM_RSH PVM_TMP PVM_VERSION
23. Save the changes to the file. The slave node is now configured.
24. Restart the computer with this command:
shutdown –r now
25. Repeat steps 1 through 20 for each of the remaining nodes.
When all of the slave nodes have been configured, go to “Final Configuration” on page 72.
66
SEQUEST Cluster Installation and Operation Manual
Thermo Scientific
2 Setting Up the SEQUEST Cluster
Setting Up the Slave Nodes: Fedora 6.0
Setting Up the Slave Nodes: Fedora 6.0
This procedure assumes that you are familiar with installing Fedora 6.0. This section contains
the following topics:
• Installing Fedora 6.0
• Configuring Fedora 6.0
Note Repeat the following procedures for each slave node in the cluster. Configure each
slave node identically to the other nodes.
Installing Fedora 6.0
This procedure assumes that the Fedora 6.0 operating system has not already been installed
on the slave nodes. If Fedora 6.0 has already been installed then go to “Configuring Fedora
6.0” on page 69.
Y To install Fedora 6.0
1. Insert the Fedora Installation 1 CD into your computer and then restart your computer.
2. When you are prompted for an installation mode, select the graphical mode by pressing
ENTER or by waiting for a few seconds.
3. If you are prompted to test the CD-ROM, select Skip.
4. In the Welcome to Fedora Linux page, click Next.
5. In the Language Selection page, select the language you want to use and click Next.
6. In the Keyboard Configuration page, select what type of keyboard is connected to the
computer and click Next.
7. In the Disk Partitioning Setup page, unless you are familiar with installing Fedora, select
the Automatically partition option. Click Next.
8. In the Automatic Partitioning page, select the Remove All Partitions On This System
option. Click Next.
9. In the Partitioning page, click Next.
10. In the Network Configuration page, set up the network configuration parameters:
a. Click Edit in the Network Devices box.
b. Disable the Configure using DHCP option and enter the IP address and netmask
for this computer.
The slave computers will be connected to the secondary network card in the master
computer through the Ethernet hub. They should have IP addresses in the same
group as the secondary network card in the master computer.
Thermo Scientific
SEQUEST Cluster Installation and Operation Manual
67
2
Setting Up the SEQUEST Cluster
Setting Up the Slave Nodes: Fedora 6.0
Use a private address space (AS) number for the network containing the slave
computers. For example: use 192.168.66.1 for the first slave computer, 192.168.66.2
for the second slave computer, and so on until all of the slave computers have been
set up.
Enter the netmask if it is not entered automatically.
Disable the IP6 address field.
c. Click OK to save the changes.
d. Select the Manually Set the Hostname option and enter the hostname.
Name the first slave node in your cluster node1, then use name node2 for the second
node in the cluster, and so on for the remaining nodes.
e. Enter a gateway address for this network and then click Next to save these changes.
f.
A warning box appears, but because the slave computers do not need DNS, click
Continue in the warning box.
11. In the Time Zone Selection page, select the correct time zone for your location and click
Next.
12. In the Set Root Password page, enter the root password for the system and click Next.
13. In the Package Defaults page, disable the Office Package option and select Customize
Now option. Click Next.
14. In the Package Group Selection page, deselect the following options:
• Desktop Environments - All items in this section should be deselected.
• Applications - All items in this section should be deselected except for Engineering
and Scientific.
• Development - All items in this section should be deselected.
• Servers - All items in this section should be deselected except FTP Servers and Legacy
Network Servers.
• Base - All items in this section should be deselected except for Base and Legacy
Software Support.
• Language - All items in this section should be deselected.
15. Select the Scientific and Engineering Programs option. Click Details and select the
PVM option. Deselect all other options.
16. Select the Legacy Network Server option. Click Details and select telnet and rsh-server.
17. Select the Legacy Software Server option. Click Details and select capability library
options.
18. Click Next.
68
SEQUEST Cluster Installation and Operation Manual
Thermo Scientific
2 Setting Up the SEQUEST Cluster
Setting Up the Slave Nodes: Fedora 6.0
19. Click Next to install the Fedora software. An installation progress dialog box appears.
The dialog box will prompt which CDs are required during the software loading process.
20. In the Congratulations screen, follow the instructions to finish the installation.
Configuring Fedora 6.0
Y To configure Fedora 6.0
1. After the computer reboots and if the Setup Agent displays, complete the following:
a. Select the Firewall option and disable the firewall.
b. Select the Systems Services option and enable the rexec, rsh, and vsfptd options.
c. Disable the sendmail option.
d. Select OK and press ENTER.
2. Log into your computer as root. If you ran the Setup Agent in step 1 then go to step 9.
Step 9 modifies the selinux configuration file.
3. Run the service configuration program:
/usr/sbin/ntsysv
4. Scroll down the list and make sure the rexec, rsh, and vsftpd options are active. You can
toggle an option by pressing SPACE on the keyboard.
5. Disable the sendmail option.
6. Press TAB to select OK and press ENTER to save the changes.
7. Disable the firewall with this command:
system-config-securitylevel-tui
8. Select the disable firewall option and press TAB to select OK and press ENTER to save
the changes.
9. Change the selinux (Security Enhanced Linux) configuration file to enable FTP uploads:
a. Access the configuration file with this command:
vi /etc/selinux/config
b. Change the line that begins with SELINUX to:
SELINUX=permissive
c. Save the file and the changes.
10. Create the proteomics user account with this command:
adduser proteomics
11. Set the password for this account with this command:
passwd proteomics
Thermo Scientific
SEQUEST Cluster Installation and Operation Manual
69
2
Setting Up the SEQUEST Cluster
Setting Up the Slave Nodes: Fedora 6.0
12. Create a directory for the FASTA databases and change the permissions on that directory:
mkdir /usr/database
chmod 777 /usr/database
13. Change the permissions of the /usr/share/pvm3/bin/LINUX directory with this command:
chmod 777 /usr/share/pvm3/bin/LINUX
14. Create a configuration file (sequest.ini) for the SEQUEST executable program:
vi /usr/share/pvm3/sequest.ini
15. Add the following line to the configuration file (sequest.ini) and then save the file:
DatabasePath: /usr/database
16. Create the hosts.equiv file:
vi /etc/hosts.equiv
17. Add the following line to the file and then save the file:
Master_computer_name proteomics
Where Master_computer_name is replaced with the name you used for the master
computer.
18. Create the .rhosts file:
vi ~proteomics/.rhosts
19. Add the following line to the file and then save the file:
+ proteomics
20. Update the permissions for the .rhosts file:
chmod 600 ~proteomics/.rhosts
21. Because the slave computers will not be set up in a domain, modify the existing /etc/hosts
file (see Figure 38) to include the host names of each slave node:
vi /etc/hosts
Figure 38. /etc/hosts file
# Do not remove the following line, or various programs
# that require network functionality will fail.
70
127.0.0.1
localhost.localdomain localhost
192.168.66.250
192.168.66.1
192.168.66.2
192.168.66.3
192.168.66.4
192.168.66.5
master
node1
node2
node3
node4
node5
SEQUEST Cluster Installation and Operation Manual
Thermo Scientific
2 Setting Up the SEQUEST Cluster
Updating from SEQUEST Cluster 3.1 or SEQUEST Cluster 3.1 SR1 to SEQUEST Cluster 3.3.1
22. Add the PVM environment variables to the existing .bashrc file that is in the proteomics
account with this command (see Figure 39 for edits):
vi ~proteomics/.bashrc
Figure 39. .bashrc file for Fedora 6.0
# .bashrc
# User specific aliases and functions
# Source global definitions
if [ -f /etc/bashrc ]; then
. /etc/bashrc
fi
PVM_ARCH=LINUX
PVM_ROOT=/usr/share/pvm3
PVM_RSH=/usr/bin/rsh
PVM_TMP=/tmp
PVM_VERSION=3.4.4
export PVM_ARCH PVM_ROOT PVM_RSH PVM_TMP PVM_VERSION
23. Save the changes to the file. The slave node is now configured.
24. Restart the computer with this command:
shutdown –r now
25. Repeat steps 1 through 20 for each of the remaining nodes.
When all of the slave nodes have been configured, go to “Final Configuration” on page 72.
Updating from SEQUEST Cluster 3.1 or SEQUEST Cluster 3.1 SR1 to
SEQUEST Cluster 3.3.1
If you have not yet installed Xcalibur 1.4 SR1 or 2.0.6 and BioWorks 3.3.1 SP1 on the master
node of the cluster, do that before proceeding. Refer to the BioWorks Installation Guide for
more information on installing and licensing BioWorks 3.3.1 SP1.
Once the SEQUEST Cluster 3.3.1 software has been loaded onto the master node of the
cluster, you will need to update the configuration of the clusters.
Before starting this process, make sure that SEQUEST and PVM are not running on the
system. Open the PVM console and then type halt at the PVM prompt to stop the PVM
application. For more information on the PVM console, refer to “PVM Console” on page 21.
Y To update to SEQUEST Cluster 3.3.1
1. Make sure you are logged on to the cluster master node using an account with
Administrator privileges.
2. Start Cluster Manager:
Thermo Scientific
SEQUEST Cluster Installation and Operation Manual
71
2
Setting Up the SEQUEST Cluster
Final Configuration
a. Choose
Start > Programs > Xcalibur > BioWorks Browser to Start BioWorks.
b. Choose Tools > Cluster Manager to open the Cluster Manager application.
3. Click the Configuration tab to display the Configuration page.
4. Select the operating system that is installed on each node of your cluster. Once you have
selected the OS that is running on each node, click Save Configuration to update the
configuration.
5. Click Copy SEQUEST to copy the SEQUEST executable to each node of the cluster.
6. Reboot the entire cluster.
Note The Copy SEQUEST and Save Configuration buttons are available only when you
are logged into an account with Administrator privileges.
Final Configuration
This section has the following topics:
• Configuration Using the Administrator Login
• Configuration Using the Proteomics Login
Note You do not need to complete the procedures described in this section if you are
upgrading from a previous SEQUEST Cluster installation.
Configuration Using the Administrator Login
Y To complete the final configuration using the administrator login
1. Log into the master node as administrator.
2. Start BioWorks Browser.
BioWorks Browser starts, but it only allows you to review data. To use the SEQUEST
and Cluster software, you need a license key.
3. Choose Help > About Bioworks Browser to open the About BioWorks Browser dialog
box (see Figure 40).
4. Click License.
72
SEQUEST Cluster Installation and Operation Manual
Thermo Scientific
2
Setting Up the SEQUEST Cluster
Final Configuration
Figure 40. About Bioworks Browser dialog box
5. Copy the license key from the License dialog box (see Figure 41) and e-mail it to
[email protected]. Request that Thermo Scientific enable the
SEQUEST/SEQUEST and Cluster features in the updated license. Include the serial
number found on the BioWorks 3.3.1 SP1 CD case with your request.
6. When you receive the updated license from Thermo Scientific, enter it into the
BioWorks Browser License dialog box. Then, click Set.
Thermo Scientific
SEQUEST Cluster Installation and Operation Manual
73
2
Setting Up the SEQUEST Cluster
Final Configuration
Figure 41. Bioworks Browser License dialog box
7. Start BioWorks Browser and then open the Cluster Manager program by choosing Tools
> Cluster Manager. Like BioWorks Browser, the Cluster Manager (see Figure 42) will
ask for a license the first time it is started.
8. Copy the license key from the License Manager and e-mail it to
[email protected]. In the e-mail for this license, include the Purchase Order
number for your SEQUEST Cluster, the number of CPUs that are licensed, and the
serial number from the SEQUEST Cluster CD case.
Figure 42. Cluster Manager License dialog box
74
SEQUEST Cluster Installation and Operation Manual
Thermo Scientific
2
Setting Up the SEQUEST Cluster
Final Configuration
Figure 43. Cluster Manager dialog box
9. When you receive the updated license from Thermo Fisher Scientific, enter it into the
License Manager dialog box. Then, click Set.
10. Start the Cluster Manager again. The default display for the Cluster Manager is shown in
Figure 43. Select the Configuration page (see Figure 44).
11. If you are using Linux, you must enter your User Login Name and User Password.
12. Do one of the following:
• If your slave nodes are running Microsoft Windows 2000 or Microsoft Windows XP,
then in the Windows group box, enter the share points that were created during the
Slave Node Configuration in the Cluster Share Point and Database Share Point
text boxes. Normally, these values are:
Thermo Scientific
Cluster
(sharepoint for the PVM software)
Database
(sharepoint for the FASTA databases)
SEQUEST Cluster Installation and Operation Manual
75
2
Setting Up the SEQUEST Cluster
Final Configuration
• If your slave nodes are running Red Hat Linux, Red Hat Enterprise Linux, or Fedora,
then in the Linux group box, enter the directory location of the PVM software and
FASTA databases into the Cluster Directory and Database Directory text boxes.
Normally, these values are:
/usr/share/pvm3 (location of PVM software)
/usr/database
(location of FASTA databases)
Because the account proteomics was created during the installation of the Linux
software, enter that login name and its password in the User Login Name and User
Password text boxes.
Figure 44. Cluster Manager dialog box - Configuration page, showing node information
IMPORTANT Do not enter your computer’s full qualified domain name. Enter your
computer name such as, my_laptop.
13. For each slave node of your cluster, enter the computer name and number of CPUs that
are present in that computer. Then, select the type of OS that is installed on that slave
node.
76
SEQUEST Cluster Installation and Operation Manual
Thermo Scientific
2
Setting Up the SEQUEST Cluster
Final Configuration
14. Click Save Configuration to create the PVM configuration file.
Note The PVM Configuration is found in the directory C:\Cluster and is named
pvm_hosts.txt. Example PVM hosts files are shown in Figure 45 and Figure 46.
Figure 46 is a Red Hat Linux 7.2 or 8.0 example. If you are using, a later version of
Red Hat Linux, replace LINUX with i386 for each node path.
node1
node2
node3
node4
node5
node6
node7
node8
dx=c:\cluster\pvm\lib\win32\pvmd3.exe
dx=c:\cluster\pvm\lib\win32\pvmd3.exe
dx=c:\cluster\pvm\lib\win32\pvmd3.exe
dx=c:\cluster\pvm\lib\win32\pvmd3.exe
dx=c:\cluster\pvm\lib\win32\pvmd3.exe
dx=c:\cluster\pvm\lib\win32\pvmd3.exe
dx=c:\cluster\pvm\lib\win32\pvmd3.exe
dx=c:\cluster\pvm\lib\win32\pvmd3.exe
node1
node2
node3
node4
node5
node6
node7
node8
dx=/usr/share/pvm3/lib/LINUX/pvmd3
dx=/usr/share/pvm3/lib/LINUX/pvmd3
dx=/usr/share/pvm3/lib/LINUX/pvmd3
dx=/usr/share/pvm3/lib/LINUX/pvmd3
dx=/usr/share/pvm3/lib/LINUX/pvmd3
dx=/usr/share/pvm3/lib/LINUX/pvmd3
dx=/usr/share/pvm3/lib/LINUX/pvmd3
dx=/usr/share/pvm3/lib/LINUX/pvmd3
sp=2
sp=2
sp=2
sp=2
sp=2
sp=2
sp=2
sp=2
sp=2
sp=2
sp=2
sp=2
sp=2
sp=2
sp=2
sp=2
15. With the Configuration page set up, you can also copy the Sequest task to each
slave/compute node of the cluster by clicking Copy SEQUEST.
16. Now that the Cluster Manager is configured, you can copy the FASTA databases that
were installed onto the master computer to the slave/compute nodes. Do this through the
Databases page of the Cluster Manager (see Figure 45).
17. To copy the FASTA databases to the slave nodes, select each database that you want to
copy (by clicking in the second column of the table) and then click Copy Database.
When the databases have been copied, the program automatically updates the display, by
performing the same action as Query Nodes.
Thermo Scientific
SEQUEST Cluster Installation and Operation Manual
77
2
Setting Up the SEQUEST Cluster
Final Configuration
Figure 45. Cluster Manager dialog box - Databases page
Configuration Using the Proteomics Login
Y To complete the final configuration using the proteomics login
1. Log out of the computer (as administrator) and log in to the computer as proteomics.
2. Open a MS/DOS console window and change to the directory C:\Cluster\wrshd.
3. Type one of the following:
• If the slave node is running Microsoft Windows 2000 or Microsoft Windows XP:
rsh node1 c:\cluster\wrshd\id.exe
This command displays the output shown in Figure 46.
78
SEQUEST Cluster Installation and Operation Manual
Thermo Scientific
2
Setting Up the SEQUEST Cluster
Final Configuration
Figure 46. Output from id.exe command
• If the slave node is running Red Hat Linux, Red Hat Enterprise Linux, or Fedora:
rsh node1 “cat /etc/hosts”
This command displays the contents of the hosts file on the slave node, as shown in
Figure 47.
Figure 47. Output from “cat /etc/hosts” command
Thermo Scientific
SEQUEST Cluster Installation and Operation Manual
79
2
Setting Up the SEQUEST Cluster
After the Final Configuration
After the Final Configuration
If the master and slave nodes are configured as described in this chapter, then the following
locations will contain the SEQUEST program files:
Microsoft Windows 2000 Server / Windows 2003 Server (master node)
c:\cluster\pvm\bin\WIN32\sequest_master.exe
c:\cluster\pvm\bin\WIN32\sequest_slave.exe
Microsoft Windows 2000 Professional / Windows XP Professional (slave node)
c:\cluster\pvm\bin\WIN32\sequest_slave.exe
Red Hat Linux / Red Hat Enterprise Linux / Fedora (slave node)
/usr/share/pvm3/bin/LINUX/sequest_slave
Files Modified During the Installation
The files that are modified during installation include the following:
Microsoft Windows 2000 Server / Windows 2003 Server (master node)
C:\cluster\pvm
C:\cluster\wrshd
C:\cluster\temp
Microsoft Windows 2000 Professional / Windows XP Professional (slave node)
C:\cluster\pvm
C:\cluster\wrshd
C:\cluster\temp
Red Hat Linux / Red Hat Enterprise Linux / Fedora (slave node)
/etc/hosts
/etc/hosts.equiv
/home/proteomics/.rhosts
/home/proteomics/.bashrc
/usr/share/pvm3/sequest.ini
/usr/database
80
SEQUEST Cluster Installation and Operation Manual
Thermo Scientific
3
Using the SEQUEST Cluster
This chapter describes how to use the SEQUEST cluster.
Contents
• SEQUEST Cluster Manager
• Configuring BioWorks for Use with SEQUEST Cluster
• Running a SEQUEST Search on the Cluster
• PVM Console
SEQUEST Cluster Manager
The Cluster Manager program provides tools to do the following:
• Install the SEQUEST Cluster license
• Configure the PVM nodes
• Distribute the SEQUEST application to the slave nodes
• Start and stop the PVM software
• Maintain the FASTA databases on each slave node
• Submit SRF files to the Cluster for processing
In “Final Configuration” on page 72, the Cluster Manager was used to install the SEQUEST
Cluster license, to configure the PVM nodes, and to distribute the SEQUEST application to
the slave nodes. Refer to that section for information on these tasks. The remaining tasks are
discussed in this section.
When you start the Cluster Manager program (in the BioWorks window, choose Tools >
Cluster Manager), the Status page is displayed. See Figure 48. The purpose of the Status page
is to start PVM and to clean up the PVM operation files on each node of the cluster.
Thermo Scientific
SEQUEST Cluster Installation and Operation Manual
81
3
Using the SEQUEST Cluster
SEQUEST Cluster Manager
Figure 48. Cluster Manager dialog box - Status page
Starting and Stopping the PVM Software
When the Cluster Manager is open, it periodically checks to see if PVM is running, and, if it
is, the Cluster Manager displays a status message. When PVM is running the Start PVM and
Cleanup Nodes buttons are unavailable.
To start the PVM software, click Start PVM. This starts the pvmd3 program, which acts as
the main console for PVM. The PVM console runs in a separate console window. This
window must be running for the PVM software to function correctly. Figure 48 displays the
Status page when PVM is running.
To stop the PVM software, you must display the MS/DOS Console window that was started
by the Cluster Manager and type “halt”, and then press ENTER. Do not close the PVM
console window using the X button in the upper-right corner of the window. Doing so does
not stop PVM on each of the slave nodes. If this occurs, you must manually terminate the
PVM files on each node of the cluster by clicking Cleanup Nodes.
When PVM is running, it creates some operation files (*.pvmd) in the PVM temporary
directory. If you stop PVM using the halt command, these files are automatically removed.
However, if you do not stop PVM by using the halt command, these files are not removed.
PVM will not start if old versions of these operation files are found in the temporary
directory. Click Start PVM to automatically remove the operation files.
82
SEQUEST Cluster Installation and Operation Manual
Thermo Scientific
3
Using the SEQUEST Cluster
SEQUEST Cluster Manager
Once PVM has been started, the Cluster Manager can be closed without it affecting the
running PVM.
More information about the PVM Console can be found in “PVM Console” on page 96.
Managing Databases
You use the Databases page of the Cluster Manager (see Figure 49) to copy and remove
FASTA and indexed databases from the slave nodes of the cluster.
Note Some of the functionality of this page of the Cluster Manager was already
demonstrated in “Final Configuration” on page 72.
For the Databases page to work properly, it needs to know where the databases are stored on
the slave nodes. This information was specified in “Final Configuration” on page 72. For
slave nodes that are using:
• Windows 2000 or Windows XP, a shared directory named Database was created on each
slave node. This share point is specified on the Configuration page.
• Linux or Fedora, the actual directory location of the databases must be specified on the
Configuration page because an ftp connection is used to copy the databases to the slave
nodes.
When Cluster Manager is started, only the local databases will be displayed. To find out what
databases are present on the other nodes, click Query Nodes.
Y To copy a database
1. To copy a database from the master node, select the check box in the first column of the
table that corresponds to the database that you want to copy.
2. Click Copy Databases.
The application copies the database to each node of the cluster. While the databases are
being copied, a status dialog box appears displaying which database is being copied to
which node. The program copies the FASTA database plus the associated files for that
database (.idx, .hdr, and .dgt).
Y To delete a database
1. To delete databases from the nodes, select a database.
2. Click Delete Databases. While the databases are being deleted, a status dialog box
appears displaying which database are being deleted from which node.
Thermo Scientific
SEQUEST Cluster Installation and Operation Manual
83
3
Using the SEQUEST Cluster
SEQUEST Cluster Manager
Figure 49. Cluster Manager dialog box - Databases page
Submitting SRF Files to the Cluster for Processing
The Cluster Daemon allows a remote instrument to submit Unified Search (SRF) files to the
SEQUEST Cluster for processing. The Cluster Daemon continuously watches a specified
directory for the presence of SRF files. When it finds the files, it submits a SEQUEST search
to the SEQUEST Queue.
The Cluster Daemon requires a shared directory on the cluster. This directory is specified in
the Inbound Folder text box on the Cluster Daemon page. See Figure 50.
84
SEQUEST Cluster Installation and Operation Manual
Thermo Scientific
3 Using the SEQUEST Cluster
Configuring BioWorks for Use with SEQUEST Cluster
Figure 50. Cluster Manager dialog box - Cluster Daemon page
Share this folder as you did with the PVM and Database folders during the configuration of
the slave nodes.
When searches are complete, the SRF files containing the results can be found in the folder
specified in the Outbound Folder text box.
Configuring BioWorks for Use with SEQUEST Cluster
SEQUEST Cluster 3.3.1 allows you to start searches on the cluster in two ways. Searches can
be started using BioWorks
• Running on the master node of the cluster.
• Running on a properly configured remote client computer.
To use either of these types of searches you must first configure BioWorks 3.3.1 SP1 to work
with the cluster, as described in the following sections.
Thermo Scientific
SEQUEST Cluster Installation and Operation Manual
85
3
Using the SEQUEST Cluster
Configuring BioWorks for Use with SEQUEST Cluster
Configuring BioWorks on the Cluster Master Node
Y To configure BioWorks on the master node of SEQUEST Cluster
1. Choose Start > Programs > Xcalibur > BioWorks Browser to launch BioWorks.
2. Choose Options > Configuration. The Configuration dialog box appears.
3. Select SEQUEST Cluster from the tree control to display the SEQUEST Cluster page.
See Figure 51.
Figure 51. Configuration dialog box - SEQUEST Cluster page
4. Set the parameters on the SEQUEST Cluster page:
a. Leave the Server text box blank.
b. Use the default values in the Config Folder and Inbound Folder text boxes.
c. If you do not want to perform searches on the master node of the cluster, select the
Don’t Perform Any Searches on the Master Node of the Cluster check box.
5. Click OK to save the settings and close the Configuration dialog box.
After you have set the SEQUEST Cluster configuration options, you can also set the
SEQUEST Search options to run searches on the cluster by default. These configuration
settings are optional, and can be changed when the search is launched.
86
SEQUEST Cluster Installation and Operation Manual
Thermo Scientific
3 Using the SEQUEST Cluster
Configuring BioWorks for Use with SEQUEST Cluster
Y To set SEQUEST Search options on the master node
1. Choose Start > Programs > Xcalibur > BioWorks Browser to launch BioWorks.
2. Choose Options > Configuration. The Configuration dialog box appears.
3. Select SEQUEST Search from the tree control to display the SEQUEST Search page.
See Figure 52.
4. Set the parameters in the Run SEQUEST Parameters group box:
a. Select the SEQUEST Cluster option.
b. Select how you want to run the search:
• Select Directly to run the search directly on the cluster.
• Select Through SEQUEST Queue to run the search through the SEQUEST
Queue. This option is recommended if multiple users can submit searches to
SEQUEST Cluster at the same time. (For example, if users can submit searches
from both the master node and remote client computers.)
5. Set the other parameters on the SEQUEST Search page. For more information on these
parameters, refer to Chapter 2: “Configuration” in the BioWorks User Guide.
6. Click OK to save the settings and close the dialog box.
Figure 52. Configuration dialog box - SEQUEST Search page, showing settings for searches
from the master node of the cluster
Thermo Scientific
SEQUEST Cluster Installation and Operation Manual
87
3
Using the SEQUEST Cluster
Configuring BioWorks for Use with SEQUEST Cluster
Configuring BioWorks on a Remote Client Computer
To launch searches on the cluster, the remote client computer must meet the following
requirements:
• The client computer must be capable of accessing the cluster over the network. Consult
your IT department if you need assistance in network configuration.
• The client computer must have BioWorks 3.3.1 SP1 installed and licensed for use with
SEQUEST Cluster. Refer to the BioWorks Installation Guide for information on installing
BioWorks and obtaining a license.
• BioWorks on the client computer must be properly configured to work with the cluster.
This section describes how to configure BioWorks 3.3.1 SP1 for use with the cluster.
Y To configure BioWorks for remote searches on SEQUEST Cluster
1. Choose Start > All Programs > Xcalibur > BioWorks Browser to launch BioWorks.
2. Choose Options > Configuration. The Configuration dialog box appears.
3. Select SEQUEST Cluster from the tree control to display the SEQUEST Cluster page.
See Figure 53.
Figure 53. Configuration dialog box - SEQUEST Cluster page
4. Set the parameters on the SEQUEST Cluster page:
a. In the Server text box, enter the server name of the SEQUEST Cluster master node.
b. Leave the default values in the Config Folder and Inbound Folder text boxes.
5. Click OK to save the settings and close the Configuration dialog box.
88
SEQUEST Cluster Installation and Operation Manual
Thermo Scientific
3 Using the SEQUEST Cluster
Configuring BioWorks for Use with SEQUEST Cluster
Note The Don’t Perform Any Searches on the Master Node of the Cluster check
box has no effect if it is selected in the configuration of a remote client computer.
This option is only valid when running a search from the master node of the cluster.
After you have set the SEQUEST Cluster configuration options, you can also set the
SEQUEST Search options to run searches on the cluster by default. These configuration
settings are optional, and can be changed when the search is launched.
Y To set SEQUEST Search options on a remote client computer
1. Choose Start > Programs > Xcalibur > BioWorks Browser to launch BioWorks.
2. Choose Options > Configuration. The Configuration dialog box appears.
3. Select SEQUEST Search from the tree control to display the SEQUEST Search page.
See Figure 54.
4. Set the parameters in the Run SEQUEST Parameters group box (Figure 54):
a. Select the SEQUEST Cluster option button.
b. Select the On Remote Server option button.
5. Set the other parameters on the SEQUEST Search page. For more information on these
parameters, refer to Chapter 2: “Configuration” in the BioWorks User Guide.
6. Click OK to save the settings and close the dialog box.
Figure 54. Configuration dialog box - SEQUEST Search page, showing settings for a remote
client computer
Thermo Scientific
SEQUEST Cluster Installation and Operation Manual
89
3
Using the SEQUEST Cluster
Running a SEQUEST Search on the Cluster
Running a SEQUEST Search on the Cluster
The SEQUEST Cluster can be run in BioWorks from the following locations:
• SEQUEST Search dialog box
• SEQUEST Batch search dialog box
• Search Selected Samples dialog box
The procedure for starting a search is similar whether you are starting the search from the
master node of the cluster or from a remote client computer. Where there are differences,
these differences are noted in the procedures that follow.
Starting a Search Using the SEQUEST Search Dialog Box
This topic describes only the basic steps necessary for running a search on the SEQUEST
Cluster. For detailed instructions on setting SEQUEST search parameters, refer to Chapter 3:
“Performing Search” in the BioWorks User Guide.
Y To start a SEQUEST Search on the cluster
1. Start with the RAW data file you want to search open in BioWorks.
2. Choose Actions > SEQUEST Search. The SEQUEST Search dialog box appears.
3. Click the SEQUEST Queue tab to display the SEQUEST Queue page. See Figure 55.
Figure 55. SEQUEST Search dialog box - SEQUEST Queue page
90
SEQUEST Cluster Installation and Operation Manual
Thermo Scientific
3 Using the SEQUEST Cluster
Running a SEQUEST Search on the Cluster
4. Select where to run the search:
• If you are running the search from the master node of the SEQUEST Cluster, select
either the Directly option button or the Through SEQUEST Queue option button.
• If you are running the search from a remote client computer, select the On Remote
Server option button.
5. Select the SEQUEST Cluster option.
6. Click the Basic tab to return to the Basic page.
7. In the Search Parameters list, select a parameters file to use in the search.
8. Click Edit to display the SEQUEST Search Parameters dialog box.
9. In the Database list, select the database you want to use in the search.
You must select a database that has been copied to the cluster master node and slave
nodes. If you are running a search from a remote client computer, databases that have
been copied to the master node are marked “Cluster” in the list.
To check which databases have been copied to the master node and the slave nodes, use
the Database page of the SEQUEST Cluster Manager as described in “Managing
Databases” on page 83.
Thermo Scientific
SEQUEST Cluster Installation and Operation Manual
91
3
Using the SEQUEST Cluster
Running a SEQUEST Search on the Cluster
Figure 56. SEQUEST Search Parameters dialog box, showing a Cluster database selected on a
remote client computer
10. Set the other parameters in the SEQUEST Search Parameters dialog box. Refer to
“Setting the SEQUEST Search Parameters” in the BioWorks User Guide for more
information.
11. When you have finished settings parameters, click Save to save your changes and close the
SEQUEST Search Parameters dialog box.
12. Set the other parameters in the SEQUEST Search dialog box. For more information,
refer to “Setting and Saving the Search Parameters” of the BioWorks User Guide.
Note When you run a search on the cluster from a remote client computer, only SRF
files are supported. Searches in DTA and OUT format are not supported.
92
SEQUEST Cluster Installation and Operation Manual
Thermo Scientific
3 Using the SEQUEST Cluster
Running a SEQUEST Search on the Cluster
If you are searching from a remote client computer, you must copy the SRF file from the
cluster back to the remote client computer when the search is finished in order to view your
results on the remote client computer.
Starting a Search Using the SEQUEST Batch Search Dialog Box
This section describes only the basic steps required to do a search on the SEQUEST Cluster.
For detailed instructions on setting SEQUEST search parameters, refer to Chapter 3:
“SEQUEST Search” in the BioWorks User Guide.
Y To start a SEQUEST Batch Search on the cluster
1. From the BioWorks Browser window, open the SEQUEST Batch Search dialog box by
choosing Actions > SEQUEST Batch Search. See Figure 57.
Figure 57. SEQUEST Batch Search dialog box
2. Select the Run Search On: SEQUEST Cluster option button.
3. Set the other parameters in the SEQUEST Batch Search dialog box. Refer to “Performing
a SEQUEST Batch Search” on page 3-17 of the BioWorks User Guide for more
information.
4. For each .params file you have selected to use in the search, edit the .params file to ensure
that the correct database is selected:
a. Click Edit Params File to open the SEQUEST Search Parameters dialog box.
b. In the Parameters File text box, enter the name of the .params file you want to edit.
c. In the Database list, select the database you want to use in the search.
Thermo Scientific
SEQUEST Cluster Installation and Operation Manual
93
3
Using the SEQUEST Cluster
Running a SEQUEST Search on the Cluster
You must select a database that has been copied to the cluster master node and slave
nodes. If you are running a search from a remote client computer, databases that have
been copied to the master node are marked “Cluster” in the list. You can check which
databases have been copied to the master node and the slave nodes using the
Database page of the SEQUEST Cluster Manager as described in “Managing
Databases” on page 83.
d. Set the other parameters in the SEQUEST Search Parameters dialog box. Refer to
“Setting the SEQUEST Search Parameters” of the BioWorks User Guide for more
information.
e. Click Save to save the changes and close the SEQUEST Search Parameters dialog
box.
f.
Repeat steps a through e for each .params file you want to edit.
5. To Start the search click OK.
Note When you run a search on the cluster from a remote client computer, only SRF
files are supported. Searches in DTA and OUT format are not supported.
If you are searching from a remote client computer, you must copy the SRF file(s) from the
cluster back to the remote client computer when the search is finished in order to view your
results on the remote client computer.
Starting a Search Using the Search Selected Samples Dialog Box
This section describes only the basic steps required to do a search on the SEQUEST Cluster.
For detailed instructions on setting SEQUEST search parameters, refer to Chapter 3:
“SEQUEST Search” in the BioWorks User Guide.
Y To start a SEQUEST Search from the Search Selected Samples dialog box
1. From the BioWorks Browser window, load a set of MALDI Samples into the MALDI
Plate view as described in “Searching vMALDI Samples in BioWorks” of the BioWorks
User Guide.
2. Select the spots in the plate view corresponding to the samples you want to search, and
click Search Selected Samples to display the Search Selected Samples dialog box.
94
SEQUEST Cluster Installation and Operation Manual
Thermo Scientific
3 Using the SEQUEST Cluster
Running a SEQUEST Search on the Cluster
Figure 58. Search Selected Samples dialog box
3. Select the Run Search On: SEQUEST Cluster option.
4. Set the other parameters in the Search Selected Samples dialog box. Refer to “Searching
vMALDI Samples in BioWorks” in the BioWorks User Guide for more information.
5. For the .params file you have selected to use in the search, edit the .params file to ensure
that the correct database is selected:
a. Click Edit to open the SEQUEST Search Parameters dialog box.
b. In the Database list, select the database you want to use in the search.
Thermo Scientific
SEQUEST Cluster Installation and Operation Manual
95
3
Using the SEQUEST Cluster
PVM Console
You must select a database that has been copied to the cluster master node and slave
nodes. If you are running a search from a remote client computer, databases that have
been copied to the master node are marked “Cluster” in the list.
To check which databases have been copied to the master node and the slave nodes
use the Database page of the SEQUEST Cluster Manager as described in “Managing
Databases” on page 83.
c. Set the other parameters in the SEQUEST Search Parameters dialog box. Refer to
“Setting the SEQUEST Search Parameters” of the BioWorks User Guide for more
information.
d. Click Save to save the changes and close the SEQUEST Search Parameters dialog
box.
6. Start the search by clicking OK.
Note When you run a search on the cluster from a remote client computer, only SRF
files are supported. Searches in DTA and OUT format are not supported.
If you are searching from a remote client computer, you must copy the SRF file(s) from the
cluster back to the remote client computer when the search is finished in order to view your
results on the remote client computer.
PVM Console
When the PVM daemon application is running, it maintains a console mode that allows you
to interact with the daemon. The PVM Console contains its own set of commands that are
documented in the PVM Manual (PVM: Parallel Virtual Machine: A Users' Guide and
Tutorial for Network Parallel Computing (Scientific and Engineering Computation) by Al Geist,
Adam Bequelin, and Jack Dongarra (ISBN# 0262571080)). This section highlights only the
commands that a SEQUEST Cluster user may need.
When PVM is running on the SEQUEST Cluster, an MS-DOS console window will be
present. If this window is maximized, the following display is shown (see Figure 59).
96
SEQUEST Cluster Installation and Operation Manual
Thermo Scientific
3
Using the SEQUEST Cluster
PVM Console
Figure 59. PVM Console
Table 1 contains those PVM commands that are used with the SEQUEST Cluster.
Table 1. PVM commands and descriptions
Command
Description
conf
Display the virtual machine configuration
halt
Stops the PVM daemon
help
Display the PVM console help
jobs
Displays a list of running jobs
kill
Terminates a PVM task
ps
Lists the PVM tasks
reset
Kills a running tasks
version
Lists the PVM version
The conf command (see Figure 60) lists the computers that are running with the current PVM
session. It is helpful in diagnosing if all of the nodes have been started. The Speed column
indicates how many CPUs are being used on each node of the cluster. By default, the Speed
value is used to provide a weighting as to how fast each machine is on the cluster. The default
value is 1000. Values less than 1000, indicate how many CPUs are being used on that node.
So, for the nodes cluster1 to cluster8, 2 CPUs are being used in this configuration.
Thermo Scientific
SEQUEST Cluster Installation and Operation Manual
97
3
Using the SEQUEST Cluster
PVM Console
Figure 60. Example conf command
The ps and kill commands (see Figure 61) are very similar to their UNIX counterparts. The ps
command is used to list the active PVM processes on each node of the cluster. The ps ax
command lists all the process and gives additional information about the processes. The TID
value is process ID number and is used with the kill command to remove a process. The
command kill 1c0046 removes the process associated with task 1c0046. The reset
command removes all processes from the PVM process list.
Figure 61. Example of ps and kill commands
The version command (see Figure 62) provides information about the PVM version.
The halt command stops the PVM daemon on each node of the cluster and removes the
pvmd and pvml session files that are created on each node of the cluster. This command
should be run before any maintenance is done to the cluster if the PVM program is running.
98
SEQUEST Cluster Installation and Operation Manual
Thermo Scientific
3
Using the SEQUEST Cluster
PVM Console
Figure 62. Output from version command
PVM depends on five environmental variables to work correctly. Table 2 lists and describes
these variables.
Table 2. Environmental variables used by PVM
Variable
Microsoft Windows 2000
Red Hat LINUX
PVM_ARCH
WIN32
LINUX or LINUXI386
PVM_ROOT
C:\Cluster\Pvm
/usr/share/pvm3
PVM_TMP
C:\Cluster\Temp
/tmp
PVM_RSH
PVM_VERSION
/usr/bin/rsh
3.4.3
3.4.4
Note Depending upon your configuration, some of these values may vary from what is
shown above.
Thermo Scientific
SEQUEST Cluster Installation and Operation Manual
99
4
Troubleshooting
If you are having trouble using your cluster, refer to the following common problems and
solutions as given in this chapter.
Contents
• Computer Name and Login Account Name Are the Same
• Account Name and WRSHD Login Are Not the Same
• AutoLogon Feature of Microsoft Windows 2000 Is Not Set
• Need Additional Linux Subsets
• PVM Will Not Start
• Extra Configuration Entries in WRSHD
• WRSHD Cannot Create Service
• WRSHD Will Not Start on Microsoft Windows 2000 / Windows XP
• RSH Does Not Work Between Microsoft Windows 2000 Server /
Windows 2003 Server and Linux Nodes
• RSH Is Not Working Correctly
• Extra Files From an Aborted PVM Session
• Poor Cluster Performance
• Cluster Searches Will Not Run Through SEQUEST Queue
Thermo Scientific
SEQUEST Cluster Installation and Operation Manual
101
4
Troubleshooting
Computer Name and Login Account Name Are the Same
Computer Name and Login Account Name Are the Same
PVM cannot work on a system that uses the same name for a computer and the login account
under which PVM is run. For example, if you use proteomics as the login account name then
you do not want to name any of the computers proteomics.
Account Name and WRSHD Login Are Not the Same
Because the RSH is set up with the account name proteomics, you must be logged in as
proteomics for the PVM to work correctly.
Note If you decided to use a different account name (instead of proteomics) as the login
name then you use that account name when configuring the RSH software.
AutoLogon Feature of Microsoft Windows 2000 Is Not Set
If during the initial setup of the slave nodes, the automatic logon feature has not been set,
then you can manually configure the software using the following procedure.
Microsoft Windows includes a feature that enables you to configure the computer to
automatically logon to the network, bypassing the Winlogon dialog box. To enable this
function you need to add several new values to the registry key.
Y To configure the AutoLogon feature
1. Choose
Start > Run to open the Run dialog box.
2. Type regedit and then click OK to open the Registry Editor.
3. Locate the following entry in the registry:
HKEY_LOCAL_MACHINE\SOFTWARE\Microsoft\Microsoft Windows
NT\CurrentVersion\Winlogon.
4. Add a new string value named DefaultUserName and set it to the username you want to
use to automatically logon. For example: proteomics.
5. Add a new string value named DefaultPassword' and set this to the password for the user
entered above. For example, the password for proteomics.
6. Add a new string value named AutoAdminLogon and set it to 1 to enable auto logon.
7. Exit the Registry Editor and restart your computer.
Once you have configured AutoLogon, Microsoft Windows does not stop at the login
box and wait for you to enter the login information; instead, it automatically proceeds to
the desktop corresponding to the default username.
102
SEQUEST Cluster Installation and Operation Manual
Thermo Scientific
4 Troubleshooting
Need Additional Linux Subsets
Note The password is stored in registry, which means anyone who has access to the
machine has access to the password. You can bypass this function by holding down
<Shift> during the boot or logoff process.
It is also important to note that if the DontDisplayLastUserName value is enabled, the
auto logon feature does not function.
Need Additional Linux Subsets
This procedure shows how to load the RSH Server, PVM and VSFTPD subsets. Other
subsets may also be installed using this procedure but you will have to use the name of the
specific subset instead of the RSH Server, PVM or VSFTPD names. Additionally, these other
subsets may be on a different CD-ROM than is shown in these procedures—so you might
have to search each of the CD-ROMs that comes with the Red Hat software.
Note The locations and package names used in this example are based upon Red Hat
Linux 8.0.
Y To load a Linux subset after the operating system has been installed
1. Search for any RSH related subsets that are installed on the system:
rpm –qa | grep –i rsh
2. Search for the PVM or VSFTPD subsets that you would replace rsh with either pvm or
ftp.
3. Install the RSH-Server software, insert the CD-ROM labeled Installation CD 2 of 3 into
the CD-ROM drive, and type:
mount /dev/cdrom
4. Change to the RedHat/RPMS directory:
cd /mnt/cdrom/RedHat/RPMS
5. Install the RSH-Server package:
rpm –Uhv rsh-server-0.17-10.i386.rpm
cd /
umount /dev/cdrom
6. Install the VSFTPD and PVM software, insert the CD-ROM labeled Installation CD 3 of
3 into the CD-ROM drive and type:
mount /dev/cdrom
7. Change to the RedHat/RPMS directory:
cd /mnt/cdrom/RedHat/RPMS
8. Install the VSFTPD package:
rpm –Uhv wu-ftpd-2.6.2.-8.i386.rpm
Thermo Scientific
SEQUEST Cluster Installation and Operation Manual
103
4
Troubleshooting
Extra Configuration Entries in WRSHD
9. Install the PVM software:
rpm –Uhv pvm-3.4.4-6.i386.rpm
10. Remove the CD-ROM:
umount /dev/cdrom
Extra Configuration Entries in WRSHD
If you need to remove a configuration entry from the WRSHD program, use this command:
configure –remove username
Where you replace username with the name that you want to remove.
Note To run this command you must be logged in as administrator.
WRSHD Cannot Create Service
If WRSHD was already installed on the system, removed using the Uninstall Microsoft
Windows command, and then re-installed on the system, then use this command:
rshd -install
might generate an error (see Figure 63).
Figure 63. WRSHD CreateService error
In this case, do the following:
1. Uninstall the software.
104
SEQUEST Cluster Installation and Operation Manual
Thermo Scientific
4 Troubleshooting
WRSHD Will Not Start on Microsoft Windows 2000 / Windows XP
2. Choose
Start > Run to open the Run dialog box.
3. Type “regedit” and then click OK to open the Registry Editor.
4. Locate the following entry in the registry:
HKEY_LOCAL_MACHINE\SYSTEM\CurrentControlSet\Services\BsdRshd.
5. Delete the entry and close the Registry Editor.
WRSHD Will Not Start on Microsoft Windows 2000 / Windows XP
The WRSHD on Microsoft Windows 2000/ Windows XP is run as a Microsoft Windows
Service (
Start > Settings > Control Panel > Administrative Tools > Services) under the
name BsdRshd.
You can stop and start the daemon from this dialog box by double-clicking on the BsdRshd
name in the list of services and clicking on the Start or Stop button in the BsdRshd Properties
dialog box.
To manually start the daemon, stop the BsdRshd daemon, and then, from a console window,
use these commands:
c:
cd \cluster\wrshd
rshd -d
When the BsdRshd daemon is started in debug mode the program prints information to the
console window as it receives commands. You can use this information to debug the RSH
problems.
Additional information about the WRSHD program can be found in the help file wrshd.hlp
in the directory c:\cluster\wrshd.
RSH Does Not Work Between Microsoft Windows 2000 Server /
Windows 2003 Server and Linux Nodes
If the RSH does not work between the Windows 2000 Server / Windows 2003 Server master
node and a Linux slave node, then check the log file /var/log/messages on the Linux node to see
what is wrong and correct the problem.
To view the contents of this value use this command:
cat /var/log/messages
Thermo Scientific
SEQUEST Cluster Installation and Operation Manual
105
4
Troubleshooting
RSH Is Not Working Correctly
RSH Is Not Working Correctly
If it appears that the RSH isn’t working correctly, you can test it with the following steps:
1. Log in to the master computer as administrator.
2. Open a MS/DOS console window and change to the directory C:\Cluster\wrshd.
3. Check the RSH configuration, use this command:
configure -list
This command displays the output shown in Figure 64.
Figure 64. Output from the configure command
4. Type this command to test the RSH command if the slave node is running Microsoft
Windows 2000 / Windows XP:
rsh node1 –l proteomics c:\cluster\wrshd\id.exe
This command displays the output shown in Figure 65.
106
SEQUEST Cluster Installation and Operation Manual
Thermo Scientific
4 Troubleshooting
RSH Is Not Working Correctly
Figure 65. Output from id.exe command
5. If the slave node is running Red Hat Linux, use this command:
rsh node1 –l proteomics “cat /etc/hosts”
This command displays the contents of the hosts file on the slave node as shown in
Figure 66.
6. You can repeat these commands between the slave nodes and master computer by logging
into one of the slave nodes and use this command:
rsh master “c:\cluster\wrshd\id.exe”
Figure 66. Output from “cat /etc/hosts” command
Thermo Scientific
SEQUEST Cluster Installation and Operation Manual
107
4
Troubleshooting
PVM Will Not Start
PVM Will Not Start
If, during the startup of PVM, any error messages occur (see Figure 67), the messages are
written to the pvml.proteomics file in the directory c:\cluster\temp. This file is a text file that can
be opened in Microsoft Notepad. Additional information is included in this file that is not
shown in the console window. Check this file first if PVM does not start.
Figure 67. PVM Startup with errors
In most cases, if PVM was running correctly in the past, you can fix this type of problem by
restarting the master node of the cluster. If, after restarting the master computer, the problem
still exists, then you need to reboot the entire cluster.
If the error messages in the PVM console state that the PVM nodes cannot be found, then the
binding order for the network cards might not be correct. This message is also found in the
pvml file in the PVM temp directory (normally, c:\cluster\temp).
Windows 2000 Server and Windows 2003 Server associate the computer name with the
networking protocol that is considered the initial protocol in the loading order for the
network cards. In Windows 2000 Server or Windows 2003 Server, this order can be changed
with the following steps:
1. From the Windows Taskbar, choose Start > Settings > Control Panel.
2. Double-click on the Network and Dial-up Connections icon.
3. Choose Advanced > Advanced Settings from the menu.
4. In the Connections box, select the adapter that you want to change the binding order on.
After you select the adapter, the Bindings for Local Area Connection box displays the
current binding order.
108
SEQUEST Cluster Installation and Operation Manual
Thermo Scientific
4 Troubleshooting
Extra Files From an Aborted PVM Session
5. Use the arrows on the right side of the box to move the protocol you choose to the top of
the list and then click OK.
6. If you are prompted to restart the computer, click Yes.
If PVM starts on the master node but it does not start on the slave nodes when you are using
Linux, then verify that the PVM_RSH variable is set. If it has been set then verify that it is
pointing to the correct RSH version.
Extra Files From an Aborted PVM Session
If you stop PVM without entering the halt command in the PVM console, then you might
have to manually cleanup the PVM session files. This can happen if you close the PVM
Console window or if the computer crashes.
If the system is running and you close the PVM console window, then you need to manually
stop the pvmd daemon. On Microsoft Windows 2000 or XP, this is done in the Task
Manager, whereas on Red Hat Linux or Fedora, you need to use the ps and kill commands. If
you are unfamiliar with the operation of either of these tools, then consult with your System
Administrator.
In the PVM temp directory (normally c:\cluster\temp on Microsoft Windows 2000 / XP or
/tmp on Red Hat Linux / Fedora), some files begin with pvmd and pvml. The pvmd file
contains the process id for the active PVM session. The pvml file is a log file that contains
status information for the current PVM session.
Note The extension for these files might vary based upon the OS that you are running.
On Microsoft Windows, these files will use an extension that is based upon the account
name, whereas on Linux the files will use the UID value for the account name.
Y To delete these files (pvmd.* and pvml.*) on a Windows 2000 or XP computer
1. Open an MS/DOS console window.
2. Enter these commands:
c:
cd \cluster\wrshd
del pvm*.*
Y To delete these files (pvmd.* and pvml.*) on Red Hat Linux or Fedora computer
Enter these commands:
cd /tmp
rm pvm*.*
Thermo Scientific
SEQUEST Cluster Installation and Operation Manual
109
4
Troubleshooting
Poor Cluster Performance
Poor Cluster Performance
If it appears that the cluster is taking longer to perform searches than it was previously
requiring, then check the process list in the PVM console window. Wait until no SEQUEST
searches are running on the cluster. Then, in the PVM Console window enter the following
command:
ps -ax
This command lists the PVM processes that are running on the cluster. If there are processes
remaining for the sequest_slave, then you will want to delete these processes. This is done
with either the kill or reset command in the pvm console window.
Cluster Searches Will Not Run Through SEQUEST Queue
If a SEQUEST Cluster search is set up to run on the SEQUEST Queue and the search is not
running, then you will want to check 2 items on the master node.
The SEQUEST Queue works with the service SEQUEST Daemon. Windows services run
under the SYSTEM account. The PVM software is (normally) run under the proteomics
account. When a tasks connects to PVM, on Windows, it looks for a pvmd file where the file
extension matches the account the program is being run under. Therefore, if you run a search
directly from Bioworks Browser, PVM looks for the pvmd.proteomics file, whereas a search
run from the SEQUEST Daemon service is looking for a pvmd.system file. If PVM can't find
the appropriate file, it will exit from the task that is trying to connect to PVM. If PVM is
started through the Cluster Manager program, then the pvmd.system file will be created. If
you manually start PVM (from a MS-DOS console window or through some other means),
you will need to manually copy the pvmd.proteomics file to pvmd.system.
If normal SEQUEST searches can be run through the SEQUEST Queue but the SEQUEST
Cluster searches will not run on the SEQUEST Queue, then verify that the PVM
environment variables (PVM_ROOT, PVM_ARCH, PVM_TMP, PVM_VERSION) are set
as SYSTEM variables in the Advanced > Environment Variables page of the System
Properties dialog. If the PVM values are only present in the User section, then add them to
the SYSTEM section and click OK when you are finished. Then stop the PVM console and
reboot the master node.
If a SEQUEST Cluster search is set up to run on the SEQUEST Queue and the search is not
running, then you will need to check the permissions of the Cluster Temp folder. Locate the
C:/Cluster/temp folder and set the security level for USERS to Full Control.
110
SEQUEST Cluster Installation and Operation Manual
Thermo Scientific
A
Installation Checklists
Contents
• Master Computer Checklist: Windows 2000 Server
• Master Computer Checklist: Windows 2003 Server
• Slave Computer: Microsoft Windows 2000 Checklist
• Slave Computer: Microsoft Windows XP Checklist
• Slave Computer: Red Hat Linux / Fedora Checklist
Thermo Scientific
SEQUEST Cluster Installation and Operation Manual
111
A
Installation Checklists
Master Computer Checklist: Windows 2000 Server
Master Computer Checklist: Windows 2000 Server
Task
Status
Install and configure Microsoft Windows 2000 Server
Install Microsoft Windows 2000 Service Pack 4
Configure network cards
Install PVM
Install and configure of RSH
Install of Xcalibur 1.4 or 2.0
Install of Bioworks 3.3.1
Install and configure of SEQUEST Cluster 3.3.1
Install of FASTA Databases
Configure of PVM Nodes in Cluster Manager
Distribute SEQUEST program to slave nodes
Distribute FASTA databases to slave nodes
112
SEQUEST Cluster Installation and Operation Manual
Thermo Scientific
A Installation Checklists
Master Computer Checklist: Windows 2003 Server
Master Computer Checklist: Windows 2003 Server
Task
Status
Install and configure Microsoft Windows 2003 Server
Install Microsoft Windows 2003 Server Service Pack 1
Configure network cards
Install PVM
Install and configure of RSH
Install of Xcalibur 1.4 or 2.0
Install of Bioworks 3.3.1
Install and configure of SEQUEST Cluster 3.3.1
Install of FASTA Databases
Configure of PVM Nodes in Cluster Manager
Distribute SEQUEST program to slave nodes
Distribute FASTA databases to slave nodes
Thermo Scientific
SEQUEST Cluster Installation and Operation Manual
113
A
Installation Checklists
Slave Computer: Microsoft Windows 2000 Checklist
Slave Computer: Microsoft Windows 2000 Checklist
Node
114
Install OS
Install SP4
SEQUEST Cluster Installation and Operation Manual
Install PVM
Install RSH
Share directories
AutoLogon
Thermo Scientific
A Installation Checklists
Slave Computer: Microsoft Windows XP Checklist
Slave Computer: Microsoft Windows XP Checklist
Node
Thermo Scientific
Install OS
Install SP2
Install PVM
Install RSH
Share directories
SEQUEST Cluster Installation and Operation Manual
115
A
Installation Checklists
Slave Computer: Red Hat Linux / Fedora Checklist
Slave Computer: Red Hat Linux / Fedora Checklist
Node
116
Install OS
Configure
RSH
SEQUEST Cluster Installation and Operation Manual
Configure
VSFTP
Configure
PVM
Add database
directory
Add account
Thermo Scientific
I
Index
A
extra files from an aborted PVM session 109
account name and WRSHD login are not the same 102
administrator login, configuration using 72
autologin feature is not set 102
F
FASTA Databases, installing 16
final configuration 72
B
background information 1
batch searching 93
BioWorks, installing 16
I
cluster
background information 1
how it works 2
setting up 5
Cluster Manager 81
computer name same as login account name 102
configuring
BioWorks
on master node 86
on remote client computer 88
Fedora 3.0 56
Fedora 4.0 60
Fedora 5.0 64
Fedora 6.0 69
final configuration 72
Red Hat Enterprise Linux 3.0 47
Red Hat Enterprise Linux 4.0 51
Red Hat Linux version 8.0 37
Red Hat Linux version 9.0 42
using the administrator login 72
using the proteomics login 78
installation
checklists 111
installing
BioWorks 16
FASTA Databases 16
Fedora 3.0 54
Fedora 4.0 58
Fedora 5.0 62
Fedora 6.0 67
master node software 16
PVM, master node 16
PVM, slave node 25, 33
Red Hat Enterprise Linux 3.0 45
Red Hat Enterprise Linux 4.0 49
Red Hat Linux 8.0 35
Red Hat Linux 9.0 40
RSH 17
RSH, slave node 26, 33
SEQUEST Cluster software 19
slave node software 25, 32
Xcalibur 16
installing and configuring
Windows 2000 20
Windows 2000 server 7
Windows 2003 server 12
Windows XP 28
D
L
databases, managing 83
Linux
Fedora 3.0
configuring 56
installing 54
C
E
extra configuration entries in WRSHD 104
Thermo Scientific
SEQUEST Cluster Installation and Operation
117
Index: M
Fedora 4.0
configuring 60
installing 58
Fedora 5.0
configuring 64
installing 62
Fedora 6.0
configuring 69
installing 67
Red Hat Enterprise Linux 3.0
configuring 47
installing 45
Red Hat Enterprise Linux 4.0
configuring 51
installing 49
Red Hat Linux
setting up the slave nodes with version 9.0 58, 62, 67
Red Hat Linux 8.0
configuring 37
installing 35
Red Hat Linux 9.0
configuring 42
installing 40
subsets, need additional 103
M
managing databases 83
master node
installing software 16
setting up 6
S
SEQUEST
batch search, using 93
running 90
running from the Search Selected Samples dialog box 94
SEQUEST Cluster Manager 81
SEQUEST Cluster software, installing 19
SEQUEST cluster, how it works 2
setting up
cluster 5
master node 6
slave nodes with Windows 2000 20, 28
slave nodes, Red Hat Linux 58, 62, 67
slave nodes
setting up with Windows 2000 20, 28
software, installing 25, 32
SRF files, processing 84
starting and stopping PVM software 82
submitting SRF files for processing 84
U
need additional Linux subsets 103
updating the Microsoft Windows registry 27, 35
using
SEQUEST batch search 93
SEQUEST Cluster 81
P
W
poor cluster performance 110
processing SRF files 84
proteomics login, configuration using 78
PVM
commands 97
console 96
installing, master node 16
installing, slave node 25, 33
starting and stopping 82
will not start 108
Windows 2000
Professional, installing and configuring 20
Server, installing and configuring 7
Windows 2003
Server, installing and configuring 12
Windows XP
Professional, installing and configuring 28
WRSHD
cannot create service 104
will not start 105
R
X
registry, updating 27, 35
remote client
configuring BioWorks on 88
Xcalibur, installing 16
N
118
required software 6
RSH
does not work between nodes 105
installing, master node 17
installing, slave node 26, 33
is not working correctly 106
SEQUEST Cluster Installation and Operation
Thermo Scientific


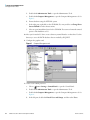


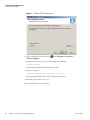
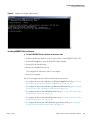


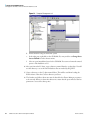


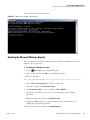


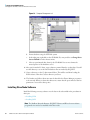


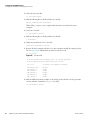


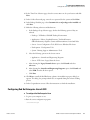
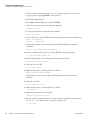
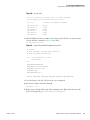


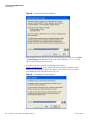

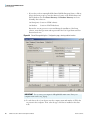
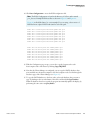
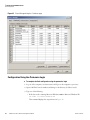


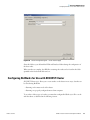

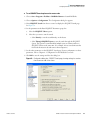


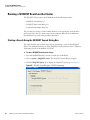
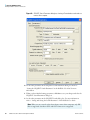


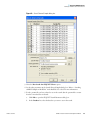


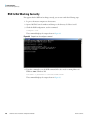
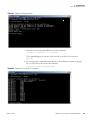


![[incr tsdb()]](http://vs1.manualzilla.com/store/data/005780303_1-7064634619abc733efac654e2a82e90d-150x150.png)