1
1.PACKAGE CONTENTS
One Anthem-SL with TRU•MIC, Element pickup, endpin preamp, volume control and battery lead __ pre-assembeled
One battery bag
Six self-stick wire clips
Two adhesive pads for volume control
One extra adhesive set for Tru • Mic
2. OVERVIEW AND CAUTIONS
The Anthem SL Classical features our patent pending TRU•MIC microphone technology. The mic is designed to capture the majority of your guitar’s true voice in a
way that only a microphone is capable of - plus it is amazingly feedback resistant. Our Element under saddle pickup carries only the lowest frequencies for punch
and authority. The TRU•MIC and Element pickup are preset for optimum performance and the soundhole mounted controller has volume and mic gain trim controls.
This system must be installed by a professional dealer/installer. We do not provide installation advice or support for home or hobbyist installations. Installers: please
read the instructions carefully before proceeding. We will not be responsible for any damage to the guitar, pickup system or personal injury resulting from installation.
3. STRAPJACK INSTALLATION
Drilling the strapjack hole
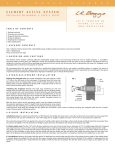
For proper installation, this jack requires a clean 1/2” hole in the tail block of the
instrument. If the guitar lacks this hole, start by placing a piece of masking tape on
the outside of the instrument over the drilling area (to avoid chipping the finish),
drill a small pilot hole in the tail block and then follow with a step drill bit.
fig. 1
Installing the strapjack
Remove the strap ring, retaining nut and one washer from the smaller threaded
section of the jack. There should still be one star locking washer, one flat washer
and a nut remaining on the larger threaded section of the jack. Bring the jack down
through the soundhole into the body and insert it into the pre-drilled hole in the
tail block. Using the internal nut (be sure to include the flat and star washers), set
the proper depth that will allow the entire smaller threaded section to protrude
from the instrument (see figure 1). With the jack in place, lay the remaining washer
over the threads and attach the external retaining nut until it’s tight. Finish by
attaching the strap ring (it should cover the retaining nut and washer). Asserting
too much pressure may crack the finish.
Tail Block
4. ELEMENT PICKUP INSTALLATION
For optimum performance
The bridge slot must have a clean, flat surface free of debris and excess over-spray from lacquer, (sometimes left from guitar manufacturers). String balance problems
are often the result of an uneven interface between the bottom of the saddle and the saddle slot floor. Both surfaces must be completely flat to give you the best
chance at a successful installation.
The depth of the saddle slot is an important factor. A tip to help determine if your slot depth is adequate is the 50/50 rule which basically says: The amount of saddle
visible above the bridge surface (with pickup installed) should be equal to or less than the amount of saddle in the slot beneath the bridge surface. An installation in
which you have a tall saddle in a very shallow slot could be the cause of problems ranging from string to string imbalance, excess feedback, and poor tone quality.
Drilling the hole
Drill the hole at either end of the slot approximately 3/16” beyond the outer string. Use a bit no smaller than 3/32” but of course no larger than the width of the saddle
slot. Before you drill, inspect the inside of the guitar and note the position of the braces in relation to the saddle slot. Drill the hole at a slight angle being careful to
avoid all braces as the drill bit penetrates the top. Now using a small file or exacto blade, slightly chamfer and de-burr the edge of the hole where the pickup bends
to protect it from being kinked or pinched. Remove all loose debris from the slot (see figure 2).
Drill hole at slight angle
Avoid drilling through brace
3/16”
3/16”
Chamfer edge
Bridge
Guitar Top
fig. 2