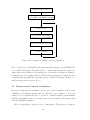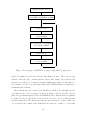
1
VISUAL3 User’s & Programmer’s Manual Rev. 2.35 OpenGL version Bob Haimes Massachusetts Institute of Technology March 20, 2001 1 License This software is being provided to you, the LICENSEE, by the Massachusetts Institute of Technology (M.I.T.) under the following license. By obtaining, using and/or copying this software, you agree that you have read, understood, and will comply with these terms and conditions: Permission to use, copy, modify and distribute, this software and its documentation for any purpose and without fee or royalty is hereby granted, provided that you agree to comply with the following copyright notice and statements, including the disclaimer, and that the same appear on ALL copies of the software and documentation: Copyright 1990-1998 by the Massachusetts Institute of Technology. All rights reserved. THIS SOFTWARE IS PROVIDED “AS IS”, AND M.I.T. MAKES NO REPRESENTATIONS OR WARRANTIES, EXPRESS OR IMPLIED. BY WAY OF EXAMPLE, BUT NOT LIMITATION, M.I.T. MAKES NO REPRESENTATIONS OR WARRANTIES OF MERCHANTABILITY OR FITNESS FOR ANY PARTICULAR PURPOSE OR THAT THE USE OF THE LICENSED SOFTWARE OR DOCUMENTATION WILL NOT INFRINGE ANY THIRD PARTY PATENTS, COPYRIGHTS, TRADEMARKS OR OTHER RIGHTS. The name of the Massachusetts Institute of Technology or M.I.T. may NOT be used in advertising or publicity pertaining to distribution of the software. Title to copyright in this software and any associated documentation shall at all times remain with M.I.T., and USER agrees to preserve same. 2 Contents 1 Introduction 4 2 VISUAL3 User Interface 5 2.1 Surfaces . . . . . . . . . . . . . . . . . . . . . . . . . . . . . . . . . . . . . . 5 2.2 Windows . . . . . . . . . . . . . . . . . . . . . . . . . . . . . . . . . . . . . 6 2.3 Scalar Visualization Tools . . . . . . . . . . . . . . . . . . . . . . . . . . . . 8 2.4 Vector Visualization Tools . . . . . . . . . . . . . . . . . . . . . . . . . . . . 10 2.5 Grid . . . . . . . . . . . . . . . . . . . . . . . . . . . . . . . . . . . . . . . . 13 2.6 Thresholding . . . . . . . . . . . . . . . . . . . . . . . . . . . . . . . . . . . 13 2.7 Cell Visualization Tools . . . . . . . . . . . . . . . . . . . . . . . . . . . . . 14 2.8 Probes . . . . . . . . . . . . . . . . . . . . . . . . . . . . . . . . . . . . . . . 16 2.9 Help Menus . . . . . . . . . . . . . . . . . . . . . . . . . . . . . . . . . . . . 17 2.9.1 3D Window . . . . . . . . . . . . . . . . . . . . . . . . . . . . . . . . 17 2.9.2 2D Window . . . . . . . . . . . . . . . . . . . . . . . . . . . . . . . . 18 2.9.3 1D Window . . . . . . . . . . . . . . . . . . . . . . . . . . . . . . . . 19 2.9.4 Dials Window . . . . . . . . . . . . . . . . . . . . . . . . . . . . . . . 19 2.9.5 Key Window . . . . . . . . . . . . . . . . . . . . . . . . . . . . . . . 21 2.10 Dialbox Functions . . . . . . . . . . . . . . . . . . . . . . . . . . . . . . . . 22 2.11 Environment Variables . . . . . . . . . . . . . . . . . . . . . . . . . . . . . . 23 2.12 Special Files . . . . . . . . . . . . . . . . . . . . . . . . . . . . . . . . . . . . 23 2.12.1 Notes on the Common Desktop Environment – CDE . . . . . . . . . 25 3 Programming VISUAL3 26 3.1 Visualization of Steady Data . . . . . . . . . . . . . . . . . . . . . . . . . . 26 3.2 Post-processing Unsteady Visualization . . . . . . . . . . . . . . . . . . . . 27 3.3 Programming Overview . . . . . . . . . . . . . . . . . . . . . . . . . . . . . 29 3.3.1 Node Numbering . . . . . . . . . . . . . . . . . . . . . . . . . . . . . 29 3.3.2 Cell Numbering . . . . . . . . . . . . . . . . . . . . . . . . . . . . . . 30 3.3.3 Connectivity . . . . . . . . . . . . . . . . . . . . . . . . . . . . . . . 31 3.3.4 Blanking 32 . . . . . . . . . . . . . . . . . . . . . . . . . . . . . . . . . 3 3.4 3.5 3.6 3.3.5 Surfaces . . . . . . . . . . . . . . . . . . . . . . . . . . . . . . . . . . 32 3.3.6 Programming Notation . . . . . . . . . . . . . . . . . . . . . . . . . 33 Programmer-called subroutines . . . . . . . . . . . . . . . . . . . . . . . . . 35 3.4.1 V3 INIT . . . . . . . . . . . . . . . . . . . . . . . . . . . . . . . . . . 35 3.4.2 V3 CURSOR . . . . . . . . . . . . . . . . . . . . . . . . . . . . . . . 37 Programmer-supplied subroutines . . . . . . . . . . . . . . . . . . . . . . . . 38 3.5.1 V3CELL . . . . . . . . . . . . . . . . . . . . . . . . . . . . . . . . . 38 3.5.2 V3SURFACE . . . . . . . . . . . . . . . . . . . . . . . . . . . . . . . 40 3.5.3 V3GRID . . . . . . . . . . . . . . . . . . . . . . . . . . . . . . . . . 41 3.5.4 V3SCAL . . . . . . . . . . . . . . . . . . . . . . . . . . . . . . . . . 41 3.5.5 V3THRES . . . . . . . . . . . . . . . . . . . . . . . . . . . . . . . . 41 3.5.6 V3VECT . . . . . . . . . . . . . . . . . . . . . . . . . . . . . . . . . 42 3.5.7 V3EQUIV . . . . . . . . . . . . . . . . . . . . . . . . . . . . . . . . . 42 3.5.8 V3BLANK . . . . . . . . . . . . . . . . . . . . . . . . . . . . . . . . 42 3.5.9 V3UPDATE . . . . . . . . . . . . . . . . . . . . . . . . . . . . . . . 43 3.5.10 V3ZPRIME . . . . . . . . . . . . . . . . . . . . . . . . . . . . . . . . 44 3.5.11 V3XYPRIME . . . . . . . . . . . . . . . . . . . . . . . . . . . . . . . 44 3.5.12 V3SURF . . . . . . . . . . . . . . . . . . . . . . . . . . . . . . . . . 45 3.5.13 V3XYSURF . . . . . . . . . . . . . . . . . . . . . . . . . . . . . . . 45 3.5.14 V3SSURF . . . . . . . . . . . . . . . . . . . . . . . . . . . . . . . . . 46 3.5.15 V3VSURF . . . . . . . . . . . . . . . . . . . . . . . . . . . . . . . . 46 3.5.16 V3EVENT . . . . . . . . . . . . . . . . . . . . . . . . . . . . . . . . 47 3.5.17 V3EVENTHELP . . . . . . . . . . . . . . . . . . . . . . . . . . . . . 47 3.5.18 V3STRING . . . . . . . . . . . . . . . . . . . . . . . . . . . . . . . . 47 C Programming . . . . . . . . . . . . . . . . . . . . . . . . . . . . . . . . . . 48 4 Hard-Copy Post-Processing 50 4.1 tab2ps . . . . . . . . . . . . . . . . . . . . . . . . . . . . . . . . . . . . . . . 50 4.2 img2ps . . . . . . . . . . . . . . . . . . . . . . . . . . . . . . . . . . . . . . . 50 4.3 img2tiff . . . . . . . . . . . . . . . . . . . . . . . . . . . . . . . . . . . . . . 51 4.4 img2X . . . . . . . . . . . . . . . . . . . . . . . . . . . . . . . . . . . . . . . 52 4 4.5 lin2ps . . . . . . . . . . . . . . . . . . . . . . . . . . . . . . . . . . . . . . . 5 Warning and Error Messages 52 53 5 1 Introduction VISUAL3 is an interactive graphics environment for the visualization of three-dimensional, structured and/or unstructured data. This volumetric data may be steady or time varying. VISUAL3 is written in FORTRAN as well as C, and uses X and the Open Graphics Library (OpenGL) for display on workstations with 3D graphics hardware. Since it uses true color rendering, VISUAL3 requires atleast 24 bits of color and Z-buffering for fast 3D drawing. A dialbox is also strongly recommended. The first section describes the user interface, the functionality of VISUAL3 and the way in which the user running the program can invoke the different capabilities. The second section describes the programming interface, the way in which the programmer couples VISUAL3 to create the end-user application program. The third section describes some programs for the post-processing of output files generated by VISUAL3. The final section describes the meaning and possible actions for the errors reported by VISUAL3. It should be noted that VISUAL3 can run over the network (the client and server on different machines). It was NOT designed to do this. The performance is degraded and the network becomes the bottle-neck (infact VISUAL3 generates noticable amount of traffic). For steady-state and other post-processing applications, move the data over the network to the machine with the graphics and then run VISUAL3. For distributed visualization run in a co-processing mode, use the pV3 system. 6 2 VISUAL3 User Interface In trying to understand the following description of the user interface, it may be helpful to run the demo programs found in the demo directory of the distribution. Five of these demo programs are called ‘blocks’, ‘polytet’, ‘hexa’, ‘prism’, and ‘tetrapyra’. The only substantial difference between them is the type of cells which define the computational grid and so the user will see little difference. The demo program ‘unsteady’ is similar to ‘hexa’ but is unsteady. The demo program ‘cprism’ is functionally identical to ‘prism’ but is written in C. As an example of loosely-coupled co-processing, the script ‘co-proc’ starts two programs ‘coproc’ and ‘covis’ that communicate through disk files; this is a prototype for distributed computing in which a CPU-intensive computation is performed on one machine (e.g. Cray) and the visualization is performed on another. 2.1 Surfaces VISUAL3 deals with three different types of surfaces. The first category is ‘domain’ surfaces. These are surfaces that are defined by the application program which initializes VISUAL3, and they typically correspond to the surfaces which bound the computational domain. A subset of this first class, are ‘mapped domain’ surfaces, for which there is a mapping from points on the surface to an (x , y ) coordinate system, this allows plotting of surface quantities in a 2D setting. The second category is ‘dynamic’ surfaces. These are surfaces whose orientation and position, relative to the computational domain, can be changed interactively by the user. Although there are several types of dynamic surface, only one dynamic surface can exist at one time. Also, a dynamic surface cannot be activated when a mapped domain surface is being plotted in the 2D window. The third category is ‘static’ surfaces. These are surfaces which at one time were ‘dynamic’, but then were ‘frozen’ and transferred into a database, along with the domain surfaces. These static surfaces are then treated in almost the same way as the unmapped domain surfaces. NOTE: Any ‘static’ surface in a ‘grid unsteady’ application deforms with the grid movement. The surface is associated with the cells and not physical space. Therefore, for planar cuts, the data is not clipped to the 2D window size when the surface was saved. 7 2.2 Windows The user interface is divided into six different windows. As is typical of X-window applications, the functions invoked by mouse button, keyboard or dialbox input are dependent upon the position of the cursor. Thus, different functions are available to the user depending on which window is ‘active’, i.e. contains the cursor. An important feature of the user interface is its help key. Pressing ‘?’ will cause a list of the available commands for the active window to be displayed in the text window. The six different windows are: • Text Window The text window is the window from which VISUAL3, or rather the application program, was started. It is a good idea to keep this window in the lower left corner of the screen where it will not be obscured by the other VISUAL3 windows. This window is used to output various messages, including the help menus, and to input filenames, numerical values, etc. • 3D Window The 3D window displays data on three-dimensional surfaces. It also displays threedimensional lines such as tufts and streamlines, which are discussed later. The objects in the 3D window can be rotated, translated and enlarged using the dialbox. All motion is relative to screen coordinates and not object coordinates. One key allows the user to store particular viewing positions, and later restore then using the numeric keypad. An output file, described later, retains this data so that it can be used with other data sets. • 2D Window The 2D window is used to display data on a mapped domain or dynamic surface (for which there exists a mapping to a (x , y ) coordinate system.) • 1D Window The 1D window is used to display one dimensional data which is generated by various functions in the 2D window or from mapping streamlines. • Key Window This window displays the color scheme used in the 3D and 2D windows. When the cursor is in this window, there are many options available. These include the ability to interactively change the color scheme, load in a new color scheme, or change the length of displayed vectors. A ‘traffic light’ (which is red when VISUAL3 is computing, yellow when VISUAL3 waiting for some specific user input, and green when ready to accept new user input) 8 is active in the left-most portion of this window. Tied to the ‘traffic light’ color is the color of the cursor. When the cursor is yellow VISUAL3 is expecting mouse button presses. A red cursor indicates that the current function may be interrupted by clicking on the red ‘traffic light’. • Dialbox Window The dialbox window serves two functions. The first is to display the functions associated with each of the dials of the dialbox. Pressing the middle mouse button will switch the dialbox display between the 3D, 2D and key windows for which the dials are active, and in each case eight dials are displayed together with labels describing the dial function (pan, zoom, rotate, etc.) when the cursor is in that window. If there is no dialbox the dials can be rotated by putting the cursor on the appropriate dial and holding down the left or right mouse button; in this case the window that is changed is the one labelled in the base of the dialbox window. Holding down the mouse button in the center of the dial will cause faster movement. In this mode the affected window will go into ‘fast-drawing’ mode where only the surface edges are drawn. Under many circumstances this produces more interactive positioning than using the physical dialbox. Pressing ‘s’ switches the dialbox window to, and from, its secondary role, which displays the state of the surface database. The database lists all of the domain and static surfaces, and for each one has four small boxes which give the status of important surface ‘attributes’. The first box gives the rendering status (white=ON, grey=translucent, black=OFF), the second is the grid status (white=ON, black=OFF), the third is the grey surface status (white=ON with colored contours, grey=ON, black=color) and the fourth is the thresholding status (white=ON, grey=cell based flat-shading, black=OFF). The meaning of some of these terms will become clearer later when discussing the visualization tools. The user can change the attributes by pressing any mouse button when the cursor is on one of the boxes. Doing this, or pressing a mouse button on the surface label, also causes that surface to become the ‘active’ surface. The ‘active’ surface is highlighted in the database, and is important for certain plotting options discussed later. 9 2.3 Scalar Visualization Tools The most important data type in VISUAL3 is scalar data, which is simply scalar information defined at each node of the computational grid. VISUAL3 does not know anything about the data other than an associated function number and label. For example, in fluid dynamic applications, function 1 may have label ‘pressure’ and function 2 may have label ‘Mach number’. An important concept in VISUAL3 is the notion of ‘active’ functions, and the ‘active scalar function’ is the function number and associated label which corresponds to the scalar data currently stored by VISUAL3. The user can switch to a different scalar function by hitting a particular key on the keyboard which is ‘bound’ by the initialization procedure to the desired function. For example, key ‘p’ may be bound to function 1, labelled ‘pressure’. The following is a list of plotting functions available for use with scalar data: • Surface rendering Gouraud-shaded (smooth color shading) surface contours of the scalar function can be rendered on any, or all, of the domain and static surfaces. Column 1 of the surface database is used to select which surfaces are to be displayed. With the cursor in the key window, there is a variety of options to interactively change the color scheme used for the rendering. Key ‘l’ loads a new color file, while key ‘r’ restores the original color file. Two dials on the dialbox change the upper and lower bounds of the scalar function range spanned by the color scheme. If the ‘active’ surface (as defined earlier) is a mapped domain surface (with an associated mapping to a (x , y ) coordinate system), then Gouraud-shaded contours can also be plotted in the 2D window, by pressing F5 in the 3D window. The active surface is highlighted in the surface database, but if one is unsure of which it is in the 3D window then pressing F1 will cause the rendering on that surface to blink off and on. Another option with mapped domain surfaces is F6 in the 3D window, which performs a surface rendering in both the 2D and 3D windows of the active ‘surface scalar’ function, a function that is only defined on mapped domain surfaces as specified by the programmer (FKEYS=3, see V3 INIT description). The color map used to render this surface function can be viewed by toggling key ‘s’ in the key window. • Cutting plane The cutting plane is a dynamic surface, a true planar surface cutting through the 3D field. The cutting plane is initialized by pressing F3 in the 3D window. This puts the 3D window into a special mode in which the 3D object is held fixed and the user can use the dialbox to rotate the cutting plane into the desired orientation. When 10 ready, pressing F3 again switches off the initialization mode and turns on the regular cutting plane mode. At this point there is a computational initialization step which takes from seconds to a minute or two depending on the size of the data set. (The ‘traffic light’ in the key window will change from red to green when VISUAL3 is ready to process new user input.) Once the cutting plane is activated, it is controlled from the 2D window, meaning that it responds to keys and dials that are active when the cursor is in the 2D window. Using dials, the cutting plane can be moved from side to side, up and down, in a direction normal to the plane (using the ‘scan’ dial) and rotated in its own plane. Function key F9 toggles (switches on and off) rendering in the 2D window, while F6 toggles rendering in the 3D widow. F10 toggles the display in the 2D window of the grid defined by the intersection of the cutting plane and the 3D computational grid faces. The cutting plane can be turned off and on (without reinitialization) using F2 in the 3D window. The cutting plane position can also be stored, like the 3D viewing position, by pressing the Ctrl key and one of the ten numbers in the numeric keypad on the right-hand-side of the keyboard. It can be restored later by pressing just the number. • Program-defined cutting plane This is similar to the last option, but instead of being a truely planar surface, it is a surface corresponding to z = const, where z is a programmer-defined function; the ‘scan’ capability varies the value of const interactively. This allows the programmer to define conical, cylindrical or other surfaces not otherwise defined by VISUAL3. The programmer also must define a mapping to (x , y ) coordinates so that plotting is possible in the 2D window. The program-defined cutting plane is activated by F4 in the 3D window. The other options in the 2D window are the same as for the regular cutting plane. • Iso-surfaces An iso-surface is a dynamic surface with a uniform value of the current active scalar variable, and is activated by F7 in the 3D window. The iso-surface value is displayed in the key window and can be varied interactively (in the key window) using the dialbox to ‘scan’ the value of z , or key ‘z’ to set its value, or the right mouse button to pick a value from the color key. 11 2.4 Vector Visualization Tools The second data type is vector data. This is a set of 3D vector values for each grid node. As with the scalar function, this vector data is associated with an ‘active’ vector function, which can be changed by pressing a key that is ‘bound’ to another vector function. The following is a list of plotting functions for vector data: • Streamlines ‘Streamlines’ are curved 3D lines which are everywhere parallel to the local vector field. They are obtained by numerical integration of the vector field along a line starting at some chosen location. The starting point is determined by use of a surface plotted in the 2D window. A point in the 2D window maps back to a corresponding point on the dynamic surface in the 3D window and so can be used to begin a single streamline; pressing one of the mouse buttons does this and (depending on which button is pressed) produces a streamline going upstream and/or downstream. Alternatively, key F11 (and subsequent mouse actions which are requested) defines a line or circle in the 2D window, which is then used to to begin a set of streamlines in the 3D window. Key F12 starts a set of streamlines from a regular grid of points in the 2D window. Using key F12 in the 3D window, the streamlines can be plotted either as lines of constant color (usually white), or colored according to the value of the local scalar function. In the latter case, it is helpful to enable the ‘grey’ status for background surfaces (using column 3 in the surface database) so that instead of being rendered in color they are instead rendered in solid grey, making the colored streamlines clearer. Also in the 3D window, key F10 animates the streamlines, F11 turns rendering on and off, and ‘Delete’ deletes all previously generated streamlines. A ‘streamer’ is an interactive streamline. It is activated by the ‘Tab’ key in the 2D window. When pointing in the 2D window, the streamline that goes through the cursor position is drawn in the 3D window. NOTES: 1) If key F5 in the 3D window is in effect, rendering a mapped domain surface in the 2D window, then the streamlines which are generated are similar to regular streamlines except that they are lie in the surface, by taking the projection of the local vector field onto the surface. Similarly, if key F6 is in effect, rendering a mapped domain surface with the surface scalar function, then the streamlines are generated using the surface vector function. 2) The streamline accuracy is reduced for the segment that crosses interface regions. Invoking this option also slows down the overall integration speed. 12 • Ribbons Stream ribbons are streamlines that have been given some width. One edge is the true particle path, the other edge is constructed by rotating a constant length normal vector about the path tangent according to the local streamwise angular rotation rate. The result is a ribbon whose twist illustrates the streamwise vorticity of the flow. When ribbons are invoked, all 3D streamlines are drawn as ribbons. If the streamlines are colored, the ribbon is rendered in the default streamline color (usually white), otherwise the ribbon is colored with the current scalar. The width of the ribbon may be adjusted by using the dials when the cursor is in the key window. A specific width may be entered by hitting ‘w’. Also, the ribbons may be rotated by using the dials with the cursor in the Key Window. • Tubes A tube is a streamline with a circular crossflow area. The radius of the cross-section is derived from the local crossflow divergence. The crossflow divergence measures the local crossflow expansion rate. Thus, the resulting tube displays the local expansion/compression of the current vector field. When tubes are invoked, all 3D streamlines are drawn as tubes. If the streamline coloring is on, the tubes will be colored with the current scalar. Otherwise, the default streamline color is used. The width of the tube may be adjusted by using the dials when the cursor is in the key window. A specific width (and maximum radius) may be entered by hitting ‘w’ in the key window. The maximum radius is useful to limit the size of the tube in stagnation regions of a flow field where the radius can become exponentially large. • Tubes with Twist The rotation and divergence effects can be rendered simultaneously by placing lines on the surface of tube which twist with the local rotation rate. This effectively combines the functionality of the ribbons and tubes. The final image displays the streamline, the rotation rate, the crossflow divergence, and scalar variations. When tubes with twist are invoked, all 3D streamlines are drawn as tubes with twist. If the streamline coloring is on, the tubes will be colored with the current scalar and the lines will be in the default streamline color. Otherwise, the tube is the default color and the lines are the current scalar. As with ribbons and tubes, the rotation angle, the tube size, and the tube maximum may all be controlled from the key window using the dial box or by the appropriate key strokes. 13 • Bubbles Bubbles are unsteady particle paths. Bubbles have essentially the same type of functionality as their steady counterparts - streamlines. Bubbles are active when Visual3 is being used in an unsteady mode. A single bubble path may be spawned by simply pressing a mouse button in the 2D window which provides an initial point to start the integration in 3D space. If streamline rendering is off (F11 in the 3D window), only the current bubble location is displayed. Otherwise, the current and the three previous or ghost bubble locations are rendered. This provides the same effect as hydrogen bubbles in experimental techniques. If streamline coloring is on (F12 in the 3D window), the current location will be rendered by the current scalar; if not, the current location is rendered with the default streamline color. Ghost bubbles always appear in grey. Several bubble paths may be started from a line or circle by using key F11 in the 2D window. Similarly, a grid of bubbles may be spawned using F12 in the 2D window. Finally, if the Streamer is on (Tab key in the 2D window), bubbles will be continuously spawned from the current cursor location at every time step. This mimics the experimental technique of streaklines where dye is continuously injected at a spot in the flow field. NOTE: Bubbles are numerically integrated using a fourth-order accurate method. Whenever a particle starts, the accuracy of the first two steps are second-order, the third step is third-order, and the fourth and beyond are fourth-order in time. • Tufts Tufts are similar in concept to streamlines. A regular grid of points in the 2D window map to a corresponding grid of points on the surface in the 3D window. At the points in the 3D window, tufts are drawn which are short lines with magnitude and direction correponding to the local vector field. At the points in the 2D window the tufts correspond to the projection of the 3D vector field onto the 2D plane. Key ‘Tab’ in the 3D window toggles tufts on and off. One of the dials in the key window allows interactive change in the scaling parameter which relates the vector magnitude to the tuft size, and key ‘a’ allows this scaling parameter to be input from the keyboard. • Arrows Arrows are the same as tufts except that they are defined only at 2D nodes (the intersection of a cut and cell edges). To emphasise that they are different, they are drawn as lines with heads in the 2D window, whereas tufts are drawn as lines with a cross base. Arrows are shown on cutting planes as well as iso-surfaces and are 14 displayed in the 3D window as line segments. Arrows are toggled on and off by key F7 in the 2D window. • Vector Clouds Vector clouds display the local vector field at nodes which meet the current threshold limits. The vector cloud technique is useful for locating interesting flow features and displaying the vector fields in these regions. Vector clouds are invoked by hitting F8 in the 3D window and are always rendered with the current scalar. 2.5 Grid The computational grid can be displayed on any, or all, of the static and dynamic surfaces. For the static surfaces this is controlled through column 2 of the surface database, and for the dynamic surface and 2D surface it is controlled by function key F10 in the 2D window. The grid lines that are displayed correspond to the intersection of the plotting surfaces and the faces of the computational grid. 2.6 Thresholding A threshold function is another scalar function which is set, or changed, by pressing the appropriate keys. The purpose of this function, when enabled, is to restrict all domain and static surface plotting to only those parts of the surface on which the thresholding function lies within a certain range. The user can interactively vary the upper and lower threshold bounds. The user can also select, through column 4 of the surface database, the surfaces that are to be thresholded. If the threshold function is chosen to be the same as the scalar function, then this provides a means to plot the part of a surface on which the scalar function is within certain limits. If the threshold function is chosen to be geometric (e.g. x) then this produces a dynamic ‘cutaway’, in which the surface is only plotted within a certain geometric volume. The threshold function can be set in two ways. Pressing a key on the keyboard that has been defined by the programmer to be associated with a threshold function (FKEYS=5, see V3 INIT description) loads that functions data into the threshold array. Alternatively, pressing F9 in the 3D window loads the current scalar function data into the threshold array. The thresholding limits, within which plotting will be performed, can be varied interactively using dials in the key window, or input manually using key ‘t’. 15 2.7 Cell Visualization Tools Another data type used by VISUAL3 is cell based scalar data, which is simply scalar information defined in each cell of the computational domain. This data type is usefull for grid quality assessment (were the scalar is a grid “goodness/badness” parameter) and for testing embedding criteria for grid adaptation (node enrichment). Unlike the scalar visualization, Gouraund-shading is not used. All surfaces of an individual cell are drawn with the same color. This is because the entire cell has the same value. The color of the cell is based on the value of the cell scalar and the associated color map. Also, cell visualization is always thresholded by the cell scalar limits. The cells can be completely rendered into the 3D window. They can be opaque or transparent (F11 in the key window), each cell outlined (F10 in the key window) or colored in grey (F9 in the key window). And, the color map used to render the cell function can be viewed by toggling key ‘s’ in the key window. The following is a list of plotting functions available for use with cell based scalar data where the result is rendering of the complete cell: • Surface Cells The cells that are within the cell scalar limits and touch the ‘active’ surface (as defined earlier) are displayed in the 3D window by pressing F1 in the key window. The active surface is the entry highlighted in the surface database found in the dialbox window. • Cut Cells The cells that are intersectted by a cut (either planar, programmed or iso-surface) and are within the cell scalar limits are rendered in the 3D window. This is activated/deactivated by the F2 key in the key window. These cells will remain even after the cut has been turned off. • Volume Cells All cells that are within the cell scalar limits are drawn in the 3D window. This option is selected by F8 in the key window. The level of interactivity can be severely impactted by using Volume Cells (based on the total number of cells plotted). For this reason, it is advisable to adjust the cell scalar limits to an appropriate and restrictive range before initiating this option. Also, to further enhance performance, some pre-processing is performed if the cell connectivity data is available. This calculation determines if a cell to be drawn is completely surrounded by cells that will also be plotted. If so, the cell is NOT plotted. The user will not notice this unless the clipping dial is used to cut into the data, then the hollows will be seen! 16 Cell data may also be flat-shaded on any static surfaces by using the fourth column of the surface database. When the box is grey, the surface is rendered by using a constant color within each cell selected via the colormap associated with the cell based scalar. The data from any dynamic surface can also be flat-shaded using the cell based scalar. This is activated by hitting F6 in the Key window. The data drawn in the 2D and 3D window are effected. Any probe generated (in the 1D window) from the 2D window will reflect the cell based scalar information. 17 2.8 Probes There are a variety of ‘probes’ which are available when plotting in the 2D window or from streamlines: • Point (2D - F1) The point probe is located at the cursor position, and returns, in the text window, the point’s coordinates and the value of the active scalar and vector functions. • Strip chart (2D - F2) The strip chart is similar to the point probe, except that instead it produces a plot in the 1D window of the current scalar function against time. • Line (2D - F3) When the line probe is invoked the user is asked to input two points using the mouse. These define a line in the 2D window, and the output is a plot in the 1D window showing the variation of the current scalar function along that line. • Edge Plot (2D - F4) The edge plot is similar to the line plot, except that in this case the line in the 2D window is the edge line closest to the cursor when this option is invoked. Multiple edge lines may be placed on the same plot. • Surface Layer (2D - F5) This option produces a line plot in the 1D window of the current scalar function along a line placed normal to an edge in the 2D window, at the edge position which is closest to the cursor. As the user moves the cursor, the normal line moves accordingly. • Streamline Probe (1D - PageUp/PageDown) The streamline probe may be started any time there are streamlines. The last streamline is mapped to the 1D window in a line plot of the current scalar against the length of the streamline. When the cursor is in the 1D window a colored disc appears in the 3D window. The color of the disc displays the local scalar, the size mimics the stream tube thickness. For surface streamlines the mapped cursor is a cross-hair displayed in both the 2D and 3D windows. This allows the user to both know which streamline is mapped and probe the streamline. Hitting ‘PageUp’ or ‘PageDown’ again maps the next/previous streamline. NOTES: 1) Tabular output files (visualXYZ.tab) created when this probe is active also contain the coordinate triads for the streamline. 2) When tubes are on, the disc size is 150% of the tube thickness. 18 2.9 2.9.1 Help Menus 3D Window The help menu that is printed when one types ‘?’ in the 3D window is as follows: 3D Window Mouse Buttons: m - Center View @ Cursor Key Strokes: + ~ - write visual.img File PrintScrn - write visual.lin File F1 - Show Current Surface F2 - Toggle Cutting Plane F3 - Cutting Plane positioning F4 - Toggle Program Cut Plane F5 - Toggle Surface Display F6 - Toggle Disp. w/Surface Fn F7 - Toggle Iso-Surface F8 - Toggle Vector Clouds F9 - Set Scalar as Threshold F10 - Animate StreamLines F11 - StreamLine Render Toggle F12 - StreamLine Color Toggle Del - Delete Last StreamLine Delete - Delete all StreamLines Insert - Save Dynamic Surface ^ - Shading Toggle Tab Home - Reset View PageUp - Depth Cueing Toggle PageDown - Reset Clipping NumPad - Set view from position # Ctrl-NumP - Store view in position # ! - 3D Window Status End - Terminate 2D modes | - Ribbon/Tube Toggle Pause - Freeze the action Esc - Terminate VISUAL3 - Tufts Toggle - Box blow-up Comments: 1) At the top of the help menu in real applications there would be a list of the scalar, vector and threshold function variables and their associated keys, as defined by the application program. 2) A toggle is a switch that is either on or off, and so pressing the key changes it to the other status. 3) Clipping is similar to a geometric thresholding. It displays the part of the 3D object that is behind a plane held parallel to the screen. 4) In the ‘NumPad’ and ‘Ctrl-NumP’ descriptions, ‘NumPad’ and ‘NumP’ refer to one of the ten numbers on the numerical keypad on the right of the keyboard. This number is then referred to as #. This option allows the storing and recall of ten different viewing positions 19 and any cutting planes that are active. For SGI machines the ‘NUM LOCK’ light must be on for these key-strokes to be acknowledged. For other machines (where the numerical keypad does not produce a proper series of codes) other keys (or the actual number keys) may be used by default. NOTE: For different keyboards (than the default), the special keys can be controlled via the ‘Visual KB’ environment variable. 2.9.2 2D Window The help menu that is printed when one types ‘?’ in the 2D window is as follows: 2D Window Mouse Buttons: l - StreamLine going upstream m - StreamLine going up/downstream r - StreamLine going downstream Key Strokes: + - Box blow-up ~ - write visual.img File PrintScrn - write visual.lin File F1 - Point Probe F2 - Strip Chart F3 - Line Probe F4 - Edge Plot F5 - Surface Layer Scan F6 - 3D Window Render Toggle F7 - Arrow Toggle F8 - Contour Toggle F9 - Render Toggle F10 - Grid Toggle F11 - Line/Circle of StreamLines F12 - Grid of StreamLines Delete - Flip X in Window Tab - Streamer Toggle End - Terminate Line Plot . - Point to XYZ / Cell / Node ! - 2D Window Status t - Dynamic Threshold Toggle Comments: 1) the ‘Delete’ option reverses the sign of the x -coordinate in the 2D window, effectively ‘turning over’ the 2D window. This is helpful when the cutting plane surface you are seeing in the 3D window is the reverse side of the 2D window. 2) ‘End’ ends all plotting in the 1D window. 3) Multiple edge lines may be placed on the same edge plot by starting the edge plot; first hit F4 when the cursor is near one edge. Next, by hitting F4 with the cursor near another edge also places that edge line in the 1D window. If the edge is already included in the plot, and F4 is hit with the cursor nearest the edge, the edge is removed from the plot. 20 2.9.3 1D Window The help menu that is printed when one types ‘?’ in the 1D window is as follows: 1D Window Mouse Buttons: m - Set Cut Plane w/ StreamLine Probe (positioning on) Key Strokes: r - add Reference line x - Change X scaling y - Change Y scaling End - Terminate Line Plot PrintScrn - Tabular Output PageUp - StreamLine Probe/Next PageDown - StreamLine Probe/Last Comments: 1) To set a planar cut perpendicular to the streamline at a given postion, first turn the streamline probe on and select the appropriate streamline, then turn planar cut positioning on (F3 in the 3D window). Move the cursor in the 1D window to the correct position, and to finish, press the middle mouse button. 2) The ‘Reference line’ is an additional line placed in the 1D window along with the results of a probe. This line is read from a file in the VISUAL3 tabular file output format and displayed in grey. 2.9.4 Dials Window Dials Window (Dials) Mouse Buttons: l - Move Dial Clockwize m - Change Window Mapping r - Move Dial CounterClockwize Key Strokes: ~ - write ImageFile of Screen c - comparison window d - Dial Sensitivity s - Surface List Toggle 21 Dials Window (Surface List) Mouse Buttons: any - Select Key Strokes: ~ - write ImageFile of Screen c - comparison window d - Dial Sensitivity s - Surface List Toggle PageUp - Move Surface List Up PageDown - Move Surface List Down Delete - Remove Current Surface V Box: 1 black not rendered grey translucent white opaque - Vec Toggle-Current Surf 2 no grid grid on 3 4 scalar rendered no thresholding grey surface cell rendering grey w/ contour thresholding on Comments: 1) This window has two modes; dials and surface list (database). In dials mode it displays or emulates the functions of the dialbox dials (if a dialbox) exists. In surface list mode it displays the surface database, a list of all of the domain, dynamic and static surfaces and their attributes. 2) In dials mode, pressing the middle button displays in succession the meaning of the dials for each of the principal windows. If dialbox emulation is being used pressing the right or left mouse buttons has the effect of turning the appropriate ‘pseudo-dial’. The middle circle moves the dial faster than the outer portion of the dial. Holding the button down will cause VISUAL3 to go into ‘outline’ mode for faster motion. This can be defeated by holding down the Shift key while pressing on the button. 3) In surface list mode, boxes 1,2,3,4 refer to the four columns of the surface list which are labelled on the screen as Render/Grid/Grey/Thres. 4) The ‘comparsion window’ is an additional window placed on the screen. This window displays of the contents of an existing VISUAL3 image file. It is open in the upper-left corner of the screen and may be moved by using the appropriate window manager functions. The keystroke ‘End’ hit in this window, closes it and deallocates any memory. 22 2.9.5 Key Window The help menu that is printed when one types ‘?’ in the key window is as follows: KEY Window Mouse Buttons: m - Set new color at cursor position r - Set Iso-Surface value Key Strokes: F1 - Current Surface Cell Toggle F2 - Cut Cells Toggle F6 - Dynamic Cell Render Toggle F8 - Volume Cell Toggle F9 - Render Cells grey F10 - Outline Cell Toggle F11 - Transparent Cells A - Toggle 3D arrow-head type S - Set arrow-head shape a - (Re)Set arrow/tuft size c - Set # of Contours f - (Re)Set function limits h - Histogram Toggle l - Load new color file m - Set S.L. Animation q - Report field limits r - Reset color scheme s - Toggle color schemes t - (Re)Set thresh lims w - Set Tube/Ribbon width z - Set ZPrime ! - Key Window Status Comments: 1) Option ‘s’ allows one to toggle the display of the color schemes, between the color scheme that is used for all standard scalar rendering, the scheme that is used to display scalar surface functions, and the color map used for scalar cell rendering. 2) The iso-surface and cutting planes both correspond to a surface on which z = const. Option ‘z’ allows one to explicitly specify the value of this constant. 3) If the displayed key is for a node based scalar, the histogram is performed based on nodes. If when the histogram is activated, the displayed key and color scheme is for a cell based scalar, then the histogram is done on cells. 23 2.10 Dialbox Functions ✗✔✗✔ ❦ ❦ ✖✕✖✕ X rotation Z✗✔ rotation ✗✔ ❦ ❦ ✖✕✖✕ Y ✗✔ rotation ✗✔ Scan ❦ ❦ ✖✕✖✕ Pan Scroll ✗✔ ✗✔ ❦ ❦ ✖✕✖✕ Zoom Clip X rotation: rotate about X-axis Z rotation: rotate about Z-axis Y rotation: rotate about Y-axis Scan: move cutting plane or iso-surface Pan: move right/left Scroll: move up/down Zoom: enlarge/reduce Clip: move clipping boundary 3D window ✗✔✗✔ ❦ ❦ ✖✕✖✕ Rotation ✗✔ ✗✔ ❦ ❦ ✖✕✖✕ Scan ✗✔✗✔ ❦ ❦ ✖✕✖✕ Pan Scroll ✗✔ ✗✔ ❦ ❦ ✖✕✖✕ Zoom Rotation: rotate Scan: move cutting plane Pan: move right/left Scroll: move up/down Zoom: enlarge/reduce 2D window ✗✔✗✔ ❦ ❦ ✖✕✖✕ Tube max Rib rot ✗✔ ✗✔ ❦ ❦ ✖✕✖✕ Vsize Tube/Rsize ✗✔✗✔ ❦ ❦ ✖✕✖✕ Fmin Fmax ✗✔ ✗✔ ❦ ❦ ✖✕✖✕ Tmin Tmax Tube max: maximum tube size Rib rot: ribbon rotation Tube/Rsize: change tube/ribbon size Vsize: change scaling of tufts/arrows Fmin: change minimum scalar function value Fmax: change maximum scalar function value Tmin: change minimum thresholding value Tmax: change maximum thresholding value Key window 24 2.11 Environment Variables VISUAL3 uses a number Unix environment variables. The variable ‘Visual3 CP’ defines the file path to be searched for color files, if they are not in the user’s current directory. This allows all of the color files to be kept in one system directory. On our system at MIT this is set to be ‘/usr/users/Visual3’. The second variable, ‘Visual KB’ is optional. This variable, if defined, must point to a file that contains alternate keyboard bindings for the special keys used by VISUAL3. The file is ACSII. The first column is the key name (10 characters) and the second is the X-keysym value in decimal (use ‘xev’ to determine the appropriate values for the key strokes). 2.12 Special Files At Rev 2.25 (and higher) all files either used by or produced by VISUAL3 will work on all UNIX releases. This includes the files generated for hard-copy post-processing. • Setup File When VISUAL3 is initialized, it looks in the user’s current directory for a file ‘.Visual3.setup’. This is an ASCII file which contains a number of useful defaults that the user may want to set to different values than VISUAL3’s initial defaults. It also contains a set of viewing positions and cutting plane positions. Normally this file is generated by VISUAL3 when the user wants to store certain favorite parameters and viewing positions so that they can be used again on another data set, which is particularly useful when the user wishes to directly compare two different data sets with the same computational grid or geometry. However, an experienced user can also generate this file from scratch. • Structure File To compute streamlines, and perform certain other functions, VISUAL3 needs cell connection data which is not supplied by the application. Therefore, part of the initialization phase consists of VISUAL3 deducing this information from the cell pointer data supplied by the user. This can be a time-consuming operation, so when completed VISUAL3 writes out the information in an unformatted structure file named ‘.Visual3.struc’, and when VISUAL3 is next re-started it looks in the current directory to see if this file exists. If it does, it loads in the information which saves a considerable amount of time for large grids. VISUAL3 does some error checking to determine whether the structure file it has loaded really correponds to the current grid data supplied to VISUAL3; if it does not, it recomputes the structure information and 25 will overwrite the old structure file. It is possible for the error checking to fail, and for VISUAL3 to load and use an incorrect structure file, in which case VISUAL3 will behave strangely and will probably abort with some error message; The solution to this is to delete the old structure file. • Color Files A number of different color files are supplied with the distribution. For those who wish to define their own color files, the format of these ASCII files is as follows: nc nb r g b . . nc . . r g b . nb . . where nc is the number of colors, nb is the number of background colors (0–4), and r, g, b are red,green,blue intensity values (0.0–1.0). The four background colors are for window background; grid color; tuft/streamline/ribbon color; contour line color. The default values which are used if nb = 0 are black; white; white; white. If nb = 0 then the specified colors over-ride the defaults for the first nb colors. When VISUAL3 searches for named color files, it first looks in the current directory, and then follows the color file path specified by the environment variable ‘Visual3 CP’. • Window Manager Resource File By default, all modern Xwindows Managers allow the closing or deleting of windows by either double-clicking on the menu pull-down or selecting ‘Close’ or ‘Quit’ from the pull-down. This will abort the execution of the Visual3 application. To avoid this, an additional window manager menu description can be added to the default information for the Window Manager. This is accomplished by specifying a userlevel resource. In the distribution the following files can be found in the top level directory; ‘user.4Dwmrc’, ‘user.mwmrc’, and ‘user.dtwmrc’. These files are for SGI’s default window manager, the Motif window manager and CDE’s window manager, respectively. The entire resoure file (for the appropriate window manager) must be copied from the system (usually something like ‘/usr/lib/X11/system.XXwmrc’ or 26 ‘/etc/dt/config/sys.dtwmrc’) – if not already done. This file gets named ‘.XXwmrc’ (where XX is 4D or m) and then the appropriate user resource file appended to the end. Note: for CDE, this file gets put in the ‘.dt’ directory at the users top level and must be given the name ‘dtwmrc’. • .Xdefaults If the SGI window manager is used, ‘4DWm’ must be told what to do with Visual3’s windows. These commands must be placed in the file ‘.Xdefaults’. See the file ‘user.Xdefaults’. For DEC, IBM and SUN systems this information is found in the window manager’s Setup File (Mwm or the appropriate file for the WM used). Visual3 requires three X fonts. The file ‘.Xdefaults’ in the users home directory is examined for the font names and are designated “Visual*large”, “Visual*medium” and “Visual*small”. The sample file ‘user.Xdefaults’ comes with the distribution and may be concatenated to the user’s ‘.Xdefaults’ file. The X fonts loaded on any system may be examined by the command ‘xlsfonts’. • ‘Mwm’ Setup File When a user begins a session using the Motif window manager, it reads the initialization file ‘Mwm’ in the user’s home directory. This file contains information on how to treat various classes of windows and the window focus (as well as other things). A sample file ‘user.Mwm’ is in the distribution and may be used as ‘Mwm’ or its contents concatenated to the user’s ‘Mwm’ file. • ‘twm’ Setup File If the ‘twm’ window manager is used, when a user begins a session, twm reads an initialization file ‘.twmrc’ in the user’s home directory. This file defines certain key bindings and window attributes. It is necessary for correct Visual3 operation for the user to modify the standard ‘.twmrc’ file as shown in the ‘user.twmrc’ file on the Visual3 distribution, or just use this file as ‘.twmrc’. 2.12.1 Notes on the Common Desktop Environment – CDE For Visual3 to work properly with CDE, the Style Manager must be used to change the default methods CDE uses for cursor/window functioning. Under the Window section “Point in Window to Make Active” must be selected. Also, “Raise Window when Active”, and “Allow Primary Windows on Top” must NOT be selected. 27 Common Blocks or global data Main Program ❄ VISUAL3 ✻ ❄ V3CELL,V3SURFACE,V3GRID,V3SCAL,V3VECT,... Figure 1: Flow diagram showing use of VISUAL3 3 Programming VISUAL3 3.1 Visualization of Steady Data The manner in which a user’s application program interacts with VISUAL3 is slightly unusual. As shown in Fig. 1 the program first initializes and activates VISUAL3 by calling V3 INIT. VISUAL3 then gets the data it requires from the program by calling a small number of programmer-supplied subroutines. These subroutines are connected to the main program only through COMMON blocks in FORTRAN or through global data in C. The reason for this unusual approach is that it keeps the interface between the program and VISUAL3 as simple as possible, and allows the programmer to plot new scalar functions by simply changing the code which supplies the scalar data to VISUAL3. In a steady visualization application, once VISUAL3 has been initialized by the main program, it remains in total control until it is terminated by the user interactively, and then it returns control to the main program. The simplest steady-state visualization application program is a main routine that reads the data from disk and calls V3 INIT. The application also contains the subroutines, V3SURFACE, V3GRID, V3SCAL, and if appropriate V3CELL and V3VECT, that are called by VISUAL3. Figure 2 shows the flow diagram for the control of VISUAL3. In the initialization phase V3CELL, V3SURFACE and V3GRID are called once to obtain the data structure and grid coordinates, which do not change. After initialization, VISUAL3 enters a large animation loop. At the beginning of the loop the first step is to process the list of X-events (keystrokes, dial movements, and cursor movements) that have occurred since the beginning of the previous loop. Processing this list can result in changes in the transformation matrix being used to view the objects in the 3D and 2D windows, or a change of desired scalar or vector variable, or the invokation of some new plotting function. 28 Initialize graphics windows ❄ call V3CELL, V3SURFACE, V3GRID ✗ ✔ ❄ process X-events ❄ if new scalar, call V3SCAL if new vector, call V3VECT ❄ ✻ (re)construct 2D data, if necessary ❄ render everything ❄ ✖ ✕ Figure 2: Flow diagram of VISUAL3 for steady application The second step is to call V3SCAL if the scalar variable has changed, and V3VECT if the vector variable has changed. The third step is to construct any 2D structures required for cutting planes and iso-surfaces. The final step is to perform the rendering, the drawing of the images in all of the graphics windows. The third and fourth steps are usually the most computationally and graphically demanding, and are optimized by keeping careful note of what has changed since the previous loop. 3.2 Post-processing Unsteady Visualization In post-processing unsteady visualization, the program control is similar to that in steady visualization. It is assumed that the unsteady data has been pre-computed or needs only a minor level of computational effort to generate it. Again the main program initializes VISUAL3 and transfers control to it, and program control is returned to the main program only when VISUAL3 terminates. There are currently two supported types of unsteadiness. The first type is ‘data un- 29 Initialize graphics windows ❄ call V3CELL, V3SURFACE, V3GRID ✗ ✔ ❄ process X-events ❄ call V3UPDATE ❄ if ‘grid unsteady’, call V3GRID call V3SCAL,V3VECT ✻ ❄ construct 2D data ❄ render everything ❄ ✖ ✕ Figure 3: Flow diagram of VISUAL3 for post-processing unsteady application steady’, in which the grid is fixed but the data changes in time. The second is ‘grid unsteady’ where the grid coordinates and the data are time varying. At present the grid structure is not allowed to be unsteady (though blanking may change). If the number of nodes, number of cells or cell connectivity changes then VISUAL3 must be re-initialized by terminating and restarting. The modifications to the control loop in VISUAL3 to handle both ‘data unsteady’ and ‘grid unsteady’ modes are very minor, as shown in Figure 3. Before the data collection phase, the programmer-supplied routine V3UPDATE is called. This allows the programmer to update the data as appropriate for the problem. As can be noted by this approach, the time varying data can exist in any form and reside in memory, on disk or may come over a network. One example in the distribution shows the use of disk i/o to plot results 30 from a completely separate process which is running concurrently. During the time that V3UPDATE is executing, VISUAL3’s user interface appears ‘frozen’; all keyboard, dialbox and mouse input is collected for subsequent processing, but there is no visual change on the screen. Thus, for good interactive response V3UPDATE should require significantly less than a second of computational effort. The other two changes are that V3GRID (and optionally V3BLANK) are called if the case is ‘grid unsteady’ so new grid coordinates must be obtained, and V3SCAL and V3VECT are always called, even if their definition has not changed (because their values will have changed). NOTE: the calls to V3GRID, V3SCAL, V3VECT and etc. are not made if the call to V3UPDATE does not change the simulation time. Under these conditions VISUAL3 assumes that the data has not changed. 3.3 Programming Overview Before presenting the subroutine argument lists in detail it is helpful to discuss in general terms the data structures which the programmer supplies to VISUAL3. The programmer gives VISUAL3 a list of unconnected cells, poly-tetrahedral strips and structured blocks. The disjoint cells are of four types; tetrahedra, pyramids, prisms and hexahedra. This element generality covers almost all data structures being used in current computational algorithms. Any special cell type which is different must be split up into some combination of these primitives by the programmer. Linear interpolation is used throughout VISUAL3, so high order elements must be also be subdivided so that the linear interpolation assumption is valid. Poly-tetrahedral strips are ‘structured’ collections of tetrahedra. The strip is started by a triangular face, one node is added to produce the first tetrahedron, another is added to produce the second cell (with the previous 3 nodes) and so forth. See Figure 4. Currently, no one is using this concept for calculating results but there is more than a factor of two savings in the storage required to represent a complete tetrahedral mesh. The distribution contains a FORTRAN routine ‘TET2POLYT.f’ which converts a volume of tetrahedral elements to a collection of poly-tetrahedra and single tetrahedra with an average strip length of between 8 and 9 cells. 3.3.1 Node Numbering The node numbering used within VISUAL3 differentiates between the nodes in the nonblock regions (formed by the disjoint cells and poly-tetrahedral strips) and the structured blocks. Figure 5 shows a schematic of the node space. knode is the number of nodes for the 31 ✁ ✁ ✁ ✁ ✁ ✁❆ ✁ ❆ ❆ ❆ ❆ ❆❆✁ ✁ ✁ ✁ ✁ ✁❆ ✁ ❍ ✁❆❍ ✁ ❆ ❍❍ ❆ ❍ ✁ ❆ ❍❍ ❆ ✁ ❆ ❆ ✁ ❆ ❆ ✁ ❆ ❆❆✁ ❆ tetra nodes: #1 1234 tetra nodes: #2 2345 tetra nodes: #3 3456 tetra nodes: #n (last) n n+1 n+2 n+3 face nodes face nodes face nodes face nodes 1 2 3 4 123 341 412 1 2 3 4 452 523 1 2 3 4 563 634 1 2 3 4 n+1 n+2 n+3 n+2 n+3 n n+3 n n+1 Figure 4: Ploy-Tetrahedral Strip non-block grid. Each structured block (m) adds N Im ∗N Jm ∗N Km nodes to the node space (where N I, N J and N K are the number of nodes in each direction). The node numbering within the block follows the memory storage, that is, (i,j,k) in FORTRAN and [k][j][i] in C. The VISUAL3 node number = base + i + (j − 1) ∗ N Im + (k − 1) ∗ N Im ∗ N Jm . Note: all indices start at 1. Blocks 1 knode nnode Figure 5: Node Space 3.3.2 Cell Numbering The non-block cell types may contain nodes from the non-block and the structured block volumes. The cell numbering used within VISUAL3 orders the cells by type. Figure 6 shows a schematic of the cell space. The programmer explicitly defines all non-block cells by the call V3CELL. Again the cells within the blocks are defined by the block size. Each structured block (m) adds (N Im − 1) ∗ (N Jm − 1) ∗ (N Km − 1) cells to cell space. The cell 32 numbering within the block follows the memory storage so that a VISUAL3 cell number = base + i + (j − 1) ∗ (N Im − 1) + (k − 1) ∗ (N Im − 1) ∗ (N Jm − 1). Note: i goes from 1 to N Im − 1, j goes from 1 to N Jm − 1, and k goes from 1 to N Km − 1. Tetras 1 Poly- Prisms Pyramids Hexas Blocks Tetras ncells Figure 6: Cell Space 3.3.3 Connectivity In order to calculate streamlines and particle paths from vector fields VISUAL3 requires information about which are cells are neighbors, i.e. share a common face. Rather than impose on the programmer the burden of computing these connections and passing the information to VISUAL3, instead VISUAL3 calculates this information by processing all cells with exposed faces. This process compiles a list of all of these faces and checks whether the face appears on another cell. If it does appear twice, then it is an interior face, and a streamline or particle can pass through from one cell to its neighbor. If it does not appear twice, then it is a surface face on the boundary of the computational domain, and a streamline will terminate when it hits the face (unless blanking is used or the option is invoked to search the domain boundaries for re-entry, see note #5 of V3 INIT). With the introduction of the structured block primitive, face matching between structured blocks is not possible. The node numbers that make up a face are different in both blocks even if they match in 3 space. The concept of ‘node equivalency’ allows the face matching to patch between regions. Node equivalency is simply a list of matching node numbers that get used only during this face matching procedure. This concept is generalized in VISUAL3 to allow equivalency to nodes anywhere in the node space. Anytime a streamline crosses a structured block, blanked or domain boundary and the integrator is able to continue (based on ‘node equivalency’ or other specified options), the accuracy is reduced for that segment. 33 3.3.4 Blanking Blanking is an option (see the description of V3 INIT) and only used with structured blocks to indicate that some region of the block is ‘turned off’. This information is also used to give VISUAL3 an indication of how multi-block grids are connected in these areas. A part of a block is deactivated by flagging the appropriate nodes as invalid. This is done by an IBLANK array. An invalid node is never used. A cell with an invalid node is considered not to exist and therefore cuts and iso-surfaces through that cell will not be plotted. Also streamlines will not pass through cells with invalid nodes. When blanking is used, all the nodes (nnode − knode) in the structured block space are given a value; zero corresponds to an invalid mesh point, any non-zero value indicates an existing node point. The value of one is the indication of an interior point. A negative value means that the physical space ‘continues’ in the block number that is the absolute value of this IBLANK entry. VISUAL3 uses an algorithm for integrating streamlines and particle paths accross blanked boundaries by finding the closest node to the required position in the target block that has an IBLANK entry equal to the original block. If the negative blanked region is at the boundary of the block and all IBLANK entries of the exitting face are the same (and the case is not grid unsteady) the connectivity information is updated with the connected cell if found. Future integrations in the current session that pass through this face will not require the IBLANK node searching. In the case of C-meshes and other topologies where the blocks abut, it is advisable to use ‘node equivalency’, if appropriate. Streamlines and particle paths are always faster going through a volume that has had face matching. When the visualization is grid unsteady, a new IBLANK array is requested for each snapshot in time (after the coordinate triads are retrieved). If the blanking has not changed, the data need not be updated, and V3BLANK should just return. But, VISUAL3 assumes that the blanking has changed, and therefore any saved cuts or iso-surfaces may contain invalid data. To prevent this problem in grid unsteady cases, saved cuts are valid only when the visualization is paused. As soon as the user continues any saved surfaces and cuts are deleted. 3.3.5 Surfaces In principle, all surface faces could be grouped together to form one bounding surface for plotting purposes. However, in many applications it is more useful to split the bounding surface into a number of pieces, referred to earlier as ‘domain surfaces’. For example, the outer bounding surface of a calculation of airflow past a half-aircraft (using symmetry to 34 reduce the computation) would typically be split into four pieces, the far-field boundary, the symmetry plane, the fuselage and the wing. If the programmer specifies each of these as separate ‘domain surfaces’ by grouping the appropriate faces, then VISUAL3 can offer the capability of plotting on just one or two of the surfaces (e.g. the fuselage and wing) and not on the others (far-field and symmetry plane). 3.3.6 Programming Notation VISUAL3 was designed to be accessible from both FORTRAN and C. FORTRAN is more restrictive in argument passing and naming, therefore it has shaped the programming interface. Also the following routine descriptions are from the FORTRAN programmer’s point of view. All subroutines internal to VISUAL3 have names which begin with ‘V3 ’ or ‘XFtn’ and the common blocks have names which begin with ‘V2C’ or ‘V3C’: such names should be avoided in an application program. It may also be helpful to look at the source code of the demo programs in the distribution. Each one is well commented and suitable for use as a template for other applications. In describing the arguments of the routines in the next sections, the following notation has been used. The variable name is first followed by ‘i’ or ‘o’, indicating input and output, respectively, showing whether or not the subroutine is to set the variable. The variable is then followed by an expression indicating the variable type (L=logical, I=integer, R=real, C=character) and its dimensionality (e.g. R(2,MNODE) indicates a two-dimensional real array with the first dimension being 2 and the second MNODE, where MNODE is an integer). The following is a list of all subroutines with a very brief description of their function: Programmer-called subroutines: • V3 INIT: initializes VISUAL3 and set arrays sizes • V3 CURSOR: moves the cursor in special circumstances Common Programmer-supplied routines: • V3CELL: defines the non-block cell data structures (not required for pure structured block cases) • V3SURFACE: defines the surface group data structure • V3GRID: sets the grid coordinates • V3SCAL: sets the scalar function values 35 • V3THRES: sets the threshold function values (optional) • V3VECT: sets the vector function values (optional) Optional Programmer-supplied routines: • V3EQUIV: defines node equivalency for face matching • V3BLANK: defines node blanking • V3UPDATE: updates time and/or data in unsteady post-processing applications • V3ZPRIME: defines the programmer-defined cutting plane • V3XYPRIME: defines associated (x , y ) values for programmer-defined cutting plane (necessary if V3ZPRIME exits) • V3SURF: initializes plotting of mapped domain surfaces • V3XYSURF: defines (x , y ) values for mapped domain surfaces (necessary if V3SURF exists) • V3SSURF: sets the surface scalar function values • V3VSURF: sets the surface vector function values • V3EVENT: allows programmer processing of X-events • V3EVENTHELP: additional help info associated with V3EVENT (necessary if V3EVENT exists) • V3STRING: additional label for plots 36 3.4 3.4.1 Programmer-called subroutines V3 INIT V3 INIT(TITL, IOPT, CMFILE, CMUNIT, WIN3D, NKEYS, IKEYS, TKEYS, FKEYS, FLIMS, MIRROR, KNODE, KEQUIV, KCEL1, KCEL2, KCEL3, KCEL4, KNPTET, KPTET, KNBLOCK, BLOCKS, KSURF, KNSURF) This subroutine initializes VISUAL3 and defines the active keys on the keyboard. TITL:i: C Title (up to 80 characters used) IOPT:i: I Control parameter IOPT=0 steady grid and data IOPT=1 steady grid and unsteady data (post-processing) IOPT=2 unsteady grid and data (post-processing) CMFILE:i: C Name of default color map file (up to 80 characters used) CMUNIT:i: I Logical unit number for file operations WIN3D:i: L .TRUE. if 3D window is bigger than 2D NKEYS:i: I Number of active keyboard keys IKEYS:i: I(NKEYS) X-keypress return code for each key TKEYS:i: C(NKEYS) Title for each key (up to 32 characters used) FKEYS:i: I(NKEYS) Type of function controlled by each key: FKEYS()=1 Scalar FKEYS()=2 Vector FKEYS()=3 Surface scalar FKEYS()=4 Surface vector FKEYS()=5 Threshold FKEYS()=6 Cell based scalar FLIMS:i: R(2,NKEYS) Function limits/scales FKEYS()=1,3,5,6 Min and max values of function FKEYS()=2,4 arrow/tuft scaling (only the first element is used) 37 MIRROR:i: I Mirror flag: MIRROR=0 No mirroring MIRROR=1 Mirror about the plane X=0.0 MIRROR=2 Mirror about the plane Y=0.0 MIRROR=3 Mirror about the plane Z=0.0 KNODE:i: I Number of non-block nodes KEQUIV:i: I Number or node equivalency pairs KCEL1:i: I Number of tetrahedra KCEL2:i: I Number of pyramids KCEL3:i: I Number of prisms KCEL4:i: I Number of hexahedra KNPTET:i: I Number of poly-tetrahedral strips KPTET:i: I Number of cells in all poly-tetrahedra KNBLOCK:i: I Number of structured blocks NOTE: A negative value indicates that blanking will be supplied for the blocks. BLOCKS:i: I(3,KNBLOCK) Structured block definitions: BLOCKS(1,m) = N I BLOCKS(2,m) = N J BLOCKS(3,m) = N K KSURF:i: I Number of domain surface faces KNSURF:i: I Number of domain surface groups Notes: 1) The X-keypress return codes for alphanumeric keys is identical to their usual ASCII integer codes. 2) A domain surface group is a collection of faces, which do not have to form a single connected surface, but form instead a logical grouping referred to earlier as being a domain surface. VISUAL3’s initialization phase examines each exposed face of each primitive, and determines whether or not it is shared with a neighboring cell. If not, it must be a surface face, but the user may choose to not declare it as such (see V3SURFACE). In this case, VISUAL3 takes all undeclared surface faces, splits them up into disjoint collections and calls the collection the ‘Others’ surface group. Therefore, the final number of domain surface 38 groups can exceed KNSURF by one. 3) FLIMS for FKEYS=1 and 5 will be calculated if set to zero. 4) If NKEYS is negative, the absolute value of NKEYS is used for the number of keys and streamline/ribbon/tube/bubble calculations are disabled. This frees up a large amount of memory (the cell connection information is discarded). 5) If NKEYS is greater than 1000, the number of keys is NKEYS-1000. This informs VISUAL3 that during streamline/bubble integration, when the path leaves the volume, to attempt to re-enter through another defined surface. Selecting this option will slow all streamline/bubble integrations. 3.4.2 V3 CURSOR V3 CURSOR(FLAG) This subroutine can be used by certain programmer-supplied routines when the programmer wants to add a function which needs user input from the text window. FLAG:i: L FLAG=.TRUE. Move cursor to text window FLAG=.FALSE. Move cursor back to previous window 39 3.5 Programmer-supplied subroutines The first set routines are the principal ones which will be used in most applications. 3.5.1 V3CELL V3CELL(CEL1, CEL2, CEL3, CEL4, NPTET, PTET) This subroutine supplies VISUAL3 with the grid data structure. It is not required for a grid that contains only structured blocks. CEL1:o: I(4,KCEL1) Node pointers for tetrahedral cells CEL2:o: I(5,KCEL2) Node pointers for pyramid cells CEL3:o: I(6,KCEL3) Node pointers for prism cells CEL4:o: I(8,KCEL4) Node pointers for hexahedral cells NPTET:o: I(8,KNPTET) Poly-Tetrahedra strip header: NPTET(1,n) = the pointer to the end of the strip n, i.e. it points to the last entry in PTET for the polytetrahedral strip NPTET(2,n) = the first node in the poly-tetrahedra NPTET(3,n) = the second node in the poly-tetrahedra NPTET(4,n) = the third node in the poly-tetrahedra NPTET(5-8,n) are used by VISUAL3 PTET:o: I(KPTET) The rest of each poly-tetrahedra, 1 node per cell Notes: 1) If KCELn is zero, the corresponding CELn must NOT be filled. And the same holds true for NPTET and PTET. 2) The correct order for numbering nodes for the four disjoint cell types is shown in Fig. 7. The Poly-Tetrahedra numbering is shown in Fig. 4. 3) When debugging or in any way changing the contents of this routine, delete ‘.Visual3.struc’ before re-running. 40 1✁✁❍❆❆❍❍❍ ✁ ✁ ✏ ✁✏ ✁ ✁ ✁ ✁ ✁ ✏ ✏ 2 ❆ ❆ ❍❍ ❍ ❆ ❆ ❆ ✏ ✏ ✏ ❆ ✏ ❆ ❆ ❍ ❍❍ ✏ ✏ 4 3 ✁ 1 ✁ ✁ ✁ ✁ ✁ ✁ 4 ❆ ❆ ❆ ❍❍ ❍ ❆ ❆ ❍ ❍❍ 3 ❆ nodes 123 234 341 412 Tetrahedron 5✁✁❍❆❆❍❍❍ ✁ face 1 2 3 4 ❆ 2❆ face 1 2 3 4 5 nodes 1234 235 345 451 512 Pyramid 6❅❅ 5❅❅ ❅ ❅ 4 1 ❅ ❅ ❅ 3 2 face 1 2 3 4 5 nodes 1234 2561 3465 461 523 Prism 8 5 7 6 4 1 3 2 face 1 2 3 4 5 6 nodes 1234 2376 3487 4851 5678 6512 Hexahedron Figure 7: Disjoint cell types and node/face numbering 41 3.5.2 V3SURFACE V3SURFACE(NSURF, SURF, SCEL, TSURF) This subroutine supplies VISUAL3 with the surface data structure. NSURF:o: I(2,KNSURF) NSURF(1,n) is the pointer to the end of domain surface group n, i.e. it points to the last entry in both SURF and SCEL for that group. NSURF(2,n) is the startup drawing state: -1 translucent 0 off 1 on 2 grid only 3 rendered with grid 4 outline 5 grey SURF:o: I(KSURF) pointers to cells+faces that make the surfaces. SURF = 8*(cell number) + face number SCEL:o: I(4,KSURF) node numbers for surface faces. For quadrilateral faces SCEL must be ordered clockwise or counter-clockwise; for triangular faces, SCEL(4,n) must be set to zero. TSURF:o: C*20(KNSURF) titles for domain surfaces (optional) Notes: 1) The correct order for numbering faces for the four disjoint cell types is shown in Fig. 7. The face definitions for Poly-Tetrahedral cells is displayed in Fig. 4. For structured blocks; face #1 is for exposed cells with cell index k = 1, face #2 is for i = N Im − 1, face #3 is for cells with j = N Jm − 1, face #4 is for i = 1, face #5 is associated with k = N Km − 1, and face #6 is for j = 1. 2) SURF and SCEL are two different ways of defining the surface faces. Either SURF or SCEL must be filled, but not both. In each case, the faces must be arranged contiguously into domain surface groups, with the end of each domain surface group specified by the pointers in NSURF. 3) When debugging or in any way changing the contents of this routine, delete ‘.Visual3.struc’ before re-running. 42 3.5.3 V3GRID V3GRID(XYZ) This subroutine supplies VISUAL3 with the grid coordinates. XYZ:o: R(3,NNODE) (x, y, z)-coordinates of grid nodes, using left-handed coordinate system. If right-handed coordinates are desired reverse sign of the z values. 3.5.4 V3SCAL V3SCAL(JKEY,S) This subroutine supplies VISUAL3 with scalar function values (FKEY=1), or (FKEY=6). JKEY:i: I Key index, relative to ordering specified in V3 INIT. (i.e. first key is 1, second is 2, third is 3, etc.) S:o: R(NNODE) Scalar function values (FKEY=1). or S:o: R(NCELLS) 3.5.5 Cell scalar function values (FKEY=6). V3THRES V3THRES(JKEY,XYZ,T) This subroutine supplies VISUAL3 with threshold function values (FKEY=5). JKEY:i: I Key index XYZ:i: R(3,NNODE) (x, y, z)-coordinates of grid nodes T:o: R(NNODE) Threshold function values Notes: 1) XYZ is passed by VISUAL3 to the user subroutine, in case it is needed to calculate T but, for storage reasons, the user’s program has not kept a copy of XYZ. XYZ must not be changed by V3THRES. 43 3.5.6 V3VECT V3VECT(JKEY,V) This subroutine supplies VISUAL3 with vector function values (FKEY=2). JKEY:i: I Key index V:o: R(3,NNODE) Vector function values (V x, V y, V z). If right-handed coordinates are desired reverse sign of the V z values. 3.5.7 V3EQUIV V3EQUIV(LISTEQ) This subroutine supplies VISUAL3 with node equivalency data. Required for KEQU IV = 0 cases. LISTEQ:o: I(2,KEQUIV) Node equivalency pairs. Notes: 1) For multiple (more than 2) node matching, always have the lowest node number in each entry. e.g, for a node at an edge between 4 blocks that line up, 3 node equivalency pairs are required, each matching the lowest node number with the others. 2) When debugging or in any way changing the contents of this routine, delete ‘.Visual3.struc’ before re-running. This data is not checked by the algorithm that determines if the old file is a match. 3.5.8 V3BLANK V3BLANK(IBLANK) This subroutine supplies VISUAL3 with blanking data. Required for KN BLOCK < 0 cases. IBLANK:o: I(NNODE-KNODE) Blanking data: < 0 node is valid and connected to this block number (negated) = 0 off, invalid node > 0 on 44 3.5.9 V3UPDATE V3UPDATE(TIME) This subroutine is called by VISUAL3 at the beginning of its principal execution loop in synchronous lock-step post-processing unsteady applications (IOP T = 1, 2). Its purpose is to allow the programmer to increment time or an iteration counter, and update variables. TIME:o: R The current simulation time. This sets the time in VISUAL3 for bubble integration. If the time between calls does not change, VISUAL3 takes this as a indication that the data has not been updated and does not call V3SCAL, V3VECT and etc. 45 The next two routines are needed for the programmer-defined cutting planes. 3.5.10 V3ZPRIME V3ZPRIME(FLAG,XYZ,NNODE,ZP,ZPRIME,XPC,YPC,HALFW) This subroutine is called when the programmer-defined cutting plane is initialized, to set up the 2D data. FLAG:i: L logical flag .TRUE. first call .FALSE. subsequent call when grid data is unsteady XYZ:i: R(3,NNODE) (x, y, z)-coordinates of grid nodes (as set in V3GRID) NNODE:i: I total number of nodes ZP:o: R(NNODE) z values ZPRIME:o: R starting z value XPC:o: R desired x value at center of 2D window YPC:o: R desired y value at center of 2D window HALFW:o: R desired half-width for square 2D window Notes: 1) The last four variables should be set only if FLAG is .TRUE. 2) For IOPT=1, it is assumed that ZP does not change with time. 3.5.11 V3XYPRIME V3XYPRIME(ZPRIME,KN,XYZ,N,XYP) This subroutine supplies VISUAL3 with the (x , y ) values at selected dynamic surface nodes. This routine is called during the data-collection phase and may be called many times. ZPRIME:i: R current z value KN:i: I(N) set of indices to nodes XYZ:i: R(3,NNODE) (x, y, z)-coordinates of grid nodes (as set in V3GRID) N:i: I number of selected nodes XYP:o: R(2,N) (x , y ) values at selected nodes Notes: 1) There is no ordering of the nodes in KN, and in fact it may contain the same node more than once. 46 The next four routines are needed for the mapped domain surfaces. 3.5.12 V3SURF V3SURF(ISURF,XPC,YPC,HALFW) This subroutine is called once when the 2D surface function key is hit to set up the 2D data. ISURF:i: I Active surface number XPC:o: R desired x value at center of 2D window YPC:o: R desired y value at center of 2D window HALFW:o: R desired half-width for square 2D window Notes: 1) If HALFW is not set, the surface will not be plotted. Therefore, in case the user makes a mistake and starts the 2D surface function when the active surface is not mapped, the V3SURF should check to see if ISURF corresponds to one of the mapped surfaces and if not should simply return without doing anything. 3.5.13 V3XYSURF V3XYSURF(KN,XYZ,N,XYP) This subroutine supplies VISUAL3 with the (x , y ) values at selected mapped domain surface nodes. This routine is called during the data-collection phase and may be called many times. KN:i: I(N) set of pointers to surface nodes XYZ:i: R(3,NNODE) (x, y, z)-coordinates of grid nodes (as set in V3GRID) N:i: I number of selected surface nodes XYP:o: R(2,N) (x , y ) values at surface nodes Notes: 1) There is no ordering of the nodes in KN, and in fact it may contain the same node more than once. 47 3.5.14 V3SSURF V3SSURF(JKEY,KN,XYZ,N,S) This subroutine supplies VISUAL3 with surface scalar values (FKEY=3) at selected mapped domain surface nodes. This routine is called during the data-collection phase and may be called many times. JKEY:i: I Key index KN:i: I(N) set of pointers to surface nodes XYZ:i: R(3,NNODE) (x, y, z)-coordinates of grid nodes (as set in V3GRID) N:i: I number of selected surface nodes S:o: R(N) Scalar function values at surface nodes Notes: 1) There is no ordering of the nodes in KN, and in fact it may contain the same node more than once. 3.5.15 V3VSURF V3VSURF(JKEY,KN,XYZ,N,V) This subroutine supplies VISUAL3 with surface vector values (FKEY=4) at selected mapped domain surface nodes. This routine is called during the data-collection phase and may be called many times. JKEY:i: I Key index KN:i: I(N) set of pointers to surface nodes XYZ:i: R(3,NNODE) (x, y, z)-coordinates of grid nodes (as set in V3GRID) N:i: I number of selected surface nodes V:o: R(3,N) Vector function values at surface nodes Notes: 1) There is no ordering of the nodes in KN, and in fact it may contain the same node more than once. 48 The final three routines are for communication with the user. 3.5.16 V3EVENT V3EVENT(ETYPE,ESTAT) This subroutine gives the programmer a method of processing X-events after they are handled by VISUAL3. One particular use of this capability is to change parameters in the main program when doing co-processing. ETYPE:i: I X-event type ESTAT:i: I X-event state 3.5.17 V3EVENTHELP V3EVENTHELP This subroutine allows the programmer to write any message to the text window which is unit * (i.e. use the Fortran statement WRITE(*,*) ’....’). This message will appear with VISUAL3’s own help message whenever the user types ’ ?’ in the 3D window. this subroutine has no arguments 3.5.18 V3STRING V3STRING(STRING) This subroutine allows the programmer to provide a label for all plots, in addition to the title supplied to V3 INIT. This is particularly useful for labelling plots with the time in unsteady applications. STRING:o: C*80 character string label 49 3.6 C Programming Using VISUAL3 with C requires that the programmer do some things that are not intuitive. This is because FORTRAN is also supported and some of VISUAL3 was written in FORTRAN. An example of a C program interface to VISUAL3 is the demo program ‘cprism’ (the source is ‘cprism.c’). It is built using the makefile ‘cprism.make’. The following rules must be followed: • main program On HP, IBM and SUN workstations, normal C conventions apply. For DEC and SGI ports the name of the main program must be ‘MAIN ’ and on all others the name is ‘MAIN ’. • routine names For HP and IBM ports, all VISUAL3 entry points are the FORTRAN names in lowercase. On all other platforms, the external entries are lower-case with an underscore (‘ ’) appended to the end. Since there are dummy entries in the VISUAL3 library for all optional routines, not getting the name of a programmer-supplied correct will still produce a complete executable. The supplied routine will not be accessed! • argument passing FORTRAN expects all arguments to be passed by reference, not value. Character variables also have their length appended to the stack (end of the call) in the order that character arguments appear in the call. These lengths are passed by value. The only routine this effects is V3 INIT. The call must have 3 more arguments; the length of TITL, the length of CMFILE, and the length of TKEYS. These are passed by value (see the demo program ‘cprism.c’). • logicals FORTRAN logicals are ints with a value of 0 for .FALSE. and -1 for .TRUE. . 50 • character strings FORTRAN character strings have a specified length (hence passing the length). If the string is not fully used, it is padded with blanks. The null byte that terminates a C string gets interpretted by FORTRAN as a zero character. To avoid passing the null either overpad the string with blanks (above the size used by V3 INIT), specify the length as the position before the null, or remove the null. For programmer supplied routines with character arguments V3STRING the strings must be padded with blanks to the specified length. See the routines ‘strcpn’ and ‘strcpb’ in the demo. • arrays FORTRAN array indexing, by default, starts at 1. Also in FORTRAN, the left-most index produces addresses that are consecutive in memory. Therefore, when filling multiple dimension arrays, reverse the order of the indices as documented and start at index zero. Note: key, node and cell numbering MUST start at 1. This gives an offset of 1 between the index and the number. • reading from standard input FORTRAN expects standard input to be empty after a read. Therefore, after reading from standard input, flush the buffer. • linking Use f77 to link and produce an executable. This invokes the FORTRAN libraries. See ‘cprism.make’. 51 4 Hard-Copy Post-Processing There are three types of output files generated by VISUAL3 when invoked by appropriate keys from the different windows. The first is tabular output which is generated from the 1D window. This is an ASCII file suitable for inclusion into most line plotting or spread-sheet software. The default file name is ‘visualXYZ.tab’. A post-processing program ‘tab2ps’ produces Postscript output. The second file type is an image dump of the entire screen or an individual window. This file is written in a C binary manner with the default name of ‘visualXYZ.img’. This can be converted into Postscript (using ‘img2ps’) or Macintosh TIFF files (using ‘img2tiff’) and viewed on the screen (using ‘img2X’). The last file type is used for line drawings. This file has the default name ‘visualXYZ.lin’ and is written in a FORTRAN unformatted manner. A post-processing program ‘lin2ps’ produces Postscript output, with hidden line removal. The following section describes the usage of the post-processors supplied with VISUAL3. It should be noted that the source and make-files for the post-processors have been included with the distribution. By making small modifications to the sources, other output devices can be supported with no changes to VISUAL3. NOTE: At Rev 2.25 (and higher) all of these VISUAL3 output files are interchangable accross all UNIX releases. 4.1 tab2ps tab2ps takes as an argument a tabular output file name and produces PostScript on standard output. The output may be redirected to a file or piped directly to the printer spooler. examples: % tab2ps visual002.tab | lp % tab2ps visual002.tab > tab.ps 4.2 img2ps img2ps takes as the first argument the image file name. Additional arguments are options controlling the translation from TrueColor to 8-bit grey scale. The output of img2ps is PostScript and is written to standard output. The output may be redirected to a file or piped directly to the printer spooler. The options are as follows: -cps produce color PostScript output - this is the only option that will produce color, the default and the other options produce grey scale output 52 -r produce a red color separation -g produce a green color separation -b produce a blue color separation -cxxxxxxxx color mapping where “x” is either r, g, or b. -i inverse intensity -4 4-bit grey scale examples: % img2ps visual001.img | lp % img2ps visual001.img -r -i > img.ps % img2ps visual001.img -cps | lpr % img2ps visual001.img -crgbrgbrg | lp Notes: 1) Options -r, -g, -b, -c and -cps are mutually exclusive. 2) If options -r, -g, -b, -c or -cps are not selected, the color translation defaults to 3 bits red, 3 bits green and 2 bits blue (-crrrgggbb). 3) PostScript printers such as Apple’s LaserWriter IInt or DEC’s LN03 (printers with only 2 MBytes) may only be able to produce hard copy from the small window (2D-window with WIND3D=.TRUE. or 3D-window with WIND3D=.FALSE.). Use the -4 option for the large window. Do not attempt full screen dumps unless your printer has alot of memory! 4.3 img2tiff img2tiff takes as its first argument the image file name, and the second argument is the output TIFF file name. The TIFF file can then be transferred to a Macintosh and be used by any application that can take TIFF as input, i.e. Adobe Photoshop. example: % img2tiff visual001.img output.tiff 53 4.4 img2X img2X may be used to view VISUAL3 image file(s) on the screen. It can display as many a 10 images and also write a VISUAL3 image file of the entire screen. img2X may have as many as 10 arguments, each should be the name of an image file. Optionally, each image can be compressed before drawn. This is done by appending ‘/n’ to the end of the file-name (where n is the compression factor). examples: % img2X visual001.img visual002.img/3 % img2X visual001.img/2 Notes: 1) The compession scheme used is very simple. If n=2, every other pixel is displayed, n=3 picks every third pixel. 2) An image window may be closed by hitting the key ‘x’ in that window. 3) A VISUAL3 image file of the entire screen may be generated by hitting ‘˜ ’ in any image window. 4) img2X is properly terminated by clicking any mouse button while the cursor is in an image window. 4.5 lin2ps lin2ps takes as an argument a VISUAL3 line output file name and produces PostScript on standard output. The output may be redirected to a file or piped directly to the printer spooler. examples: % lin2ps visual005.lin | lp % lin2ps visual005.lin > lin.ps Notes: 1) Currently lin2ps does not produce correct results from the 3D-window when the ‘clipping’ dial has been used. 2) Complex plots from the 3D window may take a significant amount of time to process. 54 5 Warning and Error Messages The following messages may occur during VISUAL3 initialization: • Error - Control Parameter Too Big! The control parameter IOPT is greater than 2. • Error - No keys! • Error - Too many keys! The value of NKEYS is out of bounds. • FKEYS(nnn) out of range! The entry in FKEYS indexed by nnn is either less than one or greater than six. • FLIMS(N,nnn) equal! The entries in FLIMS indexed by nnn have the same value. This is not legal when FKEYS(nnn) is three or six. • FLIMS(1,nnn) equal to 0.0! The entry in FLIMS indexed by nnn have the value zero. This is not legal when FKEYS(nnn) is four. • ERROR - NPTET(1,MAX) <> KPTET The last entry in NPTET does not match the value KPTET given at initialization. • ERROR - No Disjoint Cells but Nodes! KNODE is non-zero but the number of disjoint and polytet cells is zero. • ERROR - NSURF(1,MAX) > KSURF! The last entry in NSURF is greater than the number of surface faces specified, KSURF. • ERROR - Degenerate Block - block # kb Sizes: ni, nj, nk One of the block sizes (either ni, nj and/or nk) is less than two. The block number is kb. • Error - Co-Processing NOT Supported! Co-processing (negative IOPT) is not supported in this release of VISUAL3. This option requires a machine and OS that supports multiple threads running with the same address space. 55 The following messages are generated during initialization when the cell and surface data are checked for valid entries and indices: • Surfaces NOT Filled! SURF or SCEL were not filled during the call to V3SURFACE and KNSURF is nonzero. It is also possible to get this message if the data that filled SURF or SCEL is zero. • Error - NSURF(1,nnn) pointer out of range! value = mmm, last = lll, max = KSURF The entry in NSURF (where nnn is the index) has the value, mmm. This is either smaller than the previous value (lll), specified in NSURF(1,nnn-1), or it larger than the total number of faces, KSURF. • Error - CELn(kf,kc) node out of range! node = kn, max = NNODE The entry in CELn (face index kf, CELn index kc) has the value, kn. This is either less than one or greater than the total number of nodes, NNODE. • Error - NPTET(nn,kp) node out of range! node = kn, max = NNODE The entry in NPTET (index nn, polytet index kp) has the value, kn. This is either less than one or greater than the total number of nodes, NNODE. nn can be 2 through 4. • Error - NPTET(1,kp) too small: nnn The length indicated (nnn) by NPTET (polytet index kp) is less than or equal to one tetrahedron. For disjoint tetrahedra use CEL1. • Error - PTET(kc) node out of range! node = kn, max = NNODE, strip = kp, strip end = eee The entry in PTET (index kc) has the value, kn. This is either less than one or greater than the total number of nodes, NNODE. The strip index is kp and this strip ends at index eee. • Error - EQUIV(nn,ke) node out of range! node = kn, max = NNODE The entry in EQUIV has the value, kn. This is either less than one or greater than the total number of nodes, NNODE. 56 • Error - EQUIV(-,ke) same nodes! nodes = kn The entry in EQUIV (index ke) has equivalenced a node to itself. The node number is kn. • Error - EQUIV(-,ke) multiple equivalency incorrect order! nodes = kn1, kn2 The entry in EQUIV (index ke) has specified a multiple set of equivalent nodes and it was found that the lowest numbered node was not in this entry. The node numbers in this entry are kn1 and kn2. • Error - SCEL(kn,ks) node out of range! node = kn, max = NNODE The entry in SCEL has the value, kn. This is either less than one or greater than the total number of nodes, NNODE. • Error - SURF(ks) cell out of range! cell = kc, max = NCELLS The entry in SURF (surface index ks) has the cell index, kc. This is either less than one or greater than the total number of cells, NCELLS. • Error - SURF(ks) face out of range! face = kf, max = nnn The entry in SURF (surface index ks) has the face index, kf. This face number is less than one or greater than the total number of faces (nnn) for the cell type. • Error - SURF(ks) face not valid! face=1 and not first in strip The entry in SURF (surface index ks) has the face index, 1. The cell index indicates a polytet strip. This face number is only valid for the first cell in the strip. • Error - SURF(ks) face not valid! face=2 and not last in strip The entry in SURF (surface index ks) has the face index, 2. The cell index indicates a polytet strip. This face number is only valid for the last cell in the strip. • Error - SURF(ks) face not valid! Face interior to block! Cell # kc, Block # kb The entry in SURF (surface index ks) indicates the cell index, kc, that is in the structured block, kb. The face specified is not on the husk of the block. 57 The following messages are generated during face matching for connectivity. If VISUAL3 sees the file ‘.Visual3.struc’ and it appears valid, the connectivity checking is not performed and you will not see these errors. • Warning - Cell(s) exist with no neighbor or surface face! This is not an error. Faces were found that are bounding the volume(s) and were not in the surface list. Another ‘Domain Surface’ is added that is the collection of these faces and is called Others. • Warning - face table increased by num! This is not an error. Face matching requires more memory than initially allocated. This may be because there are many faces internally that do not match. Or, that KSURF does not cover the husk of the volume. • Warning - edge table increased by num! This is not an error. Edge matching requires more memory than initially allocated. • Warning - surf allocation overflow! - KSURF = num! This is not an error. The initial allocation for the surface structures was too small. These are re-allocated and the process of filling the surface data continues. • ERROR - face table allocation error! The initial allocation for the face table has failed! The problem is too big for the amount of memory available. • ERROR - face table overflow @ array(num)! An attempt to re-allocate the face table has failed. The problem is too big for the amount of memory available. • ERROR - edge table overflow @ array(num)! An attempt to re-allocate the edge table has failed. The problem is too big! • ERROR - array(num) degenerate face! # kc A degenerate face was found in the cell array indexed by num. If the cell is really degenerate (has the same node numbers in multiple entries) use the appropriate cell type! 58 • ERROR - face #iface of array(num) hit by 3 (or more cells)! The face indicated by the nodes of face iface are part of more than 2 objects. Any face must be touched by either 2 cells (an internal face) or a cell and a surface face. If you are trying to put a ‘domain surface’ where VISUAL3 thinks the face is internal, change the node numbering on one of the cells to indicate a new face. This will probably require that additional nodes be added to the node space. • ERROR - surface face (num) without an element! The face indexed by num that has been specified is not part of the volume, it is not a face of a cell. • ERROR - surf(num) does not match element connection! The specification for the cell index in SURF(num) does not match with what this procedure has found. • ERROR - Maximum Number of Edge Segments Exceeded! • ERROR - Maximum Number of Edge Lines Exceeded! You should not see these errors. If any are displayed, either the total number of cells is embarrassingly small or there is some significant problem. Contact Bob Haimes! 59 The following messages may occur during VISUAL3 run-time: • Error in Memory Allocation! VISUAL3 has requested a block of memory and has been refused. This is usually do to the problem’s size. Either wait until the workstation was fewer tasks running, find a bigger (more swap space) machine, or try to reduce the memory load for this visualization task. • Singular matrix. This occurs while processing the view transformation matrix. It is considered illegal to have a singular transformation matrix. VISUAL3 should not produce this condition. It usually happens when the file ‘.Visual3.setup’ has been corrupted. • ERROR - ColorMap OverFlow! The requested number of colors specified in the colormap file exceeds the internal colormap storage. • ERROR - ColorMap File Error! An error occured parsing the colormap file. • KeyBoard File Does NOT Exist! The environment variable ‘Visual KB’ has been set and the file indicated does not exist. • ERROR reading KeyBoard File! • ERROR E-O-F in KeyBoard File! The environment variable ‘Visual KB’ has been set and there has been an error parsing the data in the file. • Error Not a Rev. 2 Visual ImageFile: FileName An image file (for the comparison window) is not in the proper format. • Error XVisual Mismatch in Visual ImageFile: FileName An image file has an unsupported X-Visual type. • Error Bits per Pixel Illegal (number)! The number of bits/pixel is not supported in the image file. • Internal Error in GetBCell If you see this error please contact Bob Haimes! 60