1
Private Site
Table of contents
1
2
3
Home............................................................................................................................ 3
1.1
Welcome to Dr. Bengt Mårtensson's private homepage..........................................3
1.2
Some personal stuff..................................................................................................3
1.3
Impressum................................................................................................................3
1.4
Site Linkmap Table of Contents.............................................................................. 4
1.5
Legal........................................................................................................................ 6
Barf's dBox Page.......................................................................................................... 7
2.1
Barf's dBox page...................................................................................................... 7
2.2
Barf's patch page...................................................................................................... 9
2.3
Über GPL und das Tuxbox Projekt........................................................................17
2.4
Building Flash Images and YADDs with newmake.............................................. 24
2.5
Flashimages und YADDs mit newmake................................................................39
2.6
The Architecture of newmake................................................................................54
2.7
Setting up and using the automounter....................................................................67
2.8
Setting up online updates for Neutrino.................................................................. 71
2.9
Analog and Digital Video- and Audio-outputs on the dBox with Neutrino.......... 73
2.10
Some Hardware Modifications of the Nokia dBox..............................................85
2.11
Modding the Nokia dBox.....................................................................................88
2.12
Setting up a Linux/Unix Server for the dBox...................................................... 89
2.13
Non-interactive Flashing using dboxflasher........................................................ 94
2.14
The dBox IR-Keyboard........................................................................................95
2.15
FAQ for Barf's dBox page..................................................................................102
Home Theatre........................................................................................................... 104
3.1
My Home Theater Page....................................................................................... 104
3.2
Mk 1. The Pro Logic/Laserdisk Period................................................................106
3.3
Mk 2. The 5.1/DVD Period..................................................................................108
Built with Apache Forrest
http://forrest.apache.org/
Private Site
4
5
6
7
3.4
Mk 3. The big-screen period................................................................................110
3.5
Mk 4. Real loudspeakers......................................................................................113
3.6
Mk 5. High definition.......................................................................................... 115
3.7
High definition video, view of 2005.................................................................... 117
3.8
Multichannel Music and DVD Audio..................................................................119
3.9
Fixing the Vivanco AV Control 5........................................................................120
3.10
Modifying the Vivanco AV Control 5............................................................... 121
3.11
Buying a shelf off-the-shelf is not for me!.........................................................121
3.12
General Photo Gallery........................................................................................122
Home Autom. & Remote Control............................................................................ 122
4.1
Home Automation and Remote Control.............................................................. 122
4.2
Harc: Home Automation and Remote Control.................................................... 124
4.3
Modifying the Pronto RU890.............................................................................. 137
4.4
Remote Control of Blinds.................................................................................... 137
Software....................................................................................................................137
5.1
Software............................................................................................................... 137
5.2
Gnans................................................................................................................... 138
5.3
The Einstein Puzzle..............................................................................................140
Misc.......................................................................................................................... 145
6.1
Miscellaneous stuff.............................................................................................. 146
6.2
On the "Kilobyte" and computerists' obsession for power of 2's.........................146
6.3
Modal popups are evil!........................................................................................ 149
All............................................................................................................................. 149
Page 2
Built with Apache Forrest
http://forrest.apache.org/
Private Site
1. Home
1.1. Welcome to Dr. Bengt Mårtensson's private homepage
Hi! Welcome to my private site. This site is a "private site" in the sense of containing all
stuff that do not fit on my consulting site (in German only), which describes the
professional side of me, as a freelancing engineer.
NEW! Now with a section on Home automation and remote control!
1.2. Some personal stuff
1.2.1. Over me
I was born Lund, Sweden, and grew up in the south of Sweden. I studied at the University
(Mathematics) and the Institute of Technology (Electrical Engineering) in Lund and got
my masters degree ("Civilingeniörsexamen") in Electrical Engineering in 1982. The year
1983-1984 I spent as a student at Harvard University, while I, as cross registering student,
also took courses at the Massachusetts Institute of Technology. In 1986 I got my Ph.D.
("Teknisk Doktor", "Doctor of Philosophy in Engineering") from the Department of
Automatic Control (PhD advisor: Prof. K. J. Åström, co-supervised by Prof. Christopher
I. Byrnes, who I met during my Harvard period) also in Lund. (Photo taken after the
doctoral promotion, 1986.) In 1987, I spent 5 months as postdoctoral fellow at the
Department of Electrical Engineering at the University of Waterloo, with Prof. M.
Vidyasagar.
In 1987 I moved to Bremen, Germany, to work with the Institute for Dynamical Systems
at the University of Bremen. 1998 I moved to Munich, where I am presently living. I have
been working for/with, among others, science + computing, BMW, and Askon
Consulting. Presently, I work as a free-lancing engineering consultant, with this home
site.
1.3. Impressum
This web site uses a strict separation between content and style. The content of the site is
mainly written using the Apache Document XML-Format version 2.0 which is a simple
(sometimes too simple :-) format to describe e.g. web content (but not its style). The
content is processed with the Apache Forrest framework (which can be described as a
stripped-down, offline Apache Cocoon, adapted to WEB publishing), to generate W3C
valid 4.01 (transitional) HTML, as well as PDF files.
The section on the Einstein puzzles uses a few XML files using the, by me designed,
einsteinpuzzle.dtd, for example the puzzle file einstein.xml. These files are not only
used to automatically generate C++-files to solve the corresponding puzzle, but are also,
Page 3
Built with Apache Forrest
http://forrest.apache.org/
Private Site
through a custom XSLT-stylesheet, integrated into Forrest, so that the XML puzzle files
generate a HTML-file (like einstein.html) (and, through Forrest, a PDF file),
optimized for human reading.
The photo gallery was generated from one single XML File, again with a custom DTD. A
Metamorphosis script generates all the needed XML-files (using the Apache Document
DTD), showing the photos. To determine the needed files, a Metamorphosis script
generates a dependency file, which is included by a Makefile, that thus determines the
files needed. Image transformations are also made by make, using the freeware
Imagemagick program convert.
XML Files were edited with GNU Emacs, which, after 20 years of usage, still remains my
preferred authoring environment! (I am even mentioned in the Acknowledgments!).
Operating platform was GNU/Linux (SuSE Linux 9.2 – 10.0), using the Gnome desktop.
This site is not "optimized" for a particular browser, but based on vendor neutral
standards from the World Wide Web Consortium. All HTML on the site is expected to be
valid HTML 4.01 transitional, using CSS and Javascript (nothing dramatic happens
without Javascript, though). Anyhow, for technical, political, and security reasons, I
recommend the Firefox browser. Still, this site is not "best viewed with Firefox"...
No products from Redmond have been used in the production of this site.
This sites uses SI units and -prefixes, except, in a few cases when natural, the IEC
60027-2 binary prefixes are used, with names clearly different from SI-prefixes. (See this
article.)
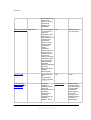
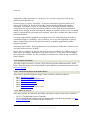
1.4. Site Linkmap Table of Contents
This is a map of the complete site and its structure.
• MyProj ___________________ site
•
•
Home ___________________ home
•
Index ___________________ index : Homepage
•
Personal ___________________ personal : Over me
•
Impressum ___________________ impressum : Over the site
•
Sitemap ___________________ linkmap : Site Linkmap
•
Legal ___________________ legal : Legal blurb
Barf's dBox Page ___________________ dbox
•
Main ___________________ index : Barf's dBox page
•
Patches ___________________ patches : Barf's patch page
•
GPL+Tuxbox (Deutsch) ___________________ gpl_tuxbox : GPL
Page 4
Built with Apache Forrest
http://forrest.apache.org/
Private Site
und das Tuxbox-Projekt
•
•
newmake ___________________ flash-yadds-newmake : Building
Flash Images and YADDs with newmake
•
newmake
(Deutsch) ___________________ flash-yadds-newmake-de :
Flashimages und YADDs mit newmake
•
Newmake
architecture ___________________ newmake-architecture : The
architecture of newmake
•
The dBox automounter ___________________ automount : Setting
up and using the automounter
•
Online image updates ___________________ update : Setting up
online updates for Neutrino
•
Analog & Digital Outputs ___________________ io : Analog and
digital outputs from the dBox
•
Hardware modifications ___________________ hwmodding :
Hardware modification
•
Photogallery Modding ___________________ hw-photogallery :
Improved AV-Switching
•
Linux server setup ___________________ server : Setting up a
Linux/Unix Server for the dBox
•
Noninteractive Flashing ___________________ dboxflasher :
Non-interactive Flashing using dboxflasher
•
The dBox IR Keyboard ___________________ keyboard : Things to
do with the dBox IR Keyboard
•
FAQ ___________________ faq : Frequently asked questions (for
the dBox page)
Home Theatre ___________________ hometheatre
•
Main ___________________ index : My Hometheatre Page
•
Mk1 ___________________ mk1 : My Hometheatre Mk 1
•
Mk2 ___________________ mk2 : My Hometheatre Mk 2
•
Mk3 ___________________ mk3 : My Hometheatre Mk 3
•
Mk4 ___________________ mk4 : My Hometheatre Mk 4
•
Mk5 ___________________ mk5 : My Hometheatre Mk 5 (present)
•
High Definition ___________________ HD : High Definition Video
Page 5
Built with Apache Forrest
http://forrest.apache.org/
Private Site
•
•
•
•
•
Multichannel, DVD Audio ___________________ DVD_Audio :
Multichannel music and DVD Audio
•
AV Control 5 ___________________ avcontrol : AV Control 5
modification
•
AV Control 5 Pictures ___________________ avcontrol_pics : AV
Control 5 modification pictures
•
Shelf ___________________ shelf : Multimedia shelf
•
General Photos ___________________ general_photogallery : The
general photo gallery
Home Autom. & Remote Control ___________________ harc : Home
Automation and Remote Control
•
main ___________________ index : Home automation & Remote
Control
•
Project HARC ___________________ project_harc : Project HARC
•
Pronto ___________________ pronto : Pronto modification
•
Blind motors ___________________ blinds : Blinds
Software ___________________ software
•
main ___________________ index : My software page
•
Gnans ___________________ gnans : Simulation software
•
Einstein Puzzle ___________________ puzzle : So-called Einstein's
Puzzle
Misc. ___________________ misc
•
Index ___________________ index :
•
Kilobyte ___________________ kilobyte : 1000 or 1024?
•
Modal Popups ___________________ modal : Modal popups are
evil!
All ___________________ all
•
Whole Site HTML ___________________ whole_site_html
•
Whole Site PDF ___________________ whole_site_pdf
1.5. Legal
1.5.1. Legal Blurb
This site is Copyright (c) by Bengt Martensson. All rights reserved.
Page 6
Built with Apache Forrest
http://forrest.apache.org/
Private Site
Software or software fragments ("patches") are published under the GPL license. Other
material (text, pictures, and style elements) are not to be reused without permission of the
author, but may be linked to (including "deeplinks").
It is possible that information or downloads from this page can cause damage to your
hardware, software, or anything else, like your temper. It can also not be excluded that
usage or downloads, or usage of herein described software, will violate applicable laws,
or agreements. By using information or downloads from this page, you agree to take the
full responsibility yourself, and not hold the author responsible.
2. Barf's dBox Page
2.1. Barf's dBox page
2.1.1. Legal
It is possible that information or downloads from this page will cause damage to your
hardware, software, or anything else (your temper?). It can also not be excluded that
usage or downloads, or usage of herein described software, will violate applicable laws,
or agreements. By using information or downloads from this page, you agree to take the
full responsibility yourself, and not hold the author responsible.
I, as well as the Tuxbox project, do not condone illegally accessing Pay-Tv. Using
information or downloads from this page for this, or other illegal purposes, is strictly
prohibited.
2.1.2. General
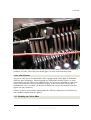
One of my interests is Tuxbox project. It aims for a free, Linux based operating system
for the digital TV-Receiver known as the dBox2. See the project's home page. I am active
in the Tuxbox forum using the nickname "Barf".
This is a fun project. It is both technologically and socially very interesting. There has
never been an official release, and there are also no release-schedule. The project in its
current stadium is explicitly aimed at experienced Linux users/programmers. However,
there are often unofficial images released. Through these, the project has had a
considerable impact, far outside of the programmer community. "Linux on the dBox" has
established itself — amazing for a project with no releases! Unfortunately, it has also
proved to be a powerful platform for implementing illegal pay-tv decoding, something
that is a severe concern for the project. There are also, in particular in the forum, a large
number of unexperienced users, who often, sometimes in obnoxious tone, complain over
missing support, unfixed bugs, lack of Unix capacities in Windows, etc. (Calling the
password file \etc\passwd, routinely killing processes with kill -9, making files
executable with chmod 777,...) Official documentation, both user documentation and
API documentation, is largely missing. As often the case in situations like this, this breeds
Page 7
Built with Apache Forrest
http://forrest.apache.org/
Private Site
the HOWTO-tradition: Documents written by authors who, often, have a very incomplete
understanding of the problem, describing (at best) a cookbook method for reaching a
particular goal, without any attempts of understanding. (Occasionally, also valuable
documents by knowledgeable persons are called "HOWTO"s.)
As a supporter and contributer of free software, nowadays sometimes called open source,
for example in the sense of the Free Software Foundation, I am concerned about the
relative emphasis on tools for non-free operating systems (in particular for those from a
certain Redmond based firm), as well as binary-only releases. The best example of this is
the Windows boot manager, a very useful and capable tool, that is almost indispensable in
the initial phase.
As I said, an interesting project...
2.1.3. Articles and Tutorials
• Über GPL und das Tuxbox Projekt. ("On GPL and the Tuxbox project"). An article on
GPL and the Tuxbox/dbox community. Only in German language, no English version
planned.
• Building images and Yadds with newmake (beginner(?) to advanced). Also available
in German.
• The newmake architecture (advanced)
• Setting up and using the automounter
• Setting up an online image- and update server for Neutrino
• Analog and Digital Video- and Audio-outputs on the dBox with Neutrino
(intermediate to advanced)
• Improved AV-Switching. Obsolete; content merged into the previous entry.
• Some Hardware Modifications of the Nokia dBox
• Photogallery Modding
• Setting up a Unix/Linux dBox server (beginner to intermediate)
• Noninteractive flashing with Unix/Linux and dboxflasher (beginner to advanced)
• The dBox IR-Keyboard
2.1.4. Barf's Patches
I have written a number of patches, that for one reason or another, are not checked in into
CVS. They are presented on the patch page, sometimes together with binaries.
2.1.5. FAQ (for this page)
FAQ
2.1.6. Feedback
Suggestions, criticism, etc are welcome, either directly to me or in the forum.
Page 8
Built with Apache Forrest
http://forrest.apache.org/
Private Site
2.2. Barf's patch page
2.2.1. Revision history
Date
Description
...
...
2006-06-05
Following patches are now checked-in or
obsolete: Online updates, infobar, avsstuff,
discrete on/off for Neutrino, saa7126, mcrec,
IMDB, LIRC-Patch. Link to the ghosting patch
added. Updated camd.c.diff-errormessage.
Misc. small improvements.
2.2.2. Barf's Patches
Name/Link
Date
Description
Forum thread(s)
Status
kabr
2006-03-29
A translation layer Volle
for remotes and
Unterstützung der
keyboards. See
Dbox2 Tastatur
the article.
Works, but needs
some testing.
Found in CVS,
partially in branch
newmake.
Ghosting patch.
2006-05-15
The well known
Unix/Linux
automounter
taken to Tuxbox
by yours truly.
See Thread.
Requires
newmake. See
the article.
Working.
controldc.cpp,
2006-01-15
Makefile.am.controldc.diff
Automount /
autofs
An interactive
controldc:
Just works. No
command line
Kommandozeilenprogramm
big deal. Not
tool for sending
zum Plappern mit really polished.
messages to
controld
controld. For
experimenting
and debugging
controld, as well
as allowing
switching video
format etc without
bypassing
controld. See
code. Put
C++-program in
directory
...apps/tuxbox/neutrino/lib/controld/controldclient,
Page 9
Built with Apache Forrest
http://forrest.apache.org/
Private Site
and patch the
Makefile.am
there.
In CVS, branch
newmake.
The newmake
rewrite of the
Tuxbox build
system. See this
article, as well as
the architecture
article.
Flashtargets in
Makefile
umgeschrieben
(concepts);
@BARF wegen
deinen neuen
Rules ;-)
(support);
Bugreports zu
"new flashrules
barf" (bugs); new
flashrules barf
beispiel
(advocacy).
Stable. Checked
in in the branch
"newmake".
zapit audio patch
2005-10-23
For Neutrino.
Forum thread,
Using this patch,
see also this
Tuxbox will, for
thread, and this.
each channel,
remember the last
selected
AudioPID (that
characterizes an
audio channel)
and save it, also
between reboots.
When returning to
the channel, it will
attempt to use the
previously
selected audio
channel, if still
available. Patch is
against version
1.375 of
zapit.cpp.
Stable, widely
tested, works
perfectly. For
"religous" reasons
(see the
referenced
threads), will not
to be committed.
The patch is very
popular with
image providers.
neutrino.cpp.diff
2005-04-02
Optional
Forum Thread.
SCART-Mode by
startup for
Neutrino.
Active-going pin-8
on the
VCR-SCART
wakes the dBox
from standby. It
would be logical
and useful, that
Not 100%
reliable. Neutrino
may go to an
undefined state
as Pin-8 goes low
again.
Page 10
Built with Apache Forrest
http://forrest.apache.org/
Private Site
the Tuxbox enters
Scart-mode
directly, if pin8 is
active when
booting (like
BetaNova).
camd.c.patch-errormessage
2006-06-05
Error message for Yes.
not subscribed
channels.
Sometimes when
switching to a
(sub-)channel, the
screen simply
stays black,
without no user
message at all.
This patch to
camd.c,
generates a
(unfortunately not
localized) error
message for the
case of the
channel not being
subscribed to/the
sub channel not
being available.
Not really
Neutrino-dependent,
but rather
dependent of the
Neutrino
NHTTPD-API.
Works, but is a
very ugly hack.
camd.c.patch
De-deactivating.
This
de-deactivates
certain capacities
in camd.c.
works
channellist.cpp,
channellist.h, and
neutrino.cpp
Improved
Forum thread.
handling of
hidden bouquets.
Using the
WEB-Interface (or
by editing
bouquets.xml
manually),
bouquets can be
marked as
"hidden". These
Yes.
Page 11
Built with Apache Forrest
http://forrest.apache.org/
Unfortunately,
something with
this patch triggers
a bug/problem
somewhere.
When zapping
down, and
jumping over a
hidden bouquet,
something
regarding the
Private Site
Fix to menue.cpp.
should be
"hidden" from the
zapping user.
Unfortunately, by
zapping,
next-channel and
previous-channel
enters the hidden
bouquets.
Furthermore, you
can select them
by entering the
channel number.
These patches to
stop this
erroneous
behavior.
avia-decoding
may go into a silly
state. Don't apply,
unless you want
to find the
problem!)
The menus of
yes
Neutrino has a
fairly stupid
time-out behavior:
when a menu
times out, control
is returned to its
precessor,
instead of closing
a possible menu
hierarchy.
Works, at least
most of the time.
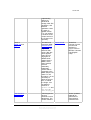
2.2.3. Checked-in Patches
Name/Link
Date
Description
Forum thread(s)
Status
Checked in to
CVS.
2006-02-21
Modernization of
Neutrino's online
update facilities.
See the article.
Modernisierung
Checked in, here
der Neutrino
(among others).
onlineupdatefunktionalität
infobar.cpp.diff
2006-01-22
With this patch,
the infobar does
not time out in
radio mode. See
Thread.
bitte kein OSD
timeout im Radio
Modus (Neutrino)
This checkin
implements a
separate time-out
for the infobar in
radio mode;
setting this to 0
achieves the
desired effect.
avsstuff
2006-01-05
Improved
Audio/Video
Switching with
Neutrino. See its
Konfiguration
Videoausgänge,
Terminatorbug
Commited here.
Page 12
Built with Apache Forrest
http://forrest.apache.org/
Private Site
own page.
•
•
•
It is common to manually add entries (services) to
/var/tuxbox/config/zapit/services.xml, for example to be able to make timer
recordings of subchannels. See this thread. The problem is, that the next channel scan
destroys the manually added information. Thread. This patch for getservices.cpp and
introduces another services-files, called myservices.xml and
antiservices.xml. They should have the same semantic and syntax as the
services.xml-file. All manual additions should be made to this
myservices.xml, which will never be overwritten by the system. Entries made to
antiservices.xml will be removed from the services list, for channels that you
(or other users of the dBox) will never want to access or even see in the channel
listings.
Recently, a timeout was added to the LCD-display. Thread. Enclosed patch for
neutrino.cpp turns on the LCD-display when Home is pressed.
The present CVS-Neutrino does not object to being shutdown in the middle of a
recoding, thus (possibly accidentally) ruining a recording. Here is the fix, as a patch to
neutrino.cpp. Thread.
2.2.4. Obsolete Patches
Name/Link
Date
Description
Forum thread(s)
Status
saa7126_core.c
Once, if the
this, this, and this. Obsoleted by
Tuxbox is set to
this thread.
avsstuff.
generate S-Video
(also known as
Y/C, and,
incorrectly,
S-VHS) on the
TV-Scart, the
VCR-Scart
delivers only a
black-and-white
(technically VBS)
signal as
"composite"
(CVBS) output.
This patch, solved
the problem (but
not without a
price...).
mcrec patch
mcrec is a nice
tool for the digital
streaming of the
radio channels of
Music Choice.
This patch makes
it more usable by
Forum thread.
Page 13
Built with Apache Forrest
http://forrest.apache.org/
Probably just as
obsolete as
mcrec.
Private Site
implementing
options for
hierarchical
storage, XML-File
generation, and
filename
uglification. Note:
the patch is
against version
0.17, not against
0.18 which is the
current version in
the Tuxbox CVS
repository.
Patch to
global.css and
epg.html.
This little hack
Forum thread.
integrates IMDB
(Internet Movie
DataBase)
support into the
Neutrino Web
server. With this
patch applied,
every film info
page gets an
additional link
entitled "Suche
IMDB", which,
when pressed,
issues a
reasonably
intelligently
chosen search
command to the
IMDB. Simple, but
useful. To use
this patch, it is not
necessary to
patch the source
tree, or rebuild
the image: Just
put patched
versions of
global.css and
epg.html in
/var/httpd_private.
Works fine,
however not with
the new web
interface by
yjogol. Loses on
titles like "German
Title (English
Title)".
LIRC-Patch for
controld.cpp
LIRC-Support for
16:9/4:3
automatic format
adjustment. The
Tuxbox software
Works. Updated
2005-08-23
(performance
improvement).
Included in the
-
Page 14
Built with Apache Forrest
http://forrest.apache.org/
Private Site
supports
automatic aspect
ratio switching
both through
SCART-Pin 8 and
WSS on line 23.
Unfortunately,
there are
situations when
both these
methods are not
enough, see my
setup. For
example, my
projector
(Panasonic
PT-AE500) when
connected by
YUV-signals does
not evaluate
WSS, and does
not use Pin8.
Therefore, the
possibility of
sending
LIRC-commands
when switching
between 16:9 and
4:3 is desirable.
This patch
extends the
LIRC-capacities
of Neutrino, in
that, when
switching to 16:9
(4:3) format, the
LIRC-File
16:9.lirc
(4:3.lirc), if
present, is
executed as a
LIRC-file. (Yes, I
know, some
operating
systems have
problems with file
names containing
colons. On
Tuxbox, and other
sane operating
systems, this is
not an issue.)
Page 15
Built with Apache Forrest
http://forrest.apache.org/
avsstuff patch
(thus obsolete).
Private Site
This patch to
rcinput.cpp
makes
Bottom-right an
OFF-button, and
this patch to
neutrino.cpp does
the rest.
•
2005-06-25
Discrete on/off for Forum thread.
Neutrino. It is a
pain in the a* that
todays consumer
electronics often
do not come with
separate on- and
off-buttons, but
with only a
toggle-button. Of
course, a human
being can tell
what state a
device is in (on or
off for example),
but for the
purpose of home
automation, it is
desirable to send
signals, for
example from
your remote
control, to turn the
thing OFF (or on),
regardless of its
present state. The
dBox with
Betanova OR
Tuxbox software
is just as silly, at
least without this
patch. There is
also a
"Discrete-Standby"-Function
implemented.
Note that "Bottom
Left" and "Bottom
Right"-buttons are
required. For
those whose
remote controls
do not contain
these, but instead
own a Philips
Pronto, the forum
participant "move"
posted the Pronto
codes in the
same thread.
Works with no
problems. Largely
obsoleted by the
kabr-patch above.
Imagekit from 2003-12-15. Integrates the creation of dBox images, jffs2only or mixed
(cramfs + jffs2) into the configure /make-process. Comes with documentation in a
Page 16
Built with Apache Forrest
http://forrest.apache.org/
Private Site
•
•
•
•
tar.gz archive. See thread. Obsoleted by newmake.
Original version of the ImageKit. Obsoleted by newer version.
Remember AudioPIDs For Neutrino. Using this patch, Tuxbox will, for each channel,
remember the last selected AudioPID (that characterizes an audio channel) and save
it, also between reboots. When returning to the channel, it will attempt to use the
previously selected audio channel, if still available. Forum thread. Obsoleted by the
zapit patch described above.
Select start channel. For Neutrino. Not everyone likes to be reminded in the morning
of what they viewed late last evening ;-). This patch implements two option flags for
zapit: with -a, the starting channel is take from the file
/var/tuxbox/config/zapit/start_channel.conf (if it exists). If using the -r option, zapit
will never attempt to write its configuration file to non-volatile memory. Forum
thread. (Despite being patches to the same file, this and the previous patch can be
applied independently of one another, or both.) Obsoleted by the zapit patch described
above.
16:9 mode for an application designed for 4:3 looks extremely ugly. Presently,
Neutrino contains several such situations. It would be quite hard to fix the distorted
menus, but some cases are easy to fix. This patch to neutrino.cc forces 4:3 in radio
mode, and this patch to mp3player.cpp forces the mp3-player to use 4:3. This patch to
scan.cpp fixes channel searching. Note that the patch make sense only for users using
automatic pin-8 video format. Forum thread. (Obsoleted by newer official versions.)
2.2.5. Barf's Binaries
Here we provide some binaries for the user who can not compile the sources themselves.
Name
Date
Description
kermit
2006-01-05
The classical
communication/file transfer
program, compiled for the
dBox. Home Page here.
zapit
Version 1.388; 2006-06-05.
with the audio-patch above
applied.
2.3. Über GPL und das Tuxbox Projekt.
2.3.1. Zusammenfassung
In diesem Artikel wird etwas Hintergundinformation zu der Lizenz für die Software des
Tuxbox Projekts, die GPL (General Public License) präsentiert. Dies ist als
Formalisierung der Idee von Software Sharing zu verstehen. Es wird auf das
Tuxboxprojekt und seine drei "offizielle Images", eingegangen, sowie der Kampf gegen
das Schwarzsehen. Es wird gezeigt, dass diese Verhältniss an starken Wiedersprüchen
leidet.
Page 17
Built with Apache Forrest
http://forrest.apache.org/
Private Site
Ich möchte mich hier bei den Forumsbenutzern dietmarw und Feynman für Feedback auf
eine frühere Version dieses Artikels bedanken.
2.3.2. Distanzierung
Ich distanziere mich ausdrücklich vom empfangen und entschlüsseln von verschlüsselten
Fernseh- und Radioprogrammen, für die keine gültige Lizenz vorliegt ("Schwarzsehen").
Dies ist sowohl strafbar, als auch ein moralisch verwerfliches Vergehen/Verbrechen. Dass
ich im Folgende einige Versuche, das Schwarzsehen zu bekämpfen kritisiere, darf in
keinster Weise als Unterstützung oder Verharmlosung vom Schwarzsehen verstanden
werden.
2.3.3. Die "Hacker's Ethics"
Es ist sowohl nützlich als auch interessant etwas über die Hintergründe der GPL zu
wissen. Dies ist von Stephen Levy in dem Buch "Hackers: Heroes of the computer
revolution" sowohl sehr gut als auch sehr lesenswert beschreiben. (Das Buch ist z.B von
Amazon erhältlich; leider keine deutsche Übersetzung verfügbar. Das englischsprachige
Wikipedia hat einen sehr guten Artikel über das Buch.) Levy beschreibt dadrin u.a. die
"hackers ethics", die sich in folgende Punkten zusammenfassen lässt:
1. Information soll frei sein. Sie darf nicht verborgen werden, oder geheimgehalten.
2. Programmierer/hackers tauschen Information zwischen sich aus. Das Verbergen von
Information ist unkooperativ, sowohl gegen andere Hackers, als auch gegen die
Menschlichkeit.
3. Quellcode für Programme ist in diesem Sinn nichts anderes als "Information".
4. Jede Art von "Gefängniss" für Informationen stellt eine Herausforderung zum
Knacken dar.
Bekanntestes Sprachrohr ist Richard Stallman, der, um diese Ideen zu verteideigen und
weitmögligst zu verbreiten, die Free Software Foundation (FSF) und das GNU Projekt
gegründet hat.
Das Prinzip vom "Sharen" von Software und dessen Quellcode ist vom Prinzip der
Freiheit (und die langfristige Gewährleistung der Freiheit) der Information abgeleitet.
2.3.4. GPL: Ein Hackers Ehrencodex in juristischer Spache
Die einfachste Möglichkeit ein selbstgeschriebenes Programm zu sharen, ist das
Verzichten auf alle Rechte und Einschränkungen für das Programm: die Veröffentlichung
als "public domain". Dies heisst, dass jeder sich davon bedienen kann (gut), vielleicht
abgeleitete und verbesserte Versionen erstellen kann (auch gut), und vielleicht sie unter
weniger freie Voraussetzungen andere zu Verfügung stellen kann (weniger gut). Es war
Stallmans Wunsch, dass freie Software frei bleiben sollte, in dem Sinn, dass auch
abgeleitete Werke zu Benutzung und Weiterverarbeitung der Öffentlichkeit zu Verfügung
stehen. Deswegen hat er einige Regeln formuliert, die dem Empfänger einige Dinge
Page 18
Built with Apache Forrest
http://forrest.apache.org/
Private Site
verbieten, Dinge die die abgeleitete Werke unfrei machen würden.
Diese Regeln wurden in der "General Public License" zusammengefasst. Streng
genommen ist sie nicht anderes als eine Formalisierung und Präzisierung von dem Prinzip
(und Hackers Ehrencodex): "Freie Information (Software) soll frei bleiben".
Hier ist, informell ausgedruckt, die Grundidee in GPL: "Diese Software ist frei (nicht mit
kostenlos zu verwechseln). Du darfst sie für alle Zwecke benutzen. Du darfst sie
ausserdem weitergeben und für unterschiedliche Zwecke weiterentwickelt, und die
modifizierte Versionen weitergeben. Was du nicht machen darfst, ist die Freiheit der
Empfänger einzuschränken, in dem du die abgeleitete Software mit restriktiveren
Bedingungen versiehst."
Die GPL formuliert dazu einige präzise Anweisungen, wie z.B. Anforderungen wie
"Quellcode zur Verfügung zu stellen" zu verstehen sind.
Ein in diesem Sinn freies Programm darf für jeden zweck ("for any purpose") benutzt
werden, gut oder böse.
Zu den Quellen eines Programmes zählen auch "Buildscripte", die zum Erstellen der
Software erforderlich sind (es sei denn, das sie ganz trivial sind).
Der genaue Text für GPL Version 2 befindet sich hier. Neulich ist eine Version 3
erschienen, die aber sich nicht in dem Sinn von Version 2 unterscheidet. Eine deutsche
Übersetzung der Version 2 befindet sich hier. Nur die englische Version ist aber
verbindlich. Auch lesenswert ist die FSF FAQ zum GPL (nur in englischer Sprache).
Die GPL ist neulich von Landgericht München I für juristich verbindlich befunden.
Niemand kann zum "Sharen" gezwungen werden. So kann jemanden, der alle Rechte für
ein Programm besitzen, frei wählen zwischen, u.a. keine Veröffentlichung, eine
restriktive Lizenzierung gegen Lizenzgebühr, Veröffentlichung nur in Binärform, Public
Domain (in Quell- oder Binärform), oder eine Veröffentlichung unter eine Lizenz wie
GPL oder Ähnliches (siehe diese Liste über verbreitete Lizenzen für freie Software). Für
abgeleitete Werke gelten aber andere Regeln, z.B. besitzt der "letzte Author" nicht die
Rechte (mit Ausnahme des Public-Domain-Softwares), und kann, sowohl formell als auch
moralisch, nicht frei über die Bedingungen für eine Veröffentlichung bestimmen.
Die GPL wurde in der 80-er Jahren formuliert. Während dieser Zeit war z.B. das
selbständige Kompilieren von Programmen eine Selbstverständlichkeit. Nicht alle könnte
selbständig ein Programm schreiben, aber man könnte mindestens C-Quellen von Usenet
Newsgruppen wie z.B. comp.sources.unix runterladen und mit dem Compiler übersetzen.
Das Konzept von Software ohne Quellcode, oder Betriebssysteme ohne einen C-compiler
war einfach fremd. Hacker (hier benutze ich das Wort als in Levys buch) haben
haubtsächich Programme für UNIX-Plattformen (vorzugsweise BSD) geschrieben, selten
für andere Plattformen wie VMS, Amiga, Atari, Macintosh, C-64. Die Microsoft
Betriebssysteme MS-DOS und Windows galten als das uncoolste überhaupt.
Page 19
Built with Apache Forrest
http://forrest.apache.org/
Private Site
Seitdem hat sich vieles geändert... Das Wort Hacker hat leider in der moderne
Nachrichtensprache die ursprüngliche Bedeutung verloren, und wird eher im Sinn von
Computerkriminalität benutzt.
2.3.5. Das Hackerprojekt "Tuxbox"
In Jahr 2000 wurde ein interessantes Hackerprojekt gestartet: das Tuxbox projekt. Der
PayTV-Sender Premiere hat, um das digitale Bezahlfernsehen zu stimulieren, sehr
intressante high-end Hardware (mit dem Standards von etwa Jahr 2000) stark
subventieniert auf den deutschen Markt veräussert (die dBox2). Das darin enthaltene
Betriebssystem, Betanova, war, wie wir alle wissen, überhaubt nicht in der Lage das
Potential der Hardware und der digitale Fernsehsendungen auszuloten. Die Hackerseele
stellt sich dabei die Frage, wie die Hardware "befreit" werden kann.
Die ursprunglich entwickelte Software wurde dabei (mit Ausnahme von mkflfs, siehe
unten) unter die GPL gestellt.
Eine intressente Beschreibung nicht nur von konkrete Tatsachen, sonder auch wie ein
Hardwarehacker "tickt", befindet sich in dem Buch von Andrew "bunnie" Huang,
"Hacking the X-Box", das sich mit dem X-Box von Microsoft befasst. (Leider ist das
Buch nicht in Deutsch erhältlig.)
Auch wenn es (mit aller Wahrscheinlichkeit) niemals die Bestrebung der ursprünglichen
Entwickler war, hat es sich gezeigt, dass die dBox2/Tuxbox-Kombination von relativ
flexibler und leistungsfähiger Hardware, zusammen mit der offenen Natur der Software
eine sehr attraktive Sammlung von Tools für das Entwickeln von
Schwarzseherprogramme darstellte.
(Offiziell) aus diesem Grund hat sich das Tuxboxprojekt für ein Open-Source Projekt
etwas merkwürdig verhalten. Eine wichtige Komponente (mkflfs) wurden nicht
veröffentlicht, sondern geheimgehalten. Auch wenn die meisten anderen Teile im
Quellcodeverwaltungssystem CVS veröffentlicht wurden, war es nicht möglich
ausschliesslich mit veröffentichen Code ein vollständiges Image zu erstellen und zu
flashen. "Offizielle" Flashimages wurden von AlexW zur Verfügung gestellt. Erst später,
u.a wegen der nicht veröffentlichte Tools, war es möglich ohne umfassende Einarbeitung
ein Image zu erstellen.
Die offizielle Motivierung für die, in dieser Art, teilweise nicht freie Software war, dass
man somit das erstellen von Schwarzseherimages auf Basis der Tuxboxsoftware
verhindern wollte. Es hat sich gezeigt, dass dies nicht erfolgreich war. Das geheimhalten
von mkflfs hat nichts gebracht: Es hat einfach gereicht, die passende Version (für 1
bzw. 2 Flashchips) von einem AlexW-Image in Binärform zu extrahieren und unverändert
wiederzuverwenden, genau so wie die Anleitung zu Erstellen von "sauberen" Images das
Verfahren beschrieben hat.
Zum Flashen, und für einige andere Operationen auf der dBox war es nahezu notwendig,
Page 20
Built with Apache Forrest
http://forrest.apache.org/
Private Site
ein nur für Windows verfügbares programm mit geheimem Quellcode zu verwenden: der
Bootmanager. (Laut Gerücht sind die Quellen nicht nur niemals veröffentlicht worden,
sondern sogar in einem Plattencrash verlorengegangen :-). Ein moderneres ähnliches
Programm ist Alexander Hallenbergs ("Gurgel") Flashassistent, auch mit
unveröffentlichtem Quellcode.
Wesentlich für den Erfolg des Projekts war das "reverse Engineering" von Teilen der
ursprünglichen Software. Insbesondere wird aus der (als legal erworbene, z.B. bei Kauf
der Hardware) Software einige Binärdateien, die Firmware für einige custom Chips
(AViA und CAM-modul) extrahiert, und in der neuen Software benutzt. Diese Firmware
ist nur in vorhandene, verschlüsselte Form enthältlig. Eine decompilierung oder Analyse
ist (meines Wissens nach) niemals publiziert worden. Es wird angenommen, das sobald
die Originalsoftware legal erworben ist, und die Firmware nicht zu Weiterverbreitung
angeboten werden, alle gesetzlichen Anforderungen erfüllt sind, und, implizit, dass das
Verfahren juristisch unproblematisch ist. (Siehe z.B. Tuxbox Wiki.)
Unter anderem aus diesen Grunden ist das Tuxbox-Projekt (leider) mehr verbunden mit
bereitstellen von Flashimages, als mit dem eigentlichen Kern: die Quellen im CVS.
Seit ein Paar Jahren existiert eine große Anzahlt von unterschiedlichen
Tuxbox-basierenden Images. Fast alle sind für Schwarzsehen ausgelegt, auch wenn man
oft das eigentliche "Scharfmachen" (installation von besondere Softwarekomponente,
z.B. sogenannte Emulatoren ("Emus"), die eine lizenzierte Entschlüsslung emuliert, und
installation von Entschlüsselungsschlüsseln ("Keys")) dem Benutzer überläßt. Fast alle
diese Images verletzen die GPL in dem Sinn dass sie:
1. Quellcode für Erweiterungen, sowie ggf. Buildscripte etc. nicht den Benutzern zu
Verfügung stellen, und/oder
2. Die Images werden anderen Regeln für Weiterverbreitung und Modifikation unterlegt
als GPL.
Die meisten Imagebauer legen großer Wert darauf, ihre Images mit individuellen
Verbesserungen zu versehen. Dies betrifft natürlich die Schwarzseherfähigkeiten, aber
auch andere Eigenschaften wie GUI-Menus, Plugins, Logos etc. Die "Verbesserungen"
diesbezüglich sind in fast allen Fälle ziemlich überflächlich, und tragen nur selten zu
wirklichen Funktionalitätsverbesserungen oder -Erweiterungen bei. Auch zu den
Modifikationen, die nicht mit Schwarzsehen verknüpft sind, wird Quellcode geheim
gehalten. Dies gilt auch für verwendete Buildscripte etc. In einem Fall wird eine
Weiterdistribution untersagt (sowohl von unmodifizierte, als auch für modifizierte
Images), sogar Anleitungen zu Modifikation (egal für welche Zweck) werden verboten!,
angeblich um die Benutzung für Schwarzsehen zu verhindern...
Es ist verständlich, dass die Imagebauer in gewissem Sinn markieren wollen, was sie
erschaffen haben — trotzdem ist es ja eine kreative Tat. Durch 1. oder 2. oben macht man
aber dadurch freie Software unfrei, indem man weiteres "Sharing" (sowohl von eigene
Beiträge als auch von den "99%" der Programmcodes, der unverändert durchgereicht
wird) untersagt. Traurig ist, dass das Sharen von Software keinen Stellenwert hat; man ist
Page 21
Built with Apache Forrest
http://forrest.apache.org/
Private Site
sogar stolz über geheim gehaltene ("non-public") Teile. (Vielleich hat man Angst, dass
eine Veröffentlichung schlechten Programmierstil, oder "geklaute" Teile verraten
würde?)
Formell sagt man, dass 1. und 2. oben die GPL verletzt. Wie oben beschrieben, sehe ich
dies nicht als ein Verletzung irgenwelcher langweiligen und uncoolen Bestimmungen,
sondern als ein unkooperatives Verhalten: Es werden Programme, frei im Sinn der GPL
zu Verfügung gestellt, und man bedankt den Autoren und der Welt damit, dass man
abgeleitete Werke unfrei macht. Es ist auch eine zweifelhaftes Verständniss von
"intellektuellem Eigentum" (sowohl in formellem als auch in moralischem Sinn). Den
ursprunglichen Authoren und Copyrightinhabern verneint man ihre Rechte indem man
ihre Lizenzbestimmungen ignoriert. Selbst fordert man aber, dass der Rest der Welt die
eigenen Bestimmungen (die sich oft die ursprungliche wiedersprechen) unbedingt
respektiert.
2.3.6. Das Tuxbox Forum
Für das Tuxbox-projekt, wie vom Forum und Wiki definiert, gelten folgende Regeln (in
meiner Formulierung):
1. Schwarzsehen wird nicht toleriert, auch nicht Diskussion darüber. Die Foren, die sich
mit Schwarzsehen befassen, oder dulden, werden (in Anlehnung an Star Wars) "die
dunkle Seite" genannt.
2. Die Images von dietmarw, YADI und Jack the Grabber ("JtG") gelten als die drei
"offiziellen Images" des Tuxbox-projekts.
3. Alles andere als die drei "offizielle Images", und natürlich selbstgebautes, also auch
"illegale Images" wo das "Schaftmachen" (in Sinn von oben) nicht stattgefunden hat,
gelten als illegal.
4. Support für "illegale Images" werden verweigert, weil sie illegal sind, und weil sie
(nicht a priori, aber in allen bekannten Fällen) "GPL verletzen".
5. Die "offiziellen Images" unterstützen out-of-the-box nicht den Empgang von
Premiere, auch nicht mit gültiger Lizenz und Smartcard. Der Grund ist dass die AGB
von Premiere den Empfang mit nicht authorisierter Hard- oder Software untersagt. In
diesem Fall wird das "Scharfmachen" dem Benutzer überlassen: Entweder durch
Austausch von einem enthaltenen Programm durch ein anderes, in Internet
erhältliches, oder eine triviale Sourcecodemodifikation wird die Software in der Lage
sein Premiere, mit einem gültigen Smartcard, zu empfangen.
6. Die oben genannten Firmwarefiles (ucodes) dürfen nicht verbreitet werden. Die
"offiziellen Images" werden ohne sie zur Verfügung gestellt. Das Extrahieren und das
von Betanova unabhängige Benutzen wird als unproblemstisch angesehen, solange sie
aus dem original legalen Betanovaimage des Benutzers gewonnen wurden.
Im Tuxboxforum haben sich besondere Sitten entwickelt. Ablehnung vom offensichtlich
illegalem Schwarzsehen, und man "hat" GPL. Man supportet "die drei offiziellen
Images". Support für andere (ausser selbstgebastelte, ohne Schwartseherzusätze) wird
verweigert, nicht nur aus gesetzliche Gründen, sondern (völlig konsequent und richtig)
Page 22
Built with Apache Forrest
http://forrest.apache.org/
Private Site
weil sich die Images "der dunklen Seite" sich auf, (zumindest im Detail) in geheimen Art
und Weise modifizierte Quellen, und deswegen korrekte Antworten nicht möglich seien.
Dabei geht man sehr "pragmatisch" mit den Mangel von Quellen zu dem JtG-Image um
(siehe unten).
Das Verständniss von GPL scheint auch sehr "pragmatisch" zu sein. GPL wird als eine
Sammlung feine, aber schwierig zu verstehende Regeln zu sein. Z.B. wurde einmal die
Frage, falls das Bereitstellen der Quellen einer Modifikation durch Bereitschaft, auf
Anfrage die Quellen zu mailen, abgedeckt ist, als "Auslegungsinterpretation" (fehlerhaft)
eingestuft. Die Grundcharakter, GPL als Inkarnation der Idee der Sharing von Software
wird nicht verstanden.
Viele Teilnehmer des Tux-Forums betätigen sich auch, mit den gleichen Nicknames, in
Foren der dunklen Seite. Dabei sind sie fast ohne Ausnahme sich der unterschiedlichen
Regeln und Sitten der Foren bewusst.
Die naive Idee, dass man das Böse (hier: das Schwarzsehen) durch Verbote
(Einschränkungen der Freiheit der Software) bekämpft, ist sehr verbreitet (siehe z.B. die
(teilweise recht amüsante) Diskussion über den Einsatz von Filesysteme mit effizientere
Kompression). Es ist dabei mehr als unwahrscheinlich, dass irgendwelche Teilnehmer der
dunkeln Seite sich von irgendetwas "bösem" durch ein Verbot (oder durch binary-only
Programme) aufhälten lassen.
2.3.7. Zu den drei "offiziellen Images"
2.3.7.1. Die dietmarw-Images
Die dietmarw-Images werden nach Änderungen im CVS jede Nacht automatisch gebaut
und zum Download zur Verfügung gestellt. Sie sind aus den tagesaktuellen Quellen, mit
im CVS verfügbaren Werkzeugen gebaut.
2.3.7.2. YADI-images
Als die AlexW-Images eingestellt wurde, gab es keine automatische und reproduzierbare
Art, Images zum Tuxboxprojekt zu bauen. Das Zeil des YADI-Projekts war, (und ist noch
laut YADI Homepage): "Yadi versucht den Prozess der Imageerstellung basierend auf
dem GNU DBox2 Software Projekt, durch diverse Scripte und Patche zu vereinfachen
bzw. zu automatisieren. Zusätzlich gibt es hier fertige Images im SquashFS und JFFS2
Format". Werkzeuge (shellskripte) wurde geschrieben, um ein Image automatisch und
reproduzierbar zu erstellen. Die so erstellte Werkzeuge ("das YADI-Skript") waren aber
in keinste Weise ein Entwurf für ein richtiges Buildsystem für die Tuxbox, sondern eher
als eine laienhaftige Sammlung von Shellskripte zu sehen. In 2004 könnte trotzdem das
YADI-Skript ein benutzbares Image erstellen. Es wurde auch unterhalten. Eher als
"Nebenprodukt" wurde das so erstellte Image zur Verfügung gestellt: das YADI-Image.
Seitdem, scheint es, haben ursprüngliche Mitglieder das Projekts verlassen, und es scheint
Page 23
Built with Apache Forrest
http://forrest.apache.org/
Private Site
so, dass "YADI" nur noch aus ein bis zwei Personen besteht. Seit geraumer Zeit wird das
YADI-skript nicht mehr gepflegt, und kann auch nicht mehr ein Image erzeugen. Die
ursprüngliche Zielsetzung ist also inzwischen nicht mehr existent und statt dessen wird
gelegentlich ein "YADI-Image" ins Netz gestellt.
2.3.7.3. "Jack the Grabber"-Images
Ursprunglich als Image optimiert um zusammen mit dem Closed-Source Programm Jack
the Grabber zu funktionieren, wurde das sogenannte "Jack The Grabber"-Image (JtG)
veröffentlicht. Bei JtG scheint man nicht viel vom Sharing der Software zu halten. (Siehe
Haftungsausschluss und Nutzungsbedingungen, siehe auch Regeln für den JtG-Image
Bereich.) Das Image verletzt die GPL in mehrfacher Weise: Es sind einige
Modifikationen dadrin enthalten, z.B. an Neutrino, wobei die Quellen nicht zur
Verfügung gestellt werden. (Wobei die Modifikationen oft früher oder später in
irgendeiner Form ins CVS einfliessen.) Die Verpflichtigung, das abgeleitete Werk gleich
frei wie die Quellen zu Verfügung zu stellen wird völlig ignoriert: Laut JtGs
Bestimmungen darf das Image nicht weiterverbreitet werden, ein Recht zu
Weiterentwicklung (egal für welche Zweck) wird dem Benutzer verneint, und sogar das
Veröffentlichung von Anleitungen zu Modifikation (egal zu welchen Zweck) ist
untersagt! Das Letzte ist nicht nur eine Verletzung der Softwarelizenzen sondern auch ein
Versuch, die Recht der freien Meinungausserungen einzuschränken. (Nicht einmal
Microsoft traut sich sowas zu...) Werkzeuge ("Buildskripte") zu Erstellen des Images
werden nicht Veröffentlicht. (Ich habe ganz klare Indizien, dass der Imagebauer das
Imagebauen als wohlgehütetes Geheimniss halten möchte.)
2.4. Building Flash Images and YADDs with newmake
2.4.1. Revision history
Date
Description
2006-02-14
Initial version.
2006-03-02
Updated script fragments to take into account
that customization scripts are now called as
./[email protected] (previously sh
[email protected]), making $0 different.
2006-03-19
Minor changes. Added section on root partition
size.
2006-04-15
Mention custiomizationsdir. Added paragraph on
"script" as "misnormer". Added comment on bad
magic bytes. Added link to the architecture
document.
2006-04-17
Rewrote Cleaning targets (to reflect changes).
Updated URL to the GNU Make manual.
Page 24
Built with Apache Forrest
http://forrest.apache.org/
Private Site
2006-07-19
Minor spellfixes, reference to the German
Version.
2.4.2. Introduction
Eine deutsche Version dieses Dokuments ist hier verfügbar.
This document covers newmake from the user's perspective, and covers image and yadd
builds, and elementary customization. The architecture of newmake is described in
another document.
2.4.2.1. Some history
A few years ago, image creation for the Tuxbox software was a black art. The Makefile
support was quite incomplete, in particular for other images than cramfs-images. Not only
were the CVS tools bad or incomplete, worse, some parts were deliberately kept secret,
namely the tool, now known as mkflfs, available in the CVS-directory
.../hostapps/mkflfs. According to a posting from this time, most developers
were not able to build an image. The "Guild of the Image makers" was born. Most
well-known from this time are the "AlexW-Images": mainly consisting of CVS-sources,
but with some, more-or-less secretly held "fixes", (probably) necessary for building a
functioning image out of the CVS-sources.
In August 2003, in a project that called itself "GNU DBox2 Software Project", it became
increasingly embarrassing to keep mkflfs secret, and the sources for mkflfs were
checked in to CVS. Also, the Makefile gradually improved in functionality. Still, much
was left to be desired: functionality, maintainability, sound software design. Building an
image from pure CVS was not really possible.
In 2004 the YADI ("Yet Another DBox Image") project was born. (Do not confuse
"YADI" and "YADD"!) Its goal was to automate and to simplify image creation. For this,
a number of scripts and patches were incorporated and/or written. Additionally,
flash-ready images were provided.
YADI was a big success. The goal was achieved. Images were made available, based
(almost?) completely with free software -- both in its content, and the tools involved, in a
way that was open to the user. With the YADI-script, automatic image creation was
possible. However, instead of addressing the fundamental weakness in the CDK build
process, they provided scripts to build images. They did not provide a build mechanism
for a software project. Software project are built with a software build system, like make,
or a later successor, such as Ant or Maven, not with shell scripts.
newmake, presently as alternative branch in CVS, tries to address these weaknesses.
I would like to thank everyone who have provided bug reports and feedback, in particular
dietmarw, who is using newmake to build the dietmarw-images.
Page 25
Built with Apache Forrest
http://forrest.apache.org/
Private Site
2.4.2.2. Goal
The goal of the present article is to provide the reader with basic know-how. It is not the
goal to provide an idiot-proof step-by-step instruction (like the so-called HOWTOs). Prior
exposure to shell scripts is required for many parts, in particular the customization chapter
and the appendix, however not for image/yadd creation in its simplest form.
The present document (at least in the present version) does not try to describe the inner
working of the make file and the make process. For this, the reader is referred to the
sources (which are somewhat commented!), and to the relevant threads in the Cross
Development Kit section of the Tuxbox forum. Also, we do not describe all options to
configure, only the most common and important ones.
2.4.2.3. How hard is it?
My answer would be: It is as hard as reading this article. The reader understanding most
herein should not have any problems; for the reader for which most of this is gibberish,
hmm, it may be wiser to stay with ready-made images.
2.4.2.4. General
There are two possible goals when compiling the source: Either "YADD" or image. "A
YADD" consists of a few files that the dBox loads using the TFTP-Service, and a
filesystem, made accessible to the dBox from a NFS-Server (see this article). This mode
of operation has many advantages when developing the Tuxbox software, or when
learning the system. The name "YADD" once meant "Yet Another DBox Distribution".
Unfortunately, this misleading and throughout silly name has stuck.
My suggestion to the apprentice image/yadd-builder is: First build a YADD with your
favorite GUI, and get it to work. Next step would be to build a jffs2-image, again with
your favorite GUI.
Most people would like to combine and/or automate the steps described below. As
opposed to "HOWTOs", this guide is aimed at understanding the involved issues, and
leaves scripting to the reader. The reader with reasonable prior exposure to shell scripts
should have no problem writing his/her own build script after reading this guide.
In this article, "GUI" will denote either Neutrino or Enigma. "Filesystem" in the context
of a complete image will denote the file system where the root resides: This may be
cramfs (a compressed, read-only filesystem for embedded devices), squashfs (another
compressed, read-only file system, often considered to be more efficient than cramfs), or
jffs2 (a journalled read-write filesystem). A "cramfs (full) image" consists of a root file
system, using the cramfs file system, and a (smaller) jffs2 filesystem, that is to be
mounted on /var. The analog statement holds for "squashfs (full) images", while a "jffs2
(full) image" does not have a separate /var file system, since the root files system, being
jffs2, is writeable. Additionally, the full images contains an additional partition,
Page 26
Built with Apache Forrest
http://forrest.apache.org/
Private Site
containing the u-boot boot loader. This part is different between dBoxes with one and two
flash chips. This is indicated by "1x" and "2x". A complete image carries the name
[neutrino,enigma]-[cramfs,squashfs,jffs2].img[1,2]x, e.g.
neutrino-jffs2.img2x.
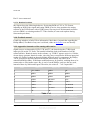
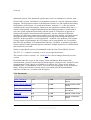
2.4.3. Build system prerequisites
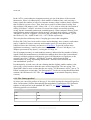
The prerequisites on the host for building Tuxbox images and yadds can be summarized
in: A modern Unix/Linux system with some 2 GB of free disk space. The Tuxbox project
does not have a favorite host environment, and in general, questions like "Can Redhat x.y
build it?" will not get a definite answer. The reason for this is that no-one really cares to
keep track of the features of particular distributions. Requirement are instead formulated
for versions of the tool, like autoconf, automake, make, etcetera. The official tool version
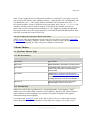
requirement at the time of this writing is summarized in the following table:
Tool
Required Version
autoconf
2.57a
automake
1.8
libtool
1.4.2
gettext
0.12.1
make
3.80
makeinfo
any
tar
any
bunzip2
any
gunzip
any
patch
any
infocmp
any
gcc
= 2.95 or >= 3.0
g++
= 2.95 or >= 3.0
flex
any
bison
any
pkg-config
any
wget
any
The build process will automatically check some of these requirements. If you miss one
of the programs, of if your version is older than the above requirements, in general it is
Page 27
Built with Apache Forrest
http://forrest.apache.org/
Private Site
much quicker to installed the required version (either all compiled package, e.g. in
rpm-format from your distributer, or getting it in source format, compiling and installing
yourself), than to try to find out if the above requirements really are necessary.
Note:
Other descriptions require tools like fakeroot, mksquashfs, mkcramfs, mkjffs2fs (or mkfs.jffs2), and,
possibly, mklibs to be installed on your system. In our setup, this is not required.
On my SuSE 10.0 system it was necessary to install these extra packages: autoconf,
automake, gcc, bison, flex, gcc-c++, newcurses-develop, and
zlib-develop.
Building on a Unix, non-Linux system should probably be possible, as long as the
required GNU Tools are installed. Using a non-GNU make will almost surely not work,
since GNU-extensions are used freely.
Likewise, compiling with Cygwin "should" work, although no-one has done it during
modern times (as far as I am aware of).
2.4.4. Checking out the sources
The Tuxbox sources is distributed through the Tuxbox CVS server. Regular source
releases are presently neither made, nor planned. For our purposes, the source are
"checked out" (= copied to your local disk) anonymously by first creating an empty
directory, say /tuxbox/head, at a (local) disk with "lots" of free space, cd-ing to it,
and issuing the command
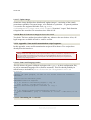
cvs -d [email protected]:/cvs/tuxbox -z3 co -f -r newmake -P .
Note the period at the end of the previous line! This command checks out the newmake
files, and for the cases where no newmake version is available, the HEAD version.
In HEAD, there are two files cdk/root/etc/init.d/rcS and
root/etc/init.d/rcS.insmod. In newmake, these are instead products, which
are generated from its source root/etc/init.d/rcS.m4. It is therefore advisable
to delete cdk/root/etc/init.d/rcS and
cdk/root/etc/init.d/rcS.insmod, just to be on the safe side.
At this point, it may be desirable to apply some source patches to the sources. If you are
compiling for the first time, it is advisable not to apply patches. If problems occur, it is
much easier (both technically and socially) to help someone who is using the "unmodified
CVS sources".
2.4.5. Configuring
Next some intermediate files are generated. Change to the cdk subdirectory, and issue
the command
Page 28
Built with Apache Forrest
http://forrest.apache.org/
Private Site
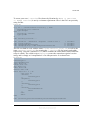
./autogen.sh
(with no arguments). This creates, among other things, a shell script called configure.
This script is executed, given a number of options, to set up the system for building an
image/a yadd according to the users wishes. For a complete list of options, use the
command ./configure --help. This guide will only describe a typical use, and
some other options the author happens to consider useful. The spirit of the configuration
options are like in typical GNU tools. A typical use, compatible with the selection above,
may be
./configure --prefix=/tuxbox --with-cvsdir=/tuxbox/head
--enable-maintainer-mode
The --with-cvs-dir states where the sources are located (should have a subdirectory
cdk), while the --prefix states that a number of important directories are to be
created as subdirectories of said directory. Their location can be further influenced by
some other configuration options, ./configure --help produces the full list.
--enable-maintainer-mode is practical, also for not-maintainers, since it enables
the created Makefiles to be automatically rebuild when the need arise (for example after
some software updates).
There are other useful options available; some are being discussed below.
Please examine the output of autogen for errors and warnings. The warning
/usr/local/share/aclocal/pkg.m4:5: warning: underquoted definition of
PKG_CHECK_MODULES
from autogen.sh can be ignored, as well as these warnings from configure:
configure: WARNING: using tuxbox
checking for mkcramfs... no
configure: WARNING: using tuxbox
checking for mkjffs2... no
checking for mkfs.jffs2... no
configure: WARNING: using tuxbox
checking for mksquashfs... no
configure: WARNING: using tuxbox
mklibs
cramfs
mkfs.jffs2
squashfs
Note:
The reader comparing this document to similar descriptions from "the dark ages" have noted, that the option
--with-targetruleset=[standard,flash] is no longer used. During "the dark ages" it was necessary to,
during configuration time, restrict yourself to building either yadds, or images. In newmake this is no longer necessary.
Warning:
Do not try to build as root!
2.4.6. Compiling
The high-level make targets relevant for building (full) images are:
flash-[neutrino,enigma,all]-[cramfs,squashfs,jffs2,all]-[1x,2x,all].
For YADD-builds, these are: yadd-[neutrino,enigma,all]. For example, the
Page 29
Built with Apache Forrest
http://forrest.apache.org/
Private Site
command
make flash-neutrino-jffs2-all yadd-enigma
will build flashable jffs2-only images with Neutrino, both for 1x-boxes and for 2x-boxes
(filenames neutrino-jffs2.img1x and neutrino-jffs2.img2x). Also, a
YADD containing Enigma will be built.
On my Athlon XP 1800 a command like make yadd-neutrino in a clean directory
takes around one and a half hour.
2.4.7. Where do we go from here?
2.4.7.1. Booting the YADD
If a YADD just have been built, proceed to this article for setting up a YADD server.
Note the make-target serversupport that generates some setup files for the server,
interfacing the build with the server setup seamlessly.
2.4.7.2. Flashing the image
If an image has been build, next step would be to read it into the flash memory of the
dBox, called "flashing". For this, I recommend either using the interactive flashing of
Neutrino (dBox -> Services -> Software update -> Expert functions -> Write whole
image), or the dboxflasher described here. The dboxflasher is built by the make-target
serversupport. Other possibilities for flashing are described in Tuxbox Wiki.
2.4.8. Incremental builds
In general, people are not interested in just building the software once. Improvements to
the sources are checked into CVS on a daily basis. Also, many people would like to
improve the software, either by applying other peoples patches (e.g. from my patch page
:-), or by programming themselves. It is then desirable for make to rebuild what is
needed, no more and no less. The present "newmake" goes a long way in that direction.
To rebuild a make-target target, just issue the command make target, and make
will remake that target. It can then happen, that make starts (re-)building a completely
different component! This is, at least most of the time, the right thing to do, since the
target may depend on other parts, which have changed, making a renewed build of that
component necessary.
In some situations, it may be desirable to force a rebuild of a component. Several
components are downloaded in a distribution file to the directory cdk/Archive, and
when the build takes place, unpacked, patches are applied (only in some cases),
configured, compiled, installed, and the sources then deleted again. Everything takes
place automatically. The installation of the particular package is recorded by a marker file
in directory cdk/.deps. Used on unpack-compile-install-delete-packages, this
technique is not as bad as when (mis-)used in other contexts (like the HEAD branch in
Page 30
Built with Apache Forrest
http://forrest.apache.org/
Private Site
CVS still does). If desired, such a marker file can be removed, forcing rebuild of the
associated component.
2.4.9. Cleaning targets
There is a large number of different cleaning targets:
distclean
The most drastic cleaning target, deleting (almost) everything that was not
checked out from CVS. This is seldomly necessary.
mostlyclean
A smarter target is mostlyclean, that cleans in the directories containing
"tuxbox-sources", but leaves the compilation environment, and all
unpack-compile-install-delete-components alone. Also, the cdkroot directory,
(i.e. the yadd-installation), as well as the TFTP-files (kernel and u-boot) are
not touched.
depsclean
Deletes all marker files in the .deps directory, thus forcing recompilation of all
unpack-compile-install-delete-components. This is seldomly sensible: They
depend on their sources, and, possibly, a patch file, and the Makefile knows
these dependencies.
clean
Combines mostlyclean, depsclean, and flash-clean. Also tries to
delete as much as possible in the cdkroot directory, that was not installed
during the bootstrap run. Thus, it is attempted to bring the environment to the
stage when the build environment has just been compiled, for example by
make bootstrap.
flash-semiclean
This target deletes most build directories in $(flashprefix), but leaves the
built boot-partitions and kernel build directories alone. This is often sensible,
since these components change comparatively seldomly.
flash-mostlyclean
In addition to flash-semiclean, this target also deletes boot-partition files
and the kernel build directories. Build full images are left untouched.
flash-clean
This target deletes all components in $(flashprefix).
Some source directories can be cleaned with a command like make -C
/tuxbox/head/apps/tuxbox/neutrino clean.
2.4.10. Updating the CVS
To update your sources with the latest commits, use a command like
cvs up -f -r newmake -dP > cvs.log 2>&1
from the top CVS directory (or from another directory, if you know what you are doing).
Page 31
Built with Apache Forrest
http://forrest.apache.org/
Private Site
Possible errors are put into the log file cvs.log.
2.4.11. Customization
The built images and yadds can be customized without changing the Makefiles. First of
all, there are some configure-options: using --with-ucodesdir=DIR a directory,
containing ucodes to be included in the image, can be given. (Note that an image
containing ucodes can not legally be distributed.) Secondly, the option
--with-logosdir=DIR can give a directory containing boot logos (logo-lcd and
logo-fb) to be included.
More elaborate customization is possible. For this, it is necessary to have some
knowledge about the inner working of the makefile. In the sequel, $(flashprefix)
will denote the value of the makefile variable flashprefix (with the configure line
above /tuxbox/cdkflash), $(targetprefix) will denote the value of the
makefile variable targetprefix (with the configure line above
/tuxbox/cdkroot), and $(buildprefix) will denote the value of the makefile
variable buildprefix (with the configure line above /tuxbox/head/cdk).
In order to build, say, neutrino-cramfs.img2x, the following directories are being
built: $(flashprefix)/root (containing filesystem and gui-independent
components), $(flashprefix)/root-cramfs (containing the kernel, built for root
filesystem on cramfs, together with its drivers), and
$(flashprefix)/root-neutrino (containing the neutrino-installation). From
these three directories, the root filesystem directory
$(flashprefix)/root-neutrino-cramfs and the var-filesystem directory
$(flashprefix)/var-neutrino are built.
Of course, it is possible to invoke a command like make
$(flashprefix)/root-neutrino-jffs2 (whereby the user have to expand
$(flashprefix), it is a make variable, but not a shell variable), then manually do the
desired changes to $(flashprefix)/root-neutrino-jffs2, and then, with the
command make flash-neutrino-jffs2-2x have the final image build,
containing the manual changes. This can be desirable for the one-time image builder.
However, in many cases a more automatic and systematic methodology is desired,
described next.
Many of the major targets calls a customization script, if present and executable. The
name of the customization script is taken as the non-directory part of the rule, with
-local.sh appended. The script is supposed to reside in customizationsdir, which is
selectable with the ./configure-option --with-customizationsdir. It
defaults to the cdk directory. The script is given two arguments: For image targets these
are $(flashprefix) and $(buildprefix); for yadd-targets these are
$(targetprefix) and $(buildprefix).
Actually, "script" is a bit of a misnormer, since they are just executed as any programs
Page 32
Built with Apache Forrest
http://forrest.apache.org/
Private Site
with two arguments. Instead of shell-scripts, these may be, e.g., compiled C programs or
Perl-scripts.
However, the customization files for the make-targets version and flash-version
(creating the /.version files in YADD and the image respectivelly) are not executed
at the end of the normal actions, it replaces them.
The custiomization script facility is illustrated by the following example.
2.4.11.1. Example
In an image, it is desired to:
1. Use own /etc/hosts,
2. Use own neutrino.conf, bouquets.xml, services.xml
3. Include the lirc component, together with own lirc configuration files.
1. and 3. are extensions that should be done to $(flashprefix)/root, while 2.,
being a Neutrino-fix, should be done to
$(flashprefix)/root-neutrino-jffs2,
$(flashprefix)/root-neutrino-cramfs, or
$(flashprefix)/root-neutrino-squashfs. To achieve 1. and 3. we write the
script root-local.sh, say:
#!/bin/sh
flashprefix=$1
buildprefix=$2
newroot=$flashprefix/root
myfiles=/home/somewhere/dbox/myfiles
cp -f $myfiles/etc/hosts
make flashlirc
cp -fr $myfiles/var/tuxbox/config/lirc
$newroot/var/tuxbox/config
$newroot/etc
The script for 2., say, root-neutrino-local.sh, is entirely similar:
#!/bin/sh
flashprefix=$1
buildprefix=$2
newroot=$flashprefix/root-neutrino
myfiles=/home/somewhere/dbox/myfiles
cp $myfiles/var/tuxbox/config/neutrino.conf $newroot/var/tuxbox/config
cp $myfiles/var/tuxbox/config/zapit/bouquets.xml
$newroot/var/tuxbox/config/zapit
cp $myfiles/var/tuxbox/config/zapit/services.xml
$newroot/var/tuxbox/config/zapit
Note:
These scripts are intended to serve as examples, and can probably not be used without modification.
Page 33
Built with Apache Forrest
http://forrest.apache.org/
Private Site
2.4.11.2. Changing the partitioning
As of 2006-03-19, the root partition size for cramfs and squashfs images can be selected
with the configure-option --with-rootpartitionsize=SIZE. The size of the
var-partition is automatically computed to use all remaining flash space, i.e. everything
not used by the other partitions. Default size is 0x660000. This number should be a
multiple of the erase size, presently 0x20000. Ignored (while meaningless) when building
jffs2-images.
2.4.12. Some "best practices"
In this section, we collect some rules that are not "necessary" to get the right result,
however, they may in the long run lead to better and more reliable and maintainable
software. They apply both to customizations and future changes to the Makefile (and its
components) itself.
If you do not like these rules, feel free just to ignore them, at least if you are writing
customization scripts for your own usage.
2.4.12.1. Idempotence
It is almost always a good idea to try to make a setup-script idempotent. That means, that
executing it several times has the same effect as executing it once.
2.4.12.2. Use "make install", do not just snarf individual files!
"Traditionally", the Tuxbox Makefile first installed packages in $(targetprefix),
and then created the image directories by copying individual files from the
$(targetprefix) hierarchy. This is not very good software engineering. First, the
know-how on the installation of the package package should sit in its Makefile, not in a
some general Makefile, just snarfing together already copied files. If that package
changes in the sense that a configuration file is added or deleted, it is necessary to change
also in the global makefile.
It is often the case, that the Makefile belonging to the package installs include files,
(static) libraries, info-files etc., that are not wanted on an embedded system with restricted
memory. The correct solution to this (real!) problem would be to modify the Makefile of
package, either to write a flashinstall target, or to provide the Makefile with a
parameter like installsize=[full,flash]. If this is not feasible, it is my opinion
that make -C ... install followed by deletion of unwanted files still is better than
copying individual files. Note that, in the step that makes the directories
$(flashprefix)/root-gui-filesystem, the include directory, as well as all
static libraries are deleted, and shared libraries are stripped of unused symbols.
2.4.13. Answers to some questions
Page 34
Built with Apache Forrest
http://forrest.apache.org/
Private Site
2.4.13.1. What if it does not build?
There is no standard procedure on what to do when the build fails. I will here try to give
some guidelines, to be read before posting to the forum.
First of all, examine the output of the first two steps, autogen.sh and configure for errors
and warnings. Every warning or error, except for the five messages listed above indicates
a problem that will most likely make build impossible.
If a build breaks, it may leave the build environment in an inconsistent state. This is in
particular true for the directories in $(flashprefix). If the build of such a make
target breaks, the directory will exist, be up-to-date according to their file modification
time, and a subsequent make command will treat it as finished and ok. Of course, an
incorrect build will result. Therefore, if a build of a directory in $(flashprefix)
breaks, please delete it before trying another make command.
By "it worked yesterday"-problems, probably the build environment is in an inconsistent
state. Issuing a more-or-less drastic cleaning command (see above) and trying
recompiling might be faster than systematic problem search.
If you need help, see below.
2.4.13.2. After flashing I get "Kein System" on the LCD/What is this "bad magic byte"
business?
Uhh, I hoped the question would not come up... The short answer is: I do not know. We
do not know. But if you are reading this article this far, you do not expect "short
answers", but "good answers". Ok. The issue has been discussed at length here. In short
the image "is" ok, it is just that some firmware in the dBox rejects it because it finds some
"bad magic bytes" on certain addresses. The forum participant mogway wrote a program,
in CVS available in the directory hostapps/checkImage. The program detects these
"bad bytes", but it does nothing to correct them. My own experience says that images
checkImages says are OK really runs. cramfs or squashfs images which
checkImage complain about, in general do not run, in some cases they do. jffs2-images
that checkImage complains about in general, but not always, runs. With these
empirical observations, I leave the possible usage of checkImage, and the subsequent
decisions, to the user, with no further recommendations.
newmake knows how to build and how to invoke this program to automatically check the
generated images. The configure-option
--with-checkImage=[none,rename,warn] may be used. If warn is selected,
then for every image that do not pass the test, a dummy, zero-length file is generated,
name as image file with _bad appended. If rename is selected, the questionable image
file is instead renamed.
It can be mentioned that the "bad magic bytes" sit in one (or more!) of the partition files,
Page 35
Built with Apache Forrest
http://forrest.apache.org/
Private Site
and are not generated by the final step (building the *.img1x and/or *.img2x files). It is
possible to invoke checkImage on the image files (*.jffs2, *.cramfs,
*.squashfs, *.flfs1x, *.flfs2x). Finally, checkImage has a debug-option
that may be useful.
2.4.13.3. I have found a mistake or a bug!
Bugs, gripes, suggestions for improvement of the software should preferably go to the
Cross Development Kit section of the Tuxbox forum. Issues regarding this text -mistakes (technical matters, spelling, grammar, pedagogical), suggestions for
improvements and extensions -- can go to me directly, however, "discussion" is probably
better off in the forum.
2.4.13.4. I need help!
Requests for help can be posted in the Cross Development Kit section of the Tuxbox
forum. Postings in German or English are welcome. Please include the configuration
options used in the posting.
Please do not mail or PM me personally, since I do not provide personal free-of-charge
support. (After having posted the problem, a PM/mail politely pointing to the thread and
asking for my answer is ok.)
2.4.13.5. Parallel make?
Recently, when the GHz-explosion ceased, the idea of multiprocessor computers got
popular again, in particular in the "budget" form of dual core processors. Builds are in
general intrinsically parallelizeable, and should be able to take advantage of several
processors. In particular, since many years GNU make supports parallel builds (issuing
several commands in parallel) (the -j option, with or without an argument). Can this be
used to compile the Tuxbox software in parallel?
The short answer is: "Parallel builds are not supported. But you are welcome to work on
it." With the present setup, some components (kernel, u-boot, busybox,...) are built in
different versions, for example, there are different kernels for YADD, and for the three
different file systems. Different versions can not be build in parallel, since the same
files/filenames are being used.
Also when no multiple versions of the same component are being built, a command like
make -j flash-neutrino-jffs2-2x presently does not produce correct result.
Feel free to work on it!
2.4.13.6. Kernel 2.6?
Kernel 2.6 is not supported (even if there are some lines regarding it in the source). Feel
free to work on it.
Page 36
Built with Apache Forrest
http://forrest.apache.org/
Private Site
2.4.13.7. Update images
Sometimes image builders have distributed "update images", consisting of the cramfs
(sometimes squashfs) filesystem image, to be flashed as a partition -- in general partition
2. newmake also supports this habit. Just, e.g., make
$(flashprefix)/root-neutrino.cramfs. Neutrino's "expert" flash function
recognizes the newmake file extensions since 2006-01-02.
2.4.13.8. How do I convert 1x-images to 2x, or vice versa?
You don't. The here outlined procedure builds any, whatever the user desires. Also, all
legal images are available in both 1x- and 2x-version.
2.4.14. Appendix. Some useful customization script fragments
In this appendix, some useful customization scripts will be shown. Two scripts have
already been shown above.
Warning:
Although in many cases usable as they are, the scripts are intended as examples, not solutions to real problems. For this
reason, the examples are included here as code snippets, not as downloadable files. Please do not use unless you
understand how they work, at least roughly. To incorporate in the building/customization process requires at least
elementary script-writing experience.
2.4.14.1. Games and Languages nuker
This file deletes all games (defined as plugins with type=1 in their configuration file),
as well as unwanted languages files (neutrino assumed). This file should probably be
called from (or included in) root-neutrino-$filesystem-local.sh
#!/bin/sh
# Nukes all game plugins, as well as all locale files not listed in
LANGUAGES
newroot=$1/root-neutrino-jffs2
LANGUAGES="deutsch english"
for f in $newroot/lib/tuxbox/plugins/*.cfg; do
grep 'type=1' $f>/dev/null && rm -f
$newroot/lib/tuxbox/plugins/`basename $f .cfg`.*
done
for f in $newroot/share/tuxbox/neutrino/locale/*; do
(echo $LANGUAGES | grep -v `basename $f .locale` >/dev/null) && rm
-f $f
done
2.4.14.2. Customizing the /.version file
Page 37
Built with Apache Forrest
http://forrest.apache.org/
Private Site
To create your own /.version file (shown by Neutrino by dBox -> Services
-> Image Version) is surely a common requirement. Here is the file I am presently
using for this:
#/bin/sh
if [ $0 = ./flash-version-local.sh ] ; then
outfile=$1/root/.version
type="image"
else
outfile=$1/.version
type="yadd"
fi
echo Creating $outfile ...
echo
echo
echo
echo
"version=`./mkversion -snapshot -version 200`"
"creator=Barf"
"imagename=Barf-$type"
"homepage=http://www.bengt-martensson.de"
>
>>
>>
>>
$outfile
$outfile
$outfile
$outfile
This file can both be used with the name flash-version-local.sh, as well as the
name version-local.sh, for creating the /.version-file for images and yadds
respectively. Note the evaluation of $0 (which contains the actual name, under which the
script is called). The called script mkversion creates the somewhat cryptical version
string, and is simply an "encapsulation" of its idiosyncrasies. It is shown here:
#!/bin/sh
releasetype=3
versionnumber=000
year=`date +%Y`
month=`date +%m`
day=`date +%d`
hour=`date +%H`
minute=`date +%M`
while expr $# > 0 ; do
case "$1" in
-release)
releasetype=0
;;
-snapshot)
releasetype=1
;;
-internal)
releasetype=2
;;
-version)
versionnumber=$2
shift
;;
esac
shift
done
echo $releasetype$versionnumber$year$month$day$hour$minute
Page 38
Built with Apache Forrest
http://forrest.apache.org/
Private Site
2.4.14.3. Archiving the images
It is the task of the build process to create the flash images, not to archive them. However,
the customization can easily be "mis"-used to make some sort of archiving, as the
following example shows:
#!/bin/sh
flashprefix=$1
imagefile=`basename $0|sed -e s/-local.sh//`
imagefilebase=`echo $imagefile|sed -e s/\.img.x//`
extension=`echo $imagefile|sed -e s/[-a-z0-9]*\.//`
newfilename="barf-"$imagefilebase-`date --iso-8601`.$extension
echo Copying $flashprefix/$imagefile to $flashprefix/$newfilename...
cp $flashprefix/$imagefile $flashprefix/$newfilename
The script should have one or more of the names
[neutrino,enigma]-[cramfs,squashfs,jffs2].[img1x,img2x]. It will
rename the file according to the current date. Again, the script is shown to demonstrate a
concept, not to be just copied.
2.4.15. References
• The GNU Make manual, online version. Also contained in the software distribution.
• The CVS Manual online, known as "The Cederqvist".
• Open Source Development with CVS, 3rd Edition. A quite useful book,
downloadable as PDF (among other formats).
2.5. Flashimages und YADDs mit newmake
2.5.1. Versionen
An English version of this document is available here.
Diese Version ist eine Übersetzung des englischsprachiges Originaldokument. Bitte
kontrollieren Sie ggfl. falls das Originaldokument in eine neuere Version vorliegt. Diese
Version ist vom 19. Juli 2006.
Die Versionsgeschichte befindet sich nur in der englischsprachige Version.
2.5.2. Einleitung
Dieses Dokument behandelt newmake aus Sicht des Benutzers. Es behandelt Image- und
yadd-Herstellung und einfache Benutzeranpassungen ("customization"). Die Architektur
von newmake wird in einem anderen Dokument beschrieben.
2.5.2.1. Zur Geschichte
Page 39
Built with Apache Forrest
http://forrest.apache.org/
Private Site
Vor einigen Jahren war Imageherstellen für die Tuxbox eine schwarze kunst. Die
Makefile-Unterstützung war, insbesondere für andere Images als cramfs-images, ziemlich
lückenhaft. Die CVS Werkzeuge waren schlecht, oder unvollständig. Noch schlimmer,
einige Teile wurden absichtlich geheim gehalten, nämlich das Werkzeug, jetzt als
mkflfs bekannt, jetzt im CVS-directory .../hostapps/mkflfs vorhanden. Laut
einer Forumsbeitrag von dieser Zeit waren die meisten Entwickler nicht in der Lage,
eigene Images herzustellen. Die "Gilde der Imagehersteller" wurde geboren. Von dieser
Zeit sind die "AlexW-Images" weithin am bekanntesten: hauptsächlich bestehend aus
CVS-sources, aber mit einigem mehr-oder-weniger den geheim gehaltenen "Fixes",
(vermutlich) notwendig für das Herstellen eines funktionierendes Images aus dem
CVS-Quellen.
Im August 2003, in einem Projekt, das sich "GNU DBox2 Software-Projekt" nannte,
wurde es in zunehmendem Maße peinlich, mkflfs geheim zu halten, und die Quellen
für mkflfs wurden in CVS eingecheckt. Auch die Funktionalität des Makefiles wurde
stufenweise verbessert. Noch wurde viel zu wünschen übrig: Funktionalität, Pflegbarkeit,
gesunde Software-Design. Ein Image von reinen CVS-Dateien zu bauen war nicht
wirklich möglich.
In 2004 wurde das YADI ("Yet Another DBox Image") Projekt geboren. (Bitte nicht
"YADI" und "YADD" verwechseln!) Sein Ziel war, Imagebuilden zu automatisieren und
zu vereinfachen. Für dieses Zweck wurden eine Anzahl von Skripte und Patches
gesammelt und/oder geschrieben. Zusätzlich wurden flashfertige Images zur Verfügung
gestellt.
YADI war ein grosser Erfolg. Das Ziel wurde erreicht. Images wurden zur Verfügung
gestellt, die sich (fast?) vollständig auf freier Software basierte -- sowohl in seinem Inhalt
als auch bezüglich die involvierte Werkzeugen, in eine Weise, die für den Benutzer
transparent war. Mit dem YADI-Skript war das automatische Imagebuilden möglich.
Jedoch, statt die grundlegende Schwäche im CDK Imageprozeß zu adressieren, stellten
sie Skripte zum Imagebauen zur Verfügung. Sie stellten nicht eine Buildsystem für ein
Software-Projekt zur Verfügung. Software-Projekt werden mit einem
Software-Buildsystem gehandhabt, wie make, oder ein neuerer Nachfolger, wie Ant oder
Maven, nicht mit Shellskripte.
newmake, momentan als alternative Branch in CVS, versucht diese Schwächen zu
adressieren.
Ich möchte mich hier bei jedem, der Bugreports und Feedback geliefert haben, bedanken.
Insbesonderes gilt dies für dietmarw, der newmake benutzt, um die dietmarw-Images zu
erzeugen.
2.5.2.2. Ziel
Das Ziel des vorliegenden Artikels ist, dem Leser mit grundlegendem Know-how zu
versehen. Es ist nicht das Ziel, eine idiotensichere Schritt-bei-Schritt Anweisung
Page 40
Built with Apache Forrest
http://forrest.apache.org/
Private Site
bereitzustellen (wie die sogenannte HOWTOs). Kenntnis in der Umgang mit Shellskripte
wird für viele Teile, insbesondere das Customization-Kapitel und der Anhang, aber nicht
für image/yadd Kreation in seiner einfachsten Form gefordert.
Das vorliegende Dokument versucht nicht die innere Funktion des Makefile und des
Makeprozesses zu beschreiben. Für dieses wird der Leser auf den Quellen (die sogar ein
wenig kommentiert sind) hingewiesen, und zu den relevanten Threads im cross
development kit Forums des Tuxbox Forums. Alle Optionen für configure werden
auch nicht beschrieben, nur die Allgemeinste und Wichtigste.
2.5.2.3. Wie schwierig ist es?
Meine Antwort würde sein: Es ist so schwerig wie diesen Artikel zu lesen und verstehen.
Der Leser, der ohne Probleme den Inhalt versteht sollte keine Probleme haben; für den
Leser, für den das Meiste von diesem Text Kauderwelsch ist, sollte vielleicht bei fertige
Images bleiben.
2.5.2.4. Allgemeines
Es gibt zwei mögliche Ziele: Entweder "YADD" oder Image. "Ein YADD" besteht aus
einigen Files, die das dBox vom TFTP-Service lädt, sowie einem Filesystem, von einem
NFS-Server (siehe diesen Artikel) für die dBox zur Verfügung gestellt. Diese Betriebsart
hat viele Vorteile, insbesonderes während Softwareentwicklung oder beim Erlernen des
Systems. Der Name "YADD" bedeutete einmal "Yet Another DBox Distribution" ("noch
eine dBox Distribution"). Leider hat sich dieser irreführende und durchaus alberne
Namen durchgesetzt.
Mein Vorschlag für den angehende Image/YADD-Lehrling ist: Bauen Sie zuerst ein
YADD mit Ihrem Favorit-GUI, und lernen Sie, mit ihm zu arbeiten. Folgender Schritt
würde sein, ein jffs2-image, wieder mit Ihrem Liebling GUI zu erstellen.
Die meisten Leute möchten die unten beschriebenen Schritte kombinieren und/oder
automatisieren. In Unterschied zu "HOWTOs", versucht diesen Artikel grundlegende
Know-How zu vermitteln, und überlassen Scripting dem Leser. Der Leser oder die
Leserin mit Vorkenntnisse über Skriptprogrammierung soll nach diesem Text in der Lage
sein, seine/ihre eigene Build-Skripts zu verfassen.
In diesem Artikel bezeichnet "GUI" entweder Neutrino oder Enigma. "Filesystem" im
Kontext eines kompletten Images bezeichnet das Dateisystem, in dem die Wurzel liegt:
Dieses kann cramfs (ein komprimiertes, Read-only filesystem für embedded Systeme)
sein, squashfs (ein anderes komprimiertes read-only-Dateisystem, oft als leistungsfähiger
als cramfs betrachtet) oder jffs2 (ein "journalled" Read-Write-Filesystem). Ein "cramfs
(voll-)Image" besteht aus einem Wurzeldateisystem mit dem cramfs Dateisystem und ein
(kleineres) jffs2-Filesystem, das an /var gemounted werden soll. Die analoge Aussage
hält für "squashfs (voll), das Images", während ein "jffs2-(voll-)Image" nicht ein
separates /var-Dateisystem enthält, weil das Wurzeldateisystem schon jffs2 ist, und
Page 41
Built with Apache Forrest
http://forrest.apache.org/
Private Site
deswegen schreibbar. Zusätzlich enthalten die vollen Images ein zusätzliche Partition, die
den u-boot Bootloader enthält. Dieses Teil ist zwischen dBoxen mit einen und zwei
Flashchips unterschiedlich. Dieses wird durch "1x" und "2x" angezeigt. Ein komplettes
Image trägt den Namen [neutrino, enigma]-[cramfs, squashfs,
jffs2].img[1, 2]x, z.B. neutrino-jffs2.img2x.
2.5.3. Buildsystem Voraussetzungen
Die Voraussetzungen auf dem Buildhost können in etwa so zusammengefasst werden:
Ein modernes Unix/Linux System mit ca. 2 GB freiem Speicherplatz. Das Tuxbox
Projekt hat keine favorisierte Buildumgebung. In Allgemen bekommt Fragen wie "geht es
mit Redhat x.y?" keine klare Antwort. Der Grund für dieses ist, dass; niemand sich
wirklich interessiert, die Eigenschaften der bestimmten Distributionen zu verfolgen.
Anforderung werden anstatt für Versionen der Werkzeuge, wie autoconf, automake,
make, usw. formuliert. Die offizielle erfordeliche Toolversione beim Zeit dieses Texts
wird in der folgenden Tabelle zusammengefasst:
Tool
Required Version
autoconf
2.57a
automake
1.8
libtool
1.4.2
gettext
0.12.1
make
3.80
makeinfo
irgendwelche
tar
irgendwelche
bunzip2
irgendwelche
gunzip
irgendwelche
patch
irgendwelche
infocmp
irgendwelche
gcc
= 2.95 or >= 3.0
g++
= 2.95 or >= 3.0
flex
irgendwelche
bison
irgendwelche
pkg-config
irgendwelche
wget
irgendwelche
Page 42
Built with Apache Forrest
http://forrest.apache.org/
Private Site
Der Bauprozeß überprüft automatisch einige dieser Anforderungen. Wenn Ihnen eins der
Programme fehlt, oder, wenn Ihre Version zu alt ist, ist es in Allgemein viel schneller, die
erforderliche Version zu installieren (entweder alles kompilierte Paket, z.B. im
rpm-Format von Ihrem Distributor, oder die Quellen zu besorgen, compilieren und
installieren), als zu versuchen, herauszufinden ob die oben genannten Anforderungen
wirklich notwendig sind.
Note:
Andere Beschreibungen erfordern dass Tools wie fakeroot, mksquashfs, mkcramfs, mkjffs2fs (oder
mkfs.jffs2), vielleicht auch mlibs, auf Ihrem System installiert sind. In unserer Umgebung ist dies nicht
erfordelich.
Auf meinem SuSE System 10.0 war es notwendig, die folgende Pakete
nachzuinstallieren: autoconf, automake, gcc, bison, flex, gcc-c++,
newcurses-develop sowie zlib-develop.
Builden auf einem Unix, non-Linux System sollte vermutlich möglich sein, so weit die
erforderlichen GNU Werkzeuge vorhanden sind. Mit einem anderen make als GNU wird
es fast sicher nicht laufen, da GNU-Erweiterungen ungehemmt verwendet werden.
Ebenso, das Compilieren unter Cygwin "soll" funktionieren, obwohl niemand es während
der modernen Zeiten getan hat (soweit ich weiss).
2.5.4. Die Quellen auschecken
Die Tuxbox Quellen wird durch den Tuxbox CVS Server distribuiert. Regelmäßige
Quellreleases sind niemals gemacht worden, und sind auch nicht für die Zukünft geplant.
Für unseren Zwecken werden die Quelle anonym "ausgecheckt" (= kopiert zu die lokalen
Festplatte), indem man zuerst ein leeres Verzeichnis erstellt, z.B. /tuxbox/head, auf
einer (lokalen) Festplatte mit "ordentlich" freiem Platz, cd-ing zu ihr, und den Befehl
cvs -d [email protected]:/cvs/tuxbox -z3 co -f -r newmake -P .
eingeben. Merken Sie die Periode am Ende der vorhergehenden Zeile! Dieser Befehl
checkt die newmake Files aus; in den Fälle, in denen keine newmake Version vorhanden
ist, wird die HEAD-Version genommen.
Im HEAD gibt es zwei Files cdk/root/etc/init.d/rcS und
root/etc/init.d/rcS.insmod. Im newmake sind diese anstatt Produkte, die von
seiner Quelle root/etc/init.d/rcS.m4 erzeugt werden. Es ist ratsam,
cdk/root/etc/init.d/rcS und cdk/root/etc/init.d/rcS.insmod zu
löschen, um auf der sicheren Seite zu sein.
An diesem Punkt kann es wünschenswert sein, einige Patches an den Quellen
anzuwenden. Wenn Sie zum ersten Mal kompilieren, ist es ratsam, Patches nicht
anzuwenden. Wenn Probleme auftreten, ist es viel einfacher (technisch sowohl als auch
sozial) jemand zu helfen, das die "unveränderten CVS Quellen" verwendet.
Page 43
Built with Apache Forrest
http://forrest.apache.org/
Private Site
2.5.5. Konfiguration
Demnächst werden einige Zwischenprodukten erzeugt. Ändern Sie zum cdk
Unterverzeichnis, und geben Sie den Befehl
./autogen.sh
ein (ohne Argumente). Dieses erzeugt unter anderem einen Shellskript namens
configure. Dieser wird ausgeführt; dabei wird eine Anzahl von Optionen übergeben,
um das System für das Builden eines Image/einer YADD entsprechend den
Benutzerwünschen vorzubereiten. Für eine komplette Liste von Optionen, benutzen Sie
das Befehl ./configure --help. Dieser Guide beschreibt nur einen typischen
Verwendung, und einige Optionen die der Author für nützlich halten. Der Geist der
Konfigurationsoptionen sind wie in den typischen GNU Werkzeugen. Ein typischer
Gebrauch, der mit den Pfadnamen oben kompatibel ist, kann sein
./configure --prefix=/tuxbox --with-cvsdir=/tuxbox/head
--enable-maintainer-mode
--with-cvsdir sagt wo die Quellen zu finden sind, (sollte ein Unterverzeichnis cdk
haben), während --prefix bedeutet, dass eine Anzahl von wichtigen Verzeichnissen
als Unterverzeichnisse des besagten Verzeichnisses erstellt werden sollen. Ihre Position
kann durch andere Konfigurationsoptionen weiter beeinflußt werden; ./configure
--help produziert die volle Liste der Optionen. --enable-maintainer-mode ist,
auch für Nichtmaintainers praktisch, da er den hergestellten Makefiles ermöglicht, sich
automatisch neu zu erzeugen, sobald die Notwendigkeit entsteht, zum Beispiel nach
einem Software-Update.
Es gibt andere nützliche Optionen; einige werden unten besprochen.
Überprüfen Sie bitte den Ausgaben von autogen für Fehler ("Error") und Warnungen. Die
Warnung
/usr/local/share/aclocal/pkg.m4:5: warning: underquoted definition of
PKG_CHECK_MODULES
from autogen.sh kann ignoriert werden, sowohl als folgende Warnungen von
configure:
configure: WARNING: using tuxbox
checking for mkcramfs... no
configure: WARNING: using tuxbox
checking for mkjffs2... no
checking for mkfs.jffs2... no
configure: WARNING: using tuxbox
checking for mksquashfs... no
configure: WARNING: using tuxbox
mklibs
cramfs
mkfs.jffs2
squashfs
Note:
Der Leser, der dieses Dokument mit ähnlichen Beschreibungen "von den dunklen Zeiten" vergleicht, haben gemerkt, das
die Option --with-targetruleset=[standard,flash] nicht mehr vorhanden ist. Während "des dunklen
Zeitalters" war es notwendig, beim Konfigurationszeitpunkt sich auf Builds von entweder YADDs oder Images sich
einzuschränken. Im newmake ist dieses nicht mehr notwendig.
Page 44
Built with Apache Forrest
http://forrest.apache.org/
Private Site
Warning:
Versuchen Sie nicht, als root zu builden!
2.5.6. Kompilieren
Die high-level make Targets, die für das Builden von (voll-)Images relevant sind, sind:
flash-[neutrino, enigma, all]-[cramfs, squashfs, jffs2,
all]-[1x, 2x, alle ]. Für YADD-Builds, sind diese: yadd-[neutrino,
enigma, all]. Z.B. der Befehl
make flash-neutrino-jffs2-all yadd-enigma
erzeugt flashbare jffs2-only Images mit Neutrino, für 1x-boxes und für 2x-boxes
(Dateinamen neutrino-jffs2.img1x und neutrino-jffs2.img2x). Auch ein
YADD, das Enigma enthält, wird erzeugt.
Auf meinem Athlon XP 1800 dauert ein Befehl wie make yadd-neutrino in einem
leeren Verzeichnisses etwa eins und in einer halben Stunde.
2.5.7. Wohin gehen wir von hier?
2.5.7.1. Booting der YADD
Wenn ein YADD gerade erzeugt worden ist, fahren Sie zu diesem Artikel, über die
Einrichtunng eines YADD-Servers, fort. Merken Sie auch das make-Target
serversupport, das einige Konfigurationsfiles für den Server erzeugt, und den
YADD-Build nahtlos an den Server-Setup anknüpft.
2.5.7.2. Flashen des Images
Wenn ein Image gebaut worden ist, ist nächste Schritt das Einspielen des Images in den
nichtflüchtige Speicher der dBox, "Flashen" genannt. Für dies empfehle ich entweder, das
interaktive Flashen von Neutrino (dBox -> Service -> Software-Aktualisierung ->
Expertenfunktionen -> ganzes Flashimage einspielen) zu benutzen, oder der dboxflasher
zu verwenden, das hier beschrieben wird. Der dboxflasher wird durch das Make-Target
serversupport erzeugt. Andere Möglichkeiten des Flashens werden in Tuxbox Wiki
beschrieben.
2.5.8. Inkrementelle Builds
Im allgemeinen sind Leute nicht an einem einmaligen Build der Software interessiert.
Verbesserungen zu den Quellen werden in CVS täglichen eingecheckt. Viele Leute
möchten die Software verbessern, indem sie Patches anwenden (z.B. von meiner
Patchseite :-), oder durch eigene Programmierung. Es ist dabei wünschenswert, dass
genau die Teile neu erzeugt wird, die neu erzeugt werden muss, nicht mehr und nicht
weniger. Das vorliegende "newmake" geht ein langer Weg in dieser Richtung. Um ein
Page 45
Built with Apache Forrest
http://forrest.apache.org/
Private Site
Target target neu zu bauen, benutzen Sie das Befehl make target, und make wird
es, falls notwendig, neu erzeugen. Es kann dann passieren, dass make zusätzlich ein
vollständig anderer Bestandteil neu erzeugt! Dieses ist, am mindestens in der Regel, die
richtige Sache, da das Target von anderen Teilen abhängen kann, die sich geändert haben,
und machen deswegen einen erneuerten Build von diesem Bestandteil notwendig.
In einige Situationen kann es wünschenswert sein, ein erneutes Build eines Komponents
zu erzwingen. Einige Komponente werden in einem Distributionsfile zum Verzeichnis
cdk/Archive downloadet, und wenn das Build stattfindet, ausgepackt, Patches werden
angewendet (nur in einigen Fällen) , konfiguriert, kompiliert, installiert, und die Quellen
dann wieder gelöscht. Alles findet automatisch statt. Die Installation des bestimmten
Pakets wird durch das Anlegen einer Markerdatei im Verzeichnis cdk/.deps notiert.
Verwendet auf Auspacken-kompilieren-installieren-löschen-paketen, ist diese Technik
nicht so schlecht wie wenn in anderen Kontexten (miss-)braucht (wie in den
MAIN-Branch in CVS). Falls gewünscht, kann solch eine Markiererdatei entfernt werden
um das Neuerzeugen des verbundenen Komponents zu erzwingen.
2.5.9. Cleaning targets
Es gibt mehrere unterschiedliche Aufräum-Targets:
distclean
Das drastischste Reinigungs-Target, (fast) alles löschend, das nicht von CVS
ausgecheckt wurde. Dieses ist selten notwendig.
mostlyclean
Ein intelligenteres Target ist mostlyclean, säubert in die Verzeichnisse, die
Tuxboxquellen enthalten; lässt aber die Kompilationsumgebung und in alle
Auspacken-kompilieren-installieren-löschen-Komponente unberührt. Auch das
cdkroot Verzeichnis, (d.h. die Yadd-Installation), sowie die TFTP-Files
(Kernel und u-boot) werden nicht angefasst.
depsclean
Löscht alle Markerdateien im .deps Verzeichnis und zwingt so
Neucompilation aller
Auspacken-kompilieren-installieren-löschen-Komponente. Dieses ist selten
sinnvoll: Sie hängen von ihren Quellen und vielleicht von einer Patchfile ab,
und der Makefile kennt diese Abhängigkeiten.
clean
Kombiniert mostlyclean, depsclean, und flash-clean. Versucht auch
soviel wie möglich im cdkroot-Verzeichnis zu löschen, das nicht während
des Bootstrapdurchlaufes installiert waren. So wird er versucht, die
Umgebung in einem Zustand zu bringen, wo die Buildumgebung gerade
kompiliert worden ist, z.B. mit make bootstrap.
flash-semiclean
Dieses Target löscht die meisten Verzeichnisse in $(flashprefix), mit
Ausnahme von den Boot-Partitionen und den Kernelbauverzeichnisse. Dieses
Page 46
Built with Apache Forrest
http://forrest.apache.org/
Private Site
ist oft sinnvoll, da diese Bestandteile verhältnismässig selten sich ändern.
flash-mostlyclean
Zusätzlich zumflash-semiclean löscht dieses Target auch Bootfiles und
die Kernbauverzeichnisse. Vollimages werden unberührt gelassen.
flash-clean
Dieses Target löscht Alles in $(flashprefix).
Einige Quellverzeichnisse können mit einem Befehl wie make -C
/tuxbox/head/apps/tuxbox/neutrino clean gesäubert werden.
2.5.10. Aktualisierung des CVS
Um Ihre Quellen mit dem spätesten checkins zu aktualisieren, verwende Sie einen Befehl
wie
cvs up -f -r newmake -dP > cvs.log 2>&1
vom toplevel CVS Verzeichnis (oder von einem anderen Verzeichnis, wenn Sie wissen,
was Sie tun). Mögliche Fehler werden in das logfile cvs.log aufgeführt.
2.5.11. Customization
Die erzeugte Images und die yadds können angepasst ("customized") werden, ohne die
Makefiles zu ändern. Erstmals, gibt es einige Konfigurationsoptionen: mit
--with-ucodesdir=DIR kann ein Verzeichniss angegeben werden, das ucodes
inthält, die im Images enthalten sein soll. (Ein Image das ucodes enthält kann nicht legal
verteilt werden.) Zweiten, mit der Option --with-logosdir=DIR kann ein
Verzeichniss angegeben werden, das boot logos (logo-lcd und logo-fb) enthält, die
im Image enthalten sein soll.
Durchdachtere Customization ist möglich. Für dieses ist es notwendig, etwas Wissen über
die innere Funktion des Makefiles zu haben. In der Folge bezeichnet $(flashprefix)
den Wert des Makefile Variablen flashprefix (mit Konfiguration wie oben
/tuxbox/cdkflash), $(targetprefix) bezeichnet den Wert des Makefile
Variablen targetprefix (mit Konfiguration wie oben /tuxbox/cdkroot), und
$(buildprefix) bezeichnet den Wert des Makefile Variablen buildprefix (mit
der Konfiguration oben /tuxbox/head/cdk).
Um z.B. neutrino-cramfs.img2x zu erzeugen, werden die folgenden
Verzeichnisse erstellt: $(flashprefix)/root (enthält Filesystem- und
GUI-unabhängige Bestandteile), $(flashprefix)/root-cramfs (enthält den
Kernel, für Wurzel-Filesystem auf cramfs konfiguriert, zusammen mit seinen Treibern)
und $(flashprefix)/root-neutrino (enthält die Neutrinoinstallation). Aus
diesen drei Verzeichnissen, werden das Rootfilesystemverzeichniss
$(flashprefix)/root-neutrino-cramfs und das var-filesystemverzeichnis
$(flashprefix)/var-neutrino gebaut.
Selbstverständlich ist es möglich, einen Befehl wie make
Page 47
Built with Apache Forrest
http://forrest.apache.org/
Private Site
$(flashprefix)/root-neutrino-jffs2 einzugeben (wobei der Benutzer
$(flashprefix) selbst ersetzen muss; es ist eine make-Variabel, aber nicht eine
Shell-Variabel), dann manuell gewünschten Änderungen an
$(flashprefix)/root-neutrino-jffs2 durchzuführen, und dann, mit dem
Befehl make flash-neutrino-jffs2-2x den Imagebau abschließen, um ein
Image zu erstellen, das die manuellen Änderungen enthält. Dieses kann für den
einmaligen Imagesbau sinnvoll sein. Jedoch in vielen Fällen wird eine automatischere
und systematischere Methode gewünscht, zunächst beschrieben.
Viele der wichtigeren Targets rufen ein Customization-Script auf, falls vorhanden und
ausführbar. Der Name des Customization Scriptes wird als das Nicht-Verzeichnis Teil der
Regel genommen, mit -local.sh angefügt. Der Script soll im customizationsdir
liegen. Dies ist mit der configure-Option --with-customizationsdir auswählbar.
Default ist das cdk-Verzeichnis. Das Script wird zwei Argumente übergeben: Für
Imagetargets sind diese $(flashprefix) und $(buildprefix); für Yaddtargets
sind diese $(targetprefix) und $(buildprefix).
Die Bezeuchnung "Script" ist ein bisschen irreführend, da sie als normale Programme mit
zwei Argumenten ausgeführt werden. Anstelle von einem Shell-Script können dies z.B.
ein kompilierte C Programme, oder ein Perl-Script, sein.
Jedoch werden die Customization Filen für die Targets version und
flash-version (die /.version-Files in YADD bzw. im Image erstellt) nicht am
Ende der normale make-Actions ausgeführt, es ersetzt sie.
Der Custiomizationscripting wird durch das folgende Beispiel veranschaulicht.
2.5.11.1. Beispiel
In einem Image wird es gewünscht:
1. Eigene /etc/hosts benutzen,
2. Eigene neutrino.conf, bouquets.xml, services.xml benutzen
3. Inkludiere die lirc-Komponente, zusammen mit eigenen lirc Konfiguration Files.
1. und 3. sind Erweiterungen, die zu $(flashprefix)/root erfolgt werden sollten,
während 2., seiend Neutrino-regeln, sollten zu
$(flashprefix)/root-neutrino-jffs2, zu
$(flashprefix)/root-neutrino-cramfs oder zu
$(flashprefix)/root-neutrino-squashfs getan werden. Um 1. und 3. zu
erzielen. schreiben wir das Script root-local.sh, z.B.:
#!/bin/sh
flashprefix=$1
buildprefix=$2
newroot=$flashprefix/root
myfiles=/home/somewhere/dbox/myfiles
cp -f
$myfiles/etc/hosts
$newroot/etc
Page 48
Built with Apache Forrest
http://forrest.apache.org/
Private Site
make flashlirc
cp -fr $myfiles/var/tuxbox/config/lirc
$newroot/var/tuxbox/config
Das Script für 2. nennen wir es root-neutrino-local.sh, ist völlig ähnlich:
#!/bin/sh
flashprefix=$1
buildprefix=$2
newroot=$flashprefix/root-neutrino
myfiles=/home/somewhere/dbox/myfiles
cp $myfiles/var/tuxbox/config/neutrino.conf $newroot/var/tuxbox/config
cp $myfiles/var/tuxbox/config/zapit/bouquets.xml
$newroot/var/tuxbox/config/zapit
cp $myfiles/var/tuxbox/config/zapit/services.xml
$newroot/var/tuxbox/config/zapit
Note:
Diese Scripte sollen als Beispiele dienen und können vermutlich nicht ohne Anpassung verwendet werden.
2.5.11.2. Ändern der Partitionierung
Ab 2006-03-19, kann die Rootpartitionsgröße für cramfs und squashfs Images mit der
Configure-Option --with-rootpartitionsize=SIZE angegeben werden. Die
Größe des var-Partitions wird automatisch berechnet, um den restlichen Flashspeicher
zu benutzen, der nicht durch die anderen Partitionen benutzt wird. Defaultgröße ist
0x660000. Diese Zahl sollte eine Multiple der Erasesize, momentan 0x20000 sein. Wird
ignoriert (wenn sinnlos) beim jffs2imageerstellung.
2.5.12. Einige "best practices"
In diesem Abschnitt sammeln wir einige Richtlinien, die nicht "notwendig" sind um
korrekte Ergebnisse zu erhalten, jedoch werden sie langfristig helfen, um bessere,
zuverlässigere und pflegbare Software zu erstellen. Sie wenden sich sowohl an den
Customizationen an, sowie zukünftige änderungen am Makefile (und zu seinen
Bestandteilen) selbst.
Wenn Sie nicht diese Richtlinien mögen, ignoriern Sie sie, am mindestens wenn Sie
Customization Scripte für Ihren eigenen Brauch schreiben.
2.5.12.1. Idempotens
Es ist fast immer eine gute Idee zu versuchen, ein Installationsscript idempotent zu
schreiben. Dies bedeutet, dass das mehrmalige Ausführen den gleichen Effekt hat wie das
einmalige Ausführen.
2.5.12.2. Benutze "make install", mopse nicht einzelne Files!
Page 49
Built with Apache Forrest
http://forrest.apache.org/
Private Site
In der Vergangenheit hat das Tuxbox Makefile die Komponente zuerst in
$(targetprefix) installiert, und dann die Imageverzeichnissen durch Kopieren der
einzelnen Files von der $(targetprefix) Hierarchie erstellt. Dieses ist nicht sehr
gute Softwaretechnik. Zuerst gehört das Know-how bzgl. Installation des Paket dem
Makefile des Pakets, und soll nicht einem allgemeinen Makefile sitzen, das einfach
einzelne Files rüberkopiert. Wenn dieses Paket sich ändert, z.B. dadurch eine
Konfiguration File zugefügt oder gelöscht wird, wird es auch notwendig, in das globale
Makefile zu ändern.
Es ist häufig der Fall, dass das Makefile, das dem Paket gehört, include-Files, (statische)
Bibliotheken, Info-Files etc. installiert, die nicht auf einem enbedded System mit
beschränktem Speicher gewünscht sind. Die korrekte Lösung zu diesem (wirklichen!)
Problem würde wurde sein, das Makefile des Pakets zu ändern, entweder, um ein
flashinstall-Target zu schreiben, oder das Makefile mit einem Parameter wie
installsize=[full,flash] zu versehen. Wenn dieses nicht durchführbar ist, ist
es meine Meinung, daß make -C ... install gefolgt vom Löschen der
unerwünschten Files besser ist als das kopierend einzelne Files. Zu erwähnen ist auch,
daß in dem Schritt, der die Verzeichnisse $(flashprefix)/root-gui-filesystem
erzeugt, das include-verzeichnis, sowie alle statischen Bibliotheken gelöscht werden und
dynamische Bibliotheken von unbenutzten Symbolen gestrippt werden.
2.5.13. Antwort auf einige Fragen
2.5.13.1. Falls das Build nicht gelingt
Es gibt kein Standardverfahren auf was zu tun, wenn das Build schiefläft. Ich versuche
hier einige Richtlinien zu geben, zu Lesen bevor Posten zum Forum.
Zuerst, überprüfen Sie den Output der ersten zwei Schritte, autogen.sh und
configure für Fehler und Warnungen. Jede Warnung oder Fehler, außer den fünf
Warnings, die oben verzeichnet werden, zeigt ein Problem an, das wahrscheinliche Build
unmöglich macht.
Wenn ein Build bricht, kann es die Umgebung in einem inkonsequenten Zustand
hinterlassen. Dies gilt insbesondere für die Verzeichnisse in $(flashprefix). Wenn
der Bau solch eines Make-Targets bricht, besteht das Verzeichnis, ist entsprechend ihrer
Änderungszeit aktuell, und ein folgendes make Befehl behandelt ihn wie fertig und okay.
Selbstverständlich wird ein fehlerhaftives Build das Ergebniss. Wenn ein Build eines
Unterverzeichnisses von $(flashprefix) in den Brüchen geht, bitte lösche es, bevor
Sie einen anderen Make Befehl versuchen.
Bei "es funktionierte gestern"-Probleme, ist vermutlich die Umgebung in einem
inkonsequenten Zustand. Ein mehr-oder-wenige drastische Reinigungsbefehl (sehen Sie
oben) ist hierbei oft schneller als eine systematische Problemsuche.
Wenn Sie Hilfe benötigen, sehen Sie unten.
Page 50
Built with Apache Forrest
http://forrest.apache.org/
Private Site
2.5.13.2. Nach dem Flashen bekomme ich "Kein System" auf dem LCD/Was ist diese "bad
magic byte" Zeugs?
Uhh, ich hoffte, daß die Frage würde nicht kommen wurde... Die kurze Antwort ist: Ich
weiß es nicht. Wir wissen es nicht. Aber, wenn Sie diesen Artikel so weit lesen, erwarten
Sie nicht "kurze Antworten", sondern "gute Antworten". O.K. Das Thema ist ausführlich
hier besprochen worden. Kurz gesagt, das Image "ist" in Ordnung, es ist nur dass
irgendwelche Firmware in der dBox es zurückweist, weil es einige "schlechte magische
Bytes" auf bestimmten Adressen findet. Der Forumteilnehmer mogway hat ein Programm
geschreiben, in CVS im Verzeichnis hostapps/checkImage zu finden. Das
Programm ermittelt die "schlechten Bytes", aber es tut nichts, um sie zu beheben. Meine
eigene Erfahrung sagt, daß Images, die checkImages für gut findet, wirklich laufen.
cramfs-, oder squashfs Images, worüber sich checkImage beschweren, läufen im
allgemeinen nicht, in einigen Fällen läufen sie aber doch. jffs2-images, worüber sich
checkImage beschwert, läufen oft,aber nicht immer. Mit diesen empirischen
Beobachtungen überlasse ich dem möglichen Benutzung von checkImage und den
folgenden Entscheidungen, dem Benutzer, ohne weitere Empfehlungen.
newmake weisst, wie dieses Programm angeruft werden kann, um die erzeugten Images
automatisch zu überprüfen. Die Konfigurationsoption
--with-checkImage=[none,rename,warn] ist dazu zu verwenden. Falls warn
gewählt ist, wird für jedes Image, das den Test nicht bestehen, eine leere Datei erzeugt,
Name gleich Imagefile mit _bad angehängt. Wenn rename gewählt wird, wird anstatt
die fragliche Imagefile umbenannt.
Es kann erwähnt werden, daß die "schlechten magischen Bytes" in einem (oder mehrere!)
von den Partitionsimages sitzt, und werden nicht durch den abschließenden Schritt
erzeugt (die *.img1x und/oder *.img2x Files erschaffen). Es ist möglich,
checkImage auf den Partitionsfiles aufzurufen (*.jffs2, *.cramfs,
*.squashfs, *.flfs1x, *.flfs2x). Schließlich hat checkImage eine
Debugoption, die nützlich sein kann.
2.5.13.3. Ich habe ein Fehler gefunden!
Bugs, Unklarheiten, Verbesserungsvorschläge, etc. der Software sollten vorzugsweise
zum Cross Development Kit Abteilung des Tuxbox forum gehen. Was diesen Text direkt
betrifft -- Fehler (die technische Angelegenheiten, Rechtschreibung, Grammatik,
pädagogisch), Verbesserungsvorschläge und Verlängerungen -- können zu mir direkt
gehen. "Diskussion" ist vermutlich besser im Forum abgehoben.
2.5.13.4. Ich benötige Hilfe!
Supportanfragen können imCross Development Kit Abteilung des Tuxbox Forum
geposted werden. Postings in deutsch oder englisch sind willkommen. Bitte vergessen Sie
nicht, die benutzte Konfigurationsoptionen zu erwähnen.
Page 51
Built with Apache Forrest
http://forrest.apache.org/
Private Site
Bitte mailen/PM-en Sie nicht mich persönlich, da ich nicht persönliche Gratissupport
anbiete.
2.5.13.5. Parallel make?
Siehe die englische Version.
2.5.13.6. Kernel 2.6?
Siehe die englische Version.
2.5.13.7. Update images
Siehe die englische Version.
2.5.13.8. How do I convert 1x-images to 2x, or vice versa?
Siehe die englische Version.
2.5.14. Appendix. Einige nützlige customization script Fragmente
In diesem Anhang werden einige nützliche Customization Scripte gezeigt. Zwei Scripte
sind bereits oben gezeigt worden.
Warning:
Auch falls in einige Fällen benutzbar wie sie sind, werden die Scripte als Beispiele, nicht Lösungen zu den realen
Problemen gezeigt. Aus diesem Grund sind die Beispiele hier als Codefragmente, nicht als downloadbare Datein,
veröffentlicht. Bitte verwenden Sie sie nicht, es sei denn Sie am mindestens ungefährlich verstehen wie sie funktionieren.
Es wird am mindestens grundlegende Script-Erfahrung erfordelig.
2.5.14.1. Games und Languages nuker
Diese File löscht alle Spiele (definiert als plugins mit type=1 in ihrer Konfiguration File),
sowie unerwünschte Sprachfiles (Neutrino angenommen). Das File sollte vermutlich von
root-neutrino-$filesystem-local.sh aufgerufen werden.
#!/bin/sh
# Nukes all game plugins, as well as all locale files not listed in
LANGUAGES
newroot=$1/root-neutrino-jffs2
LANGUAGES="deutsch english"
for f in $newroot/lib/tuxbox/plugins/*.cfg; do
grep 'type=1' $f>/dev/null && rm -f
$newroot/lib/tuxbox/plugins/`basename $f .cfg`.*
done
for f in $newroot/share/tuxbox/neutrino/locale/*; do
Page 52
Built with Apache Forrest
http://forrest.apache.org/
Private Site
(echo $LANGUAGES | grep -v `basename $f .locale` >/dev/null) && rm
-f $f
done
2.5.14.2. Customizing die /.version file
Ihre eigene /.version-File herzustellen (gezeigt von Neutrino durch dBox -> Services
-> Image-Version) ist sicher ein allgemeinee Wunsch. Hier ist die File, die ich momentan
für dieses benutze:
#/bin/sh
if [ $0 = ./flash-version-local.sh ] ; then
outfile=$1/root/.version
type="image"
else
outfile=$1/.version
type="yadd"
fi
echo Creating $outfile ...
echo
echo
echo
echo
"version=`./mkversion -snapshot -version 200`"
"creator=Barf"
"imagename=Barf-$type"
"homepage=http://www.bengt-martensson.de"
>
>>
>>
>>
$outfile
$outfile
$outfile
$outfile
Dieses File kann sowohl mit dem Namen flash-version-local.sh, sowie mit
dem Name version-local.sh, für das Erstllen des /.version- File für Images
beziehungsweise yadds benutzt werden. Merken Sie die Auswertung von $0 (die den
tatsächlichen Namen enthält, unter dem der Script aufgerufen worden ist). Das benannte
Script mkversion stellt die etwas kryptische Versionszeichenkette her und ist einfach
eine "Verkapselung" davon. Es wird hier gezeigt:
#!/bin/sh
releasetype=3
versionnumber=000
year=`date +%Y`
month=`date +%m`
day=`date +%d`
hour=`date +%H`
minute=`date +%M`
while expr $# > 0 ; do
case "$1" in
-release)
releasetype=0
;;
-snapshot)
releasetype=1
;;
-internal)
releasetype=2
;;
-version)
versionnumber=$2
shift
Page 53
Built with Apache Forrest
http://forrest.apache.org/
Private Site
;;
esac
shift
done
echo $releasetype$versionnumber$year$month$day$hour$minute
2.5.14.3. Archivierung der Images
Es ist die Aufgabe des Buildprozesses, die flashbare Images zu erstellen, und nicht sie zu
archivieren. Jedoch kann die Customization leicht missbraucht werden, um irgendeine Art
vom Archivieren zu erschaffen, wie das folgende Beispiel zeigt:
#!/bin/sh
flashprefix=$1
imagefile=`basename $0|sed -e s/-local.sh//`
imagefilebase=`echo $imagefile|sed -e s/\.img.x//`
extension=`echo $imagefile|sed -e s/[-a-z0-9]*\.//`
newfilename="barf-"$imagefilebase-`date --iso-8601`.$extension
echo Copying $flashprefix/$imagefile to $flashprefix/$newfilename...
cp $flashprefix/$imagefile $flashprefix/$newfilename
Das Script sollte einen oder mehr der Namen [neutrino, enigma]-[cramfs,
squashfs,jffs2].[img1x, img2x] haben. Es benennt die Files entsprechend
dem Tagesdatum um. Wieder wird das Script gezeigt, um ein Konzept zu zeigen, nicht
gerade kopiert zu werden.
2.5.15. Referenzen
Siehe die englische Version.
2.6. The Architecture of newmake
2.6.1. Revision history
Date
Description
2006-04-15
Initial version.
2006-04-17
Added the References section.
2.6.2. Introduction
The present documents tries to give a description of the involved concepts in newmake.
The emphasis is on concepts, not on details. It will describe a large number, but not all of
the target. It does not aim at a complete up-to-date descriptions of all targets, their
prerequisites, side effects, etc. For this, the reader is referred to the sources, which even
contains some comments(!).
Page 54
Built with Apache Forrest
http://forrest.apache.org/
Private Site
Good documentation is not program code translated to English.
The reader is supposed to know the "introductory" document, and to have some
experience and understanding of compiling programs in the GNU
automake/autoconf-environment.
The Tuxbox build system has grown over a long period of time. The original developers
are, with very few exceptions, no longer active within the project. In several cases, quite
horrible techniques have been employed. Newmake is an attempt to clean up some of the
problems; to solve it as it should have been done the first time. However, I have not went
through all components. There are still some fundamental problems inherited from "old
make".
Tuxbox uses the GNU automake/autoconf system. Understanding this on the surface is
not too hard, however understanding the inner workings, and its customizations is not a
trivial undertaking. Here we just mention that from the file configure.ac the
non-interactive configuration script configure is created, while a Makefile is
generated from the file Makefile.am. For this, some Tuxbox-specific m4-macros are
found in the file acinclude.m4.
2.6.3. Organization of the file systems
2.6.3.1. cvsdir
The top level directory that was checked out from CVS (it contains a subdirectory named
cdk) will be denoted cvsdir. (There is no make-variable with that name!)
2.6.3.2. cvsdir/cdk
Located as a subdirectory to cvsdir. This is the directory where the make-commands are
issued. Corresponds to the make-variable buildprefix.
2.6.3.3. cdk
The file system $(hostprefix), for example /tuxbox/cdk, contains the "Cross
Development Kit (CDK)". (We will refer to it as cdk.) Contained therein is the cross C
and C++ compiler (with support files), as a number of utilities for creating and
manipulating programs to be run on the dBox. Also, some programs, built during the
tuxbox build, like mkflfs are installed here. Include-files for the C++-compiler and
stdc++ library are found here. Documentation files for some of the installed component
(man- and GNU info-files) are also installed. This directory hierarchy is build during the
"bootstrap" build.
2.6.3.4. cdkroot
The file hierarchy $(targetprefix) (typically /tuxbox/cdkroot) is mounted as
Page 55
Built with Apache Forrest
http://forrest.apache.org/
Private Site
root file system for a YADD-setup. (We will refer to it as cdkroot.) However, it plays
some more roles. In the original makefile, images were built by first installing (using the
component's makefiles) in cdkroot, then selectively copying over selected files to the
image file systems. The directly hierarchy is "mainly" built during the cdk build,
however, some crucial components (belonging to the C library glibc) are installed
during the "bootstrap" build.
Through symbolic links, the above described cdk-directory depends on cdkroot, and
secondarily, through links from cdkroot to the kernel sources, on the kernel sources in
cvsdir/cvs/linux. In the future, it would be desirable to eliminate this dependency, in
my opinion also if this means multiple copies of the same file. "Single sourcing" does not
prohibit multiple copies, it means that you know where every copy came from.
Warning:
It is often tempting to delete cdkroot, in order to bring the compilation environment back to the state where the cross
development environment CDK has been build, but none of the real Tuxbox software. For reasons just described, this will
break CDK.
2.6.3.5. cdkflash
The file hierarchy $(flashprefix) (typically /tuxbox/cdkflash, henceforth
denoted by cdkflash) is a scratch area for building images. It will be described in detail
later. It can be deleted when needed/desired without any side effects.
2.6.3.6. bootprefix
For the purpose of this article, bootprefix is the target location of the yadd kernel and
the corresponding u-boot boot loader. Typically, this is the base directory for the TFTP
service.
2.6.4. Organization of the files for Make
There are hundreds of targets in the top level "Makefile". To improve the overview, it has
been split in different components. The top level Makefile.am, in the current version
1.480.2.21, is shown in the Appendix. This file first defines some high-level targets (in
terms of some other targets), then it includes a large number (presently 54) of makefile
fragments, defining other targets. The inclusion is preceeded by a comment stating the
purpose of the included fragment.
2.6.5. Download-unpack-patch-configure-build-install-clean targets
The Tuxbox software needs a number of third-party software. The build mechanism will
download the needed software sources on demand. These are stored in the directory
cvsdir/cdk/Archive. (When having several source trees on the disk, it is a good idea
to share this directory, to save disk space and downloads.) When "make-ing" the package,
the following things occur:
Page 56
Built with Apache Forrest
http://forrest.apache.org/
Private Site
1. The package source code, typically with a .tar.gz or .tar.bz2 extension, is
downloaded to the cvsdir/cdk/Archive directory,
2. It is unpacked into a temporary directory, residing in the cdk directory,
3. In some cases, a patch (residing in the directory cvsdir/cdk/Patches is applied,
4. The package is build using a package specific build command, typically a
configure-command, followed by a make-command, possibly with parameters,
5. The package is installed, typically in cdkroot, typically with a "make
install"-command, possibly with parameters,
6. The build directory is deleted,
7. The successful build is recorded by creating a zero-length file, having the same name
as the package, in the directory cvsdir/cdk/.deps.
It was attempted to have this behavior completely parameterized, using the files
rules-make, rules-archive, rules-installrules-install-flash. To
this end, rules-make defines the package name, version, name of the build directory,
name of the current source code distribution file, a command to unpack and possibly to
patch. The file rules-archive contains a mapping from file names (as given in the
rules-make file) to download-URLs. Finally, rules-install and
rules-install-flash contain the commands to install the package. HEAD-make,
if configured for image building, first consults rules-install-flash for the install
rules, if not found there, it searches rules-install. If not configured for flash
images, it only searches rules-install. Newmake, for compatibility, first searches
rules-install-flash, then rules-install.
To the implementation: For every such package, configure.ac contains the a call to
the local autoconfig macro TUXBOX_RULES_MAKE (defined in acinclude.m4),
using the package name as argument. Thus, during executing of configure, a few Perl
programs are executed, operating on the rules-*, thereby defining the shell variables
DEPENDS_package, DIR_package, PREPARE_package, VERSION_package,
INSTALL_package, CLEANUP_package. Thus, in Makefile.am (or its included
parts), constructs like @VERSION_package@ can be used; when automake creates
Makefile out of Makefile.am, these will be appropriately substituted.
This has been an interesting, but not completely successful experiment. The
"parameterization" of the build has not been a success; every make rule still looks
different. To keep used versions in a separate file still is a good idea, however, this can
just as well be achieved with the include-mechanism of (auto-)make.
A re-write would be desirable.
2.6.6. Three main sets of targets
There are three main categories of targets in the Makefile: Targets for building the cross
compilation environment ("CDK"), targets for YADDs, and targets for flash image
creation.
Page 57
Built with Apache Forrest
http://forrest.apache.org/
Private Site
2.6.6.1. The development environment CDK
The top level target is bootstrap. It turns out, that this is nothing but the gcc target.
Almost all non-cdk targets depend on this; in the case this dependency is not in the
Makefile, it is likely a bug. There are five components required:
directories
Sets up a directory skeleton in cdk and cdkroot.
binutils
Installs the GNU binutils, containing programs for creating and manipulating
binary files, like the assembler as and loader ld.
linuxdir
Installs the sources for the Linux kernel. This is necessary for building the
compiler, since the latter needs include files from the kernel.
glibc
The main C library. Since the C compiler needs this, first a "bootstrap
compiler" (target bootstrap_gcc, a mini C compiler, not needing glibc,
just intended to compile glibc) is first built.
gcc
The C cross compiler, in both C and C++-version.
These targets, with the exception of directories, are all
download-unpack-patch-configure-build-install-clean targets, in the sense above. The
rules are all found in the file make/bootstrap.mk.
2.6.6.2. YADD builds
Useful high-level targets include: yadd-neutrino, yadd-lcars, yadd-enigma,
and yadd-all.
yadd-neutrino
Installs the targets yadd-none, neutrino, as well as the plugins appropriate
for Neutrino (targets neutrino-plugins and fx2-plugins).
yadd-micro-neutrino
This target has mainly theoretical interest, to document the minimal usable
Neutrino installation.
yadd-enigma
Installs the targets yadd-none, enigma, as well as the plugins appropriate
for Enigma (targets enigma-plugins and fx2-plugins).
yadd-lcars
Installs the targets yadd-none, and lcars.
yadd-all
Installs the targets yadd-none, neutrino, enigma, and lcars.
yadd-none
The GUI-independent parts on a working yadd, consisting of bare-os,
Page 58
Built with Apache Forrest
http://forrest.apache.org/
Private Site
together with a number of other, non-GUI-based targets (config,
tuxbox_tools, procps, ftpd, yadd-ucodes, version).
bare-os
The minimal setup to run Linux on the dBox, allows to login and ls. Depends
on targets yadd-u-boot, kernel-cdk, driver, yadd-etc, busybox,
modutils, tuxinfo.
plugins
Depends on neutrino-plugins, enigma-plugins, and fx2-plugins.
neutrino-plugins
The name is strictly speaking misleading; the target installs plugins usable
with any GUI, except for the plugins in target fx2-plugins. Presently, these
are tuxmail, tuxtxt, tuxcom, tuxcal, and vncviewer (all of these correspond to
their own individual targets). Defined in make/plugins.mk.
enigma-plugins
Plugins that require Enigma. Defined in make/plugins.mk.
fx2-plugins
Plugins that require the fx2-library. Usable by any GUI. Defined in
make/plugins.mk.
neutrino
The Neutrino GUI. Defined in make/neutrino.mk.
enigma
The Enigma GUI. Defined in make/enigma.mk.
lcars
The LCARS GUI. Defined in make/lcars.mk.
config
Installs some configuration files, presently cables.xml and
satellites.xml. Defined in make/dvb-config.mk.
tuxbox_tools
installs several different tools, most of which are pretty special, some (like
switch) absolutely essential. Defined in make/tuxbox_tools.mk.
procps
A download-unpack-patch-configure-build-install-clean target. Installs the
commands ps and top. Defined in make/rootutils.mk.
ftpd
The ftp-daemon. A download-unpack-patch-configure-build-install-clean
target. Defined in make/ftpd.mk.
yadd-ucodes
Provided that --with-ucodesdir was given when configuring, installs that
directory's content in the yadd. Defined in make/ucodes.mk.
version
Creates the /.version-file in the yadd. Defined in make/version.mk.
yadd-u-boot
Creates both the "smart" u-boot, as the "dumb" u-boot-yadd, both in the
Page 59
Built with Apache Forrest
http://forrest.apache.org/
Private Site
$(bootprefix) directory. The default u-boot relies on a DHCP-server (a
bootp server will not do) to tell the name of the kernel file, and the location of
the NFS-root. Sometimes this is not available, for example when using the
Windows dBox manager. For these cases, an alternate u-boot is provided,
which, out-of-the-box, has the file name u-boot-yadd. This offers less
flexibility, having most file names/paths compiled in. Using this u-boot for
booting, the file name of the kernel is kernel-yadd, and the NFS root will be
yaddroot. As a side effect, a tool called mkimage, needed for building some
images, will be installed in cdk/bin. (This can also be achieved by calling the
target $(hostprefix)/bin/mkimage directly). Defined in
make/u-boot.mk.
kernel-cdk
Creates and installs the Linux kernel, using the path name
$(bootprefix)/kernel-cdk. Also installs the kernel and a map file in
cdkroot/boot. Defined in make/linuxkernel.mk.
driver
Compiles and installs device drivers, corresponding to the kernel. Defined in
make/linuxkernel.mk.
yadd-etc
Installs the content of the etc directory. Defined in make/etc.mk.
busybox
Configures the busybox for usage with yadd, compiles and installs it. This is
an download-unpack-patch-configure-build-install-clean target. Defined in
make/busybox.mk.
modutils
Installs some utilities for manipulating loadable kernel modules, e.g.
modprobe. This is an download-unpack-patch-configure-build-install-clean
target. Defined in make/rootutils.mk.
tuxinfo
Installs the crucial tuxinfo program. This target is actually a subset of the
target tuxbox_tools. Defined in make/tuxbox_tools.mk.
camd2
Installs the camd2 program. This target is actually a subset of the target
tuxbox_tools. Defined in make/tuxbox_tools.mk.
2.6.6.3. Flash images
The high-level flash targets
flash-[neutrino,enigma,all]-[cramfs,squashfs,jffs2]-[1x,2x,all]
were introduced in the introductory article. Here we will describe the image building
process in more detail. In the sequel, gui will denote either neutrino or enigma,
filesystem will denote either cramfs, squashfs, or jffs2 (the file system of the root
partition), while imgXx will denote either img1x or img2x.
Page 60
Built with Apache Forrest
http://forrest.apache.org/
Private Site
Fundamental for the creation of a gui-filesystem.imgXx-image are the three directory
hierarchies $(flashroot)/root (containing parts not depending on the root file
system type or the GUI), $(flashroot)/root-filesystem (containing parts
depending on the root file system, in particular the kernel and the drivers),
$(flashroot)/root-gui (containing the GUI component). There are no "short"
make targets for these directories, however they are all, with their full path names, make
targets. The flashable directories (root-gui-filesystem and var-gui) are created by
copying the contents of the previously mentioned three directories into one, performing
the library reduction and finally installing some additional components, for example by
calling appropriate "make install"-commands in the directory cvsdir/cdk/root.
From the flashable directories, partition image files are created using the commands
$(MKJFFS2), $(MKCRAMFS), and $(MKSQUASHFS). The expansion of these
commands will be determined during the configuration run.
Finally, the partition images are combined with a suitable u-boot bootloader, packed in a
flfs-partition image, to a full images using the flashmanage.pl program, or, in the
case of a jffs2-image, simply concatenated together.
The major targets are listed next.
flash-gui.imgXx
This has as only prerequisite the file $(flashprefix)/gui.imgXx. Defined
in the file make/flash-expand-targets.mk.
$(flashprefix)/gui-filesystem.imgXx.
The partition images (root-gui.filesystem, possibly var-gui..jffs2, and
filesystem.flfsXx) are combined to a full image. Defined in
make/fullimages.mk.
$(flashprefix)/root-gui.filesystem
The partition image is created from the flashable directory
$(flashprefix)/root-gui-filesystem. Defined in
make/partition-images.mk.
$(flashprefix)/var-gui.jffs2
The partition image is created from the flashable directory
$(flashprefix)/var-gui. Defined in make/partition-images.mk.
$(flashprefix)/filesystem.flfsXx
The appropriate u-boot bootloader is build, and packed into the flfs-partition
image, using the program mkflfs (code residing in
cvsdir/hostapps/mkflfs), which may be build when needed. Defined in
make/partition-images.mk.
$(flashprefix)/root-gui-filesystem
The contents of the directories root, root-filesystem, and root-gui are first
copied together into this directory, library reduction is performed by "making"
the target $(flashprefix)/root-gui-filesystem/lib/ld.so.1,
bootlogos are installed (if applicable), some additional files are installed, for
Page 61
Built with Apache Forrest
http://forrest.apache.org/
Private Site
example by calling "make install" in the directory cvsdir/cdk/root.
$(flashprefix)/var-gui
The contents of the directories root/var and root-gui/var are first copied
together into this directory. Bootlogos are installed (if applicable), some
additional files are installed, for example by calling "make install" in the
directory cvsdir/cdk/root.
$(flashprefix)/root-gui-filesystem/lib/ld.so.1
Due to the limited flash memory of the dBox (8 MiB), it is not feasible just to
include all possible shared libraries in the image. This step, called "library
reduction", makes sure that only actually needed libraries are included, and
that they are reduced in size as much as possible. Executable files and
shared libraries are stripped (= symbols removed) to reduce their size. The
necessary libraries are gathered together, mainly from cdkroot, as needed.
The work is carried out by the mklibs program. Unneeded files are deleted.
The file ld.so.1 is the runtime loader, and serves as a "marker file" for
make, in that the make target has many more "side effects" than just creating
this file. The target is defined in the file make/reduce-libs.mk.
$(flashprefix)/root-gui
"Installation" of the corresponding GUI. There is a synonym (target having this
as only prerequisite, and no actions) flash-gui. Defined in
make/neutrino.mk and make/enigma.mk.
$(flashprefix)/root-filesystem
Installation of kernel and drivers for an image having filesystem as its root file
system type. Defined in make/flashroot-fs.mk.
$(flashprefix)/root
Essentially, all components, which do not depend either of the GUI, nor of the
file system type of the root file system are installed here. Do not confuse with
non-GUI components; for example plugins usable by any GUI are also
installed here. This target does not depend on very much, instead it calls
make recursively, to install required components. We do not describe this in
further detail; the interested reader is referred to the file
make/flashroot.mk. Many of the targets there, for example flash-ftpd
are the flash versions of the yadd targets described above, of course then
without the flash- prefix.
2.6.7. Odds and Ends
2.6.7.1. GNU Make "Order-Only Prerequisites"
GNU Make 3.80 introduced a facility, the "order-only prerequisites", that I have found
indispensible for newmake. (For this reason, GNU make 3.80 is required for newmake,
while HEAD-make is satisfies with 3.79.) Since this feature is not very well known, the
name is badly chosen, and the description in the manual not very enlightening, I explain it
in detail next.
Page 62
Built with Apache Forrest
http://forrest.apache.org/
Private Site
Consider the following Makefile:
buildir=/home/me/somewhere
sourcedir=/home/me/somewhereelse
$(builddir)/prog: $(sourcedir)/prog.c $(builddir)
$(CC) -o /tmp/foobar $<
sleep 1
mv /tmp/foobar $@
$(builddir):
mkdir $@
The intention is to create the build directory (if required), and then to compile prog in it.
This also works. However, the next time make is issued, the compilation is redone!
Why? Since the target depends on $(builddir), which gets its timestamp set by the
mv-command, the target is older than its prerequisite ($(builddir)), and thus is
scheduled for re-making! (sleep 1 is inserted in the example to guarantee that the file
system dates from prog and the directory differs; it is hard to make a really simple
realistic example.) This is most likely not what the Makefile-author had in mind. What is
needed is a way to say: $(builddir) need exist, but, as long as it exists, its date should
never be taken into account. This is exactly the "order-only" (better would be
"existence-only") prerequisite does. Order-only prerequisites are separated from normal
prerequisites using the bar "|". Thus, changing the first prerequisite line to:
$(builddir)/prog: $(sourcedir)/prog.c | $(builddir)
achieves the effect the author of the original makefile wanted.
2.6.7.2. Maneuvering within the make sources
Emacs users can maneuver quite comfortable within the make sources. For this, first issue
the shell command "make TAGS" in the directory cvsdir/cdk, thereby creating a
so-called TAGS-file. Now it will be possible to use the command find-tag (normally
bound do M-.) to directly jump to the file that defines a particular target. Also other
editors have similar tags-support.
2.6.8. References
• The GNU Make manual, online version. The only Make book you need.
• The Autoconf manual, online version.
• The Automake manual, online version (slightly outdated version).
• The GNU Coding standards. There is good stuff in here. Unfortunately, not observed
by the Tuxbox project.
• GNU Autoconf, Automake, and Libtool by Gary V. Vaughan, Ben Elliston, Tom
Tromey and Ian Lance Taylor. I just discovered it, and have not read this (yet),
however, the table of contents looks very promising.
2.6.9. Appendix. Top level Makefile.am.
Page 63
Built with Apache Forrest
http://forrest.apache.org/
Private Site
## Makefile for Tuxbox
all:
@echo "You probably do not want to build all possible targets."
@echo "Sensible targets are, e.g. yadd-enigma or
flash-neutrino-jffs2-2x."
@echo "If you REALLY want to build everything, then \"make
everything\""
if TARGETRULESET_FLASH
everything: yadd-all flash-all-all-all serversupport extra
else
everything: yadd-all extra serversupport
endif
################################################################
# High-level yadd targets
bare-os: yadd-u-boot kernel-cdk driver yadd-etc busybox modutils tuxinfo
@TUXBOX_YADD_CUSTOMIZE@
yadd-none: bare-os config tuxbox_tools procps ftpd yadd-ucodes version
@TUXBOX_YADD_CUSTOMIZE@
yadd-micro-neutrino: bare-os config yadd-ucodes camd2 switch neutrino
@TUXBOX_YADD_CUSTOMIZE@
yadd-neutrino: yadd-none neutrino-plugins fx2-plugins neutrino
@TUXBOX_YADD_CUSTOMIZE@
yadd-enigma: yadd-none enigma-plugins fx2-plugins enigma
@TUXBOX_YADD_CUSTOMIZE@
yadd-lcars: yadd-none lcars
@TUXBOX_YADD_CUSTOMIZE@
yadd-all: yadd-none plugins neutrino enigma lcars
@TUXBOX_YADD_CUSTOMIZE@
extra: libs libs_optional contrib_apps fun dvb_apps root_optional udev
devel bash
# Set up some default values (used only by serversetup).
include make/defaultvalues.mk
# Set up the build environment
include make/buildenv.mk
# Set up the cross compilation enironment, including linux kernel
# source and directory structure
include make/bootstrap.mk
# The automounter (optional)
include make/automount.mk
# The busybox (implements most standard Unix commands, like ls,...)
include make/busybox.mk
Page 64
Built with Apache Forrest
http://forrest.apache.org/
Private Site
# Populate the etc directory in YADD
include make/etc.mk
# The ftpd
include make/ftpd.mk
# Some core tools (important and less important)
include make/rootutils.mk
# A number of libraries, some of which necessary for neutrino or enigma
include make/contrib-libs.mk
# Some non-GUI applications, none of which are essential
include make/contrib-apps.mk
# Tools (debugger etc) for the Tuxbox developer
include make/development-tools.mk
# The kaffe java-implementation (nonessential, presently does not build)
include make/java-stuff.mk
# Gaming platforms (gnuboy scummvm sdldoom)
include make/fun.mk
# Nonessential DVB application
include make/dvb-apps.mk
# Bluetooth (nonessential)
include make/bluetooth.mk
# FUSE and djmount for uPnP support (non-essential)
include make/upnp.mk
# The u-boot boot loader
include make/u-boot.mk
# Build kernel and its drivers
include make/linuxkernel.mk
# Install dvb configuration files (cables.xml & satellites.xml)
include make/dvb-config.mk
# dvbsnoop is a tool for analyzing dvb streams (non-essential)
include make/dvbsnoop.mk
# A nonessential library
include make/libdvb++.mk
# The zapit daemon
include make/zapit.mk
# More dvb tools, of which only streampes is installed per default
include make/dvb_tools.mk
# More misc libs, mostly nonessential
include make/misc_libs.mk
# Misc tools, not essential
include make/misc_tools.mk
Page 65
Built with Apache Forrest
http://forrest.apache.org/
Private Site
# Enigma GUI
include make/enigma.mk
# nonessential entertainment, like "screensavers" for the lcd display
include make/funstuff.mk
# The LCARS GUI
include make/lcars.mk
# LCD tools
include make/lcd.mk
# Essential, and some less essential, libraries
include make/tuxbox_libs.mk
# A small, but absolutely essential library
include make/libtuxbox.mk
# The Neutrino GUI
include make/neutrino.mk
# Plugins
include make/plugins.mk
# Some small command line tools, several of which are essential
include make/tuxbox_tools.mk
# Application that run on the build host
include make/hostapps.mk
# Generate some support files for a YADD- or flashing-server
include make/serversupport.mk
# Optionally install ucodes in the image
include make/ucodes.mk
# Generate a /.version file in the image
include make/version.mk
if TARGETRULESET_FLASH
# High-level flash targets are:
# flash-[neutrino,enigma,all]-[cramfs,squashfs,jffs2,all]-[1x,2x,all]
# Expand all flash targets containg the word "all"
include make/flash-expand-targets.mk
# Create complete images ("without BN bootloader")
include make/fullimages.mk
# Create images of the root and var file systems
include make/partition-images.mk
# Create root and var filesystems, ready for image creation
include make/flashable-dirs.mk
# Strip libraries of symbols not needed.
include make/reduce-libs.mk
Page 66
Built with Apache Forrest
http://forrest.apache.org/
Private Site
# Create the root file systems for jffs2-only, cramfs, and squashfs
# images (containing kernel but not GUI)
include make/flashroot-fs.mk
# Create the root file system, without kernel and GUI
include make/flashroot.mk
# The streampes stuff
include make/flash-streampes.mk
# Build distribution lists in neutrino internet update format
include make/distribution-lists.mk
# /etc/cramfs.urls contains URLs for update lists
include make/cramfs.urls.mk
endif
# Files not to be deleted, even though they are intermediate products
include make/precious.mk
# "Phony" make targets
include make/phony.mk
# Create the TAGS file
include make/tags.mk
# A number of cleaning targets
include make/cleantargets.mk
# Target for building source distributions (hardly used these days of
CVS :-)
include make/disttargets.mk
# Give the user rope to hang himself :-). (Note: read from the
# generated Makefile during make run, automake or configure does not
# see it.)
-include ./Makefile.local
2.7. Setting up and using the automounter
2.7.1. Revision history
Date
Description
2006-02-22
Initial version.
2006-06-05
Added ghosting and the ghosting patch.
2.7.2. Introduction
In the 1990s, workstation/server networks were growing from large to huge. Typically, a
large site had a number of servers, exporting the users' home directories (as well as
possibly project directories), and number of workstations, importing ("mounting") these
directories. This lead to a large number or mounts, having bad impact on both
performance and reliability. Typically, a client importing a file system from a server that,
Page 67
Built with Apache Forrest
http://forrest.apache.org/
Private Site
due to own or networks failure, was temporarily unaccessible, was either extremely
slowed down, or it simply hang. Also, for file systems mounted, but not really used,
network traffic was generated just to keep the mounts active. As a solution to these
problems, the automounter was suggested. With the automounter, file systems (like user
home directories) was mounted only when accessed, and unmounted after a certain period
of inactivity. Typically, there was a user data base, consisting on information on what file
system, from what server to mount for a particular user. This was typically taken from a
LAN-wide user database, such as NIS (formerly called YP), later NIS+, LDAP, or other.
How does this relate to the situation with a dBox in a home network? The large
workstation net problems are hardly an issue. The ability to take mount maps from
information systems like NIS is most definitely not there. However, the automounter
gives some more comfort: It is not necessary for a file system to be available when
booting the dBox, in order to access it later. The need to manually mount file system
before recoding (or through files like recording.start) is eliminated.
There seems to be a general consensus that the automounter is for large networks. I have
personally been using it for my home network, consisting of two or three hosts (Solaris
and/or Linux), since 1999. It is not too hard to setup, has very low overhead, is highly
reliable, and makes life a little bit more comfortable.
2.7.3. Building an image (or YADD) with automounter support
Support for the automounter is contained in the Tuxbox CVS. In the newmake CVS
branch, this support almost allows for automatic build. It would probably not be major
effort to port the newmake the MAIN files, however at the time of this writing, this has
not been done.
To support the automounter, the kernel configuration option CONFIG_AUTOFS4_FS has
to be turned on. For this, the line
CONFIG_AUTOFS4_FS=y
has to be added to the kernel configuration file,
cdk/Patches/linux-$version-dbox.config (for YADD) and
cdk/Patches/linux-$version-dbox.config-flash (for images). Here,
$version denotes the actual kernel version used, at the time of this writing it amounts
to "2.4.32".
In newmake, automake is an unpack-patch-build-install-delete-target. Installing in YADD
is done with the make target automount, for images with the make target
flash-automount (installing in $flashprefix/root). Therefore, the elegant
way is to include the line make automount in (e.g.) yadd-neutrino-local.sh
and/or the line make flash-automount in root-local.sh, possibly together
with an appropriate /etc/auto.net configuration file instead of the default one
(which is effectively empty).
That's all!
Page 68
Built with Apache Forrest
http://forrest.apache.org/
Private Site
2.7.4. Setting up the automounter
The typical Unix/Linux setup has been simplified. I believe that not very many dBox
users are interested in reading NIS-maps for the automounter, however, they may have
some servers, NAS-devices, and some Notebooks around. The automounter is therefore,
per default, configured only with one "map", and one configuration file. The startup file,
/etc/init.d/start_automount also contains some configuration possibilities.
Possibly the most interesting is the variable AUTOFSMOUNTDIR, indicating the directory
under which the mounts will take place. This directory must be absolute, must reside in a
writable area, and should not exist at booting time. The default file defines it to
/var/autofs.
The default file loads the necessary modules for mounting NFS file system. When
mounting CIFS file systems, it may be necessary to load the CIFS module; uncomment
the appropriate line in start_automount.
2.7.4.1. The configuration file /etc/auto.net
Every (non-comment) line in the configuration file /etc/auto.net describes a mount
file system. It has three fields: the mount name, the mount parameters (see the example
for syntax), and the server file system. For example, the first (non-comment) line states
that the file system /pictures on the server myserver will be mounted as
$AUTOFSMOUNTDIR/pictures (with the default values, this is
/var/autofs/pictures). Names instead of IP-numbers are accepted, as long as
they can be resolved using the normal host name resolving mechanisms (normally
/etc/hosts, sometimes supported with a name server, declared in
/etc/resolv.conf).
# This is an example of an automounter map
#
# Mount name
Parameters
server file system
pictures
-fstype=nfs,ro,nolock
myserver:/pictures
music
-fstype=nfs,ro,nolock
yourserver:/audio
movies
-fstype=nfs,ro,nolock
192.168.42.42:/filme
recording
-fstype=nfs,rw,nolock
herserver:/garbage
#
# This example is from Papst
musik
-fstype=cifs,ro,soft,user=root,password=dbox2,unc=//192.168.0.2/Musik
//192.168.0.2/Musik
If sent the USR1-signal, the automounter will unmount the unused file system (that it has
mounted). The TERM will force the automounter (the automount process) to unmount
unused file systems, and to exit cleanly. A convenient way for this is
kill -USR1 `cat /var/run/automount.pid`
and
kill -TERM `cat /var/run/automount.pid`
respectively.
Page 69
Built with Apache Forrest
http://forrest.apache.org/
Private Site
2.7.4.2. Ghosting
Users often find the standard behavior of the automounter confusing: When listing a
directory, it is nothing there, although the automounter will create entries under certain
circumstances! Even worse, trying to select, for example a recording directory from
Neutrino, is simply not possible if the directory is not presently mounted.
For this, recently so-called ghosting was implemented in the automounter and the Linux
kernel. Using this feature, the top level mounted directories will still be visible, also when
the directories are not mounted. Thus it is possible to use the Neutrino file selector to
select an automounted directory, also if it is not mounted when the file selector starts.
To use ghosting, a patch needs to be applied to the kernel. Using this patch (which
patches the kernel configuration files for CONFIG_AUTOFS4_FS=y too) will integrate
the patching into the build process. Furthermore, the automount deaemon needs to be
started with the -g-option. (This is the default in the newmake setup).
2.7.4.3. Troubleshooting
First of all, what cannot be mounted from the command line, the automounter cannot
mount either. Try the mounts from the command line, to check for misspellings, that the
options are sensible, and that the server's export permissions are appropriate.
Check that the automount process is running using the ps command. Check that the
$AUTOFSMOUNTDIR (default is /var/autofs) is present. Using the example above,
the command ls /var/autofs/pictures (note: cannot use the "TAB"-command
line completion in the shell as long as the file system is not mounted) should mount the
appropriate file system on /var/autofs/pictures. The df command can be used
to list the file systems presently mounted.
2.7.5. Questions and answers
2.7.5.1. Neutrino "automounts" file systems. How does this relate?
Not at all. Since everything a program makes can be called "automatic", someone
(probably who never had heard of automounting in our sense) decided to call
non-interactive mounting on boot "automounting". Sad. And confusing.
2.7.5.2. Will the changes to the kernel configuration file have any bad effects when cvs
update-ing?
In general, no. CVS will detect that the file is locally modified, and, as long as possible,
merge future changes in CVS with local changes. However, watch out when the kernel
version changes!
Page 70
Built with Apache Forrest
http://forrest.apache.org/
Private Site
2.7.5.3. What needs to be done the MAIN branch to support automount?
cdk/Makefile.am needs to be updated (probably just inserting the content of the
newmake file cdk/make/automount.mk), rcS and/or rcS.insmod, as well as the
image building rules (for installing auto.net and start_autofs, probably in a
writable place). Then modify the image building rule to install the required kernel
modules and /sbin/automount.
2.7.5.4. Can I extend my favorite image with the automounter?
Sure. Just replace the kernel with one with CONFIG_AUTOFS4_FS enabled, add the
required kernel modules, make sure that they match the kernel version, install
/sbin/automount, auto.net, modify rcS, and install start_automount.
Shorter version of the above: If you are able to all this, you will be building your own
images anyhow. Therefore, it does not seem very logical.
Even shorter version: Forget it!
2.7.5.5. Is this stuff restricted to Neutrino? Will it work with Enigma?
No. Yes.
2.7.5.6. Can I combine Neutrino mounting with the automounter?
Yes, as long as the mount points do not conflict.
2.7.5.7. How do I get at the debug messages?
Unfortunatelly, automount is designed to do all its logging though the syslog facility, an
this is per default not present on the Tuxbox, at least not in images. To enable the syslog
facility, enable the option CONFIG_SYSLOGD in the busybox configuration file, and
recompile busybox.
2.8. Setting up online updates for Neutrino
2.8.1. Revision history
Date
Description
2006-02-22
Initial version.
2006-03-29
Updated to take into account the now less
experimental character.
2.8.2. Introduction
Page 71
Built with Apache Forrest
http://forrest.apache.org/
Private Site
As far as I am aware, almost from the beginning of the distribution of dBox images, it
was possible to update images online. Already the AlexW-images had this property. This
requires one setup file in the image, pointing to the server, and one,
"table-of-content"-like file on the server, pointing to the files the client are offered to
download and install.
The last few years, this possibility has not been abandoned, but has "faded". Originally,
"update image" meant the root partition, using the cramfs filesystem, that was replaced,
while leaving the /var-partition, containing the user settings and preferences, intact.
Today, many (but not everyone!) prefers full images, which the Neutrino online update
mechanism, for no obvious reason, does not support.
Some years ago, images where the root partition used the so-called squashfs-filesystem
emerged. The update mechanism of Neutrino was updated to reflect this, however, the
programmer(s) implementing the change seemed to strive for making the world a better
place for squashfs-users, while the rest of the world population should blame themselves
for being stupid. The file update.cpp relied on the C Preprocessor symbol SQUASHFS
conditionally compiling in either the code for flashing squashfs partitions, or,
cramfs-partitions. Thus, a high-level GUI-program was (intended to be) differently
compiled dependent on the underlying file system!
A patch to Neutrino fixing these shortcomings was checked in in 2006-03-19, with a
subsequent fix the day after (thanx JtG-riker!). The rest of this article applies only to CVS
after that date.
2.8.3. The setup files
2.8.3.1. The /etc/cramfs.urls configuration file
The only setup file for the update mechanism residing on the dBox was traditionally
called /etc/cramfs.urls, and contained one or many lines pointing to URLs
containing "table-of-content"-files, listing image files offered for download.
(Configurable through dBox -> Service -> Software Update -> Expert
Functions -> config file.) Although the name is an anachronism, it is
suggested to stay with it.
2.8.3.2. The "Table-of-Content"-file, *.list
The "Table-of-Content"-file, traditionally with a .list suffix, lists the images the server
makes available in machine readable format. Each line describes a downloadable image,
and has four or more white-space separated fields: The first contains the URL of the
downloadable image, the second the MD5-checksum, the third the version string in the
Tuxbox SBBBYYYYMMTTHHMM convention (see, e.g. mkversion). The subsequent
fields (at least one must be present) consists of a informal verbal description for the user.
(Due to restrictions in present Neutrino updating, only very short strings are suitable.)
Page 72
Built with Apache Forrest
http://forrest.apache.org/
Private Site
2.8.3.3. Creating the setup files with newmake
newmake supports automatically creating the /etc/cramfs.urls and some
.list-files. To enable, use the option --with-updatehttpprefix=URL, where
the argument should be the URL of the .list-files, with the last component removed.
Thus, an /etc/cramfs.urls-file will be generated, containing URLs to .list-files.
See cdk/make/cramfs.urls.mk. This make target is customizable with the usual
newmake customization mechanism. There are also make targets cramfs.list,
squashfs.list, img.list, and allimages.list, see
cdk/make/distribution-lists.mk, that will create some suitable list-files.
Using the customization facility of these targets to copy the list-files and the
corresponding images to a distribution server might be a good idea.
2.8.4. Neutrino's online update function, revisited
The above mentioned patch changes Neutrino's behavior in the following way: First, the
MD5-checksum of the downloaded image is computed, and compared to the MD5-sum in
the list-file. If they are different, the image is rejected. (Previously, this test was made
only with squashfs-images.) If the file name (or, more correctly, the last component of the
URL) contains the string ".cramfs", the images is required to be a correct
cramfs-image, and rejected if a test fails. Then the image size is compared to the size of
the "Flash without bootloader"-partition. If equal, it is attempted to flash the image as a
full image. The corresponding partition is the partition with the description "Flash without
bootloader", it is not assumed to be partition /dev/mtd/4. If not, if the size is less or
equal to the root partition, the images will be flashed into the root partition (always
assumed to be /dev/mtd/2, since this presently holds true for all images built from
CVS). Otherwise the image is rejected.
One beauty spot is that the Neutrino GUI presents the same error message
(LOCALE_FLASHUPDATE_MD5SUMERROR) for different reasons. However, on the
console, more detailed error information is presented.
2.9. Analog and Digital Video- and Audio-outputs on the dBox with Neutrino
2.9.1. Revision history
Date
Description
2006-01-05
Initial version.
2006-01-17
Added digital audio. Added volume control
(analog and digital). Some more information on
the Philips. Reference to controldc. Moved
"Connectors" as the first subsection of
"Hardware". Misc. small improvements.
2006-01-22
Added reference to modding article. No analog
Page 73
Built with Apache Forrest
http://forrest.apache.org/
Private Site
output by DD.
2006-02-22
Added comments on muting.
2006-03-29
Delete Sagem bug: it has been fixed.
2006-06-05
Updated for my recent CVS check-ins, in
particular extended syntax for scart.conf.
Merged in the avsstuff article, which is now
obsolete.
2006-06-14
Wrote the Appendix. Moved the fblk-table to
there.
2006-06-17
Small fixes to the tables in the appendix, in
particular, the case a2 = 4.
2006-06-25
Extended and corrected info on the Philips
audio/video switching.
2006-07-01
Still more on the Philips (thx Pleymo): replaced
a1 and a2.
2.9.2. Introduction
In this article, the analog audio and video outputs, their possibilities and limitations are
discussed. From the software side, only Neutrino will be considered.
An understanding of the Scart connector is essential. For information, including pin-out,
on the Scart connector, see Wikipedia. For the sequel, we remark that the FBLK-Signal
(pin 16) ("Fast BLanKing") can be considered as having the semantics: "when active, an
RGB signal is available and should be used".
For a general overview of the dBox hardware, we refer to this block diagram.
2.9.2.1. Tuxbox is a hobby project!
It should always be kept in mind that the present project is a hobby project. This means,
among other things, that tools get written for two purposes: For exploring and debugging,
and for presenting actual functionality to the user. In a professional project, the exploring
and debugging parts are generally never distributed to customers, or disabled (cf. the
debug mode of the dBox). In a hobby project, based on open source, things are different:
if something is not finished, or works only partially, it is, at most, "hidden" behind an
option like ENABLE_EXPERIMENTAL_FEATURES. The goal is more often to take
the hardware to the limit, rather than just releasing perfectly working, well documented
and easily understandable features to the customers. Please keep this in mind when
griping!
For example, the dBox was almost surely not intended to generate YUV video -- then it
would have had RCA-outputs. It turns out that the video encoder used (see below) is
Page 74
Built with Apache Forrest
http://forrest.apache.org/
Private Site
perfectly able to generate YUV as well as the formats Betanova needed. If a
low-cost-version, not containing YUV-capacities, were available, it would probably have
been used instead.
Another issue here is configuration options and -files. Often, in particular when, as is here
the case, writing software for hardware for which no complete documentation is
available, the software author writes his software as a qualified guesswork. To guard for
guessings or design decisions that turned out to be wrong, configuration options are
thrown in. Although better than the alternative, this is not a good thing: It basically means
that the programmer is delegating the work to the user. Getting it right is better than
making it configurable!
2.9.2.2. Terminology
YUV
The signal format we refer to as "YUV" should properly be called "YCbCr".
Since the latter is awkward both to write and to pronounce, and since Neutrino
uses the former, we will say "YUV" (which strictly speaking means something
different).
dBox
refers to a dBox2 from Nokia, Philips, or Sagem, in either cable or satellite
version.
2.9.2.3. The dBox can...
•
Generate the following video formats on the TV-Scart output:
• YUV (+ CVBS)
• YUV (+ VBS)
• RGB (+ CVBS)
• SVideo
• CVBS
•
Generate the following video formats on the VCR-Scart:
• CVBS
• SVideo
•
Pass any video format (using up to 4 signals (RGB, YUV, SVideo, CVBS,...)) (+
audio) from the VCR-Scart to the TV-Scart. The Sagem can do this even in deep
standby.
Pass CVBS-Video and analog sound from the TV-Scart to the VCR-Scart and RCA
audio outputs.
Generate correct aspect ratio information on pin8 on TV Output
Generate correct FBLK signal on pin 16 on the TV-Scart
•
•
•
2.9.2.4. The dBox can not...
•
Not all video-format combinations can be generated simultaneously. In particular,
Page 75
Built with Apache Forrest
http://forrest.apache.org/
Private Site
•
•
•
•
•
•
•
•
•
when generating RGB or YUV, only CVBS and VBS are possible in addition.
Generate progressive video.
Generate analog output from Dolby digital (AC-3) sound. (Would require decoder,
costing license fee.)
Digitalize video from the VCR-Scart
Make any conversion on the video (or audio) from the VCR-Scart
Sagem cannot deliver different audio output on the TV-Scart and the RCA audio
outputs.
Generate correct aspect ratio information on pin8 on VCR output (at least not on
Nokias, hardware is missing)
Output digital video in the sense of e.g. IEEE 1394 ("Firewire"). (However, it can,
supported by a suitable server, capture digital video to disk files.)
Some models (equipped with AViA 500) cannot disable the S/P-Dif output once
enabled, see below.
Not all analog audio output can be attenuated or muted.
2.9.2.5. General on volume control
To prepare for the sequel, we give a general discussion of volume control for a signal
source (like a DVB receiver). First of all, the term "volume control" is a bit of a
misnormer: A signal source is generating an audio signal. This signal is typically sent to
an amplifier (or a TV), which amplifies the signal and sends it to loudspeakers. The
volume is normally "controlled" from the amplifier by its volume control, which
effectively determines the gain of the amplifier. What the signal source can do, is to
attenuate the signal. We will use this term for the rest of the article.
Normal usage should therefore be to bypass attenuation, i.e. all "volume controls" in
signal sources should be set to maximum. At least theoretically, all usage of attenuation
will lead to some quality loss.
It is generally accepted that perceived "loudness" relates logarithmically to sound
pressure. This means that a "volume knob" should preferably take the logarithmic
dependence into account and invert it, otherwise almost all of the "regulating power" will
come at the right end of the scale. A volume control/attenuation with this property is
called logarithmic. (Strictly speaking, "exponential" would be more appropriate, since
what it does is to invert a logarithmic function...) A volume control not having this
property is sometimes called linear, while it maps user input to attenuation linearly.
2.9.3. The Hardware
2.9.3.1. Connectors
The dBox comes with two SCART connectors, marked "TV'' and "VCR'' respectively.
We will subsequently refer to these as "the TV-Scart" and the "VCR-Scart", even if they
are connected to something else. Note that they are differently located on different
Page 76
Built with Apache Forrest
http://forrest.apache.org/
Private Site
hardware: The Sagem has the TV-Scart on top, and the VCR-Scart on bottom, while it is
the other way around on Nokia and Philips.
For our purposes, the TV-Scart has four video-output pins, two audio-output pins, one
video-input pin, and two audio input pins. Pin 8 (aspect ratio) and pin 16 (FBLK) are to
be considered as outputs. The VCR-Scart has four video-input pins; however one of those
(R (or Y), pin 15) can also be an output (necessary for SVideo output signal). There is
one (alternatively two, see last sentence) video output pin(s). Finally, there are two audio
inputs and two audio outputs. Pin 8 and pin 16 both exclusively work as inputs.
There are also a pair of RCA audio outputs, and an optical Toslink S/P-Dif digital audio
output.
2.9.3.2. The Video Encoder
All dBoxes share the same digital video encoder, a SAA7126H from Philips. Data sheet
is available here. It generates analog video signals in RGB, CVBS, SVideo, or YUV
format, depending on what commands it has been sent from its driver (source). Most
importantly, it generates up to four output signals, so we can immediately conclude that,
for example, RGB and SVideo output simultaneously cannot be possible, since it would
require 3 (R, G, B) + 2 (Y and C) = 5 signals.
The video encoder can be manipulated from the command line using a nifty little program
named saa.
2.9.3.3. Digital audio
Digital audio is generated by the AViA chip from the DVB stream, which is then feed to
the S/P-Dif output directly. For this reason, it is not possible for, e.g., the Neutrino audio
player to use it.
The AViA chip can attenuate the volume in the digital domain. It can also mute the
signal. This is in Neutrino called ost volume control or digital volume control. It cannot
attenuate, or mute, Dolby Digital signals. The current software does not make
"logarithmic volume control".
Often, the dBox is connected to an AV-Amplifier using both digital and analog audio
connections. If the AV-Amplifier detects a signal on the digital input, this is selected
instead of the analog input. Thus, for analog sound to be reproduced, the digital output
has be be turned off. Unfortunately, the AViA 500 cannot turn off the S/P-Dif output
once activated. Therefore, users of this setup may have to turn their AV-Amplifier
manually to analog input.
There is an open bug in the OST-muting, see this Tuxbox Wiki Article, that after a
channel zap, "breaks" muting, despite Neutrino claims muting is still on.
2.9.3.4. The AV-Switch
Page 77
Built with Apache Forrest
http://forrest.apache.org/
Private Site
There are three sources of analog video and audio inside the dBox: From the
DVB-receiver (up to four video signals + audio), from the VCR-Scart (to be considered
as four signals + audio), and from the TV-Scart (one signal (CVBS) + audio). To select
which of these inputs are sent to the different outputs is the task for a component we refer
to as the AV-Switch. Here, the different vendors differ considerably: Nokia uses a
CXA2092 chip, for which no data sheet is known. (See this however.) (Probably the
author of the driver for the chip had a very good connection to SONY?) Sagem uses a
CXA2126Q (data sheet here), while Philips uses a STV6412A (data sheet here). For our
purposes, the differences between the chips has been conveniently wrapped in the drivers,
with the exception of the configuration, see below. Most importantly, however, is that the
chip in the Sagem has only two output channels (video as well as audio). This means that
the RCA outputs always output the same audio as the TV-Scart, and that some
configuration options are accepted, but meaningless on the Sagem. The Nokia has a third
video output from the AV-Switch, however, the corresponding pins on the chips are not
connected to anything. It is possible to solder appropriate components to the right pins,
and thus to achieve a third, independently controllable, video output (CVBS only). For
the Nokia, pin 27 on the CXA2092 should be used. (I have done this modification to my
Nokia. This is described in this article.)
Analog volume attenuation
The AV-Switch can also attenuate or mute some of its analog audio outputs. In all cases,
what can be attenuated, can be muted, and vice versa. Again, here the boxes from the
different vendors differ:
Nokia
The Nokia (at least the AViA 500 models) attenuates the TV-Scart, but not the
VCR-scart and not the RCA jacks. (It has been claimed that there are
AViA-600 based Nokias that does attenuate the RCA jacks, despite the fact
that they also uses CXA2092. I do not consider these rumors plausible.)
Sagem
The Sagem attenuates the first audio switch, feeding the TV-Scart and the
RCA jacks. The other audio switch, feeding the VCR-scart is not attenuated.
Philips
The Philips, also having "only" two audio-switches, behaves almost identically
to the Sagem. The only difference is that the chip (stv6412) would allow the
driver to decide whether the RCA jack output is being attenuated or not. The
driver author has decided to turn on the attenuation unconditionally.
We mention that controld uses a volume scale from 0 (sound off) to 100 (no attenuation),
while the AV-switch uses 63 (sound off) to 0 (no attenuation), the latter roughly
corresponding to the attenuation in dB (disposing the minus-sign). The mapping from
controld-volume to AV-switch-volume is exponential, to make up a logarithmic volume
control.
Page 78
Built with Apache Forrest
http://forrest.apache.org/
Private Site
The Switching matrix
The AV-Switch consists of two or three selectors for audio and video respectively. Each
selector (switch) is controlled by a three-bit number (i.e. an integer between 0 and 7),
selecting a particular input to send to its output. This input consists of one (CVBS), two
(SVideo), or four (RGB/YUV + [C]VBS) signals.
For Sagem, v1 (a1) is the switch selecting the video (audio) to be sent to the TV-Scart
(and the RCA audio outputs), while v2 (a2) is selecting video (audio) to be sent to the
VCR-Scart. For the Nokia, v1, a1, and v2 are as with the Sagem, however, the audio
switch selecting audio to the VCR-Scart is called a3. The audio switch a2 selects audio to
the RCA outputs. I do not have access to a Philips box, but this is how I interpret the data
sheet of the STV-chip and the code of the STV6412 driver: v1 selects the output to the
VCR Scart (like v1 for the others). v2 selects the RGB-source, i.e., the output from the
RGB-pins on the TV Scart. Finally, v3 selects the "composite output" (pin 19) on the TV
Scart. There are two audio switches, a1 and a2, selecting audio for TV Scart and VCR
Scart respectively. The RCA-outputs are feed with the same signal as the TV-Scart. The
chip makes it possible to select whether they are volume attenuated or not. Optionally, it
is even possible to select between stereo and mono (= just replacing L and right by their
average) on the TV- and VCR-Scart, but not on the RCA jacks. These possibilities are
presently not used by the driver.
The CXA2126 driver does not recognize the ioctl commands AVSIOSASW3 and
AVSIOGASW3 (setting and getting of a3 respectively). The STV6412 driver recognizes
them as synonyms (!!) to AVSIOSASW2 and AVSIOGASW2 (setting and getting of a2).
(We should preferably change this.)
The semantics of the entries in the routing tables are given in the Appendix.
The FBLK Setting
The FBLK setting in the switch determines how the FBLK output on the TV-Scart (pin
16) is controlled. The semantic of the entry is given in the Appendix. For passing
VCR-Scart video input to the TV-Scart, it would be natural to let FBLK follow the
VCR-Scart input.
The settings of the AV-Switch can be examined as well as manipulated from the
command line with the program switch.
2.9.4. The Software: controld
For our discussion, the dBox operates either in DVB-mode (generating video from DVB
transmissions) or Scart-Mode (routing analog video from the VCR-Scart). The task for
the high level software is to, according to vendor, the selected operating mode, and the
preferred formats for "TV-" and "VCR-Output", to send the appropriate commands to the
saa-driver, enabling it to generate suitable signals on its four output lines, and to send the
Page 79
Built with Apache Forrest
http://forrest.apache.org/
Private Site
correct routing commands to the AV Switch. For this, the daemon controld is responsible.
The neutrino main program sends controld messages, and can provide controld with user
configurable parameters.
controld is a daemon program, responding to messages sent to it. There exists
messages for setting and getting video format, volume, aspect ratio, etc. A command line
program, named controldc, for sending these messages is presented on my patch
page. This is roughly speaking a "brother" to switch and saa.
2.9.4.1. The configuration file scart.conf
The present controld knows 6 cases, depending on vendor (Nokia, Sagem, Philips) and
operating mode (DVB, Scart). There is a configuration file,
/var/tuxbox/config/scart.conf. In the simplest case, for all the different
cases (in the sense above), there is an array of 6 (or optionally 7) numbers, in turn: v1 a1
v2 a2 v3 a3 fblk (their meaning was explained above). These numbers are fed to the
respective switching matrices, and, in the case of Scart-Mode, to the FBLK-switch. A
scart.conf using this "classic" syntax might look like:
#typ_vcr/dvb:
nokia_scart:
nokia_dvb:
sagem_scart:
sagem_dvb:
philips_scart:
philips_dvb:
v1 a1 v2 a2 v3 a3 (vcr_only: fblk)
2 1 0 1 1
5 1 1 0 1 1
2 1 0 0 0 0
0 0 0 0 0 0
3 3 2 2 3 2
1 1 1 1 1 1
3
This is not a complete solution. There are simply too few parameters to be able to cover
all cases we have with different TV formats. There is not even a possibility to select the
output format of the VCR-Scart: Either you get CVBS or SVideo, in the latter case, when
using a CVBS-Connection, the VCR picture turns black-and-white (the "Terminator bug"
in the Tuxbox forum). People often could not use the same scart.conf for SVideo as
for RGB.
Since 2006-05-27, controld understands an extended syntax and semantic for
scart.conf, containing many more parameters, thus (hopefully) enabling one
configuration to work in all situations. A scart.conf adhering to the new syntax may
look like
#
v1
fblk
nokia_scart:
3 3} 2 2
nokia_dvb:
0 0} 1
sagem_scart:
0 0} 1 3
sagem_dvb:
0 0} 0
philips_scart:
a1
v2
a2
v3
a3
{3 3 3 3 3} 2 {{1 7} {1 7} {1 7} {1 7} {1 7}} 2 {3 3 3
{1 5 4 5 5} 1 {{1 2} {1 7} {1 2} {7 7} {1 7}} 1 {0 0 0
{2 2 2 2 2} 1 {{0 0} {0 0} {0 0} {0 0} {0 0}} 1 {0 0 0
{0 0 1 0 0} 0 {{0 1} {0 7} {0 1} {7 7} {0 7}} 0 {0 0 0
{3 3 3 3 3} 3 {{2 2} {2 2} {2 2} {2 2} {2 2}} 2 {3 3 3
Page 80
Built with Apache Forrest
http://forrest.apache.org/
Private Site
3 3} 2 3
philips_dvb:
1 1} 1
{1 1 1 1 1} 1 {{1 1} {1 1} {1 1} {1 1} {1 1}} 1 {1 1 1
For v1, instead of a single number, it is now possible to give an array (using the syntax
above) consisting of five numbers, corresponding to the TV-Video signal format (in
order) CVBS, RGB, S-Video, YUV+VBS, and YUV+CVBS. Using a single number, like
in the old version, is also possible, For v2, there is a double array, the pairs correspond to
the TV-Video format as in v1; the first digit in the pair corresponds to VCR-Signal type
CVBS, while the second one corresponds to VCR-Signal type S-Video. Also here the old
syntax is possible. Finally, v3 has the same syntax as v1.
It should be noted that, due to restrictions in the hardware (discussed above), the
VCR-Signal type S-Video is possible only together with TV-Signal format CVBS and
S-Video. For this, Neutrino makes it impossible to select non-working combination.
2.9.5. Passing the DVD-Player through
Passing the analog video and audio from the VCR-Scart is really quite straightforward.
Both the four video-signals are passed through, as well as the aspect ratio on pin8 and the
FBLK signal on pin 16. In particular, the video format on TV-output is the same as on
VCR-Input, no matter what TV-Video Format you have selected in the Neutrino menus!
As far as I am aware of, no significant quality reduction result.
2.9.5.1. ... in deep standby?
The Sagem can route VCR-Video through in deep standby. It will not be started by
active-going pin 8 on the VCR-Scart. The Nokia can not do this, and will boot on
active-going pin8 on the VCR-Scart. The Philips is reported to behave like the Nokia.
Although it is "correct behavior" of the Nokia to boot by active-going pin 8, this can be
annoying at times: say that you want to play a CD with your DVD-Player that is
connected to the VCR-Scart. Since the front processor is responsible for this behavior,
there is nothing we can do to affect it. Of course, cutting pin8 either in the Scart-cable or
within the dBox may be acceptable. However, aspect ratio switching will no longer work,
which may or may not be acceptable.
In my modding article a hardware modification is described, that will stop the wake-up,
but will not cripple the aspect ratio switching: Cut the pin8-connection within the dBox.
Connect the connection from the VCR to the base of a simple NPN-transistor (e.g.
BC547). Connect its collector to a point that is around 12 V in operation, but 0 V when in
deep standby. The emitter of the transistor goes to the remaining part of the
pin8-connection, facing the dBox electronics. This makes up an emitter follower. When
the collector is 12 V, the emitter follows the base (= pin8 of the SCART), when the
collector is 0 V, the emitter is also 0 V.
When Neutrino has booted, it will not go into Scart-mode even if the VCR-Scart is active
Page 81
Built with Apache Forrest
http://forrest.apache.org/
Private Site
(pin 8), as opposed to Betanova. A fix for this is presented on my patch-page.
2.9.6. Hooking up for YUV-Output
Although not originally planned by the hardware designers, the dBox is capable of
high-quality YUV-output. As should be clear from the above, this requires neither special
hardware, funny parameters, or black magic in any form. YUV is delivered on the RGB
pins on the SCART: Y on the Green pin (pin11), U (really Cb) on the Blue pin (pin 7),
and V (really Cr) on the Red pin (pin 15). Since TVs, Projectors, and AV Receivers
inputting YUV almost exclusively use RCA jacks, an appropriate cable and/or adapter is
required. It is not hard to solder one (using 75 ohm RG-59 coaxial cable), however, an
off-the-shelf "SCART-to-RGB" cable of good quality, like the Clicktronic HC 401-100,
will work and is not too expensive. Attach a "Y"-label to the Green plug, "U" (or "Cb") to
the Blue plug, and "V" (or "Cr") label to the Red plug if it makes you feel more
comfortable :-). In the menu dBox -> Settings -> Video -> VideoOutput select the entry
"YUV + CVBS". Ready!
Using the above settings, an ordinary TV will present an acceptable picture, using the
CVBS input. Using the CVS version, FBLK will be active, and the TV will (because
instructed so by FBLK!) take YUV for RGB, presenting a very greenish picture.
Everything looks like "The Matrix"...
2.9.6.1. Myths
Do I need a special cable/adapter?
No. Rumors exist, that Y "should" be taken from the CVBS-pin (pin 19). There
may, at some point in time, have been images around for which this was
either necessary or sensible. If it was ever true, it is not true for current CVS
sources, or current (legal) images.
I have heard that I must select "YUV + VBS" as video format.
You can select "YUV + VBS" or "YUV + CVBS", it produces the same YUV
output. Using "YUV + CVBS" has no disadvantages, using "YUV + VBS"
makes (color) video output on the VCR-Scart impossible. This myth seems to
be related to the first one.
2.9.7. Open Topics, loose ends
2.9.7.1. Data Lines
Pins 10 and 12 of the Scart connector are "Data Lines", used for such applications as
synchronizing channels on TVs and VCRs. There are a number of commercial names
around (AV-Link, EasyLink, ...) but to my knowledge, no open protocols have been
proposed for this. According to the circuit diagram for the Nokia, pin 10 of the TV-Scart
carries the label "SCART_AV_LINK", and is connected to the CPU. To the best of my
knowledge, this has never been put to use, nether by Betanova or from any free software.
Page 82
Built with Apache Forrest
http://forrest.apache.org/
Private Site
Pin 12 is not connected.
2.9.7.2. Random Problems
My Sagem show the following behavior: If selecting RGB or YUV as TV-Format,
inputting an RGB Video signal and letting FBLK go active, then somehow the output
consists of the DVD-Picture with a DVB-picture superimposed! Workarounds would be
to lower FBLK, or selecting another TV Video format (it is not used anyhow during
Scart-mode pass-thru).
2.9.8. Feedback wanted
Found any mistakes or holes? Have information I don't have (in particular regarding the
Philips dBox)? Feedback of any sort is solicited, either in the forum or to me directly.
2.9.9. Appendix. Semantics of the routing table entries
Signal sources are denoted by DVB, VCR, and TV, the latter being the CVBS signal
input (pin 20) on the TV-Scart. The number behind the slash is the number of useful
connected lines. Identical entries in the column, e.g. "DVB/2" appears twice in v1/Nokia,
do not always generate identical results, since they may correspond to different input pins
on the AV-Switch, hooked up through slightly different passive components. By Philips,
"AUX" denotes an auxiliary input to the switch, almost surely not useful in an
unmodified Philips dBox. A hardware modification may be possible, enabling these to be
connected to a video/audio source. By a1 and v2 on the Philips, only two bits are used,
instead of three by Nokia and Sagem. Therefore, the values 4 – 7 are "impossible".
Value
Nokia (TV)
Sagem (TV)
Philips (VCR)
0
TV/1; DVB/3
DVB/4
Off
1
DVB/1
DVB/2
DVB/2
2
DVB/2
VCR/4
DVB/2
3
VCR/4
Not used
TV/1
4
DVB/2
DVB/2
AUX/1
5
DVB/4
TV/1
Not allowed
6
DVB/3
Not used
Not allowed
7
Off
Off
Not allowed
Table 1: v1
Value
0
Nokia (VCR)
TV/1
Sagem (VCR)
DVB/2
Page 83
Built with Apache Forrest
http://forrest.apache.org/
Philips (TV
(RGB-Pins))
Off
Private Site
1
DVB/1
DVB/2
DVB/3
2
DVB/2
VCR/2
VCR/3
3
VCR/2
Not used
Not allowed
4
DVB/2
DVB/2
Impossible
5
Off
TV/1
Impossible
6
Off
Not used
Impossible
7
Off
Off
Impossible
Table 2: v2
Value
Nokia (only with HW mod.)
Philips (TV/CVBS (Pin 19))
0
TV/1
Off
1
Off
DVB/1
2
DVB/1
DVB/1
3
VCR/1
VCR/1
4
DVB/1
AUX/1
5
Off
Not allowed
6
Off
Not allowed
7
Off
Not allowed
Table 3: v3
Value
Nokia (TV)
Sagem (TV+Aux)
Philips (VCR)
0
Off
DVB
Off
1
DVB
VCR
DVB
2
VCR
Not used
TV
3
Off
TV
AUX
4
Off
Off
Impossible
Table 4: a1
Value
Nokia (Aux)
Sagem (VCR)
Philips (TV+Aux)
0
Off
DVB
Off
1
DVB
VCR
DVB
2
VCR
Not used
VCR
3
TV
TV
AUX
Page 84
Built with Apache Forrest
http://forrest.apache.org/
Private Site
4
Off
Off
TV
Table 5: a2
Value
Nokia (VCR)
0
Off
1
DVB
2
Off
3
TV
Table 6: a3
Value
Nokia
Sagem
Philips
0
Forced inactive
Forced inactive
Forced inactive
1
Forced active
Forced active
Forced active
2
Follows the FBLK of
the VCR-Scart input
Follows the FBLK of
Follows the FBLK of
the DVB video encoder the DVB video encoder
3
?
Follows the FBLK of
the VCR-Scart input
Follows the FBLK of
the VCR-Scart input
Table 7: fblk
2.10. Some Hardware Modifications of the Nokia dBox
2.10.1. Introduction
This article describes some hardware extension that I felt "was necessary" to my Nokia
dBox. First of all, although the box is fairly well equipped with video outputs (see this
article), I wanted outputs to be simultaneously connected (although they could still not be
simultaneously used) to YUV-inputs, SVideo-inputs, and RGB-inputs. I wanted to see if
the mysterious "v3"-output worked. Also some other minor modifications are described
herein.
This is the back plate of the modified dBox:
This article uses terminology and facts from the previous article. A reasonable
understanding of electronics is assumed.
Some more photos are collected here.
Page 85
Built with Apache Forrest
http://forrest.apache.org/
Private Site
2.10.2. Additional Video Outputs
Although the dBox is in the position (see this background article and this improved
controld) I wanted to be able to connect YUV-cables (preferably fitted with RCA jack)
simultaneously with the RGB-connection. An S-Video Hosiden connector would be nice
too. Unfortunately, "snarfing a video signal" is not as easy as making an additional analog
audio output where you can just connect them in parallel. It turned out that all the video
signal outputs where using the same emitter follower as output step, see the following
figure.
Page 86
Built with Apache Forrest
http://forrest.apache.org/
Private Site
The working of an emitter follower is described in every elementary electronics textbook.
We just remark that the voltage of "Out" follows "In" very closely, while loading the
input very little.
In all cases, "In" is connected to pins of the AV-Switch, and "Out" to different pins on the
Scart connectors. The transistor BC547B is the discrete component, while BC847B is the
SMD version, used in the Nokia. I duplicated this circuit for all extra video outputs
desired, taking the "In" signal from the appropriate pin of the AV-Switch, and feeding the
output to an RCA- (or Hosiden) jack. In this way, I have made separate RCA jacks for the
four output pins (labeled Y, Cb, Cr, and CVBS respectively). These correspond to the
"v1" video output channel, also connected to the TV-Scart. From the "v2" video output
channel (connected to the VCR-Scart), both signals are taken to a Hosiden connector. The
CVBS-Signal is taken to an RCA-jack. Finally, the mysterious "v3" video output was
taken from pin 27 on the CXA2092.
Holes were drilled in the back plate and appropriate RCA and Hosiden jacks were
mounted. The components were essentially soldered to the output jacks, with cables to
connect the base of the transistor to the AV-Switch's pins. It turns out that 75 ohm
resistors are slightly hard to get by; Conrad sells them, but only in quantities of 100
(Order number 408948 - 62).
The outcome of this modification is quite pleasing. In particular, I not need to use my
Scart-Switcher as a signal splitter.
2.10.3. Inhibiting Wake-Up from SCART-Inputs
As described in the previous article, it may be desirable not to let active-going pin8 on the
VCR-Scart wake up the dBox. For this, we used exactly the same circuit, but where
"+12V" has to be taken from a point that is 0V during deep standby. The connection for
pin8 on the VCR-Scart was cut, "In" connected to pin8 of the VCR-Scart, and "Out" to
the PCB, where pin8 had gone previously. It turned out that the most difficult part was to
find an appropriate 12/0V supply. For this, I used the signal denoted +12V_OPB on the
circuit diagram, available just under the modem connector, see the green wire on photos.
The emitter follower is shown here:
Page 87
Built with Apache Forrest
http://forrest.apache.org/
Private Site
It turns out that a Scart-connector with one pin cut on the inside is mechanically prone to
problems. For this, I fixed the pin with hot glue, as can be seen from the picture.
2.10.4. Miscellaneous
The power cable was a non-detachable cable, equipped with a Euro plug. A detachable
cable has some advantages, when swapping my Nokia dBox and my Sagem, or when
(occasionally) the need for power cycling occurs. It was also my intention to replace the
fairly useless modem with a second RS232 output. At the time of this writing, this is
unfortunately not yet working. (In Internet available pin-outs for the modem connector
appear not quite accurate.)
Finally, as can be seen from the photographs, the different connectors were labeled in a
more readable fashion than in original.
2.11. Modding the Nokia dBox
Page 88
Built with Apache Forrest
http://forrest.apache.org/
Private Site
2.12. Setting up a Linux/Unix Server for the dBox
2.12.1. Yet another guide on setting up a Linux server?
The goal of this guide is to proved help on setting up a Unix or Linux server for providing
the dBox with some useful services. It is aimed at the beginner to intermediate user.
Nothing really new is presented here. The emphasis is on traditional Unix services,
getting them to work, to troubleshoot them.
2.12.2. General
It is only when you network the dBox, that you can take advantage of its full power. A
number of services exist, and new are invented regularly. Some of these are multimedia
related, and enables the box to digitally record DVB-transmissions, or to reproduce video
or audio material. This is not the topic for the present guide, that instead focuses on the
more traditional Unix services.
The three services we will cover are:
NFS
Provides file server service
TFTP
Provides the client with a file to boot
DHCP
Provides the client with parameters, that it needs for booting
Typically, but not by necessity, they reside on the same host.
It is sometimes sensible to set up only, e.g., an NFS-Server.
If using newmake to compile the CDK, outlines for /etc/hosts, /etc/exports,
and /etc/dhcpd.conf are generated, by the target serversupport.
2.12.2.1. YADD and its advantages
It is possible for the dBox (in debug mode!) to boot entirely from a server, not using any
(nonvolatile) internal memory. The necessary parameters for booting will be received
from a server, another (possibly different) server provides it with the necessary boot
loader (u-boot, in the past "ppcboot") and secondly with a Linux kernel. The root file
system is NFS-mounted from a server. This mode of operation is called YADD ("Yet
Another Dbox Distribution"), or CDK ("Cross Development Kit"), an extraordinarily
silly, but established, name. This mode of operation has many advantages:
• The flash memory, i.e. "its" operating system, is not affected in any way.
• Using the flash functions of, e.g. Neutrino, the flash can be read out, or the flash can
be new programmed.
• Disk space, also in the root partition, is "unlimited".
Page 89
Built with Apache Forrest
http://forrest.apache.org/
Private Site
•
Very practical for development: After a successful build, the changed software
immediately resides on the dBox, without need for flashing.
2.12.2.2. Host name resolving
In many situations, computers have to be referred to in a unique fashion. This can be done
with IP-Numbers, or, if the involved computers can understand it, symbolic names. To
translate the symbolic names to IP-numbers ("hostname resolving"), a number of
mechanisms have been proposed. For home networks, usually the file /etc/hosts is
used. For a small home network, this may look like:
127.0.0.1
192.168.1.1
192.168.1.2
192.168.1.5
192.168.1.6
localhost
workcomputer
server
dbox nokia
sagem
This file is then distributed to all computers in the network. Now the symbolic names can
be used in configuration files.
2.12.3. The DHCP Server
The dhcpd-daemon supplied with most Linux distribution is a very versatile program. It
implements, not only the DHCP-protocol, but also the BOOTP protocol. It provides a
client, providing only its MAC-address, with the information necessary to boot from a
TFTP- and NFS-server. I recommend not to configure it using the system administration
tool, but instead to generate a suitable configuration file /etc/dhcpd.conf. If using
newmake to compile CDK, a suitable /etc/dhcpd.conf will be generated by the
target serversupport, adapted to the parameter used when running the
configure-command. This file will typically look like:
#
#
#
#
#
This is a template for dhcp.conf
Copy to the appropriate location for your server,
typically /etc/dhcp.conf.
You may have to modify this file manually.
Please see the documentation for your server and for dhcpd.
ddns-update-style none;
subnet 192.168.1.0 netmask 255.255.255.0 {
}
host dbox {
fixed-address 192.168.1.5;
hardware ethernet 00:50:9c:xx:xx:x;
allow bootp;
server-name "godzilla";
next-server "godzilla";
option root-path "/tuxbox/cdkroot";
if exists vendor-class-identifier {
filename "kernel-cdk";
} else {
filename "u-boot";
}
}
Page 90
Built with Apache Forrest
http://forrest.apache.org/
Private Site
where "godzilla" is the name of the DHCP-, TFTP-, and NFS-server.
The MAC-address of the dBox needs to be entered here. Often, it is printed on the back
plate of the dBox. Otherwise, a command like arp -a can often be used to determine it.
The MAC-number of a dBox always starts with "00:50:9C".
As of CVS-Stand 2006-02-01, the root path can be entered in the form
IP-Address:/directory, not forcing TFTP- and NFS-server to coincide. However,
using IP-Name instead of IP-Address is not possible.
The dhcpd-daemon can be started either from the system administration tool, or directly
with /etc/init.d/dhcpd start.
For more information, see the man-pages for dhcpd and dhcpd.conf, or the source of
the software, ISC.
Unfortunately, unless you remove the Ethernet cable from the dBox when booting, unlike
the NFS-server and the TFTP-server, the dhcpd-daemon interferes with normal operation
of the dBox -- it will simply force the box to boot from the server. I do not know of a
really elegant solution: personally I let dhcpd be off by default, and start it, using
/etc/init.d/dhcpd start, when needed.
2.12.3.1. Troubleshooting
As can be inferred from the configuration file, there is a fair number of things that can go
wrong. Also, as is discussed in this thread, some versions of dhcpd do not work with the
Tuxbox. For troubleshooting, use the system log, typically /var/log/messages. For
reference, we show a successful boot ("godzilla" is the server, "dbox" the dBox, having
MAC-address 00:50:9c:xx:xx:xx):
Jan 23 14:28:21 godzilla dhcpd: BOOTREQUEST from 00:50:9c:xx:xx:xx via
eth0
Jan 23 14:28:21 godzilla dhcpd: BOOTREPLY for 192.168.1.5 to dbox
(00:50:9c:xx:xx:xx) via eth0
Jan 23 14:28:22 godzilla dhcpd: DHCPDISCOVER from 00:50:9c:xx:xx:xx via
eth0
Jan 23 14:28:22 godzilla dhcpd: DHCPOFFER on 192.168.1.5 to
00:50:9c:xx:xx:xx via eth0
Jan 23 14:28:22 godzilla dhcpd: DHCPREQUEST for 192.168.1.5
(192.168.1.1) from 00:50:9c:xx:xx:xx via eth0
Jan 23 14:28:22 godzilla dhcpd: DHCPACK on 192.168.1.5 to
00:50:9c:xx:xx:xx via eth0
Jan 23 14:28:23 godzilla dhcpd: DHCPDISCOVER from 00:50:9c:xx:xx:xx via
eth0
Jan 23 14:28:23 godzilla dhcpd: DHCPOFFER on 192.168.1.5 to
00:50:9c:xx:xx:xx via eth0
Jan 23 14:28:23 godzilla dhcpd: DHCPREQUEST for 192.168.1.5
(192.168.1.1) from 00:50:9c:xx:xx:xx via eth0
Jan 23 14:28:23 godzilla dhcpd: DHCPACK on 192.168.1.5 to
00:50:9c:xx:xx:xx via eth0
Jan 23 14:28:27 godzilla dhcpd: DHCPDISCOVER from 00:50:9c:xx:xx:xx via
eth0
Page 91
Built with Apache Forrest
http://forrest.apache.org/
Private Site
Jan 23 14:28:27 godzilla dhcpd: DHCPOFFER on 192.168.1.5 to
00:50:9c:xx:xx:xx via eth0
Jan 23 14:28:27 godzilla dhcpd: DHCPREQUEST for 192.168.1.5
(192.168.1.1) from 00:50:9c:xx:xx:xx via eth0
Jan 23 14:28:27 godzilla dhcpd: DHCPACK on 192.168.1.5 to
00:50:9c:xx:xx:xx via eth0
Jan 23 14:28:37 godzilla rpc.mountd: authenticated mount request from
dbox:800 for /tuxbox/cdkroot (/tuxbox/cdkroot)
The last line is not from dhcpd, but shows that the NFS-mount of the root succeeded.
2.12.4. The TFTP Server
TFTP is a very simplified file transfer protocol. For the Tuxbox, it serves the client with
the boot loader u-boot and the Linux kernel kernel-cdk, as well as (optionally) the
logo files logo-fb and logo-lcd. The TFTP-Service is normally set up using the
system's administration tool. The only real interesting setup option is its base directory
(called "Boot image directory" in YAST2/SuSE). This is where u-boot and
kernel-cdk reside. It should normally be the same as the --with-bootdir
parameter to configure.
2.12.4.1. Troubleshooting
There is not too much that can go wrong, basically only "File not found". These messages
can often be found in the system log, typically /var/log/messages.
Since the TFTP-daemon "chroot"-s to its base directory, all file names are interpreted
with respect to this directory, which can sometimes be confusing.
2.12.5. The NFS Server
The Network file system (NFS) is the most common remote file system in the Unix
world. For a file server for the dBox, there appears to be a consensus that it offers better
performance and reliability than other alternatives.
The NFS server is turned on using your standard system administration tool, like YAST2
in SuSE. For the configuration (what file systems are exported, to what client, and with
what properties), it really all boils down to editing the file /etc/exports, although
system administration tools may offer "user friendly" ways of editing this file.
Typically, the file may look like:
/tuxbox/cdkroot
/multimedia/music
/multimedia/streaming
dbox(rw,sync,no_root_squash)
dbox(ro)
dbox(rw)
This file says that the directory /tuxbox/cdkroot (on the server) is exported to the
host with the name "dbox" (as found in /etc/exports), the host may mount it with
write-access. The options "sync" and "no_root_squash" should be used for the file system
to be mounted as root, otherwise it is not needed. The second line states that the
filesystem /multimedia/music may be mounted by host "dbox", but not with write
Page 92
Built with Apache Forrest
http://forrest.apache.org/
Private Site
access.
After changing /etc/exports the NFS-daemon does not automatically take changes
into account. The system is told to re-read /etc/exports by, e.g., a command like
exportfs -a or /etc/init.d/nfsserver restart.
Solaris does not use /etc/exports but a share-command.
If using newmake to compile the CDK, it generates am /etc/exports-fragment,
suitable for exporting the used cdkroot to the dbox -- assuming that the compile host is
the same as the NFS-Server of course.
2.12.5.1. Troubleshooting
The NFS server is in general quite robust, and seldomly makes problems. Most problems
are permissions problems. Look in the log file(s) on the server (typically
/var/log/messages) for problems. However, the Tuxbox does not implement file
locking over NFS, so file systems have to be mounted using the "nolock" option (on the
client, that is), otherwise the mount may hang.
2.12.6. Other possible services
There is a vast number of different services that may or may not be of interest.
Multimedia related services are, e.g. shoutcast and VLC. There are also the traditional
Unix-Services. These can, possibly after installing some client software component, in
general be used with the Tuxbox.
2.12.6.1. DNS Name server
To have your own nameserver in your LAN may be useful, or at least nice. That way, it is
not necessary to keep /etc/hosts up to date on all hosts on the LAN.
2.12.6.2. RARP server, Bootp server
The dhcpd daemon, setup like here proposed, takes over the task of these services, which
are therefore not needed.
2.12.7. Flashing
In this article a non-interactive flashing using the "dboxflasher", a specially compiled
u-boot, is described. This is an application using DHCP and TFTP.
Booting from YADD and flashing, using either Neutrino's (or Enigma's) flashing
functions (or, from the command line, the commands eraseall or fcp) is a viable
possibility both for reading and writing of the flash memory (partition /dev/mtd/4,
"Flash without bootloader").
Page 93
Built with Apache Forrest
http://forrest.apache.org/
Private Site
2.12.8. Troubleshooting
For trouble shooting, a log from the serial console (also called bootlog) is indespensible.
See wiki for some more details. Without it, no sensible debugging is possible, just
guessings. Also, the log on the server (typically /var/log/messages) can give many
important hints, in particular regarding NFS- and DHCP-problems.
2.12.9. Links
• CDK YADD Boot Procedure"> in Tuxbox Wiki. Also in German as CDK (YADD)
Bootvorgang. Describes the steps involved in booting a CDK setup.
• DHCP software from ISC.
2.13. Non-interactive Flashing using dboxflasher
2.13.1. Introduction
The present article describes a method for non-interactive flashing of dBoxes using a
server with DHCP and TFTP capacities, like a Linux computer.
The use of the u-boot as flashing tool was introduced by Homer in "dboxflasher mit/ohne
Nullmodem-Kabel", however without sources. It was checked in to CVS by yours truly,
who also wrote Makefile rules (in newmake) and the script described later.
A serial connection ("nullmodem cable") is not required. However, troubleshooting
without it is fairly meaningless.
2.13.2. General
The dboxflasher really "is" nothing else than a configuration file for the u-boot. This file
is checked in in the Tuxbox CVS, u-boot.flasher.dbox2.h. The interesting part
is the boot command, which reads:
#define CONFIG_BOOTCOMMAND
\
"tftp \"dboxflash.img\";protect off 10020000 107fffff; " \
"erase 10020000 107fffff;cp.l 100000 10020000 1F8000;reset"
This means: first, get the file dboxflash.img from the TFTP-server. Then make the
appropriate area in the flash memory (everything except for the first 128KiB, which is
used by the BR boot loader) writable and erase it. Finally, copy the just downloaded file
to the just erased flash area. Then reboot.
To use dboxflasher for flashing, the TFTP-server have to first provide it as the first
boot-file (replacing the normal u-boot, taking the name from the DHCP-parameters), then
provide dboxflash.img (for which the name is known). Optionally, logo files
dboxflasher-fb and dboxflasher-lcd may be provided, also by the
TFTP-server. Finally, the DHCP-server have to be shutdown by the time the dBox
Page 94
Built with Apache Forrest
http://forrest.apache.org/
Private Site
reboots, otherwise the same procedure will start all over again. Preferably, this should all
co-exist with a setup of DHCP and TFTP for booting YADDs (see this document).
To automate these tasks is the object of the following section.
2.13.3. A script for automated flashing
The script do-flash is an attempt to satisfy these requirements. It is invoked as:
do-flash filename
where filename is the filename of the image file to be flashed. The script first checks
the size of the file, makes a backup of possible previous u-boot, and copies the
dboxflasher to its location, and the flash-file to dboxflash.img. Then, to be sure we
are in a known state, a possibly running dhcpd is terminated. dhcp is subsequently started,
and the dbox (that is assumed to have the IP-name "dbox") is rebooted using the Neutrino
web API. Of course, this will reboot the dBox only if running Neutrino, otherwise the
user have to reboot the dBox manually. The script waits for two minutes. During this
interval, the dBox is supposed to boot (only the DHCP-related services are required to be
completed during this interval). After two minutes, the flashing is supposed not to be
completed, the DHCP server is terminated, preventing the flashing to start anew. The
original u-boot is then restored. In the case of interruption (with e.g. Control-C), the
signal is trapped, dhcp terminated, and the original u-boot restored. The flashing is also
logged to a local file.
2.13.4. Building, or downloading, dboxflasher
The dboxflasher configuration file is a part of the Tuxbox CVS. Users of the newmake
branch can build it automatically within the CDK setup using the make target
dboxflasher. This target will install dboxflasher in the tftp-directory.
Here, a compiled dboxflasher can be downloaded.
2.13.5. Performance
My Nokia (2x) is flashed in approximately 2 minutes. Unfortunately, flashing my Sagem
(1x) does not work that well, but takes approximately 10 minutes. I do not know why.
2.14. The dBox IR-Keyboard
2.14.1. Revision history
Date
Description
2006-02-20
Initial version.
2006-03-29
Fixed some minor errors. Mention kb2rcd.
Update and describe patch.
Page 95
Built with Apache Forrest
http://forrest.apache.org/
Private Site
2.14.2. Introduction
Originally, the dBox was designed as a "multimedia terminal", with applications such as
pay-per-view ordering, email, and home banking in mind. This design consideration
amounts for the second (never officially used) card slot, the modem, and the optionally
available infrared keyboard. This is all history, in particular, the keyboard was quite hard
to get. Recently, they are available on German eBay for a quite reasonable price. (Search
for "dbox tastatur").
The keyboard events are intercepted by the front processor of the dBox, making it
possible both to read the keyboard as a generic computer keyboard, and to interpret the
keys as coming from a normal remote control.
Some plugins access the keyboard. This topic is not covered by the present article, but
may be found on Tuxbox WiKipedia, on the IR Keyboard page or on the Tuxbox
commander page.
The empirical statements in this article has been verified on a Nokia, as well as on a
Sagem dBox. It is believed that the Philips acts similarly.
The picture has been shamelessly stolen from Tuxbox WiKipedia.
2.14.3. The hardware
The keyboard is in laptop design and size, and comes exclusively in German
qwertz-layout with German labeling. See the picture. There is a "fire button" on the
extreme left, and a "joystick like" thing to the right. Below the "joystick", there is another
Page 96
Built with Apache Forrest
http://forrest.apache.org/
Private Site
"fire button". On the front, there are four IR-Diodes, that appear to provide quite reliable
communication. I tried with a distance of 7 meters with no problems, probably much
larger distances are possible.
The unit is powered by 4 AA-type batteries. It is suitable both for desktop- and
sofa-usage. The mechanical quality is quite acceptable, in particular considering the low
price.
2.14.4. Low-level interface
All keys send different infrared signals. The driver in
.../driver/fp/dbox2_fp_keyboard.c translates these in keycodes and events.
The keycodes are listed in the source code file
.../apps/tuxbox/neutrino/src/driver/rcinput.h. These keycodes are
in general from the Linux include file include/linux/input.h. The "Fn"-key to
the lower left is made into a shift-key: it sends no keycode, but makes some keys (the
ones having blue lettering) sending other keycodes. These are: KP0 to KP9,
KPASTERISK, KPMINUS, KPPLUS, KPDOT, KPENTER (on the return key),
KPSLASH. Until recently, the two Windows keys, and the key marked "Druck S-Abf"
were left out.
As opposed to the remote control, no keys on the keyboard makes the dBox wake up from
deep standby.
The left "fire button" sends the BTN_LEFT keycode, and the right one the BTN_RIGHT
keycode. Usage of the "joystick" can be identified by the event type.
2.14.5. The keyboard as a computer keyboard
A front processor driver (dbox2_fp_keyboard.o) makes it possible to use the
keyboard as a normal computer keyboard. With the command loadkeys (normally
executed from rcS) it is possible to load a proper keyboard translation table. Since the
keyboard is labeled as a German qwertz-keyboard, the de-latin1-nodeadkeys
keymap is recommended. (de-latin1, used in the HEAD branch of CVS, is an
alternative, however, for a computerist in general unsuitable.)
The appropriate keymap is loaded with the command like loadkeys
/share/keymaps/i386/qwertz/de-latin1-nodeadkeys.kmap.gz. The
following files must be installed for this to work:
/bin/loadkeys
/share/keymaps/i386/qwertz/de-latin1-nodeadkeys.kmap.gz
/share/keymaps/i386/qwertz/de-latin1.kmap.gz
/share/keymaps/i386/include/linux-keys-bare.inc.gz
/share/keymaps/i386/include/linux-with-alt-and-altgr.inc.gz
/share/keymaps/i386/include/qwertz-layout.inc.gz
Around 100 kB space in the root partition is required. With this keyboard tables,
Page 97
Built with Apache Forrest
http://forrest.apache.org/
Private Site
everything (but the Windows keys) works, as far as I know, flawlessly.
Through /etc/inittab, there are more possibilities. With keys Alt-F2 thought
Alt-F6 a virtual console is opened on the framebuffer. It is hidden (not closed) by the
key Alt-F1. Finally, /etc/inittab instructs the system to reboot on the
Cntrl-Alt-Del ("Strg-Alt-Enf" on German keyboards) key press.
2.14.6. The keyboard as a remote control for Neutrino
The first impression when trying the keyboard out of the box is that Neutrino recognizes
very few of the keys. These are: The numerical keys 0 to 9, "Pos1" = Home, Bild ^ =
Page Up, "Bild v" = Page Down (seldomly used, found only on very old remote controls),
as well as the cursor keys. There is nothing wrong with this — the keyboard is a
"keyboard", not a bulky replacement remote control!
In the menu dBox -> Settings -> Key Setup, it is possible to bind certain
functionality (e.g. switching between TV- and radio-mode) to arbitrary keys. All
keyboard keys (except for "Fn") can be used for this. With CVS from 2006-02-17
(2006-03-26 for the remaining three: KEY_SYSRQ, KEY_LEFTMETA, and
KEX_RIGHTMETA), Neutrino also knows sensible names for those keys.
To be able to programmatically use the key, rcinput.h was extended. The keycodes
have names taken from include/linux/input.h. From the keycodes, Neutrino key
events are being named in an obvious manner.
Unfortunately, the event belonging to key on the German labeling denoted with ß, should
logically be named RC_minus. However, this name was previously taken in a previous
version of the file to denote the key for lowering the volume (RC_volumedown would
have been better). For this reason, the name RC_hyphen was chosen.
2.14.6.1. Really turning the keyboard into a bulky remote control
Neutrino does not offer a clean way to, for example, add another "red button". So, instead
the original version of this article presented a dirty way :-). (Just hard coding some
translations into rcinput.cpp.)
2.14.6.2. The kb2rcd-daemon
Possibly as an answer, robspr1 in the Tuxbox forum wrote the daemon kb2rcd, see this
posting (and following ones), as well as this thread in the Jack-the-Grabber forum. This is
no doubt an interesting approach. It is a daemon that gets events (from
/dev/input/event0), translates them, (not necessarily 1-1, but possibly 1-0
(Scripts), or 1-n (macros)) and pushes them back in the device. The advantage is the
modularity, as it works with "everything", including plugins as well as Enigma. Also, it is
easily added to an existing image, even cramfs/squashfs-Images. The drawback is that it
works on the event-level; therefore everything like timing, up/down-Events etc. must be
Page 98
Built with Apache Forrest
http://forrest.apache.org/
Private Site
considered. As I tried it, at first it did not work at all, only for very long key presses. I
found out that the initial delay (200ms) needed to be lowered. It can be configured using a
configuration file kb2rcd.conf. It can execute commands, as well as plugins, directly.
Recent versions can translate joystick actions to cursor keys, and can also interpret the
Alt-key as a shift key, as well as assigning a binding to delayed keys. It is (partially)
described in this Wiki-contribution (as well as the threads quoted). It has been checked in
to CVS, in the directory .../apps/tuxbox/tools/kb2rcd.
2.14.6.3. A patch for rcinput
The patch for rcinput, available here, has been vastly improved. The translation is now
governed by a configuration file, in spirit similar to the configuration file for kb2rcd.
The patch works by translating keys, (not events), therefor no 1->n translation (macros)
are possible. In particular, instead of key presses, several Neutrino-messages (see
.../apps/tuxbox/neutrino/src/neutrinoMessages.h) can be generated,
optionally with data. In this way, it is also possible to execute plugins directly .The
configuration file should be located in /var/tuxbox/conf/rc.conf. A sample
configuration file is shown in the Appendix.
To the file format of the configuration file: Every line is of the form keyword=action or
keyword=action(data). All other lines are ignored. A hash sign ("#") is taken as a
comment character. Here keyword in general is the name of a key (translated to lower
case), but there are also additional keywords:
Keyword
Allowed Values
Description
keyname (lower case)
action (lower case)
Have action be executed at
press of key keyname.
debug
on and off
Turns on and off tracing on the
system console.
no_neutrinoevents_when_vcon and off
If on, whenever a virtual
console is visible (opened with
F2 – F6), key presses will not
be forwarded to neutrino.
Allowed actions are the key names, as well as some additional actions. These often, but
not always, are the same as the corresponding Neutrino messages, translated to lower
case.
Action
Data
keyname
system
Description
Have Neutrino execute the
action associated with
keyname.
command
Page 99
Built with Apache Forrest
http://forrest.apache.org/
The data is taken as argument
to a system command; in
normal english, "is executed".
Private Site
Output is output to the system
console. The return status is
reported to the console.
mode_tv
Switches neutrino to TV mode
mode_radio
Switches neutrino to radio
mode
vcr_on
Switches on SCART-mode.
vcr_off
Switches off SCART-mode.
standby_on
Switches on standby-mode.
standby_off
Switches off standby-mode.
show_epg
Shows the EPG.
show_infobar
Shows the infobar.
lock_rc
Locks the remote control (and
the keyboard). Press the red
key followed by the dBox key to
re-enable. See this Wiki-article.
show_volume
Shows the volume bar.
evt_popup
message
Shows message in a temporary
popup.
evt_extmsg
message
Shows message in an extmsg
popup.
evt_plugin
pluginname.cfg
Starts the popup with the name
pluginname.
reload_conf
Reload the configuration file.
shutdown
Shutdown the system. Note
that this is a way of
implementing a bona-fide
discrete power-off-key.
2.14.7. Appendix. A sample rc.conf
# Demo rc.conf
A comment do not need a `#', as long as it does not contain an equal
sign
# Do not turn on debugging yet (it babbles while parsing this file),
# just at the end of the file
#debug=on
# Do not let Neutrino see the keys when a virtual console is open
Page 100
Built with Apache Forrest
http://forrest.apache.org/
Private Site
no_neutrinoevents_when_vc=on
key_kp1=system(date)
key_kp2=system(ls)
# Projector suitable params (requires controldc)
key_kp5=system(controldc setVideoOutput 4) # YUV
# TV suitable params
key_kp8=system(controldc setVideoOutput 1;controldc setVideoFormat 0) #
RGB + auto
key_kp9=system(controldc setVideoFormat 1) # 16:9
key_minus=key_help
key_esc=key_home
key_f1=key_red
key_f2=key_green
key_f3=key_yellow
key_f4=key_blue
key_f5=mode_tv
key_f6=mode_radio
key_f7=vcr_on
key_f8=vcr_off
key_f9=standby_on
key_f10=standby_off
key_numlock=show_epg
key_sysrq=show_infobar
key_scrolllock=lock_rc
key_insert=show_volume
key_btnleft =key_ok
key_btnright=key_power
key_102nd=key_volumedown
key_grave=key_volumeup
key_pause=key_mute
key_delete=key_setup
evt_popup and evt_extmsg works!
key_leftmeta=evt_popup(Barf rulez)
key_rightmeta=evt_extmsg(This nonsense stays on the screen for a LOOONG
time)
plugins can be started by evt_start_plugin
key_end=evt_start_plugin(tuxtxt.cfg)
special function: reload_conf reloads this file
key_tab=reload_conf
key_bottomright=shutdown
# NOW, turn on debugging
debug=on
2.14.8. Appendix. Installing the keyboard mapping file with newmake.
Here is a root-local.sh file that will install the above mentioned files in a newmake
run. It violates this "style recommendation" severly ;-). Note that the value of
Page 101
Built with Apache Forrest
http://forrest.apache.org/
Private Site
targetprefix has to be manually edited in the file.
#!/bin/sh
newroot=$1/root
targetprefix=/tuxbox/cdkroot
make console_tools
install $targetprefix/bin/loadkeys $newroot/bin
install -d $newroot/share/keymaps/i386/qwertz
install -d $newroot/share/keymaps/i386/include
install -m 444
$targetprefix/share/keymaps/i386/qwertz/de-latin1-nodeadkeys.kmap.gz
$newroot/share/keymaps/i386/qwertz
install -m 444 $targetprefix/share/keymaps/i386/qwertz/de-latin1.kmap.gz
$newroot/share/keymaps/i386/qwertz
install -m 444
$targetprefix/share/keymaps/i386/include/linux-keys-bare.inc.gz
$newroot/share/keymaps/i386/include
install -m 444
$targetprefix/share/keymaps/i386/include/linux-with-alt-and-altgr.inc.gz
$newroot/share/keymaps/i386/include
install -m 444
$targetprefix/share/keymaps/i386/include/qwertz-layout.inc.gz
$newroot/share/keymaps/i386/include
2.15. FAQ for Barf's dBox page
2.15.1. Questions
2.15.1.1. 1. Warum schreibst du nicht auf Deutsch? Du bist ja offensichtlich auf einem
deutschen Server/(Why don't you write in German?)
Englisch ist die Nummer 1. internationale Spache der Wissenschaft und Technik, genau
so wie latein für die Medizin, französisch für das Postwesen, oder Deutsch für die
Theologie. Entweder schreibe ich auf Deutsch, und schliesse nicht Deutschsprechende
aus, oder schreibe ich auf Englisch, und schliesse nicht Englischsprechende aus. Ich
glaube das zweite ist besser. Die eigentliche Zielgruppe dieser Seite versteht Englisch, da
bin ich mir ziemlich sicher.
Ausserdem gibt es recht wenige englischsprachige dBox-Sites. Und die, die es gibt,
gehören fast ausschließlich zu "der dunkle Seite".
2.15.1.2. 2. Why isn't this stuff in CVS?
It differs. Some of the stuff are, or will be checked in. In some cases the patch is not quite
reliable, or there are other reasons for not committing it. This site makes it possible to
publish patches that are not to be committed.
2.15.1.3. 3. What is a patch? What can I do with it?
Short answer: If you really need to ask, then it is not for you. Long answer: A "diff"
Page 102
Built with Apache Forrest
http://forrest.apache.org/
Private Site
describes the difference between two files, one "original" and "fixed". It is generated by
the program diff. It contains the changed lines, together with a few content lines around
the changed lines. These content lines makes the patch and the patching procedure
somewhat robust, for example if the original file changes in a different place. When the
diff is distributed, in the intent of making it possible for people in the possession of the
original file to generate the fixed file, the diff is called a patch. With e.g. a text editor, the
original file and the patch, the fixed file can be constructed. There also exists a program
which automates this task. It was written by Larry Wall possibly 20 years ago, and,
surprisingly, carries the name patch. Typical use of the patch program is: patch
foobar.c < foobar.c-patch. This is called "applying the patch" or "patching".
This may go wrong, you must check the output of the program! See next Q:
2.15.1.4. 4. What if the patching goes wrong?
You must not go on without thinking! Most likely, the "original file" has changed in a
way that makes automatic applying of the patch impossible. If you have a reasonable
understanding of the syntax and semantic of the files you are patching, you may be able
to use your understanding and your brain to manually apply the patch in a way consistent
with the original intention. Independently of this, you should inform the author of the
patch, he/she may or may not be willing to update the patch (for you and for the rest of
the community!).
2.15.1.5. 5. Can you give me an idiot-proof step-by-step description of what I have to do to
get one (or several) of your patches on my dBOX?
Short answer: No. Because there is no such thing. Slightly longer answer: Main steps are:
Checking out the sources of the CVS, applying the patch(-es), configuring, compiling,
possibly customizing, building an image, flashing it.
2.15.1.6. 6. I don't know anything about this Unix/C crap. How much effort would it take to
learn do all this?
Consider it as getting into a new hobby. If you have no previous experience, it will
probably take months before you have successfully built and flashed your first working
image. Don't want to scare anyone away...
2.15.1.7. 7. Patching and compiling is sooo complicated, can't you provide a binary?
In some cases (like zapit) this makes sense. For programs that changes almost daily (like
Neutrino) this would make no sense.
2.15.1.8. 8. Ok, I have a binary (e.g. zapit). I use an image that I want to keep using. How
can I put the new binary into my image?
First of all: if your image is considerably different from the current CVS, it may not work
at all, since the API and the communication between the programs tend to change fairly
Page 103
Built with Apache Forrest
http://forrest.apache.org/
Private Site
often. If your image has its root filesystem writable (so-called jffs2-only-image), you can
just overwrite the old file (after making a backup :-) with the new one. Unfortunately, this
is seldomly the case :-(. The images with non-writable root filesystem have their /var
file system writable. It may be possible to put your binary there (say in /var/bin), and
somehow tell the system to look for it there. If also this in not feasible, you have to
extract the root file system partition, transfer it to a PC, unpack it, modify the unpacked
file system, make a new file system, transfer it to the dBOX and flash that partition. How
to do this is outside the scope of this FAQ.
2.15.1.9. 9. Where does the name "Barf" come from?
"Barf" is one of the main characters in one of my favorite movies of all time, Spaceballs
by Mel Brooks. In today's English, "to barf" means to vomit or puke (literally or
symbolically). Googling for "barf" also gives a number of acronyms.
3. Home Theatre
3.1. My Home Theater Page
3.1.1. Revision history
Date
Description
2005-05-23
Initial version.
2005-12-21
Added initial Mk 4 information including photos.
2006-02-24
Integrated the Mk 4 stuff. Put mk3, HD, remote
control, and DVD Audio in separate pages.
General fixes.
2007-06-18
Updated Sanyo projector including photos.
Moved Home automation and Remote Control
(previously "Remote Control"). General fixes.
(Actually, this version was never published...)
2009-07-19
Major reorganization. Moved most stuff to
separate pages. Still much left to do.
3.1.2. Introduction
High-tech Audio/Video reproduction is a fascinating hobby. It encompasses "Hi-Fi"
(audio only). It is hard to find a good one-word summary, but the word "Home Theater"
(and variations in other languages, for example in German "Heimkino") has gained
widespread usage and acceptance.
I avoid the term "high-end", since, to me, this is just too close to voodoo and senseless
money destruction—cables in the three or four digit price range, to be (in the case of
Page 104
Built with Apache Forrest
http://forrest.apache.org/
Private Site
loudspeaker cables) burned-in (or, in the case of even-more expensive burn-in-free
cables) not needing burn-in.
On these pages, I present "my hobby". A superior sound and a superior picture is of
course part of the goal. Just as well as light, remote control and home automation,
decoration, even flowers. But it is not a matter just of buying sufficiently expensive
components, but also of technical problem solutions, since often the desired solution
cannot just be bought, at least not within the budget of a mortal. An above all, everything
must be combined with a personal style and taste, which does include more than just the
technical elements.
Of course, high-quality equipment is not cheap. However, achieving the goal within a
reasonable budget is a challenge. Also, I often try to (re-)use old equipment, repairing
and/or modernizing if necessary and/or desired. Or to modify equipment beyond its
original capacities.
Said many times before: Enjoying fantastic movies and music within the comfort of your
own four walls does have its thrill.
Oh, by the way: High-tech, movies and music are not everything. For example books are
much easier to transport, and requires very little resources. To me, there are few things
the world needs less than, say, the possibility to watch movies on the beach on a mobile
phone display...
3.1.3. Articles and Links
The bulk of this previously very long "page" has been put into different articles, listed
below. Note that issues concerning remote control and home automation has been moved
to its own section.
3.1.3.1. On the development of the home theatre
These articles describes different stages of the evolution of the home theatre.
• Mk 0. The Dawn of Man.
• Mk 1. The Pro Logic/Laserdisk Period.
• Mk 2. The 5.1/DVD Period.
• Mk 3. The big-screen period.
• Mk 4. Real loudspeakers.
• Mk 5. High Definition. Present setup.
3.1.3.2. Different projects
Here some articles are collected, describing experiences, and, to some extent, opinions:
• On 2+2+2 multichannel setup. (Planned)
• An ir-controlled high-quality analog 8-channel audio switch.(In preparation, see this
forum contribution (in German) in the meantime.)
Page 105
Built with Apache Forrest
http://forrest.apache.org/
Private Site
•
•
•
•
•
•
•
•
A simple loudspeaker relay switch box. (In preparation, see this forum contribution
(in German) in the meantime.)
High-Definition (from 2005, thereby highly obsolete, for historical interest only.)
Multichannel Music, DVD Audio, and SACD. (Needs updating)
Fixing the Wellington Scart switch ("Vivanco AV Control 5")
Ipod docks (Planned)
Bedroom and kitchen (Planned)
Work desk sound (Planned)
Multimedia Shelf
3.1.3.3. External internet resources
In other places on this site, I mention several Internet resources, that has somehow been
useful for me, and I feel I can recommend. Here are some more. Links related to home
automation and remote control are presented on the corresponding page.
• beisammen.de. Qualified German language discussion forum. I participate using the
nickname "Barf". Very low tolerance level against "silliness" in all forms.
• avsforum.com America high-volume home theater forum
• Schaltungsdiest Lange Service manuals ("all" languages) for "everything", in general
in printed format. Sold to everyone, very fast deliveries. On the downside, pretty
expensive (typically 10–20 Euro), and the rather weak WWW-site.
• Wiki for the Tuxbox project, aiming for a free, Linux based operating system for the
dBox Satellite/Cable digital receiver. Further comments are given on my dBox page.
Also see My DVD/Bluray/HD-DVD collection.
3.2. Mk 1. The Pro Logic/Laserdisk Period.
3.2.1. Introduction
The new TV and the new video recorder had watered my appetite: In January 1994 I
bought a Pro Logic receiver (Onkyo TX-SV9041), a laserdisk player (Sony MDP 650D)
and, as front Left/Right/Center speakers the Bose Acoustimass 7. Surround speakers also
from Bose (VS100). This (essentially) completes the setup that I refer to as Mk 1. This
was a fantastic feeling. Surround sound! No-one had seen anything like the sound and
picture quality of the laserdisk before. Audio and video completely integrated. Both me
and my friends were deeply impressed. Except for the tiny TV-picture, it was hard to
imagine anything (essentially) better. A drawback was of course the extraordinary prices
and the bad availability of software in form of laserdisks: 100 DM and more were
common. The disadvantage was somewhat lessened by the fact that one of Germany's
largest laserdisk importers (Cinemabilia, seems to have gone out of business now) had
their store located within walking distance from my apartment in Bremen. A big source of
inspiration was the mailing list Europe-LD (and later Europe-DVD).
Page 106
Built with Apache Forrest
http://forrest.apache.org/
Private Site
Time went on, and I started to get annoyed by the tonal quality (or, rather, lack thereof) of
the Bose system. By movies, it could make a considerable amount of Ka-boom, but in
particular for listening to music the un-detailed, bodiless, bass weak and colored
characteristic started to get on my nerves. I learned, what amount of marketing hype goes
into Bose, and what reputation its products hold on Internet (see, e.g. here.) The
surround-speakers VS-100 (VS for "Video-Speaker", a name that Bose apparently have
selected to mean "quality not even attempted") was a simplistic 1-Way system, with the
cheapest parts possible. Not even claimed to be full-range, but a "video speaker". It is
hard to imagine that the cost more than, say, 10 Euro to manufacture. Nevertheless, they
cost 299 DM (German Marks; slightly more that 150 Euro) each!
To fit in optically, the Thorens turntable was painted with a matt black spray paint. (I
cannot stand the walnut look of the 1970's.)
3.2.1.1. PALplus
Some years later, for a limited period of time, PALplus (a technologically quite advanced
trick to send (analog) 16:9-Programs without annoying the 4:3-crowd) was considered the
best thing after sliced bread, and I bought a set-top standalone decoder. (It was available
under several different names, but all manufactured by Nokia.) (This, technologically not
uninteresting, experiment, has been put on the historical garbage dump by digital TV.
Probably very few persons (one of them is me :-) has ever taken advantage, or even noted.
As far as I am aware, this experiment has probably cost the European tax- and
license-payers enormous sums...
Probably not many persons (in Germany) know it, but at the time of this writing (June
2005), German public ("Öffentlich-rechtliche") TV channels (ARD, ZDF, Dritte, 3sat,
arte,...) all send a considerable amount of its 16:9-Programs in PALplus: often several
hours per day and channel.
3.2.2. Details on Mk 1. (Bremen 1994–München 2000)
• TV: Philips Matchline 28ML8805
• Loudspeakers (Left/Center/Right): Bose Acoustimass 7
• Surround Loudspeakers: Bose VS100
• Laserdisk Player: Sony MDP 650D
• Receiver Onkyo TX-SV9041
• VHS Recorder: Panasonic NV-F55EG
• Receiver: Marantz SR-60
• CD Player: Marantz CD42
• Tape Deck: Marantz SD-53
• Timer: Pioneer DT-555
• Turntable Thorens TD150/II (purchased 1972), equipped with SME Model 3009
Series II Improved Arm and ADC XLM MKII stylus.
• "Telefunken" PALplus-decoder (manufactured by Nokia)
Page 107
Built with Apache Forrest
http://forrest.apache.org/
Private Site
•
•
•
Premiere analog pay-tv decoder
Stax SR-X Mark 3 electrostatic earphones, with SRD-6 adapter. Purchased in 1982.
Remote Control: Many, e.g. Lapeschi Telegenius
3.2.2.1. Kitchen, Bedroom, and Computer
The kitchen and the bedroom were powered from the Marantz SR-60 amplifier. The
kitchen had two IQ Mini Lady Loudspeakers, while the bedroom was equipped with
homebuilt so-called Voigt-horns with Louther elements. These were connected in
parallel.
For the computer desk, a pair of JBL Control 1G speakers were used, connected as the
secondary speaker pair of the Onkyo.
3.2.3. Photos (Bremen 1999)
Continue to Mk 2. The 5.1/DVD Period.
3.3. Mk 2. The 5.1/DVD Period
3.3.1. General
In 2000, I,
• felt sick and tired over my music being massacred by Bose,
• felt disappointed with the bad musical properties of Pro Logic matrix surround,
• had stopped buying laserdisks, due to the high prices, nonexistent future, limited
possibilities in comparison to DVD, and bad selection,
• was very interested in real, discrete, five-channel sound (originally "AC-3", later
"Dolby Digital 5.1"),
• wanted to explore the possibilities of the new emerging media, DVD,
• and, finally, was economically healthy again :-).
A new generation was due. I sold the the Bose Acoustimass (I answered a BMW
Newsgroup advert explicitly seeking Bose — so my consciousness is clean! I even gave
the buyer the VS-100's free of charge.). Instead, I bought a set from Nubert, including
active sub-woofer. The receiver was replaced by a Yamaha RX-V 596. The analog
Pay-TV decoder was replaced by a digital receiver, a Nokia dBox II, running the
(infamous) software from Betanova.
The tuner of the old video recorder had somehow developed severe picture disturbances
(the customer service department at the store in Bremen where I originally bought it
claimed it was in order, and recommended me to use a SCART-cable (i.e., problem is not
the device, but that the customer is such a stupid sod, that connects a VCR and a TV with
an HF-cable! For the record: written proofs of these statements exist, including a
Page 108
Built with Apache Forrest
http://forrest.apache.org/
Private Site
Panasonic service center report, in which the tuner is characterized as broken.) As
replacement, the Philips VR-1100 (S-VHS ET) was selected. (It turned out to be
somewhat loud, mechanically.)
As DVD-Player, the Pioneer DV 525 was selected, with a code free/Macrovision free
modification (Macrovision removal was legal then, unfortunately not now) from Chiptech
(out of business since 2006-12-31) was selected.
In this context, I attempted to modify the Laserdisk player (Sony MDP 650D) to be able
to reproduce the AC-3 (nowadays "Dolby Digital") digital sound found on some
laserdisks. During this work, I managed to break the laser disk player severely (a
short-circuit on -12 Volts, that had no sensible fusing, and several secondary problems.
Altogether a large number of components replaced.) Due to problems borrowing a
sensible oscilloscope, and since the number of laserdisks with AC-3 sound I own amounts
to exactly 6, and these titles are available as DVD anyhow, I abandoned that project.
The TV had to be repaired twice due to problems in the vertical deflection, and the
vertical deflection circuit.
With the number of devices increasing, some sort of universal remote control was
absolutely necessary. I have had somewhat mixed experiences with conventional remote
controls, so I bought the most advanced remote control around (in 2000) a Philips Pronto,
the RU 890 model (now obsolete since a long time). See the section on home automation
and remote control.
The Betanova software in the digital receiver was getting increasingly annoying.
Fortunately, some smart people manage to "hack" the dBox II and port the Linux kernel
to it, see my dBox page, and references therein. Since then, my involvement in this
project has dramatically increased.
To reduce power consumption during standby, all devices but the dBox and the VCR
(these may be recording) were connected to a master-slave power outlet box. Thus, in
standby, (except for the VCR and dBox) only the Yamaha receiver (which is known to
have low (< 1 Watt) standby power consumption) is connected to the power.
As a whole, I was very happy with this setup. In particular, the new loudspeakers brought
life to my music collection. I was fascinated by the possibilities of the DVD's, and their
comparatively moderate prices (compared to laser disks).
Due to the large number of devices (at times, also the tape deck and the CD-Player was
connected) and the comparatively small number of inputs to the Yamaha, there was a
need for quite a "creative" connection, see the wiring diagram.
3.3.2. Details Mk 2 (München 2000–2004)
• TV: Philips Matchline 28ML8805
• Loudspeakers:
Page 109
Built with Apache Forrest
http://forrest.apache.org/
Private Site
•
•
•
•
•
•
•
•
•
•
•
•
•
•
•
•
•
•
Front Left/Right: NuBox 460 (2000-07-07)
Center: NuBox CS-3
Surround Left/Right: NuLine RS-3 (using Vogel's VLB 100 wall brackets)
Subwoofer: NuBox AW-850
Laserdisk Player: Sony MDP 650D
Yamaha RX-V 596 (Purchased 2000-07-15)
Receiver Onkyo TX-SV9041
Tape Deck: Marantz SD-53
Pioneer DV 525 Code Free 2000-05-13
S-VHS ET Recorder Philips VR-1100
Nokia dBox II running the infamous Betanova software
Timer: Pioneer DT-555 (only used as clock)
Turntable Thorens TD150/II (purchased 1972), equipped with SME Model 3009
Series II Improved Arm and ADC XLM MKII stylus.
"Telefunken" PALplus-decoder (manufactured by Nokia)
Stax SR-X Mark 3 electrostatic earphones, with SRD-6 adapter. Purchased in 1982.
Bass shakers: 2 Sinus live bass pump
Remote Control: Philips Pronto RU 890
TV-Live Light 13W
Wiring diagram (not showing loudspeaker or power cables).
3.3.2.1. Kitchen and Bedroom
Loudspeakers in the kitchen and the bedroom were powered from the old Onkyo receiver.
A composite-video cable from the Yamaha to the bedroom allowed for certain video
viewing in the bedroom, using a small Philips TV.
For the computer desk, a pair of JBL Control 1G speakers were used, connected as the
secondary speaker pair of the Onkyo.
3.3.3. Photos (Munich 2004)
Continue to Mk 3. The big-screen period.
3.4. Mk 3. The big-screen period.
3.4.1. General
Already since Mk 1 in 1994, I had dreamed of a projector. However, the high prices,
moderate quality, and to a certain extent the very bulky devices made it stay a dream. Ten
year later, in 2004, the prices had gone down and the quality up, and I saw in the
Panasonic PT-AE 500 the device I had been waiting for in 10 years. (Many other persons
obviously felt similarly, so I had to wait almost two months for delivery...). The problem
Page 110
Built with Apache Forrest
http://forrest.apache.org/
Private Site
with shortage of inputs was solved by the new Yamaha Receiver (RX-V 1400). Since that
device supports 7.1 channels, two more loudspeakers (Nubert NuWave RS-5) "were
necessary". I also bought a relatively simple pull-down screen (16:9 format, 2.34 meters
wide, gain 1.0) from Mediastar.
Getting this stuff to work, and work well, turned out not exactly to be "unpacking,
connecting the wires, go". To get the picture right, the screen and the projector has to be
correctly aligned within centimeters, preferably millimeters. A roof lamp had to be
removed. At that time, a sensible, and reasonably priced projector mount did not seem to
be available. Therefore, the projector mount is of my own construction, although I
acknowledge the influence of this thread in AVS-Forum. It consists of a furniture foot (!)
in the shape of a solid iron tube, attached to a plexi glass piece by only one (but large)
bolt (thus it can be rotated). The projector is attached to the plexi glass sheet using four
iron rods with M4 thread. Using wing nuts and springs, position and angel of the
projector can be adjusted. The mount thus provides four degrees of freedom. Total cost:
around 15 Euros.
To make screen, TV, and other devices fit, TV table and Hifi Tower had to be lowered
(thanx to Günter for cutting the steel tubes for me).
The now over 11 years old TV has started to show signs of its age (had had problems with
vertical deflection, see above). The tuner broke, so I replaced it early 2004. There was
also a problem with 16:9-mode, that I managed to fix. (Thanx again to Günter, this time
for lending me the oscilloscope.)
The roller-curtain mechanism for the screen did not stop exactly where I wanted it to. So I
threw it out, and replaced it with an electric tube motor from a local hardware store. For
remote control, it was connected with an IntertechnoCMR - 500 switch, see the section on
home automation. Finally, recently the lower bar was made heavy by a solid iron bar, to
keep the screen hang as flat as possible.
Video signals, in CVBS, S-Video, or YUV format are feed into the Yamaha receiver. In
the first two cases, the signal is up-converted to YUV by the Yamaha, and feed through
three RG-59 cables (20 meters) to the projector. The drawback with this method is that
the format information is lost (no pin-8 on SCART, no WSS on line 23), thus I have to
adjust the aspect ratio of the projector manually.
Both the dBox, and the DVD-player deliver YUV signals to the projector, and RGB
(through the Vivanco SCART-Switch) to the TV. Unfortunately, for both of them, they
cannot deliver YUV and RGB at the same time (the number of Video DA-Converters is
simply not enough). Both of them are "reconfigured" between RGB mode and YUV (+
CVBS)-mode. For the dBox, I have my own shortcut on a certain key doing this with just
one key press (with the standard software this is not possible). For the DVD player, I have
to go into the setup menus, enter the video section, and make the change there. I have two
Pronto macros for this. As with all elaborate macros of this kind, the reliability is not
100%.
Page 111
Built with Apache Forrest
http://forrest.apache.org/
Private Site
Many, or rather the most, of my favorite movies are not 16:9 aspect ratio (or,
approximately the same, 1.85:1), but the wider 2.35:1 format ("Cinemascope"). Thus, it
leaves black "letter-box" bars on the 16:9 screen. To "frame" the picture better, I made
masking boards of solid wood, covered with black velvet-type adhesive film ("dcfix").
Thus, the black bars are not medium-gray, but really black, which adds quite a lot to the
cinematic experience. (Using subtitles, this may have a drawback, in particular if the
subtitles falls partly on, partly outside of the board. This disadvantage can to some extent
be circumvented by the DVD-Player, that is able to adjust the vertical position of the
subtitles.)
I love the wide Cinemascope movies. Unfortunately, it is pretty hard to reproduce at
home (which is probably a part of the explanation of why the movie industry invented it
in the first place :-) — either (for the case of a 4:3 screen), half of the screen is just black
(so-called letter-boxing), or, half of the content is brutally chopped ("Pan and Scan", a
practice just too common both in commercial and public TV. (Really, it is all depending
on whether you consider the TV to be there to show the movie, or the movie to be there to
fill up the TV.)
To do some tuning on the projector in the sense of, e.g., cine4home, the projector was
equipped with a 52 mm red filter KR3.
Unfortunately, I was somewhat unhappy with the usage concept of the Panasonic
projector, see the section on remote control.
3.4.2. Details on Mk3.
• Projector Panasonic PT-AE500 [1280 x 720 resolution] (2004-03-05)
• Receiver Yamaha RX-V 1400 (2004-01-20)
• Loudspeakers:
• Front Left/Right: NuBox 460 (2000-07-07)
• Center: NuBox CS-3 (2000-07-07)
• Surround Left/Right: NuLine RS-3 (using Vogel's VLB 100 wall brackets)
• Left/Right Back Surround: NuWave RS-5 Antrait (2004-01-23)
• Subwoofer: NuBox AW-850
•
•
•
•
•
•
•
•
•
Screen Mediastar 16:9, 2.34 meters wide
Turntable Thorens TD150/II (purchased 1972), equipped with SME Model 3009
Series II Improved Arm and ADC XLM MKII stylus.
Timer: Pioneer DT-555 (only used as clock)
TV: Philips Matchline 28ML8805
Laserdisk Player: Sony MDP 650D
DVD Video/Audio Player: Panasonic S75. Regional Code free (using a special remote
control).
S-VHS ET Recorder Philips VR-1100
Nokia dBox II running Tuxbox
"Telefunken" PALplus-decoder (manufactured by Nokia)
Page 112
Built with Apache Forrest
http://forrest.apache.org/
Private Site
•
•
Stax SR-X Mark 3 electrostatic earphones, with SRD-6 adapter. Purchased in 1982.
Remote Control: Philips Pronto RU 890 (purchase 2000-09-05)
•
•
TV-Live Light 13W
Vivanco Control 5. Modified.
3.4.3. Photos from Mk 3
Continue to Mk 4. Real loudspeakers.
3.5. Mk 4. Real loudspeakers.
3.5.1. General
I was by no means unhappy with the sound of the NuBox speakers, however, I felt more
could be had. So I ordered new front and center speakers, namely Nubert's top-of-the-line
NuWave speakers. These were the NuWave 125, and the center NuWave CS-65
(delivered on 2005-08-01). First, I switched the surround left/right and the back surround
speakers, using the RS-5s as surround left/right speakers.
The difference to the previous setup was stunning. In particular, the precision and the
sheer power was a clear indication that "size does matter". The homogeneity of the five
NuWave speakers was also superior to the previous setup.
Just as an experiment, I tried the old large NuBoxes as surround speakers — and was
again surprised, this time how much better multichannel music sounded with large
speakers also in the back. For serious multichannel music listening, small surround
loudspeakers like the RS-5 are simply not acceptable. The drawback with the experiment
setup was: the homogeneity was broken; the NuBoxes could not match the precision of
the NuWaves. Also, there was no way to accommodate boxes of that size at the required
position in the apartment — I definitely wanted wall-mounted speakers. I ordered two
NuWave DS-55 (delivered 2005-10-13), which turned out to tonally match the from
NuWaves perfectly, and have bass power approaching that of a "big box". Wall-mounting
a 16 kg speaker is not really a trivial endeavor. However, Vogel's VLB 200 wall mounts
turned out to be perfectly capable for this. Also the design matches the NuWaves. See the
photographs below.
Also the design of the NuWaves suits my style much better than old wannabe-wooden
NuBoxes. I do not like loadspeakers pretending to be pianos. The NuWaves say to me:
"Hey here I am, made of metal and synthetic materials, and I am proud of that. I am not a
piano, but a loudspeaker!". According to this, the look of the old subwoofer Nubert
AW-850 did not fit to the new NuWave speakers. so I made it black by using
self-adhesive foil (see the photos). Although not perfect, I consider the result quite
acceptable.
Most cables have been replaced by Clicktronic products. Also the Stax Headphone driver
Page 113
Built with Apache Forrest
http://forrest.apache.org/
Private Site
unit has been replaced by the Stax SRD-7 (bought on eBay). The body shakers in the sofa
(now powered from the "computer" amplifier) have been re-enabled. The Thorens
turntable was tuned again, with a new stylus, new drive belt, and new paint.
The old center and surround speakers have been moved into the bedroom setup, which is
now 5.1. The old front speakers (NuBox 460) have been sold.
The Nokia dBox was modified to, among other things, provide separate YUV-Outputs.
This modification is described in detail in this article.
To switch between analog multi channel sources, together with some additional
possibilities, a switch box was constructed, see this article.
In November 2006, I replaced the Panasonic projector by the slightly more modern (but
already by the time of purchase not quite up-to-date) Sanyo PLV-Z4. This is intended to
be in use until "Full HD"-projectors (1080p/24p) economically accessable. The Panasonic
now resides with my brother.
A projector mount was constructed along the same lines as the previous one, however
with the board in plywood, covered with adhesive foil in blackwood look (see photos).
The projector is connected through YUV-cables, as with the Panasonic. The
DVD-DVI-cable has been replaced by a DVI-HDMI-cable (for the HPTC). Additionally,
there is a serial connection, which I intend to describe in detail here.
The new Sanyo offers considerably better contrast, and a much better usability concept.
On the downside, Panasonic's advertised "smooth screen technology" is obviously not just
advertisment; close to the screen the "chicken net effect" is much more noticable than
with the Panasonic.
3.5.2. Details
• Projector Sanyo PLV-Z4 [1280 x 720 resolution] (2006-11-23)
• Receiver Yamaha RX-V 1400 (2004-01-20)
• Loudspeakers:
• Front Left/Right: NuWave 125, anthracite (2005-08-01)
• Center: NuWave CS-65 anthracite (2005-08-01)
• Surround Left/Right: NuWave DS-55 anthracite (2005-10-13) (using Vogel's
VLB 200 wall brackets)
• Left/Right Back Surround: NuWave RS-5 anthracite
• Subwoofer: NuBox AW-850
•
•
•
•
•
Screen Mediastar 16:9, 2.34 meters wide
Turntable Thorens TD150/II (purchased 1972), equipped with SME Model 3009
Series II Improved Arm and ADC XLM MKII stylus.
Timer: Pioneer DT-555 (only used as clock)
TV: Philips Matchline 28ML8805
Laserdisk Player: Sony MDP 650D
Page 114
Built with Apache Forrest
http://forrest.apache.org/
Private Site
•
•
•
DVD Video/Audio Player: Panasonic S75. Regional Code free (using a special remote
control).
S-VHS ET Recorder Philips VR-1100
Nokia dBox II running Tuxbox
"Telefunken" PALplus-decoder (manufactured by Nokia)
Stax SR-X Mark 3 electrostatic earphones, with SRD-7 adapter. Purchased in 1982,
adapter in 2005.
Remote Control: Philips Pronto RU 890 (purchase 2000-09-05)
Cables mainly Clicktronic.
•
•
•
TV-Live Light 13W
Vivanco Control 5. Modified.
Analog 8 channel switch.
•
•
•
•
3.5.3. Photos (2005--2007)
Continue to Mk 5. High definition.
3.6. Mk 5. High definition.
3.6.1. General
I had previously done quite a bit of experimenting with high definition videos using a
Windows PC and movies on DVD-Rom in Windows media format, see this article
(which, although the content is severely obsolete, represents a historic standpoint). From
that article it should be clear, that getting a real high-definition setup was a must. Also, in
2007, HD-DVDs and BluRay discs appeared, and I purchased a BluRay player (Samsung
BDP 1400, still in use).
For switching HDMI-sources, and converting between digital and analog video, a new
receiver was needed. For me, the possibility to integrate it into an automation systems
was essential. All AV-Receivers in the "midrange" price segments come with an RS232
control port. However, I considered Ethernet to be a vastly superior solution. It turned out
that several AV Recivers contained Ethernet interfaces for Internet radio and streaming,
but, except for one extremely expensive device, only the Denon was controllable from
Ethernet. For this reason, the Denon AVR-3808 (later per software upgraded to
AVR-3808A) was selected.
To complete the (full) HD setup, a full HD projector was necessary. In January 2008,
affordable projectors were available, and I bought a Sanyo PLV-Z2000 with
ISF-Calibration. At about the same time, the destructive "format war" ended. As a result,
the prices for both HD-DVD players and discs plummeted, and, dancing on the grave of
HD-DVD, I bought a player (Toshiba HD-EP30) as well as fairly large number of
HD-DVDs, all to prices unthinkable while the format war lasted...
Page 115
Built with Apache Forrest
http://forrest.apache.org/
Private Site
Not without sadness, I retired the old TV, and bought a new LCD TV. It hangs on the
wall using a Vogels wall mount. The old TV table has also been retired, thus the center
speaker is also mounted on the wall, using wall brackets intended for a microwave oven!
The DVD player was replaced with an Oppo DV-983H, enabling, among other things,
SACD and better possibilities for integration in the automation systems through the
bidirectional RS-232 port.
To my disappointment, Nubert decided to discontinue the NuWave series. At this time, I
ordered two RS-5 (dipole) surround speakers to complete the 2+2+2 setup.
To switch between analog multi channel sources, together with some additional
possibilities, a switch box was constructed, see this forum contribution. However, since
modern HDMI-connections can transfer e.g. DVD-Audio or SACD formats losslessly, its
use is nowadays more limited.
It is planned to replace the Samsung Bluray player by an Oppo BDP-83 in the near future.
The system can be controlled over my LAN network, using different Ethernet-IR
gateways etc. This will be the subject of a future article.
3.6.2. Details
• Projector Sanyo PLV-Z2000, ISF-Calibrated (2008-01-25)
• Receiver Denon AVR-3808, upgraded to 3808A (purchase 2007-10-12, upgrade
2008-11-05)
• HD-DVD Player Toshiba HD-EP30, code free (2008-03-25)
• Bluray Player Samsung BDP-1400
• OPPO DVD player DV-983H, code free (2008-05-31)
• Loudspeakers:
• Front Left/Right: NuWave 125, anthracite (2005-08-01)
• Center: NuWave CS-65 anthracite (2005-08-01)
• Surround Left/Right: NuWave DS-55 anthracite (2005-10-13) (using Vogel's
VLB 200 wall brackets)
• Left/Right Back Surround: NuWave RS-5 anthracite
• Height: NuWave RS-5 anthracite (2008-04-29)
• Subwoofer: NuBox AW-850
•
•
•
•
•
•
•
•
Denon ASD 11R Ipod dock (2008-08-26)
Screen Mediastar 16:9, 2.34 meters wide
Turntable Thorens TD150/II (purchased 1972), equipped with SME Model 3009
Series II Improved Arm and ADC XLM MKII stylus.
Timer: Pioneer DT-555 (only used as clock)
TV: Philips 37PFL9603 (2008-08-27)
Vogels EFW6345 TV wall mount
S-VHS ET Recorder Philips VR-1100
Nokia dBox II, with hardware modification, running Tuxbox
Page 116
Built with Apache Forrest
http://forrest.apache.org/
Private Site
•
•
•
•
•
Stax SR-X Mark 3 electrostatic earphones, with SRD-7 adapter. Purchased in 1982,
adapter in 2005.
Remote Control: Mainly UFC-7781 (One for All OFA Digital 12) (2008-04-08)
Cables mainly Clicktronic.
Selfmade analog 8 channel switch; an article is planned, see this forum contribution
(in German) in the meantime.
Selfmade loudspeaker relay switch box; article planned, see this forum contribution
(in German) in the meantime.
3.6.3. Photos
Photos will appear shortly.
3.7. High definition video, view of 2005
Note:
This article was written in 2005, as both BluRay and HD-DVD were unavaiable. The content is therefore highly
irrelevant with respect to today's problems. Nevertheless, I think my thoughts from 2005 are quite (historically)
interesting, so I decided to leave it unchanged (except for this note).
3.7.1. General
In a setup like the above described, there is a bottleneck: the resolution. The NTSC, and
later, the PAL TV standard were established in the 1950s and 1960s. (Strictly speaking,
this is wrong: NTSC and PAL denotes how the color information is encoded, not the
parameters like the number of lines etc. However, by convention the traditional parameter
values are referred to as "NTSC" or "PAL".) While the sound of a setup like the above
describe is at least equal to all but the very best cinemas, the resolution is not really
adequate. Even the simplest digital camera, and, since some time, even the cameras of
camera-equipped mobile phones, provide higher resolution. A visit to "any" local movie
theater will also confirm this. Fortunately, improvement is on the way: HDTV. HDTV
comes in three flavors:
• 720p (1280 x 720 pixels in progressive scan),
• 1080i (1920 x 1080 pixels, interlaced,
• 1080p (1920 x 1080 pixels, progressive scan,
all in aspect ratio 16:9. The frame rate may be different — a movie fan like myself find it
slightly disappointing that 24 pictures per second is not preferred, but the
NTSC/PAL-compatible 50/60 frames per second.
In the US and in Japan, regular TV transmissions in HDTV already takes place. In
Europe, there have some test transmissions. The German pay-tv provider Premiere has
announced three HD-Channels (documentation, sport, movies) for November 2005.
However, many details are unclear. However, for a movie fan like myself, high-quality
Page 117
Built with Apache Forrest
http://forrest.apache.org/
Private Site
movies for purchase on a "DVD-like medium" is of course the first priority. This is, to a
certain extent, already reality:
In the Internet, there are many places where HDTV-demos can be downloaded: for
example the Windows Media (9 or 10) from Microsoft and from DivX. There are several
stunning demos, both in 720p format and in 1080i/1080p format. They can be played on a
powerful PC. There are also some DVD's in Windows Media format available. The first
(?) was the Terminator 2 Ultimate Editon. Unfortunately, this shows the Digital Rights
Management (DRM) biting, prohibiting play unless you are in the possession of a
North-American IP-number!
Later, the IMAX Corporation released a number of attractive IMAX movies (or rather,
documentaries), in both 720p and 1080p format (Amazon, Stormchasers, Journey into the
Amazing Caves, Discoverers, Dophins, The Living See, Step into Liquid (Location-based
DRM protection), Coral Reef Adventure, Speed, The Magic of Flight). (Search on
amazon.com for "wmvhd".) These are only available in "Region 1", but can be imported
from any international Region-1 store.
In France, (and only there!!) the Taxi 3 movie is available in High-Definition. That
version, almost surely deliberately, comes without non-French language versions or even
subtitles!
High-Def has several attractive movies available as WMV-HD. They contain two 5.1
sound tracks, in German, and in English. The quality is, in general, stunning. (The site
also contains several good technical articles, although their admiration for Microsoft is
annoying.)
Using a highly proprietary format like WMV from Microsoft is of course a problem.
Through the use of Digital Rights Management (DRM), Microsoft can, with its license
policy, decide on who can make a player and who can not. For example, a Linux player,
or more generally, a free software player appears not possible. However, to envision
commercial HD material without heavy restrictions is probably naive.
3.7.1.1. My HTPC
Presently, HD material can only be reproduced on a, fairly "fat" PC (2.4 GHz Processor
etc according to Microsoft, more according to High-Def.) (Often, the term HTPC ("Home
Theater PC") is used.) This is my (present) HTPC:
• AMD Athlon 1800 XP (1533 MHz)
• Motherboard ASUS A7V333 with 1 GiB RAM
• Sapphire ATI Radeon 9600XT Ultimate Edition 128 MiB (passive cooling)
• Creative Soundblaster Audigy 2 ZS (24 bit, 192 kHz, 7.1 channels)
Despite of being far below the requirements for CPU-Power, the HTPC manages to
reproduce the 720p material described above in very satisfying quality.
The video card is connected to the Yamaha receiver using a Y/C (S-Video) connection,
Page 118
Built with Apache Forrest
http://forrest.apache.org/
Private Site
and with the projector using a 7.5 meter DVI-HDMI cable. (I first tried a cheap (10m)
cable, but this caused severe picture disturbances, in particular in blue.) There is a digital
SPDIF coaxial audio cable from the sound card to the Yamaha receiver, as well as an
8-wire analog cable for analog sound to the analog multi-channel inputs of the Yamaha.
Unfortunately, it is not possible (nor desirable) to output the 5.1 (or 7.1) sound from the
WMVHD-Movies through the SPDIF digital output. All channels are connected with
hum-suppressing transformers (from car-hifi) to a special connection box, in detail
described here.
The picture (and sound) of this setup is simply stunning...
3.8. Multichannel Music and DVD Audio
3.8.1. Multichannel Music and DVD Audio
In the early years, fantastic sound meant fantastic music. With the advent of "surround
sound", the emphasis shifted a bit, in the direction of film sound. Also, my present
speakers (Bose Acoustimass 7) did not really make music sound "musically". Surround
sound in the sense of matrix encoded "Dolby surround" also does not "promote"
audiophile music. Already Dolby Digital 5.1 and DTS offer more for multichannel music
(five discrete full-range channels, although with some compression). DVD Audio,
together with Super Audio CD (SACD), presently offers the ultimate in modern
audiophile audio reproduction. DVD Audio offers a sampling depth up to 24 bits,
sampling frequence up to 192 kHz, and up to 6 channels. Instead of lossy compression,
the music date may be compressed losslessly using Meridian Lossless Packing.
DVD-Audio can also contain multimedia content like pictures, lyrics, etc. It can also be
combined with video content, although audio of highest quality/bandwidth and video
cannot coexist (for bandwidth reasons). DVD Audio comes with digital copy protection
that is part of the specification, and not based on deliberately specification-violations and
production of deliberately defect discs (like "copy protected" CD's). SACD has similar
properties, however, it cannot be combined with multimedia content. It is said, e.g. by
Wikipedia, that there is a format war between SACD and DVD Audio. It appears to me
that formats wars in the 2000's run differently than the format war between VHS,
Betamax and Video 2000; also compare the "format war" DVD-R vs. DVD+R.
Unfortunately, DVD-Audio (as well as SACD) has not spread very much. Hardware
vendors are not advertising the format. The music industry seems more interested in
inventing defective "copy protected" "CD's" than to provide the customers with the best
possible quality. How many titles on the present "Top-10" are available as SACD or
DVD-Audio?
The selection of DVD-Audio discs is not overwhelming. Several albums were obviously
made during the quadraphony years, possibly never as such released, and just recently
released in multichannel. Two examples are Chicago II and Deep Purple's Machine Head,
both sound absolutely amazing (not only considering their age): mixed for 4 or 5
Page 119
Built with Apache Forrest
http://forrest.apache.org/
Private Site
channels, instead of up-mixes.
Some of my favorite multichannel DVD-Audios (see My DVD collection) :
• Deep Purple: Machine Head
• Pat Metheny Group: Imaginary Day
• Off Space
• The Crystal Method: Legion of Boom
• Blue Man Group: Audio
• Yes: Magnification
3.9. Fixing the Vivanco AV Control 5
3.9.1. Revision history
Date
Description
2005-05-23
Initial version.
2009-07-19
Added last paragraph.
3.9.2. Fixing the Vivanco AV Control 5
The number of SCART inputs is "always" to small. Actually, with my present setup, with
the Yamaha switching video signals of different types, the need of a SCART input
selector was not there as before. Rather, I needed a signal splitter, so that the dBox could
provide both RGB for the TV, and YUV for the Yamaha, to me forwarded to the
projector. For this, the Vivanco AV Control 5 appeared to be an interesting alternative,
completely RGB(/YUV) capable, with remote control, reasonable band width, and
moderate price tag . I purchased one such on 2004-04-13. Unfortunately, it turned out to
have three problems:
• The infrared remote control protocol is strange, using alternating codes (I fail to see
for what reason)
• The housing was extremely ugly, cheapish silver-plastic look, absolutely incompatible
with the rest of my equipment, or with my taste for that matter...
• The format switching voltage on pin 8 of the SCART plug did not work properly: On
voltages that indicated 4:3 format, although somewhat low but still within the specs,
the device erroneously went into 16:9-mode.
The problem with the silly remote codes was solved with some systematic work with the
Pronto, analyzing the codes. Every key on the remote control can send two different
codes, one "501"-code, and one "701"-command. These are sent alternating in the
following sense: Assume that the first key you press sends a 501-code, and the device
reacts on it. Then the next key, regardless of which, will send its 701-code, the following
its 501-code, and so on. So far so good. However, after having received a 501-command
(701-command), the device is in a state where it only reacts for 701-commands
Page 120
Built with Apache Forrest
http://forrest.apache.org/
Private Site
(501-commands)! I.e., both the device and have an internal two-state state-machine, and
they need to be synchronized for the remote control to work! Needless to say, this makes
the life of users and designers of alternate remote controls more difficult. For usage in an
integrated home-theater environment, it is desirable to put the device in a known state. To
achieve this, I have selected a brute-force method: every key on the Pronto sends both the
501-code and the 701-code. This works reliably, but of course has increased cost
associated, both in time for sending two codes, and in added memory requirement.
The ugly plastic front was replaced by an aluminum angle, appropriately cut and drilled,
bought at a local hardware store. The rest of the housing, together with the aluminum
profile, was spray painted matt black. See pictures.
The incorrect switching voltage was somewhat harder. I emailed the Vivanco hot line (on
2004-04-16) regarding the problem. I received a reply somewhat later, stating that they
(or their manufacturer) were aware of the problem, but (of course...) other manufacturers
were to blaim, because they equipped their boxes with too weak power supplies(!).
Looking deeper into the circuit, it turned out that there were some badly selected Zener
diodes that were responsible for the mis-behavior. Changing these (D32 (for input AV1),
D22 (AV2), D17 (AV3), and D27 (AV4)) to, say, 5.6 Volts fixes the problem. Vivanco
was informed on 2005-02-06.
On 2007-02-15 Samuel Wong of Welkintec Ltd. wrote me a very nice mail and presented
himself as the designer of the device. He described in detail the changes his firm has
made to fix the problem with erroneous switching voltages. He also described the the
used IR protocol as the original Philips RECS 80 codes (SAA3008); Transmission Mode:
Mode 1 (reference time REF equals 3To), Subsystem Address: -100. This protocol is
described in detail here. My project Harc contains an implementation of the protocol (file
recs80.xml), and the device is supported through the device file avcontrol5.xml.
Pictures!
3.10. Modifying the Vivanco AV Control 5
3.11. Buying a shelf off-the-shelf is not for me!
Of course, the collection of media (CD, DVD, Laserdisks, Vinyl LP, Music Cassettes,
VHS Tapes) keeps growing. To keep track of the content, I use an XML-Based system
designed by myself (some day, I may publish it on this page), and for the DVD's the
(paid) version of Invelos' DVD Profiler. Here is my DVD collection online. But of
course, just keeping track of the content is not enough — the "download" generation may
be of a different opinion though — the medias must reside somewhere, physically.
Buying an off-the-shelf shelf (sorry...) was not an option for a person like myself. Instead,
to hold CD's, DVD's and VHS tapes (the number of which should decrease in the future) I
made my own construction, that can be seen in the photo gallery. It is made with iron wall
brackets holding glass boards, with aluminum profiles at the edges.
Page 121
Built with Apache Forrest
http://forrest.apache.org/
Private Site
Some picture of the multimedia shelf in the constricuction phase. For more pictures in
populated state, see the photo galleries of Mk3, Mk4, and Mk5.
3.12. General Photo Gallery
3.12.1. New Photos from my home theater
Some general pictures
4. Home Autom. & Remote Control
4.1. Home Automation and Remote Control
Here, a page on remote control with applications to home automation will occur. Both
theory, practical solutions, as well as program code will be presented.
4.1.1. Revision history
Date
2009-07-18
Description
Initial version.
4.1.2. My project — HARC
• This article describes my current project in the area of home automation and remote
control (in particular infrared remote control).
4.1.3. Articles
• Modifying a Philips Pronto RU890 for 433 MHz RF-control.
• Blinds. Modifying the Rollotron 9200 for remote control.
• Balcony door control with Rademacher Samson. Planned.
• DIY Power IR-Blasters to be used (for example) with the GlobalCache GC-100.
Planned.
• Creating the ultimate hard-button remote for the Tuxbox. Planned.
4.1.4. Downloadable files
• The project HARC, including source code.
• Listing of all possible codes, in Pronto format, for controlling the Intertechno family
of 433 MHz RF controlled products. (Note that (almost) identical units are also sold
by other names, such as Düwi and One for all). The codes are computed, not learned.
• Listing of all possible codes, in Pronto format, for controlling the RS200 series of 433
MHz RF controlled products, once sold by Conrad electronics under their own name.
Page 122
Built with Apache Forrest
http://forrest.apache.org/
Private Site
The codes are computed, not learned.
4.1.5. External links
4.1.5.1. Projects
•
•
•
•
•
•
•
Openremote is a brand new project that looks very interesting and promising. There is
also a large number of similarities between their approach and Harc, like the emphasis
on using open standards and free software. Forum (not very active presently), Twitter,
YouTube.
The JP1-Project and Forum is a very unique project. It aims at complete control over
the remotes made by Universal Electronics (UEIC), which include the brand names
"One For All" and "Radio Shack". Through careful study of its hard- and firmware,
techniques and programs for custom programming a remote, equipped with a 6-pin
connector (on the remote's PCB called "JP1", giving the project its name) were
developed. Thus, an off-the-shelf remote can be taken much beyond its original
capacities. Most importantly, it can be programmed from a computer to generate
"arbitrary" IR-signals. Very knowledgeable when it comes to decoding of obscure IR
protocols.
LIRC (Linux InfraRed Control)LIRC is well established, mature, and active free
software project. It is used in very many free software projects. It contains support for
a large number of infrared senders as well as receivers. There are also a large number
of user contributed configuration files for different IR remote controls and devices, in
general consisting of leaned commands. No forum, however a mailing list exist,
archived here.
Tonto is normally referred to as an alternate configuration ("CCF") editor for the first
generation of the Philips Pronto remote controls. It is a free replacement for the
original ProntoEdit program. Unfortunately inactive since 2004.
"Eventghostis an advanced, easy to use and extensible automation tool for MS
Windows. It can use different input devices like infrared or wireless remote controls
to trigger macros, that on their part control a computer and its attached hardware. So it
can be used to control a Media-PC with a normal consumer remote." Since it is
Windows-only, it is presently of limited interest, at least to me. Written in Python,
there should be hope however... It can be considered as a free (GPL) alternative to
Girder.
Bettyhacks.com (in German). Recently (2006–2007), some German TV channels tried
to establish the "interactive remote" called "Betty". The project failed miserably and
was discontinued in 2007. However, the hardware is quite powerful (see the WiKi
pages of the link) with LCD 160 x 128 Pixel, LPC2220 - 32bit arm7tdmi-s cpu, and 8
Mbyte flash. It can be had "used" for surplus prices. An open-source project "Boop"
was started to write free software for it.
sbprojects.com. This site contains a number of good theoretical background articles
on IR control.
Page 123
Built with Apache Forrest
http://forrest.apache.org/
Private Site
4.1.5.2. Discussion forums
•
•
•
Remotecentral is possibly the premium site for issues like discrete code search.
Hardware reviews etc is unfortunately often of limited interest outside of the U.S.A.,
since much of much of hardware is only available on one side of the Atlantic. Their
collection of IR-codes is vast, but, IMHO, severely flawed: there is a gigantic number
of configuration files available, each one tied to a particular remote control (-family),
containing a lot of irrelevant "cruft" like button layout etc, having a more-or-less
arbitrary name. The codes are in general learned and not always cleanly leaned. (It is
one of the goals of Harc to overcome this problem by proposing a general code
exchange format, using canonical commands names, without the cruft.)
In the German language home theater forum Beisammen, for this topic interesting
postings (some by me using the nickname "Barf") are, somewhat step-motherly,
delegated to the sub-forum "Zubehör" (Accessories). Very qualified in many areas,
remote control is not one of them — not even a dedicated sub-forum exists.
AVSForum
4.1.5.3. Manufacturer
•
•
•
•
•
•
•
•
IRTransNice IR sender/receiver hardware. Forum.
GlobalCachéNetworked IR-Sender etc.
EZControl Networked sending of RF control signals for, e.g., Intertechno switches.
Forum. German only.
Promixis is known for its products Girder (windows based automation tool) and
Netremote (Programmable, network dependent remote control GUI for Windows or
Windows Mobile/CE). Forum.
USB-UIRT. An IR sender/receiver with USB connection. Forum
Philips Pronto
Intertechno. Cheap RF-Controlled switches and dimmers. In German only.
Marmitec. X10 for use in Europe.
4.1.5.4. Some of my forum contributions
•
Review and analysis of the One for all Light Control In German.
4.2. Harc: Home Automation and Remote Control
4.2.1. Revision history
Date
2009-07-18
Description
Initial version.
4.2.2. Introduction
Page 124
Built with Apache Forrest
http://forrest.apache.org/
Private Site
Since 2006 I have been writing software, designed file formats, and classified remote
control signals, revolving around infrared remote control and home automation. It
presently consists of around 18000 lines of source code in Java and XML. Very much
code has been junked or re-written. Since I do not have an immediate goal, and my
possibility to work on the project is limited, I have decided to make the outcome
available.
The present version is copyrighted by myself, and available under the GNU General
Public License version 3. In the future, it may also be available under additional
conditions, so-called dual licensing. File formats are in the public domain, including their
machine readable descriptions, i.e. dtd and schema files.
As a working project name, as well as in the Java module names, I have been using the
name Harc, which is simply an acronym for "Home Automation and Remote Control".
Unfortunately, the name is far too generic to register as an Internet domain. There is even
a Sourceforge project named Harc, (inactive since 2002).
It is proposed to call a user or developer of the system an harc-eologist.
The present document is aimed more at a high-level description of the system, rather than
being a user's manual. It describes most aspects of Harc at most very roughly.
Warning:
This is unfinished, experimental software, aimed at the expert user. "Non-programmers" will probably not find anything
of use herein. No warranty of any kind is given.
4.2.3. Overview of the system
The "system" consists of a number of data formats, and Java classes operating on those
formats. It has been the goal to formulate file formats allowing for a very clean
description of infrared protocols, the commands of devices to be controlled (in particular,
but not exclusively audio- and video equipment), networking components, topology of an
installation, as well as macros. From these very general universal formats configuration
files in other formats, used by other systems, can automatically be generated.
There is also a quite universal GUI that gives access to most of the functionality within
the Java classes. This has been written to demonstrate the possibilities for the expert user.
Convenience and accessibility for the novice user has not been a priority. (Such user
interfaces are conceivable, however.)
Directly supported communication hardware and software are GlobalCache GC-100,
IRTrans LAN (only the LAN version is supported directly), RS232 serial communication
through the GlobalCaché or ser2net, TCP sockets, HTTP, RF 433 and 868 MHz through
EZcontrol T10 as well as through an IR->RF translator like Conrad Eggs or Marmitek
pyramids. Indirectly, through LIRC, a vast number of IR senders are supported.
Page 125
Built with Apache Forrest
http://forrest.apache.org/
Private Site
4.2.4. Data model
Next a somewhat technical description of the file formats will be given. These are all
defined in the form of XML files with a rather strict DTD. The discussion to follow will
focus on the concepts, not on the details. Of course, the semantics of the files are defined
by the DTD file.
Necessary theoretical background on IR signals can be found for example in this article.
4.2.4.1. The command names
Harc has higher requirements on the data quality of its input files than other related
projects. For example, in LIRC, a configuration file consists of a device name, and a
number of commands with associated IR signals. The names of the commands there are
in principle completely arbitrary, and it appears to be common to try to follow the
vendor's naming. In Harc, there is instead a fixed (but of course from the developer
extensible) list of command names, intended to uniquely denote a command for a device.
A command name in principle is a verb, not a noun, and should describe the action as
appropriate as possible. There is, for example, no command power, instead there are
three commands: power_on, power_off, and power_toggle (having the obvious
semantics). Also, a command which toggles between play and pause status may not be
called play, but should be called play_pause.
The names are defined in the XML file commandnames.xml, from which a Java enum
command_t is created through an XSLT style-sheet mk_command_t.xsl. Further
rules for command names are found as comments in that file.
4.2.4.2. The protocol files
By "(infrared) protocol" we mean a mapping taking a few parameters (one of those a
"command number", one a "device number", sometimes others) to an infrared signal. A
protocol file is an XML file describing exactly how the IR signal is made up from the
parameters. The format is quite close to an XML version of the "IRP notation" of the
JP1-Project. It is a machine readable description on how to map the parameters into a
modulated infrared signal, consistent with a technical description. The protocol is
identified by its name. A protocol takes a certain number of parameters, although
sometimes one is defaulted.
At his point, the reader may like to compare this prose description of the protocol we (and
the JP1 project) call nec1 with the XML code in nec1.xml. Note that our description,
using an arbitrary subdevice number, corresponds to the author's "Extended Nec
protocol".
The naming of the different protocols is of course somewhat arbitrary. In general, I have
tried to be compatible with the JP1-Project.
Page 126
Built with Apache Forrest
http://forrest.apache.org/
Private Site
It can be noted that the supported radio frequency protocols are nothing but IR-signals
with the carrier consisting of infrared 950nm light substituted by suitable radio carrier,
typically of 433 MHz.
Ideally, most users should not have to worry with the protocol files. This is only
necessary when introducing a device with a IR-protocol that has not yet been
implemented. At the time of this writing the 17 protocols have been implemented, this
covers the most important ones, but not all known to e.g. the JP1 project.
4.2.4.3. Device files
A device file is an XML file describing the commands for controlling a device. In Harc a
device file truly describes the device and its commands, stripped from all information not
pertaining to the very device, like key binding on a remote, button layout, display name,
the IR blaster it is connected to, location, IP-address, MAC-address, etc. (This is in
contrast to many other systems, like Pronto CCF-files or JP1 device updates).
There may be many different types of commands for the device, like IR, RF signals (this
is, at least for the few cases presently supported, nothing else but IR signals with the
infrared light as carrier replaced by an radio signal, for Europe of 433 or 868 MHz
frequency), commands over serial RS232 interfaces or TCP sockets, or utilizing a WEB
API. Also "browsing" the device (pointing a Web browser to its www server), pinging
and sending WOL-packages are considered commands, as well as suppling power,
sometimes "in reverse direction" (like a motorized blind going up or down). Possibly the
same command can be issued over different media. Some commands may take arguments
or deliver output. For this (and other) reasons, care should be taken to use the "correct"
command names, not just a phrase the manufacturer found cool. Commands are grouped
in commandsets, consisting of commands having its type (ir, serial, tcp,...), device number
etc in common.
IR signals within a device file may contain codes in Pronto CCF format in addition (or
instead) if the structured information (protocol, device number, command number etc).
Actually, "exporting in XML format" means generating an XML file augmented with the
raw CCF codes. In may cases, also so-called cooked Pronto codes (Background, written
by remotecentral) are included, as well as JP1 protocol information.
The device configuration file is processed by an xinclude-aware parser, allowing a certain
include-file structure, that can be used to structure the data.
Example
As an example, consider the Oppo DV-983HDVD player with serial support. This is
supported by Harc with the file oppo_dv983.xml. Its commands can be downloaded
directly from the manufacturer (hats off!), both the infrared and the serial commands. As
can be found in the spreadsheet on the IR code, the device uses the previously mentioned
nec1 protocol, with device number equal to 73. This corresponds to the first command
Page 127
Built with Apache Forrest
http://forrest.apache.org/
Private Site
set in the mentioned device file. The serial commands form another commandset,
subdivided into commandgroups, depending on whether they take an argument and/or
deliver output. Note that some commands (for example play) are available both as IR
and as serial commands.
Other interesting examples are the *_dbox2.xml files (referring to the German dbox
with the open source tuxbox software) , each containing two (sagem_dbox2.xml,
philips_dbox2.xml), or three (nokia_dbox2.xml) different infrared command
sets as well as an elaborate web-api command set. Another very interesting example is the
Denon A/V-Receiver denon_avr3808.xml having several infrared command sets
using the denon protocol (which, ironically, is called the "Sharp protocol" by the firm
Denon), as well as several command sets using the denon_k (Denon-Kaseikyo
protocol). Then there is a large number of "serial" commands, available through both the
serial box as well as through the (telnet) tcp port 23.
Importers
Since Harc is so picky with command names and their semantics, the value of an import
facility is limited — necessary information is simply not there (or is wrong). There exists
a large number of IR signal data in the Internet (for example from LIRC configuration
files, JP1 device updates, or the large collection (mainly CCF) of files on Remotecentral.
Presently, Harc has "importers" for Pronto/CCF and JP1's device upgrades in
RemoteMaster format. I "sort-of" wrote a LIRC-to-CCF translator a few years ago,
possibly I will finish it someday. However, the importers have as their goal to create a
first iteration of a device file (not even guaranteed to be valid XML!) to be tweaked
manually.
Exporters
Writing an exporter is in principle easier. Harc presently can export the IR signals of a
device in CCF format, LIRC-format (either a particular device, or all devices connected
to a particular LIRC server defined in the home file), JP1's device upgrades in
RemoteManager format, as well as the rem-files used by IRTrans. Individual IR-signals
can be exported in wav-format for usage with an audio output driving an IR LED after
full wave rectification, see for example this article This feature is presently not available
through the GUI.
Many other things are possible. I have had some success creating a program that, given an
XML configuration file, creates a full JP1-type image that can be flashed on a URC-7781
(that is, not just one or a few device updates).
4.2.4.4. The "home file"
The protocol and device files described up until now are a sort of universal data base —
common and invariant to every user, at least in principle. In contrast, the "home file"
(possibly the name is not very well chosen) describes the individual setup ("home"). It is
Page 128
Built with Apache Forrest
http://forrest.apache.org/
Private Site
a good idea to think of the device files as class definitions, classes which can be
instantiated one or more times, in that one or more devices of the same class are present
in the home configuration, each having its individual (instance-)name.
It is instructive to have a look at the supplied file home.xml at this point. In the home
file the different devices are defined as class instances. They can be given alternate names
(aliases) and groups can — for different purposes — be defined. For example, this can be
useful for generating GUIs taking only a certain group of devices into account. Gateways
are defined: a gateway is some "gadget" connecting some other media together, for
example, the GlobalCache (among other things) connects the "tcp connector" on the local
area network (lan) to its output connectors, which may be e.g. an infrared blaster or
stick-in LED controlling an IR-device. Devices that can be controlled declare the said
device/connector combination as a "from-gateway", or indirectly as a from-gateway-ref
(using the XML idref facility). (Yes, there are a lot of details here which ideally sometime
should be described in detail.) Thus, a routing is actually defined: how to send commands
to the device in question. Note that there may be many, redundant, paths. The actual
software is actually using this redundancy, thus implementing a certain failure-safeness.
The actual from-gateways, and their associated paths, are tried in order until someone
succeeds in sending the command. (Of course, only to the extent that transmission
failures can be detected: non-reachable Ethernet gateways are detected, humans blocking
the way between an IR-blaster and its target are not...).
Also the interconnection between AV devices can be described here, see the example.
Thus, it is possible to send high-level input selecting commands like "turn the amplifier
my_amplifier to the DVD player my_dvdplayer", and the software will determine
what command (IR or other) to send to what device. (This is later called "select mode".)
There is a great potential in this concept: Consider for example a "Conrad Egg
transmitter", which for our purposes is nothing but IR->RF gateway. Assume that a IR
stick-on emitter is glued to the egg, and connected to a Ethernet -> IR gateway. If there is,
say a RF controlled Intertechno switch, interfacing with an electric consumer, it is
possible to just issue the command for turning the electric consumer on or off, and the
software will find out that it has to send the appropriate IR signal to the IR gateway.
However, writing the configuration file is a job for the expert...
4.2.4.5. Macros
A simple macro facility has been implemented. This is presently in the form of one XML
file, see the example file macros.xml. The syntax was inspired by Lisp.
Macros may call commands (XML element command), wait (delay), "print" a message
(message), call other macros (also recursively) (macrocall), use select-mode
(select-src) and contain conditionals (cond, using the syntax of the Lisp cond).
The recursion facility eliminates the need for a loop construct.
Page 129
Built with Apache Forrest
http://forrest.apache.org/
Private Site
For the convenience of programs acting on the macro file, macros can be bundled into
groups (XML element macros). They may be "public" or "private", the latter can only
be called from other macros.
Macros can be executed by the macro engine (macro_engine.java). However, also
other usages are possible: Being all XML, XML transformations are conceivable which
generate all sort of output, such as creating shell scripts, generating HTML pages, or
macro definitions for smart remote controls like Netremote (using its extension language
Lua).
Macros with arguments are presently not implemented.
4.2.5. Basic Java classes
There is a large number of Java classes operating on the data objects. Some classes
operates on protocols, some on device classes (through device files), some on device
instances in the sense of the home file. In most cases when it is sensible to call use the
class individually, it contains a main-method, i.e. can be called from the command line.
In general, there are a number of arguments. A usage message can be generated in the
usual GNU way, using --help as argument.
4.2.6. Program usage
The main entry point in the main jar-file is called Main. Its usage message reads:
harc --version|--help
harc [OPTIONS] [-g|-r|-l [<portnumber>]]
harc [OPTIONS] <macro>
harc [OPTIONS] <device_instance> <command> [<argument(s)>]
harc [OPTIONS] -s <device_instance> <src_device_instance>
where OPTIONS=-A,-V,-M,-h <filename>,-t
ir|rf433|rf868|www|web_api|tcp|udp|serial|bluetooth|on_off|ip|special,-m
<macrofilename>,-T 0|1,-# <count>,-v,-d <debugcode>,-a <aliasfile>, -b
<browserpath>, -p <propsfile>, -z <zone>,-c <connection_type>
Using the -g (as well as no argument at all, to allowing for double clicking the jar-file)
starts Harc in GUI mode, described in the next section. Invoking Harc with the -r, -l
portnumber starts the readline and port listening mode respectively. Otherwise Harc will
run in non-interactive mode, executing one command or macro, and then exit.
4.2.6.1. Non-interactive mode
If there is only one argument, it is considered to be a macro, and it is attempted to execute
it. (Using "?" as argument, the available macros will be listed.) The -s option enables the
select mode, described previously. Otherwise, the arguments are considered as a device
instance name, followed by a command name, and optionally by arguments for the
command. If the command name is missing or "?", the possible command names for the
Page 130
Built with Apache Forrest
http://forrest.apache.org/
Private Site
device will be listed.
The remaining options are as follows:
-A
switch only audio on target device (if possible)
-V
switch only video on target device (if possible)
-M
use so-called smart-memory on some devices
-h home-filename
use home-filename as home file instead of the default one
-m macro-filename
use macro-filename as home file instead of the default one
-t type
prefer command of type type regardless of ordering in home file (if possible)
-T zero_or_one
for codes with toggles (like RC5), set the toggle value to the argument.
-v
verbose execution.
-d debug code
set debug code. See debugargs.java for its precise meaning. Use -1 to
turn on all possible debugging.
-a aliasfile
Normally, aliases (allowing the software accept e.g. "enter" and "select" as
synonyms for "ok") are taken from the official command.xml. This option
allows the usage of another alias file.
-b browserpath
Allows using an alternative path to the browser used to invoke
browse-commands, instead of the default one.
-p propsfile
Allows using an alternative properties file, instead of the default one.
The following options apply only to the select mode
-z zone
Select for zone zone (if possible)
-c connection
Prefer connection type connection for the selection (if possible)
4.2.6.2. Readline mode
The "Readline mode" is an interactive command line mode, where the user types the
commands one at a time. If GNU readline is available, the extraordinary facilities of GNU
readline allows not only to edit present command and to recall previous commands, but
also for an intelligent completion of relevant names for macros, devices, and commands.
Page 131
Built with Apache Forrest
http://forrest.apache.org/
Private Site
If GNU readline is not available, Harc's "readline mode" will still work, only these
"comfort features" are missing. The semantics of the typed command are like the
non-interactive arguments. There are also some extra commands, introduced by "--";
these in general correspond to the command line options described above. The normal
command line options are ignored.
4.2.6.3. Port listen mode
Starting Harc in port listening mode starts a multithreaded server, listening for commands
on the TCP port given as argument, default 9999. The server responds to a connection on
that port and spawns off a new thread for each connection. It listens to commands on that
port, sending output back. The semantics of the command line sent to the server is the
same as for the non-interactive invocations, with the addition of the commands --quit,
which makes the session/thread close, and --die, which in addition instructs the server
not to spawn any more threads, but to die when the last session has ended.
4.2.6.4. The GUI
The present GUI was not designed for deployment. It does not offer a user friendly way
for allowing a nontechnical user to control his home or home theater. Rather, the goal was
a research-type GUI, to allow the expert user to access to most of the functionality of the
Java classes, without having to look in the Javadoc class documentation.
Hopefully, in the near future, there will be one or more "cool" GUIs for the system. This
need not be additions to the present system, but rather integrations with other
technologies and projects, like Openremote.
The main properties of the present GUI will be described next.
The GUI consists of a title bar with pull-down menus for File, Edit, Options, Misc., and
Help. These are believed to be more-or less self explanatory. There are six panes, that will
be described in order. Many interface elements have a short tool-text help messages,
which are displayed when the cursor is hoovering above the element. The lower part of
the main window is occupied by "the console". The latter is a read-only "pseudo paper
roll console", listing commands, tracing- and debugging information as directed by the
user's selections, as well as command output and error messages.
Except for the mandatory about-popup (which is of course non-modal!), popups are not
used.
The GUI resides almost completely within the file gui_main.java. It was designed
using the Netbeans IDE version 6.5.
The Home/Macros pane
This pane corresponds to using Harc through the Home configuration file. Devices, using
Page 132
Built with Apache Forrest
http://forrest.apache.org/
Private Site
their instance names as defined in the home configuration file are sent commands,
possibly with one argument, possibly returning output in the console. (Commands taking
two or more arguments cannot be sent through the GUI.) The first row is for sending
commands to devices, the second for the select mode, while the third one can execute
macros. Note that both the execution of macros and of commands are executed in
separate threads.
This pane is the only one coming close to "deployment usage". The other panes can be
useful for setting up a system, defining and testing new devices or protocols, or for
"research usage".
The Device classes pane
This pane allows for sending infrared signals (no other command type!) to the using
either a GlobalCache or an IRTrans, that has been selected using the "Output HW" pane,
including output connector to use. The home configuration file is not used. The devices
are called by their class names.
The IR Protocols pane
This pane has more of research character. For a protocol in the protocol data base, a
device number, possibly a subdevice number, and a command number is entered, pressing
the "Encode" button causes the corresponding IR code in Pronto CCF format to be
computed and displayed. Pressing the send button causes the code to be sent to a
GlobalCache or IRTrans that was selected in the "Output HW" pane. Note that it is
possible to hand edit (including pasting from the clipboard) the content of the raw code
before sending. Whenever there is content in the raw code text area, the decode button
can be invoked, sending the content to the DecodeIR library, thus trying to identify an
unknown IR signal (if possible).
Log files from the Irscope program (using .icf as their file extension) can be imported
using the icf button.
There presently appears to be some "glitches" in the button enabling code; click e.g. in
the "raw code" text area to enable buttons that are incorrectly disabled.
The Output HW pane
This pane has three subpanes: GlobalCache (for selecting the GlobalCache, and its output
connector, used on the Device classes and on the IR Protocols pane), IRTrans (dito), and
EZControl. The latter is sort of an interactive toolbox for the EZcontrol T10, allowing to
send different commands, inquiry the status of one or all of the preselected switches, as
well as getting a list of its programmed timers.
The IRcalc panel
Page 133
Built with Apache Forrest
http://forrest.apache.org/
Private Site
This pane is a sort-of spreadsheet for computing IR signals in the Pronto or JP1 context.
The exact way it works is left as an exercise for the reader...
The Options panel
This pane allows the user to set a few more options. On-off options are sometimes instead
available through the Options pull-down menu.
4.2.6.5. Properties
Harc uses a properties file in XML format. For some of the properties there is no sensible
access in the GUI. For this reason, it may therefore sometimes be necessary to manually
edit this file with a text editor (or XML editor).
4.2.7. Interaction with other projects
HARC interacts with other projects within the area. It can be pointed out that in the case
of Java projects, Harc uses unmodified jar-files; in the case of shared libraries (.so or
.dll) these are also used in an unmodified state. In no case, Harc "borrows" code from
the projects. Also, in this way additional functionality is implemented, none of which is
of essential (like import/export of a certain file format). Differently put: should the need
arise to eliminate "derivedness", only minor, nonessential functionality will be sacrificed
(or needs to be implemented anew).
4.2.7.1. LIRC: Linux InfraRed Control
LIRC is a well established, mature, and active free software project. It is used in very
many free software projects. It contains support for a large number of infrared senders
and receivers, some sane hardware designs, other possibly less sane. There are also a
large number of user contributed configuration files for different IR remote controls and
devices, in general consisting of leaned commands. A network enabled LIRC server
consists of the software running on a host, listening on a network socket, containing one
or more IR transmitter or transmitter channels. A client sends requests to, e.g., transmit a
certain command for a certain device type. Since Harc can talk to a network LIRC server
(see source in the file lirc.java), there is a large number of IR senders that Harc in
this way "indirectly" supports. Unfortunately, the configuration files are residing on the
LIRC server only; there is no way to request the transmission of a signal the server does
not know in its data base. (A patch for this was submitted by myself, but rejected by the
maintainer. I plan to make it available on my web server.) From its IR data base, Harc can
generate configuration files for LIRC. There is presently no possibility to import LIRC
files.
Presently, there is no support for selecting output channels on LIRC servers with multiple
IR devices or IR channels. (This can probably be fairly easily implemented using the
Page 134
Built with Apache Forrest
http://forrest.apache.org/
Private Site
LIRC server command SET_TRANSMITTERS and the connector attribute in the
home.xml file.)
LIRC is licensed under GNU General Public License, version 2 or later. However, Harc is
not a derived work; it contains no LIRC code, and is not linked to any libraries. It
optionally "talks" to a LIRC server, but this functionality is entirely optional.
4.2.7.2. JP1
The JP1 project is a very unique project. It aims at complete control over the remotes
made by Universal Electronics (UEIC), which include the brand names "One For All" and
"Radio Shack". Through careful study of its hard- and firmware, techniques for custom
programming a remote, equipped with a 6-pin connector (on the remote's PCB called
"JP1", giving the project its name) was developed. Thus, an off-the-shelf remote can be
taken much beyond its original capacities. Most importantly, it can be programmed from
a computer to generate "arbitrary" IR-signals.
RemoteMaster is a program for, among other things, creating so-called device updates.
These device updates can be produced by Harc, as rmdu-exports. Thus, for an
IR-controlled device in the Harc database, a suitable JP1-enabled remote control can be
made to send the appropriate IR-signals. (There are some details, that will be documented
somewhere else.) RemoteMaster is presented as an interactive GUI program, however, it
can also (although this is not supported) be called through a Java API. Harc presently uses
version 1.89, which is not the current version. Although it seems to lack all copyright
notices, it is referred to as "open source" and GPL.
Another tool from the JP1 project is DecodeIR by John Fine, available under the GNU
General Public License, version 2 or later. It consists of a shared library
(DecodeIR.dll or DecodeIR.se) , written in C++, together with a Java wrapper
(DecodeIR.jar). To build that jar file, also this file is needed. The tool attempts to
decode an IR-signal in CCF form into a well known protocol with device number,
command number, possibly subdevice number and other parameters. See the IR protocols
pane in the GUI.
4.2.7.3. IRScope
Together with appropriate hardware, the Windows program IRScope by Kevin
Timmerman is very useful to "record", and optionally analyze unknown IR-signals
(again, using the same DecodeIR as above). The log files generated by this program can
be directly parsed, see the code in ict_parse.java or the IR protocols pane. The
program is licensed under GNU General Public License, version 2 or later. Harc neither
uses code or links to it, and is not a derived work.
4.2.7.4. Tonto
Tonto is normally referred to as an alternate configuration ("CCF") editor for the first
Page 135
Built with Apache Forrest
http://forrest.apache.org/
Private Site
generation of the Philips Pronto remote controls. It is a free replacement for the original
ProntoEdit program, written by Stewart Allen, licensed under the GNU General Public
License, version 2. Being written in Java, it runs "everywhere", in contrast to the original
Windows-only program. It also contains a Java API. Harc uses the Tonto API (in the
form of the file tonto.jar) to import CCF files, and to generate CCF files for devices
in its data base. (The latter are supposed to be more of a target for aliasing, than a directly
usable user interface.) Unfortunately, the project is (essentially) inactive since 2004.
4.2.7.5. wakeonlan
Harc uses wakeonlan (licensed under the GNU Lesser General Public License), a small
Java library for implementing WOL-functionality.
4.2.7.6. Java Readline
The interactive command line uses the Java Readline (licensed under the GNU Lesser
General Public License), which of course only makes sense when used in conjunction
with the GNU Readline library, which is licensed under GNU General Public License,
version 2 or later.
4.2.8. Future development
The big missing piece is of course the complete lack of a "pretty" user interface.
Minor improvements:
• Replace the DTD based file formats with scheme based. This should be a real
migration to more intelligent formats, not just a syntax change.
• Implement support for multi-transmitter LIRC servers.
• Eliminating the need to configure a LIRC server by finishing and publishing the LIRC
patch described above, and making corresponding changes to lirc.java.
• Scripting facility, for example with Rhino/Javascript. Should this replace or
complement the present macro engine?
Presently, I do not want to commit myself to maintaining Harc. The goal is not, and has
never been, to present a full solution for (for example) home automation, but rather to
produce some reusable data exchange formats, and some useful tools, that fit with other
projects. Nevertheless, I welcome both bug reports, bug fixes as well as enhancements. I
also welcome new configuration files for devices and protocols.
I look forward in particular to a cooperation with the Openremote Project.
4.2.9. Downloads
Download Harc! Relevant third-party libraries in jar-format are included.
A version of libJavaReadline.so for 64-bit Linux can be downloaded here.
Page 136
Built with Apache Forrest
http://forrest.apache.org/
Private Site
Precompiled dynamic libraries libreadline.so and libhistory.so should be
available from any Linux distributor, package name probably readline or so.
Precompiled libDecodeIR (version 2.36) can be downloaded for Windows, 32-bit
Linux x86, and 64-bit Linux x86. Note that these components are needed only to enable
some special functionality of Harc. There is no need to get them just to try things out.
Corresponding sources can either be downloaded from the Internet using URLs published
in this page, or (as required by the GPL) requested from me.
4.3. Modifying the Pronto RU890
4.3.1. Putting a IR -> RF converter inside of the Pronto case
I had purchased some 433 MHz radio controlled equipment from Conrad, like for
example three of their power outlet strip "Funk-Steckdosenleiste RS-300". The problem
was to get the Pronto to generate the radio signals. For this, it turned out to be possible to
use half of a remote control extender set, meant to receive an infrared signal with a
transmitter that transfers it using 433 MHz radio signals. Later, a receiver converts the
signal in infrared again. I removed the receiver board, cut with a Dremel it to fit into the
Pronto, and connected it to the Pronto batteries.
4.4. Remote Control of Blinds
In southern Germany, external blinds made up of heavy plastic profiles are extremely
common. For home theater, these are excellent: they provide an almost perfect darkness,
even with sunlight outside. Electric motors are available, like the Rollotron 9200. Even
remote control, and light sensible controls, are available. The drawback with such
solutions is of course (not counting the price!) that it is unclear if and how such devices
can be integrated in the whole system. For obvious reasons, I wanted to use the
Intertechno CMR-500. This thing switches two "channels" with one connector in
common. The objective was to remotely control the "up" and the "down" button.
Unfortunately, a look at the signals with an oscilloscope showed that there were no
"common" for both "up" and "down". Therefore, I equipped the Rollotron with two reed
relays, feed by 5 Volts. The modification is described in pictures.
On two windows, more space was available, so instead of the somewhat expensive
Rollotron, a cheaper and bulkier device could be used. Also it has the advantage that it
can be controlled by the CMR-500 directly, with no relays.
All five blinds in my apartment are remotely controllable.
5. Software
5.1. Software
Page 137
Built with Apache Forrest
http://forrest.apache.org/
Private Site
Since many years, I am a supporter, and, to some extent, a contributer of free software,
for example in the sense of the Free Software Foundation. This page contains the
following software, written by myself:
• Harc, a system of utilities for Home Automation and Remote Control,
• Gnans, a simulation program for dynamical systems, and
• The Einstein Puzzle, a treatise on a famous puzzle (-family).
In all cases, the software can be used, redistributed, modified etc in accordance with the
GNU General Public License.
5.2. Gnans
5.2.1. Digging in the Closet
So, I decided to make this 13 year old (first version) program available again. (With some
Googling effort, it was probably possible to find the, up until now, most recent version,
1.6.1, somewhere on the web.) In particular, to make the necessary modifications to make
it compile in a modern GNU/Linux environment. (It was more work than I expected :-\ ).
This version only "supports" GNU/Linux, but it should not be awfully hard to get to work
on other similar system.
Some aspects of the program (in particular the GUI...) look awfully dated now. Still, there
is a sound core, and, to my knowledge, there is no, and has never been, any other free
software offering this functionality (Scilab?).
5.2.2. Limitations and Bugs in the Modern-Day Version
Let's make one thing clear: The main reason for digging up Gnans again is to make the
source available for the Community to use, develop, and learn from. It is not to provide
those who cannot afford Simulink with a free alternative, or to provide Octave with "its
Simulink".
Unfortunately, in the modern-day port I did not succeed to get the classes in gnanslib to
work. This means the classes delay, histo, and delay. Possibly worse, the
"close-window"-functionality (i.e. the closing by clicking the closing icon on the window,
nowaday (when even Gnome and KDE developers try to re-engineer Windows) denoted
by "x". That is, clicking the close-window icon does not work as expected, it kills the
program (without even cleaning up) instead of closing the present window. Therefore,
don't do it!. (This is not a "bug" but a "limitation". The functionality was not common
when the program was developed, and I have never implemented it.)
5.2.3. What is this thing anyhow?
Gnans is a program (and language) for the numerical study of deterministic and stochastic
Page 138
Built with Apache Forrest
http://forrest.apache.org/
Private Site
dynamical systems. The dynamical systems may evolve in continuous or discrete time.
Gnans loads a system, a definition of a dynamical system in a special, equation oriented
language. The description consists of declarations of states etc, and equations describing
the dynamics of the system. As an advanced feature, arbitrary C++-code may also be
contained in the system description. Gnans sorts the equations, translates them into C++,
which is subsequently compiled and linked into the running program. It is then able to
solve the system equations numerically with the speed of a compiled (as opposite to
interpreted) program. Several numerical integrators, also for stochastic differential
equations, are provided. Gnans has an intuitive user interface, making it possible control
the program and to change all relevant parameters using an intuitive point-and-click
interface. In this operation, it can be considered ``an initial value problem (IVP) engine''.
Using a simple script language, this IVP-engine can be programmed. As a by-product,
this offers the possibility of a command line interface. (Actually, as another by-product,
Gnans contains a rather powerful pocket calculator!) Simple interactive two-dimensional
plot routines are provided.
Gnans is copyrighted, but freely distributable under the Gnu General Public License.
The GCC C++ compiler is required, even if you just get the binaries.
The current version is version 1.6.2. Click here for a list of changes from the previous
version.
Download either the source or the a binary Linux distribution. Both contain full
documentation, except for some large PostScript figures, which are only "needed" for the
printed manual. These figures are available in a separate file. (These are the same as
included in the 1.2 distribution, so there is no need to get them again if you already have
them.) Pick up the formatted version only in you cannot print the documentation
otherwise. In that case, you don't need the figures.
5.2.4. Downloads
File
gnans-1.6.2.tar.gz
Version
1.6.2
Size
Description
1.4 MB
Source for the current
version.
gnans-1.6.2-bin-i686-suse-linux.tar.gz
1.6.2
0.5 MB
Binaries of the current
version.
gnans-doc-pictures.tar.gz0.97
1.0 MB
Postscript figures for
the manual.
gnans.pdf
0.97
4.1 MB
Manual in PDF format.
gnansdoc-0.97.ps.gz
0.97
1.2 MB
Manual in PostScript
format.
Page 139
Built with Apache Forrest
http://forrest.apache.org/
Private Site
5.3. The Einstein Puzzle
5.3.1. Revision history
Date
Description
2005-05-23
Initial version.
2007-01-22
Added the parkinlot problem. Some minor
improvements. Note on Wikipedia.
Note:
The original version of this article was witten on 2005-05-23, and referred to a Wikipedia-Article for the "original"
version of the problem and some historic notes. Since then, the said article has been thoroghly rewritten, probably to the
better. Among other things, the article has been renamed to Zebra_Puzzle, and another formulation is considered
"first known publication". Also see the discussion page. I have selected not to rewrite the present article to take these
changes into account.
5.3.2. The Puzzle
The so-called "Einstein's Puzzle" is a well-known logical puzzle. Commonly, it is claimed
to have been invented by Albert Einstein, and it is also claimed that he should have stated
that only 2 percent of the world's population was able to solve it. There is no authoritative
source for these claims. Likely, the claims were invented by the
"everything-is-relative"-people. Nevertheless, I will call a puzzle of this sort "an Einstein
puzzle" for the rest of this article.
There are many, more or less "isomorphic", versions of "the puzzle". The version in
Wikipedia (which I have allowed myself to copy here), goes:
• There are 5 houses. each a different colour.
• A person of a different nationality is in each house.
• The 5 owners each drink a certain drink, each smoke a certain brand of cigarette, and
each have a certain pet. No owner has the same pet, smokes the same brand of
cigarettes nor drinks the same drink as any other.
• The question is: Who has the fish?
CLUES
• The British man lives in the red house.
• The Swedish man has a dog for a pet.
• The Danish man drinks tea.
• The green house is to the left of the white house.
• The owner of the green house drinks coffee.
• The person that smokes Pall Mall has a bird.
• The owner of the yellow house smokes Dunhill.
• The person that lives in the middle house drinks milk.
Page 140
Built with Apache Forrest
http://forrest.apache.org/
Private Site
•
•
•
•
•
•
•
The Norwegian lives in the first house.
The person that smokes Blend, lives next to the one that has a cat.
The person that has a horse lives next to the one that smokes Dunhill.
The one that smokes Bluemaster drinks beer.
The German smokes Prince.
The Norwegian lives next to a blue house.
The person that smokes Blend, has a neighbour that drinks water.
There have been many versions around, in many cases simply with other names of some
of the involved properties. More significantly, most versions involve only 14 clues, not
15 as above. With the program presented later, it is easy to show that one rule (but not
two!) can be omitted, while still guaranteeing a unique solution.
I was fascinated by this puzzle already as a child, (This is the version that I had) and I felt
immensely proud when I succeeded to solve it. I have seen several different versions of
such puzzles, some very similar, or even "isomorphic" (equal after a relabeling of
properties or property values). This article presents four different Einstein-puzzles, clearly
non-isomorphic. They differ in their number of properties (= p) and their values (= v), the
type of predicates in the rules. The puzzle "Table" below also uses subsets of values (for
example: from the property first_name the sex of the person can be inferred. Some rules
state that a certain property-value pair is associated with a certain sex.)
It also deserves to be pointed out, that all of the puzzles originate in verbal form, and the
translation to properties, values, and predicates in some case is quite non-trivial, and
involves other than pure logical reasoning. In the original problem, it is (somehow?!)
obvious that "neighbor" means immediate neighbor, an interpretation that is not the same
as the meaning in normal day use (nor the meaning in mathematics). Also, for example,
the German wording of the table-puzzle contains clues (in particular regarding the sex of
the persons), that for someone with only elementary knowledge of the language may not
catch. Even worse, in some cases, cultural interpretations may be implicitly assumed: A
person whose mothers tongue is a right-to-left-language may interpret the statement "The
Norwegian lives in the first house." different from a left-to-right-"speaker".
We define an "Einstein-problem" to consist of
• p properties, each with
• v values, together with
• a number of rules (predicates) which restrict the possible solutions
As defined, an Einstein-puzzle can have zero, one, or many solutions. Of course, a "good"
Einstein-puzzle should have exactly one.
If "position" (in any disguise) is a part of the problem, we will count it to the number of
properties, p. With no rules, it is easy to see that the number of solutions is v!^(p-1). (The
"-1" comes from the fact that one property, which normally can be interpreted as a
position, is used to to "index" a solution.) For the original Einstein puzzle, this number
amounts to 5!^5 = 2.4883200000 * 10^13.
Page 141
Built with Apache Forrest
http://forrest.apache.org/
Private Site
A rule like "The owner of the green house drinks coffee" (we will call such a rule an
equivalence in the sequel) restricts the number of solutions with a factor of v. A rule like
"The person that smokes Blend, lives next to the one that has a cat." is already more
complicated to analyze: If the Blend-smoker lives in one of the two edge-houses, this
nails the cat-owner as his (only) neighbor, if the Blend-smoker does not live in an
edge-house, he has two neighbors, one of them must be the cat-owner. It is easy to come
up with some upper and lower estimates for the number of rules necessary for a unique
solution, but it is probably at most in trivial special cases possible to come up with criteria
for a unique solution. Oh well, we do not know an optimal strategy for chess either... :-)
However, the program presented later can be used to compute the number of solutions for
a particular Einstein puzzle. Thus, e.g., for a problem with a unique solution, for every
rule it can be tested whether it is necessary for the uniqueness of the solution.
We also remark that the property "position" (possibly in some disguise), as opposed to
most other properties, has more structure (for example, it is a totally ordered set, and also
has a metric), and therefore concepts like neighbor, facing, preceeding etc make sense,
which would not make sense on an arbitrary set.
5.3.3. Five Einstein-Puzzles
In the following table, four different, clearly non-isomorphic, Einstein-puzzles are
presented. Clicking on the name will open the puzzle description page. The meaning of
the XML-column will be explained shortly.
Name
XML
Props
Values
Used
Predicates
Subsets
Source
Comment
Einstein
XML
6
5
equivalence,neighbor,
to_right
The
original
puzzle,
according
to
Wikipedia
Doctors
XML
4
4
exclusion
Source:
Uses
this forum, exclusions
(contribution exclusively
from
(sorry :-)
quantumfluff),
which
-
The
Original!
This
version
has
non-minimal
rule set
(15 rules,
while 14
suffice.
For
example,
rule 15
can be
deleted.).
Page 142
Built with Apache Forrest
http://forrest.apache.org/
Private Site
almost
surely is
not the
original
source.
Table
XML
4
8
equivalence,yes
exclusion,
neighbor,
property_in,
gegenueber
From the
The verbal
German
formulations
magazine are
"Die
somewhat
ZEITMagazin".
tricky,
See scan containing
of the
a good
original
deal of the
article.
difficulties,
therefore I
do not
provide a
translation,
but leave
it it in
German.
Elskaren
XML
6
10
equivalence,left_side,
facing,
right_side
exclusion,
neighbor,
not_neighbor
Found in a This is
local
basically a
student
blown-up
magazine version of
"Elskaren" the
for/by the original
electrical
puzzle,
engineering with ten
students
houses
at Lund
instead of
Institute of five.
Technology. Non-minimal
Translated rule set
from
(rules 16
Swedish.
and 27
Scan.
can be
eliminated).
Parkinglot
XML
6
5
equivalence,neighbor,
not_neighbor
Found in
Translated
German
from
student
German.
forum
www.matheboard.de
5.3.4. Making it formal
To be able to solve a puzzle with computer, we first have to translate it to a formal
notation. I have selected to design an XML DTD for this task. Generated documentation
Page 143
Built with Apache Forrest
http://forrest.apache.org/
Private Site
for this DTD is found here. Thus, for a, verbally described Einstein puzzle, an XML file,
valid with respect to said DTD, has to be (manually) written. For example, einstein.xml is
the XML-File in which the problem in the Wikipedia version is formulated. Actually, the
XML-version of the puzzles in the table above, is available through a click in the second
column.
We now give an informal description of the semantics of the XML file. The XML file
first defines the different properties, and their possible values. The used names have to
adhere to the syntax of identifiers in the C language (ascii-letters, digits, and underscore
"_"). If necessary, subsets can be defined here, too. Then a number of rules are defined. A
rule consists of one or more predicates, predicates being equivalence, exclusion,
and if position is among the properties, neighbor, facing, gegenueber,
to_right, and not_neighbor. A predicate takes two or more property-value pairs.
So is the rule "The British man lives in the red house" translated into
<equivalence>
<property-value name="nationality" value="english"/>
<property-value name="color" value="red"/>
</equivalence>
For a property-value in a subset, there is the predicate property_in.
A peculiarity, that somehow sneaked into the code, is that for the property position, the
values are ignored, and instead C-style indexing is used (i.e. starting with 0). For
example, the rule "The person that lives in the middle house drinks milk" should be
translated into
<equivalence>
<property-value name="position" value="2"/>
<property-value name="drink" value="milk"/>
</equivalence>
The DTD also allows for textual information, as well as pictures.
Later, the XML file is translated into a C++-program, that will solve the puzzle. Also, on
this web-site, based on Apache Forrest, HTML-Files, like for example einstein.html, are
automatically generated from the XML-files, with no human inputs.
5.3.5. Programming
The transformation of the XML-File to a C++ program is carried out by a Metamorphosis
script. Metamorphosis is a powerful and generic tree transformation tool from Ovidius. It
is a commercial program, but can be downloaded free of charge.
To run, you need Metamorphosis (any version should do), a C++-compiler (I have only
tried gcc, but there are no special requirements), and make (preferably). Download the
Puzzle Kit from the download section, unpack in an empty directory, make sure
Metamorphosis and the C++ compiler works, adjust the paths in the Makefile, and type
"make".
Page 144
Built with Apache Forrest
http://forrest.apache.org/
Private Site
There are some command line options, most are only of interest for debugging. (See the
code in generic.cc.) However, the command line option -# makes the program give
out all possible solutions; the default behavior of the program is to terminate as soon as
one solution has been found. This option can be used to determine the number of
solutions; in particular to determine the uniqueness of "the" solution.
The execution of most puzzle solvers take only some milliseconds. The "elskaren" puzzle,
due to its larger size, takes somewhat longer: With maximal optimization (this makes a
huge difference for elskaren) it takes 2.3 seconds on my Athlon 1800XP.
5.3.6. Contributions
I would be happy for other "Einstein Puzzles", in particular if they are not isomorphic
with any of the herein presented.
Note:
If you have never compiled C++ programs before, you may need assistance. There is nothing wrong with that, and does
not make anyone stupid. However, I kindly request not to be sent questions on how to compile C++ program, etc.
5.3.7. Downloads
File
Version
Description
Puzzle Kit
2005-05-27
Complete kit with
Metamorphosis script, include
file, XML-Files, and Makefile
C++ Files
2005-05-27
The generated C++ Files
einstein.cc, elskaren.cc,
table.cc, and doctors.cc.
Only for those without
Metamorphosis.
5.3.8. Links
This is of course not the only web page that deals with the Einstein puzzle. Here are some
links, that was not mentioned earlier.
• http://www.mindspring.com/~mccarthys/puzzle1.htmStraightforward, pen-and-paper
type solution.
• http://www.stanford.edu/~laurik/fsmbook/examples/Einstein'sPuzzle.htmlElegant
solution based on logical programming.
• http://www.rakkav.com/homeworlds/brainstem/pages/einstein.htmSome interesting
discussion, in particular on verbal formulations and ambiguity. And, of course, a
solution of the standard puzzle.
6. Misc.
Page 145
Built with Apache Forrest
http://forrest.apache.org/
Private Site
6.1. Miscellaneous stuff
Here are some random ramblings on different themes. The inclusion of a matter here does
not mean that I consider it more important than issues not covered here.
6.1.1. Revision history
Date
Description
2005-05-23
Initial version.
2009-07-19
Renamed from "likes-dislikes" to "misc"
(directory). Reorganized. Removed
http://www.daniel-rehbein.de/urteil-landgericht-hamburg.html
link; it is no longer pertinent in that the sillyness
it argues against is hardly found any more (goal
achieved!). Removed link to
www.amazingcameron.com due to insufficient
up-to-dateness. Added antipolygraph.org,
ternary operator.
6.1.2. Articles
• On the "Kilobyte" and computerists' obsession for power of 2's.
• Modal popups are evil!
6.1.3. Other Items
• The ternary operator (like in days == leapyear ? 366 : 365) is often frown
upon, and considered as bad programming style by some individuals or style guides.
However, as this Wikipedia article shows, when used properly, the ternary operator is
very helpful to write logical, redundancy free code, producing better and more
maintainable code than when avoiding it. My dress code is, if I have a meeting, then
tie, otherwise jeans is actually better than If I have a meeting, then my dresscode is
tie, otherwise my dress code is jeans, since the latter is redundant ("my dresscode is"
is duplicated), and the exterior if-clause hides the ultimate purpose, namely to select a
dress code, not to perform different actions depending on whether a meeting occurs or
not.
• For many of us who are forced to work with MSDOS or Windows, the selection of
the path-component separator, the backslash character "\", is a never ending source of
annoyance, since it violates the established semantics of that character, e.g. within the
C programming language, see Wikipedia. This note contains a plausible explanation.
6.2. On the "Kilobyte" and computerists' obsession for power of 2's.
6.2.1. The misuse of a century-old prefix
Page 146
Built with Apache Forrest
http://forrest.apache.org/
Private Site
In the 1970's, (semiconductor) computer memory got out of the doors of the research
laboratories. Since it is addressed by a finite number of address lines, each carrying a
binary signal, the number of cells in a computer memory chips is almost always a number
that is equal to a power of two. Thus, there was a need for a short form of saying "this
chip contains 1024 memory cells". Since 1024 = 2^10 is close to 1000, the convention of
calling 1024 bytes "1 kByte" was born. Everyone knew that it was strictly speaking
wrong, but the community understood it unambiguously. When computer memory, both
semiconductor memory and non-volatile memory, increased their capacity, words like
"Megabyte" and even "Gigabyte" were born, and, according to the convention, "given"
the values of 2^20 = 1048576 and 2^30 = 1073741824 respectively.
This story has been told many times, Googling gives more that enough hits.
Prefixes like "kilo" have been used in science and technology since centuries, and cannot
just be "redefined" because someone needs another prefix, no more than pi can be
redefined. Since the 1960s they are known as SI prefixes. To provide at least some
intellectual consistency, esoteric rules were invented, like: "It is not `kilo-Bytes', it is
'KBytes (pronounced 'kay-bytes')", writing the "k" large, etc.
Not all computer memory is semiconductor memory, addressed with a number of binary
signals. Hard disk manufacturers (which did not address their drives like semiconductor
memory) sold their products with capacity given in SI Megabytes or Gigabytes, to the
extreme rage of the "1 KByte = 1024 Bytes" fraction, who accused the disk
manufacturers for using "misleading information", instead of their misused and
non-standardized "prefixes".
Psychologically, in such cases, the one claiming that the slightly smaller number is the
correct one, a priori tends to make the more serious impression. The one saying "100
Watt RMS" must be more serious than the one saying "150 Watt music effect", just as "76
kWatt" sounds more serious than "100 Horsepowers". Or the one saying that the hard disk
contains 100 GB instead of 107 GB... (See this footnote for an almost conspiracy-theory
version.)
6.2.2. The "binary prefixes"
So, there was a need for prefixes of the type 2^10n, while leaving the classical SI-prefixes
alone. In December 1998 the International Electrotechnical Commission (IEC) defined a
number of such prefixes in the standard IEC 60027-2, see NIST or Wikipedia. The
following prefixes were defined:
Factor
Name
Symbol
2^10
kibi
Ki
2^20
mebi
Mi
2^30
gibi
Gi
Page 147
Built with Apache Forrest
http://forrest.apache.org/
Private Site
2^40
tebi
Ti
2^50
pebi
Pi
2^60
exbi
Ei
Thus, the usage of binary prefixes using SI-names is, at least now, not only misleading,
but also unnecessary, and should be considered discouraged, see NIST.
6.2.3. Binary is for geeks
Even if we settle for a sensible, common and universally accepted language, calling
different things by different names, the binary prefixes, often is not a natural, or even
good, choice. It is without doubt that it is practical and natural to speak of a "1 GiB"
computer memory or a 32 kiHz clock frequency. However, an advantage of "A one-layer
DVD contains 4.377 GiB" over "A one-layer DVD contains 4.7 GB" is not obvious, or,
rather, not there. But who cares: both these numbers are equally ugly, why should one
ugly number be preferred over the other? However, when we are to do arithmetics, the
difference shows:
Problem 1:
Will a 3.83 GB plus a 870 MB file fit on a 4.7 GB DVD?
Problem 2:
Will a 3.567 GiB plus a 829.7 MiB file fit on a 4.377 GiB DVD?
This is the same problem, but first in base 10 and then in base 2. (There are more
decimals in the second case, but that is not the point.) In both cases, it will fit exactly. In
both cases, the formulation is mathematically unambiguous, and the problem uniquely
solvable. However, in the first case, the answer requires a simple addition, which many
people can do in their heads (even I :-). The second case is not a hard task as a math
assignment, but it feels silly to compute 3.567 + 829.7/1024 to find out if you need one or
two DVDs. Just adding 3.567 and 0.8297 simply gives the wrong answer! The "1.44 MB"
Floppy disk (which has a capacity, not 1.44 MB or 1.44 MiB, but 1.44*1000*1024 =
1.47MB = 1.41MiB, exactly double that of the "double-density" 720MiB floppy disk!)
probably is a victim of the comparative difficulty of making arithmetics in the
base-2-world.
But of course, base-2 to is to computer science what Latin is to medicine...
6.2.4. Other external links
• The Wikipedia article on Kilobyte previously took the same standpoint as this article,
which is probably not correct for an encyclopedia article. Presently, it says "Kilobyte
... equal to either 1,000 bytes (10^3) or 1,024 bytes (2^10), depending on context.",
probably as some compromise. This is bad; it is simply not a statement for which a
consent exists, see the next entry, in particular its Footnote 1.
• This article, written by a 1KB=1024B proponent, quite well illustrates the mess the
you get into with the 1024B interpretation. Of course, this was not the author's
Page 148
Built with Apache Forrest
http://forrest.apache.org/
Private Site
•
intention. Footnote [7] is entertaining ("Nearly everyone (including the experts) gets
this wrong..."). Interestingly enough, the author suggests using "BB" for "billion
bytes" instead of "GB", not taking into account that billion is a word that means
differently in different regions of the world...
A plea for sanity. Comes close to the same article as this one, quite funny.
6.3. Modal popups are evil!
I have been using early windowing systems, in particular the X-Windows system (with
Xt/Athena Widget tools etc). These worked quite well, without resorting to modal
popups. Then Windows started to spread, and with it, the usage of modal popups. I was
immediately repelled by the restrictions these meant. Unfortunately, the usage of modal
popups has spread outside of the Windows world, for example to Java, KDE, Gnome.
A modal popup prohibits the user from any interaction with the application, except for
that popup window. This often feels like an insult to the user, who may have other ideas
of what he wants to do with the program, and the order in which he wants to do it. In
many cases, they simply constitute a usability catastrophe: Assume an error message, to
which the user is expected to react ("cannot write file..."). In order to analyze the problem
(why could the file not be written?), the user want to utilize other parts of the program,
like the help facility. He can't. Because the modal popup is blocking the application. Or
he want to look up "Error E6553-6633-995A2" in the documentation. Problem is that he
has to destroy the information (contained in the modal popup) before he can access the
documentation...
In some cases, modal popups are justified. (fatal errors, ending dialogs,...) In most cases
not. The are just a way of unnecessarily restricting (and annoying) the user. In general,
the more complex a program is, the harder it is for the programmer to anticipate the user's
(sensible) wishes, and the more modal popups should be avoided.
So why are modal popups so widely used? Even by "Microsoft-criticals"? Possibly
because people are used to being forced and do not question? Or because the
programmers were lazy (It should also be said that using modal popups in some cases
makes it easier to write correct programs; when limiting the user's choices, there is less
that can go wrong...)
There is also an issue with program robustness: If a complex application somehow goes
haywire, like generating "many" error popups, possibly in an infinite loop, the
modal-popupper in general must be killed from the OS; a non-modal popupper can more
easily be recovered.
The similarities between modal popups and DVDs UOP is striking: It is like disabling the
Audio-key; "no need to use it, the user can go to the menu and there select his audio
track".
7. All
Page 149
Built with Apache Forrest
http://forrest.apache.org/
Private Site
Page 150
Built with Apache Forrest
http://forrest.apache.org/