1
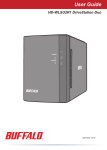
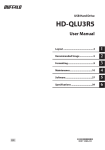
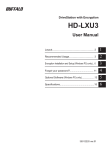
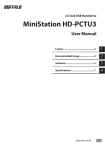
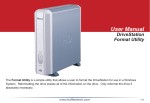
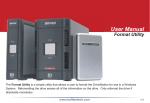
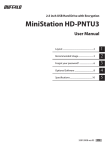
User Guide
HD-WLU3R1 DriveStation Duo
ÐÏ×ÅÒ
ÁÃÃÅÓÓ
EN
35011790 ver.01
Front Panel Layout
Power LED
Power On: blue
RAID Maintenance: purple
Power Off: off
ÐÏ×ÅÒ
Access LEDs
Access: blinking green
Failure: red
Rebuild: blinking red
Power Off: off
ÁÃÃÅÓÓ
2
Back Panel Layout
Power Mode Switch
▲Auto
▼Off
RAID Mode
Button
USB 3.0
DC in
Note: To change between RAID modes, you may use either the RAID
utility or the RAID mode button. The RAID utility is included with the
software on your DriveNavigator CD. For more information on using
the RAID mode button, see the Reference Guide.
3
DriveStation Setup
Congratulations on your new DriveStation Duo! With dual hard drives, the
DriveStation Duo gives you many options for large capacity and easy-to-use
redundancy.
Insert the DriveNavigator CD into your computer’s CD-ROM drive.
On a PC, DriveNavigator should automatically launch.
If it does not, click [Start] and select [Run]. In the Run
dialog, enter “d:\DriveNavi.exe” (where d is the drive
letter of your CD-ROM drive). Click [OK] to continue.
For a Mac, open the CD and click [RaidUtility.dmg] to
begin installation.
Click [Begin Installation]. Click [Next] to
step through the installation. Mac users
can skip this step.
4
The wizard will step you through setting up your DriveStation Duo, configuring
your RAID settings, and reformatting if desired.
The DriveStation Duo may be connected to your computer with a USB
connection.
After completing the setup wizard, your DriveStation Duo is installed and ready to
use!
By default, your Duo is configured in RAID 1 mode. In RAID 1, data can be
recovered even if one of the hard disks in DriveStation fails. However, the total
available space is 1/2 of the maximum space.
If you prefer a different RAID configuration, or if you prefer to use DriveStation
as a single drive, you may use the RAID Utility to change your DriveStation’s
RAID settings. Turn to the next page for instructions on using the RAID Utility.
Alternately, you may change the RAID mode with the RAID mode button as
described in the Reference Guide.
Out of the box, the DriveStation is formatted with FAT32, allowing it to be used
with most common operating systems. If you’re going to use it with programs
that generate filesizes larger than 4 GB, such as backup software, reformat the
DriveStation with NTFS or Mac OS Extended.
By default, all drives on the DriveStation are divided into 2 TB partitions. This
allows older versions of Windows, such as 32-bit Windows XP and Windows
Server 2003, to read the drives without additional software or service packs.
Users of newer operating systems may wish to re-partition the DriveStation with
larger partitions, but this is not recommended for 32-bit Windows XP. Windows
Server 2003 may be able to read larger partitions after the latest service pack is
applied.
5
Using the RAID Utility
The RAID Utility allows you to configure your DriveStation Duo in several modes:
Normal mode - Appears to your computer as two separate hard drives. Note that
normal mode only works with a USB connection.
Spanning mode - Appears to your computer as one large hard drive.
RAID 0 mode - Appears to your computer as a single drive. Higher performance
than Spanning mode.
RAID 1 mode - Appears to your computer as a single drive. The second drive is
an exact copy of the first drive, for redundancy.
Notes:
・Changing the mode of the drives in your Duo will erase all data on them! Back
up any important data before using the RAID Utility.
On a PC, launch the RAID Utility by clicking on [RAID Utility] in the DriveStation
Duo program group, or from the Start menu.
On a Mac, double-click the RaidUtility icon on your desktop.
6
Using the RAID Utility
Once launched, the RAID Utility will briefly scan for your DriveStation
Duo. This may take a few seconds.
The initial screen will show your current configuration. If your Duo is
new, it will probably be in RAID 1 mode.
To change the RAID mode, click [Config] and choose [Disk Config].
7
Using the RAID Utility
Select the drive structure that you’d like to use.
On a PC, the disk can be formatted with FAT32 or NTFS. Select the
format that you prefer. FAT32 is compatible with most Windows PCs
and Macs. NTFS offers the best performance with Windows, but isn’t
compatible with Mac. NTFS is recommended for use with backup, video
editing and other programs that may need filesizes larger than 4 GB.
If you are using Windows XP, or Windows Server 2003 without SP1 or
later, use compatability mode. Compatability mode will divide drives into
2 TB partitions that can be read by Windows XP or Windows Server 2003.
Click [Yes], and [Yes] again. Understand that this will erase any data on
the drive!
8
Using the RAID Utility
To Windows Users
The message below may be displayed when you try to change the
disk configuration (such as by selecting NTFS format) using the RAID
Management Utility.
If this message appears, wait until the changes to the disk configuration
are complete and “The setting was successfully changed” is displayed,
then click [Cancel]. The disk is now ready to use.
If you inadvertently click [Format disk] in the above message, one of
the following things will happen.
• If “You do not have sufficient rights to perform this operation” is
displayed, click [OK].
• If “Not Formattable” is displayed, click [Close].
• If the standard Windows format screen is displayed, click [Close].
Note: If the drive is formatted with the Windows format utility,
changes to the disk configuration may not complete normally.
If this happens, use the RAID Management Utility to set the
disk configuration again.
9
Other Utilities (Windows Only)
The DriveStation Duo includes several optional utilities for use with Windows
computers. To install and use these utilities, insert the CD-ROM that came
with your DriveStation Duo into a Windows PC.
Click [Begin Installation] and then [Additional Software Installation].
TurboPC can increase data transfer speeds for your Buffalo product.
TurboCopy uses caching to increase data transfer speeds.
Backup Utility is software to back up and restore data from your PC. To use,
select a source drive to be backed up and a target location for backup data.
RAMDISK Utility uses the memory in your computer as a virtual hard drive
“RAM drive”. The RAM drive is recognised as a hard drive by your computer,
and you can read and write data to it like any other hard drive.
Buffalo Tools Launcher lets you easily launch software from the Buffalo
utility suite. Just click an icon to launch the desired Buffalo tool or utility.
eco Manager lets you put the DriveStation into sleep mode to save power.
It works in RAID 0, RAID 1, and Spanning modes. Normal mode is not
supported.
SecureLockMobile encrypts the data on your DriveStation, preventing the
data from being accessed by anyone but you.
NovaBACKUP is backup software.
To learn more about installing and using these utilities, click on [View User
Manual].
10
Replacing a Hard Drive
Caution:
Please do not lift the DriveStation Duo by its front cover. The front cover
might come off.
Before removing hard drives, touch a metal object to dissipate static
electricity in your body, or wear a static wrist strap.
Work carefully! Some of the metal edges inside the DriveStation Duo
are sharp.
Damage done to the DriveStation Duo by improper disassembly is not
covered by warranty.
Do not reverse the two drives, or your data may be lost.
Replacement drives should be the same capacity as the drive being
replaced, or larger.
Do not use a hard drive that has previously been used in a DriveStation
Duo as a replacement drive. Remove any partitions on it first, or
rebuilding might not work normally.
Replacement hard drives are available from www.buffalotech.com.
Replacing a drive can result in lower transfer speeds for DriveStation
Duo depending on the performance of the replacement drive.
11
Replacing a Hard Drive
1
Shut down the DriveStation and
remove all cables.
▲AUTO
▼OFF
2
Pull the front cover forward while
pressing gently on the hollow on
the left side.
3
Remove the front cover.
12
Replacing a Hard Drive
4
Tab
Press the release below the drive
and pull the tab above the drive
out 2 cm (about 1 inch) .
Knob
5
Remove the failed drive.
6
Insert the new drive until it clicks.
13
Replacing a Hard Drive
7
8
Reattach the front cover.
Reattach all cables and power on the DriveStation Duo.
Note: If the DriveStation Duo is in normal mode, format the new drive.
14
Troubleshooting
FAQ
The following is a list of common issues with the DriveStation. Following
each issue are possible resolutions.
I cannot see the DriveStation in My Computer. (Windows)
Verify that the POWER light is on. If it is not, then ensure that the
power switch is in the AUTO position.
If you have installed the Power Save Utility, then verify that the
DriveStation was not put into power saving mode. Consult the
manual for the Power Save Utility for additional help. The manual
can be found on the DriveNavigator CD-ROM.
Verify that the hard drive inside the DriveStation is spinning. This
can be verified by placing your hand on the sides of the case
and feeling for a slight vibration. Also, after the DriveStation has
been powered on for fifteen minutes or more it will begin to get
warm. If neither of the proceeding tests verified that the hard drive
is spinning, then please contact technical support for further
assistance.
My backup program can’t save files to the DriveStation.
Reformat your DriveStation with NTFS or Mac OS Extended.
FAT32 is limited to 4 GB filesizes.
15
Technical Specifications
Standard Compliance:
USB 3.0
Transmission Speed:
Max. 5.0 Gbps (USB 3.0)
Power Consumption:
Max. 36 W
Dimensions:
3.4” x 5.0” x 8.1” (86 x 127 x 204 mm)
Weight:
4.85 lbs. (2.2 kgs)
Operating Environment:
41 - 95° F (5 - 35° C)
20 - 80% humidity (non-condensing)
OS Compatibility:
Windows 7 (32-bit or 64-bit),
Windows Vista (32-bit or 64-bit),
Windows XP (32-bit),
Windows Server 2008 R2 (64-bit),
Windows Server 2008 (32-bit or 64-bit),
Windows Server 2003 R2 (32-bit),
Windows Server 2003 (32-bit),
Mac OS X 10.4 or later
16
www.buffalotech.com