Transcript
News, Downloads und Informationen
The latest catalogue sections and news
www.wunderlich.de
www.wunderlich.de/update
Anbauhilfe
User Manual
Artikel: Cockpitgehäuse "Integra"
Bestellnummer: 8500125/ -139/ -183/ -288
1.
2.
3.
4.
5.
Part: Cockpit Cover "Integra"
Part number: 8500125/ -139/ -183/ -288
Vielen Dank für Ihr Vertrauen zu unserem Produkt.
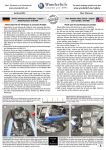
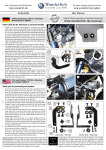
Entfernen Sie rechts und links die Befestigungsschraube des
Armaturenbügels (Bild A), schieben Sie die Blechmutter auf
die mitgelieferten Halter und befestigen Sie diese mit den
Originalschrauben am Fahrzeug (Bild B).
Kleben Sie im vorderen Bereich der Abdeckung einen Streifen
Klettband auf (Bild C) und kleben Sie das Gegenstück auf den
vorderen Scheibenhalter (Bild D). (Bitte entfetten Sie vorab die
Klebeflächen auf der Abdeckung und dem Scheibenhalter.)
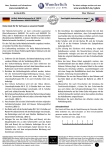
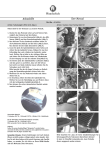
Ziehen Sie die Schutzfolie von der Abdeckung ab und setzen Sie
die Schnellverschlußschrauben in die Abdeckung ein (Bild E)
Setzen Sie die Abdeckung von hinten nach vorne auf, richten
Sie diese so aus, daß die Befestigungsbohrungen fluchten und
drehen Sie mit dem beiliegenden Schlüssel die Schrauben durch
eine 90°-Drehung fest (Bild F).
Drücken Sie die Abdeckung vorne im Klett fest und prüfen Sie
anschließend deren festen Sitz.
Thank you for purchasing our product.
1. On both the left and right sides, remove the lower bolts which attach the
bar surrounding the instruments. (Image A) Slide the supplied clip nuts
to the supplied aluminum brackets and attach those brackets, using the
original screws, just removed. (Image B)
2. Attach one piece of the supplied Velcro to the underside of the Integra
Cockpit Cover (Image C) and the other side to the top of the front
windshield mount. (Image D) Remember to clean these areas first!
3. Remove the plastic protective film from the cover. Place the DZUS fasteners
in the two holes, noting the sequence in which the various pieces are
installed. (Image E) The plastic washer on the underside of the cover will
retain the DZUS assembly.
4. Starting from the rear (in direction of travel) hook the cover over the
bottom of the instruments and then over the top and over the front
windshield mount. Position the cover and insert the DZUS fasteners into
the clip nuts, then tighten them with the enclosed key by turning the
fasteners 90 degrees.
5. Press down on the area where the Velcro is installed and check that the
strips are securely attached.
A
B
C
D
E
F
1- Planexzapfen
"Dzus" Fastener
2- Sicherungsscheibe
Plastic Washer
3- Alu Rosette
Aluminium Washer
4- Seitendeckel
Cover
Genereller Hinweis: Unsere Anleitungen sind nach bestem Wissen erstellt worden,
erfolgen jedoch ohne Gewähr. Sollten Sie mit dem Anbau nicht zurecht kommen
oder Zweifel haben, so wenden Sie sich bitte an Ihren BMW-Händler oder die
Werkstatt Ihres Vertrauens. Bitte beachten Sie , dass wir keine Gewährleistungen
für fahrzeugspezifische Toleranzen übernehmen können! Es kann im Einzelfall
notwendig sein, dass Produkte diesen angepasst werden müssen.
Copyright
by
Wunderlich
General note: Our fittings instructions are written to the best of our knowledge
but specifications or details may change. If you have difficulties or have doubts
with fitting this part please seek advice from your BMW dealer or workshop of
your choice. Please note that in some cases due to vehicle related tolerances
beyond our control some products might need adjusting to fit. We cannot
warranty parts fitting in those circumstances.