Transcript
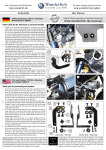
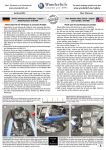
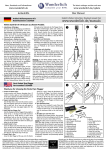
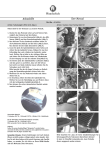
News, Downloads und Informationen
The latest catalogue sections and news
www.wunderlich.de
www.wunderlich.de/update
Anbauhilfe
User Manual
Artikel: Kit Brems + Kuppl. Hebel F650GS
Bestellnummer: 9003380 + 9003390
Part: Brake + Clutch Lever Set F650 GS
Part number: 9003380 + 9003390
Vielen Dank für Ihr Vertrauen zu unserem Produkt
1. Demontieren Sie den alten
Hebel. Setzen Sie den neuen
Hebel ein und achten Sie dabei
darauf, dass der Bremsstift in
der Führung des Bremszylinders
sitzt (Abb. A).
2. Montieren Sie die Befestigungsschraube und Mutter wieder
und achten Sie darauf, dass der
Bremlichtschalter funktioniert
(Abb. B). Eventuell müssen Sie
den Schalter etwas nachjustieren.
3. Zum Einstellen des Hebelwegs
drücken Sie den Hebel (Abb. C)
nach vorne und bringen Sie das
Einstellrad in die gewünschte
Position. Achten Sie darauf,
dass die Zahl immer an der
Markierung steht (Abb. D).
4. Überprüfen Sie Funktion und
Bremswirkung!
Thank you for purchasing our product
Bremshebel verstellbar/ Adjustable Brake Lever
F 650 GS/CS/Dakar
A
B
C
D
1. Remove the original brake lever.
Install the new adjustable lever
and make certain that the
actuation pin properly fits into
the socket (Image A)
2. Reinstall the pivot pin and nut,
taking care that the brake light
functions properly. You may need
to adjust the brake light switch.
(Image B)
3. To make adjustments to the
position of the lever, simply push
the lever forward slightly and then
rotate the adjuster to the desired
position (Image C). Make sure
that a number is always opposite
the arrow marking. (Image D)
4. Make sure that the brake works
properly before riding the
motorcycle.
Kupplungshebel verstellbar/ Adjustable Clutch Lever
F 650 GS/CS/Dakar
1. Demontieren Sie den alten Hebel und
montieren Sie den neuen Kupplungshebel mit
den originalen Kunststoffscheiben. Stellen
Sie nun das Kupplungszugspiel, wie bei dem
Original ein (Bild A1). Achten Sie jedoch
darauf, daß Sie das Kupplungshebelspiel an
der Rändelschraube (A2) so eingestellt ist,
daß 1-2 mm Leerweg vorhanden sind.
2. Zum Einstellen des Hebelwegs drücken Sie
den Hebel nach vorne und bringen Sie das
Einstellrad in die gewünschte Position (Bild
B). Achten Sie darauf, dass die Zahl immer
an der Markierung steht (Abb. C).
Achtung: Bei der stufenweisen Einstellung des Hebels sollte die Stufe 4 nur
genutzt werden, wenn sich der Gang ohne
höheren Kraftaufwand und Getriebeschlagen einlegen läßt, da es ansonsten zu
Getriebeschäden kommen kann. Achten
Sie darauf, dass die Kupplung sowohl
im warmen als auch im kalten Zustand
sauber trennt.
A
1
2
B
Note: Only use position 4 of the clutch
lever if a clean gear change can be had
without any grinding noise. If such a noise
is noticed, please use position 3 or lower.
Make sure that the clutch works properly
before riding the motorcycle!
C
Genereller Hinweis: Unsere Anleitungen sind nach bestem Wissen erstellt worden,
erfolgen jedoch ohne Gewähr. Sollten Sie mit dem Anbau nicht zurecht kommen
oder Zweifel haben, so wenden Sie sich bitte an Ihren BMW-Händler oder die
Werkstatt Ihres Vertrauens. Bitte beachten Sie , dass wir keine Gewährleistungen
für fahrzeugspezifische Toleranzen übernehmen können! Es kann im Einzelfall
notwendig sein, dass Produkte diesen angepasst werden müssen.
1. Check the amount of free play in your clutch
lever and make a note of it (Image A1).
Remove the original clutch lever. Install the
new adjustable lever and re-use the original
plastic washer. Use the knurled adjuster (A2)
to adjust the cable, so that the free play is the
same as it was with the original lever. Always
make sure that the clutch lever is adjusted
such that there is at least 1-2 mm of free
play.
2. To make adjustments to the position of the
lever, simply push the lever forward slightly
and then rotate the adjuster to the desired
position (Imgage B). Make sure that a number
is always opposite the arrow marking (Image
C).
Copyright
by
Wunderlich
General note: Our fittings instructions are written to the best of our knowledge
but specifications or details may change. If you have difficulties or have doubts
with fitting this part please seek advice from your BMW dealer or workshop of
your choice. Please note that in some cases due to vehicle related tolerances
beyond our control some products might need adjusting to fit. We cannot
warranty parts fitting in those circumstances.