1
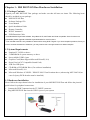
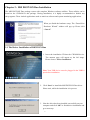
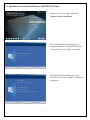
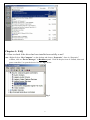
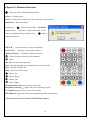
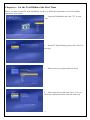
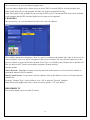
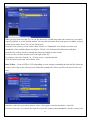
MSI DIGIVOX Duo Installation Manual Contents V1.0 Chapter 1 : MSI DIGIVOX Duo Hardware Installation .................................................................................... 2 1.1 Package Contents ................................................................................................................................. 2 1.2 System Requirements........................................................................................................................... 2 1.3 Hardware Installation........................................................................................................................... 2 Chapter 2 : MSI DIGIVOX Duo Installation..................................................................................................... 3 2.1 The Driver Installation of MSI DIGIVOX Duo................................................................................... 3 2.2 TotalMedia Application Installation of MSI DIGIVOX Duo .............................................................. 4 2.3 The Remote Control Installation of MSI DIGIVOX Duo ................................................................... 6 Chapter 3:Uninstallation of MSI DIGIVOX Duo ........................................................................................... 7 3.1 The Driver Uninstallation of MSI DIGIVOX Duo ............................................................................ 8 3.2 The Utilities Uninstallation of MSI DIGIVOX Duo ......................................................................... 8 3.3 TotalMedia Application Uninstallation of MSI DIGIVOX Duo........................................................ 8 Chapter 4 : FAQ ................................................................................................................................................. 9 4.1 How to check if the driver has been installed successfully or not? ..................................................... 9 Chapter 5 :Remote Functions........................................................................................................................... 10 Chapter 6 : Use the TotalMedia at the First Time ............................................................................................ 11 Chapter 7 : TV Function in TotalMedia ........................................................................................................... 13 Chapter 8 : PIP / PBP Mode in TV Function ................................................................................................... 24 1 Chapter 1 : MSI DIGIVOX Duo Hardware Installation 1.1 Package Contents Unpack your MSI DIGIVOX Duo package and make sure that all items are intact. The following items should be included in your package: MSI DIGIVOX Duo Software Package CD* Users Manual Quick Installation Guide Remote Controller DVB-T Antenna** USB Extension Cable * Includes MAGIX Goya Base software. Goya Base is XP, MCE 2005 and Vista compatible. Some functions are unavailable; please upgrade to MAGIX Goya Multimedia for more functions. **The included antenna is only suitable for areas with a strong DVB-T signal. If you have reception problems, first try to move or reorient the antenna. Otherwise, you may need to use a stronger antenna for better reception. 1.2 System Requirements Pentium-IV 2.0GHz or above 512MB RAM of system memory or above One available USB 2.0 port Graphics Card (Must Support Microsoft DirectX® 9.0) Sound Card (AC97 Compatible Sound Card) 2GB Free HD Space CD-ROM or DVD-ROM Drive (For software installation) Microsoft DirectX® 9.0 Microsoft Windows ® XP SP2 / XP MCE 2005/ Vista Premium above (when using MCE 2005 OS,an extra 3rd party DVD decoder must be installed) 1.3 Hardware Installation Please follow the steps shown below for installation of your MSI DIGIVOX Duo and follow the pictorial guide below for peripheral connections. 1. Connect the DVB-T antenna into the TV INPUT connector. 2. Plug MSI DIGIVOX Duo into the USB 2.0 port of your system 2 Chapter 2 : MSI DIGIVOX Duo Installation The MSI DIGIVOX Duo package comes with complete Windows software utilities. These utilities can be found on the CD-ROM in this package. During installation, it is highly recommended to disable any sub-programs. These include applications such as antivirus software and system monitoring applications. When you finish the hardware setup. The “Found New Hardware Wizard” window will pop up. Please click “Cancel”. 2.1 The Driver Installation of DIGIVOX Duo 1. Insert the installation CD into the CD ROM device. The autorun page will appear as the left image. Please choose “Driver Installation” Note: Your USB device must be plugged in the USB2.0 port before installation. 2. Click “Start” to install the MSI DIGIVOX Duo driver. Please wait, while the installation is in process 3. Now the driver has been installed successfully on your computer and click “OK” to finish driver installation and go to next step. 3 2.2 TotalMedia Application Installation of MSI DIGIVOX Duo 1. Return to the autorun page, and choose “TotalMedia Installation”. 2. The InstallShield Wizard will guide you through installation of TotalMedia application. Click “Next” to continue. 3. Click “Yes” accept all the terms of the proceeding License Agreement to install TotalMedia. 4. Please input user information and your TotalMedia serial number. Click “Next” to continue. 4 Note: While installing TotalMedia, it requires serial number. The serial number is printed on the front side of CD paper bag. Please check it from the CD bag. 5. Please choose the destination folder where you want to install the files. You can click “Browse” to change the destination folder. Finally click “Next” to go to next step. 6. Setup will add program icons to the Program Folder’s list. You may type a new folder name, or select one from the existing folders list. Click “Next” to start installing. Please wait while installation in process. . 7. 5 When the message as the one on the left image, click “Finish” to end the installation and go to next step. 2.3 The Remote Control Installation of MSI DIGIVOX Duo 6 1. Return to the autorun page, and choose “Remote Control Installation”. 2. The InstallShield Wizard will guide you through installation of MSI DIGIVOX Duo remote utilities. Click “Next” to continue. 3. MSI DIGIVOX Duo utilities have been installed. Please click “ Finish” to finish your installation. Chapter 3:Uninstallation of MSI DIGIVOX Duo You can follow the steps to Uninstall. (For Windows XP) Start -> Settings -> Control Panel -> Add / Remove Program (For Windows Vista) Start -> Settings -> Control Panel -> Programs and Features 7 3.1 The Driver Uninstallation of MSI DIGIVOX Duo Choose “MSI DigiVox Duo BDA Driver” and click the “Remove”. Follow the instruction on screen to complete the uninstallation. Note1: Your USB device must be plugged in the original USB2.0 port before uninstallation. 3.2 The Utilities Uninstallation of MSI DIGIVOX Duo Choose “MSI DigiVox Duo Utility” and click the “Remove”. Follow the instruction on screen to complete the uninstallation. 3.3 TotalMedia Application Uninstallation of MSI DIGIVOX Duo Choose “ArcSoft TotalMedia 3.5” and click the “Remove”. Follow the instruction on screen to complete the uninstallation. 8 Chapter 4 : FAQ 4.1 How to check if the driver has been installed successfully or not? Ans : Right click on “My Computer” on the desktop and choose “Properties”. Once in “Properties” window, click on “Device Manager” in Hardware panel. Click on the plus icon of “Sound, video and game controllers” to open the device list. See Fig.1 below. Fig.1 9 Chapter 5 :Remote Functions :Turns on /off the TotalMedia application. Source:Change Source. Zoom:Switch between full screen and windowed viewing modes. Shut Down:Shut down the PC. Please press 「 」button to turn off the “TotalMedia” and then press 「shut down」button. After that, it will appear a warning-message window. Press 「 」button again to shut down. CH+/CH-: Switch to the next / previous channel. VOL-/VOL+: Decrease / increase the volume. Numeric Keypad: Keypad for channel selection. :Switch to the previously selected channel. :Enter. Rec:Record the current program. Stop:Stop the playback or recording of the current program. Play:Play the recorded file. Mute:Turn on /off the Audio. :Menu_Up. :Menu_Down. :Menu_Left. :Menu_Right. Return(Red key):Return to the previous menu. Snapshot (Green key):Capture the on-screen image to a file. TV (Yellow key):Directly execute TV Function. EPG (Blue key):Reveal Electronic Programming Guide from internet. *Remote Control only for Arcsoft Total Media Software 10 Chapter 6 : Use the TotalMedia at the First Time Before you start to watch TV with TotalMedia, you have to follow the instructions to scan all available channels in your region. 1 Open the TotalMedia, and click “TV” to next step. 2 On the TV Signal Setting, please click “Next” to next step. 3 Please select your region and click “Next” 4 Select video device and click "Next" .You can select one of them and set the other after this step. 11 5 Click “Start” to scan Total Media channels. All scanned channels will be shown on channel list. When scan is completed, click “Next” to the next step. When channels were found, please click ”OK” to continue. 6 After setting up one tuner, Click “Yes” to setup the second tuner. 7 In Setting Digital EPG, please choose “NO” now, and Click “Next” to next step. 12 8 Click “Finish” to finish the Total Media channel scanning. 9 You can enjoy watching TV with TotalMedia now. Chapter 7 : TV Function in TotalMedia Welcome to ArcSoft TotalMedia, an all-in-one multimedia application that allows you to access and work with digital photos, home videos, recorded TV programs, radio and your digital music library right from your TV or home computer. TotalMedia is divided into the main sections below. Note that some versions of TotalMedia may not contain all the sections listed depending on the hardware configuration, and the specific version of TotalMedia installed. 13 FLOATING TOOLBAR The floating toolbar appears for a few seconds whenever you move the mouse: The "Home" button (it looks like a house) takes you to the program's startup screen. The arrow takes you to the previous screen. The toolbar at the bottom of the screen features standard audio/video playback controls (Play/Pause, Stop, Record,) plus Volume and Channel controls. Special controls for MPEG2 playback and only appear when necessary. When watching movie discs, video files, and recorded TV shows: Use these buttons to adjust the playback speed at variable rates. When watching MPEG-2 videos and recorded TV shows: Use these buttons to skip forward by roughly 27 seconds, or backwards by roughly 27 seconds. These buttons are useful for bypassing commercials or skipping back slightly if you accidentally skip ahead too far. When watching movie discs: Use these buttons to skip to the next or previous chapter. TV MODULE This section lets you view and edit the settings for TV recording. After configuration in Chapter 6 is completed, you can use your remote control to change channels, or use the channel controls (+/- button) in the floating toolbar at the bottom of the screen. You may pause and rewind TV (while you’re watching) using both the remote control and the toolbar. Options include: Full Screen - Displays the video over the entire program display area-typically the entire screen. You can 14 click the Full Screen button to switch into full screen mode. Press "Esc" or double-click the mouse to go back to a normal window. Note: You should check the "Time Shift" option in TV Settings to display the time bar. EPG -Display the electronic programming guide. Channels -View the program channel list. Click a channel to learn more about it. Recorded TV -Burn the recorded TV shows to a disc. Schedule -Program the application to record TV shows. Capture Frame -Take a screen capture of the current video screen. The captured image will be saved in the "My Documents | My Pictures" folder by default .Teletext - Watch teletext (if available). Settings -View and edit the settings for the TV module. Favorite Channel List Press Ctrl+D to display the Favorite Channel List and select a channel to watch. To remove a channel, click on its corresponding "Delete" icon (trash can). To rearrange your list, press the Up/Down arrow buttons on the right of each channel. • Click on the Up/Down arrow buttons on the left to browse the channel list. EPG 15 This section lets you view the channel program lists. If you are using a digital device, please select to access EPG or network EPG to view the program lists. While using analog device, the program will take you to the network EPG directly. Note: This option is only available if you are using an EPG service. The Internet EPG may not be available in all countries and the EPG on some digital services may not be supported. CHANNELS This section lets you view the channel list and select a specific channel. The available channels are listed here. There is a preview window in the bottom left corner of the screen. To watch a channel, click on it, and it will appear in the preview window. You can click the button next to the preview window to play it in Full Screen mode. Press "Esc" to exit Full Screen. Double click a channel will take you back to the TV main screen and the program will start showing. Options include: Add to Favorite - Highlight a channel on the list and click on the button to set it as a favorite channel. A checkmark indicates favorite channel. Delete From Favorite - If you select a favorite channel, click on this button to remove it from the favorite channels list. From the "Channel Type", choose either to view "All" or only the "Favorite" channels. Note: When using digital tuner, there will be two more options: "TV" and "Radio". RECORDED TV This section displays your recorded TV shows. 16 When you play back recorded TV, you can fast forward or rewind using either the controls on your remote control, keyboard, or on the floating toolbar. You can click the button next to the preview window to play it in Full Screen mode. Press "Esc" to exit Full Screen. From the View section, you can choose either "Detail" or "Thumbnail" view. Both views show you thumbnails of the available photos and folders; "Detail" view includes file/folder names and dates. From the Sort section, choose to arrange the photos according to name or date. To trim a video, click the scissors icon to the right of the file. To rename a video file, click the "A_" icon to access a virtual keyboard. Click the Delete (trash can) icon to delete a file. Burn To Disc - Create a DVD or VCD (depending on your settings) containing the selected files. Burn one or more video clips to disc. Browse to the folder that contains the videos, and select the specific files you want. Check the video files you want to burn to a disc. Click again to deselect (uncheck) a video file. To trim a video clip, or to choose the frame be used as the chapter button thumbnail, click the scissors icon 17 to the right of the file name. Click the disc settings button, to select the proper disc drive, change video format and modify other disc options. Click the DVD Menu Design button to personalize your DVD disc with a custom title and graphics. When you’re ready to make a disc, click "Burn." SCHEDULE This section lets you program the application to record TV shows, then the application will monitor the schedule and record the scheduled programs automatically on the correct day/time. Add - Lets you enter in a new program for recording: • Enter the name of the program (click "A_" to access a virtual keyboard), then select a channel, recording Frequency (once, daily, or weekly), and set the start/stop recording time. Modify - Edit the recording details of the selected item. History - Display a history of your recorded TV 18 shows. The selected recorded program can be shown in the preview area. Click the Delete (trash can) icon to delete a file. • Click the "Clear All" button to discard all the files. The "Frequency" option enables you to filter shows by how often they are recorded (once, daily, and weekly). If conflicting recording sessions are scheduled, you will be presented with a summary of the conflicts and asked to update the schedule. tvtv schedules -Download program schedules from the tvtv website. (The option is only available when you are using the tvtv EPG.) TELETEXT This section lets you watch the teletext. The available teletext channels are listed in the preview area. Move your mouse to select different teletext channels. The selected titles will be shown on the red, green, yellow and blue area. Click the button with the corresponding color to watch it. Click the "Live TV" button to go back to the TV screen. Click the "Teletext Home" button to go back to the teletext main index page. 19 Note: This function is not available in all countries. (Typically only Europe.) SETTINGS View and edit TV settings. Reset TV Signal This section lets you view and edit the settings for TV signal. The settings is divided into four steps: Select your region. Select video device. Click "Start" to scan for available channels. Set up two tuners. After setting up one tuner, if there is another tuner in your PC, you can repeat the steps for the second tuner. Choose the options you want from the various pull-down lists. The program also provides "Previous" and "Next" buttons to switch between setup pages. When you're ready, click "Finish". Edit Channels View and edit channels for recording from TV. 20 To add channels automatically, simply click "Start." The program will scan through each channel and determine if there is an available signal. Channels will appear in the channel list. Check "Auto get analog channel name" option to download channel names while channels are being scanned. It would take more time to scan the channels. Note: The option is only available when using an analog tuner and when Teletext is supported in your region. For analog devices, sometimes the automatic scan may not pick up a channel if the signal is poor. To manually add a channel, click "Add Channel." You can enter the channel number, as well as a name for the channel. To select the channels, you can click on one by one or using the "Select All" option. Or click "Deselect All" button to undo the selection. (Checkmarks indicate channels selected.) To rename the channel, click the "A_" icon to access a virtual keyboard. Click the "Delete" (trash can) icon to delete a channel. Note: If you are using an analog tuner and a digital tuner together, the screen will be slightly different. • Click the arrow icon to change the signal. 21 TV Settings This section lets you view and edit the TV settings. Choose the device you want to use. Note: The Device Name option is only available when you are using two tuners (Digital and Analog.) Choose Close Caption/Subtitles, Audio, Video Standard and Digital TV EPG from the list. Note: The Video Standard option is only available for analog tuners. Setting the Time Shifting feature to "On" enables you to pause live TV and watch recorded TV before the recording is complete. This feature requires a high performance PC. Note: If your computer CPU runs at 2.0Ghz or higher, this option will be automatically on; otherwise, it will be off. Import Channel List This section lets you import the channel list that you saved before. Go to the folder that contains the channel list file you want to import (for example: My Favorite.chl). Click on the "Up One Level" button to go up one directory level. Check the channel list file (.chl) you want to import. 22 When you're ready, click "Import." Export Channel List This section lets you export the current channel list. Browse your computer and go to the folder that you want to save the channel list file. To rename a channel list file, click on the "A_" icon to bring up a virtual keyboard or type in your file name directly. When you're ready, click "Export." tvtv settings/EPG -Go to the tvtv or EPG wizard. The wizard will walk you through the settings. Channel Mapper This section lets you map your scanned channels with the channels in internet EPG that can be scheduled. • Select channels you want to map from "Available Channels on tvtv" list and "Scanned Channels" list. The program of the selected channel will be display in the preview area. • Click "Map" after choosing. Or click "Unmap" to discard the mapped channels. 23 Note: The function is just available in Germany, Austria, Switzerland, UK, France, Spain, Italy and Netherlands. Chapter 8 : PIP (Picture-In-Picture) / PBP (Picture-By-Picture) Mode in TV Function Dual tuners provide the function that watching 2 TV programs at the same time. You can choose PIP Mode or PBP Mode. PIP (Picture-In-Picture) Mode PIP Mode will show a bigger main TV screen and a smaller TV screen at the same time. You can control the TV screen with a green frame by floating toolbar. Double click the smaller main TV will change their position with each other. Double click the bigger one will make it full screen. Enable PIP (Picture-In-Picture) Mode In the floating tool bar you will find the icon like the pic below. Click the icon will enable you to choose Single / PIP. Click PIP to enable PIP Mode. 24 PIP (Picture-In-Picture) Mode in full screen You can adjust the position and size for smaller TV window. Click the icon on the floating tool bar as the pic below to adjust the smaller TV window size. Click the icon on the floating tool bar as the pic below to adjust the smaller TV window position. PBP (Picture-By-Picture) Mode PBP Mode will show 2 TV screens side by side. You can control the TV screen with a green frame by floating toolbar. Double click the left TV screen will change their position with each other. Double click the right one will be back to PIP Window Mode. In order to make a good PBP using experience, a wide screen is recommended. PBP Mode can only be activated in full screen, and only be supported these resolutions below. 1280x720,1280x768,1280x800,1360x768,1440x900,1600x900,1600x1024,1680x1050,1920x1080, 1920x1200,2560x1200。 25 Enable PBP (Picture-By-Picture) Mode At the Full screen in the floating tool bar , you will find the icon like the pic below, click PBP to enable it. 26