1
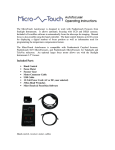
DIGITAL IMAGER USER'S MANUAL
ABOUT THE DIGIAL IMAGER PACKAGE
Digital Imager
PhotoLib2002 Installation CD-ROM
USB Plug
Hand Control
SYSTEM REQUIREMENTS
Telescope with 1.25" focuser tube
Pentium II-233 MHz and Above
Microsoft Windows 98/Windows ME/Windows 2000
32MB of RAM
100MB of available harddrive space
CD-ROM Drive
USB Port
INSTALLING PHOTOLIB2002 AND THE
DIGITAL IMAGER DRIVER
1) Insert the PhotoLib2002 CD into your CD-ROM drive
2) You should automatically see the PhotoLib2002 window. Doubleclick Setup.exe.
F
If you don't see the PhotoLib2002 window, open the Start menu,
select Run, type D:\Setup.exe (substitute the correct drive if it is not
D), click OK.
3) In the Welcome dialog box, click OK to start the installation
process.
4) Destination Folder indicates where PhotoLib2002 will be installed.
If you want to change the destination folder, click Browse, and
locate the desired folder. Click Next to continue.
5) Click Next in the Select Program Folder dialog box to begin the
installation.
6) After PhotoLib2002 is installed, a message asks you whether you
want to install the Digital Imager Driver. Click Yes.
7) Click OK to install the Version 1.02 driver.
8) Click Yes to continue.
9) Installation is now complete.
USING THE DIGITAL IMAGER
BEFORE SETTING UP THE DIGITAL IMAGER
Make sure that PhotoLib2002 and the driver are installed on your
computer.
SETTING UP THE DIGITAL IMAGER
1) After the telescope is properly set up, and the desired object is
found in the center of the eyepiece, remove the eyepiece and
insert the Digital Imager into the diagonal. Secure the Digital
2) Imager by tightening the thumbscrew or eyepiece locking ring.
3) Plug the USB plug into the USB port on your computer. The
indicator lamp on the Digital Imager glows green when the camera
is properly connected to the computer.
F
*If the Digital Imager driver warns you that digital signature is not
found and whether you want to continue the installation, click Yes.
Double-click the PhotoLib2002 icon on your desktop to start the
program. You can also click the Start Menu, choose Programs >
PhotoLib2002. Once the PhotoLib2002 is launched, it will
automatically go into the "Video Mode" (see P.5) and start a window
with the view your Digital Imager is currently pointed at (the Video
Window). If it does not start automatically, click Import Photo on the
System Toolbox to bring up the view. If the view appears blurry, adjust
the focusers on your telescope to focus the image.
Single Shots: Simply press the button on the Digital Imager hand
control, or click Single Capture on the System Toolbox in
PhotoLib2002. PhotoLib2002 will give you another window containing
the image you just captured.
Video Recording: Click Video Capture on the System Toolbox (see
P.6), then OK to start recording. To stop the recording, press ESC or
click anywhere in the window. Click Video Playback button to view the
video.
CUSTOMIZING THE SETTINGS
In the "Video Mode", the Video Source and Video Format on the
System Toolbox let you modify how the view is displayed on your
computer screen.
Video Source allows adjustments to the brightness, contrast,
saturation, and orientation of the view.
Video Format allows adjustments to the size and format of the view.
SAVING THE IMAGE/VIDEO
The image or video you captured is not permanently stored until it has
been saved. To save it, make sure the window containing the
image/video you wish to save is activated, either click the Save button
in the Main Toolbar or choose File>Save or Save as.
ABOUT PHOTOLIB2002
PhotoLib2002 delivers a user friendly environment for importing
images captured by Digital Imager, digital camera, scanner, or other
TWAIN or VFW devices. Moreover, PhotoLib2002 provides image
editing tools to help you alter the images captured or create drawings
from scratch.
AN OVERVIEW OF THE WORK AREA
Menu Bar
This contains menus for performing commands. The
commands are grouped by topic. For example, the View menu
includes commands to open tool bars or palettes.
Main Toolbar
System Toolbox
Toolbox
See P.2.
See P.2.
See P.2.
THE VIDEO WINDOW
The Video Window shows the view your Digital Imager is currently
pointed at. To open the Video Window, click Import Photo in the
System Toolbox. No image or video is captured at this point. See P.3
for capturing the image or video.
VIDEO MODE
PhotoLib2002 goes into "Video Mode" when the Video Window is
activated. In "Video Mode", the following options are available on the
menu bar: File, Edit, View, Video View, Video Setup, Capture, and
Help. The Toolbox and other image editing functions are not available
in "Video Mode".
F
Tips
M Warning
1
IMAGE MODE
Rectangle Tool
PhotoLib2002 goes into "Image Mode" when an image window is
activated or a new file is created. You can now edit the image using
the Toolbox and the following options on the The following toolbars
provide single-click access to many PhotoLib2002 features. To display
these toolbars, select View on the menu bar, then the toolbar you
wish to view.
Panning
Filled Eclipse
Color Palatte
Eclipse Tool
CARE FOR YOUR DIGITAL IMAGER
PHOTOLIB2002 TOOLS
The following toolbars provide single-click access to many
PhotoLib2002 features. To display these toolbars, select View on the
menu bar, then the toolbar you wish to view.
MAIN TOOLBAR
New
Cut
Open
Copy
Save
Paste
Save the current document
to the current record
Print
Undo
Print Preview
Redo
About PhotoLib2002
SYSTEM TOOLBOX
The System Toolbox on the menu bar provides instant modifications to
the image you are currently viewing.
Import Photo
Video Format
Close Video Window
Video Compress
Single Capture
Exit
Video Capture
Video Preview/Stop
Video Source Control
Video Playback
The following tips help ensure your Digital Imager performs at its best.
1) Disconnect the Digital Imager from the telescope and your
computer before cleaning.
2) Clean the surface of the Digital Imager with dry soft cloth only. Do
not use any cleaning agent with alcohol content. Do not clean with
water.
3) Keep the Digital Imager away from water, dust, dew, grease,
smoke, direct sun light, and heat source.
4) Use the Digital Imager indoor whenever possible.
5) The Digital Imager should be operated in a 0° to 40°C
environment. Do not operate under humid, vibrating, and dusty
conditions.
SPECIFICATIONS
Sensor :
Video Format :
Shutter :
Resolution :
Pixels :
Frame Rate :
Minimum Illumination :
S/N Ratio :
Aperture :
Power :
Operating Environment :
1/3" CMOS
24-bit
Electronic controlled
640x480
300,000
30fps(CIF), 15fgs (VGA)
3 lux
Equals to 48dB or above
1.25"
USB 9 5V)
0 - 40° C
TOOLBOX
The Toolbox includes the tools that let you draw, paint,
erase, use type, change colors, choose stroke styles,
change brightness/contrast, and view color information in
RGB.
Selet Tool
Filled Rounded Corner Rectangle
Move Tool
Rounded Corner Rectangle
Curv Tool
Fill Tool
Freehand Tool
Type Tool
Eraser
Color Select Tool
Straight Line Tool
Brightness/Contrast
Filled Rectangle
Zoom
M
DO NOT POINT THE DIGITAL IMAGER DIRECTLY
TO THE SUN THROUGH A TELESCOPE. THE
INTERNAL HEAT BUILD-UP WILL DAMAGE THE
DIGITAL IMAGER ELEMENTS.
2