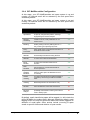
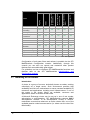
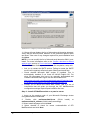
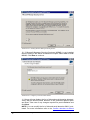
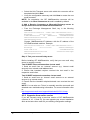
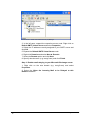
1
GFI MailEssentials 14.1 Getting Started Guide By GFI Software Ltd. http://www.gfi.com Email: [email protected] Information in this document is subject to change without notice. Companies, names, and data used in examples herein are fictitious unless otherwise noted. No part of this document may be reproduced or transmitted in any form or by any means, electronic or mechanical, for any purpose, without the express written permission of GFI Software Ltd. GFI MailEssentials was developed by GFI Software Ltd. GFI MailEssentials is copyright of GFI Software Ltd. 1998-2009 GFI Software Ltd. All rights reserved. GFI MailEssentials is a registered trademark and GFI Software Ltd. and the GFI logo are trademarks of GFI Software Ltd. in the Europe, the United States and other countries. Version ME-GSG-EN-1-02.005 Last updated: December 15, 2009 Contents 1 Introduction 1.1 1.2 1.3 2 About this manual Terms used in this manual Licensing 1 2 2 How does GFI MailEssentials work? 3 2.1 2.2 3 Introduction System requirements Important settings Installing on gateway servers for SMTP Servers Uninstalling GFI MailEssentials 7.1 8 Introduction System requirements Important settings Installing on gateway servers for Lotus Domino Installation for SMTP Servers 6.1 6.2 6.3 6.4 7 Introduction System requirements Important settings Installing on Microsoft Exchange or SBS server Installing on an email gateway or relay/perimeter server Installing on Microsoft Exchange Server 2007/2010 clusters Installation for Lotus Domino 5.1 5.2 5.3 5.4 6 Introduction System requirements Important settings Installing on Microsoft Exchange Server 2000/2003 Installing on an email gateway or relay/perimeter server Installing on Microsoft Exchange 2000/2003 cluster Installing on IIS cluster Installation for Microsoft Exchange 2007 & 2010 4.1 4.2 4.3 4.4 4.5 4.6 5 Inbound mail filtering Outbound mail filtering Installation for Microsoft Exchange 2000 & 2003 3.1 3.2 3.3 3.4 3.5 3.6 3.7 4 1 Introduction Troubleshooting and support 8.1 8.2 Getting Started Guide Introduction Troubleshooting: Installation issues 3 4 5 5 5 6 7 15 29 42 57 57 57 58 59 68 78 79 79 79 80 81 95 95 95 96 97 111 111 113 113 113 Contents i 8.3 8.4 8.5 8.6 8.7 9 Knowledge Base Web Forum Request technical support Build notifications Documentation 114 114 115 115 115 Appendix - Installing MSMQ 117 9.1 9.2 9.3 Windows Server 2000 Windows Server 2003 Windows Server 2008 117 117 120 10 Glossary 121 11 Index 125 ii Contents Getting Started Guide 1 Introduction 1.1 About this manual The scope of this „Getting Started Guide‟ is to help you install and run GFI MailEssentials on your network with minimum configuration effort. It describes: 1. The various environments and email infrastructures supported by this product 2. Guides you through the respective installation procedure 3. Walks you through the key steps needed to get the product running on default settings. Manual structure The sections in this manual are „self contained‟ and are designed to guide you through the sequence of steps needed to: 1. Identify product prerequisites applicable to your network 2. Prepare your environment for product installation 3. Install/upgrade GFI MailEssentials 4. Configure, test and run the product. The sections in this manual are structured as follows: Chapter 1 Introduces this manual. Chapter 2 Provides a high-level overview of how GFI MailEssentials works. Chapter 3 Gives detailed information on how to install GFI MailEssentials on Windows Server environments running Microsoft Exchange 2000 or 2003. Chapter 4 Provides detailed information on how to install GFI MailEssentials on Windows Server environments running Exchange 2007 or 2010. Chapter 5 Provides detailed instructions on how to install GFI MailEssentials for Lotus Domino email servers. Chapter 6 Gives detailed information regarding the installation of GFI MailEssentials for other SMTP Servers. Chapter 7 Provides guidelines on how to troubleshoot common issues. Glossary Includes a collection of specific technical terms used in this manual. Follow the instructions for your type of network using the appropriate section in this manual. Where applicable each section contains information related to installing GFI MailEssentials on the same server as your mail server, on a mail gateway or relay/perimeter server or in a clustered environment. Getting Started Guide Introduction 1 Administration and Configuration manual Detailed administration and configuration guidelines are provided in a separate manual called GFI MailEssentials Administration and Configuration manual which is installed with the product or separately downloadable from the GFI web site: http://www.gfi.com/mes/mes14acmanual.pdf This Administration and Configuration manual complements this Getting Started Guide by providing more detailed information on how to use and customize the features provided in GFI MailEssentials (e.g. tweaking of anti spam filters). 1.2 Terms used in this manual The following terms are used in this manual: “NOTE:” This provides additional information and references essential to GFI MailEssentials‟ operation. “IMPORTANT:” o This provides important information such as warnings and cautions that advise of potential issues commonly encountered. For any technical terms and their definitions as used in this manual refer to the Glossary chapter. o 1.3 Licensing Information on licensing is available on: http://www.gfi.com/products/gfi-mailessentials/pricing/licensing 2 Introduction Getting Started Guide 2 How does GFI MailEssentials work? 2.1 Inbound mail filtering Inbound mail filtering is the process through which incoming email are filtered before delivery to users. Figure 1 - Inbound mail filtering When an email is received: If Directory Harvesting filter is configured to execute at SMTP level, it checks the recipient‟s email address. If the recipient‟s email address is not found, the email is blocked. The email is checked to see if it is addressed to a list in the list server. If the email matches a list, it will be processed by the list server. The incoming email is filtered using all the spam filters. Any email that fails a spam filter check is sent to the anti spam email actions. If an email goes through all the filters and is not identified as spam, it then goes to the next stage. If configured, email is next archived to the reporting database. If configured, auto-replies are next sent to the sender. If configured, email monitoring is next executed and the appropriate actions taken. The new senders filter is now executed. Email is sent to the user‟s mailbox. Getting Started Guide How does GFI MailEssentials work? 3 2.1.1 Inbound email domains A very important concept within GFI MailEssentials is that of inbound email domains. During its configuration, GFI MailEssentials will automatically detect the domains on which you receive emails. This enables it to distinguish between inbound and outbound emails and therefore protect your network against spam. Inbound email domains are also configurable after installation through the GFI MailEssentials Configuration console. For more information refer to the GFI MailEssentials Administration and Configuration manual. 2.2 Outbound mail filtering Outbound mail filtering is the process through which email sent by users within a company is processed before it is sent out. Figure 2 - Outbound mail filtering User creates and sends email. Remote commands check executes any remote commands in email if any are found. If none are found, email goes to the next stage. Email is next checked to see if it should be archived. If archiving is enabled, email is saved in the reporting database. If configured, the applicable disclaimer is next added to the email. Email is checked for any mail monitoring which may apply and action is taken according to any rules configured. If enabled, the auto-whitelist check adds the recipient‟s email address to the whitelist. This automatically enables replies from such recipients to go to the sender without being checked for spam. After this check, emails are sent to the recipients. 4 How does GFI MailEssentials work? Getting Started Guide 3 Installation for Microsoft Exchange 2000 & 2003 3.1 Introduction GFI MailEssentials installation depends on how your network is configured for Exchange 2000/2003. You can install this product on: The dedicated mail server: This setup is typically used to filter email spam on the mail server (running Microsoft Exchange) that is configured to receive emails directly from the internet. The SBS 2000/2003 server: This setup is used to filter email spam on the SBS 2000/2003 server, which uses Microsoft Exchange to receive emails directly from the internet. The mail relay server: This setup is commonly used to filter spam in distributed email infrastructures., especially those running a DMZ. In this environment a dedicated machine (also known as a gateway/perimeter server is set to relay emails to another mail server (running Microsoft Exchange). GFI MailEssentials is installed on the gateway/perimeter server so that email spam is filtered before reaching the mail server. This setup reduces network traffic, email storage and processing requirements on your mail server. Microsoft Exchange Server & IIS Clusters: This type of installation is commonly used to filter spam within environments where clusters are used as disaster prevention and recovery. 3.2 System requirements 3.2.1 Software Supported operating systems Microsoft Windows Server 2008 Standard/Enterprise Microsoft Windows Server 2003 Standard/Enterprise (x86 or x64) Microsoft Windows 2000 Server/Advanced Server (SP1 or higher) Microsoft Small Business Server 2000 (SP2) Microsoft Small Business Server 2003 (SP1) Supported mail servers Getting Started Guide Microsoft Exchange Server 2000 (SP1) Microsoft Exchange Server 2003 (SP2) Installation for Microsoft Exchange 2000 & 2003 5 Other components Microsoft .NET Framework 2.0 Microsoft XML core services: This is required by the GFI MailEssentials reporter to enable anti spam report generation. For UK/US English OS this is installed automatically by GFI MailEssentials. For other languages, this can be downloaded from: http://www.microsoft.com/downloads/details.aspx?FamilyId=3144 B72B-B4F2-46DA-B4B6-C5D7485F2B42&displaylang=en Microsoft Virtual Server cluster group resource with a physical disc cluster. This is required ONLY for environments running Microsoft Exchange 2000/2003 clusters. For more information refer to: http://technet.microsoft.com/enus/library/bb124318(EXCHG.65).aspx Microsoft Message Queuing Services. Internet Information Services (IIS) 5 or 6 - SMTP service. 3.2.2 Hardware Processor Minimum: Intel Pentium or compatible 1 GHz 32-bit processor Recommended: x64 architecture-based server with Intel 64 architecture or AMD64 platform. Memory Minimum: 1GB Recommended: 2GB RAM Physical Storage Minimum: 500MB for installation, 2GB for execution. Recommended: 500MB for installation, 4GB for execution 3.3 Important settings 3.3.1 Antivirus and backup software Antivirus and backup software may cause GFI MailEssentials to malfunction. This occurs when such software denies access to certain files required by GFI MailEssentials. Disable third party antivirus and backup software from scanning the following folders: x86 installations (32-bit) X64 installations (64-bit) <..\Program Files\GFI\MailEssentials> <..\Program Files (x86)\GFI\MailEssentials> <..\Program Files\Common Files\GFI> <..\Program Files (x86)\Common Files\GFI> 6 Installation for Microsoft Exchange 2000 & 2003 Getting Started Guide <..\Inetpub\mailroot> If installed on a gateway machine. <..\Program Files\Exchsrvr\Mailroot> If installed on the same machine as Microsoft Exchange 2000/2003. 3.3.2 Firewall port settings Configure your firewall to allow the following port connections. These ports are used by GFI MailEssentials to connect to GFI servers: DNS (Port 53) - Used by anti spam filters (DNS blacklist, Sender Policy Framework, Header Checking) to identify the domain from where received emails originated. FTP (Ports 20 and 21) - Used by GFI MailEssentials to connect to 'ftp.gfisoftware.com' and retrieve latest product version information. HTTP (Port 80) - Used by GFI MailEssentials to download product patch and anti spam filter updates (i.e. SpamRazer, Anti-Phishing, and Bayesian anti spam filters) from the following locations: o 'http://update.gfi.com' o 'http://update.gfisoftware.com' 'http://support.gfi.com' 'http://db11.spamcatcher.net' (GFI MailEssentials 14 or earlier) o 'http://sn92.mailshell.net' (GFI MailEssentials 14 SR1 or later) Remoting (Ports 8021) - Used in the latest builds of GFI MailEssentials for inter-process communication. No firewall configuration is required to allow connections to or from the remoting ports since all the GFI MailEssentials processes run on the same server. o o NOTE: Ensure that no other applications (except GFI MailEssentials) are listening on port 8021. (OPTIONAL) LDAP (Port 389) - Used by GFI MailEssentials to get email addresses from SMTP server. Only required if the server running GFI MailEssentials does not have access/cannot get list of users from Active Directory e.g. in a DMZ environment or other environment which does not use Active Directory. 3.4 Installing on Microsoft Exchange Server 2000/2003 3.4.1 Upgrade from earlier version If you are currently using a previous version of GFI MailEssentials (versions 9, 10, 11 and 12), you can upgrade your current installation while at the same time retain all your existing configuration settings. Important notes Upgrades cannot be undone i.e. you cannot downgrade to an earlier version once you have installed the latest version. On upgrading an existing installation, licensing reverts to trial version and a new fully purchased license key for the GFI Getting Started Guide Installation for Microsoft Exchange 2000 & 2003 7 MailEssentials 14.1 is required. For more information on new license keys, refer to: http://customers.gfi.com You cannot change the installation path during GFI MailEssentials upgrades. When upgrading from GFI MailEssentials 9, the current Bayesian weights file will be upgraded to the new format used in GFI MailEssentials 10 or later. The new format is more compact and uses less memory. NO DATA WILL BE LOST. Upgrade procedure 1. Launch GFI MailEssentials installation on the server where your earlier version of GFI MailEssentials is installed. Screenshot 1 - Confirm the upgrade 2. Click Yes to start the upgrade process and follow on-screen instructions. For assistance refer to New installations section below. 3.4.2 New installations Pre-install actions No pre-install actions or configurations are required. Important notes 1. At the end of the installation process, GFI MailEssentials will restart Microsoft Exchange Server services. This is required to allow GFI MailEssentials components to be registered and started. Failing to restart the SMTP service will negatively affect anti spam filtering and email flow. 2. Before starting installation, close any running Windows applications. Installation procedure 1. Logon your Microsoft Exchange Server machine using administrator credentials. 2. Double click mailessentials14.exe (32-bit install) or mailessentials14_x64.exe (64-bit install) accordingly. 3. Select install language and click Next. 4. Select whether to check for newer versions/builds of GFI MailEssentials and click Next. 5. Read licensing agreement. To proceed with the installation select I accept the license agreement and click Next. 8 Installation for Microsoft Exchange 2000 & 2003 Getting Started Guide 6. Click Next to install in default location or click Browse to change path. 7. Specify user details and enter license key. Click Next to continue. 8. Specify the email address where notifications (e.g. failed anti spam filters, spam digests) are sent. Screenshot 2 - Selecting SMTP mode or Active Directory mode 9. Specify whether GFI MailEssentials will get the list of email users (required for user-based configuration/rules e.g. disclaimers) from Active Directory or SMTP server. Click Next to continue. Screenshot 3 - Installing Microsoft Message Queuing Service Getting Started Guide Installation for Microsoft Exchange 2000 & 2003 9 10. If Microsoft Message Queuing Services (MSMQ) is not installed then the dialog in the above screenshot will open. Select Yes to install MSMQ. Click Next to continue. Screenshot 4 - Configure your inbound email domain 11. Setup will now display the list of inbound email domains detected. Verify that all inbound email domains to be protected against spam are listed. Take note of any changes required for post-installation and click Next. NOTE: You can modify the list of inbound email domains ONLY postinstallation. For more information refer to the Confirm domains to defend against spam section in Post-install actions below. 12. Click Finish to finalize your installation. On completion, setup will: Ask you to restart the SMTP service. IMPORTANT: Failing to restart the SMTP service will negatively affect anti spam filtering and email flow. Check whether Microsoft XML engine is installed. This is automatically installed if not found on UK/US English OS. For other OS languages, this has to be manually downloaded and installed. Microsoft XML engine can be downloaded from: http://www.microsoft.com/downloads/details.aspx?FamilyId=3144 B72B-B4F2-46DA-B4B6-C5D7485F2B42&displaylang=en Prompt you to launch the Post Install Quick Start Guide. This is a set of instructions that will guide you through the configuration settings required post-install/for first use (Recommended). 13. At this stage, GFI MailEssentials is installed. You must now configure GFI MailEssentials for first use. For instructions refer to the next section Post-install actions. 10 Installation for Microsoft Exchange 2000 & 2003 Getting Started Guide 3.4.3 Post-install actions To ensure that your GFI MailEssentials anti spam system is effectively up and running you must perform the following post-install actions: Step 1: Launch GFI MailEssentials Configuration console Click on Start ► All Programs ► GFI MailEssentials ► GFI MailEssentials Configuration. Step 2: Verify current DNS Server settings 1. Right click Anti spam ► Anti Spam Settings node and select Properties. 2. Click on the DNS Server tab. Verify the DNS server details automatically detected during install. 3. To specify a different DNS Server, select Use the following DNS server and specify details. 4. Click Test to check your newly added DNS server settings. 5. Click OK to finalize your configuration. Step 3: Confirm domains to defend against spam NOTE: ONLY the inbound email domains configured in GFI MailEssentials will be protected against spam. 1. Right click General ► General Settings node and select Properties. 2. Click on the Inbound Email Domains and ensure that all required inbound domains are listed in the Inbound Domains field. 3. To specify additional domains, click Add… and enter inbound email domain details. 4. Click OK button to finalize your configuration. Step 4: Enable Directory Harvesting This filter uses Active directory or LDAP lookups to verify whether inbound emails are addressed to legitimate „internal‟ email accounts. To enable this filter: 1. Right click Anti spam ► Anti Spam Filters ► Directory Harvesting node and select Properties. 2. Select Enable directory harvesting protection. 3. Select the lookups method to be used: Use native Active Directory lookups option - Select this option if during installation you selected to get the list of email users from Active Directory (see Installation procedure section above - step 9). Use LDAP lookups - Select this option if GFI MailEssentials is installed on a server which is not part of your Active Directory domain (e.g. GFI MailEssentials is installed in the DMZ). Directory Harvesting will use LDAP to query Active Directory. (see Installation procedure section above - step 9). In addition: Getting Started Guide Installation for Microsoft Exchange 2000 & 2003 11 o o o Unselect the Anonymous bind option if your LDAP server requires authentication Enter the authentication details using Domain\User format. Click Test button to test your LDAP configuration settings. Step 5: Configure whitelists This filter allows you to specify lists of „friendly‟ email domains, email addresses or IP addresses. WARNING: USE THIS FEATURE WITH CAUTION. Entries in this list will not be scanned for spam and will bypass all anti spam filtering. 1. Right click Anti spam ► Whitelist node and select Properties. 2. Click on the Whitelist tab. 3. Click Add… and specify domains/email addresses or IP addresses to whitelist. 4. Click OK to finalize your configuration. Step 6: Test your anti spam system GFI MailEssentials is now ready to start managing spam. To verify that anti spam is working properly: 1. Navigate to Start ► All Programs ► GFI MailEssentials ► GFI MailEssentials Dashboard. 2. Using an external email account (for example webmail, hotmail or Gmail), create a new email and key in “100% free” as the subject. 3. Send the email to one of your internal email accounts. By default, GFI MailEssentials will forward this email to sub-folder „Suspected Spam‟ in the user‟s mailbox. 4. Allow some time for email delivery and confirm that GFI MailEssentials is working by: Screenshot 5 - Testing your anti spam system Checking the GFI MailEssentials Dashboard. When the email is received, the details are displayed in the MTA logging window. Ensure that the description next to the test email with subject „100% free‟ is „Blocked: Keyword Checking‟. 12 Installation for Microsoft Exchange 2000 & 2003 Getting Started Guide Screenshot 6 - Spam email delivered to ‘Suspected Spam” sub-folder Accessing the inbox of the email account to which the test email was sent and confirm that the email is moved to the „Suspected Spam‟ sub-folder in Inbox. 3.4.4 GFI MailEssentials Configuration At this stage, your GFI MailEssentials anti spam system is up and running. All inbound email will be scanned by the anti spam filters enabled by default. Getting Started Guide Filter Description Enabled by Default SpamRazer An anti-spam engine that determines if an email is spam by using email reputation, message fingerprinting and content analysis. Yes Directory Harvesting Stops email which is randomly generated towards a server, mostly addressed to nonexistent users. Yes Phishing Blocks emails that contain links in the message bodies pointing to known phishing sites or if they contain typical phishing keywords. Yes Sender Policy Framework Stops email which is received from domains not authorized in SPF records No AutoWhitelist Addresses to which an email is sent to, are automatically excluded from being blocked. Yes Installation for Microsoft Exchange 2000 & 2003 13 Whitelist A custom list of safe email addresses Yes Email blacklist A custom list of blocked email users or domains. Yes DNS blacklists Checks if the email received is from senders that are listed on a public DNS blacklist of known spammers. Yes Spam URI Realtime Blocklists Stops emails which contain links to domains listed on public Spam URI Blocklists such as sc.surbl.org Yes Header checking A module which analyses the individual fields in a header by referencing the SMTP and MIME fields Yes Keyword checking Spam messages are identified based on blocked keywords in the email title or body No New Senders Emails that have been received from senders to whom emails have never been sent before. No Bayesian analysis An anti-spam technique where a statistical probability index based on training from users is used to identify spam. No By default, email classified as spam will be moved to the „Suspected Spam‟ folder. Although enabled by default, moving email to a folder in Inbox is NOT the only anti spam filter action that can be triggered on detection of email spam. Other actions include email tagging and deletion of spam emails. Tagging Delete Forward to specific email address Move to subfolder in user mailbox Move to junk mail folder Move to specific folder Anti spam filter actions SpamRazer Yes Yes Yes Yes Yes Yes Directory Harvesting Yes Yes Yes Yes Yes Yes Phishing Yes Yes Yes Yes Yes Yes Sender Policy Framework Yes Yes Yes Yes Yes Yes Whitelist N/A N/A N/A N/A N/A N/A Email blacklist Yes Yes Yes Yes Yes Yes DNS blacklists Yes Yes Yes Yes Yes Yes Spam URI Realtime Blocklists Yes Yes Yes Yes Yes Yes Header checking Yes Yes Yes Yes Yes Yes Keyword checking Yes Yes Yes Yes Yes Yes New Senders Yes Yes Yes Yes No Yes Bayesian analysis Yes Yes Yes Yes Yes Yes Filters N/A - Not applicable 14 Installation for Microsoft Exchange 2000 & 2003 Getting Started Guide Configuration of anti spam filters and actions is possible via the GFI MailEssentials Configuration console. Additionally, through this console you can also run reports and customize other product features such as enable daily spam digest. For guidelines on how to configure GFI MailEssentials functions and features refer to the GFI MailEssentials Administration and Configuration manual. 3.5 Installing on an email gateway or relay/perimeter server Introduction GFI MailEssentials can be installed: On a perimeter server (e.g. in a DMZ) As a mail relay server between the perimeter (gateway) SMTP server and the recipients‟ inboxes. Both setups enable you to reduce unnecessary email traffic by using your Active Directory resources (at a perimeter/gateway server level) to drop connections for non-existent email recipients in incoming email. This helps counter spamming techniques such as Directory Harvest Attacks (a brute force type of attack used by spammers to find valid/existent e-mail addresses at a domain). This structure stops the majority of Spam from arriving at your Microsoft Exchange server. Figure 3 - A typical Perimeter SMTP Relay Server setup 3.5.1 Upgrades from earlier version If you are currently using a previous version of GFI MailEssentials (versions 9, 10, 11 and 12), you can upgrade your current installation while at the same time retain all your existing configuration settings. Getting Started Guide Installation for Microsoft Exchange 2000 & 2003 15 Important notes Upgrades cannot be undone i.e. you cannot downgrade to an earlier version once you have installed the latest version. On upgrading an existing installation, licensing reverts to trial version and a new fully purchased license key for the GFI MailEssentials 14.1 is required. For more information on new license keys, refer to: http://customers.gfi.com. You cannot change the installation path during GFI MailEssentials upgrades. When upgrading from GFI MailEssentials 9, the current Bayesian weights file will be upgraded to the new format used in GFI MailEssentials 10 or later. The new format is more compact and uses less memory. NO DATA WILL BE LOST. Upgrade procedure 1. Launch GFI MailEssentials installation on the server where your earlier version of GFI MailEssentials is installed. Screenshot 7 - Confirm the upgrade 2. Click Yes to start the upgrade process and follow on-screen instructions. For assistance refer to New installations section below. 3.5.2 New installations Important notes 1. During installation, GFI MailEssentials restarts Microsoft Exchange Server services. This is required to allow GFI MailEssentials components to be registered and started. 2. Before starting installation, close any running Windows applications. 3. When installing GFI MailEssentials on a DMZ, we recommend you use LDAP lookups to get the list of email users (required for userbased configuration/rules e.g. disclaimers) from your SMTP server. The AD of a DMZ usually will NOT include all the network users (email recipients). Pre-install actions GFI MailEssentials uses the IIS SMTP service as its SMTP Server and therefore the IIS SMTP service must be configured to act as a mail relay server. This is achieved as follows: 16 Installation for Microsoft Exchange 2000 & 2003 Getting Started Guide Step 1: Enable IIS SMTP Service 1. Go to Start ► Control Panel ► Add or Remove Programs ► Add/Remove Windows Components. 2. Select Internet Information Services (IIS) and click Details. 3. Select the SMTP Service option and click OK. 4. Click Next to finalize your configuration. Step 2: Create SMTP domain(s) for email relaying 1. Go to Start ► Control Panel ► Administrative Tools. 2. Click on Internet Information Services (IIS) Manager. Screenshot 8 - Internet Information Services (IIS) Manager 3. In the left pane, expand the respective server node. Right click on Default SMTP Virtual Server and select Properties. 4. Select the IP address currently assigned to your SMTP server and click OK. 5. Expand the Default SMTP Virtual Server node. 6. Right click Domains and select New ► Domain. 7. Select the Remote option and click Next. 8. Specify domain name (e.g. test.gfi.com) and click Finish. Step 3: Enable email relaying to your Microsoft Exchange server: 1. Right click on the new domain (e.g. test.gfi.com) and select Properties. 2. Select the Allow the Incoming Mail to be Relayed to this Domain checkbox. Getting Started Guide Installation for Microsoft Exchange 2000 & 2003 17 Screenshot 9 - Configure the domain 3. Select the Forward all mail to smart host option and specify the IP address of the server managing emails in this domain. IP address must be enclosed in square brackets e.g. [123.123.123.123] so to exclude them from all DNS lookup attempts. 4. Click OK to finalize your configuration. Step 4: Secure your SMTP email-relay server If unsecured, your mail relay server can be exploited and used as an open relay for spam. To avoid this from happening, it is recommended that you specifically define which mail servers can route emails through this mail relay server (i.e. allow only specific servers to use this email relaying setup). To achieve this: 1. Go to Start ► Control Panel ► Administrative Tools. 2. Click on Internet Information Services (IIS) Manager. 3. In the left pane, expand the respective server node. Right click on Default SMTP Virtual Server and select Properties. 4. Click on the Access tab and select Relay. 18 Installation for Microsoft Exchange 2000 & 2003 Getting Started Guide Screenshot 10 - Relay options 5. Select the Only the list below option and click Add. 6. Specify IP(s) of the mail server(s) that are allowed to route emails through your mail relay server. You can specify: Single computer - i.e. Authorize one specific machine to relay email through this server. Use the DNS Lookup button to lookup an IP address for a specific host. Group of computers - i.e. Authorize specific computer(s) to relay emails through this server. Domain - Allow all computers in a specific domain to relay emails through this server. NOTE: The Domain option adds a processing overhead that can degrade SMTP service performance. This is due to the reverse DNS lookup processes triggered on all IP addresses (within that domain) that try to route emails through this relay server. Getting Started Guide Installation for Microsoft Exchange 2000 & 2003 19 Step 5: Enable your Microsoft Exchange Server to route emails via mail relay server/GFI MailEssentials Screenshot 11 - Forwarding email to GFI MailEssentials machine 1. Launch Exchange System Manager. 2. Right click Connectors node and select New ► SMTP Connector. Screenshot 12 - Specifying IP of GFI MailEssentials machine 3. Select the Forward all mail through this connector to the following smart host option, and specify the IP of your mail relay server within square brackets (i.e. the IP of the machine on which GFI MailEssentials is installed) e.g. [123.123.1.123]. 20 Installation for Microsoft Exchange 2000 & 2003 Getting Started Guide Screenshot 13 - Adding a bridgehead 4. Click Add and select the virtual SMTP Server (i.e. the email relay server on which GFI MailEssentials is running). Screenshot 14 - Adding SMTP as address space 5. Click on the Address Space tab then click Add. 6. Select SMTP and click OK. Getting Started Guide Installation for Microsoft Exchange 2000 & 2003 21 7. Click OK to finalize your configuration. All emails will now be forwarded to the GFI MailEssentials server. Step 6: Update your domain MX record to point to mail relay server Update the MX record of your domain to point to the IP of the new mail relay server. If your DNS server is managed by your ISP, ask your ISP to update the MX record for you. If MX record is not updated all emails will be routed directly to your email server - hence by-pass GFI MailEssentials anti spam filters. Verify that MX record has been successfully updated To verify whether MX record is updated do as follows: 1. Click Start ►Run and type: Command 2. From the command prompt type in: nslookup 3. Type in: set type=mx 4. Specify your mail domain name. The MX record should return a single IP address. This should be the mail relay server I.P. address. Screenshot 15 - Checking the MX record of your domain Step 7: Test your new mail relay server Before proceeding to install GFI MailEssentials, verify that your new mail relay server is working correctly by doing as follows: Test IIS SMTP inbound connection via test email 1. Send an email from an „external‟ account (e.g. internet email account) to an internal email address/user. 2. Ensure that intended recipient received the test email in the respective email client. Test IIS SMTP outbound connection via test email 1. Send an email from an „internal‟ email account to an external account (e.g. internet email). 2. Ensure that the intended recipient/external user received the test email. NOTE: You can also use „Telnet‟ to manually send the test email and obtained more troubleshooting information. For more information refer to: http://support.microsoft.com/support/kb/articles/Q153/1/19.asp 22 Installation for Microsoft Exchange 2000 & 2003 Getting Started Guide Installation procedure 1. Logon your Microsoft Exchange Server machine using administrator credentials. 2. Double click mailessentials14.exe (32-bit install) or mailessentials14_x64.exe (64-bit install) accordingly. 3. Select preferred install language and click Next. 4. Select whether to check for newer versions/builds of GFI MailEssentials and click Next. 5. Read licensing agreement. To proceed with this installation select I accept the license agreement and click Next. 6. Click Next to install in default location or click Browse to change path. 7. Specify user details and enter license key. Click Next to continue. 8. Specify the email address where notifications (e.g. failed anti spam filters, spam digests) are to be sent. Screenshot 16 - Selecting SMTP mode or Active Directory mode 9. Specify whether GFI MailEssentials will get the list of email users (required for user-based configuration/rules e.g. disclaimers) from Active Directory or SMTP server. Click Next to continue. Getting Started Guide Installation for Microsoft Exchange 2000 & 2003 23 Screenshot 17 - Installing Microsoft Message Queuing Service 10. If Microsoft Message Queuing Services (MSMQ) is not installed then the dialog in the above screenshot will open. Select Yes to install MSMQ. Click Next to continue. Screenshot 18 - Configure your inbound email domain 11. Setup will now display the list of inbound email domains detected. Verify that all inbound email domains to be protected against spam are listed. Take note of any changes required for post-installation and click Next. 24 Installation for Microsoft Exchange 2000 & 2003 Getting Started Guide NOTE: You can modify the list of inbound email domains ONLY postinstall. For more information refer to the Confirm domains to defend against spam section in Post-install actions below. 12. Click Finish to finalize your installation. On completion, setup will: Ask you to restart the SMTP service. IMPORTANT: Failing to restart the SMTP service will negatively affect anti spam filtering and email flow. Check whether Microsoft XML engine is installed. This is automatically installed if not found on UK/US English OS. For other OS languages, this has to be manually downloaded and installed. Microsoft XML engine can be downloaded from: http://www.microsoft.com/downloads/details.aspx?FamilyId=3144 B72B-B4F2-46DA-B4B6-C5D7485F2B42&displaylang=en Prompt you to launch the Quick Start Guide. This is a set of instructions that will guide you through the configuration settings required post-install/for first use (Recommended). 13. At this stage, GFI MailEssentials is installed. You must now configure GFI MailEssentials for first use. For instructions refer to the next section titled Post-install actions. 3.5.3 Post-install actions To ensure that your GFI MailEssentials anti spam system is effectively up and running you must perform the following post-install actions: Step 1: Launch GFI MailEssentials Configuration console Click on Start ► All Programs ► GFI MailEssentials ► GFI MailEssentials Configuration. Step 2: Verify current DNS Server settings 1. Right click Anti spam ► Anti Spam Settings node and select Properties. 2. Click on the DNS Server tab. Verify the DNS server details automatically detected during install. 3. To specify a different DNS Server, select Use the following DNS server and specify details. 4. Click Test to check your newly added DNS server settings. 5. Click OK to finalize your configuration. Step 3: Confirm domains to defend against spam NOTE: ONLY the inbound email domains configured in GFI MailEssentials will be protected against spam. 1. Right click General ► General Settings node and select Properties. 2. Click on the Inbound Email Domains tab and ensure that all required inbound domains are listed in the Inbound domains field. 3. To specify additional domains, click Add… and enter inbound email domain details. Getting Started Guide Installation for Microsoft Exchange 2000 & 2003 25 4. Click OK button to finalize your configuration. Step 4: Enable Directory Harvesting This filter uses Active directory or LDAP lookups to verify whether inbound emails are addressed to legitimate „internal‟ email accounts. To enable this filter: 1. Right click Anti spam ► Anti spam Filters ► Directory Harvesting node and select Properties. 2. Select Enable directory harvesting protection. 3. Select the lookups method to be used: Use native Active Directory lookups option - Select this option if during installation you selected to get the list of email users from Active Directory (see Installation procedure section above - step 9). Use LDAP lookups - Select this option if GFI MailEssentials is installed on a server which is not part of your Active Directory domain (e.g. GFI MailEssentials is installed in the DMZ). Directory Harvesting will use LDAP to query Active Directory. (see Installation procedure section above - step 9). In addition: o Unselect the Anonymous bind option if your LDAP server requires authentication o o Enter the authentication details using Domain\User format. Click Test button to test your LDAP configuration settings. Step 5: Configure whitelists Whitelists enable you to specify lists of „friendly‟ email domains, email addresses or IP addresses. WARNING: USE THIS FEATURE WITH CAUTION. Entries in this list will not be scanned for spam and will bypass all anti spam filtering. 1. Right click Anti spam ► Whitelist node and select Properties. 2. Click on the Whitelist tab. 3. Click Add… and specify domains/email addresses or IP addresses to whitelist. 4. Click OK to finalize your configuration. Step 6: Test your anti spam system GFI MailEssentials is now ready to start managing spam. To verify that anti spam is working properly: 1. Clicking Start ► All Programs ► GFI MailEssentials ► GFI MailEssentials Dashboard. 2. Using an external email account (for example webmail, hotmail or Gmail), create a new email and key in “100% free” as the subject. 3. Send the email to one of your internal email accounts. GFI MailEssentials will tag this email as spam by adding the tag [SPAM] to the email „subject‟ field. 26 Installation for Microsoft Exchange 2000 & 2003 Getting Started Guide 4. Allow some time for email delivery and confirm that email spam tagging is working by: Screenshot 19 - Testing your anti spam system Checking the GFI MailEssentials Dashboard. Use the Status tab to view the status of key GFI MailEssentials services and email processing activity. Receipt and processing status of this email is logged in the MTA logging window. Screenshot 20 - Email tagged as SPAM Getting Started Guide Accessing the inbox of the email account to which the test email was sent and confirm that email subject includes [SPAM] in the subject field. Installation for Microsoft Exchange 2000 & 2003 27 3.5.4 GFI MailEssentials Configuration At this stage, your GFI MailEssentials anti spam system is up and running. All inbound email will be scanned by the anti spam filters enabled by default. Filter Description Enabled by Default SpamRazer An anti-spam engine that determines if an email is spam by using email reputation, message fingerprinting and content analysis. Yes Directory Harvesting Stops email which is randomly generated towards a server, mostly addressed to nonexistent users. Yes Phishing Blocks emails that contain links in the message bodies pointing to known phishing sites or if they contain typical phishing keywords. Yes Sender Policy Framework Stops email which is received from domains not authorized in SPF records No AutoWhitelist Addresses to which an email is sent to, are automatically excluded from being blocked. Yes Whitelist A custom list of safe email addresses Yes Email blacklist A custom list of blocked email users or domains. Yes DNS blacklists Checks if the email received is from senders that are listed on a public DNS blacklist of known spammers. Yes Spam URI Realtime Blocklists Stops emails which contain links to domains listed on public Spam URI Blocklists such as sc.surbl.org Yes Header checking A module which analyses the individual fields in a header by referencing the SMTP and MIME fields Yes Keyword checking Spam messages are identified based on blocked keywords in the email title or body No New Senders Emails that have been received from senders to whom emails have never been sent before. No Bayesian analysis An anti-spam technique where a statistical probability index based on training from users is used to identify spam. No By default, email classified as spam will be tagged (i.e. will include the prefix [SPAM] in the subject field). Although enabled by default, email tagging is NOT the only anti spam filter action that can be triggered on detection of email spam. Other actions include re-routing of spam emails to specific folders and deletion of spam emails. Filters 28 Installation for Microsoft Exchange 2000 & 2003 Anti spam filter actions Getting Started Guide Tagging Delete Forward to specific email address Move to subfolder in user mailbox Move to junk mail folder Move to specific folder SpamRazer Yes Yes Yes Yes Yes Yes Directory Harvesting Yes Yes Yes Yes Yes Yes Phishing Yes Yes Yes Yes Yes Yes Sender Policy Framework Yes Yes Yes Yes Yes Yes Whitelist N/A N/A N/A N/A N/A N/A Email blacklist Yes Yes Yes Yes Yes Yes DNS blacklists Yes Yes Yes Yes Yes Yes Spam URI Realtime Blocklists Yes Yes Yes Yes Yes Yes Header checking Yes Yes Yes Yes Yes Yes Keyword checking Yes Yes Yes Yes Yes Yes New Senders Yes Yes Yes Yes No Yes Bayesian analysis Yes Yes Yes Yes Yes Yes N/A - Not applicable Configuration of anti spam filters and actions is possible via the GFI MailEssentials Configuration console. Additionally, through this console you can also run reports and customize other product features such as enable daily spam digest. For guidelines on how to configure GFI MailEssentials functions and features refer to the GFI MailEssentials Administration and Configuration manual. 3.6 Installing on Microsoft Exchange 2000/2003 cluster Introduction A cluster is a group of servers, technically known as nodes, working collectively as a single server. Such environment provides high availability and fail over mechanisms to ensure constant availability of resources and applications including email infrastructures. If one of the nodes in the cluster fails/is not available, resources and applications switch to another cluster node. A Microsoft Exchange cluster can be set up in one of 2 modes: active/active or active/passive. GFI MailEssentials supports ONLY active/passive clusters. In an active/passive cluster, a „failover‟ mechanism ensures that whenever an active cluster fails, one of the available passive nodes becomes active (i.e. takes over the role of the failed node). In view of the way clusters work, GFI MailEssentials must be installed on all servers/cluster nodes in order to ensure uninterrupted email Getting Started Guide Installation for Microsoft Exchange 2000 & 2003 29 spam management. GFI MailEssentials installation in a Microsoft Exchange 2000/2003 cluster is a 4-tier process: Process 1: Install GFI MailEssentials on the Active cluster node. Process 2: Stop the GFI MailEssentials Legacy Attendant and the GFI POP2Exchange cluster resources and move the Exchange Virtual Server cluster group resource to a passive/other node. Process 3: Install GFI MailEssentials on another cluster node. Process 4: Add specific GFI MailEssentials services to the Exchange Virtual Server cluster resource group Repeat Processes 2, 3 and 4 above for the remaining passive node(s) in the cluster. 3.6.1 Upgrade from earlier version If you are currently using a previous version of GFI MailEssentials (versions 9, 10, 11 and 12), you can upgrade your current installation while at the same time retain all your existing configuration settings. Pre-upgrade actions None Important notes Upgrades cannot be undone i.e. you cannot downgrade to an earlier version once you have installed the latest version. On upgrading an existing installation, licensing reverts to trial version and a new fully purchased license key for the GFI MailEssentials 14.1 is required. For more information on new license keys, refer to: http://customers.gfi.com You cannot change the installation path during GFI MailEssentials upgrades. When upgrading from GFI MailEssentials 9, the current Bayesian weights file will be upgraded to the new format used in GFI MailEssentials 10 or later. The new format is more compact and uses less memory. NO DATA WILL BE LOST. When upgrading in a Microsoft Exchange cluster environment, all instances of GFI MailEssentials must be upgraded i.e. GFI MailEssentials must be upgraded on all cluster nodes/servers making part of the cluster. Upgrade procedure 1. Launch GFI MailEssentials installation on the server where your earlier version of GFI MailEssentials is installed. 30 Installation for Microsoft Exchange 2000 & 2003 Getting Started Guide Screenshot 21 - Confirm the upgrade 2. Click Yes to start the upgrade process and follow on-screen instructions. For assistance refer to the Installation procedure chapter in the section below. 3.6.2 New installations Important notes 1. Only active/passive cluster setups are supported. 2. Before starting installation, close any running Windows applications. 3. Before starting installation, Microsoft Exchange Server 2000/2003 needs to be installed in clustered mode. 4. Before starting installation ensure that you have a Microsoft Virtual Server cluster group resource with a physical disc cluster available. Pre-install actions Create Microsoft Virtual Server cluster group resource Before you can create an Exchange Virtual Server in a Windows Server cluster, you must first create a cluster resource group. This is the unit of failover in a Windows Server cluster. When Exchange Server is running in a Windows Server cluster, the cluster resource group that contains the Exchange cluster resources is referred to as an Exchange Virtual Server. To create a resource group for an Exchange Virtual Server in a Windows Server cluster do as follows: 1. Start Cluster Administrator. On prompt, specify cluster details (e.g. name) or click the browse button to select cluster in which you want to create an Exchange Virtual Server. 2. In the console tree, right-click Groups and select New ► Group. 3. In the New Group Wizard that starts automatically, specify a name for the new cluster group, and click Next. 4. Click Finish to finalize your configuration. This new group object is displayed under Groups in Cluster Administrator. Installation procedure Step 1 - Install GFI MailEssentials in the shared hard drive on active server 1. Logon on the active node of your Microsoft Exchange cluster using administrator credentials. 2. Double click mailessentials14.exe (32-bit install) or mailessentials14_x64.exe (64-bit install) accordingly. 3. Select install language and click Next. 4. Select whether to check for newer versions/builds of GFI MailEssentials and click Next. Getting Started Guide Installation for Microsoft Exchange 2000 & 2003 31 5. Read licensing agreement. To proceed with the installation select I accept the license agreement and click Next. 6. Click Next to install in default location or click Browse to change path. 7. Specify user details and enter license key. Click Next to continue. 8. Specify the email address where notifications (e.g. failed anti spam filters, spam digests) are sent. Screenshot 22 - Selecting SMTP mode or Active Directory mode 9. Specify whether GFI MailEssentials will get the list of email users (required for user-based configuration/rules e.g. disclaimers) from Active Directory or SMTP server. Click Next to continue. 32 Installation for Microsoft Exchange 2000 & 2003 Getting Started Guide Screenshot 23 - Installing Microsoft Message Queuing Service 10. If Microsoft Message Queuing Services (MSMQ) is not installed then the dialog in the above screenshot will open. Select Yes to install MSMQ. Click Next to continue. Screenshot 24 - Configure your inbound email domain 11. Setup will now display the list of inbound email domains detected. Verify that all inbound email domains to be protected against spam are listed. Take note of any changes required for post-installation and click Next. Getting Started Guide Installation for Microsoft Exchange 2000 & 2003 33 NOTE: You can modify the list of inbound email domains ONLY postinstall. For more information refer to the Confirm domains to defend against spam section in this manual. 12. Click Finish to finalize your installation. On completion, setup will: Ask you to restart the SMTP service. Failing to restart the SMTP service will negatively affect anti spam filtering and email flow. Check whether Microsoft XML engine is installed. This is automatically installed if not found on UK/US English OS. For other OS languages, this has to be manually downloaded and installed. Microsoft XML engine can be downloaded from: http://www.microsoft.com/downloads/details.aspx?FamilyId=3144 B72B-B4F2-46DA-B4B6-C5D7485F2B42&displaylang=en Prompt you to launch the Quick Start Guide. This is a set of instructions that will guide you through the GFI MailEssentials configuration settings required post-install/for first use. Step 2 - Move the Exchange Virtual Server cluster group 1. Go to Control Panel ► Administrative Tools ► Cluster Administrator. 2. Stop the GFI MailEssentials Legacy Attendant and the GFI POP2Exchange cluster resources. 3. Move the Exchange Virtual Server cluster group resource to another node. Step 3 - Install GFI MailEssentials on a passive server 1. Logon on the passive node of your Microsoft Exchange cluster using administrator credentials. 2. Double click mailessentials14.exe (32-bit install) or mailessentials14_x64.exe (64-bit install) accordingly. 3. Select install language and click Next. 4. Select whether to check for newer versions/builds of GFI MailEssentials and click Next. 5. Read licensing agreement. To proceed with the installation select I accept the license agreement and click Next. 6. Click Next to install in default location or click Browse to change path. 7. Specify user details and enter license key. Click Next to continue. 8. Specify the email address where notifications (e.g. failed anti spam filters, spam digests) are sent. 34 Installation for Microsoft Exchange 2000 & 2003 Getting Started Guide Screenshot 25 - Selecting SMTP mode or Active Directory mode 9. Specify whether GFI MailEssentials will get the list of email users (required for user-based configuration/rules e.g. disclaimers) from Active Directory or SMTP server. Click Next to continue. Screenshot 26 - Installing Microsoft Message Queuing Service 10. If Microsoft Message Queuing Services (MSMQ) is not installed then the dialog in the above screenshot will open. Select Yes to install MSMQ. Click Next to continue. Getting Started Guide Installation for Microsoft Exchange 2000 & 2003 35 Screenshot 27 - Configure your inbound email domain 11. Setup will now display the list of inbound email domains detected. Verify that all inbound email domains to be protected against spam are listed. Take note of any changes required for post-installation and click Next. NOTE: You can modify the list of inbound email domains ONLY postinstall. For more information refer to the Confirm domains to defend against spam section in Post-install actions below. 12. Click Finish to finalize your installation. On completion, setup will: Ask you to restart the SMTP service. Failing to restart the SMTP service will negatively affect anti spam filtering and email flow. Check whether Microsoft XML engine is installed. This is automatically installed if not found on UK/US English OS. For other OS languages, this has to be manually downloaded and installed. Microsoft XML engine can be downloaded from: http://www.microsoft.com/downloads/details.aspx?FamilyId=3144 B72B-B4F2-46DA-B4B6-C5D7485F2B42&displaylang=en Prompt you to launch the Quick Start Guide. This is a set of instructions that will guide you through the GFI MailEssentials configuration settings required post-install/for first use. Step 4 - Add specific GFI MailEssentials services to the Exchange Virtual Server cluster resource group When installing GFI MailEssentials in a clustered windows environment, the product services described below are not automatically included in a cluster resource group. Consequently, if the cluster node on which GFI MailEssentials is running fails, these product services are not moved to another cluster node along with the resource group and they will not be restarted on the new node. As a 36 Installation for Microsoft Exchange 2000 & 2003 Getting Started Guide result, GFI MailEssentials will not start up properly after a failover in a cluster environment. The services to be added to the Exchange Virtual Server cluster resource group are: Service Name: gfiasmlhost Display name: GFI MailEssentials Managed Attendant Service Dependencies: None Start Parameters: None Registry Replication: None Service Name: listserv Display Name: GFI MailEssentials List Server Dependencies: GFI MailEssentials Legacy Attendant Start Parameters: None Registry Replication: None Service Name: GFIMETRXSVC Display Name: GFI MailEssentials Enterprise Transfer Service Dependencies: GFI MailEssentials Legacy Attendant Start Parameters: None Registry Replication: None To add these services: 1. Go to Control Panel ► Administrative Tools ► Cluster Administrator. 2. In the tree view on the left hand side of the „Cluster Administrator console‟, expand the cluster root node and then the Groups node. 3. Right-click on the Exchange Virtual Server cluster group resource to bring up the pop-up menu. 4. Scroll down to the New menu item to expand it, and select Resource to bring up the New Resource wizard. 5. Enter the service display name in the „Name‟ and „Description‟ fields. Select „Generic Service‟ as Resource Type and select the Exchange Virtual Server cluster group resource as the group to which the new resource will be added. Click Next. 6. In the Possible Owners dialog, add the nodes of the Exchange cluster to the list of preferred owners. Click Next. 7. Select the resource dependencies in the Dependencies dialog. Click Next. 8. In the „Generic Service Parameters‟ dialog, enter the service name, and leave the start parameters text box empty. Click Next. 9. Click Finish to finalize your configuration. Do not add any keys in the „Registry Replication‟ dialog. 10. Repeat from step 3 to 8 above for each service mentioned above. Getting Started Guide Installation for Microsoft Exchange 2000 & 2003 37 11. Right-click on the newly added resource(s) and select Bring Online to enable services. These resources are visible in the list of cluster resources of the Exchange Virtual Server cluster. 3.6.3 Post-install actions At this stage, GFI MailEssentials is installed. You must now configure GFI MailEssentials for first use. To ensure that your GFI MailEssentials anti spam system is effectively up and running do as follows: Step 1: Launch GFI MailEssentials Configuration console Click on Start ► All Programs ► GFI MailEssentials ► GFI MailEssentials Configuration. Step 2: Verify current DNS Server settings 1. Right click Anti spam ► Anti Spam Settings node and select Properties. 2. Click on the DNS Server tab. Verify the DNS server details automatically detected during install. 3. To specify a different DNS Server, select Use the following DNS server and specify details. 4. Click Test to check your newly added DNS server settings. 5. Click OK to finalize your configuration. Step 3: Confirm domains to defend against spam NOTE: ONLY the inbound email domains configured in GFI MailEssentials will be protected against spam. 1. Right click General ► General Settings node and select Properties. 2. Click on the Inbound Email Domains tab and ensure that all required inbound domains are listed in the Inbound domains field. 3. To specify additional domains, click Add… and enter inbound email domain details. 4. Click OK button to finalize your configuration. Step 4: Enable Directory Harvesting This filter uses Active directory or LDAP lookups to verify whether inbound emails are addressed to legitimate „internal‟ email accounts. To enable this filter: 1. Right click Anti spam ► Anti spam Filters ► Directory Harvesting node and select Properties. 2. Select Enable directory harvesting protection. 3. Select the lookups method to be used: Use native Active Directory lookups option - Select this option if during installation you selected to get the list of email users from 38 Installation for Microsoft Exchange 2000 & 2003 Getting Started Guide Active Directory (see Installation procedure section above - step 9). Use LDAP lookups - Select this option if GFI MailEssentials is installed on a server which is not part of your Active Directory domain (e.g. GFI MailEssentials is installed in the DMZ). Directory Harvesting will use LDAP to query Active Directory. (see Installation procedure section above - step 9). In addition: o Unselect the Anonymous bind option if your LDAP server requires authentication o Enter the authentication details using Domain\User format. o Click Test button to test your LDAP configuration settings. Step 5: Configure whitelists This filter allows you to specify lists of „friendly‟ email domains, email addresses or IP addresses. WARNING: USE THIS FEATURE WITH CAUTION. Entries in this list will not be scanned for spam and will bypass all anti spam filtering. 1. Right click Anti spam ► Whitelist node and select Properties. 2. Click on the Whitelist tab. 3. Click Add… and specify domains/email addresses or IP addresses to whitelist. 4. Click OK to finalize your configuration. Step 6: Test your anti spam system GFI MailEssentials is now ready to start managing spam. To verify that anti spam is working properly: 1. Clicking Start ► All Programs ► GFI MailEssentials ► GFI MailEssentials Dashboard. 2. Using an external email account (for example webmail, hotmail or Gmail), create a new email and key in “100% free” as the subject. 3. Send the email to one of your internal email accounts. By default, GFI MailEssentials will forward this email to sub-folder „Suspected Spam‟ in the user‟s mailbox. 4. Allow some time for email delivery and confirm that GFI MailEssentials is working by: Getting Started Guide Installation for Microsoft Exchange 2000 & 2003 39 Screenshot 28 - Testing your anti spam system Checking the GFI MailEssentials Dashboard. When the email is received, the details are displayed in the MTA logging window. Ensure that the description next to the test email with subject „100% free‟ is „Blocked: Keyword Checking‟. Screenshot 29 - Spam email delivered to ‘Suspected Spam” sub-folder Accessing the inbox of the email account to which the test email was sent and confirm that the email is moved to the „Suspected Spam‟ sub-folder in Inbox. 40 Installation for Microsoft Exchange 2000 & 2003 Getting Started Guide 3.6.4 GFI MailEssentials Configuration At this stage, your GFI MailEssentials anti spam system is up and running. All inbound email will be scanned by the anti spam filters enabled by default. At this stage, your GFI MailEssentials anti spam system is up and running. All inbound email will be scanned by the anti spam filters enabled by default. Filter Description Enabled by Default SpamRazer An anti-spam engine that determines if an email is spam by using email reputation, message fingerprinting and content analysis. Yes Directory Harvesting Stops email which is randomly generated towards a server, mostly addressed to nonexistent users. Yes Phishing Blocks emails that contain links in the message bodies pointing to known phishing sites or if they contain typical phishing keywords. Yes Sender Policy Framework Stops email which is received from domains not authorized in SPF records No AutoWhitelist Addresses to which an email is sent to, are automatically excluded from being blocked. Yes Whitelist A custom list of safe email addresses Yes Email blacklist A custom list of blocked email users or domains. Yes DNS blacklists Checks if the email received is from senders that are listed on a public DNS blacklist of known spammers. Yes Spam URI Realtime Blocklists Stops emails which contain links to domains listed on public Spam URI Blocklists such as sc.surbl.org Yes Header checking A module which analyses the individual fields in a header by referencing the SMTP and MIME fields Yes Keyword checking Spam messages are identified based on blocked keywords in the email title or body No New Senders Emails that have been received from senders to whom emails have never been sent before. No Bayesian analysis An anti-spam technique where a statistical probability index based on training from users is used to identify spam. No By default, email classified as spam will be tagged (i.e. will include the prefix [SPAM] in the subject field). Although enabled by default, email tagging is NOT the only anti spam filter action that can be triggered on detection of email spam. Other actions include re-routing of spam emails to specific folders and deletion of spam emails. Getting Started Guide Installation for Microsoft Exchange 2000 & 2003 41 Tagging Delete Forward to specific email address Move to subfolder in user mailbox Move to junk mail folder Move to specific folder Anti spam filter actions SpamRazer Yes Yes Yes Yes Yes Yes Directory Harvesting Yes Yes Yes Yes Yes Yes Phishing Yes Yes Yes Yes Yes Yes Sender Policy Framework Yes Yes Yes Yes Yes Yes Whitelist N/A N/A N/A N/A N/A N/A Email blacklist Yes Yes Yes Yes Yes Yes DNS blacklists Yes Yes Yes Yes Yes Yes Spam URI Realtime Blocklists Yes Yes Yes Yes Yes Yes Header checking Yes Yes Yes Yes Yes Yes Keyword checking Yes Yes Yes Yes Yes Yes New Senders Yes Yes Yes Yes No Yes Bayesian analysis Yes Yes Yes Yes Yes Yes Filters N/A - Not applicable Configuration of anti spam filters and actions is possible via the GFI MailEssentials Configuration console. Additionally, through this console you can also run reports and customize other product features such as enable daily spam digest. For guidelines on how to configure GFI MailEssentials functions and features refer to the GFI MailEssentials Administration and Configuration manual. 3.7 Installing on IIS cluster Introduction A cluster is a group of servers, technically known as nodes, working collectively as a single server. Such environment provides high availability and fail over mechanisms to ensure constant availability of resources and applications including email infrastructures. If one of the nodes in the cluster fails/is not available, resources and applications switch to another cluster node. A Microsoft Exchange cluster can be set up in one of two modes: active/active or active/passive. GFI MailEssentials supports ONLY active/passive clusters. In an active/passive cluster, a „failover‟ mechanism ensures that whenever an active cluster fails, one of the available passive nodes becomes active (i.e. takes over the role of the failed node). 42 Installation for Microsoft Exchange 2000 & 2003 Getting Started Guide In view of the way clusters work, GFI MailEssentials must be installed on all servers/cluster nodes in order to ensure uninterrupted email spam management. GFI MailEssentials installation in an IIS cluster is a 3-tier process: Process 1: Install GFI MailEssentials on the Active cluster node. Process 2: Install GFI MailEssentials on another cluster node. Process 3: Add specific GFI MailEssentials services to the Exchange Virtual Server cluster resource group. Repeat Processes 2 and 3 above for the remaining passive node(s) in the cluster. 3.7.1 Upgrade from earlier version If you are currently using a previous version of GFI MailEssentials (version 12), you can upgrade your current installation while at the same time retain all your existing configuration settings. Pre-upgrade actions None Important notes Upgrades cannot be undone i.e. you cannot downgrade to an earlier version once you have installed the latest version. On upgrading an existing installation, licensing reverts to trial version and a new fully purchased license key for the GFI MailEssentials 14.1 is required. For more information on new license keys, refer to: http://customers.gfi.com You cannot change the installation path during GFI MailEssentials upgrades. When upgrading in a Microsoft Exchange cluster environment, all instances of GFI MailEssentials must be upgraded i.e. GFI MailEssentials must be upgraded on all cluster nodes/servers making part of the cluster. Upgrade procedure 1. Launch GFI MailEssentials installation on the server where your earlier version of GFI MailEssentials is installed. Screenshot 30 - Confirm the upgrade 2. Click Yes to start the upgrade process and follow on-screen instructions. For assistance refer to Installation procedure chapter in the section below. Getting Started Guide Installation for Microsoft Exchange 2000 & 2003 43 3.7.2 New installations Important notes 1. Only active/passive cluster setups are supported. 2. Before starting installation, close any running Windows applications. 3. Before starting installation, Microsoft Exchange Server 2000/2003 needs to be installed in clustered mode. 4. Before starting installation ensure that you have a Generic Service cluster group resource for the SMTP Service and a physical disc cluster resource available. Pre-install actions Create a new resource 1. Open Cluster Administrator. 2. In the console tree, double-click Groups folder. 3. In the details pane, click the group to which you want the resource to belong. 4. On the File menu, select to New, and then click Resource. 5. In the New Resource Wizard, type the appropriate information in Name and Description, click the appropriate information in Resource type and Group, and click Next. 6. Add or remove possible owners of the resource, and click Next. 7. To add dependencies, under Available resources, click a resource, and then click Add. Or, to remove dependencies, under Resource dependencies, click a resource, and then click Remove. 8. Repeat step 7 for any other resource dependencies, and click Next. 9. Set resource properties in the Parameters dialog box, Installation procedure Step 1 - Install GFI MailEssentials in the shared hard drive on active server 1. Logon on the active node of your IIS cluster using administrator credentials. 2. Double click mailessentials14.exe (32-bit install) or mailessentials14_x64.exe (64-bit install) accordingly. 3. Select install language and click Next. 4. Select whether to check for newer versions/builds of GFI MailEssentials and click Next. 5. Read licensing agreement. To proceed with the installation select I accept the license agreement and click Next. 6. Click Next to install in default location or click Browse to change path. 7. Specify user details and enter license key. Click Next to continue. 44 Installation for Microsoft Exchange 2000 & 2003 Getting Started Guide 8. Specify the email address where notifications (e.g. failed anti spam filters, spam digests) are sent. Screenshot 31 - Selecting SMTP mode or Active Directory mode 9. Specify whether GFI MailEssentials will get the list of email users (required for user-based configuration/rules e.g. disclaimers) from Active Directory or SMTP server. Click Next to continue. Screenshot 32 - Installing Microsoft Message Queuing Service 10. If Microsoft Message Queuing Services (MSMQ) is not installed then the dialog in the above screenshot will open. Select Yes to install MSMQ. Click Next to continue. Getting Started Guide Installation for Microsoft Exchange 2000 & 2003 45 Screenshot 33 - Configure your inbound email domain 11. Setup will now display the list of inbound email domains detected. Verify that all inbound email domains to be protected against spam are listed. Take note of any changes required for post-installation and click Next. NOTE: You can modify the list of inbound email domains ONLY postinstall. For more information refer to the Confirm domains to defend against spam section in Post-install actions below. 12. Click Finish to finalize your installation. On completion, setup will: Ask you to restart the SMTP service. Failing to restart the SMTP service will negatively affect anti spam filtering and email flow. Check whether Microsoft XML engine is installed. This is automatically installed if not found on UK/US English OS. For other OS languages, this has to be manually downloaded and installed. Microsoft XML engine can be downloaded from: http://www.microsoft.com/downloads/details.aspx?FamilyId=3144 B72B-B4F2-46DA-B4B6-C5D7485F2B42&displaylang=en Prompt you to launch the Quick Start Guide. This is a set of instructions that will guide you through the GFI MailEssentials configuration settings required post-install/for first use. Step 2 - Install GFI MailEssentials on a passive server 1. Logon on the passive node of your Microsoft Exchange cluster using administrator credentials. 2. Double click mailessentials14.exe (32-bit install) or mailessentials14_x64.exe (64-bit install) accordingly. 3. Select install language and click Next. 4. Select whether to check for newer versions/builds of GFI MailEssentials and click Next. 46 Installation for Microsoft Exchange 2000 & 2003 Getting Started Guide 5. Read licensing agreement. To proceed with the installation select I accept the license agreement and click Next. 6. Click Next to install in default location or click Browse to change path. 7. Specify user details and enter license key. Click Next to continue. 8. Specify the email address where notifications (e.g. failed anti spam filters, spam digests) are sent. Screenshot 34 - Selecting SMTP mode or Active Directory mode 9. Specify whether GFI MailEssentials will get the list of email users (required for user-based configuration/rules e.g. disclaimers) from Active Directory or SMTP server. Click Next to continue. Getting Started Guide Installation for Microsoft Exchange 2000 & 2003 47 Screenshot 35 - Installing Microsoft Message Queuing Service 10. If Microsoft Message Queuing Services (MSMQ) is not installed then the dialog in the above screenshot will open. Select Yes to install MSMQ. Click Next to continue. Screenshot 36 - Configure your inbound email domain 11. Setup will now display the list of inbound email domains detected. Verify that all inbound email domains to be protected against spam are listed. Take note of any changes required for post-installation and click Next. NOTE: You can modify the list of inbound email domains ONLY postinstall. For more information refer to the Confirm domains to defend 48 Installation for Microsoft Exchange 2000 & 2003 Getting Started Guide against spam section in Post-install actions below.12. Click Finish to finalize your installation. On completion, setup will: Ask you to restart the SMTP service. Failing to restart the SMTP service will negatively affect anti spam filtering and email flow. Check whether Microsoft XML engine is installed. This is automatically installed if not found on UK/US English OS. For other OS languages, this has to be manually downloaded and installed. Microsoft XML engine can be downloaded from: http://www.microsoft.com/downloads/details.aspx?FamilyId=3144 B72B-B4F2-46DA-B4B6-C5D7485F2B42&displaylang=en Prompt you to launch the Quick Start Guide. This is a set of instructions that will guide you through the GFI MailEssentials configuration settings required post-install/for first use. Step 3 - Add specific GFI MailEssentials services to IIS Server cluster resource group When installing GFI MailEssentials in a clustered windows environment, the product services described below are not automatically included in a cluster resource group. Consequently, if the cluster node on which GFI MailEssentials is running fails, these product services are not moved to another cluster node along with the resource group and they will not be restarted on the new node. As a result, GFI MailEssentials will not start up properly after a failover in a cluster environment. The services to be added to the Exchange Virtual Server cluster resource group are: Display Name: GFI MailEssentials Legacy Attendant Service Dependencies: None Service Name: GFI MailEssentials Legacy Attendant Service Start Parameters: None Registry Replication: None Service Name: gfiasmlhost Display name: GFI MailEssentials Managed Attendant Service Dependencies: None Start Parameters: None Registry Replication: None Service Name: listserv Display Name: GFI MailEssentials List Server Dependencies: GFI MailEssentials Legacy Attendant Start Parameters: None Registry Replication: None Getting Started Guide Installation for Microsoft Exchange 2000 & 2003 49 Service Name: GFI POP2Exchange Display Name: GFI POP2Exchange Dependencies: GFI MailEssentials Legacy Attendant Start Parameters: None Registry Replication: None Service Name: GFIMETRXSVC Display Name: GFI MailEssentials Enterprise Transfer Service Dependencies: GFI MailEssentials Legacy Attendant Start Parameters: None Registry Replication: None To add these services: 1. Go to Control Panel ► Administrator. Administrative Tools Cluster 2. In the tree view on the left hand side of the „Cluster Administrator console‟, expand the cluster root node and then the Groups node. 3. Right-click on the IIS Cluster group resource to bring up the pop-up menu. 4. Scroll down to the New menu item to expand it, and select Resource to bring up the New Resource wizard. 5. Enter the service display name in the „Name‟ and „Description‟ fields. Select „Generic Service‟ as Resource Type and select the Exchange Virtual Server cluster group resource as the group to which the new resource will be added. Click Next. 6. In the Possible Owners dialog, add the nodes of the Exchange cluster to the list of preferred owners. Click Next. 7. Select the resource dependencies in the Dependencies dialog. Click Next. 8. In the „Generic Service Parameters‟ dialog, enter the service name, and leave the start parameters text box empty. Click Next. 9. Click Finish to finalize your configuration. Do not add any keys in the „Registry Replication‟ dialog. 10. Repeat from step 3 to 8 above for each service mentioned above. 11. Right-click on the newly added resource(s) and select Bring Online to enable services. These resources are visible in the list of cluster resources of the Exchange Virtual Server cluster. 3.7.3 Post-install actions At this stage, GFI MailEssentials is installed. You must now configure GFI MailEssentials for first use. To ensure that your GFI MailEssentials anti spam system is effectively up and running do as follows: Step 1: Launch GFI MailEssentials Configuration console Click on Start ► All Programs ► GFI MailEssentials ► GFI MailEssentials Configuration. 50 Installation for Microsoft Exchange 2000 & 2003 Getting Started Guide Step 2: Verify current DNS Server settings 1. Right click Anti spam ► Anti Spam Settings node and select Properties. 2. Click on the DNS Server tab. Verify the DNS server details automatically detected during install. 3. To specify a different DNS Server, select Use the following DNS server and specify details. 4. Click Test to check your newly added DNS server settings. 5. Click OK to finalize your configuration. Step 3: Confirm domains to defend against spam NOTE: ONLY the inbound email domains configured in GFI MailEssentials will be protected against spam. 1. Right click General ► General Settings node and select Properties. 2. Click on the Inbound Email Domains tab and ensure that all required inbound domains are listed in the Inbound domains field. 3. To specify additional domains, click Add… and enter inbound email domain details. 4. Click OK button to finalize your configuration. Step 4: Enable Directory Harvesting This filter uses Active directory or LDAP lookups to verify whether inbound emails are addressed to legitimate „internal‟ email accounts. To enable this filter: 1. Right click Anti spam ► Anti-Spam Filters ► Directory Harvesting node and select Properties. 2. Select Enable directory harvesting protection. 3. Select the lookups method to be used: Use native Active Directory lookups option - Select this option if during installation you selected to get the list of email users from Active Directory (see Installation procedure section above - step 9). Use LDAP lookups - Select this option if GFI MailEssentials is installed on a server which is not part of your Active Directory domain (e.g. GFI MailEssentials is installed in the DMZ). Directory Harvesting will use LDAP to query Active Directory. (see Installation procedure section above - step 9). In addition: o Unselect the Anonymous bind option if your LDAP server requires authentication o Enter the authentication details using Domain\User format. o Click Test button to test your LDAP configuration settings. Step 5: Configure whitelists This filter allows you to specify lists of „friendly‟ email domains, email addresses or IP addresses. Getting Started Guide Installation for Microsoft Exchange 2000 & 2003 51 WARNING: USE THIS FEATURE WITH CAUTION. Entries in this list will not be scanned for spam and will bypass all anti spam filtering. 1. Right click Anti spam ► Whitelist node and select Properties. 2. Click on the Whitelist tab. 3. Click Add… and specify domains/email addresses or IP addresses to whitelist. 4. Click OK to finalize your configuration. Step 6: Test your anti spam system GFI MailEssentials is now ready to start managing spam. To verify that anti spam is working properly: 1. Clicking Start ► All Programs ► GFI MailEssentials ► GFI MailEssentials Dashboard. 2. Using an external email account (for example webmail, hotmail or Gmail), create a new email and key in “100% free” as the subject. 3. Send the email to one of your internal email accounts. GFI MailEssentials will tag this email as spam by adding the tag [SPAM] to the email „subject‟ field. 4. Allow some time for email delivery and confirm that email spam tagging is working by: Screenshot 37 - Testing your anti spam system Checking the GFI MailEssentials Dashboard. Use the Status tab to view the status of key GFI MailEssentials services and email processing activity. Receipt and processing status of this email is logged in the MTA logging window. 52 Installation for Microsoft Exchange 2000 & 2003 Getting Started Guide Screenshot 38 - Email tagged as SPAM Accessing the inbox of the email account to which the test email was sent and confirm that email subject includes [SPAM] in the subject field. 3.7.4 GFI MailEssentials Configuration At this stage, your GFI MailEssentials anti spam system is up and running. All inbound email will be scanned by the anti spam filters enabled by default. Getting Started Guide Filter Description Enabled by Default SpamRazer An anti-spam engine that determines if an email is spam by using email reputation, message fingerprinting and content analysis. Yes Directory Harvesting Stops email which is randomly generated towards a server, mostly addressed to nonexistent users. Yes Phishing Blocks emails that contain links in the message bodies pointing to known phishing sites or if they contain typical phishing keywords. Yes Sender Policy Framework Stops email which is received from domains not authorized in SPF records No AutoWhitelist Addresses to which an email is sent to, are automatically excluded from being blocked. Yes Whitelist A custom list of safe email addresses Yes Installation for Microsoft Exchange 2000 & 2003 53 Email blacklist A custom list of blocked email users or domains. Yes DNS blacklists Checks if the email received is from senders that are listed on a public DNS blacklist of known spammers. Yes Spam URI Realtime Blocklists Stops emails which contain links to domains listed on public Spam URI Blocklists such as sc.surbl.org Yes Header checking A module which analyses the individual fields in a header by referencing the SMTP and MIME fields Yes Keyword checking Spam messages are identified based on blocked keywords in the email title or body No New Senders Emails that have been received from senders to whom emails have never been sent before. No Bayesian analysis An anti-spam technique where a statistical probability index based on training from users is used to identify spam. No By default, email classified as spam will be tagged (i.e. will include the prefix [SPAM] in the subject field). Although enabled by default, email tagging is NOT the only anti spam filter action that can be triggered on detection of email spam. Other actions include re-routing of spam emails to specific folders and deletion of spam emails. Tagging Delete Forward to specific email address Move to subfolder in user mailbox Move to junk mail folder Move to specific folder Anti spam filter actions SpamRazer Yes Yes Yes Yes Yes Yes Directory Harvesting Yes Yes Yes Yes Yes Yes Phishing Yes Yes Yes Yes Yes Yes Sender Policy Framework Yes Yes Yes Yes Yes Yes Whitelist N/A N/A N/A N/A N/A N/A Email blacklist Yes Yes Yes Yes Yes Yes DNS blacklists Yes Yes Yes Yes Yes Yes Spam URI Realtime Blocklists Yes Yes Yes Yes Yes Yes Header checking Yes Yes Yes Yes Yes Yes Keyword checking Yes Yes Yes Yes Yes Yes New Senders Yes Yes Yes Yes No Yes Bayesian analysis Yes Yes Yes Yes Yes Yes Filters N/A - Not applicable 54 Installation for Microsoft Exchange 2000 & 2003 Getting Started Guide Configuration of anti spam filters and actions is possible via the GFI MailEssentials Configuration console. Additionally, through this console you can also run reports and customize other product features such as enable daily spam digest. For guidelines on how to configure GFI MailEssentials functions and features refer to the GFI MailEssentials Administration and Configuration manual. Getting Started Guide Installation for Microsoft Exchange 2000 & 2003 55 4 Installation for Microsoft Exchange 2007 & 2010 4.1 Introduction GFI MailEssentials installation depends on your network infrastructure, i.e. Microsoft Exchange 2007/2010 or SBS 2008 setup. You can install this product on: Same server running Microsoft Exchange or SBS: This setup is typically used to filter email spam on Microsoft Exchange or SBS servers set to receive emails directly from „outside‟ (i.e. the internet). Mail gateway or relay/perimeter server: This type of installation is commonly used to filter spam in distributed email infrastructures - especially those running a DMZ. In this environment a dedicated machine is set to relay emails to another server running Microsoft Exchange. Here, GFI MailEssentials is typically installed on the mail relay server so that email spam is filtered before reaching your Microsoft Exchange server. This setup reduces network traffic, email storage and processing requirements on your email infrastructure. Microsoft Exchange Server 2007/2010 clusters: This type of installation is commonly used to filter spam within environments where clusters are used as disaster prevention and recovery mechanisms. 4.2 System requirements 4.2.1 Software Supported operating systems Microsoft Windows Server 2008 x64 Microsoft Windows Server gateway/perimeter server only) Microsoft Small Business Server (SBS) 2008 Standard 2008 x86 (Installations on Mail Servers Getting Started Guide Microsoft Exchange Server 2007 or Microsoft Exchange Server 2007 SP1 Microsoft Exchange Server 2010 Installation for Microsoft Exchange 2007 & 2010 57 Other components Microsoft .NET Framework 2.0 Microsoft XML core services: This is required by the GFI MailEssentials reporter to enable anti spam report generation. For UK/US English OS this is installed automatically by GFI MailEssentials. For other languages, this can be downloaded from: http://www.microsoft.com/downloads/details.aspx?FamilyId=3144 B72B-B4F2-46DA-B4B6-C5D7485F2B42&displaylang=en Microsoft Message Queuing Services. Microsoft Exchange Server MAPI Client and Collaboration Data Objects 1.2.1. This can be downloaded from: http://www.microsoft.com/downloads/details.aspx?FamilyID=E17E 7F31-079A-43A9-BFF2-0A110307611E&displaylang=en 4.2.2 Hardware Processor Minimum: Intel Pentium or compatible 1 GHz 32-bit processor Recommended: x64 architecture-based server with Intel 64 architecture or AMD64 platform Memory Minimum: 1GB RAM Recommended: 2GB RAM Physical Storage Minimum: 500MB for installation, 2GB for execution Recommended: 500MB for installation, 4GB for execution 4.3 Important settings 4.3.1 Antivirus and backup software Antivirus and backup software may cause GFI MailEssentials to malfunction. This occurs when such software denies access to certain files required by GFI MailEssentials Disable third party antivirus and backup software from scanning the following folders: x86 installations (32-bit) x64 installations (64-bit) <..\Program Files\GFI\MailEssentials> <..\Program Files (x86)\GFI\MailEssentials> <..\Program Files\Common Files\GFI> <..\Program Files (x86)\Common Files\GFI> <..\Inetpub\mailroot> If installed on a gateway machine. <..\Program Files\Exchsrvr\Mailroot> If installed on the same machine as Microsoft Exchange 2007/2010. 58 Installation for Microsoft Exchange 2007 & 2010 Getting Started Guide 4.3.2 Firewall port settings Configure your firewall to allow the following port connections. These ports are used by GFI MailEssentials to connect to GFI servers: DNS (Port 53) - Used by anti spam filters (DNS blacklist, Sender Policy Framework, Header Checking) to identify the domain from where received emails originated. FTP (Ports 20 and 21) - Used by GFI MailEssentials to connect to 'ftp.gfisoftware.com' and retrieve latest product version information. HTTP (Port 80) - Used by GFI MailEssentials to download product patch and anti spam filter updates (i.e. SpamRazer, Anti-Phishing, and Bayesian anti spam filters) from the following locations: o 'http://update.gfi.com' o 'http://update.gfisoftware.com' o o 'http://support.gfi.com 'http://db11.spamcatcher.net' earlier) (GFI MailEssentials 14 or o 'http://sn92.mailshell.net' (GFI MailEssentials 14 SR1 or later) Remoting (Ports 8021) - Used in the latest builds of GFI MailEssentials for inter-process communication. No firewall configuration is required to allow connections to or from the remoting ports since all the GFI MailEssentials processes run on the same server. NOTE: Ensure that no other applications (except GFI MailEssentials) are listening on port 8021. (OPTIONAL) LDAP (Port 389) - Used by GFI MailEssentials to get email addresses from SMTP server. ONLY required if the server running GFI MailEssentials does not have access/cannot get list of users from Active Directory e.g. in a DMZ environment or other environment which does not use Active Directory. 4.4 Installing on Microsoft Exchange or SBS server 4.4.1 Upgrade from earlier version If you are currently using a previous version of GFI MailEssentials (version 12), you can upgrade your current installation while at the same time retain all your existing configuration settings. Important notes Upgrades cannot be undone i.e. you cannot downgrade to an earlier version once you have installed the latest version. On upgrading an existing installation, licensing reverts to trial version and a new fully purchased license key for the GFI MailEssentials 14.1 is required. For more information on new license keys, refer to: http://customers.gfi.com You cannot change the installation path during GFI MailEssentials upgrades. Getting Started Guide Installation for Microsoft Exchange 2007 & 2010 59 Upgrade procedure 1. Launch GFI MailEssentials installation on the server where your earlier version of GFI MailEssentials is installed. Screenshot 39 - Confirm the upgrade 2. Click Yes to start the upgrade process and follow on-screen instructions. For assistance refer to New installations section below. 4.4.2 New installations Important notes 1. During installation, GFI MailEssentials restarts Microsoft Exchange Server services. This is required to allow GFI MailEssentials components to be registered and started. 2. Before starting installation, close any running Windows applications. 3. Since Microsoft Exchange Server 2007/2010 can only be installed on Windows Server 2008 64-bit, GFI MailEssentials 64-bit version is required. Installation procedure 1. Logon your Microsoft Exchange Server machine using administrator credentials. 2. Double click mailessentials14_x64.exe. 3. Select install language and click Next. 4. Select whether to check for newer versions/builds of GFI MailEssentials and click Next. 5. Read licensing agreement. To proceed with the installation select I accept the license agreement and click Next. 6. Click Next to install in default location or click Browse to change path. 7. Specify user details and enter license key. Click Next to continue. 8. Specify the email address where notifications (e.g. failed anti spam filters, spam digests) are sent. 60 Installation for Microsoft Exchange 2007 & 2010 Getting Started Guide Screenshot 40 - Selecting SMTP mode or Active Directory mode 9. Specify whether GFI MailEssentials will get the list of email users (required for user-based configuration/rules e.g. disclaimers) from Active Directory or SMTP server. Click Next to continue. Screenshot 41 - Installing Microsoft Message Queuing Service 10. If Microsoft Message Queuing Services (MSMQ) is not installed then the dialog in the above screenshot will open. Select Yes to install MSMQ. Click Next to continue. 11. Click Finish to finalize your installation. On completion, setup will: Getting Started Guide Installation for Microsoft Exchange 2007 & 2010 61 Check whether Microsoft XML engine is installed. This is automatically installed if not found on UK/US English OS. For other OS languages, this has to be manually downloaded and installed. Microsoft XML engine can be downloaded from: http://www.microsoft.com/downloads/details.aspx?FamilyId=3144 B72B-B4F2-46DA-B4B6-C5D7485F2B42&displaylang=en Launch the post-installation wizard that registers GFI MailEssentials with the local installation of Microsoft Exchange 2007/2010. Post-installation wizard 1. Click Next in the welcome page. 2. If installing on Microsoft Exchange 2007, skip to step 3. If installing in a Microsoft Exchange 2010 environment, configure a user to enable GFI MailEssentials to move emails caught as spam to a custom folder in the users‟ mailbox. Select one of the following options: Do not move spam to subfolders in user mailboxes - Select this option to disable spam emails to be moved to a special folder in the users‟ mailboxes. Move spam using an automatically created user - Select this option to let GFI MailEssentials automatically create a user with all the required rights. Move spam using the following user account - Select this option to use a manually created user. Specify the credentials (Domain\username and password) of a dedicated user and click Set impersonation rights to assign the required rights to the specified user. NOTE: The manually specified user credentials must be dedicated to this feature only. The username, password or other properties must not be changed from Microsoft Exchange or Active Directory, otherwise the Move to Exchange folder feature will not work. 62 Installation for Microsoft Exchange 2007 & 2010 Getting Started Guide Screenshot 42 - Inbound email domains list 3. In the email domains list: Review local domains found. NOTE: Asterisks (*) next to inbound email domains indicate domains detected by Microsoft Exchange. Key in the inbound domain and click Add. Select domains and click Remove to remove domains. Click Next to continue setup. Screenshot 43 - Server roles detected and list of components to install. Getting Started Guide Installation for Microsoft Exchange 2007 & 2010 63 4. A list of the Microsoft Exchange Server 2007/2010 server roles detected and GFI MailEssentials components required is displayed. Click Next to install the required GFI MailEssentials components. 5. Click Finish to finalize the installation. On completion, setup will: Prompt you to launch the Quick Start Guide. This is a set of instructions that will guide you through the configuration settings required post-install/for first use (Recommended). At this stage, GFI MailEssentials is installed. You must now configure GFI MailEssentials for first use. For instructions refer to the next section Post-install actions. 4.4.3 Post-install actions To ensure that your GFI MailEssentials anti spam system is effectively up and running you must perform the following post-install actions: Step 1: Launch GFI MailEssentials Configuration console Click on Start ► All Programs ► GFI MailEssentials ► GFI MailEssentials Configuration. Step 2: Verify current DNS Server settings 1. Right click Anti spam ► Anti-Spam Settings node and select Properties. 2. Click on the DNS Server tab. Verify the DNS server details automatically detected during install. 3. To specify a different DNS Server, select Use the following DNS server and specify details. 4. Click Test to check your newly added DNS server settings. 5. Click OK to finalize your configuration. Step 3: Confirm domains to defend against spam NOTE: ONLY the inbound email domains configured in GFI MailEssentials will be protected against spam. 1. Right click General ► General Settings node and select Properties. 2. Click on the Inbound Email Domains tab and ensure that all required inbound domains are listed in the Inbound domains field. 3. To specify additional domains, click Add… and enter inbound email domain details. 4. Click OK button to finalize your configuration. Step 4: Enable Directory Harvesting This filter uses Active directory or LDAP lookups to verify whether inbound emails are addressed to legitimate „internal‟ email accounts. To enable this filter: 1. Right click Anti spam ► Anti-spam filters ► Directory Harvesting node and select Properties. 64 Installation for Microsoft Exchange 2007 & 2010 Getting Started Guide 2. Select Enable directory harvesting protection. 3. Select the lookups method to be used: Use native Active Directory lookups option - Select this option if during installation you selected to get the list of email users from Active Directory (see Installation procedure section above - step 9). Use LDAP lookups - Select this option if GFI MailEssentials is installed on a server which is not part of your Active Directory domain (e.g. GFI MailEssentials is installed in the DMZ). Directory Harvesting will use LDAP to query Active Directory. (see Installation procedure section above - step 9). In addition: o Unselect the Anonymous bind option if your LDAP server requires authentication. o Enter the authentication details using Domain\User format. o Click Test button to test your LDAP configuration settings. Step 5: Configure whitelists This filter allows you to specify lists of „friendly‟ email domains, email addresses or IP addresses. WARNING: USE THIS FEATURE WITH CAUTION. Entries in this list will not be scanned for spam and will bypass all anti spam filtering. 1. Right click Anti spam ► Whitelist node and select Properties. 2. Click on the Whitelist tab. 3. Click Add… and specify domains/email addresses or IP addresses to whitelist. 4. Click OK to finalize your configuration. Step 6: Test your anti spam system GFI MailEssentials is now ready to start managing spam. To verify that anti spam is working properly: 1. Clicking Start ► All Programs ► GFI MailEssentials ► GFI MailEssentials Dashboard. 2. Using an external email account (for example webmail, hotmail or Gmail), create a new email and key in “100% free” as the subject. 3. Send the email to one of your internal email accounts. By default, GFI MailEssentials will forward this email to sub-folder „Suspected Spam‟ in the user‟s mailbox. 4. Allow some time for email delivery and confirm that GFI MailEssentials is working by: Getting Started Guide Installation for Microsoft Exchange 2007 & 2010 65 Screenshot 44 - Testing your anti spam system Checking the GFI MailEssentials Dashboard. When the email is received, the details are displayed in the MTA logging window. Ensure that the description next to the test email with subject „100% free‟ is „Blocked: Keyword Checking‟. Screenshot 45 - Spam email delivered to ‘Suspected Spam” sub-folder Accessing the inbox of the email account to which the test email was sent and confirm that the email is moved to the „Suspected Spam‟ sub-folder in Inbox. NOTE: In a Microsoft Exchange 2010 environment, if Move to Exchange folder option is not enabled in the Post-install wizard, the default anti spam action is Tagging. The spam email is delivered in Inbox and tagged [SPAM]. 66 Installation for Microsoft Exchange 2007 & 2010 Getting Started Guide 4.4.4 GFI MailEssentials Configuration At this stage, your GFI MailEssentials anti spam system is up and running. All inbound email will be scanned by the anti spam filters enabled by default. Filter Description Enabled by Default SpamRazer An anti-spam engine that determines if an email is spam by using email reputation, message fingerprinting and content analysis. Yes Directory Harvesting Stops email which is randomly generated towards a server, mostly addressed to nonexistent users. Yes Phishing Blocks emails that contain links in the message bodies pointing to known phishing sites or if they contain typical phishing keywords. Yes Sender Policy Framework Stops email which is received from domains not authorized in SPF records No AutoWhitelist Addresses to which an email is sent to, are automatically excluded from being blocked. Yes Whitelist A custom list of safe email addresses Yes Email blacklist A custom list of blocked email users or domains. Yes DNS blacklists Checks if the email received is from senders that are listed on a public DNS blacklist of known spammers. Yes Spam URI Realtime Blocklists Stops emails which contain links to domains listed on public Spam URI Blocklists such as sc.surbl.org Yes Header checking A module which analyses the individual fields in a header by referencing the SMTP and MIME fields Yes Keyword checking Spam messages are identified based on blocked keywords in the email title or body No New Senders Emails that have been received from senders to whom emails have never been sent before. No Bayesian analysis An anti-spam technique where a statistical probability index based on training from users is used to identify spam. No By default, email classified as spam will be moved to the „Suspected Spam‟ folder. Although enabled by default, moving email to a folder in Inbox is NOT the only anti spam filter action that can be triggered on detection of email spam. Other actions include email tagging and deletion of spam emails. Filters Getting Started Guide Anti spam filter actions Installation for Microsoft Exchange 2007 & 2010 67 Tagging Delete Forward to specific email address Move to subfolder in user mailbox Move to junk mail folder Move to specific folder SpamRazer Yes Yes Yes Yes Yes Yes Directory Harvesting Yes Yes Yes Yes Yes Yes Phishing Yes Yes Yes Yes Yes Yes Sender Policy Framework Yes Yes Yes Yes Yes Yes Whitelist N/A N/A N/A N/A N/A N/A Email blacklist Yes Yes Yes Yes Yes Yes DNS blacklists Yes Yes Yes Yes Yes Yes Spam URI Realtime Blocklists Yes Yes Yes Yes Yes Yes Header checking Yes Yes Yes Yes Yes Yes Keyword checking Yes Yes Yes Yes Yes Yes New Senders Yes Yes Yes Yes No Yes Bayesian analysis Yes Yes Yes Yes Yes Yes N/A - Not applicable Configuration of anti spam filters and actions is possible via the GFI MailEssentials Configuration console. Additionally, through this console you can also run reports and customize other product features such as enable daily spam digest. For guidelines on how to configure GFI MailEssentials functions and features refer to the GFI MailEssentials Administration and Configuration manual. 4.5 Installing on an email gateway or relay/perimeter server Introduction GFI MailEssentials can be installed: On a perimeter server (e.g. DMZ) with Microsoft Exchange Server 2007/2010 in Edge Server role. As a mail relay server between the perimeter (gateway) SMTP server and the recipients‟ inboxes with Microsoft Exchange Server 2007/2010 in Hub Transport role. Both setups enable you to reduce unnecessary email traffic by using your Active Directory resources (at a perimeter/gateway server level) to drop connections of non-existent email recipients in incoming email. This greatly helps against common spamming techniques such as Directory Harvest Attacks (a brute force type of attack used by spammers to find valid/existent e-mail addresses at a domain). This structure eliminates most spam from arriving at your Microsoft Exchange server. 68 Installation for Microsoft Exchange 2007 & 2010 Getting Started Guide Figure 4 - A typical Perimeter SMTP Relay Server setup 4.5.1 Pre-install actions Step 1: Send and Receive connector setup NOTE: These connectors are not required for Microsoft Exchange Server 2007/2010 installed with Edge Server Role. Ensure that the required Send connectors and Receive connectors to and from Microsoft Exchange 2007/2010 are created for servers installed with Hub Transport Role. Where these are not yet created: 1. Add a „Send Connector‟ to Microsoft Exchange forward all emails to the GFI MailEssentials machine server to From the Microsoft Exchange Server Management Console select Organization Configuration ► Hub Transport ► Actions ► New Send Connector In the New SMTP connector wizard, key in the name for the connector in the introduction screen. NOTE: You can use „GFI MailEssentials SMTP Connector‟. From the Select the intended use for this Send Connector drop down list box select Internet. From the Address space screen click Add and key in *. Click Ok and click Next. Choose Route mail through the following smart host, click Add and specify the IP address of the server where GFI MailEssentials is installed. Click Next. Getting Started Guide Set the authentication for the GFI MailEssentials machine (if required) and click Next. Installation for Microsoft Exchange 2007 & 2010 69 Select the Hub Transport server with which this connector will be associated and click Next. Verify the configuration summary and click New to create the new send connector. NOTE: On completion, the GFI MailEssentials connector will be available in the Send Connectors tab and is enabled by default. 2. Add a „Receive Connector‟ to Microsoft Exchange server to accept emails from the GFI MailEssentials Machine From the Exchange Management Shell, key in the following command: new-receiveconnector -name "GFI MailEssentials" Bindings "0.0.0.0:25" -RemoteIPRanges "<MailEssentials IP Address>" -AuthMechanism "ExternalAuthoritative" -PermissionGroups "ExchangeServers" Change <MailEssentials IP Address> with the IP address of the GFI MailEssentials machine. Example: new-receiveconnector -name "GFI MailEssentials" Bindings "0.0.0.0:25" -RemoteIPRanges "192.168.0.1" -AuthMechanism "ExternalAuthoritative" -PermissionGroups "ExchangeServers" Step 2: Test your new mail relay server Before installing GFI MailEssentials, verify that your new mail relay server is working correctly: Test IIS SMTP inbound connection via test email 1. Send an email from an „external‟ account (e.g. internet email account) to an internal email address/user. 2. Ensure that intended recipient received the test email in the respective email client. Test IIS SMTP outbound connection via test email 1. Send an email from an „internal‟ email account to an external account (e.g. internet email) 2. Ensure that the intended recipient/external user received the test email. NOTE: You can also use „Telnet‟ to manually send the test email and obtained more troubleshooting information. For more information refer to: http://support.microsoft.com/support/kb/articles/Q153/1/19.asp 4.5.2 Upgrades from earlier version If you are currently using a previous version of GFI MailEssentials (versions 9, 10, 11 and 12), you can upgrade your current installation while at the same time retain all your existing configuration settings. 70 Installation for Microsoft Exchange 2007 & 2010 Getting Started Guide Important notes Upgrades cannot be undone i.e. you cannot downgrade to an earlier version once you have installed the latest version. On upgrading an existing installation, licensing reverts to trial version and a new fully purchased license key for the GFI MailEssentials 14.1 is required. For more information on new license keys, refer to: http://customers.gfi.com You cannot change the installation path during GFI MailEssentials upgrades. When upgrading from GFI MailEssentials 9, the current Bayesian weights file will be upgraded to the new format used in GFI MailEssentials 10 or later. The new format is more compact and uses less memory. NO DATA WILL BE LOST. 4.5.3 Upgrade procedure 1. Launch GFI MailEssentials installation on the server where your earlier version of GFI MailEssentials is installed. Screenshot 46 - Confirm the upgrade 2. Click Yes to start the upgrade process and follow on-screen instructions. For assistance refer to New installations section below. 4.5.4 New installations Important notes 1. During installation, GFI MailEssentials restarts Microsoft Exchange Server services. This is required to allow GFI MailEssentials components to be registered and started. 2. Before starting installation, close any running Windows applications. Installation procedure 1. Logon your Microsoft Exchange Server machine using administrator credentials. 2. Double click mailessentials14.exe (32-bit install) or mailessentials14_x64.exe (64-bit install) accordingly. 3. Select install language and click Next. 4. Select whether to check for newer versions/builds of GFI MailEssentials and click Next. 5. Read licensing agreement. To proceed with the installation select I accept the license agreement and click Next. Getting Started Guide Installation for Microsoft Exchange 2007 & 2010 71 6. Click Next to install in default location or click Browse to change path. 7. Specify user details and enter license key. Click Next to continue. 8. Specify the email address where notifications (e.g. failed anti spam filters, spam digests) are sent. Screenshot 47 - Selecting SMTP mode or Active Directory mode 9. Specify whether GFI MailEssentials will get the list of email users (required for user-based configuration/rules e.g. disclaimers) from Active Directory or SMTP server. Click Next to continue. Screenshot 48 - Installing Microsoft Message Queuing Service 72 Installation for Microsoft Exchange 2007 & 2010 Getting Started Guide 10. If Microsoft Message Queuing Services (MSMQ) is not installed then the dialog in the above screenshot will open. Select Yes to install MSMQ. Click Next to continue. 11. Click Finish to finalize your installation. On completion, setup will: Ask you to restart the SMTP service. IMPORTANT: Failing to restart the SMTP service will negatively affect anti spam filtering and email flow. Check whether Microsoft XML engine is installed. This is automatically installed if not found on UK/US English OS. For other OS languages, this has to be manually downloaded and installed. Microsoft XML engine can be downloaded from: http://www.microsoft.com/downloads/details.aspx?FamilyId=3144 B72B-B4F2-46DA-B4B6-C5D7485F2B42&displaylang=en Prompt you to launch the Quick Start Guide. This is a set of instructions that will guide you through the configuration settings required post-install/for first use (Recommended). 4.5.5 Post-install actions To ensure that your GFI MailEssentials anti spam system is effectively up and running you must perform the following post-install actions: Step 1: Launch GFI MailEssentials Configuration console Click on Start ► All Programs ► GFI MailEssentials ► GFI MailEssentials Configuration. Step 2: Verify current DNS Server settings 1. Right click Anti spam ► Anti-spam settings node and select Properties. 2. Click on the DNS Server tab. Verify the DNS server details automatically detected during install. 3. To specify a different DNS Server, select Use the following DNS server and specify details. 4. Click Test to check your newly added DNS server settings. 5. Click OK to finalize your configuration. Step 3: Confirm domains to defend against spam NOTE: ONLY the inbound email domains configured in GFI MailEssentials will be protected against spam. 1. Right click General ► General Settings node and select Properties. 2. Click on the Inbound Email Domains tab and ensure that all required inbound domains are listed in the Inbound domains field. 3. To specify additional domains, click Add… and enter inbound email domain details. 4. Click OK button to finalize your configuration. Getting Started Guide Installation for Microsoft Exchange 2007 & 2010 73 Step 4: Enable Directory Harvesting This filter uses Active directory or LDAP lookups to verify whether inbound emails are addressed to legitimate „internal‟ email accounts. To enable this filter: 1. Right click Anti spam ► Anti-spam filters ► Directory Harvesting node and select Properties. 2. Select Enable directory harvesting protection. 3. Select the lookups method to be used: Use native Active Directory lookups option - Select this option if during installation you selected to get the list of email users from Active Directory (see Installation procedure section above - step 9). Use LDAP lookups - Select this option if GFI MailEssentials is installed on a server which is not part of your Active Directory domain (e.g. GFI MailEssentials is installed in the DMZ). Directory Harvesting will use LDAP to query Active Directory. (see Installation procedure section above - step 9). In addition: o Unselect the Anonymous bind option if your LDAP server requires authentication. o o Enter the authentication details using Domain\User format. Click Test button to test your LDAP configuration settings. Step 5: Configure whitelists This filter allows you to specify lists of „friendly‟ email domains, email addresses or IP addresses. WARNING: USE THIS FEATURE WITH CAUTION. Entries in this list will not be scanned for spam and will bypass all anti spam filtering. 1. Right click Anti spam ► Whitelist node and select Properties. 2. Click on the Whitelist tab. 3. Click Add… and specify domains/email addresses or IP addresses to whitelist. 4. Click OK to finalize your configuration. 74 Installation for Microsoft Exchange 2007 & 2010 Getting Started Guide Step 6: Test your anti spam system GFI MailEssentials is now ready to start managing spam. To verify that anti spam is working properly: 1. Clicking Start ► All Programs ► GFI MailEssentials ► GFI MailEssentials Dashboard. 2. Using an external email account (for example webmail, hotmail or Gmail), create a new email and key in “100% free” as the subject. 3. Send the email to one of your internal email accounts. GFI MailEssentials will tag this email as spam by adding the tag [SPAM] to the email „subject‟ field. 4. Allow some time for email delivery and confirm that email spam tagging is working by: Screenshot 49 - Testing your anti spam system Getting Started Guide Checking the GFI MailEssentials Dashboard. Use the Status tab to view the status of key GFI MailEssentials services and email processing activity. Receipt and processing status of this email is logged in the MTA logging window. Installation for Microsoft Exchange 2007 & 2010 75 Screenshot 50 - Email tagged as SPAM Accessing the inbox of the email account to which the test email was sent and confirm that email subject includes [SPAM] in the subject field. 4.5.6 GFI MailEssentials Configuration At this stage, your GFI MailEssentials anti spam system is up and running. All inbound email will be scanned by the anti spam filters enabled by default. Filter Description SpamRazer An anti-spam engine that determines if an email is spam by using email reputation, message fingerprinting and content analysis. Yes Directory Harvesting Stops email which is randomly generated towards a server, mostly addressed to nonexistent users. Yes Phishing Blocks emails that contain links in the message bodies pointing to known phishing sites or if they contain typical phishing keywords. Yes Sender Policy Framework Stops email which is received from domains not authorized in SPF records No AutoWhitelist Addresses to which an email is sent to, are automatically excluded from being blocked. Yes Whitelist A custom list of safe email addresses Yes 76 Installation for Microsoft Exchange 2007 & 2010 Enabled by Default Getting Started Guide Email blacklist A custom list of blocked email users or domains. Yes DNS blacklists Checks if the email received is from senders that are listed on a public DNS blacklist of known spammers. Yes Spam URI Realtime Blocklists Stops emails which contain links to domains listed on public Spam URI Blocklists such as sc.surbl.org Yes Header checking A module which analyses the individual fields in a header by referencing the SMTP and MIME fields Yes Keyword checking Spam messages are identified based on blocked keywords in the email title or body No New Senders Emails that have been received from senders to whom emails have never been sent before. No Bayesian analysis An anti-spam technique where a statistical probability index based on training from users is used to identify spam. No By default, email classified as spam will be tagged (i.e. will include the prefix [SPAM] in the subject field). Although enabled by default, email tagging is NOT the only anti spam filter action that can be triggered on detection of email spam. Other actions include re-routing of spam emails to specific folders and deletion of spam emails. Tagging Delete Forward to specific email address Move to subfolder in user mailbox Move to junk mail folder Move to specific folder Anti spam filter actions SpamRazer Yes Yes Yes Yes Yes Yes Directory Harvesting Yes Yes Yes Yes Yes Yes Phishing Yes Yes Yes Yes Yes Yes Sender Policy Framework Yes Yes Yes Yes Yes Yes Whitelist N/A N/A N/A N/A N/A N/A Email blacklist Yes Yes Yes Yes Yes Yes DNS blacklists Yes Yes Yes Yes Yes Yes Spam URI Realtime Blocklists Yes Yes Yes Yes Yes Yes Header checking Yes Yes Yes Yes Yes Yes Keyword checking Yes Yes Yes Yes Yes Yes New Senders Yes Yes Yes Yes No Yes Bayesian analysis Yes Yes Yes Yes Yes Yes Filters N/A - Not applicable Getting Started Guide Installation for Microsoft Exchange 2007 & 2010 77 Configuration of anti spam filters and actions is possible via the GFI MailEssentials Configuration console. Additionally, through this console you can also run reports and customize other product features such as enable daily spam digest. For guidelines on how to configure GFI MailEssentials functions and features refer to the GFI MailEssentials Administration and Configuration manual. 4.6 Installing on Microsoft Exchange Server 2007/2010 clusters On Microsoft Exchange 2007/2010 servers only servers with the Mailbox Role can be part of a cluster. Any other roles are required to be installed on separate servers. To install GFI MailEssentials as part of a Microsoft Exchange 2007/2010 cluster, install GFI MailEssentials on a server running the Hub Transport or the Edge Transport Role. Alternatively, you install GFI MailEssentials on a separate machine in gateway/perimeter server mode. On Microsoft Exchange 2007/2010 server clusters without the Mailbox role, the option to move SPAM to subfolders of the users‟ mailbox is disabled. High availability for the Hub Transport, Edge Transport, Client Access, and Unified Messaging server roles is achieved through a combination of server redundancy, Network Load Balancing (NLB), hardware load balancing, Domain Name System (DNS) round robin, as well as proactive server, service, and infrastructure management. In this case GFI MailEssentials will need to be installed on all servers running the Hub Transport roles or all servers running the Edge Transport roles. Instructions on how to install GFI MailEssentials are provided in the previous sections. 78 Installation for Microsoft Exchange 2007 & 2010 Getting Started Guide 5 Installation for Lotus Domino 5.1 Introduction Installing GFI MailEssentials with Lotus Domino enables you to scan all inbound emails received from „outside' (i.e. the internet) for spam before reaching your Lotus Domino server. Outbound emails relayed to GFI MailEssentials are also processed (e.g. adding of disclaimers and auto-whitelisting) before these are sent via internet. To install GFI MailEssentials with Lotus Domino, the server where GFI MailEssentials is installed must be configured as an email gateway server (also known as "Smart host" or "Mail relay" server) for all your email. All inbound and outbound email must pass through this server for scanning before being relayed to the mail server for distribution. 5.2 System requirements 5.2.1 Software Supported operating systems Microsoft Windows Server 2008 (x86 or x64) Microsoft Windows Server 2003 Standard/Enterprise (x86 or x64) Microsoft Windows 2000 Server/Advanced Server (SP1 or higher) Microsoft Small Business Server 2000 (SP2) / 2003 (SP1) Mail Servers Lotus Domino 6 or later Other components Microsoft .NET Framework 2.0 Microsoft Data Access Components (MDAC) 2.8 - This component is used by GFI MailEssentials‟ mail archiving feature to communicate with databases. Download this component from: Getting Started Guide http://www.microsoft.com/Downloads/details.aspx?familyid=6C050 FE3-C795-4B7D-B037-185D0506396C&displaylang=en Internet Information Services (IIS) (x32 or x64) - SMTP service and WWW service. This is required to enable communications between GFI MailEssentials and Lotus Domino. Microsoft XML core services: This is required by the GFI MailEssentials reporter to enable anti spam report generation. For UK/US English OS this is installed automatically by GFI MailEssentials. For other languages, this can be downloaded from: Installation for Lotus Domino 79 http://www.microsoft.com/downloads/details.aspx?FamilyId=3144 B72B-B4F2-46DA-B4B6-C5D7485F2B42&displaylang=en Microsoft Message Queuing Services. 5.2.2 Hardware Processor Minimum: Intel Pentium or compatible 1 GHz 32-bit processor Recommended: x64 architecture-based server with Intel 64 architecture or AMD64 platform. Memory Minimum: 1GB Recommended: 2GB RAM Physical Storage Minimum: 500MB for installation, 2GB for execution. Recommended: 500MB for installation, 4GB for execution 5.3 Important settings 5.3.1 Antivirus and backup software Antivirus and backup software may cause GFI MailEssentials to malfunction. This occurs when such software denies access to certain files required by GFI MailEssentials. Disable third party antivirus and backup software from scanning the following folders: x86 installations (32-bit) x64 installations (64-bit) <..\Program Files\GFI\MailEssentials> <..\Program Files (x86)\GFI\MailEssentials> <..\Program Files\Common Files\GFI> <..\Program Files (x86)\Common Files\GFI> <..\Inetpub\mailroot> If installed on a gateway machine. 5.3.2 Firewall port settings Configure your firewall to allow the following port connections. These ports are used by GFI MailEssentials to connect to GFI servers: DNS (Port 53) - Used by anti spam filters (DNS blacklist, Sender Policy Framework, Header Checking) to identify the domain from where received emails originated. FTP (Ports 20 and 21) - Used by GFI MailEssentials to connect to 'ftp.gfisoftware.com' and retrieve latest product version information. 80 Installation for Lotus Domino Getting Started Guide HTTP (Port 80) - Used by GFI MailEssentials to download product patch and anti spam filter updates (i.e. SpamRazer, Anti-Phishing, and Bayesian anti spam filters) from the following locations: o 'http://update.gfi.com' o 'http://update.gfisoftware.com' o 'http://support.gfi.com o 'http://db11.spamcatcher.net' (GFI MailEssentials 14 or earlier) 'http://sn92.mailshell.net' (GFI MailEssentials 14 SR1 or later) o Remoting (Ports 8021) - Used in the latest builds of GFI MailEssentials for inter-process communication. No firewall configuration is required to allow connections to or from the remoting ports since all the GFI MailEssentials processes run on the same server. NOTE: Ensure that no other applications (except GFI MailEssentials) are listening on port 8021. LDAP (Port 389) - Used by GFI MailEssentials to get email addresses from Lotus Domino server. 5.4 Installing on gateway servers for Lotus Domino 5.4.1 Pre-install actions GFI MailEssentials uses the IIS SMTP service as its SMTP Server and therefore the IIS SMTP service must be configured to act as a mail relay server. This is achieved as follows: Step 1: Enable IIS SMTP Service 1. Go to Start ► Control Panel ► Add or Remove Programs ► Add/Remove Windows Components. 2. Select Internet Information Services (IIS) and click Details. 3. Select the SMTP Service option and click OK. 4. Click Next to finalize your configuration. Step 2: Create SMTP domain(s) for email relaying 1. Go to Start ► Control Panel ► Administrative Tools. 2. Click on Internet Information Services (IIS) Manager. Getting Started Guide Installation for Lotus Domino 81 Screenshot 51 - Internet Information Services (IIS) Manager 3. In the left pane, expand the respective server node. Right click on Default SMTP Virtual Server and select Properties. 4. Select the IP address currently assigned to your SMTP server and click OK. 5. Expand the Default SMTP Virtual Server node. 6. Right click Domains and select New ► Domain. 7. Select the Remote option and click Next. 8. Specify domain name (e.g. test.gfi.com) and click Finish. Step 3: Enable email relaying to your Microsoft Exchange server: 1. Right click on the new domain (e.g. test.gfi.com) and select Properties. 2. Select the Allow the Incoming Mail to be Relayed to this Domain checkbox. 82 Installation for Lotus Domino Getting Started Guide Screenshot 52 - Configure the domain 3. Select the Forward all mail to smart host option and specify the IP address of the server managing emails in this domain. IP address must be enclosed in square brackets e.g. [123.123.123.123] so to exclude them from all DNS lookup attempts. 4. Click OK to finalize your configuration. Step 4: Secure your SMTP email-relay server If unsecured, your mail relay server can be exploited and used as an open relay for spam. To avoid this from happening, it is recommended that you specifically define which mail servers can route emails through this mail relay server (i.e. allow only specific servers to use this email relaying setup). To achieve this: 1. Go to Start ► Control Panel ► Administrative Tools. 2. Click on Internet Information Services (IIS) Manager. 3. In the left pane, expand the respective server node. Right click on Default SMTP Virtual Server and select Properties. 4. Click on the Access tab and select Relay. Getting Started Guide Installation for Lotus Domino 83 Screenshot 53 - Relay options 5. Select the Only the list below option and click Add. 6. Specify IP(s) of the mail server(s) that are allowed to route emails through your mail relay server. You can specify: Single computer - i.e. Authorize one specific machine to relay email through this server. Use the DNS Lookup button to lookup an IP address for a specific host. Group of computers - i.e. Authorize specific computer(s) to relay emails through this server. Domain - Allow all computers in a specific domain to relay emails through this server. NOTE: The Domain option adds a processing overhead that can degrade SMTP service performance. This is due to the reverse DNS lookup processes triggered on all IP addresses (within that domain) that try to route emails through this relay server. Step 5: Configure Lotus Domino for GFI MailEssentials a. Configure Lotus Domino to send outbound emails through GFI MailEssentials 1. From the „Lotus Domino Administrator‟, click Configuration tab and select configurations item under the server node. 2. From the „Configurations main window, select the server to use with GFI MailEssentials and click edit configuration. 3. Select Router/SMTP tab and ensure Basics is selected. 4. Double click on the content to edit. Select Relay host for messages leaving the local internet domain option and key in the IP address of the mail gateway server where GFI MailEssentials is installed. 84 Installation for Lotus Domino Getting Started Guide 5. Click Save and Close to save configuration. b. Configure Lotus Domino LDAP settings 1. From the „Directory Assistance database‟, click on Add directory assistance to create a new Assistance document. 2. Select the LDAP Clients checkbox from the „Make this domain available to:‟ option. 3. From the „server configuration‟, edit the credentials under the configuration. Enable Anonymous authentication to allow GFI MailEssentials to access Lotus Domino LDAP. Step 6: Update your domain MX record to point to mail relay server Update the MX record of your domain to point to the IP of the new mail relay server. If your DNS server is managed by your ISP, ask your ISP to update the MX record for you. If MX record is not updated all emails will be routed directly to your email server - hence by-pass GFI MailEssentials anti spam filters. Verify that MX record has been successfully updated To verify whether MX record is updated: 1. Click Start ► Run and type Command 2. From the command prompt type in: nslookup 3. Type in: set type=mx 4. Specify your mail domain name. The MX record should return a single IP address. This should be the mail relay server I.P. address. Screenshot 54 - Checking the MX record of your domain Step 7: Test your new mail relay server Before proceeding to install GFI MailEssentials, verify that your new mail relay server is working correctly by doing as follows: Test IIS SMTP inbound connection via test email 1. Send an email from an „external‟ account (e.g. internet email account) to an internal email address/user. 2. Ensure that intended recipient received the test email in the respective email client. Test IIS SMTP outbound connection via test email Getting Started Guide Installation for Lotus Domino 85 1. Send an email from an „internal‟ email account to an external account (e.g. internet email) 2. Ensure that the intended recipient/external user received the test email. NOTE: You can also use „Telnet‟ to manually send the test email and obtained more troubleshooting information. For more information refer to: http://support.microsoft.com/support/kb/articles/Q153/1/19.asp 5.4.2 Upgrade from earlier version If you are currently using a previous version of GFI MailEssentials (versions 9, 10, 11 and 12), you can upgrade your current installation while at the same time retain all your existing configuration settings. Important notes Upgrades cannot be undone i.e. you cannot downgrade to an earlier version once you have installed the latest version. On upgrading an existing installation, licensing reverts to trial version and a new fully purchased license key for the GFI MailEssentials 14.1 is required. For more information on new license keys, refer to: http://customers.gfi.com. You cannot change the installation path during GFI MailEssentials upgrades. When upgrading from GFI MailEssentials 9, the current Bayesian weights file will be upgraded to the new format used in GFI MailEssentials 10 or later. The new format is more compact and uses less memory. NO DATA WILL BE LOST. Upgrade procedure 1. Launch GFI MailEssentials installation on the server where your earlier version of GFI MailEssentials is installed. Screenshot 55 - Confirm the upgrade 2. Click Yes to start the upgrade process and follow on-screen instructions. For assistance refer to New installations section below. 5.4.3 New installations Important notes 1. During installation, GFI MailEssentials restarts IIS services. This is required to allow GFI MailEssentials components to be registered and started. 86 Installation for Lotus Domino Getting Started Guide 2. Before starting installation, close any running Windows applications. Installation procedure 1. Logon the email gateway server where GFI MailEssentials will be installed using administrator credentials. 2. Double click mailessentials14.exe (32-bit install) or mailessentials14_x64.exe (64-bit install) accordingly. 3. Select install language and click Next. 4. Select whether to check for newer versions/builds of GFI MailEssentials and click Next. 5. Read licensing agreement. To proceed with the installation select I accept the license agreement and click Next. 6. Click Next to install in default location or click Browse to change path. 7. Specify user details and enter license key. Click Next to continue. Screenshot 56 - Specify mail server details 8. Specify IP address and listening port of Lotus Domino Server and the external domain name used. Click Next to continue. 9. Specify the email address where notifications (e.g. failed anti spam filters, spam digests) are sent. Getting Started Guide Installation for Lotus Domino 87 Screenshot 57 - Selecting SMTP mode 10. Select No, I do not have Active Directory… option to use SMTP server to get the list of email users. Click Next to continue. Screenshot 58 - Installing Microsoft Message Queuing Service 11. If Microsoft Message Queuing Services (MSMQ) is not installed then the dialog in the above screenshot will open. Select Yes to install MSMQ. Click Next to continue. 88 Installation for Lotus Domino Getting Started Guide Screenshot 59 - Configure your inbound email domain 12. Setup will now display the list of inbound email domains detected. Verify that all inbound email domains to be protected against spam are listed. Take note of any changes required for post-installation and click Next. NOTE: You can modify the list of inbound email domains ONLY postinstall. For more information refer to the Confirm domains to defend against spam section in Post-install actions below. 13. Click Finish to finalize your installation. On completion, setup will: Ask you to restart the SMTP service. IMPORTANT: Failing to restart the SMTP service will negatively affect anti spam filtering and email flow. Check whether Microsoft XML engine is installed. This is automatically installed if not found on UK/US English OS. For other OS languages, this has to be manually downloaded and installed. Microsoft XML engine can be downloaded from: http://www.microsoft.com/downloads/details.aspx?FamilyId=3144 B72B-B4F2-46DA-B4B6-C5D7485F2B42&displaylang=en Prompt you to launch the Quick Start Guide. This is a set of instructions that will guide you through the configuration settings required post-install/for first use (Recommended). 14. At this stage, GFI MailEssentials is installed. You must now configure GFI MailEssentials for first use. For instructions refer to the Post-install actions section below. 5.4.4 Post-install actions To ensure that your GFI MailEssentials anti spam system is effectively up and running you must perform the following post-install actions: Getting Started Guide Installation for Lotus Domino 89 Step 1: Launch GFI MailEssentials Configuration console Click on Start ► All Programs ► GFI MailEssentials ► GFI MailEssentials Configuration. Step 2: Verify current DNS Server settings 1. Right click Anti spam ► Anti Spam Settings node and select Properties. 2. Click on the DNS Server tab. Verify the DNS server details automatically detected during install. 3. To specify a different DNS Server, select Use the following DNS server and specify details. 4. Click Test to check your newly added DNS server settings. 5. Click OK to finalize your configuration. Step 3: Confirm domains to defend against spam NOTE: ONLY the inbound email domains configured in GFI MailEssentials will be protected against spam. 1. Right click General ► General Settings node and select Properties. 2. Click on the Inbound Email Domains tab and ensure that all required inbound domains are listed in the Inbound domains field. 3. To specify additional domains, click Add… and enter inbound email domain details. 4. Click OK button to finalize your configuration. Step 4: Enable Directory Harvesting This filter uses Active directory or LDAP lookups to verify whether inbound emails are addressed to legitimate „internal‟ email accounts. To enable this filter: 1. Right click Anti spam ► Anti-Spam Filters ► Directory Harvesting node and select Properties. 2. Select Enable directory harvesting protection. 3. Select the Use LDAP lookups and: a. Unselect the Anonymous bind option if your LDAP server requires authentication b. Enter the authentication details using Domain\User format. c. Click Test button to test your LDAP configuration settings. Step 5: Configure whitelists This filter allows you to specify lists of „friendly‟ email domains, email addresses or IP addresses. WARNING: USE THIS FEATURE WITH CAUTION. Entries in this list will not be scanned for spam and will bypass all anti spam filtering. 1. Right click Anti spam ► Whitelist node and select Properties. 2. Click on the Whitelist tab. 90 Installation for Lotus Domino Getting Started Guide 3. Click Add… and specify domains/email addresses or IP addresses to whitelist. 4. Click OK to finalize your configuration. Step 6: Test your anti spam system GFI MailEssentials is now ready to start managing spam. To verify that anti spam is working properly: 1. Clicking Start ► All Programs ► GFI MailEssentials ► GFI MailEssentials Dashboard. 2. Using an external email account (for example webmail, hotmail or Gmail), create a new email and key in “100% free” as the subject. 3. Send the email to one of your internal email accounts. GFI MailEssentials will tag this email as spam by adding the tag [SPAM] to the email „subject‟ field. 4. Allow some time for email delivery and confirm that email spam tagging is working by: Screenshot 60 - Testing your anti spam system Getting Started Guide Checking the GFI MailEssentials Dashboard. Use the Status tab to view the status of key GFI MailEssentials services and email processing activity. Receipt and processing status of this email is logged in the MTA logging window. Installation for Lotus Domino 91 Screenshot 61 - Email tagged as SPAM Accessing the inbox of the email account to which the test email was sent and confirm that email subject includes [SPAM] in the subject field. 5.4.5 GFI MailEssentials Configuration At this stage, your GFI MailEssentials anti spam system is up and running. All inbound email will be scanned by the anti spam filters enabled by default. Filter Description SpamRazer An anti-spam engine that determines if an email is spam by using email reputation, message fingerprinting and content analysis. Yes Directory Harvesting Stops email which is randomly generated towards a server, mostly addressed to nonexistent users. Yes Phishing Blocks emails that contain links in the message bodies pointing to known phishing sites or if they contain typical phishing keywords. Yes Sender Policy Framework Stops email which is received from domains not authorized in SPF records No AutoWhitelist Addresses to which an email is sent to, are automatically excluded from being blocked. Yes Whitelist A custom list of safe email addresses Yes 92 Installation for Lotus Domino Enabled by Default Getting Started Guide Email blacklist A custom list of blocked email users or domains. Yes DNS blacklists Checks if the email received is from senders that are listed on a public DNS blacklist of known spammers. Yes Spam URI Realtime Blocklists Stops emails which contain links to domains listed on public Spam URI Blocklists such as sc.surbl.org Yes Header checking A module which analyses the individual fields in a header by referencing the SMTP and MIME fields Yes Keyword checking Spam messages are identified based on blocked keywords in the email title or body No New Senders Emails that have been received from senders to whom emails have never been sent before. No Bayesian analysis An anti-spam technique where a statistical probability index based on training from users is used to identify spam. No By default, email classified as spam will be tagged (i.e. will include the prefix [SPAM] in the subject field). Although enabled by default, email tagging is NOT the only anti spam filter action that can be triggered on detection of email spam. Other actions include re-routing of spam emails to specific folders and deletion of spam emails. Tagging Delete Forward to specific email address Move to subfolder in user mailbox Move to junk mail folder Move to specific folder Anti spam filter actions SpamRazer Yes Yes Yes Yes Yes Yes Directory Harvesting Yes Yes Yes Yes Yes Yes Phishing Yes Yes Yes Yes Yes Yes Sender Policy Framework Yes Yes Yes Yes Yes Yes Whitelist N/A N/A N/A N/A N/A N/A Email blacklist Yes Yes Yes Yes Yes Yes DNS blacklists Yes Yes Yes Yes Yes Yes Spam URI Realtime Blocklists Yes Yes Yes Yes Yes Yes Header checking Yes Yes Yes Yes Yes Yes Keyword checking Yes Yes Yes Yes Yes Yes New Senders Yes Yes Yes Yes No Yes Bayesian analysis Yes Yes Yes Yes Yes Yes Filters N/A - Not applicable Getting Started Guide Installation for Lotus Domino 93 Configuration of anti spam filters and actions is possible via the GFI MailEssentials Configuration console. Additionally, through this console you can also run reports and customize other product features such as enable daily spam digest. For guidelines on how to configure GFI MailEssentials functions and features refer to the GFI MailEssentials Administration and Configuration manual. 94 Installation for Lotus Domino Getting Started Guide 6 Installation for SMTP Servers 6.1 Introduction Installing GFI MailEssentials with other SMTP enables you to scan all inbound emails received from „outside' (i.e. the internet) for spam before reaching your SMTP Server. Outbound emails relayed to GFI MailEssentials are also processed (e.g. adding of disclaimers and auto-whitelisting) before these are sent via internet. To install GFI MailEssentials with other SMTP servers, the server where GFI MailEssentials is installed must be configured as an email gateway server (also known as "Smart host" or "Mail relay" server) for all your email. All inbound and outbound email must pass through this server for scanning before being relayed to the mail server for distribution. 6.2 System requirements 6.2.1 Software Supported operating systems Microsoft Windows Server 2008 (x86 or x64) Microsoft Windows Server 2003 Standard/Enterprise (x86 or x64) Microsoft Windows 2000 Server/Advanced Server (SP1 or higher) Microsoft Small Business Server 2000 (SP2) / 2003 (SP1) Mail Servers Any SMTP compliant email server Other components Microsoft .NET Framework 2.0 Microsoft Data Access Components (MDAC) 2.8 - This component is used by GFI MailEssentials‟ mail archiving feature to communicate with databases. Download this component from: Getting Started Guide http://www.microsoft.com/Downloads/details.aspx?familyid=6C050 FE3-C795-4B7D-B037-185D0506396C&displaylang=en Internet Information Services (IIS) (x32 or x64) - SMTP service and WWW service. This is required to enable communications between GFI MailEssentials and your SMTP server. Microsoft XML core services: This is required by the GFI MailEssentials reporter to enable anti spam report generation. For Installation for SMTP Servers 95 UK/US English OS this is installed automatically by GFI MailEssentials. For other languages, this can be downloaded from: http://www.microsoft.com/downloads/details.aspx?FamilyId=3144 B72B-B4F2-46DA-B4B6-C5D7485F2B42&displaylang=en Microsoft Message Queuing Services. 6.2.2 Hardware Processor Minimum: Intel Pentium or compatible 1 GHz 32-bit processor Recommended: x64 architecture-based server with Intel 64 architecture or AMD64 platform Memory Minimum: 1GB Recommended: 2GB RAM Physical Storage Minimum: 500MB for installation, 2GB for execution Recommended: 500MB for installation, 4GB for execution 6.3 Important settings 6.3.1 Antivirus and backup software Antivirus and backup software may cause GFI MailEssentials to malfunction. This occurs when such software denies access to certain files required by GFI MailEssentials. Disable third party antivirus and backup software from scanning the following folders: x86 installations (32-bit) x64 installations (64-bit) <..\Program Files\GFI\MailEssentials> <..\Program Files (x86)\GFI\MailEssentials> <..\Program Files\Common Files\GFI> <..\Program Files (x86)\Common Files\GFI> <..\Inetpub\mailroot> If installed on a gateway machine. 6.3.2 Firewall port settings Configure your firewall to allow the following port connections. These ports are used by GFI MailEssentials to connect to GFI servers: DNS (Port 53) - Used by anti spam filters (DNS blacklist, Sender Policy Framework, Header Checking) to identify the domain from where received emails originated. FTP (Ports 20 and 21) - Used by GFI MailEssentials to connect to 'ftp.gfisoftware.com' and retrieve latest product version information. 96 Installation for SMTP Servers Getting Started Guide HTTP (Port 80) - Used by GFI MailEssentials to download product patch and anti spam filter updates (i.e. SpamRazer, Anti-Phishing, and Bayesian anti spam filters) from the following locations: o 'http://update.gfi.com' o 'http://update.gfisoftware.com' o 'http://support.gfi.com o 'http://db11.spamcatcher.net' (GFI MailEssentials 14 or earlier) 'http://sn92.mailshell.net' (GFI MailEssentials 14 SR1 or later) o Remoting (Ports 8021) - Used in the latest builds of GFI MailEssentials for inter-process communication. No firewall configuration is required to allow connections to or from the remoting ports since all the GFI MailEssentials processes run on the same server. NOTE: Ensure that no other applications (except GFI MailEssentials) are listening on port 8021. LDAP (Port 389) - Used by GFI MailEssentials to get email addresses from SMTP server. 6.4 Installing on gateway servers for SMTP Servers 6.4.1 Pre-install actions GFI MailEssentials uses the IIS SMTP service as its SMTP Server and therefore the IIS SMTP service must be configured to act as a mail relay server. This is achieved as follows: Step 1: Enable IIS SMTP Service 1. Go to Start ► Control Panel ► Add or Remove Programs ► Add/Remove Windows Components. 2. Select Internet Information Services (IIS) and click Details. 3. Select the SMTP Service option and click OK. 4. Click Next to finalize your configuration. Step 2: Create SMTP domain(s) for email relaying 1. Go to Start ► Control Panel ► Administrative Tools. 2. Click on Internet Information Services (IIS) Manager. Getting Started Guide Installation for SMTP Servers 97 Screenshot 62 - Internet Information Services (IIS) Manager 3. In the left pane, expand the respective server node. Right click on Default SMTP Virtual Server and select Properties. 4. Select the IP address currently assigned to your SMTP server and click OK. 5. Expand the Default SMTP Virtual Server node 6. Right click Domains and select New ► Domain. 7. Select the Remote option and click Next. 8. Specify domain name (e.g. test.gfi.com) and click Finish. Step 3: Enable email relaying to your Microsoft Exchange server: 1. Right click on the new domain (e.g. test.gfi.com) and select Properties. 2. Select the Allow the Incoming Mail to be Relayed to this Domain checkbox. 98 Installation for SMTP Servers Getting Started Guide Screenshot 63 - Configure the domain 3. Select the Forward all mail to smart host option and specify the IP address of the server managing emails in this domain. IP address must be enclosed in square brackets e.g. [123.123.123.123] so to exclude them from all DNS lookup attempts. 4. Click OK to finalize your configuration. Step 4: Secure your SMTP email-relay server If unsecured, your mail relay server can be exploited and used as an open relay for spam. To avoid this from happening, it is recommended that you specifically define which mail servers can route emails through this mail relay server (i.e. allow only specific servers to use this email relaying setup). To achieve this: 1. Go to Start ► Control Panel ► Administrative Tools. 2. Click on Internet Information Services (IIS) Manager. 3. In the left pane, expand the respective server node. Right click on Default SMTP Virtual Server and select Properties. 4. Click on the Access tab and select Relay. Getting Started Guide Installation for SMTP Servers 99 Screenshot 64 - Relay options 5. Select the Only the list below option and click Add. 6. Specify IP(s) of the mail server(s) that are allowed to route emails through your mail relay server. You can specify: Single computer - i.e. Authorize one specific machine to relay email through this server. Use the DNS Lookup button to lookup an IP address for a specific host. Group of computers - i.e. Authorize specific computer(s) to relay emails through this server. Domain - Allow all computers in a specific domain to relay emails through this server. NOTE: The Domain option adds a processing overhead that can degrade SMTP service performance. This is due to the reverse DNS lookup processes triggered on all IP addresses (within that domain) that try to route emails through this relay server. Step 5: Configure your SMTP server for GFI MailEssentials Refer to the SMTP server documentation on forwarding email to the GFI MailEssentials server. Step 6: Update your domain MX record to point to mail relay server. Update the MX record of your domain to point to the IP of the new mail relay server. If your DNS server is managed by your ISP, ask your ISP to update the MX record for you. If the MX record is not updated, all emails will be routed directly to your email server - hence by-pass GFI MailEssentials anti spam filters. 100 Installation for SMTP Servers Getting Started Guide Verify that MX record has been successfully updated To verify whether MX record is updated do as follows: 1. Click Start ► Run and type in Command 2. From the command prompt type in: nslookup 3. Type in: set type=mx 4. Specify your mail domain name. The MX record should return a single IP address. This should be the mail relay server I.P. address. Screenshot 65 - Checking the MX record of your domain Step 7: Test your new mail relay server Before proceeding to install GFI MailEssentials, verify that your new mail relay server is working correctly by doing as follows: Test IIS SMTP inbound connection via test email 1. Send an email from an „external‟ account (e.g. internet email account) to an internal email address/user. 2. Ensure that intended recipient received the test email in the respective email client. Test IIS SMTP outbound connection via test email 1. Send an email from an „internal‟ email account to an external account (e.g. internet email). 2. Ensure that the intended recipient/external user received the test email. NOTE: You can also use „Telnet‟ to manually send the test email and obtained more troubleshooting information. For more information refer to: http://support.microsoft.com/support/kb/articles/Q153/1/19.asp 6.4.2 Upgrade from earlier version If you are currently using a previous version of GFI MailEssentials (versions 9, 10, 11 and 12), you can upgrade your current installation while at the same time retain all your existing configuration settings. Important notes Getting Started Guide Upgrades cannot be undone i.e. you cannot downgrade to an earlier version once you have installed the latest version. Installation for SMTP Servers 101 On upgrading an existing installation, licensing reverts to trial version and a new fully purchased license key for the GFI MailEssentials 14.1 is required. For more information on new license keys, refer to: http://customers.gfi.com You cannot change the installation path during GFI MailEssentials upgrades. When upgrading from GFI MailEssentials 9, the current Bayesian weights file will be upgraded to the new format used in GFI MailEssentials 10 or later. The new format is more compact and uses less memory. NO DATA WILL BE LOST. Upgrade procedure 1. Launch GFI MailEssentials installation on the server where your earlier version of GFI MailEssentials is installed. Screenshot 66 - Confirm the upgrade 2. Click Yes to start the upgrade process and follow on-screen instructions. For assistance refer to New installations section below. 6.4.3 New installations Important notes 1. During installation, GFI MailEssentials restarts IIS services. This is required to allow GFI MailEssentials components to be registered and started. 2. Before starting installation, close any running Windows applications. Installation procedure 1. Logon your Microsoft Exchange Server machine using administrator credentials. 2. Double click mailessentials14.exe (32-bit install) or mailessentials14_x64.exe (64-bit install) accordingly. 3. Select install language and click Next. 4. Select whether to check for newer versions/builds of GFI MailEssentials and click Next. 5. Read licensing agreement. To proceed with the installation select I accept the license agreement and click Next. 6. Click Next to install in default location or click Browse to change path. 7. Specify user details and enter license key. Click Next to continue. 102 Installation for SMTP Servers Getting Started Guide Screenshot 67 - Specify mail server details 8. Specify IP address and listening port of your SMTP server and the external domain name used. Click Next to continue. 9. Specify the email address where notifications (e.g. failed anti spam filters, spam digests) are sent. Screenshot 68 - Selecting SMTP mode 10. Select No, I do not have Active Directory… option to use SMTP server to get the list of email users. Click Next to continue. Getting Started Guide Installation for SMTP Servers 103 Screenshot 69 - Installing Microsoft Message Queuing Service 11. If Microsoft Message Queuing Services (MSMQ) is not installed then the dialog in the above screenshot will open. Select Yes to install MSMQ. Click Next to continue. Screenshot 70 - Configure your inbound email domain 12. Setup will now display the list of inbound email domains detected. Verify that all inbound email domains to be protected against spam are listed. Take note of any changes required for post-installation and click Next. NOTE: You can modify the list of inbound email domains ONLY postinstall. For more information refer to the Confirm domains to defend 104 Installation for SMTP Servers Getting Started Guide against spam section in Post-install actions below.13. Click Finish to finalize your installation. On completion, setup will: Ask you to restart the SMTP service. IMPORTANT: Failing to restart the SMTP service will negatively affect anti spam filtering and email flow. Check whether Microsoft XML engine is installed. This is automatically installed if not found on UK/US English OS. For other OS languages, this has to be manually downloaded and installed. Microsoft XML engine can be downloaded from: http://www.microsoft.com/downloads/details.aspx?FamilyId=3144 B72B-B4F2-46DA-B4B6-C5D7485F2B42&displaylang=en Prompt you to launch the Quick Start Guide. This is a set of instructions that will guide you through the configuration settings required post-install/for first use (Recommended). 14. At this stage, GFI MailEssentials is installed. You must now configure GFI MailEssentials for first use. For instructions refer to the Post-install actions section below. 6.4.4 Post-install actions To ensure that your GFI MailEssentials anti spam system is effectively up and running you must perform the following post-install actions: Step 1: Launch GFI MailEssentials Configuration console Click on Start ► All Programs ► GFI MailEssentials ► GFI MailEssentials Configuration. Step 2: Verify current DNS Server settings 1. Right click Anti spam ► Anti Spam Settings node and select Properties. 2. Click on the DNS Server tab. Verify the DNS server details automatically detected during install. 3. To specify a different DNS Server, select Use the following DNS server and specify details. 4. Click Test to check your newly added DNS server settings. 5. Click OK to finalize your configuration. Step 3: Confirm domains to defend against spam NOTE: ONLY the inbound email domains configured in GFI MailEssentials will be protected against spam. 1. Right click General ► General Settings node and select Properties. 2. Click on the Inbound Email Domains tab and ensure that all required inbound domains are listed in the Inbound domains field. 3. To specify additional domains, click Add… and enter inbound email domain details. 4. Click OK button to finalize your configuration. Getting Started Guide Installation for SMTP Servers 105 Step 4: Enable Directory Harvesting This filter uses Active directory or LDAP lookups to verify whether inbound emails are addressed to legitimate „internal‟ email accounts. To enable this filter: 1. Right click Anti spam ► Anti-Spam Filters ► Directory Harvesting node and select Properties. 2. Select Enable directory harvesting protection. 3. Select the Use LDAP lookups and: a. Unselect the Anonymous bind option if your LDAP server requires authentication b. Enter the authentication details using Domain\User format. c. Click Test button to test your LDAP configuration settings. Step 5: Configure whitelists This filter allows you to specify lists of „friendly‟ email domains, email addresses or IP addresses. WARNING: USE THIS FEATURE WITH CAUTION. Entries in this list will not be scanned for spam and will bypass all anti spam filtering. 1. Right click Anti spam ► Whitelist node and select Properties. 2. Click on the Whitelist tab. 3. Click Add… and specify domains/email addresses or IP addresses to whitelist. 4. Click OK to finalize your configuration. 106 Installation for SMTP Servers Getting Started Guide Step 6: Test your anti spam system GFI MailEssentials is now ready to start managing spam. To verify that anti spam is working properly: 1. Clicking Start ► All Programs ► GFI MailEssentials ► GFI MailEssentials Dashboard. 2. Using an external email account (for example webmail, hotmail or Gmail), create a new email and key in “100% free” as the subject. 3. Send the email to one of your internal email accounts. GFI MailEssentials will tag this email as spam by adding the tag [SPAM] to the email „subject‟ field. 4. Allow some time for email delivery and confirm that email spam tagging is working by: Screenshot 71 - Testing your anti spam system Getting Started Guide Checking the GFI MailEssentials Dashboard. Use the Status tab to view the status of key GFI MailEssentials services and email processing activity. Receipt and processing status of this email is logged in the MTA logging window. Installation for SMTP Servers 107 Screenshot 72 - Email tagged as SPAM Accessing the inbox of the email account to which the test email was sent and confirm that email subject includes [SPAM] in the subject field. 6.4.5 GFI MailEssentials Configuration At this stage, your GFI MailEssentials anti spam system is up and running. All inbound email will be scanned by the anti spam filters enabled by default. Filter Description SpamRazer An anti-spam engine that determines if an email is spam by using email reputation, message fingerprinting and content analysis. Yes Directory Harvesting Stops email which is randomly generated towards a server, mostly addressed to nonexistent users. Yes Phishing Blocks emails that contain links in the message bodies pointing to known phishing sites or if they contain typical phishing keywords. Yes Sender Policy Framework Stops email which is received from domains not authorized in SPF records No AutoWhitelist Addresses to which an email is sent to, are automatically excluded from being blocked. Yes Whitelist A custom list of safe email addresses Yes 108 Installation for SMTP Servers Enabled by Default Getting Started Guide Email blacklist A custom list of blocked email users or domains. Yes DNS blacklists Checks if the email received is from senders that are listed on a public DNS blacklist of known spammers. Yes Spam URI Realtime Blocklists Stops emails which contain links to domains listed on public Spam URI Blocklists such as sc.surbl.org Yes Header checking A module which analyses the individual fields in a header by referencing the SMTP and MIME fields Yes Keyword checking Spam messages are identified based on blocked keywords in the email title or body No New Senders Emails that have been received from senders to whom emails have never been sent before. No Bayesian analysis An anti-spam technique where a statistical probability index based on training from users is used to identify spam. No By default, email classified as spam will be tagged (i.e. will include the prefix [SPAM] in the subject field). Although enabled by default, email tagging is NOT the only anti spam filter action that can be triggered on detection of email spam. Other actions include re-routing of spam emails to specific folders and deletion of spam emails. Tagging Delete Forward to specific email address Move to subfolder in user mailbox Move to junk mail folder Move to specific folder Anti spam filter actions SpamRazer Yes Yes Yes Yes Yes Yes Directory Harvesting Yes Yes Yes Yes Yes Yes Phishing Yes Yes Yes Yes Yes Yes Sender Policy Framework Yes Yes Yes Yes Yes Yes Whitelist N/A N/A N/A N/A N/A N/A Email blacklist Yes Yes Yes Yes Yes Yes DNS blacklists Yes Yes Yes Yes Yes Yes Spam URI Realtime Blocklists Yes Yes Yes Yes Yes Yes Header checking Yes Yes Yes Yes Yes Yes Keyword checking Yes Yes Yes Yes Yes Yes New Senders Yes Yes Yes Yes No Yes Bayesian analysis Yes Yes Yes Yes Yes Yes Filters N/A - Not applicable Getting Started Guide Installation for SMTP Servers 109 Configuration of anti spam filters and actions is possible via the GFI MailEssentials Configuration console. Additionally, through this console you can also run reports and customize other product features such as enable daily spam digest. For guidelines on how to configure GFI MailEssentials functions and features refer to the GFI MailEssentials Administration and Configuration manual. 110 Installation for SMTP Servers Getting Started Guide 7 Uninstalling GFI MailEssentials 7.1 Introduction This chapter describes how to uninstall GFI MailEssentials for all supported operating systems. NOTE 1: If you are planning to uninstall and reinstall GFI MailEssentials to fix problems you may be having during installation, you should first read the Troubleshooting and support chapter in this manual. NOTE 2: Third-party components which are required by GFI MailEssentials, such as Microsoft .NET Framework or Microsoft XML core services, will not be uninstalled. 7.1.1 Uninstall GFI MailEssentials 1. Exit GFI MailEssentials. 2. From the Control Panel select: Add or Remove Programs - Windows Server 2000 or 2003, Windows SBS 2000 or 2003. Programs and Features - Windows Server 2008, Windows SBS 2008. 3. From the list of installed software select GFI MailEssentials for Exchange/SMTP and click Remove or Uninstall. 4. Follow on-screen instructions to uninstall GFI MailEssentials. Getting Started Guide Uninstalling GFI MailEssentials 111 8 Troubleshooting and support 8.1 Introduction This chapter explains how to resolve any GFI MailEssentials issues encountered during installation. The main sources of information available to solve these issues are: This manual - most issues can be solved through the information in this manual section. GFI Knowledge Base articles Web forums Contacting GFI Technical Support 8.2 Troubleshooting: Installation issues Issue Possible solution License key for the previous version is not accepted and the upgraded version is in evaluation mode. When upgrading to a new version of GFI MailEssentials, you are required to upgrade your license key. For more information on how to upgrade your key, refer to: During installation some errors may be received causing the product not to be installed properly, or not to be installed at all. The Microsoft Event log warnings are created due to a missing requirement for the GFI MailEssentials Legacy Attendant service. Event Type: „Warning‟ Event ID: „0‟ Event Source: „GFI MailEssentials Legacy Attendant Service‟ Event Description: „The GFI MailEssentials Legacy Attendant Service subprocess '8-auantiphish2' has terminated with error code [1].The sub-process will not be available until the service is restarted. Please contact GFI Support if the problem persists.‟ During installation some errors may be received causing the product not to be installed properly, or not to be installed at all. “Error 1720.There is a problem with this Windows Installer package. A script required for this Getting Started Guide http://kbase.gfi.com/showarticle.asp?id=KBID003408 This requirement is configured by the post-installation wizard and therefore, no warnings of the same type will be reported in the Microsoft event logs after completing the GFI MailEssentials postinstallation wizard. 1. Disable any real-time scanning software such as antivirus software. 2. Ensure that you do not have any software that automatically removes files from the TEMP folder. 3. Log in with Domain Administrator privileges. 4. Download and install the latest version of Windows Scripting Host & Windows Installer for your Windows Operating System from: http://www.microsoft.com/downloads/ Troubleshooting and support 113 install to complete could not be run. Contact your support personnel or package vendor.”: “Setup failed to launch installation engine: Access is denied.” or: “Error installing Ikernel.exe, access is denied.” 5. Ensure that the following Microsoft Windows technologies are installed correctly and not corrupt: Microsoft Windows Management Instrumentation (WMI) Microsoft Windows Installer Microsoft .Net Framework Microsoft Data Access Components (MDAC) 6. Ensure that the following system libraries located at <Windows\System32> are correctly registered: urlmon.dll Oleaut32.dll ole32.dll Actxprxy.dll Shell32.dll Shdocvw.dll Mshtml.dll Browseui.dll Scrrun.dll To register system libraries perform the following steps: a. Click Start and select Run b. Key in: cmd.exe c. Key in: regsvr32 <path & filename of dll> Example: regsvr32 c:\windows\system32\urlmon.dll 7. Place the installation file in a temporary directory on the server where you are installing the GFI product and retry installing GFI MailEssentials. 8. Check Distributed Component Object Model (DCOM) permissions as explained in: http://support.microsoft.com/default.aspx?scid=kb;en-us;295278 NOTE: For more information on how to resolve common Windows Installer problems refer to: http://support.microsoft.com/default.aspx?scid=kb;en-us;555175 8.3 Knowledge Base GFI maintains a comprehensive Knowledge Base repository, which includes answers to the most common installation problems. In case that the information in this manual does not solve your installation problems, next refer to the Knowledge Base. The Knowledge Base always has the most up-to-date listing of technical support questions and patches. Access the Knowledge Base by visiting: http://kbase.gfi.com/ 8.4 Web Forum User to user technical support is available via the GFI web forum. Access the web forum by visiting: http://forums.gfi.com/. 114 Troubleshooting and support Getting Started Guide 8.5 Request technical support If none of the resources listed above enable you to solve your issues, contact the GFI Technical Support team by filling in an online support request form or by phone. Online: Fill out the support request form and follow the instructions on this page closely to submit your support request on: http://support.gfi.com/supportrequestform.asp Phone: To obtain the correct technical support phone number for your region please visit: http://www.gfi.com/company/contact.htm NOTE: Before you contact our Technical Support team, please have your Customer ID available. Your Customer ID is the online account number that is assigned to you when you first register your license keys in our Customer Area at: http://customers.gfi.com. We will answer your query within 24 hours or less, depending on your time zone. 8.6 Build notifications We strongly suggest that you subscribe to our build notifications list. This way, you will be immediately notified about new product builds. To subscribe to our build notifications, visit: http://www.gfi.com/pages/productmailing.htm. 8.7 Documentation If this manual does not satisfy your expectations, or if you think that this documentation can be improved in any way, let us know via email on: [email protected] Getting Started Guide Troubleshooting and support 115 9 Appendix - Installing MSMQ 9.1 Windows Server 2000 The message queuing service is a scalable system service developed by Microsoft to enable high volume event processing. The message queuing service is included with every Windows 2000/2003 and XP version, although not always installed by default. To check whether MSMQ is installed and to install it if it is not: 1. Open the Windows Control Panel from the start menu, double-click on Add/Remove Programs and then click on the Windows Components tab to launch and display the Windows components wizard. Now check if the 'Message Queuing Service' checkbox is selected. Screenshot 73 - The Windows components wizard 2. If the Message Queuing Services checkbox is not selected, you need to install the Message Queuing Service. To do this, select the checkbox and click Next. You need to have your Windows CD at hand. 3. The Message Queuing Service will now be installed. 9.2 Windows Server 2003 The message queuing service is a scalable system service developed Getting Started Guide Appendix - Installing MSMQ 117 by Microsoft to enable high volume event processing. GFI MailEssentials uses this service for the list server. The message queuing service is included with every Windows 2000/2003 and XP version, although not always installed by default. To check whether MSMQ is installed and to install it if it is not: 1. Open the Windows Control Panel from the start menu, double-click on Add/Remove Programs and then click on the Windows Components tab to launch and display the Windows components wizard. 2. Click on Application Server and then click Details. Screenshot 74 - Windows Components Wizard 3. If the Message Queuing checkbox is selected it means the service is already installed and you can thus skip the rest of this section. If it is not, then you need to follow the rest of the steps below to install the message queuing service. In the Application Server dialog click on Message Queuing and then click Details. 118 Appendix - Installing MSMQ Getting Started Guide Screenshot 75 - Message queuing component 4. In the Message Queuing dialog select the Core functionality checkbox and then click OK. Screenshot 76 - MSMQ Core functionality 5. In the Application Server dialog click OK and then click Next in the Windows Components Wizard window to start installing the message queuing service. 6. When the installation of the message queuing service is complete, you need to click Finish in the Windows Components Wizard. The Message Queuing Service is now installed. Getting Started Guide Appendix - Installing MSMQ 119 9.3 Windows Server 2008 For detailed instructions on how to install MSMQ on Windows Server 2008 refer to: http://technet.microsoft.com/en-us/library/cc730960.aspx 120 Appendix - Installing MSMQ Getting Started Guide 10 Glossary Active Directory A technology that provides a variety of network services, including LDAP-like directory services. AD See Active Directory Auto-reply An email reply that is sent automatically to incoming emails. Bayesian Filtering An anti spam technique where a statistical probability index based on training from users is used to identify spam. Background Intelligent Transfer Service A component of Microsoft Windows operating systems that facilitates transfer of files between systems using idle network bandwidth. BITS See Background Intelligent Transfer Service Blacklist A list of email users or domains from whom email is not to be received by users Botnet Malicious software that runs autonomously and automatically and is controlled by a hacker/cracker. Demilitarized Zone A section of a network that is not part of the internal network and is not directly part of the Internet. Its purpose typically is to act as a gateway between internal networks and the internet. Disclaimer A statement intended to identify or limit the range of rights and obligations for email recipients Domain Name System A database used by TCP/IP networks that enables the translation of hostnames into IP numbers and to provide other domain related information. DMZ See Demilitarized Zone DNS See Domain Name System DNS MX See Mail Exchange Email monitoring rules Rules which enable the replication of emails between email addresses. False positives An incorrect result that identifies an email as spam when in fact it is not. Ham Legitimate e-mail IIS See Internet Information Services Internet Information Services A set of Internet-based services created by Microsoft Corporation for internet servers. IMAP See Internet Message Access Protocol Internet Message Access Protocol One of the two most commonly used Internet standard protocols for e-mail retrieval, the other being POP3. LDAP See Lightweight Directory Access Protocol Lightweight Directory Access Protocol An application protocol used to query and modify directory services running over TCP/IP Getting Started Guide Glossary 121 122 Glossary List servers A special use of e-mail systems that allows for widespread distribution of emails to multiple email users through discussion lists or newsletters. Mail Exchange A record used by DNS to provide the names of other entities to which the mail should be sent. MAPI See Messaging Application Programming Interface MDAC See Microsoft Data Access Components Messaging Application Programming Interface A messaging architecture and a Component Object Model based API for Microsoft Windows. Microsoft Message Queuing Services A message queue implementation for Windows Server operating systems. Microsoft Data Access Components A Microsoft technology that gives developers a homogeneous and consistent way of developing software that can access almost any data store. MIME See Multipurpose Internet Mail Extensions MSMQ See Microsoft Message Queuing Services Multipurpose Internet Mail Extensions A standard that extends the format of e-mail to support text other than ASCII, non-text attachments, message bodies with multiple parts and header information in non-ASCII character sets. NDR See Non Delivery Report Non Delivery Report An automated electronic mail message the sender on an email delivery problem. Perimeter server/gateway The computer (server) in a LAN that is directly connected to an external network. In GFI MailEssentials perimeter gateway refers to the email servers within the company that first receive email from external domains. Phishing The process of acquiring sensitive personal information with the aim of defrauding individuals, typically through the use of fake communications POP2Exchange A system that collects email messages from POP3 mailboxes and routes them to mail server. POP3 See Post Office Protocol ver.3 Post Office Protocol ver.3 A protocol used by local email clients to retrieve emails from mailboxes over a TCP/IP connection. Public folder A common folder shared between Microsoft Exchange users which enables information. RBL See Realtime Blocklist Realtime Blocklist Online databases of spam IP addresses. Incoming emails are compared to these lists to determine if they are originating from blacklisted users. Remote commands Instructions that facilitate the possibility of executing tasks remotely. Secure Sockets Layer A protocol to ensure an integral and secure communication between networks. Simple Mail Transport Protocol An internet standard used for email transmission across IP networks. SMTP See Simple Mail Transport Protocol Spam actions Actions taken on spam emails received, e.g. delete email or send to Junk email folder. Getting Started Guide SSL See Secure Sockets Layer WebDAV A HTTP extensions database that enables users to manage files remotely and interactively. Used for managing emails in the mailbox and in the public folder in Microsoft Exchange. Whitelist A list of email addresses and domains from which emails are always received Zombie See Botnet Getting Started Guide Glossary 123 11 Index Inbound mail filtering, 3 A antivirus software, 113 L Licensing, 2 B List servers, 4, 124 Bayesian, 116, 123 blacklist, 14, 28, 41, 54, 67, 77, 93, 109 Blacklist, 123 M MAPI, 124 Microsoft Exchange Server, 69, 70 C Microsoft IIS, 16, 81, 97 cluster, 30, 34, 37, 43, 49 MSMQ, 119, 120, 121, 122, 124 D O Dashboard, 12, 27, 40, 52, 66, 75, 91, 107, 115 Outbound mail filtering, 4 Directory Harvesting, 11, 26, 38, 51, 64, 74, 90, 106 P DMZ, 123 perimeter server, 15, 68 DNS Server Configuration, 11, 25, 38, 51, 64, 73, 90, 105 POP3, 123, 124 R E Email monitoring, 123 Exchange 2000/2003, 5, 6, 7, 29, 30 Remote commands, 124 Reports, 11, 25, 38, 50, 64, 90, 105 W I IIS SMTP, 115, 116 IMAP, 123 WebDAV, 125 Whitelist, 12, 26, 39, 51, 52, 65, 74, 90, 106, 125 inbound email domains, 4, 11, 26, 38, 51, 64, 73, 90, 105 Getting Started Guide Index 125