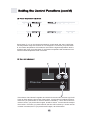
Download Installation and User Manual
Transcript
HB21FWRSS Two drawer side by side fridge freezer with ice maker & water dispenser Installation and User Manual Your 1st Year Guarantee Your appliance carries a 1 year parts and labour warranty. To fulfil the conditions of your guarantee, the appliance must be correctly installed and operated in accordance with the instructions, and only be used for normal domestic purposes. Please note that the guarantee, and service availability, only apply to the United Kingdom. Customer Service In case of difficulty please call the Customer Service Helpline on: 0844 800 7845 Please ensure you have the model and serial number to hand when calling customer service. Please keep your receipt or invoice in a safe place as they will be required as proof of date of purchase. ATTENTION: The appliance must be positioned so that the plug is accessible. If the supply cord is damaged, it must be replaced by the manufacturer, its service agent or similary qualified persons in order to avoid a hazard. Warning: Do not use mechanical devices or other means to accelerate the defrosting process, other than those recommended by the manufacturer. Warning: Do not damage the refrigerant circuit. Warning: Do not use electrical appliances inside the food storage compartments of the appliance, unless they are of the type recommended by the manufacturer. Before operating this appliance, please thoroughly read this manual and retain for future reference. Represents an instruction you must follow. This refrigerator uses AC 220-240V~/50 Hz power Large voltage fluctuation may prevent start-up of the refrigerator, burning of main control board or compressor, or abnormal compressor noise. In such cases an auto stabiliser is needed. This appliance is supplied with a standard UK plug, fitted with a 13 amp fuse. After the refrigerator is installed, the plug must be within reach. over/press on the power cord. If the cord or plug is worn or damaged, stop using it immediately. Contact a service engineer to replace it. When you open or close the dairy bin, please do so as shown to avoid trapping fingers. Unplug the fridge in the following cases: Before you clean or maintain the fridge. Before changing the light bulb. Do not pull the convertible drawer with too much force as food may fall out. Do not overpack the drawer otherwise food will fall out when opening too fast. Flammable, explosive or dangerous items, and highly explosive acid and alkali must not be put in the fridge. Do not put unstable materials on the fridge, such as heavy containers or containers full of water, to avoid personal injury. Do not rest containers of water on the refrigerator to prevent leaks that could damage the electrical workings of the unit. Do not play or hang on the bottle holder or drawers on the inside of the door. This may damage the bottle holder and drawers or lead to them falling off the fridge and causing personal injury. Do not step on the drawers at any time to avoid the appliance tipping over and causing bodily harm. The gaps in between the doors and cabinets are small. Take care not to trap fingers in the door when opening and closing. Keep children away from the fridge. Do not spray or rinse the fridge and do not put the fridge in a humid environment. This will prevent damage to the electrical insulation and performance of the fridge. Do not put bottled beer or soft drinks inside the freezer drawers. Dismantling or modifying the fridge is prohibited. Repairing damage to the cooling pipes is also not allowed. Any repair work must be carried out by a service engineer or technician. When the fridge is no longer in use, remove the doors, gaskets and shelves and put them in a safe place. This prevents the risk of child entrapment inside the fridge. The fridge should be placed in a location away from any heat source or direct sunlight. This will improve the performance of the fridge. The fridge must be on a flat, solid floor. You can put a flat, hard, non-flammable spacer underneath it if you wish. Do not use the packing foam as a spacer. If the fridge is on a slightly uneven surface, adjust the feet accordingly. Raise the fridge by turning the feet clockwise. To lower, turn the feet counter clockwise. Do not put the fridge in a place where it is humid, or close to water where there is a risk of splashing. Clean off any spots of water or dirt with a soft cloth. The fridge must be placed in a location with good ventilation. It must be near a safe water resource, and there must be at least 1 inch (2.54cm) of space on all 3 sides and along the top of the fridge. 1. Raise the door from the middle hinge with one hand. 2. Insert clip ring (inside gift bag) with pliers using the other hand as shown. 3. Insert up to 3 clip rings as needed. 1. Water filter : This unit comes equipped with a chlorine and odour free filter. 2. “Ready ice”: Is located in the upper freezer drawer for quick ice cube access. A great place to store large quantities of ice for parties and picnics. 3. Extra large, spacious design: The refrigerator offers large capacity fresh and frozen food in three convenient compartments; a French door type refrigerated compartment and two lower freezer drawers. The upper freezer drawer is for ice cubes, regularly used foods and “left-overs”. The lower freezer drawer is for deep, longer duration freezing. 4. CFC-free, Frost-free, Fast-freeze and Fast-cool options. 5. Air curtain technology: The air curtain is in the front top part of the refrigerated compartment. It prevents cold air from escaping when the fridge is opened, and distributes cool air evenly. This ensures that food is kept fresh for longer. 6. Automatic temperature and clock display. 7. Water filter and door ajar alerts for notifiying you of performance changes. 8. Temperature in both Celsius and Farenheit, with large humidity controlled pantry tray. Fresh food storage indicator Dairy compartment Dairy product stored here Wine/bottle rack Telescopic shelf Bottle rack Icemaker, upper freezer drawer Deep freeze lower drawer Features of some models may differ from that shown above. Removing and installing the doors In the event that you need to remove the refrigerator doors, please follow the door removal and installation instructions below. It is suggested, for your safety, to have two or more people to assist you in completing the below task to avoid injury, product damage or property loss. Right hand door removal and installation 1. Remove the screws on the top hinge cover, then place the top hinge cover to one side for reinstallation. 2. Using a screwdriver, remove the top hinge screws. Remove the hinge, then take the refrigerator door off and place it to one side for the time being. 4. Re-install the refrigerator door in reverse sequence. When lifting up the hinge and separating it from the door body, please be careful to support the door to stop it falling forward. Left hand door removal and installation 1. First remove the top hinge cover. 2. Disconnect the wire cable connector and the water pipe connector. Remove the hinge screws using a screwdriver, take off the hinge, then remove the door body and place it in a safe place. Removing and installing the doors (cont’d) 4. Re-install the door in reverse order. When lifting up the hinge and separating it from the door body, please be careful to support the door to stop it falling forwards. Upper freezer drawer removal and installation 1. First open the drawer as far as possible. 2. Push down the two black levers located on the side runners to release the drawer. 3. Remove the drawer from the runners. 4. To re-install the drawer, carefully align the runners on the drawer with those on the refrigerator then close the drawer. Runners Lower freezer inner drawer compartment removal 1. Open the drawer as far as possible. 2. Pull the rear section of the inner drawer compartment upwards slightly to enable the front section to be released from the door. 3. Hold the front section of the inner compartment and pull it upwards to remove it from the appliance. 4. Re-install in the reverse order. Note: It is not possible to remove the drawer door on the lower freezer compartment. Caution: Ensure children and pets do not play inside the lower drawer. Preparation before use 1. Remove all packaging material. This includes the foam base, corner posts, adhesive tape, etc. 3. Place the refrigerator in a suitable location. (See previous section - “Location”). 2. Check the components list to ensure all parts and materials are provided. Consult your dealer if you find parts are missing. 4. Toe grille installation. Open and remove the lower freezer compartment bin. Install the toe grille with screws from the gift bag as shown. Please ensure the model and serial number, purchase date and receipt are copied and taped to the manual for safe keeping. 5. It is recommended to clean the refrigerator before use. Before putting food in the refrigerator, please clean inside and outside with water and diluted baking soda. Dip a clean cloth in approx 4 litres of water and a spoonful of baking soda. 1. Plugging in the power cord. After turning on the power, the factory pre-sets will be in effect, the default time is 12:00, the the dispenser control centre is in unlock mode. 3. Put the food into the refrigerator. The refrigerator will be cooled completely after a period of a few hours. Frozen and fresh foods can then be put into the refrigerator for normal use. 6. Position the fridge then plug it in! After the refrigerator has been placed on a flat surface and cleaned, turn on the power then let it run a few hours, before loading it with food. 2. Operation of the refrigerator. Adjusting manually: Once in operation the control functions can then be set according to your requirements. (See section - “Setting the control functions” overleaf). When changing the fridge temperature the new temperature will only occur after a period of time. The length of this period of time depends on the degree of the temperature change, the ambient temperature, the frequency of door openings, and the amount of food stored in the fridge. Dispenser Control Centre Fridge Freezer Control Panel , L ........................................................ Refrigerator quick-chill button To lock: Press button C, after the first sound of the buzzer, the lock indicator light will illuminate, the clock settings are fixed and the function for getting cold drinks is locked. To unlock: Press button C again, after the first sound of the buzzer, the light goes out, indicating the clock settings can be adjusted and water can be dispensed. Press button J or K and the fresh food temperature control panel will flicker. The temperature range is 34 to 44 degrees F, and each time you press button K, the temperature will increase a level until the highest temperature setting is reached. Each time you press J, the temperature will decrease a level until the lowest temperature is reached. Press button F or G on the freezer temperature control panel and area H will flicker. The temperature range of the freezer is -2 to 8 degrees F. Each time you press button G, the freezer temperature will increase a level until the highest temperature level is reached; each time you press button F, the freezer temperature will decrease a level until the lowest temperature level is reached. ` Press button A and button B together and hold for three seconds, the time sign D will begin to flicker after the first sound of the buzzer. Press button A to adjust the hours. Each time you press button A, the time will be increased by 1 hour until 23 hours is reached, then if you press button A again, 00 will be shown. Press button B to adjust the minutes. Each time you press button B, the time will increase by 1 minute until 59 minutes is reached, then if you press button B again, 00 will be shown. The quick-freeze function is designed to freeze food completely in the shortest possible time. Press button E and the quick-freeze button indicator lamp will be illuminated and the freezer will be in the quick-freeze mode. The freezer will remain in this mode for 4 hours. You can press button E after 3 hours if you wish to end the quick-freeze mode early. Press button L and the Fresh Food quick-chill refrigerator indicator lamp will illuminate and the refrigerator will be in the quick-chill refrigerator mode. The refrigerator will switch out of quick-chill mode when the storage temperature is 2 degrees F lower than the desired temperature. If you want to switch off the quickchill mode, you can press button L, the quick-chill button indicator lamp will go out, and the refrigerator will be out of quick-chill mode. When the refrigerator is in the quick-freeze or quick-chill modes, within the set time, the process of refrigerating remains constant without affecting the power. (7) Celsius / Fahrenheit switching function Press buttons F, G and J on the control panel simultaneously and hold for three seconds. The temperature range will change to Celsius after the first buzzer has sounded. Repeat this process again to revert back to Farenheit. (8) The water filter indicator setting When the indicator light of the water filter is illuminated this means the water filter should be changed. After the water filter is changed, please press the water filter reset button M, and the indicator light of the water filter N will go out. (9) Control centre power down After 30 seconds the digital display on the control panel will switch off until such time as the refrigerator is used again. (10) Error codes In the event of an error occurring, the digital display screen will show one of the following codes: F1, F2, F3, F5, F6, Ed, ER, E0, E1, E2. If this happens, please consult your service centre to have the refrigerator repaired. (11) Door ajar alarm When any door is left open for more than 60 seconds, the door ajar alarm function of the refrigerator will start, and the alarm will buzz at 30 second intervals to alert the user that there is a door left open. (12) Over-voltage protection This refrigerator is equipped with power-surge protection. When this function is in effect, the refrigerator will switch off automatically. After 5 minutes, the power should be turned back on. (13) Power-breaking memorising function When the refrigerator turns off as a result of a power surge, the state of the refrigerator before the power break is memorised, allowing the refrigerator to operate with the programmed default values prior to the event. - Short term fresh or frozen food can be placed in the upper section of the refrigerator or in the top freezer drawer respectively. Store raw foods in the lower area of the refrigerator away from ready to eat food in the top area. - The height of the cantilever shelves can be adjusted to fit your storage needs. When adjusting the height of the shelf, first remove any food placed on the shelf. Tilt the front of the shelf upwards then pull it to unlatch the rear hooks (fig 1) . Place the hooks in a new ladder slot location and tilt back down into position on an even horizontal plane (see pictures to the right). Make sure that the two sides of the shelf are in level positions otherwise the shelf may fall down or the food may drop off. - Crisper use The refrigerator is designed to include a fruits, vegetables and/or deli crisper. Its inside temperature can be adjusted according to the type of food being stored. Fig 1. Turn up the humidity control button located on the right side of the crisper (fig 2), to increase the humidity inside. In doing this the crisper is suitable for storing cucumbers, grapes, oranges, apples, peaches, lettuce and other produce with a high moisture content. Turn down the humidity control button to lower the humidity in the crisper, suitable for storing meats, cheeses, onions and other drier foods. - Full width pantry The refrigerator is specially designed to include a full width pantry with a temperature which can be adjusted depending on the type of food to be stored in there. Fig 2. Humidity control button Air regulator button Note: Don’t press the air-regulator button too hard, to avoid any damage. - Bottle rack height adjustment and cleaning Hold both sides of the bottle rack then lift and pull it straight out for cleaning or to change location (fig 3). After cleaning, the bottle rack can be installed in the reverse manner, and the position can be adjusted according to the height of the food to be stored. Fig 3. - Crisper cover removal Lift up the shelf, then pull it straight out in the direction shown (fig 4). When adjusting the height of the bottle rack, it is better to house the dairy bin above the bottle rack. Fig 4. It is recommended to leave storage space between the foods for good cold air circulation. The temperatures in the refrigerator are slightly warmer near the top and colder near the base. Suggestions for storage: 1. Eggs, butter, cheese etc. 2. Tins, cans, condiments etc. 3. Drinks and all kinds of bottled foods. 4. Pickled foods, drinks, cans etc. 5. Meat, poultry, fish and raw foods. 6. Flour foods, cans, dairy etc. 7. Cooked meats, sausage etc. 8. Fruits, vegetables, salads etc. Changing the fresh food compartment light bulbs The voltage and wattage of the fresh food compartment bulbs are: 220~240 Volt, 50 Hz - 25W. (Never use bulbs with power over 25W) When changing the light bulbs: Disconnect the appliance from the power supply. 1. Release the two tabs at the back of the light shield and remove the cover. 2. Turn the bulb in a counter-clockwise direction, then install a new bulb. 3. Install the light shield back in the tabs in the reverse order and snap back into place. Air curtain removal and installation (only for servicing if needed) 1. Remove the water filter. 2. Take off the fresh food light shield and unscrew the bulb. 3. Remove the screws of the air curtain frame, using a screw driver. 4. Take down the fresh food air curtain by using your hands to press down on the air curtain with a little force. Re-install the air curtain in reverse order. To remove the full width pantry drawer: • • • • Remove the upper crisper compartments Remove the full width pantry door flap and lid Open the full width pantry drawer fully Grip the side runners of the drawer to ensure they remain in the fully extended position, then push the drawer compartment back slightly to release it from the locking mechanism on the runners (see image below). Grip the front and back of the drawer on the right hand side then lift and manipulate the drawer slightly to release it from the runners. The drawer unit can then be removed. • • Drawer runners Underside of drawer unit Drawer locking mechanism To re-install the full width pantry: • Slide the drawer back onto the runners, ensuring the drawer locks back into place on the runner to prevent the drawer from falling out. Precautions when freezing food Avoid putting hot foods into the freezer, first let them cool until they reach room temperature. Divide the foods into small portions (not more than 2.5kg each), so it is easier for the foods to be stored. Write the expiry date and food names on the outside of the packaging so you can be assured of the food type and when it is safe to eat. Take food from the freezer to defrost when needed. Defrosted food cannot be refrozen unless it is cooked. The foods should be packed before they are frozen and the surface of the packaging kept dry. This keeps the packs from freezing together. The packaging material should be odourless and airproof so different foods can be mixed without affecting the quality. a). Cut the water pipe according to need and avoid bending the water pipe too much. Usually the length should be less than 18ft (5m). If the water pipe is too long, the ice and cold water content will be affected because there may not be sufficient water pressure. b). The water pipe cannot withstand heat. Keep it away from all heat sources. c). It is recommended to have this product installed by a qualified technician. d). Before first use, press the water dispenser pad several times for 1 minute. Do not press for more than 1 minute to prevent overheating of the pad activator solenoid. Cold water will begin to flow from the outlet. e). Water supply pipe instruction: The cold water pressure should be between 21-123 psi for automatic ice making. f). The water filter is fitted to remove chlorine and odours from the water. It cannot sterlise or destroy anything, so be certain to connect the water pipe to a drinkable water source. 2. Precautions a). To prevent the pipe from freezing, do not install the water pipe in a space below 32 degrees F. b). Open the water valve to flush the pipe, check leakage in the water pipe joints and allow the water to run until it is clear. c). When the temperature of the ice maker is equal to or below 5 degrees F, the ice maker will begin to make ice. Throw out the first few batches of ice cubes if you are making ice for the first time or have not made it for a long time. d). After the fridge is installed, put the water supply pipe in a suitable place to prevent crushing and damage. e). The filter in the water pipe is there to filter impurities in the water, and to make ice clean and hygienic. If the cubed ice becomes smaller, this may suggest that the filter is blocked from the impurities. After 6 months of use, the “change filter” indicator light will turn on. At this time you should contact your local service centre to purchase a new filter. After you have changed the filter, the indicator light will turn off. The refrigerator comes with a filter installed; after this you have to buy and change the filter yourself. f). The ice maker should only be connected to a source of drinkable water. 3. Ice maker working principle The ice maker tray periodically receives an automatic flow of water to the ice maker ice cube tray. Once the water freezes a sensor on the tray recognises cubes have been made and automatically twists the tray to drop the ice cubes into the ice bucket. Capacity of the ice maker depends on the ambient temperature, frequency of the freezer door openings and freezer compartment cooling temperature setting. Typical ice harvest is 4 pounds (1.8kg) of ice per day. Occasionally you may hear sounds, like the flowing of water or ice cubes dropping. These sounds are quite normal and are not a cause for concern or complaint. In periods of infrequent use, ice cubes may stick together, again this is quite normal. Older ice cubes can get stale. Clean the ice container periodically using warm water. Before putting it back, dry it well so that the cubes do not stick to the surfaces. If you will not be using the ice container for a long time, throw out the remaining ice cubes, wash the container with warm water, dry it with a towel and place back in the fridge. Then close the water supply to the ice maker. To close the water supply press refrigerator button “<” and freezer button “>” simultaneously for 3 seconds. This will close off the water supply to the ice maker but will not affect the water dispenser. 1. Your upper freezer drawer is arranged to load ice cubes in a tray on the left side and either more ice or frequently frozen and reused foods on the right side of the drawer. 2. When opening the upper freezer drawer avoid rapid pull out which can cause the ice cubes to fall into the lower deep freeze drawer. 3. When the ice maker is dropping ice into the upper freezer drawer, the ice bucket signal of circling dashes will appear on the dispenser clock screen. It is recommended that the user wait for the ice cubes to drop before opening the upper freezer drawer. Using the cold water dispenser When pressing the water dispenser tab the first time you may not get water out immediately since air will be in the line. Please press for at least 1 minute, in order to clear the air and replace it with water from the water tank. Don’t put hands or other articles into the water dispenser equipment or ice storage box. Defrosting: Defrosting is done automatically so there is no need to manually defrost this appliance. Cleaning: To keep internal odours to a minimum it is best to periodically clean the inside shelves, crispers, bins and wall. Disconect the appliance from the power supply before cleaning. Clean the fridge using a soft sponge or cloth with warm water. When done, dry off the areas with a clean cloth. 6. During cleaning, do not use hot water to clean the glass shelves, as they may break or crack. This could cause personal injury and/or damage the fridge. 7. Door gaskets often collect dirt so please clean them with a damp cloth. When the “Water filter indicator light” is on If the “Water filter indicator light” is on, it is indicating that you should change the water filter. You should change the water filter at least every six months or when the water capacity or the ice making capacity has shown an obvious decrease. Please pay attention to your local conditions as you may need to change the water filter more frequently due to the different water properties. Changing the water filter Caution: Water may be retained in the old filter cartridge. This could cause some water spillage through the filter housing drain. It is recommended to place a container under the filter housing area to prevent leaks. 6. Run the fridge water dispenser for 3-5 minutes (at 1 minute intervals) after replacing the filter, to flush out the water tank. Discard this water. 7. After replacing the filter cartridge, reset the fridge display. (See section 9 setting the control functions). Caution: 1. The fridge water dispenser and ice cube maker cannot be used without the water filter. 2. For filter replacement questions or information on your appliance, contact your dealer. 1. Do not use the water filter, dispenser or ice maker with water that is microbiologically unsafe or, if you are not sure that it is safe, without disinfecting the water before or after it goes through the system. 2. After installing a new water filter, discard all ice produced during the first 24 hours. 3. If the fridge drinking dispenser or ice maker has not been used actively for an extensive period of time, or if ice cubes have an unpleasant taste or odour, change the water filter. 4. Air trapped in the system may cause water and the filter cartridge to eject. Use caution when removing. Foods can be stored in sound condition for several hours after a power failure. During a power failure do not put new food into the fridge or freezer, and open the door as infrequently as possible. If you are aware there will be a power failure ahead of time, make cubed ice and put it in the upper part of the fresh food compartment. If the temperature becomes warmer in the freezer due to a power failure or other malfunction, the expiry date on frozen food may change, and food quality may decrease. If you do not want to use the fridge for a long period of time, remove the power cable from the socket. Cut off all power supply and water sources. Clean the fridge as directed in this manual. Leave the fridge door open to prevent any odours from accumulating. Normally the fridge performs best when it is left on to run continously rather than unplugging and energising it frequently. If you will be on vacation for a long time, disconnect the appliance from the power source and water supply, and take out all food. Clean the interior of the fridge once any frost has melted. Wipe it clean to remove any food residue that could cause odours. If the ambient temperature is below freezing, call qualified service personnel to drain the water system. This prevents leakage and keeps the pipes from bursting due to frozen water. - Disconnect the appliance from the power supply. Remove all food. Fix all moveable parts such as fresh food, freezer shelves and crispers with a good adhesive tape. - Close the fridge doors and drawers and fix with tape to prevent opening during transportation. - During transportation, the maximum slant angle must not be over 45 degrees (from vertical standing) to prevent damage to the cooling system. - Do not attempt to move or carry this appliance by using the refrigerator handle. This can damage the appliance and may lead to personal injury. It is suggested that you should not lay the refrigerator flat whilst transporting. This could cause oil to drain away from the compressor. If you must transport in this way, allow the fridge to stand vertically for 4-6 hours so oil can return into the compressor before turning on the fridge power. 
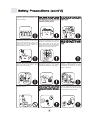
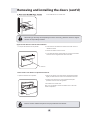
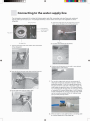
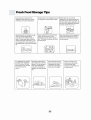
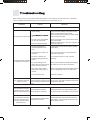
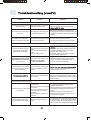
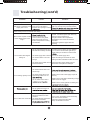
Before calling for service, please first read the following table. This could save you time and money. In this table, common problems are discussed which can be corrected by minor adjustments by you. Problem Cause Solution The temperature is too low. • The refrigerator is in deep freeze cooling. The compressor doesn’t work. on. • The fuse or the circuit breaker for the room has tripped. • There is no electricity supply. The fridge operates frequently or operates for a long time. The compressor frequently cycles on and off. • Check and change to new 13A fuse and/or reset the circuit breaker. • Check the power supply in the room. Call the local electricity company. • The room temperature or outside temperature is too high. • In this case it is normal for the fridge to operate continuously. • The automatic ice maker is in operation. • This is normal since the ice maker adds extra work load in the fridge. • The doors or drawers are frequently being opened and closed. • Try to reduce frequency of door or drawer openings. • The control settings in the • Raise up the compartment temperatures slightly freezer and fresh food compart- and allow 24 hours to reach new balance. ments are set to cold level. • Door and/or drawer gasket seals may be dirty, frayed, or cracked. • Clean off the gaskets and/or heat slightly with hair dryer so gasket takes contour of metal frame. • The condenser is dirty. • Clean the condenser. The compartment temperature sensors keep the fridge at the set This is normal. The fridge compressor will provide points causing the compressor to the required cooling level. cycle. The temperature inside the The temperature inside the freezer is too low, with the freezer section is set too low. fresh food temperatures fine. The temperature inside the fresh food compartment is too cold, while the freezer sections are fine. • This case is normal for a fridge that goes into deep freeze automatically. The period of deep freeze cooling lasts about 30 minutes. • Make sure the power cord plug is inserted all the way into the power outlet. Set the temperature in the freezer slightly higher then wait 24 hours for new balance to be achieved. Set the temperature inside the fresh food section The temperature inside the fresh slightly warmer. The temperatures will reach new food area is set too low. balance within 24 hours. Problem Cause Solution The temperature is too low. The foods stored in the full width • The control setting in the fresh pantry are frozen. food area is set too cold. The foods stored in the crisper • The settings for the fresh food are frozen. compartment are too cold. • Set the fresh food control setting slightly higher. The new set point temperature will reach a • Raising the fresh food control settings to a slightly higher temperature and/or lowering the humidity control setting will prevent frost or ice forming. Readings on the dispenser • An electronic operating problem • Call your service engineer who can display are showing error codes. has been encountered. diagnose the problem and make correction. The temperature is too high. The freezer drawer sections or fresh food compartment temperatures are too high. the freezer but ok in the fresh food section. • Try to reduce frequency of opening doors and • The doors or drawers are open frequently or for too long each • Take extra care to keep gaskets sealing well time. around the perimeter of the doors. Keep • The doors or drawers are left gaskets clean and dirt free. open. • Periodically clean the condenser coil with a • The condenser is dirty. vacuum cleaner attachment. • The temperature setting in the The temperature is too warm in • The temperature setting in the the fresh food section but just fresh food section is set too fine in the freezer. warm. crisper is too warm. • Set the temperature colder for the freezer section. Then allow it to balance within 24 hours at new colder temperature. colder. The new colder temperature can be achieved within 24 hours. • The fresh food set temperature • Set the fresh food temperature colder and the is too warm. balance to colder temperature will be achieved within 24 hours. Water, humidity, frost/ice in the fridge. • It is in a hot or humid environment. • The door or drawer of the fridge is left open. Moisture formation on the inside • The door or drawer is opened of the fridge. too frequently or for too long each time. • Food containers or liquids are left open. Water droplets collect in the lower crisper drawer areas. • Humidity settings are set too high. • Try raising the temperature slightly in the affected compartment. • Check to make sure the door gaskets are clean and sealing well against the metal cabinet frame. • Reduce the frequency of door openings. • Let hot foods cool to room temperature and cover foods and liquids. • It is normal for some wet air to collect inside the enclosed crisper. To reduce the accumulation of moisture, lower the humidity setting and/or raise the fresh food compartment temperature. Troubleshooting (cont’d) Problem Cause Solution Water/ humidity / frost / ice in the fridge. Water forms at underside of the crisper glass covers. • Moisture given off from wet • When placing foods in the fridge first pat them foods or door seal leaks or with a dry cloth to remove excess moisture. frequent door openings in humid Possibly raise fresh food temperature. Water/humidity/ frost on the outside of the fridge. Wet air forms droplets of water on the outside edges of the fridge. environment mixes with cooler air at the door gasket areas of the fresh food and freezer compartments causing condensation. • A small amount of dew or water moisture is normal. It is best to wipe it down with a dry cloth to improve performance. • A slight increase in the compartment temperatures can reduce this moisture formation. • Check door gasket for proper seal and cleaning. Automatic ice-maker • The ice cube height sensor arm • To make more ice cubes you may distribute has detected a full tray condition. your ice to the center drawer right side (or lower drawer) to increase ice cube harvest The ice maker has stopped making ice. • The water supply valve is closed. • Turn on the water supply valve. • The freezer section is not cold enough. • Adjust the setting to the freezer to colder setting and allow it to balance within 24 hours. • The water source saddle valve is • Check the water supply saddle valve for somehow blocked. obstruction and replace it if damaged. • Set the freezer drawer to a colder setting. The ice making capacity is low. • The freezer drawer area is not cold enough. 25-121 psi and add water booster if too low. • The water supply valve is not high enough pressure or not • Make sure the water valve supply is open all the way. • The ice maker sensor arm is • Make sure the water filter is distributing enough water and is not clogged. • Make sure the drawer gaskets are sealing and continuously. • The ice maker level sensor is • Check the movement of the ice maker sensor • Uncovered, unwrapped, foods are stored near the ice cube • Cover, wrap, and position frozen foods away container. from the ice cube container. The ice cubes have a bad odor. • The water filter has approached • Check and replace the water filter. the end of its useful life. • Dump out the stale ice cubes. long a period of time. Problem Cause Solution Cold water not dispensing. Cold water not dispensing. The water has a strange odour. The water supply pressure is • The water supply pipe is not open. • The water filter is blocked. • Open the water supply line all the way. • Replace the water filter. • Check that no water tubes are kinked or restricted. • The water is stored too long without use. • The local potable water source is suspect. • Remove 10-12 cups of water and throw away, then check if odour improves. • Contact your local water supply company to check quality of the water. • Water pressure level is below specification minimum of 25 psi. • Contact local plumbing supply dealer to install water booster to obtain 25-121 psi water pressure rating. The fridge has a bad odour. The inside of the fridge is dirty. • The inside walls, shelves, and door bins need cleaning life. • Clean all inside surfaces with warm water and a clean soft damp cloth then wipe dry. • Wrap and cover foods to extend useful food life. The door or drawer is hard to open and/or close closing. • The door may have food articles or packages that are obstructing • Re-position the shelves, door bins, or internal closure. containers to allow the door to close. • The level of the refrigerator is • Ensure the floor is level using sturdy materials causing the door to shift out of that are also non flammable. position • Provide a good 1” (2.54cm) clearance on all 3 • The door could be hitting against sides and on top of the cabinet so doors can adjacent cabinets or appliances. open and close freely. • The door hinge alignment may • Adjust hinges and add spacer clips supplied. • Position the foods away from the drawer sides • The stored foods are interfering and spread out the foods evenly within the The drawers are hard to move with the slide mechanism. drawers. • The drawer slides are dirty from • Clean the drawer and wipe down the slides periodically so the slide ball bearings move freely. The light bulb is out. The light bulb is out. • The light bulb is damaged or unscrewed • The light switch is blocked somehow with debris or food particles • The fridge power is off. • See section on changing light bulbs • Disconnect the power supply cord plug. Locate the light switch on the food liner wall and move it to see if food can be dislodged by pressing the switch in and out a few times. • Make sure the power cord plug is fully engaged If you hear: A beeping noise inside the fridge. • One door or drawer of the fridge • This is normal and will repeat every 1 minute until is open for over 60 seconds. the door or drawer is closed. This appliance is marked according to the European directive 2002/96/EC on Waste Electrical and Electronic Equipment (WEEE). By ensuring this product is disposed of correctly, you will help prevent potential negative consequences for the environment and human health, which could otherwise be caused by inappropriate waste handling on this product. The symbol on the product indicates that this product may not be treated as household waste. Instead it shall be handed over to the applicable collection point for the recycling of electrical and electronic equipment. Disposal must be carried out in accordance with local environmental regulations for waste disposal. For more detailed information about treatment, recover and recycling of this product, please contact your local council, your household waste disposal service, or the shop where you purchased the product. The manufacturer cannot be held liable for any damage caused due to non-compliance with these important safeguards. The manufacturer declines any responsibility for possible inaccuracies contained in the present publication attributable to copying and printing errors. The right is reserved by the manufacturer to make such changes to products as are deemed necessary or appropriate, without affecting their essential characteristics. P