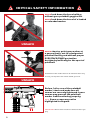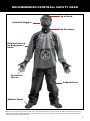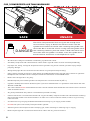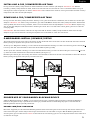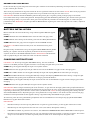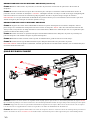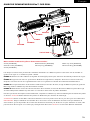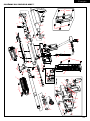
1
ELECTRONIC MARKER
User Manual
English
Français
English
ELECTRONIC MARKER
TABLE OF CONTENTS
IMPORTANT SAFETY GUIDELINES 2
OPERATION GUIDE / START UP
3
8 STEPS TO START AND PLAY
4-5
CRITICAL SAFETY INFORMATION
6
RECOMMENDED PAINTBALL SAFETY GEAR
7
CO2 / COMPRESSED AIR TANK WARNINGS
8
INSTALLING/REMOVING A CO2 / COMPRESSED AIR TANK 9
E-MR5 BARREL INSTALL / REMOVE / SETUP
9
PROPER USE OF YOUR BARREL BLOCKING DEVICE
9-10
BATTERY INSTALLATION/ CHARGING INSTRUCTIONS
10
LEAP 3 CIRCUIT BOARD w/C.A.M.D. SETTINGS
11
TRIGGER ADJUSTMENT
12
INSTALLING CARRYING HANDLE W/SIGHT 12
INSTALLING / REMOVING A PAINTBALL LOADER 12
LOADING PAINTBALLS IN THE MAGAZINE/ RELEASING THE MAGAZINE
13
INSTALLING / REMOVING THE SOPMOD STOCK
14
VELOCITY ADJUSTMENT INCREASE / DECREASE
14
A JAMMED PAINTBALL 14-15
SQUEEGEE CLEANING OF THE BARREL AND BREACH 15
DISASSEMBLE / REASSEMBLE REAR INTERNALS
15-16
QUAD RIS BARREL SHROUD REMOVAL
16
Eko™ CUP SEAL REMOVAL
17
TROUBLESHOOTING
18
WARRANTY STATEMENT
19
E-MR5™ PARTS LIST
20
E-MR5™ SCHEMATICS
21
MR™ ACCESSORIES
22-23
IMPORTANT SAFETY GUIDELINES
WARNING
•
This paintball Marker is NOT a toy. Misuse can cause serious injury or death.
•
Kingman recommends that the customer must be at least 18 years of age to purchase this product. Person
under 18 years of age must have adult supervision when using this product.
•
Read this User manual before using this product.
•
Any modifications or tampering of original factory parts or use of non authorized aftermarket accessories
will void all warranties and liabilities from Kingman.
•
Keep the barrel blocking device on Marker when not shooting/playing.
•
To ensure proper adjustment of velocity FEET PER SECOND (fps), Kingman strongly recommends using
a chronograph for paintball use located or purchased at most paintball stores and paintball fields. The
discharge of paintballs at high velocity can cause serious injuries or death if misused.
•
Before / after use of the Marker, check and make sure all screws are securely tightened. Loose screws
may prevent the Marker from functioning properly. A paintball Marker NOT properly maintained can be
dangerous and can cause serious injury or death.
•
Any person using this product or within range of this product while it is in use MUST wear EYES/FACE,
EARS PROTECTION designed specifically for the sport of paintball. This includes, but is not limited to,
performing maintenance, velocity check and target practice.
•
Kingman reminds the user that SAFETY IS YOUR RESPONSIBILITY. Protect your EYES/FACE AND EARS
at all times. Kingman will not be held liable for injuries or death sustained when failing to follow the safety
guidelines.
•
Never shoot or point your Marker at a person that is not in a designated paintball facility and without proper
paintball EYES/FACE/EARS PROTECTION. The protection includes and not limited to the protection of
eyes, face, ears, neck and head. Avoid shooting underneath the paintball goggles.
•
DO NOT point or shoot at any Law Enforcement Officer.
•
DO NOT remove the Orange Blaze Muzzle Ring. This identifies the paintball Marker is NOT a firearm.
•
Treat every paintball Marker as if it were loaded.
•
Never look down the barrel of a loaded or unloaded Marker.
•
Always keep the paintball Marker in SAFE mode until ready to operate.
•
Always remove the air source and all paintballs from the Marker. This includes paintballs inside the breach
of the Marker, before storage or disassembly / maintenance.
•
Fire only (.68 Cal.) and/or First Strike™ paintballs with this product. The use of any foreign objects will
VOID all warranties and liabilities from Kingman. DO NOT attempt to Freeze any Paintballs.
•
Always make certain the bolt of the Marker is in the un-cocked position when not shooting/playing.
•
Using a paintball Marker outside of a non designated paintball field can be illegal, and is subject to law
enforcement penalties if property damage is caused by the user.
•
Never point or shoot your Marker at an animal.
•
Never point the barrel toward yourself while playing, running or stumbling to avoid shooting underneath
your paintball goggles.
•
Wear appropriate clothing to avoid any exposure of skin to protect you when playing paintball games.
•
Please transport your Marker in a non-transparent carrying case.
•
Transfer this User manual upon change of Marker ownership.
•
Please visit www.spyder.tv for the latest User Manual updates.
2
English
OPERATION GUIDE / START UP
1.
Always attach a barrel blocking device over the tip of the barrel for safety precautions when not shooting/
playing.
2.
Install and Charge the Battery (SEE BATTERY INSTALLATION)
3.
Attach a CO2/Compressed Air Tank to the Markers C/A adapter. Using a CO2/Compressed Air Tank firmly
tighten clockwise to the Markers C/A adapter until it is snug. HELPFUL TIP: Make sure to have the CO2/
Compressed Air Tank filled before attaching. NOTE: O-rings in the Markers parts kit are NOT supplied to attach
on a CO2/Compressed Air Tank. IMPORTANT: You should never need to use any hand tool to attach a CO2/
COMPRESSED AIR TANK to the Markers C/A adapter. (SEE CO2/COMPRESSED AIR TANK WARNING)
4.
Attach the Magazine to the Trigger Housing or attach Force Feed Paintball Loader to the Markers clamping
feed neck and tighten the set screw. NOTE: Fill Loader with only (.68 Cal.) paintballs/Fill Magazine with (.68
Cal.) or First Strike™ paintballs. NEVER mix First Strike™ Paintballs and (.68cal) Paintballs inside a Straight
Magazine.
5.
Turn the Power On for the Electronic Trigger Frame. (SEE LEAP 3 CIRCUIT BOARD C.A.M.D. SETTINGS)
6.
Cocking the Marker. Pull the AR15 Style Charging Handle rearward until the FS Venturi Bolt latches. CAUTION:
Should you let go of the AR15 Style Charging Handle before it latches, your Marker may fire.
7.
Remove the barrel blocking device. CAUTION: With the power switch turned On the Marker is LIVE. Pulling the
Trigger will fire a paintball. IMPORTANT: Only test your Marker in a safe direction or In a designated playing
field.
8.
Performing a velocity (fps) check. Turning the Velocity Adjuster/Spring Guide clockwise will increase the
velocity (fps) while turning counter-clockwise will decrease the velocity (fps). NOTE: Your Marker is intended
to be used in a paintball facility with the proper paintball protection. IMPORTANT: Kingman recommends using
a chronograph to ensure Marker’s velocity is under 300 (fps).
9.
When finished playing, remove all paintballs from the Magazine and Force Feed Paintball Loader. Then detach
the loader from the Markers feed neck by loosening the set screw on feed neck clamp. CAUTION: There may be
one paintball in the Marker’s breach; take a shot or two in a safe direction to make sure the barrel and Receiver
are empty.
10. Place the barrel blocking device over the barrel tip. This will help avoid any accidental discharge.
11. Kingman recommends having the Marker in the SAFE/OFF and un-cocked position after use.
12. Unscrew the CO2/Compressed Air Tank from the Markers C/A adapter. By turning the tank counter clockwise
will detach from the Markers C/A adapter. CAUTION: Never expose any skin underneath the C/A adapters
bleed hole when removing the tank. This can run the risk of getting skin burn from the releasing of the GAS.
IMPORTANT: You should never need to use any hand tool to detach a CO2/Compressed Air Tank from the
Markers C/A Adapter. (SEE CO2/COMPRESSED AIR TANK WARNING)
13. Store the Marker in a paintball bag or in a safe place. WARNING: Before/after use of the Marker, make sure
to fasten all screws. Loose screws may prevent the Marker from functioning properly. HELPFUL TIP: It’s a
good practice to lubricate your Marker before and after each use, especially when storing the Marker for an
extended period of time. Add a few drops of paintball gun oil on the Striker O-ring (SEE DISASSEMBLE/
REASSEMBLE REAR INTERNALS). Before storing the Marker, make sure the Marker is in the SAFE/OFF, uncocked position without air source attached, any paintball inside the Marker has been removed and with barrel
blocking device On.
IMPORTANT
•
Firing velocity may vary according to altitude and climate conditions.
•
Before using your Marker in play, you must always first perform a “SAFE VELOCITY TEST”. This can only be
accomplished by using a testing device called a “Velocity Chronograph“ and can be performed at a paintball
dealership or local playing field. NOTE: This product is intended to be used at a velocity no greater than
300 feet per second (fps). Paintball Markers are not intended to shoot within 30 feet.
•
This paintball Marker may have excess gas after the removal of the CO2 / Compressed Air Tank. Please
remove all paintballs and discharge the remaining gas safely.
•
Never store a CO2 / Compressed Air Tank attached to the Marker.
3
8 STEPS TO START AND PLAY
IMPORTANT: Please read the Safety and Operation Guidelines before you start the 8 quick steps to Start and Play.
IMPORTANT: The Barrel must be installed before loading the Magazine or Force Feed Paintball Loader.
1
1. Insert the barrel blocking device.
3
3. Install a CO2/Compressed air
tank.
4
2
2. Remove left grip panel and
install battery.
4
4. First fill magazine with paintballs and attach to the receiver
before installing the loader with
paintballs.
English
8 STEPS TO START AND PLAY (CONTINUED)
5
5. Put on your paintball goggles
and cock back the marker.
7
7. Power on the circuit board and
remove the “SAFE” mode.
6
6. Remove the barrel blocking device.
8
8. Ready to play.
IMPORTANT: Make sure the Marker is in the SAFE MODE and the barrel blocking
device is on the Marker’s barrel after PLAY.
5
CRITICAL SAFETY INFORMATION
NEVER look down the barrel with or
without your paintball goggles ON.
NEVER look down the barrel of a loaded
or unloaded marker.
WARNING:
UNSAFE
NEVER shoot or point your marker at
a person that is not in a designated
paintball facility and without proper
EYES/FACE/EARS protection
designed specifically for the sport of
paintball.
*Paintball marker model shown is for demonstration only
and may not represent the marker model you have.
WARNING:
UNSAFE
Before / after use of the paintball
marker, check and make sure all
screws are securely tightened. Loose
screws may prevent the paintball
marker from functioning properly.
NOTE: Some screws may not be
highlighted in diagram.
IMPORTANT: Please read the Owner’s Manual before you
play.
6
RECOMMENDED PAINTBALL SAFETY GEAR
Cap or Hood
Paintball Goggles
Neck Protector
Paintball Jersey
w/ Body Armor
under
Protective
Gloves
Padded Pants
Athletic Shoes
Wear appropriate dress attire to avoid any exposed skin when playing paintball. We recommend purchasing
a Paintball Goggles, Neck Protector, Paintball Jersey or Long Sleeve shirt, Body Armor, Protective Gloves,
Athletic Shoes and Padded Pants.
7
CO2 / COMPRESSED AIR TANK WARNINGS
SAFE
DAN GER
UNSAFE
The CO2 or Compressed Air Tank can fly off with enough force
to cause serious injury or death if the Valve unscrews from the
cylinder head. LOOK at the Valve when removing the cylinder from
the marker. Be sure that the valve is turning with the cylinder rather
than remaining stationary with the marker. STOP if the Valve starts
to unscrew from the cylinder. If in doubt, screw the cylinder back
onto the marker and contact a trained person for repair.
•
All valves must only be installed or removed by a qualified air smith.
•
See CO2 / Compressed Air tank labels for retest dates. Cylinder tanks must be retested periodically.
•
Improper use, filling, storage or disposal of all air cylinders may result in death, personal injury and/or
property damage.
•
Always keep cylinders out of reach from children or any inexperienced person(s).
•
Only properly trained personnel in accordance with CGA Pamphlets P.1 and G-6.3 must fill all air cylinders.
Pamphlets are available from the Compressed Gas Association or www.CGANET.com.
•
Never alter the cylinder in any way.
•
DO NOT expose pressurized cylinders to temperatures in excess of 130˚F (54˚C).
•
Cylinders heated to an excess of 250˚F (121˚C) must be condemned or re-qualified in accordance with test
defined in CFR-49.
•
The valve should NEVER be detached from the canister. Please seek immediate assistance from a trained air
smith should this occur.
•
Any tank packed with the product is intended for paintball use only.
•
Confirm that there is an attached urethane O-ring on the CO2 / Compressed Air tank valve before attaching
the tank to the marker. The tank will leak air as soon as it is secured to the marker, if the O-ring is missing
from the valve.
•
A urethane O-ring is highly recommended before attaching any air supply to the marker.
•
NEVER over pressurize a CO2 / Compressed Air cylinder.
•
Avoid any direct skin exposure to the escaping gas, when installing or removing any air supply.
•
Never expose cylinders to corrosive materials or clean with any caustic cleaners.
8
English
INSTALLING A CO2 / COMPRESSED AIR TANK
Firmly screw the CO2 / Compressed Air Tank clockwise into the markers C/A Adapter. HELPFUL TIP: Before
installing a CO2 / Compressed Air Tank, make sure that the tank is full and that it has a urethane bottle O-ring on
the top of the valve to prevent air leaks. IMPORTANT: You should never need to use any hand tool to attach a CO2 /
Compressed Air Tank to the C/A Adapter.
REMOVING A CO2 / COMPRESSED AIR TANK
Firmly unscrew the CO2 / Compressed Air Tank by turning the tank counter-clockwise until it comes out of the C/A
Adapter. HELPFUL TIP: After firing the marker, you should ALWAYS remove the CO2 / Compressed Air Tank before
storing. When the tank is being removed, excess air will release from the C/A Adapter. CAUTION: Never expose any
skin to the C/A Adapters bleed hole when removing the tank. This is to avoid the risk of getting skin burn from the
escaping GAS.
IMPORTANT: You should never need to use any hand tool to detach a CO2 / Compressed Air Tank from the C/A
Adapter. If you cannot remove a tank by hand please see a certified air smith for assistance.
E-MR5 BARREL INSTALL / REMOVE / SETUP
To install the barrel you must lineup the center arrow marked on the barrel to the arrow marked on the Front Shroud
Base (see figure A) once lineup then insert the barrel.
To Set up for “Magazine” feeding, turn the barrel counterclockwise making sure the arrow marking on the barrel (M )
is line up with the arrow marked on the Front Shroud Base (see figure B).
To set up for the “Loader” feeding, turn the barrel clockwise making sure the arrow marking on the barrel (L ) is line
up with the arrow marked on the Front Shroud Base (see figure C).
Removing the barrel you must lineup the center arrow marked on the barrel to the arrow marked on the Front Shroud
Base (see figure D) once lineup then pull the barrel out.
A
C
L
L
M
B
D
M
L
M
PROPER USE OF YOUR BARREL BLOCKING DEVICE
A Barrel Blocking Device or “BBD” is an essential part of your paintball safety equipment. The Barrel Blocking
Device is designed to stop a paintball from exiting a paintball marker accidentally. Improper use of the Barrel
Blocking Device will not provide protection.
BARREL SOCK/BAG TYPE DEVICE
Place the bag/sock part of the Barrel Blocking Device over the end of your barrel and wrap the elastic cord around
the back end of your marker. Adjust the length of the elastic cord to make sure your Barrel Blocking Device fits
securely over your markers barrel. NOTE: If the elastic cord is too long you can tie a couple of knots around the cord
to shorten its length.
9
BARREL PLUG TYPE DEVICE
Insert the barrel plug securely into the end of your markers barrel before proceeding to load paintballs and screwing
in your tank to your marker.
The barrel plug should fit firmly into the barrel with a significant amount of resistance. NOTE: The barrel plug should
not be easy to remove and always inspect the O-rings to make sure they are not worn or cut.
IMPORTANT: Remove the Barrel Blocking Device only when you are getting ready to begin play or have been
instructed to do so by a field safety official. Always keep your Barrel Blocking Device on your marker after you have
finished playing. Keep it in place even after you have emptied all paintballs and removed your air tank from your
paintball marker. WARNING: Inspect your Barrel Block Device regularly for wear and any tear if it is worn, replace it
immediately.
BATTERY INSTALLATION
Please consider the environment by using a Rechargeable 9.6volt Spyder
Battery.
STEP 1 Remove the three M3x8 Screws from the Left side grip panel.
STEP 2 Attach the battery to the battery wire harness Red / Black Wires.
STEP 3 Reattach the grip panel and tighten the three M3x8 Screws.
HELPFUL TIP: Please note how the parts are removed for easy reassembly.
Kingman Group recommends using the Spyder 9.6volt NiMH Rechargeable
Battery as a power source for optimum performance and will provide a
superior shot count of 5000 to 6000 rounds. IMPORTANT: Performance
will vary depending on the mode used and rate of fire achieved.
CHARGING INSTRUCTIONS
HELPFUL TIP: To charge a Spyder 9.6 NiMH battery, the Circuit Board
must be in the OFF position. Spyder batteries are not fully charged when purchased.
STEP 1 Plug the Spyder LED A/C charger into a power outlet.
STEP 2 Connect the Spyder A/C charger cord to the rear of the Markers trigger frame’s charging port.
STEP 3 The LED indicator on the Spyder LED A/C charger will display RED when the battery is charging.
STEP 4 The LED indicator on the Spyder LED A/C charger will display GREEN when the battery is fully charged.
For a complete charge, Kingman recommends a charging time of 6-8 hours.
STEP 5 Unplug the Spyder LED A/C charger cord from the rear of the Markers trigger frame’s charging port after
charging.
STEP 6 Remove the Spyder LED A/C charger from the power outlet.
IMPORTANT: Never charge the battery for over 24 hours, as you will risk damaging the battery and/or electronics.
HELPFUL TIP: It is recommended that the battery be charged prior to use in order to ensure maximum performance,
especially if the battery has not been used in over a period of time. NOTE: A fully charged Spyder battery will last
about 5000-6000 shots, depending on your firing methods or firing mode in use. Under normal use and charging
conditions the expected life of the Spyder battery is approximately 700-1000 charging cycles.
To avoid any risks of having the Battery explode or the Circuit Board burned: charge only Spyder 9.6volt NiMH
Batteries in Spyder electronic frames.
IMPORTANT
•
DO NOT attempt to recharge any Alkaline or any other type of battery in the Spyder electronic frame.
•
DO NOT try to recharge batteries that are rusted, corroded, damaged or leaking.
•
FAILURE to follow any of the instructions, will VOID ALL WARRANTIES AND LIABILITIES from Kingman.
•
Kingman will not be held liable for any injury or damages from the improper use of this product. This accessory is not intended for use with any other product other than what Kingman designed it for.
10
English
LEAP 3 CIRCUIT BOARD w/C.A.M.D. SETTINGS
SAFE – Red LED
SEMI – Green LED
3 Burst – Blue LED
6 Burst – Blue LED
AUTO – Orange LED
BATTERY ICON – Yellow LED (Solid LED = Good, Flashing LED = Low)
2 BUTTON ACCESS OPERATIONS
Press and release the Upper “Power” Button to turn the Marker “On”. The C.A.M.D. Board
will display the Red “Safe” indicator “On” meaning that the Marker is in safety mode and will
not allow the Marker to shoot. The default firing mode is Semi Auto and the Green “Semi”
indicator will be displayed as the Marker firing mode.
To turn the safety “Off” press and release the Lower “Mode” Button and the Red “Safe”
indicator will turn off, the Marker is now capable of firing in Semi Auto. To turn the safety back
“On” press and release the Lower “Mode” Button again.
To turn the Power “Off” press and hold the Power Button until all C.A.M.D. LED indicator powers down completely.
CHANGING MODES
To change the firing mode, Press and hold the Lower “Mode” Button until the firing mode indicator on the C.A.M.D.
Board will start flashing. While the indicator is flashing press and release the Lower “Mode” Button to scroll through
the mode setting. When the desired firing mode has been selected, press and hold the Lower “Mode” Button until
the indicator stops flashing. The Marker will now operate in the firing mode that has been selected. The Red “Safe”
indicator will remain “On”, to turn the safety “Off” press and release the Lower “Mode” Button and the Red “Safe”
indicator will turn “Off”, the Marker is now capable of firing in the selected mode.
IMPORTANT: The safety may be enabled in any mode by pressing and releasing the Lower “Mode” Button, the Red
“Safe” LED indicator will turn on and keep the Marker from accidentally shooting while the Power is “On”.
FIRING MODE LOCK
To lock the operations of the Marker in Semi-Auto Mode remove the lock switch from the circuit board while the
Power is “Off” this will default the Marker operation and shoot in Semi-Auto Mode Only.
To lock the operation in 3 Burst Mode turn the Marker Power “ON”, select 3 Burst on the C.A.M.D. Board indicator,
remove the tournament lock switch from the circuit board to lock in 3 Burst Mode. NOTE: Following the same steps
on selecting the 3 Burst Mode will allow you to lock the Marker operation in 6 Burst or Auto Mode. NOTE: Use
the lock switch when the playing field requires it. NOTE: Semi-Auto Mode maybe the only allowable Firing Mode
permitted in your country. Check with your local officials regarding this application. For example select European
countries, Australia and New Zealand are restricted to use Semi-Auto Model ONLY.
BATTERY POWER INDICATOR
If the battery power drops below 8.5 volts, the battery icon on the C.A.M.D. Board will start flashing indicating a low
power supply, it is time to replace the battery or if you are using a Spyder 9.6 Volt Rechargeable Battery, then it is
time for a recharge. NOTE: The low battery indicator icon will only flash while the Power is “On”.
SLEEP MODE
The LEAP 3 Circuit Board comes with this feature to improve Battery Life and the board will power down after 20
minutes of inactivity.
WARNING
•
Spyder Electronic Markers are not water resistant.
•
Extreme moisture can cause serious damage to any Spyder Electronic Marker.
•
Always clean any dirt or paint inside the Markers electronics.
•
Never attempt to modify the electronics circuitry, doing so will VOID all electronic warranties and liabilities
from Kingman.
11
TRIGGER ADJUSTMENT
STEP 1 Adjusting the Top Trigger Screw located
underneath the Trigger Frame clockwise will swing the
Trigger closer to the touch switch. NOTE: Adjusting
the Top Trigger screw counter-clockwise will increase
the trigger gap. IMPORTANT: Over adjusting the
Trigger screw to close won’t allow the trigger to
activate the touch switch which will not allow the
Marker to fire.
STEP 2 Adjusting the Middle Trigger Screw
clockwise will shorten the trigger stop from the touch
switch. NOTE: This will increase trigger sensitivity.
Unscrewing it counter clockwise will decrease trigger
sensitivity.
INSTALLING CARRYING HANDLE W/SIGHT
Loosen both Locking Screws
from the Carrying Handle Sight.
Place the Carrying Handle
Sight to fit above the Picatinny
Body Rail. Make sure to align
the Locking Plate with the
Carry Handle Sight. Then
Fasten both Locking Screws.
NOTE: The Carrying Handle
Sight adjusting wheel should
be on the Right side and at the
rear of the Receiver.
INSTALLING / REMOVING A PAINTBALL LOADER
IMPORTANT: The Barrel must be installed
before loading the Magazine or Force Feed
Paintball Loader.
Attach an Force Feed Paintball Loader to
the Markers Feed Neck and tighten the
set screw. Only use .68 caliber paintballs
through the loader.
Loosen the Feed Neck set screw and
remove the Force Feed Paintball Loader.
When removing the loader make sure to
remove all paintballs. CAUTION: There may
be paintballs in the Markers breach; take a
couple of shots in a safe direction to make
sure the Barrel and Receiver are empty.
12
1
2
English
LOADING PAINTBALLS IN THE MAGAZINE
IMPORTANT: The Barrel must be installed before
loading the Magazine or Force Feed Paintball Loader.
IMPORTANT: Always have the marker on SAFE MODE
until you are ready to operate.
IMPORTANT: Storing paintballs in a temperature
of 59° F (15°C) or below will affect the quality and
performance of the paintballs.
IMPORTANT: The magazine should be clean and free of
any shell fragment or dirt before loading paintballs.
WARNING: DO NOT attempt to Freeze any Paintballs.
STEP 1 Slide the ball pusher towards the bottom of
the magazine and turn to the left to place the guide pin
in the locked position.
STEP 2 Load only 9 Paintballs (.68 Cal.) or 9 First
Strike Paintballs. NOTE: First Strike Paintballs can only
be loaded in a specific direction in the First Strike Capable (FSC) 9 round Straight Magazine. HELPFUL TIP: The
Fin of the First Strike Paintball is facing towards the Receiver and the Rounded Body of the First Strike Paintball is
facing towards the Barrel. NEVER mix First Strike™ Paintballs and (.68cal) Paintballs inside a Straight Magazine.
STEP 3 Follow the guided line to insert the Magazine straight into the Trigger Housing until it snaps into position.
STEP 4 Turn the ball pusher pin right to the unlocked position.
IMPORTANT: If the ball pusher pin is not released, the spring will not push the paintballs into the markers breach.
RELEASING THE MAGAZINE
Push the magazine release button located on the right side of the markers handle. This will allow the magazine to
slide out the handle. NOTE: Never take apart the magazine release button unless the magazine does not release
from the trigger frame.
IMPORTANT: NEVER slam the magazine into the receiver, excessive force inserting the magazine will push a
paintball pass the ball detents and roll out the barrel.
NOTE: Do not store magazine (s) loaded with paintballs for an extended period of time as the pressure from the
magazine spring will cause the paintballs to de-form and not shoot properly.
HELPFUL TIP: Older paintballs left for a period of time are not recommended for use or you will experience
premature paintball breakage and poor accuracy.
FIRST STRIKE™ PAINTBALL WARNING
Paintball is an extreme sport. Misuse of the equipment can cause serious injury or death. Due to the
physical attributes of First Strike paintballs, the following must be adhered too. When using First Strike
paintballs in Kingman/Spyder paintball markers, all players must wear the following: full-face paintball
goggles that protect face, eyes and ears, cap or hood for the back of the head, neck protector, long sleeve
top, pants and full finger gloves. Markers must be chronographed using First Strike paintballs to insure
that the velocity remains under 300 fps or the velocity required by the playing field. Do not shoot any
player at a distance less than 30 ft. (10 yards), or the minimum distance required by the playing field.
Please read the complete marker manual and follow all of the important safety guidelines given by
Kingman/Spyder or check www.spyder.tv/safety
The use of the First Strike paintballs may not be allowed at all fields. Check the field’s paintball rules
before use.
13
INSTALLING / REMOVING THE SOPMOD
STOCK
Place the SOPMOD Stock in the top breach of the Receiver
behind the FS Venturi Bolt. Once the SOPMOD Stock is in place
secure the Stock with the set screw provided, then tighten with
the Allen wrench.
To adjust the length of the SOPMOD Stock press and hold the
Lever for adjustment. Once the Lever is released this will lock
into position.
Loosen the set screw on the right side of the Receiver with
the Allen wrench. Then remove the SOPMOD Stock out the
top breach of the Receiver. HELPFUL TIP: The SOPMOD
Stock must be removed if intended to clean the marker. (SEE
DISASSEMBLE/REASSEMBLE AND CLEANING OR REAR
INTERNALS).
VELOCITY ADJUSTMENT INCREASE / DECREASE
To INCREASE your velocity FPS (Feet Per Second) using
the Allen wrench turn the Velocity Adjuster / Spring Guide
clockwise.
To DECREASE your velocity FPS (Feet Per Second) using
the Allen wrench turn the Velocity Adjuster / Spring Guide
counter-clockwise.
STP089
Decrease
Velocity
NOTE: The velocity of this paintball Marker ranges from
approximately 220 - 300 feet per second (fps). Velocities
will fluctuate or vary due to paintball size, climate condition,
altitude, type of air source and variance in spring tension from
manufacturing.
WARNING:
•
The recommended Velocity speed should be no greater
than 300 fps. Not doing so can cause serious injury if
the Velocity is dangerously high.
Increase
Velocity
VTA089
•
Paintball markers are not intended to shoot any person
less than 30 feet.
•
Never point a loaded marker at any person who is not wearing the proper face protection.
•
Never at any point should you look down the barrel, whether the marker is loaded or not.
•
Using a paintball marker outside a non designated paintball field can be illegal, and is subject to law
enforcement penalties if property damage is caused by the user.
A JAMMED PAINTBALL
In the event of a paintball break and the FS Venturi Bolt jams, follow these steps to help un-jam the Marker. The
Markers breach is located where the barrel starts to thread in the Receiver and underneath the Markers feed neck.
Before attempting to un-jam the FS Venturi Bolt you should always have your Goggles or Safety Glasses on. Make
sure the Marker is in the SAFE MODE position before attempting to un-jam the FS Venturi Bolt. Remove the CO2/
Compressed Air Tank before attempting to un-jam the Marker. Remove all paintballs from the Magazine and Force
Feed Paintball Loader. Have the barrel removed from the Receiver to allow the paintball(s) to exit. With enough
force on the AR15 Charging Handle, pull back to release the FS Venturi Bolt from the jammed position. Another
method is to use a “Straight Shot Squeegee” or the end of a wood dowel rod; push against the face of the FS Venturi
Bolt with enough force to release the jammed Bolt. Always clean the paint from the breach and barrel to enhance the
performance of your Marker.
14
English
DANGER: Do not look down the Marker barrel. Always wear goggles specifically designed for paintball use while
working on your paintball Marker.
IMPORTANT: Always have the Marker on SAFE MODE before disassembly. Remove all paintballs and air source from
the Marker before performing any maintenance.
HELPFUL TIP: Follow these steps to help clean/remove Marker parts should in the event of a paintball break.
SQUEEGEE CLEANING OF THE BARREL AND BREACH
Using a Stick Squeegee (not included)
If the FS Venturi Bolt is in the un-cocked position you need to re-cock the Marker. Slide a stick squeegee down the
barrel until it reaches the Markers breach. Then remove the stick squeegee out of the barrel. This should wipe clean
any paint residue that could have broken inside the Marker. HELPFUL TIP: Make sure the Markers breach is clean
and clear of any paintball shell fragments or dirt. Repeat this step if the paint residue did not wipe clean after the
first attempt.
Using a Cable Swab Squeegee (not included)
Twist off the barrel and slide a cable swab squeegee from the open end so the swab is the last portion of the
squeegee out of the barrel tip. Grab hold the tail of the cable squeegee and pull. This should wipe clean any paint
residue that could have broken in the barrel. HELPFUL TIP: Make sure the Markers breach is clean and clear of any
paintball shell fragments or dirt. Repeat this step if the paint residue did not wipe clean after the first attempt.
DISASSEMBLE / REASSEMBLE REAR INTERNALS
STK022
STP089
VBT090
REC090
VTA089
STB002
SPR025
STF001
RPN023
Part Names and Numbers described in this section:
AR15 Charging Handle (#STK022)
Quick Disconnect Pin (#RPN023)
Striker Buffer (#STF001)
FS Venturi Bolt (#VBT090)
Receiver (#REC090)
Striker Plug (#STP089)
Striker Bolt (#STB002)
Striker Spring (#SPR025)
Velocity Adjuster (#VTA089)
Disassembling the Internals
HELPFUL TIP: The SOPMOD Stock should not be attached to the Receiver when removing Rear Internals.
STEP 1 Pull out the Disconnect Pin from the Receiver. HELPFUL TIP: Remove the Striker Plug while the marker is
in the un-cocked position this will prevent the internals from springing out because the Striker Spring is compressed.
STEP 2 Remove the Striker Plug with the Striker Spring and Striker Buffer out the back of the Receiver.
STEP 3 Tilt back the end of the Marker into your hands ready catch the FS Venturi Bolt and Striker Bolt from the
back of the Receiver. HELPFUL TIP: When the internals are removed it would be wise to clean any dirt or paint from
the inside of the Receiver with a squeegee and wipe the FS Venturi Bolt clean with a rag or paper towel. Apply some
paintball gun oil on Striker O-ring periodically. IMPORTANT: It is not necessary to disassemble the rear internals for
basic maintenance unless the Striker O-ring needs to be replaced.
15
Reassemble Rear Internals
STEP 1 Join both FS Venturi Bolt and Striker Bolt thru the rear of the Receiver with the O-ring on the Striker
Bolt facing towards the front of the Marker. NOTE: When inserting both parts, apply finger pressure behind the FS
Venturi Bolt and at the same time pull on the Trigger to allow entry of the both parts.
STEP 2 Insert the Striker Buffer flush at the lower end of the Receiver and place the Striker Spring thru the Striker
Buffer.
STEP 3 Place the Striker Plug w/Velocity Adjuster & Spring Guide to the rear of the Receiver.
STEP 4 Insert the Disconnect Pin thru the Receiver to secure the Striker Plug in place. WARNING: Before/after
use of the Marker, make sure to fasten all screws. Screws may become loose due to vibration. Loose screws can be
dangerous and cause injury.
To assure marker is assembled properly, follow the schematic drawing or position parts in order during disassembly.
Parts assembled backwards or improper parts installed will / can cause the marker to malfunction.
WARNING:
Never attempt to remove the Markers internals while the CO2 / Compressed Air Tank is attached. Make sure to
remove all paintballs and loader before disassembling the marker.
QUAD RIS BARREL SHROUD REMOVAL
STEP 1 Using a 1/2 inch or 13mm open end or and adjusted wrench loosen the Swivel End of the hose.
STEP 2 Remove the Three Screws that hold the Trigger Housing to the Receiver. One the Screw is located at the
rear of the Receiver. The other Two additional Screws are on the Left and Right side of the Trigger Housing.
STEP 3 Once the Trigger Housing is removed from the Receiver, loosen all of the 5 Screws from the Quad RIS Barrel
Shroud. This will allow the both halves to split apart.
HELPFUL TIP: Please note how the parts are removed for easy reassembly.
16
English
Eko™ CUP SEAL REMOVAL
SCR057
SCR037
ITP026
ITP023
LPC089
SCR016
SPR016
Swivel End
Part Names and Numbers describe in this section:
Screw (#SCR016)
Vertical Screw (#SCR037)
Screw (#SCR057)
Eko™ Valve Pin (#ITP026)
Valve Spring (#SPR016)
Eko™ Cup Seal (#ITP023)
Reservoir Plug (#LPC089)
The following steps will provide easy access to the Eko™ Cup Seal. The sign of a worn out Eko™ Cup Seal is the
presence of CO2 / Compressed Air leaking down the barrel.
HELPFUL TIP: Do not rush or skip any of the steps for proper disassembly of the Marker. Remove the barrel before
starting.
STEP 1 Using a 1/2 inch/13 mm open end or an adjustable wrench to loosen the swivel end of the Hose. NOTE: A
Plastic Washer is inside the female swivel end of the Hose. Make sure you do not lose this part.
STEP 2 Remove the three screws that hold the Trigger Frame to the Receiver. One screw is located at the rear of
the Trigger Frame. Two additional screws are on the left and right side of the Trigger Frame.
STEP 3 Remove the Vertical Screw that is holding the Reservoir Plug. Once the Reservoir Plug has been removed
the Valve Spring, Eko™ Valve Pin and Eko™ Cup Seal will be attached.
STEP 4 Detach the Valve Spring from the Reservoir Plug, and then unscrew the Eko™ Cup Seal from the Eko™ Valve
Pin. Replace the Eko™ Cup Seal with a new one supplied in the Spare Parts Kit.
Once these steps have been completed, reassembly all parts back in the Receiver. HELPFUL TIP: Please note how
the parts are removed for easy reassembly.
CAUTION: Use the proper Allen wrenches to fasten all screws and never apply more force than necessary.
IMPORTANT: Always remove the Air Tank before any disassembly of your marker. Do not remove the Eko™ Valve
Body unless specific Eko™ Valve Body repairs are needed. Do not remove the Eko™ Valve Body with a screwdriver
as it will damage the Eko™ Valve Body Lip and cause air leaks. NOTE: The Eko™ Valve Body Screw must be removed
prior to taking out the Eko™ Valve Body.
17
TROUBLESHOOTING
Air Leak From The Hose Line
1.
If air is leaking from the opposite ends of the hose fittings will need to retighten to snug.
2.
The female end of the hose must have a Plastic Washer installed inside the Hose collar and be tightened properly. IMPORTANT: The Hose line supplied has metric female ends. This will not install into American 1/8” (NPT)
threaded fittings. If installed incorrectly, it is possible to damage the attachment fittings and hose line.
Dealing With An Air Leak
Down The Barrel or Out of The Trigger Frame
1.
Eko™ Cup Seal is bad and needs to be replaced. (SEE Eko™ Cup Seal REMOVAL GUIDE)
2.
The Valve Body lip is nicked or scratched and needs to be replaced. NOTE: Never remove the Valve Body unless specific repairs are needed.
3.
Air leaking through the Receiver and out of the Trigger Frame. The back o-ring on the Valve Body is damaged
and needs to be replaced.
Dealing with a Paintball Breakage
1.
If the weather temperature is below 59°F (15°C) or above 86°F (30°C) paintballs can become brittle and
not hold up to the Markers velocity and outside temperature. Paintballs have a shelf life and can become too
fragile for use. Paintballs can take a different shape in time so would be wise to size the paintball with your
barrel. Dirt or broken paint shell fragments in the barrel can cause the Marker to have re-cocking issues. Using
a squeegee thru the upper portion of the Receiver will remove most of the dirt or broken shell fragments.
2.
If the loader has double fed a paintball in the barrel/breach and the Marker was fired. This can break paint out
of the barrel.
3.
If you over shoot the paintball loader and in middle travel have wedged a paintball in the breach this could
cause a paintball breakage.
4.
Velocity adjustment is too high and needs to be lowered to proper velocity (fps) speed.
Re-cocking Related Issues
1.
Need lubrication on the Striker O-ring. (SEE DISASSEMBLE/REASSEMBLE AND CLEANING OF REAR
INTERNALS).
2.
Striker O-ring is damaged or missing. Replace with a new Kingman approved Striker O-ring. NOTE: The Striker
O-ring cannot be substituted with another type of o-ring.
3.
The pressure in the tank is too low and possibly needs to be refilled.
4.
Dirt or broken paint shell fragments in the Receiver can cause the Marker to have re-cocking issues. Using a
squeegee thru the upper portion of the Receiver will remove most of the dirt or broken shell fragments. Should
this issue continue, remove the Markers internals for complete cleaning. (SEE DISASSEMBLE/REASSEMBLE
AND CLEANING OR REAR INTERNALS).
Electronic Trigger Frame Troubleshooting
If your Marker is not shooting it may be due to one of the following problems:
1.
Battery may need to be recharged.
2.
The Battery Wire Harness is not properly attached to the circuit board.
3.
The Coil Set Harness is not properly attached to the circuit board. 4.
The Touch Switch Harness is not properly attached to the circuit board. NOTE: If the Markers Electronics have
any dirt or paint, Kingman recommends using an aerosol can of air. Apply the can of air directly at the components that need cleaning.
18
English
WARRANTY STATEMENT
Kingman warrants the original retail purchaser that this product is free from defects in material and workmanship
under normal use and service for a period of (1) year from the original date of purchase. Any Electronic Components
in an Electronic Spyder marker are warranted for (6) months and the Tadao® Circuit Board for (3) months from the
original date of purchase. Kingman agrees to repair or replace (at its discretion) any product within (a reasonable period of time). This warranty does not cover O-rings, Eko™ Cup Seals, 9.6v Rechargeable Battery, Charger, Scratches,
Nicks, normal wear and tear of parts, any modifications, normal fading of anodizing and damage caused by dropping
or hitting of products. This warranty shall not apply if it is shown by a Kingman Technician that the consumer caused
the defect or malfunction because of misuse. This warranty only covers original factory parts. Any modifications or
tampering of original factory parts will VOID warranty and liabilities from Kingman. Any damage caused by water
will not be covered under warranty. Warranty repair can only be conducted by Kingman Technician or Kingman
Authorized Technician. For warranty to be effective, consumer must return the enclosed warranty registration card
filled out, along with a copy of the purchase receipt, within (15) days of the original purchase date. This warranty is
not transferable. Paintball Markers are non-refundable. This warranty will not cover pick up, shipping, delivery, and/
or house calls. If the product needs repair, the consumer is responsible for packaging the product and covering the
shipping cost to Kingman. Please include a note with your name, address, phone number and a brief description of
the malfunction to:
KINGMAN GROUP
Attn: Tech Department
14010 Live Oak Avenue
Baldwin Park, CA 91706 U.S.A.
www.kingman.com
• Warranty Registration is also available at www.spyder.tv
FOR TECHNICAL SUPPORT
Our Technical Support Department is open Monday through Friday, from 8 am to 5 pm (PST), and may be reached at
Tel: (626) 430-2300 Fax: (626) 851-8530
PATENT #8,286,622
19
E-MR5™ PARTS LIST
1
ASA036
C/A Adapter Angled
43 SCR018
M3 x 8 Screw (+)
2
BAR002
Orange Blaze Rubber Ring
44 SCR024
M5 x 25 Screw C/A Adapter (A)
3
BAR003
Spyder Barrel Plug
45 SCR029
M4 x 6 Venturi Bolt Screw (A)
4
BLS039
Barrel Ball Stopper
46 SCR037
M4 x 12 Vertical Screw (AFH)
5
ECB015
LEAP 3 Circuit Board w/CAMD
47 SCR045
M4 x 14 Feed Neck Screw (A)
6
ELM001
Coil Set
48 SCR048
Feed Neck Clamp Screw (A) & Nut
7
ELM002
Coil Pin
49 SCR050
M4 x 16 Magazine Screw (+)
8
ELM003
Tournament Lock Switch
50 SCR051
M2 x 8 Magazine Release Button Screw (+)
9
ELM004
Capacitor
51 SCR057
M4 x 12 Shroud Screw (A)
10 ELM008
Touch Switch Membrane
52 SER003
Sear (ESP)
11 FND089
Polymer Off Set Feed Neck (plastic)
53 SPR016
Valve Spring
12 FRG083
Magazine Ball Stopper & Spring
54 SPR025
Striker Spring 110.mm
13 FRG084
Magazine Ball Pusher w/Guide Pin
55 SPR026
Barrel Guide Pin Spring
14 FRG085
Magazine Release Button
56 SPR035
First Strike Magazine Spring (straight)
15 FRG086
Magazine Release Lock
57 SPR028
Magazine Release Spring
16 GRP015
Flat Grip Panels (black)
58 SPR030
AR15 Style Charging Handle Spring
17 HSE089
Disconnect Hose
59 SPR036
Trigger Spring (electronic)
18 HSF004
Plastic Washer
60 SPR037
Sear Spring (electronic)
19 HSF006
Male to Male Adapter (MET x MET)
61 STB002
Striker Bolt
20 HSF011
Metric Female to Standard Male Adapter
62 STF001
Striker Buffer
21 ITP023
Eko™ Cup Seal
63 STK016
Carrying Handle Locking Plate
22 ITP025
Eko™ Valve Body
64 STK017
Carrying Handle Locking Screw
23 ITP026
Eko™ Valve Pin
65 STK021
Picatinny Body Rail
24 LPC089
Reservoir Plug
66 STK022
AR15 Style Charging Handle
25 ORG001
Striker O-ring #14.3 1.7 70pu
67 STP089
Striker Plug
26 ORG002
O-ring #15 80
68 TRF016
E-MR5 Trigger Frame Only (no internal)
27 ORG003
Barrel O-ring #22 1.5 80
69 TRS006
Single Trigger (electronic)
28 ORG004
O-ring #11 80
70 VBT090
FS Venturi Bolt
29 ORG008
O-ring #10 80
71 VTA089
Velocity Adjuster & Spring Guide
30 ORG029
Flat Barrel O-ring #20 22.8 3.8
72 WRH002
Battery Harness
E-MR5 Spare Parts Kit
73 WRH007
Touch Switch (3P)
32 REC090
E-MR5 Receiver
74 JE1015
9.6v Rechargeable Battery
33 RPN018
Magazine Release Pin
34 RPN022
Barrel Guide Pin
76 31234
35 RPN023
Quick Disconnect Pin
77 31243
Quad RIS Barrel Shroud
36 RPN024
Touch Switch Roll Pins
78 31246
First Strike Capable (FSC) 9rnd Straight Magazine
37 RPN025
Venturi Bolt Cocking Pin
79 31248
SOPMOD Stock w/Angled Butt Plate
38 RPN026
Trigger / Sear Roll Pin
80 31252
Front Sight Base (FSB)
39 SCR003
Circuit Board Screw (+)
81 31253
Sling Plate
40 SCR007
Valve Body Screw (A)
82 31254
14" FS Battle Barrel
41 SCR011
Coil Set Screw
83 31255
AR15 Muzzle Brake
42 SCR016
M5 x 12 Screw (A)
*
PAK090
*
JE1029
A/C Charger w/LED (110 volt)
Carrying Handle Mount w/Sight
Part Name/Description
Part Number
Schematics Number
20
* Item Not Pictured
( + ) Cross-Head Screw
(A) Allen-Head Screw
39
5
39
2
9
8
73
83
3
33
15
59
69
38
36
27
80
60
52
82
68
51
24
74
72
7
53
41
10
6
38
26
12
21
4
77
78
23
78
13
56
11
50 14
57
22 26
51
30
26
47
48
34
55
46
76
49
28
20
42
17
40
64
18
65
68
32
63
19 28
51
42
25
58
44
1
81
35
26
42
61
66
26
62
70
43
54
79
37
71
45
16
29
67
43
English
E-MR5™ SCHEMATICS
21
MR™ ACCESSORIES
14” FS Battle Barrel #31254
18” FS Sniper Barrel #31256
Features include:
•
AR15 Birdcage Style Muzzle Brake w/ Standard Threading
•
Compatible w/ E-E-MR5™, E-MR5™, MRX™ & MRX™ Elite
•
First Strike™ Capable (FSC)
* MRX™ & MRX™ Elite need the MRX™ G2 Venturi Bolt (#31259)
to use this barrel
Features include:
•
AR15 Birdcage Style Muzzle Brake w/ Standard Threading
•
Compatible w/ E-E-MR5™, E-MR5™, MRX™ & MRX™ Elite
•
First Strike™ Capable (FSC)
* MRX™ & MRX™ Elite need the MRX™ G2 Venturi Bolt (#31259)
to use this barrel
SOPMOD Stock (F) #31247
SOPMOD Stock (A) #31248
Features include:
•
Adjustable SOPMOD Shoulder Stock w/ Removable Flat Butt
Plate
•
Compatible w/ All MR™ Series Stock Tubes
•
Flat Butt Plate (#31249) May Be Purchased Separately
Features include:
•
Adjustable SOPMOD Shoulder Stock w/ Removable Angled
Butt Plate
•
Compatible w/ All MR™ Series Stock Tubes
•
Angled Butt Plate (#31250) May Be Purchased Separately
14” Barrel w/ Threaded Muzzle
Brake
With Flat Butt Plate
Back Up Iron Sights (BUIS) #31241
Flip Up Sights
Features include:
•
Adjustable Windage and Elevation
•
Two Apertures at Rear Sight
•
Compatible w/ All MR™ Series Picatinny RIS
22
18” Barrel w/ Threaded Muzzle
Brake
With Angled Butt Plate
AR15 Muzzle Brake #31255
Threaded Muzzle Brake
Features include:
•
AR15 Birdcage Style Muzzle Brake
•
Standard Threading
•
Compatible w/ FS Battle, FS Sniper, FS CQB & Hammer 7™
Barrels
English
MR™ ACCESSORIES
MR™ Barrel Shroud #31251
M4A1 Style Barrel Shroud
Features include:
•
M4 Style Oval Heat Shield w/ 14 Slot Bottom RIS (B14)
•
Compatible w/ E-E-MR5™ & E-MR5™
•
12” CQB Barrel Requires Front Shroud Base #31244
Front Shroud Base #31244
Sling Plate #31253
M4A1 Style Front Shroud Base
Rear Single Point
Features include:
•
M4A1 Style, Front Shroud Base Ring Eliminates the FSB,
w/ Delta Ring Eyelet
•
Compatible w/ MR™ Barrel Shroud, Quad RIS Barrel Shroud,
MRX™ Barrel Shroud
10 Round Magazine #31231
.68 Caliber Paintball Magazine
Features include:
•
•
•
•
•
AR Style Curved Magazine
10 Round .68 Caliber Paintball Capacity
Soft Spring Compression
Guided Ball-Pusher w/ Easy Lock & Load
Compatible w/ E-MR5™, MR5™, Hammer 7™, MRX™ & MRX™ Elite
Markers
Features include:
•
Single Point Sling Plate w/ Ring
•
Rotates to the Left or Right Side for use with either hand
•
Fits only the E-E-MR5™ & E-MR5™
High Capacity Magazine #31245
15 Round .68 Caliber Paintball Magazine
Features include:
•
•
•
•
•
AR Style Curved Magazine
15 Round .68 Caliber Paintball Capacity
Soft Spring Compression
Guided Ball-Pusher w/ Easy Lock & Load
Compatible w/ E-MR5™, MR5™ & Hammer 7™, MRX™ & MRX™ Elite
Markers
23
Français
ELECTRONIC MARKER
TABLE DES MATIERES
IMPORTANTES CONSIGNES DE SECURITE
26
MISE EN ROUTE
27
8 ÉTAPES POUR COMMENCER À JOUER 28-29
INFORMATIONS IMPORTANTES DE SÉCURITÉ 30
ÉQUIPEMENT DE SÉCURITÉ RECOMMANDÉ POUR LE PAINTBALL
31
CONSIGNE DE SECURITE SUR LA BOUTEILLE DE CO2/AIR COMPRIMEE 32
DEMONTER UNE BOUTEILLE DE CO2/AIR COMPRIME 33
INSTALLER / DÉMONTER / MONTER LE BARIL E-MR5
33
UTILISATION APPROPRIEE DU BOUCHON DE CANON 33-34
INSTALLATION DE LA PILE / CHARGEMENT DE LA PILE
34
REGLAGES DE LA CARTE ELECTRONQUE «LEAP 3» AVEC ECRAN «C.A.M.D»
35
REGLAGE DE LA DÉTENTE
36
INSTALLATION DE LA POIGN ÉE DE TRANSPORT W/SIGHT 36
INSTALLATION / RETRAIT D’UN CHARGEUR DE BILLES
36
CHARGEMENT DES BILLES DANS LE MAGAZINE/ LIBERANT LE MAGAZINE
37
MONTAGE/DÉMONTAGE D’UN SOPMOD STOCK
38
REGLAGE DE LA VELOCITE, AUGMENTER / DIMINUER
38
BILLE COINCEE DANS LA DESCENTE DE BILLE
38-39
NETTOYAGE DU CANON ET DU CONDUCTUER AVEC UNE RACLETTE
39
DEMONTAGE/NETTOYAGE/ REMONTAGE DES PIECES INTERNES
39-40
QUAD RIS BARIL SUAIRE
40
GUIDE DE DEMONTAGE DU Eko™ CUP SEAL
41
DÉPANNER
42
POLICE DE GARANTIE
43
LISTE DES PIECES DU SPYDER E-MR5™
44
SCHÈMAS DU SPYDER E-MR5™
45
IMPORTANTES CONSIGNES DE SECURITE
WARNING
•
Ce marqueur de paintball n’est PAS un jouet. Une mauvaise utilisation peut entraîner des blessures graves
ou la mort.
•
Kingman recommande que le client ait au moins 18 ans pour acheter ce produit. Les personnes de moins de
18 ans doivent être surveillées par un adulte lorsqu’elles utilisent ce produit.
•
Veuillez lire ce manuel de l’utilisateur avant d’utiliser ce produit.
•
Toute modification ou altération des pièces d’origine ou utilisation d’accessoires de rechange non autorisés
annulera toutes les garanties et responsabilités de Kingman.
•
Maintenez le dispositif de blocage du canon sur le marqueur lorsque vous ne tirez/jouez pas.
•
Pour garantir le bon réglage de la vitesse en pied par seconde (fps), Kingman recommande vivement
d’utiliser un chronographe spécial paintball, que vous trouverez et pourrez acheter dans la plupart des
magasins et terrains de paintball. Les billes sont déchargées à grande vitesse, avec un impact élevé
susceptible de causer des blessures graves ou la mort en cas de mauvaise utilisation.
•
Avant / après l’utilisation du marqueur, vérifiez et assurez-vous que toutes les vis sont bien serrées. Les vis
desserrées peuvent empêcher le bon fonctionnement du marqueur. Un marqueur de paintball MAL entretenu
peut être dangereux et causer des blessures graves ou la mort.
•
Toute personne utilisant ce produit ou se trouvant à portée de tir de ce produit lorsqu’il est utilisé DOIT
porter une PROTECTION pour le(s) YEUX/VISAGE, OREILLES conçue spécialement pour la pratique du
paintball. Ceci inclut, sans s’y limiter, la réalisation d’un contrôle de l’entretien/la vitesse lors des exercices
de tir.
•
Kingman rappelle à l’utilisateur qu’il est RESPONSABLE DE SA SECURITE. Protégez toujours vos yeux/
visage et oreilles. Kingman ne sera pas tenu responsable des blessures ou de la mort résultant du nonrespect des consignes de sécurité par un utilisateur.
•
Ne tirez ni ne pointez jamais votre marqueur sur/vers une personne ne se trouvant pas sur un terrain de
paintball et ne portant pas de PROTECTION YEUX/VISAGE/OREILLES. La protection inclut, sans s’y
limiter, la protection des yeux, du visage, des oreilles, du cou et de la tête. Évitez de tirer sous le masque de
paintball.
•
NE pointez ni NE tirez PAS vers/sur une personne chargée de faire respecter la Loi.
•
Manipulez chaque marqueur de paintball comme s’il était chargé.
•
Ne regardez jamais dans le canon d’un marqueur chargé ou déchargé.
•
Laissez toujours le marqueur de paintball en mode « SECURITE » jusqu’à ce que vous soyez prêt à jouer.
•
Retirez toujours la source d’air et toutes les billes du marqueur, y compris les billes à l’intérieur du
conducteur du marqueur, avant le démontage.
•
Ne tirez que des billes de calibre (0,68)/First Strike™ avec ce produit. L’utilisation de tous les objets
étrangers annulera toutes les garanties et les dettes de Kingman. N’essayez pas de bloquer les balles de
peinture.
•
Assurez-vous toujours que le boulon du marqueur est en position désarmée lorsque vous ne tirez/jouez pas.
•
Utiliser un marqueur de paintball en dehors d’un terrain de paintball non désigné peut être illégal et faire
l’objet de sanctions légales en cas de dommages matériels causés par l’utilisateur.
•
Ne tirez ni ne pointez jamais votre marqueur sur/vers un animal.
•
Ne pointez jamais le canon vers vous lorsque vous jouez, courrez ou trébuchez, afin de ne pas tirer sous
votre masque de paintball.
•
Portez des vêtements adaptés pour protéger votre peau lors des parties de paintball.
•
Dans un sac lorsque pas dans l’utilisation de transport.
•
Cédez ce manuel de l’utilisateur lorsque le marqueur change de propriétaire.
•
Veuillez consulter le site HYPERLINK “http://www.spyder.tv/”www.spyder.tv pour obtenir les dernières
mises à jour du manuel de l’utilisateur.
26
Français
MISE EN ROUTE
ATTENTION: Toujours garder son lanceur éteint ou sur le mode “safe” jusqu’a son utilisation.
1.
Toujours mettre un bouchon de canon en bout de canon pour des raisons de sécurité quand le lanceur n’est pas
utilisé.
2.
Installer et charger le pile (Coir chapitre INSTALLATION DE LA PILE, DE SON CHARGEMENT)
3.
Attacher la bouteille de CO2 ou d’air comprimé à l’adaptateur. CONSEIL: Assurez-vous que la bouteille de
CO2 ou d’air comprimé soit remplie avant de la monter au lanceur. Vissez la bouteille dans le sens des aiguilles
d’une montre dans l’adaptateur jusqu’à ce que la valve s’ouvre. Si vous constatez une fuite entre la valve de la
bouteille et l’adaptateur, remplacez les joints toriques uréthane. NOTE: Les joints toriques uréthane ne sont
pas fournis dans le kit de réparation, ces joints ne sont pas faits pour la valve de la bouteille. IMPORTANT:
Vous ne devriez jamais avoir à utiliser des outils pour monter ou démonter la bouteille de CO2 ou d’air comprimé sur l’adaptateur.
4.
Attacher Joindre le Magazine pour le logement de déclencheur ou joindre le chargeur de Paintball au cou de
marqueurs nourrir et serrer la vis sans. NOTE: Remplissage Loader avec seulement (.68 cal.) remplissage/
paintballs Magazine avec (.68 cal.) ou billes First Strike™. Ne jamais mélanger First Strike ™ Paintballs et
(.68cal) balles de peinture à l’intérieur d’un Magazine en ligne droite.
5.
Allumez la carte electronique (reportez vous au chapitre REGLAGES DE CARTE ELECTRONQUE «LEAP 3»
AVEC ECRAN «C.A.M.D»
6.
Armement du marqueur. À gauche du récepteur, se trouve un bouton d’armement que vous devez tirer vers
l’arrière jusqu’à ce que la culasse FS Venturi s’enclenche ATTENTION: Si vous lâchez la culasse avant qu’elle
ne s’enclenche, un coup pourrait partir.
7.
Enlever le bouchon de canon. PRECAUTION: Si le bouton de sécurité est enclenché, le lanceur est en mode «
live », appuyer sur la détente déclenchera le tir d’une bille. IMPORTANT: Toujours tester le lanceur dans une
direction sure ou dans une aire de jeu approprié et vous ne devrez que tester les capacités du lanceur.
8.
Effectuez un TEST DE VELOCITÉ (fps). Tourner l’ajusteur de vélocité / guide ressort dans le sens des aiguilles
d’une montre augmentera la vélocité (fps). NOTE: Votre marqueur est destiné à être utilisé uniquement sur
un complexe de paintball avec les protections appropriées à la pratique du paintball. IMPORTANT: Kingman
recommande l’utilisation d’un chronographe pour s’assurer que la vélocité du marqueur soit en dessous de 300
pieds par seconde (fps).
9.
Lorsque terminée, retirer toutes les balles de peinture du Magazine et le chargeur. ATTENTION: Il est possible
qu’une bille de paintball se trouve dans la descente de billes; appuyez sur la détente à quelques reprises en
pointant le marqueur dans une direction sûre pour vous assurer que le canon et la descente de billes soient
vides.
10. Replacez le bouchon de canon / chaussette à canon, sur le canon quand le lanceur n est pas utilisé. Ceci évitera
tout tir accidentel.
11. Kingman recommande de mettre le marqueur en position “SAFE” après utilisation.
12. Dévissez la bouteille de CO2/air comprimé de l’adaptateur C/A du marqueur. Dévissez dans le sens opposé
des aiguilles d’une montre. ATTENTION: Ne jamais exposer une partie du corps non protégée sous le trou
d’évacuation de CO2/air comprimé de l’adaptateur C/A lorsque vous enlevez la bouteille. Ceci peut entraîner
des risques de brûlure venant de l’évacuation du gaz. IMPORTANT: Vous ne devriez jamais avoir besoin de
recourir à l’utilisation d’outils pour détacher la bouteille de CO2/air comprimé.
13. Placez le marqueur dans un sac de paintball ou dans un endroit sûr. CONSEIL PRATIQUE: Due aux vibrations
les vis peuvent se desserrer et se perdre. Assurez-vous de resserrer toutes les vis avant et après utilisation du
marqueur. Il est conseillé de lubrifier le marqueur avant et après chaque utilisation, surtout lorsque le marqueur
n’a pas servi pendant un long laps de temps. Ajoutez quelques gouttes d’huile pour marqueur de paintball sur
le joint de marteau. (Voir guide de démontage/ remontage). Avant de ranger le marqueur, assurez vous d’avoir
votre marqueur en position désarmée. Ceci évitera que le ressort principal ne perde sa tension.
IMPORTANT
•
La vitesse de tir peut varier en fonction de l’altitude et des conditions climatiques.
•
Avant d’utiliser votre marqueur dans une partie, vous devez toujours réaliser un « TEST DE SECURITE
DE VITESSE ». Celui-ci ne peut se faire qu’à l’aide d’un appareil de test, que l’on appelle « chronographe
de vitesse » et ne peut être réalisé que chez un distributeur ou sur un terrain de paintball local. NOTE: Ce
produit est conçu pour être utilisé à une vitesse inférieure à 300 pieds par secondes (fps). Les marqueurs
de paintball ne sont pas conçus pour être tirés à une portée de 30 pieds (10 mètres).
•
Ce marqueur de paintball peut avoir un surplus de gaz après le retrait de la bouteille de CO2 / air comprimé.
Veuillez retirer toutes les billes et décharger le reste de gaz en toute sécurité.
•
Ne conservez jamais une bouteille de CO2 / air comprimé fixée au marqueur.
27
8 ÉTAPES POUR COMMENCER À JOUER
IMPORTANT: Lire les recommandations de sécurité et de fonctionnement avant de suivre les 8 étapes rapides pour
commencer à jouer.
IMPORTANT: Le canon doit être installé avant de charger le Magazine ou le chargeur de Paintball.
1
1. Insérez le systéme de blocage du
canon.
3
3. Installez une bouteille de CO2 /
d’air comprimé.
28
2
2. Installez une pile dans poigneé.
4
4. Installez le chargeur de paintball
ou le magazine et le remplir avec
des balles de peinture.
Français
8 ÉTAPES POUR COMMENCER À JOUER (continuer)
5
5. Mettez vos lunettes de paintball
et armez le marqueur.
7
7. Mettez la carte de circuit sous
tension et déverrouillez la mode
sécurité.
6
6. Retirez le systéme de blocage du
canon.
8
8. Prêt à jouer et tirer.
IMPORTANT: S’assurer que le marqueur est en MODE SÉCURITÉ et que le dispositif de
blocage du canon est bien en place sur le marqueur après avoir JOUÉ
29
INFORMATIONS IMPORTANTES DE SÉCURITÉ
Ne JAMAIS regarder le fût du lanceur de paintball avec
ou sans vos lunettes de protection.
Ne JAMAIS regarder le fût d’un lanceur de paintball qu’il
soit chargé ou non.
WARNING:
UNSAFE
Ne JAMAIS viser une personne ou tirer avec votre
lanceur sur une personne ne portant pas l’équipement
requis pour le paintball et sans les protections pour
les YEUX/VISAGE/OREILLES (masque de paintball),
spécifiquement conçues pour pratiquer le paintball.
WARNING:
UNSAFE
Avant/après l’utilisation du lanceur de paintball, s’assurer
que toutes les vis sont bien serrées. Éviter de perdre des
vis permet de garantir le bon fonctionnement du lanceur
NOTE: Certaines vis ne figurent
IMPORTANT: Merci de lire le Guide De l’utilisateur1 avant
de commencer a jouer.
30
Français
ÉQUIPEMENT DE SÉCURITÉ RECOMMANDÉ POUR LE PAINTBALL
Casquette ou
casque
Lunettes de
paintball
Protège-cou
Chandail de paintball avec plastron
en dessous
Gants de
protection
Pantalon épais
Chaussures de
randonnée
Utiliser la combinaison appropriée afin d’éviter tout contact avec la peau durant la partie de paintball. Nous
recommandons d’acquérir un masque, un protège-cou, un chandail de paintball ou un tee-shirt à manches
longues, un plastron, des gants de protection, des chaussures de randonnée et un pantalon épais.
31
CONSIGNE DE SECURITE SUR LA BOUTEILLE DE CO2/AIR COMPRIME
SAFE
DAN GER
WARNING:
UNSAFE
La bouteille de CO2 ou d’air comprimé peut partir avec assez de
force pour causer des blessures graves ou la mort si la valve se
détache de la bouteille. Toujours regarder la valve en devisant la
bouteille, en s’assurant que la valve tourne avec la bouteille et
ne reste pas sans bouger contre l’adaptateur on/off. Arrêter le
démontage si la valve commence à se dévisser de la bouteille. Dans
le doute, revisser la bouteille (sens des aiguilles d’une montre) et
contactez une personne compétente pour la réparation.
•
Toute valve doit être installée et désinstallée par une personne compétente en pneumatique.
•
Reportez vous au label sur la bouteille pour les dates de ré épreuve .Les bouteilles doivent être réprouver
périodiquement..
•
Une utilisation, remplissage, conservation inadaptée a la bouteille peut provoquer la mort, des blessures ou
/ et des dégradation au matériel.
•
Toujours garder les bouteilles hors de porter des enfants ou de personnes non expérimentées.
•
Seulement les personnes ayant suivi un stage de remplissage avec la CGA PamphletsP.1 et G-6.3 sont
autorisées à remplir les bouteilles. Les Pamphlets sont disponible au près de l association « COMPRESSED
GAS ASSOCIATION » ou sur le site www.CGANET.com.
•
Ne jamais modifier la bouteille d’aucune manière que ce soit.
•
Ne JAMAIS exposer une bouteille sous pression a une température supérieure a 130F (54C)
•
Une bouteille chauffée à une température supérieure a 250F (121C) doit être jetée ou ré éprouvée en
conformité avec le test défini dans le CFR-49
•
La valve ne devrait jamais être détachée de la bouteille, demander immédiatement une assistance à une
personne compétente si cela se produit.
•
Toute bouteille inclue avec ce produit doit être utilisée exclusivement pour la pratique du paintball et rien
d’autre.
•
Vérifiez que le joint torique uréthane est bien présent sur la valve de la bouteille de CO2 ou d’air comprimé
avantde monter la bouteille sur le lanceur. Si le joint torique est manquant, la bouteille se mettra à fuire du
moment que la bouteille sera attachée au lanceur.
•
Il est fortement conseillé d’utiliser exclusivement des joints torique uréthane.
•
Ne jamais monter la bouteille de CO2 ou d’air comprimé en surpression.
•
Evitez toute exposition directe de la peau au gaz purgé, en montant ou démontant la bouteille du lanceur.
•
Ne jamais exposer la bouteille a des substances corrosives ou produits caustiques.
32
Français
DEMONTER UNE BOUTEILLE DE CO2/AIR COMPRIME
Dévisser la bouteille de CO2 ou d’air comprimé de l’adaptateur en tournant dans le sens inverse des aiguilles
d’une montre. CONSEIL: Après l’utilisation vous devriez toujours démonter la source de gaz de votre lanceur.
Quand la bouteille est démontée de l’adaptateur, un excèdent de gaz est purge par le dessous. PRECAUTION: Ne
jamais exposer la peau en dessous de l’adaptateur où se trouve le trou d évacuation lors du démontage. Ceci peut
provoquer des brûlures de la peau au moment de la purge du gaz. IMPORTANT: Vous ne devriez jamais avoir à utiliser
des outils pour monter ou démonter la bouteille de CO2 ou d’air comprimé sur l’adaptateur.
MONTER UNE BOUTEILLE DE CO2/AIR COMPRIME
Visser fermement la bouteille de CO2 ou d’air comprimé dans le sens des aiguilles d’une montre dans l’adaptateur.
CONSEIL: Toujours vérifier que la bouteille de CO2 ou d’air comprimé soit pleine et que le joint uréthane soit présent
sur la valve pour éviter des fuites. IMPORTANT: Vous ne devriez jamais avoir à utiliser des outils pour monter ou
démonter la bouteille de CO2 ou d’air comprimé sur l’adaptateur.
INSTALLER / DÉMONTER / MONTER LE BARIL E-MR5™
Pour installer le baril vous devez aligner la flèche centrale du baril avec avant du carénage de base avec une élingue
mount (voir schéma A). Une fois alignés, insérez le baril.
Pour monter l’alimentation “Magazine”, tournez le baril dans le sens inverse des aiguilles d’une montre en vérifiant
que la flèche sur le baril (M ) soit alignée avec avant du carénage de base avec une élingue mount (voir schéma
B). Pour monter l’alimentation “Loader”, tournez le baril dans le sens des aiguilles d’une montre en vérifiant que la
flèche sur le baril (L ) soit alignée avec avant du carénage de base avec une élingue mount (voir schéma C).
Pour démonter le baril, alignez la flèche centrale du baril avec avant du carénage de base avec une élingue mount
(voir schéma D). Une fois alignés, retirez le baril.
A
C
L
L
M
B
D
M
L
M
UTILISATION APPROPRIEE DU BOUCHON DE CANON
Le bouchon de canon est une partie essentielle à la sécurité de votre équipement .Le bouchon de canon est un outil
servant a empêcher les billes de sortir du canon. Mal utilisé le bouchon de canon ne sert à rien.
BOUCHON DE CANON TYPE “CHAUSSETTE”
Placer la chaussette du bouchon de canon par dessus le bout du canon et tirez l’élastique pour l’accrocher à l’arrière
du lanceur. Ajuster l’élastique de manière à ce que la tension soit suffisante pour arrêter une bille sortant du canon.
NOTE: si l’élastique est trop long, vous pouvez faire des noeuds pour raccourcir l’élastique.
BOUCHON DE CANON TYPE “BOUCHON RIGIDE”
Insérer le bouchon de canon au bout du canon en vous assurant qu il tient bien avant de charger les billes dans le
lanceur et de visser la bouteille de gaz au lanceur.
Le bouchon de canon doit rester fermement en place avec une certaine résistance. NOTE: le bouchon de canon ne
33
BOUCHON DE CANON TYPE “BOUCHON RIGIDE” (continuer)
doit pas être facile a enlever et il faut toujours inspecter les joints toriques pour s’assurer qu’ils ne soient pas abîmés
ou coupées.
N’enlevez le bouchon de canon que quand vous êtes prêt à jouer ou si un agent de sécurité du terrain vous donne
l’autorisation de le faire.
Gardez toujours votre bouchon de canon sur votre lanceur après avoir fini de jouer et gardez le, même après avoir
vidé le lanceur des billes de paintball et démonté la bouteille de gaz de votre lanceur.
ATTENTION: Pensez à inspecter régulièrement votre bouchon de canon, si vous observez une usure, remplacez-le
immédiatement. Toujours avoir votre bouchon de canon sur votre lanceur pour prévenir un éventuel accident qui
pourrait causer de blessures grave ou même la mort.
INSTALLATION DE LA PILE
ÉTAPE 1 retirer les trois vis M3x8 le panneau de la poignée gauche.
Remarque: Une Allen clé fournie dans le kit de pièces de rechange.
ÉTAPE 2 joindre la batterie pour le harnais de câble de batterie rouge et
noir des fils.
ÉTAPE 3 Resserrez les vis M3x8 trois.
ASTUCE UTILE: Veuillez noter comment les pièces sont supprimées pour
remontage facile.
Groupe de Kingman recommande l’utilisation de la Barchetta 9,6 volt NiMH
Rechargeable Battery comme une puissance source pour des performances
optimales et fournira un comte de tir supérieure d’environ 5000 à 6000
tours. IMPORTANT: Rendement variera selon le mode utilisé et la cadence
de tir atteint.
INSTRUCTIONS DU CHARGEUR
CONSEIL: Pour charger une batterie NiMH 9,6 de Spyder, le Circuit imprimé doit être en position OFF. Spyder
batteries ne sont pas entièrement facturés lorsque acheté.
ETAPE 1: branchez le chargeur Spyder LED A/C sur la prise électrique 110V / 220 V selon le pays d’utilisation.
ETAPE 2: connectez le câble du chargeur Spyder LED A/C a l’arrière de la poignée du lanceur.
ETAPE 3: la LED sur le chargeur s’affichera en rouge lorsque la pile charge
ETAPE 4: la LED sur le chargeur s’affichera en verte lorsque la pile est chargée
ETAPE 5: débranchez le câble connecté a l’arrière de la poignée du lanceur
EATPE 6: débranchez le chargeur Spyder LED A/C de la prise electrique
IMPORTANT: vous ne devez jamais charger la pile plus de 24 heures sous peine d’endommager la pile ou les composants électroniques. ASTUCE: Il est recommandé de charger la pile le jour avant son utilisation pour assurer des
performances maximum, surtout si le lanceur n’a pas été utilisé depuis plus d’une semaine. NOTE: Une pile Spyder
chargée peut tirer environ 5000 á 6000 coups, dépendant du mode de tir dans le quel se trouve le lanceur. Dans
des conditions de chargement normales et en suivant les consignes, une pile Spyder a une durée de vie d’environ
700 á 1000 charges. Pour éviter tout risqué d’explosions de la pile ou des circuits électroniques, ne chargez que la
pile Spyder 9.6Volt NiMH dans la poignée du lanceur.
IMPORTANT
•
NE PAS FAIRE: ne chargez jamais une pile Alcaline ou tout autre type de pile dans un lanceur Spyder.
•
NE PAS FAIRE: Ne chargez aucune pile montrant des signes d’usure, rouillées ou ayant des fuites.
•
NOTE: Ne pas suivre les instructions déchargera Kingman de toute garantie ou encore responsabilité.
•
Kingman ne sera pas tenu responsable des blessures ou dommages cause par une mauvaise utilisation du
produit. Ce produit n’est pas destiné à être utilisé sur autre chose que sur le produit que Kingman a conçu.
34
Français
REGLAGES DE LA CARTE ELECTRONQUE «LEAP 3» AVEC ECRAN «C.A.M.D»
SAFE – Rouge LED
SEMI – Verte LED
3 Burst – Bleu LED
6 Burst – Bleu LED
AUTO – Orange LED
BATTERY ICON – Jaune LED (couleur unie LED = bon, clignotant LED = faible)
LES 2 BOUTONS DE PARAMETRAGE
Pressez le bouton du haut “Power” pour allumer le lanceur. L’écran CAMD affichera le voyant
rouge “safe” et le voyant « ON » , ce qui signifie que le lanceur est allumer mais avec la
sécurité enclenchée donc le lanceur ne tirera pas.Le mode par defaut est le semi auto et l’
ecran CAMD affichera le mode « semi » en vert.
Pour désenclencher la securité, appuyez et relachez sur le bouton du bas « MODE» le voyant
« SAFE » s’ eteindra , et le lanceur est prêt a tirer. Pour enclencher la sécurité de nouveau
, réappuyez sur le boutton du bas et le lanceur reviendra en mode « SAFE » et le voyant s’
allumera rouge. Pour éteindre le lanceur, appuyez et laissez maintenu le bouton “Power”
jusqu’a ce que la carte s’éteignes et aucun voyant ne soit actif.
CHANGEMENT DES MODES DE TIR
Pour changer de mode de tir, appuyez sur la touche du bas “Mode” jusqu’ à ce que le voyant « MODE » clignote, vous
êtes maintenant dans la sélection des modes.a chaque pression du boutton, vous passerez d’un mode a l’autre, vous
verrez les different voyant vous indiquer quel mode vous selectionnez.appuyez et tenez appuyé le bouton du bas
jusqu’ à ce que le voyant s’arrete de clignoter, le mode de tir est maintenant selectionné.Le lanceur par defaut se
remet toujours en position « SAFE » , pour pouvoir tirer , veuillez pressez le bouton du bas une fois pour enlever la
securité , le lanceur est maintenant prêt a tirer. (Voir chapitre VERROU DES MODES) IMPORTANT: la securité peut
etre enclenchée dans n’ importe quel mode , juste en pressant le boutton du bas , l’ indicateur s’ affichera rouge et le
lanceur sera protégé de tout tir accidentel.
VERROU DES MODES
Pour verrouiller le lanceur en mode SEMI AUTO , retirez le verrou de sur la carte électronique quand le lanceur est
éteint. Le lanceur a partir de ce moment la ne fonctionnera plus que en mode SEMI AUTO.
Pour verrouiller le lanceur en mode 3 Burst, retirez le verrou de sur la carte électronique avec la carte allumée cette
fois.Cela bloquera le lanceur dans le mode 3 Burst. NOTE: Faites la meme chose si vous désirez sélectionner le mode
6 Burst or Auto.
NOTE: Utilisez le verrou également si les règles du jeu vous l’ impose. NOTE: le mode semi auto peut etre le seul autorisé dans le pays dans lequel vous vous trouvez , demandez aux autorités locales la legislation. Par exemple dans
tous les pays d’ europe ainsi qu’en Australie et en Nouvelle Zélande , seulement le mode semi auto est autorisé.
INDICATOR DE BATTERIE
Si l’énergie dans la pile tombe en dessous de 8.5 volts, l’icône de pile sur le CAMD va commencer a flasher indiquant
un faible niveau de pile, il est temps de remplacer la pile ou si vous utilisez une pile rechargeable Spyder 9.6V, il est
alors temps de la recharger.
MODE VEILLE
La carte LEAP 3 est fournie avec cet option pour améliorer la durée des piles, la carte se mettra en veille âpre 20
minutes d’inactivité. S’il vous plait, pensez à l’environnement en utilisant un pile Spyder 9.6V. Veuillez noter : la
version Européenne est vérrouillée en SEMI AUTO
MISE EN GARDE
•
•
•
•
Les lanceurs Spyder ne sont pas résistants à l’eau.
Une humidité trop importante peu causée de sérieux dommage aux lanceurs électronique Spyder.
Toujours nettoyer de la saletée ou de la peinture sur les composants électroniques du lanceur.
Ne jamais essayer de modifier les composants électroniques, le faire, annulera toutes les garanties et la
responsabilité de kingman sur les pièces électroniques.
35
REGLAGE DE DÉTENTE
ÉTAPE 1: Agissant sur la vis de détente haut
située sous le cadre de la gâchette vers la droite
se balancera la gâchette plus près de l’interrupteur
tactile. NOTE: Agissant sur la vis de détente haut
dans le sens antihoraire augmentera l’écart de la
gâchette. IMPORTANT: Sur la gâchette de réglage
vis pour fermer ne permettra le déclencheur activer
ÉTAPE 2: l’interrupteur tactile qui ne permettra
pas le marqueur au feu. Agissant sur la vis médiane
de déclencheur dans le sens horaire raccourcira
le blocage de la détente de l’interrupteur tactile.
NOTE: Cela augmentera la sensibilité de déclenchement. En dévissant dans le sens horaire va diminuer
la sensibilité de la gâchette.
1
2
INSTALLATION DE LA POIGN ÉE DE TRANSPORT W/SIGHT
Desserrez les deux vis de verrouillage de la vue transportant
de gérer.
Placez la vue de gérer
transportant adaptée au-dessus
du Rail de corps Picatinny.
Assurez-vous d’aligner la
plaque de verrouillage avec la
vue transportant de gérer. Puis
serrez les deux vis de verrouillage. NOTE: La transportant
gérer vue ajustant roue devrait
être sur le côté droit et à
l’arrière du récepteur.
INSTALLATION / RETRAIT D’UN CHARGEUR DE BILLES
IMPORTANT: Le canon doit être
installé avant de charger le Magazine ou le
chargeur de Paintball.
Fixer un chargeur de billes électronique
ou à gravité au distributeur de marqueurs
et serrer les vis de pression. Serrer les
deux accessoires pour assurer une bonne
fixation. N’utiliser que des billes de
calibre 0.68 dans le chargeur.Desserrer
les vis du distributeur de marqueurs et
retirer le chargeur de billes électronique
ou à gravité. Lors du retrait du chargeur,
s’assurer que toutes les billes soient
retirées. ATTENTION: Il peut rester des
billes dans le conducteur du marqueur ;
donner quelques coups dans une direction
sans danger pour vérifier que le canon et
la culasse sont vides.
36
Français
CHARGEMENT DES BILLES DANS LE MAGAZINE
IMPORTANT: Le canon doit être installé
avant de charger le Magazine ou le chargeur
de Paintball.
IMPORTANT: Tant que vous n’êtes pas prêt
à jouer, le marqueur doit toujours être en
MODE SECURITE.
IMPORTANT: Stocker les billes de paintball
à une température de 15° C (59° F) en
affectera la qualité et la performance.
IMPORTANT: Le chargeur doit être propre et
vous devez tirez tout fragment de cartouche
ou poussière avant de charger les billes de
paintball. AVERTISSEMENT: NE congelez
PAS les billes de paintball.
ÉTAPE 1: Slide le placeur de balle vers le
bas du magazine et tourner à gauche pour
placer la broche de guide est en position
verrouillée.
ÉTAPE 2 Charge seulement 9 (.68 cal.) ou
des balles de peinture dans le magasin anglé First Strike™. Ne jamais mélanger First Strike ™ Paintballs et (.68cal)
balles de peinture à l’intérieur d’un Magazine en ligne droite.
ÉTAPE 3: Insérez le magazine directement dans le logement de déclencheur. NOTE: Le Magazine devrait être
installé directement dans le logement de déclencheur avec facilité. Assurez-vous que le magazine est dans une
position de composant logiciel enfichable verrouillé.
ÉTAPE 4: Une fois que la dernière bille a été chargée dans le chargeur, relâchez l’arrêt du chargeur.
IMPORTANT: Si la goupille de guidage du poussoir de billes n’est pas relâchée, le ressort ne poussera pas les billes
dans le conducteur des marqueurs.
LIBERANT LE MAGAZINE
Appuyez sur le bouton de libération magazine situé sur le côté droit de la poignée de marqueurs. Ceci permettra
le magazine de glisser sur la poignée. NOTE: Jamais prendre part le magazine relâchez le bouton, à moins que le
magazine ne libère pas de l’armature de déclencheur.
IMPORTANT: Ne démontez JAMAIS le chargeur ou vous ANNULEREZ la garantie de Kingman.
NOTE: Ne stockez pas le(s) chargeur(s) chargé(s) de billes pendant une longue période, car la pression du ressort du
chargeur entraînera la déformation des billes et le marqueur ne tirera plus correctement.
CONSEIL UTILE: L’utilisation de billes plus anciennes stockées pendant une longue période n’est pas recommandée,
car elles éclateront prématurément et vos tirs seront peu précis.
AVERTISSEMENT POUR LES BILLES FIRST STRIKE™
Le paintball est un sport extrême. Une mauvaise utilisation de cet équipement peut causer des blessures
graves ou la mort. En raison des caractéristiques physiques des billes First Strike, les points suivants
doivent être respectés: Lorsque vous utilisez les billes First Strike dans les lanceurs Kingman/Spyder,
tous les joueurs doivent être équipés des éléments suivants : des lunettes paintball intégrales qui
protègent votre visage, vos yeux et vos oreilles, une casquette ou une cagoule pour le derrière de la tête,
un protège-cou, un haut à manches longues, un pantalon et des gants couvrant la totalité des doigts.
Les lanceurs doivent être chronographés avec les billes First Strike afin d’assurer que la vitesse est en
dessous de 300 fps ou de la vitesse exigée par le terrain de paintball. Ne tirez sur aucun joueur à une
distance inférieure à 30 pieds (environ 10 m), ou à la distance minimum exigée par le terrain de jeu.
Veuillez lire l’intégralité du manuel du lanceur et suivre les consignes de sécurité données par Kingman/
Spyder, ou consultez les consignes de sécurité sur www.spyder.tv/safety. L’utilisation des billes First
Strike n’est peut être pas autorisée sur tous les terrains. Consultez les règles du terrain de paintball avant
de les utiliser.
37
MONTAGE/DÉMONTAGE D’UN SOPMOD STOCK
Placez le SOPMOD Stock dans la violation haut du récepteur
derrière la culasse FS Venturi. Une fois le SOPMOD Stock en
place assurer le Stock avec la vis sans fourni, puis serrez avec la
clé Allen.
Pour ajuster la longueur de la presse SOPMOD Stock et tenir le
levier de réglage. Une fois que le levier est sorti il se bloque en
position.
Desserrez la vis fixe sur le côté droit du récepteur avec la clé
Allen. Puis supprimer le SOPMOD Stock sur la Haut de la page
violation du récepteur. CONSEIL UTILE: Le SOPMOD Stock
doit être supprimé si l’intention de nettoyer le marqueur. (VOIR
DÉSASSEMBLER ET RÉASSEMBLER ET NETTOYAGE OU
ARRIÈRE INTERNES).
REGLAGE DE LA VELOCITE, AUGMENTER / DIMINUER
Pour AUGMENTER la vélocité FPS (feet per second = pieds par
seconde) utilisez la clef six pans et tournez la pièce VELOCITY
ADJUSTER/SPRING GUIDE dans le sens des aiguilles d’une
montre.
STP089
Decrease
Velocity
Pour DIMINUER la vélocité, tournez dans le sens inverse des
aiguilles d’une montre. NOTE: La pièce VELOCITY ADJUSTER/
SPRING GUIDE ne se démonte pas par l’arrière du bouchon de la
pièce STRIKER PLUG.
NOTE: La vitesse de ce paintball marqueur varie entre environ
220-300 pieds par seconde (fps). Vitesses vont fluctuer ou
varier en raison de la taille de paintball, condition climatique,
altitude, type de source d’air et de la variance dans la tension du
ressort de la fabrication.
MISE EN GARDE
Increase
Velocity
VTA089
•
La vélocité de ne doit jamais excédée 300 fps, une
vélocité plus importante est dangereuse et peu causée de
sérieuses blessures.
•
Les lanceurs de paintball ne sont pas faits pour être utilisés contre des personnes à moins de 25 pieds.
•
Ne jamais pointer le lanceur en direction d’une personne qui ne porte pas une protection faciale adaptée a la
pratique du paintball.
•
Ne regardez jamais dans le canon à aucun moment que le lanceur soit chargé ou non.
•
Utiliser un lanceur de paintball en dehors d’une zone faite pour le paintball peut être illégal, et peut être
passible de poursuites si des dégâts ont été causés par son utilisateur.
BILLE COINCEE DANS LA DESCENTE DE BILLE
Dans l’éventualité ou une bille serait coincée par la culasse et la bloquerai, suivez cette procédure pour débloquer
la bille. La chambre de la bille est située juste avant le canon en dessous de la descente de bille. Avant d’essayer de
débloquer la bille vous devez porter votre masque de protection. Assurez vous d’avoir mis le lanceur en position off
ou enclenché la sécurité. Démontez la bouteille de CO2 ou d’air comprimé, enlevez le chargeur de billes, et assurez
vous qu’il ne reste plus de billes dans le lanceur. Dévissez le canon du lanceur pour permettre à la bille coincée de
sortir. Tirez avec une force suffisante sur la goupille de réarmement vers l’arrière jusqu’à débloquer la culasse. Si
vous n’arrivez toujours pas par ce moyen à décoincer la culasse, une autre méthode consiste a prendre une tige
de nettoyage droite et rigide ou bien une tige en bois et pousser la culasse vers l’arrière en poussant avec la tige
38
Français
depuis l’avant du lanceur en faisant attention que la surface en contact avec le devant de la culasse soit plat pour
ne pas endommager la culasse ou l’alésage du corps. Après avoir débloqué la culasse d’une manière ou d’une autre,
nettoyez la chambre de la bille et la culasse si nécessaire pour assurer des performances optimums.
DANGER: Ne pas regarder dans le canon du marqueur. Toujours porter des lunettes spécialement conçues pour les
marqueurs de paintball, dès que vous manipulez votre marqueur.
IMPORTANT: Toujours mettre le marqueur en MODE SÉCURITÉ avant de le démonter. Retirer toutes les billes et
toute source d’air éventuelle du marqueur avant d’effectuer les tâches de maintenance.
CONSEIL UTILE: Suivre ces étapes pour enlever la bille / nettoyer le marqueur, en cas de rupture de bille.
NETTOYAGE DU CANON ET DU CONDUCTEUR AVEC UNE RACLETTE
Utilisation d’une tige de nettoyage rigide (non fournie)
Si la culasse FS Venturi Bolt est en position non armée, vous devez réarmer le marqueur. Faire glisser la tige rigide
vers le bas du canon jusqu’au conducteur du marqueur. Retirer ensuite la tige du canon. Ceci devrait nettoyer tout
résidu de peinture qui aurait pénétré à l’intérieur du marqueur. CONSEIL UTILE: S’assurer que le conducteur du
marqueur est propre, sans fragments de cartouche de bille ni poussière. Répéter cette étape s’il reste encore des
résidus de peinture.
Utilisation d’une tige de nettoyage pourvue d’un coton-tige (non fournie)
Dévisser le canon et faire glisser le coton-tige en partant de l’extrémité filetée, afin que le bout du coton-tige
atteigne le bout du canon. Saisir le bout de la tige de nettoyage et tirer. Ceci devrait éliminer tout résidu de peinture
qui aurait pénétré à l’intérieur du canon. CONSEIL UTILE: S’assurer que le conducteur du marqueur est propre, sans
fragments de cartouche de bille ni poussière. Répéter cette étape s’il reste encore des résidus de peinture.
DEMONTAGE/NETTOYAGE/ REMONTAGE DES PIECES INTERNES
STK022
STP089
VBT090
REC090
VTA089
STB002
SPR025
STF001
RPN023
Noms et des numéros de pièces dans cette section:
AR15 Charging Handle (#STK022)
Quick Disconnect Pin (#RPN023)
Striker Buffer (#STF001)
FS Venturi Bolt (#VBT090)
Receiver (#REC090)
Striker Plug (#STP089)
Striker Bolt (#STB002)
Striker Spring (#SPR025)
Velocity Adjuster (#VTA089)
DEMONTAGE DES PIECES INTERNES ARRIERES
CONSEIL UTILE: Le SOPMOD Stock ne devrait pas être fixé au récepteur, lors de la suppression des parties
internes arrière.
ÉTAPE 1: Retirez la tige de débranchement du récepteur. CONSEIL UTILE: Enlevez l’obturateur du percuteur
lorsque le marqueur est en position désarmée; l’obturateur du percuteur étant comprimé, les pièces internes ne
sortiront pas brusquement.
39
DEMONTAGE DES PIECES INTERNES ARRIERES (continuer)
ÉTAPE 2: Retirer l’obturateur du percuteur, le ressort du percuteur et le butoir du percuteur de l’arrière du
récepteur.
ÉTAPE 3: Inclinez l’arrière du marquer dans vos mains pour attraper la culasse FS Venturi Bolt et le verrou du
percuteur situés à l’arrière du récepteur. CONSEIL: nettoyez l’intérieur du corps a l’aide d’une tige, nettoyez également le marteau et la culasse en remettant quelque goûtes d’huile sur le joint torique rouge du marteau.
IMPORTANT: il n’ est pas necessaire de demonter les pieces internes pour un entretient normal a moins que vous
deviez changer le joint torique du marteau (striker O-ring).
REMONTAGE DES PIECES INTERNES ARRIERES
ÉTAPE 1: Joignez-vous à FS Venturi Bolt Bolt et boulon au poste d’attaquant à l’arrière du récepteur avec le
joint torique sur le boulon de l’attaquant face vers l’avant du marqueur. NOTE: Lors de l’insertion de chacune des
deux parties, une pression du doigt derrière la culasse FS Venturi Bolt et en même temps tirer sur la gâchette pour
permettre l’entrée des deux parties.
ÉTAPE 2: Insérer la chasse au poste d’attaquant à l’extrémité inférieure du récepteur et place au printemps au
poste d’attaquant à la mémoire tampon au poste d’attaquant.
ÉTAPE 3: Placez le cache marteau avec l’ajuster de vélocité et le guide ressort à l’arrié du corps.
ÉTAPE 4: Introduisez la tige de débranchement pour bloquer l’obturateur du percuteur en place.
MISE EN GARDE: avant et après l’utilisation, vérifiez que toutes les vis soient bien serrées, une vis desserrée peut
cause de sérieuses blessures.
QUAD RIS BARIL SUAIRE
ÉTAPE 1: Utilisez une clé à molette ou réglable de 13 mm/1/2 pouces pour desserrer l’extrémité pivotante du tuyau. NOTE:
Une rondelle en plastique se trouve à l’intérieur de l’extrémité pivotante femelle du tuyau. Ne perdez surtout pas cette pièce.
ÉTAPE 2: Supprimer les trois vis qui fixent le déclencheur logement au récepteur. Une vis est situé à l’arrière du récepteur.
Les deux autres vis supplémentaires sont sur la gauche et la droite de l’habitation de déclencheur.
ÉTAPE 3: Une fois le logement déclencheur est retiré du récepteur desserrer toutes les 5 vis de carénage. Ceci permettra le
Suaire de scinder en deux. ASTUCE UTILE: Veuillez noter comment les pièces sont supprimées pour réassemblage facile.
40
Français
GUIDE DE DEMONTAGE DU Eko™ CUP SEAL
SCR057
SCR037
ITP026
ITP023
LPC089
SCR016
SPR016
Swivel End
Noms et des numéros de pièces dans cette section:
Screw (#SCR016)
Vertical Screw (#SCR037)
Screw (#SCR057)
Eko™ Valve Pin (#ITP026)
Valve Spring (#SPR016)
Eko™ Cup Seal (#ITP023)
Reservoir Plug (#LPC089)
Les étapes suivantes vous permettrons d’accéder facilement au « Eko™ Cup Seal ». Une fuite d’air ou de CO2 au
canon est le signe d’ un « Eko™ Cup Seal » abîmé.
ÉTAPE 1: Utilisez une clé à molette ou réglable de 13 mm/1/2 pouces pour desserrer l’extrémité pivotante du tuyau.
ÉTAPE 2: Supprimer les trois vis qui fixent le déclencheur logement au récepteur. Une vis est situé à l’arrière du
récepteur. Les deux autres vis supplémentaires sont sur la gauche et la droite de l’habitation de déclencheur.
ETAPE 3: Lorsque le bouchon de la chambre a été enlevé, le ressort de valve, la tige de Eko™ Cup Seal, le guide de
Eko™ Cup Seal et le Eko™ Cup Seal devrait être attaché.
ETAPE 4: Détachez le ressort de valve du bouchon de la chambre, et ensuite dévissez le Eko™ Cup Seal de la tige
de valve. Remplacez le Eko™ Cup Seal avec un neuf fourni dans le kit de pièces détachées.
Une fois que toutes les étapes ont été exécutées, remplacer le « Eko™ Cup Seal » endommagé et remontez les pièces
au lanceur. ASTUCE: Notez comment les pièces se démontent pour faciliter le remontage.
ATTENTION: Utiliser la clef Allen à la bonne taille de la vis et ne jamais serrer les vis plus fort qu’il n’est nécessaire.
IMPORTANT: Toujours démonter la bouteille de sur le lanceur avant de démonter le lanceur. Ne pas démonter la
valve à moins qu’une réparation de la valve soit nécessaire. N’utilisez pas de tourne vis pour démonter la valve, cela
pourrait faire des marques sur la valve qui provoqueraient des fuites. NOTE: La vis de valve doit être démontée.
41
DÉPANNER
FUITE D’AIR DU TUYAU
1.
Si la fuite d’air se situe à l’extrémité opposée du tuyau, les raccords auront besoin d’être resserrés pour être
bien ajustés.
2.
L’extrémité femelle du tuyau doit être équipée d’une rondelle en plastique à l’intérieur du collier de serrage et
doit être bien serrée. IMPORTANT: Le tuyau fourni a des extrémités femelles métriques. Il ne sera pas possible
de le brancher à un raccord fileté américain 1/8” (NPT). En cas de mauvaise installation, les raccords et le
tuyau risquent d’être endommagés.
EN CAS DE FUITE D’AIR
Dans le canon ou hors du cadre de la gâchette.
1.
Le joint de culasse est en mauvais état et doit être remplacé. (VOIR LE GUIDE DE RETRAIT DU JOINT DE
CULASSE)
2.
Le rebord du corps du clapet est éraflé ou rayé et doit être remplacé. NOTE: Ne jamais retirer le corps du clapet, sauf si des réparations sont vraiment nécessaires.
3.
Fuite d’air dans le récepteur et par le cadre de la gâchette. Le joint torique arrière du corps du clapet est endommagé et doit être remplacé.
En cas d’éclatement des billes
1.
Si la température est inférieure à 15 °C (59 °F) ou supérieure à 30 °C (85 °F), les billes peuvent devenir cassantes et ne pas supporter la vitesse des marqueurs et la température extérieure. Les billes ont une durée de
vie et peuvent devenir trop fragiles pour être utilisées. Les billes peuvent changer de forme avec le temps et
il est recommandé de les calibrer selon votre canon. Des fragments de cartouche de peinture sales ou cassés
dans le canon peuvent provoquer des problèmes de réarmement du marqueur. L’utilisation d’une tige de nettoyage dans la partie supérieure du récepteur permettra d’enlever la plupart de ces fragments sales ou cassés.
2.
Si deux billes se trouvent à l’intérieur du canon/conducteur en même temps et que le marqueur a été armé, les
billes peuvent être éjectées du canon.
3.
Si le chargeur de billes est trop chargé et qu’une bille est coincée à mi-chemin dans le marqueur, les billes
risqueraient d’éclater.
4.
La vitesse est trop élevée et doit être réduite à la bonne vitesse (fps).
Problèmes liés au réarmement
1.
Il faut lubrifier le joint torique du percuteur. (VOIR DÉMONTAGE/MONTAGE ET NETTOYAGE DES PARTIES
INTERNES ARRIÈRE).
2.
Le joint torique du percuteur est endommagé ou manquant. Le remplacer par un nouveau joint torique de percuteur homologué Kingman. NOTE: Le joint torique du percuteur ne peut pas être remplacé par un autre type
de joint torique.
3.
La pression dans la bouteille est trop faible et il faut probablement la remplir à nouveau.
4.
La présence de fragments de cartouche de peinture sales ou cassés dans le récepteur peut provoquer des problèmes de réarmement du marqueur. L’utilisation d’une tige de nettoyage dans la partie supérieure du récepteur
permettra d’enlever la plupart de ces fragments sales ou cassés. Si ce problème persiste, retirer les parties
internes du marqueur pour les nettoyer complètement. (VOIR DÉMONTAGE/MONTAGE ET NETTOYAGE OU
PARTIES INTERNES ARRIÈRE).
Dépannage de cadre déclencheur électronique
Si votre marqueur n’est pas tir elle peut être due à l’un des problèmes suivants:
1.
Batteries doivent être rechargées.
2.
Le harnais de fil de batterie n’est pas correctement attaché à la Commission de circuit.
3.
La bobine Set harnais n’est pas correctement attaché à la Commission de circuit.
4.
La touche commutateur harnais n’est pas correctement attaché à la Commission de circuit. NOTE: Si les
marqueurs électroniques ont toute saleté ou la peinture, Kingman recommande à l’aide d’un aérosol peut d’air.
Appliquer le peut d’air directement sur les composants qui ont besoin de nettoyage.
42
Français
POLICE DE GARANTIE
Kingman garanti au client original ce produit pour une période de 1 ans à partir de la date d’achat, garantie pièce et
main d’oeuvre en cas de défaillance sous réserve que le produit est été utilisé dans des conditions normales. Toutes
pièce électronique dans les lanceurs Spyder électronique sont garantie 6 mois à partir de la date d’achat. Kingman
accepte de réparer ou remplacer à sa discrétion tout produit dans une période de temps raisonnable. Cette garantie
ne couvre pas les joints toriques, Eko™ Cup Seals, pile 9.6V rechargeable, chargeur de pile, rayures, les usures
normales, toute modification, délavage normal de l’anodisation, et coups ou dommages à la suite de choques. Le
produit de sera pas garanti si un des technicien de Kingman prouve que le client est responsable de la panne ou de
l’usure. Cette garantie ne couvre que les pièces d’origine. -Toute modification du produit ou de ses pièces d’origines
entraînera l’annulation de la garantie ainsi que la responsabilité de Kingman. Tout dommage causé par de l’eau
ne sera pas couvert. Les réparations sous garanties doivent être effectuées par un technicien de Kingman ou un
technicien approuvé par Kingman. Pour que la garantie soit valide , le client doit retourner le coupon de garantie
ci joint dûment complété, avec une copie du reçu du vendeur sous 15 jours après l’achat. Cette garantie n’est pas
transférable. Les lanceurs de paintball ne sont pas remboursables. Cette garantie ne couvre pas les frais d’envoie,
d’enlèvement ou encore les téléphones. Si le lanceur a besoin d’être réparé, le client emballera le lanceur et l’enverra
avec le nom, l’adresse, le numéro de téléphone et une brève description du problème a l’adresse suivante :
KINGMAN GROUP
Attn: Tech Department
14010 Live Oak Avenue
Baldwin Park, CA 91706 U.S.A.
www.kingman.com
• L’enregistrement de la garantie est aussi disponible sur le site Internet: www.spyder.tv
SUPPORT TECHNIQUE
Notre support technique est ouvert de Lundi à Vendredi de 8 heure à 17 heures (heure cote ouest des USA) et peux
être joint au Tele: (626) 430-2300 Fax:(626) 851-8530
PATENT #8,286,622
43
LISTE DES PIECES DU SPYDER E-MR5™
1
ASA036
C/A Adapter Angled
43 SCR018
M3 x 8 Screw (+)
2
BAR002
Orange Blaze Rubber Ring
44 SCR024
M5 x 25 Screw C/A Adapter (A)
3
BAR003
Spyder Barrel Plug
45 SCR029
M4 x 6 Venturi Bolt Screw (A)
4
BLS039
Barrel Ball Stopper
46 SCR037
M4 x 12 Vertical Screw (AFH)
5
ECB015
LEAP 3 Circuit Board w/CAMD
47 SCR045
M4 x 14 Feed Neck Screw (A)
6
ELM001
Coil Set
48 SCR048
Feed Neck Clamp Screw (A) & Nut
7
ELM002
Coil Pin
49 SCR050
M4 x 16 Magazine Screw (+)
8
ELM003
Tournament Lock Switch
50 SCR051
M2 x 8 Magazine Release Button Screw (+)
9
ELM004
Capacitor
51 SCR057
M4 x 12 Shroud Screw (A)
10 ELM008
Touch Switch Membrane
52 SER003
Sear (ESP)
11 FND089
Polymer Off Set Feed Neck (plastic)
53 SPR016
Valve Spring
12 FRG083
Magazine Ball Stopper & Spring
54 SPR025
Striker Spring 110.mm
13 FRG084
Magazine Ball Pusher w/Guide Pin
55 SPR026
Barrel Guide Pin Spring
14 FRG085
Magazine Release Button
56 SPR035
First Strike Magazine Spring (straight)
15 FRG086
Magazine Release Lock
57 SPR028
Magazine Release Spring
16 GRP015
Flat Grip Panels (black)
58 SPR030
AR15 Style Charging Handle Spring
17 HSE089
Disconnect Hose
59 SPR036
Trigger Spring (electronic)
18 HSF004
Plastic Washer
60 SPR037
Sear Spring (electronic)
19 HSF006
Male to Male Adapter (MET x MET)
61 STB002
Striker Bolt
20 HSF011
Metric Female to Standard Male Adapter
62 STF001
Striker Buffer
21 ITP023
Eko™ Cup Seal
63 STK016
Carrying Handle Locking Plate
22 ITP025
Eko™ Valve Body
64 STK017
Carrying Handle Locking Screw
23 ITP026
Eko™ Valve Pin
65 STK021
Picatinny Body Rail
24 LPC089
Reservoir Plug
66 STK022
AR15 Style Charging Handle
25 ORG001
Striker O-ring #14.3 1.7 70pu
67 STP089
Striker Plug
26 ORG002
O-ring #15 80
68 TRF016
E-MR5 Trigger Frame Only (no internal)
27 ORG003
Barrel O-ring #22 1.5 80
69 TRS006
Single Trigger (electronic)
28 ORG004
O-ring #11 80
70 VBT090
FS Venturi Bolt
29 ORG008
O-ring #10 80
71 VTA089
Velocity Adjuster & Spring Guide
30 ORG029
Flat Barrel O-ring #20 22.8 3.8
72 WRH002
Battery Harness
E-MR5 Spare Parts Kit
73 WRH007
Touch Switch (3P)
32 REC090
E-MR5 Receiver
74 JE1015
9.6v Rechargeable Battery
33 RPN018
Magazine Release Pin
34 RPN022
Barrel Guide Pin
76 31234
35 RPN023
Quick Disconnect Pin
77 31243
Quad RIS Barrel Shroud
36 RPN024
Touch Switch Roll Pins
78 31246
First Strike Capable (FSC) 9rnd Straight Magazine
37 RPN025
Venturi Bolt Cocking Pin
79 31248
SOPMOD Stock w/Angled Butt Plate
38 RPN026
Trigger / Sear Roll Pin
80 31252
Front Sight Base (FSB)
39 SCR003
Circuit Board Screw (+)
81 31253
Sling Plate
40 SCR007
Valve Body Screw (A)
82 31254
14" FS Battle Barrel
41 SCR011
Coil Set Screw
83 31255
AR15 Muzzle Brake
42 SCR016
M5 x 12 Screw (A)
*
PAK090
*
JE1029
A/C Charger w/LED (110 volt)
Carrying Handle Mount w/Sight
PARTIE LE NOM/DESCRIPION
NUMÉRO DE PARTIÈ
DIAGRAMME NOMBRE
44
* Item Not Pictured
( + ) Cross-Head Screw
(A) Allen-Head Screw
39
5
39
2
9
8
73
83
3
33
15
59
69
38
36
27
80
60
52
82
68
51
24
74
72
7
53
41
10
6
38
26
12
21
4
77
78
23
78
13
56
11
50 14
57
22 26
51
30
26
47
48
34
55
46
76
49
28
20
42
17
40
64
18
65
68
32
63
19 28
51
42
25
58
44
1
81
35
26
42
61
66
26
62
70
43
54
79
37
71
45
16
29
67
43
Français
SCHÈMAS DU SPYDER E-MR5™
45
PASSION FOR PAINTBALL™
www.Spyder.tv
Distributed by Kingman Group / 1.888.Kingman / www.kingman.com / 14010 Live Oak Ave. / Baldwin Park, CA 91706 USA
XIIJ